#3d print tutorials
Explore tagged Tumblr posts
Visit Tumblr Blog
Explore Tumblr blogs with no restrictions, modern design and the best experience.
Last Seen Tumblr Blogs


Fun Fact
Tumblr’s website traffic is steadily declining.
Text

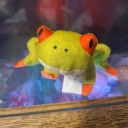
It's still Wednesday over here and I really wanted to get a post in today. I spent my day corralling elementary schoolers on a field trip to the Natural History Museum and it took a lot out of me. Thank you @thewholelemon, @drowninginships, @monbons, @lovelyladzzzz and @fiend-for-culture for the tags!
I started posting Beautiful Roaring Scream last week and a new chapter will be going up on Friday. In the meantime, here's some Simon POV:
Once we’ve made it inside Baz’s room, I briefly take it in from the corner of my eye and suddenly it has my full attention.
“Why is your room so much bigger than mine?!” I squawk. Where my room can barely fit a couch and bed in the living space, Baz has an actual living room with a sofa and chairs and a separate bedroom.
“Hush, let's not argue over size.” He's back to kissing me as he manoeuvres us towards the shower. It’s a good distraction.
I’ve managed to also get a few rough sketches done as well!


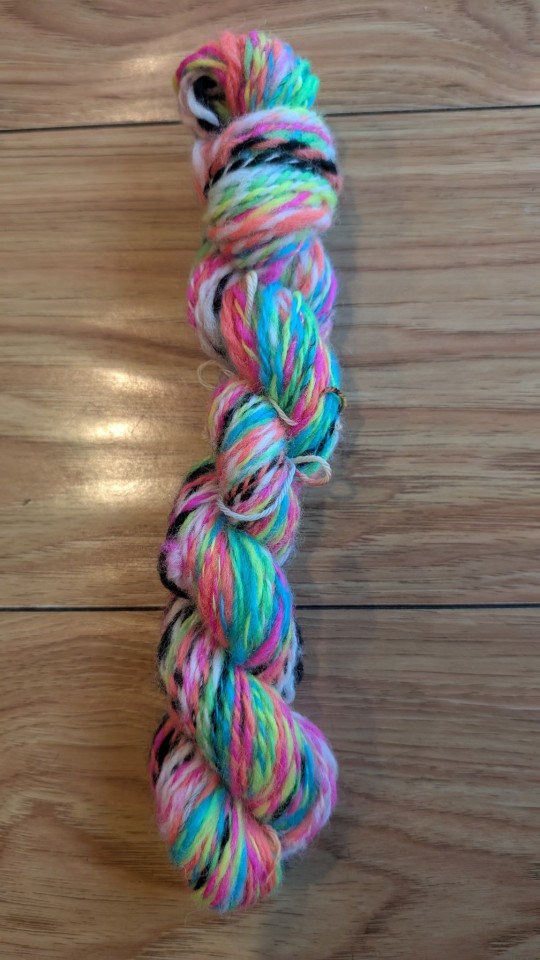
I learned how to spin yarn last weekend and it's taken a lot of my attention this week. It's so satisfying to see my consistency improve every time I pick it up. I'm not sure if I'll knit something with this yarn, I might just keep it for posterity. A long term goal would be to one day spin a sweater quantity of yarn, but I'm a ways off from that.
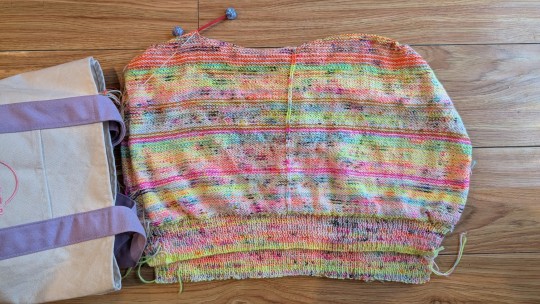
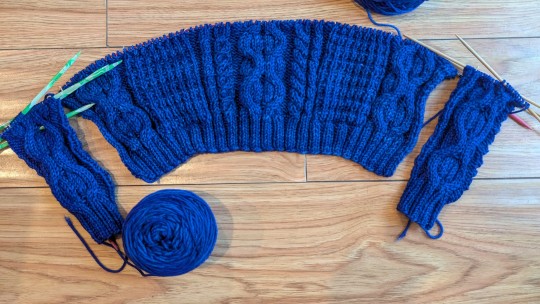
I also made progress on my scrappy sweater and my nephew's cardigan. And Littlest Purple seems to have remembered that I started and never finished a cardigan for her, so I'll have to get to it when my queue clears up a bit.
Tags for Sunday, since it's so late:
@talentpiper11 @messofthejess @blackberrysummerblog @valeffelees @artsyunderstudy @you-remind-me-of-the-babe @youarenevertooold @bookish-bogwitch @facewithoutheart @larkral @run-for-chamo-miles @roomwithanopenfire @cosmicalart @mooncello @that-disabled-princess @cutestkilla @noblecorgi @iamamythologicalcreature @best--dress @emeryhall @ileadacharmedlife @drowninginships @supercutedinosaurs @whatevertheweather @rbkzz @ebbpettier @cccloudsss @theimpossibledemon @katatsumuli @onepintobean @orange-peony @hushed-chorus @ic3-que3n @bazzybelle @palimpsessed @martsonmars @aristocratic-otter @shrekgogurt @alexalexinii @prettygoododds @ivelovedhimthroughworse @raenestee @skeedelvee @lovelettersto-mars @jyae23 @the-beard-of-edward-teach
#I've already started going down the spinning YouTube tutorial rabbit hole#now I've got a list of things that mr. purple can 3D print for me#i wasn't about to let a bunch of kids get there best of me and keep me from posting#my art#knitblr#wip wednesday
46 notes
·
View notes
Text
Did a little photo tutorial for the chrome effect cockpits. It's easier than it looks, but harder than it should be. I wouldn't recommend it for small ones, but large bubble cockpits like this looks pretty nice with it. You could probably do other sky colors for alien worlds too

#art#battletech#painting#canopiancatboyart#mech#mechwarrior#miniature#tabletop#wargaming#3d printing#board games#battlemech#mecha#tutorial#griffin
245 notes
·
View notes
Text
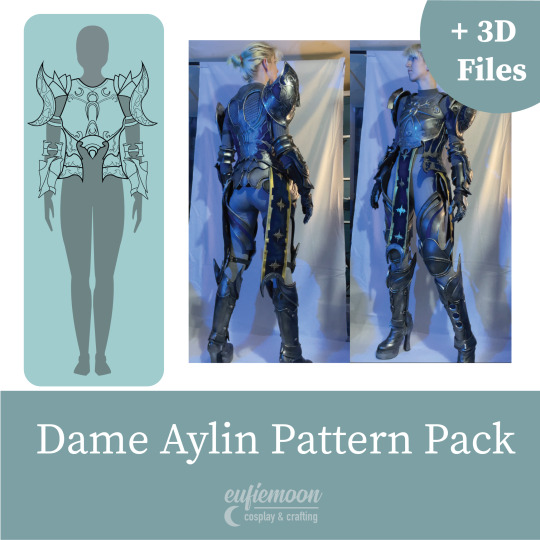
Now available on my Gumroad!
https://eufiemoon.gumroad.com/l/lhjpdi
I finally got all my patterns for Aylin digitised! Please make sure you read the listing description before purchase so you know what you’re getting!
Happy Crafting!
#cosplay#bg3#cosplayer#cosplaying#baldurs gate iii#baldur’s gate 3#baldurs gate 3#dame aylin#dame aylin cosplay#dame Aylin bg3#cosplay pattern#cosplay tutorial#cosplay wip#foam armour#armour#3d printing
27 notes
·
View notes
Text
3D-Printing Resources for Propmaking + Cosplay
3D Printing Shops
Illustris Models - STL Files, Kits, & Commissions
Femme Forge - Cosplay Props
Porzellan Props - STL Files & Kits
Lightning and Lace - Props & STL Downloads
DangerousLadies - Resin & 3D-Printed Accessories, Props, Patterns, & Kits
3D Printing Websites
CG Trader - Cosplay-related STL Files
Cults 3D - Cosplay-related STL Files
Printables - 3D Printed Costumes & Cosplay Files
MyMiniFactory - 3D Models & STL Files
Thingiverse - Free 3D Models & STL Files
Guides & Tutorials
The Book of 3D Printing by Kamui Cosplay
Recommended Supplies - Illustris Props
Finishing FDM Prints - Illustris Props
Finishing Resin Prints - Illustris Props
Punished Props Academy - Videos & Podcasts
4 notes
·
View notes
Text
FF14 Battle Portrait Magnet tutorial
Hihi~ I'm back with another tutorial! This time it's on how I made the battle portraits into magnets.

If you don't have a 3D printer, I did do a quick experiment on how a similar effect can be done with paper alternative. You can scroll directly to that section.
If you have a 3D printer:
Things you will need:
3D files of the casing you want to print
3D printer
a print out of the character portrait
Paint or Spray paint of the color you want the casing to be
UV resin
Tape
Magnetic Tape (I brought mine from Daiso)
Step 1: Obtain the 3D model of the casing of the character you want to make. Unfortunately there's no easy way around it. You will most likely need to make the 3D model. As for me, I already modeled all the characters I wanted to print. If you want to print any of the ones I already made, the files can be found here (Just a note, I made these really quickly so they're not optimized models at all but will work for printing)
Step 2: Print the Model

Step 3: Spray printed model to whatever casing color you want. In my case, I wanted gold so I spray painted it with Rust-Oleum Specialty Metallic Effects Spray Paint in Gold. Then let the paint dry

Step 4: Print the character portrait at 5.7cm (that's the default size for the 3Dmodels I made) and cut it out.

Step 5: Place the portrait into the casing
Step 6: Find a place you want to work with resin and put down a few pieces of tape with the sticky side up. I used regular painter's tape here
Step 7: Place the casing(with portrait inside) on top of the tape. The reason for this is that the resin might shrink a little when being cured and that may bend the 3D printed casing. The tape is to hold it down.(Also I forgot to take a photo from when I was making Hades so this is from when I was making Hythlodaeus.

Step 8: Pour resin into the casing. If there's bubbles, I just used a toothpick to poke at the bubbles till they are gone.
Step 9: Cure the resin. How to cure it and how long will depend on what it says on the package of the resin you brought. I have a UV lamp and let it sit for 150 seconds.
Step 10: After it's fully cured, remove the portrait from the tape and stick a small piece of magnetic tape at the back and that's it!

Congrats! now you have a character portrait magnet :)

If you don't have a 3D printer:
I have tried making a paper version just to test it out. It worked but it doesn't look as neat as the 3D printed version and has a bigger edge. Tbh that might also simply be the result of me rushing it as I just wanted to test a proof of concept. At the end of the day, it did work so if you want to try it, here are the steps:
Things you will need:
a print out of the character portrait
UV resin
Some kind of paper sealer (I used Rust-Oleum Painter's Touch 2X Ultra Cover Gloss Clear in this example)
Tape
Magnetic Tape (I brought mine from Daiso)
Step 1: Drag and drop your portrait into photoshop/Clip studio or any other art programs.
Step 2: Create a layer above the character portrait and draw an outline around the character portrait as well as an outline slightly away from the portrait. This will be your Magnet casing edge.
Step 3:Create a new document and duplicate the "casing edge" that you created 4 times. Then duplicate the outer edge 3 times. Paste your Character portrait into one of the 3 outer edge images. You should end up with something similar to the image below. (P.S My File here can be printed as it is and be used if you just wanted a Emet one :)

Step 4: Print all the pieces out. Place a piece of tape behind one of the "Outer Edge" pieces. Make sure it covers the whole piece.
Step 5: Cut all the pieces out. Make sure to remove the center of the "Casing Edge" ones
Step 6: Stack and Glue the 4 edges on top of each other
Step 7: Glue the stack from the above step to the "Outer Edge" piece with the portrait image.
Step 8: Glue the 2 outer edge pieces behind the one with the portrait image. Make sure the piece with the tape backing is at the very back. After all that is done, it should look like below

Step 9: Take the entire piece outside and spray it with a sealer. ( I used Rust-Oleum Painter's Touch 2X Ultra Cover Gloss Clear in this example but it doesn't have to be this). Then let the piece dry.

Steps from this point on is the same as the 3D printed version.
Step 10: Find a place you want to work with resin and put down a few pieces of tape with the sticky side up. I used regular painter's tape here.
Step 11: Place the casing(with portrait inside) on top of the tape. The reason for this is that the resin might shrink a little when being cured and that may bend the casing. The tape is to hold it down.
Step 12: Pour resin into the casing. If there's bubbles, I just used a toothpick to poke at the bubbles till they are gone.
Step 13: Cure the resin. How to cure it and how long will depend on what it says on the package of the resin you brought. I have a UV lamp and let it sit for 150 seconds.
Step 14: After it's fully cured, remove the portrait from the tape and stick a small piece of magnetic tape at the back and that's it!

9 notes
·
View notes
Text
#stl#pokemon#jigglypuff#christmas#timelapse#3d printing#blender#zbrush#otaku#3d art#anime figures#anime#cults3d#tutorial#3d sculpting#mugiwara#onepiece#3d design#pokemon3d#pokemonmodels#fanart#pokeart#pokemonfanart
5 notes
·
View notes
Text

http://bit.ly/dl-lightweight-3dp-tutorial
It was such a delight to add my industry knowledge to Loratail Cosplay’s lightweight printing guide! This blog is incredibly comprehensive in regards to figuring out your printer settings for lightweight filament and debugging print issues with this new and novel material.
Happy propmaking, cosplayers!
16 notes
·
View notes
Text

im trying to make one of those kig/kemono style fursuit heads :3 hopefully ill be able to finish it quickly and have it 3d printed to see how it looks
#this is like. my 2nd blender project ever. so thats why it looks kinda ass lol#i really love how these types of fursuit heads look so im following a tutorial to make one#im going to 3d print it because I need to see if I have to make any changes to the mold (hopefully not)#also the eyes and eyebrows are just for reference because theyll be holes in the actual mask#if i am going to make a fursuit (even just the head) im gonna have to buy fur fabric aughhh. I dont like spending moneyy
4 notes
·
View notes
Text

Thank you! The bases are 3D printed. I just searched "Necron bases" on MyMiniFactory.com and they came right up.

First Steps are pretty simple - prime black, dry brush Dark Green, then dry brush again with 50/50 Dark Green and Livery Green. Then the lowest level of the base gets a coat of Leadbelcher, and a wash of Nuln Oil.

Once that's dry, I make up a semi-thick oil wash using thinner and white oil paint. I got a set of like 24 different oils at my local craft store for under $20. Load a fine tip brush with the oil wash and gently tap the tip into the runes. The surface tension will pull the wash into the recessed runes. This is called a "pin wash".
I also pin wash the battle damaged areas so the cracks will also look like they're glowing.
This will take a little while to dry. I give it about an hour.

Time to make it glow! Gently airbrush Livery Green over the areas you pin washed white. The white picks up the color super vibrantly, and the overspray gives the glow effect.
Hope this helps!!
32 notes
·
View notes
Text
Leaving Facebook Behind: Exploring New Platforms to Connect with Fellow DIY Enthusiasts and Filmmakers
Hello everyone! 🌟
After spending years on Facebook, I’ve decided it’s time for a change. The platform no longer feels like the right fit for me, so I’m stepping away to explore new spaces where I can connect with like-minded people who share my passion for DIY culture and filmmaking. It’s a bit of a leap, but I’m excited to see what lies ahead.
Why am I leaving Facebook, you might ask? Over time, I’ve noticed that it’s become more difficult to find people who are genuinely interested in the creative things I care about. With so much noise from ads, news, and personal posts, it’s been hard to foster meaningful conversations around DIY projects and filmmaking. I crave a space where I can meet others who are equally passionate about creating something from scratch—whether it’s building cool stuff with our hands or telling stories through the lens of a camera.
That’s why I’m searching for new platforms that foster these interests. I’m eager to find others who are into the DIY culture, filmmaking, and creativity at large. I want to meet people who are willing to collaborate, share ideas, and bring something unique to the table. Maybe, together, we can even start a global filmmaking project! 🌍🎬
Imagine this: a film made by passionate people from all corners of the world, each contributing their own skills, perspectives, and creativity to tell a story that transcends borders. That’s the dream I’m chasing—building a community of creators who share the same vision, no matter where we are.
If you're into DIY culture, filmmaking, or just love to create, I’d love to connect!
Let’s connect, share ideas, and dream big. Who knows? Maybe our next project will be a diy-project we make together, from scratch, all over the globe.
Stay tuned for updates on my journey. 🚀
#filmmakers #cosplayfamily #starwarsfamily #diy #makerspace #cosplay
2 notes
·
View notes
Video
youtube
Controlling Plastic Injection Machine Nozzle Movement with a Digital Las...
#youtube#Plastic Injection Machine#Nozzle Movement#Digital Laser Ruler#Arduino Project#Wemos D1 Mini#Stepper Motor#3D Printing#Industrial Automation#DIY Electronics#Tutorial#Arduino#Digital Control#Laser Ruler#DIY#VL53L0X#ULN2003#Maker Community
6 notes
·
View notes
Text
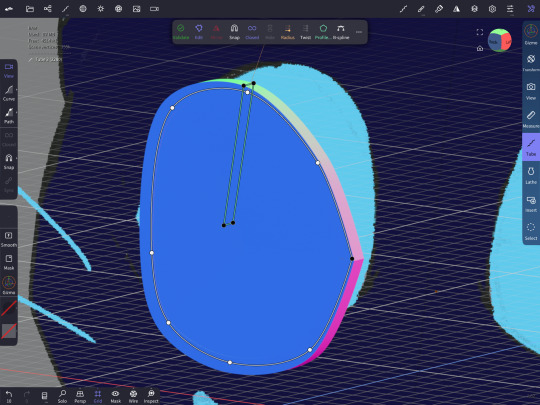
Fursuit Eye blanks in Nomad Sculpt (with pictures)
-
I saw very limited resources for making eye blanks on Nomad Sculpt so I thought it would be worth it to post here!!
DISCLAIMER: I am very new to the program! I would highly recommend playing around with the program! In addition I don’t have an exact way to measure dimensions, this is very much a loose process. I will update this once I 3d print the actual file, stay tuned!
The Eye Wall
This will be the section that fits nice and snug into the actual suit eye holes. It’s often the part with the most depth. I would highly recommending importing a reference image so the final eye looks how you desire!!
Step 1: Creating the shape
Press the “tube” button on the right side of the screen. From here press the “path” button on the left side of the screen, and if it isn’t activated press the “closed” symbol. From here tap on the point you actually want to start at. You should have a small white dot on your screen now (this is on the top of my character’s eye reference).
From there press and drag the circle, this should create two circles, one red and one blue when you select it. From here you have to go into the middle of your line and drag another point out of the line. It’s a closed shape so it acts a little funky.

Make the rough shape of your eye. If you want a sharp point (like the side of an eye), you can tap any of your white dots twice to make it uncurved (this will make the white dot black)!

BEFORE YOU FINALIZE make sure you are facing the front (or whatever side you prefer), if your angle is off your eye will be at an angle!! Once you are happy with the shape press the green button, this will make the actual tube.

You should now have a round tube roughly in the shape of your desired eye shape.
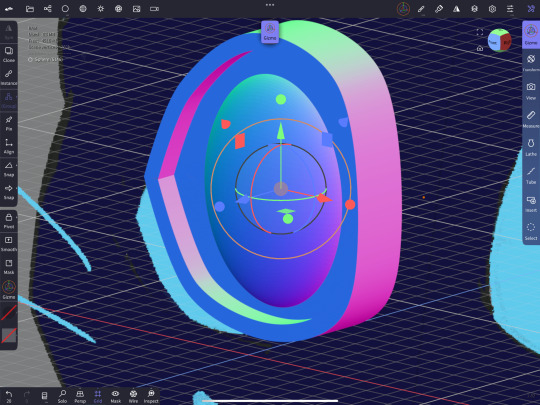
Step 2: editing the shape
It’s a round tube right now, which isn’t ideal for an eye blank! Therefor we will do some editing.
Press “profile”. Here I kept the default settings, which gave me 4 sides! The setting should look like they do below.
Lastly. DONT validate the shape (you will need to access it later) and use the gizmo tool to work around with the depth of the eye (by pressing and dragging the red circle)
The Inner Eye and Pupil hole
This is the area that will house the hole for the iris and pupil (I will be referring to it as a pupil for simplicity)!
Step 1: Duplicate the layer
Clone the layer your eye wall is on!
Step 2: Editing to fill the hole
This part is a little tricky. There should be four black dots where you can adjust the length the sides go to. Go on the side of the shape where you see all four of those shapes clearly (with the inner most black dots visible). Make sure you are on the side exactly! Or else the shape could have an angle.

Next you will drag the inner-most black circles to roughly the middle of the eye on the outer edges (you are ONLY dragging down, with dragging to the side as little as possible!!). This will fill in the whole eye if it reaches that halfway point or more!
If you look to the side of your shape, the whole area should be filled in, if not edit the lines slightly to better fit!
Step 3: Editing your new shape
Next up we will use our trusty Gizmo tool again. Decrease the depth to your liking and move the shape to either side of your eye blank, be careful to make sure it fits in properly and lines up with the wall!
Step 4: The pupil
For this tutorial I will use a simple oval pupil. Add a circle OR make another tube shape and close the hole (following steps one and two). The circle will leave a slight curve due to the shape, so if you want a flat or unique hole for the pupil, edit accordingly.
For ease I’m using a circle I modified. I added the circle in and moved and edited the shape until it was something I liked (using the gizmo tool)
Next you will negatively subtract space using that shape. Do this by unselecting the shape for your pupil and selecting the inner eye space. Then press “bolean merge”, then the “boolean” button. This will carve out the area creating a blank space (the blue background of the pupil is from my reference image)!

And that’s it!! If you try this out let me know what you think and how it worked!!
17 notes
·
View notes
Text
Here's a quick video tutorial that shows how I assembled my hanging garden solar light shade after 3D printing.
The materials you will need are:
- 1 3D printed solar light shade (printed in 2 pieces )
- 1 big box store tapered path LED solar light with top diameter of 2 3/4 inches across. ( I used the Wal-mart Mainstays brand that runs under $3 each.)
-Scissors
-Twine, nylon string, paracord, or wire to fit through the top holes for hanging.
Instructions:
1. Remove the top of the solar path light from its post and place into the hanging holder such that the solar panel is facing upwards and the 4 holes of the holder are at the top.
2. Place the shade over the holder containing the garden light so that the inner edges slide into place within the groove of the holder.
3. String an adequate length of twine or hanging cord of your choice through one of the top holes, then across the solar panel to the opposite side through another hole.
4. Tie a secure knot at the top.
5. Repeat the process with another length of cord through the second set of holes on top of the holder for added stability.
6. Hang your solar light anywhere in your garden that receives a bit of sunlight and enjoy!
If you'd like to purchase the .STL file for this decorative hanging garden solar light shade, be sure to check out the Etsy link in my bio! Thanks!
#cozypixelfluff #tutorial #diy #solarlight #3dprinting #gardenlighting #howto #gardensolarlightshade #hanginggardenlight #hangingoutdoorlights #solarpathlight #LEDlight #etsy #smallbusiness #lighting #party #gardenart #artsandcrafts #crafting #gardenaccessories #stlfile
instagram
#art#artist#cozypixelfluff#small business#tutorial#diy#3dprinting#garden art#solarpowered#solarlights#solarlightshade#solar light#3d printing#garden#garden lights#garden lighting#home and garden#cottagecore#solar lighting#3d printed#cozy#cute and cozy#cozycore#ambiance#madeinusa#crafting#arts and crafts#Instagram
3 notes
·
View notes
Text
a little more blender tutorial before bed. pshoooo
#i am foaming at the mouth i am chomping at the bit. i want to start character modeling already but i know i shouldn't#because 2d ability to make a character and 3d ability to see it in my head are Very different than being capable of making it in a program#and i will be discouraged by it looking so bad and feeling so hard when it's only hard because i don't have the practice on how to do it ye#but i WANT TO. but i won't. i need to make the abbey first when i feel comfortable enough in the program.#the first steps are done at least. i have finished a tutorial and now thoroughly understand the very basic-est of basics#so now. i will move on to the actual basics#one day... i might make a 3d printable strahd and or abbot and or other characters. like statues not minis#my rose wanted to get into 3d printing + mini painting so that'd be very cool
6 notes
·
View notes
Text
As meat is on the menu on this site. ;) , here's a 3d print recently painted. Tutorial coming soon on youtube.


#3d art#3d#3d model#3d printing#3d paint#thor#thor odinson#m#arvel#thor love and thunder#chris hemsworth#art#painting#tutorial
10 notes
·
View notes
Text
Blender 3D Tutorial Part 3: Master Face Creation (F Key), Join Mid & Fix Flip Normals
🎥 New Tutorial Alert! Learn 3 essential Blender skills: ✅ Face creation with F key ✅ Join Mid technique ✅ Fixing flip normals
youtube
#3d#3d model#blender3d#3d printing#youtube#tumblr milestone#3dmodeling#art#cults3d.com#3d render#art tutorial#how to#tips#3d modeling#blender#low poly#Youtube
0 notes