#DIY Electronics
Explore tagged Tumblr posts
Visit Tumblr Blog
Explore Tumblr blogs with no restrictions, modern design and the best experience.
Last Seen Tumblr Blogs


Fun Fact
Tumblr was created by web developers David Karp and Marco Arment.
Text

This photo is weirdly intimate, so i wanted to share
98 notes
·
View notes
Text
youtube
I mentioned noise box 3 recently. here it is, in all it brutalist glory
Warning, Sudden lights and sounds. Harsh sounds. Noise box 3 is a aggressive noise maker with objectively too much gain/distortion.
12 notes
·
View notes
Text
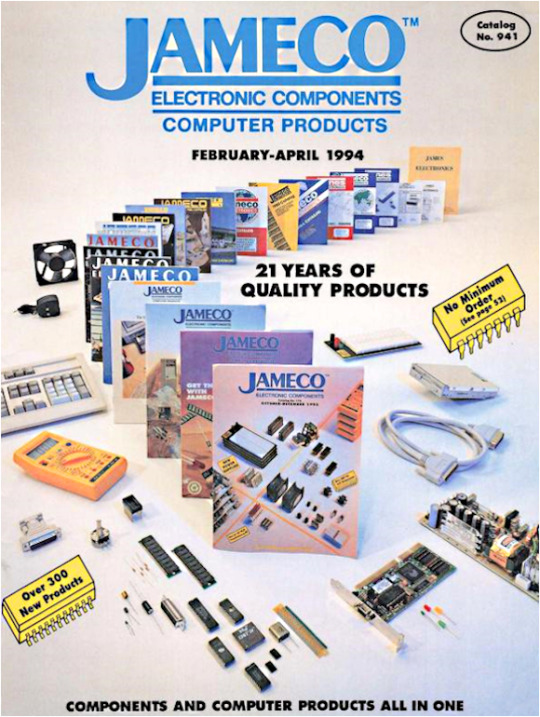
Jameco Electronic Components
Catalog 941, February - April 1994
Jameco Electronics has been serving hobbyists, engineers, and industry professionals for over 45 years. I personally can count myself among those who would thumb endlessly through the pages, from my pre-teen years into my engineering career.
Founded in 1972 by Dennis Farley, Jameco began as a small mail-order business in Silicon Valley, California. Initially focusing on surplus electronics, the company expanded its product line to include a wide range of electronic components, tools, and accessories.
Throughout its history, Jameco has been committed to providing exceptional customer service, competitive pricing, and a vast selection of products. Today, Jameco remains a trusted source for electronic components, continuing to support innovation and creativity in the electronics community.
#90s magazines#90s electronics#jameco electronics#catalog covers#1994#1990s#90s#nineties#mid 1990s#vintage catalogs#retro catalogs#retro tech#vintage tech#jameco#tech catalogs#diy#diy electronics#electronic hobbyists#low quality image
7 notes
·
View notes
Text
need a bit of advice on something rather new to me... i have been DYING to get into some semblance of diy electronics/robotics, specifically regarding the idea of building a flipper zero knockoff with a raspberry pi/esp32/arduino. or a hack rf one ripoff, etc. u get it? i wanna make a lil handheld pwnagotchi pet style device for rolljam rf shit, something that can copy and paste and send and receive rf signals, but homemade by my self....
please if anyone has experience, resources, ideas, anything at all= hit me up right now immediately asap today please.... i am so passionate and ready to do this please help me make device go beepboop
#flipper zero#hack rf one#raspberry pi#esp32#arduino#diy electronics#diy#diy hacking#car hacking#hacking hardware#hacking#help#hacking help#hacking question#need advice#diy projects#diy craft#diy punk#upcycle#homebrew
14 notes
·
View notes
Text

all the signal wirin is done now i gotta start runnin power lines & test
7 notes
·
View notes
Text


Prototype time!
My first project in 2025. It was nice trip down memory lane, returning to 8bit micro controller. I am still trying to get the hang of the printing setup and new filament so the printing is pretty poor on this one.
#programming#gluing stuff together#diy electronics#attiny85#MQ9 sensor#avr#3D print#microcontrollers
2 notes
·
View notes
Text
As I mentioned, since the power has been out for over a day, I took the household phones, laptops, and rechargable batteries to the library today to recharge them. This left my wife here without much in the way of entertainment, so before I left, she was asking if we had a portable radio around, preferably one that didn't need headphones.
This is where it comes in really handy that her stepdad sent me two electronics kits for Christmas: an AM radio, and an FM radio. (And that I built them both nearly as soon as I got them; I don't have a battery- or butane-powered soldering iron, so having them in pieces would be pretty useless.) So we set up the FM one and it's been playing music all day.
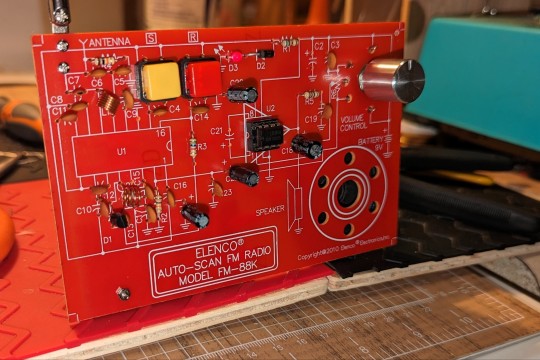
As much as we sometimes question the utility of broadcast media in a world where people keep saying "everybody has a smartphone", it's really nice to have these fallbacks, because there will always be emergencies and outages.
17 notes
·
View notes
Text
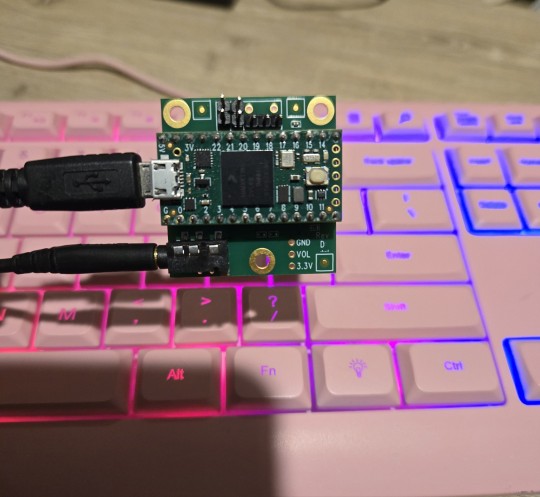
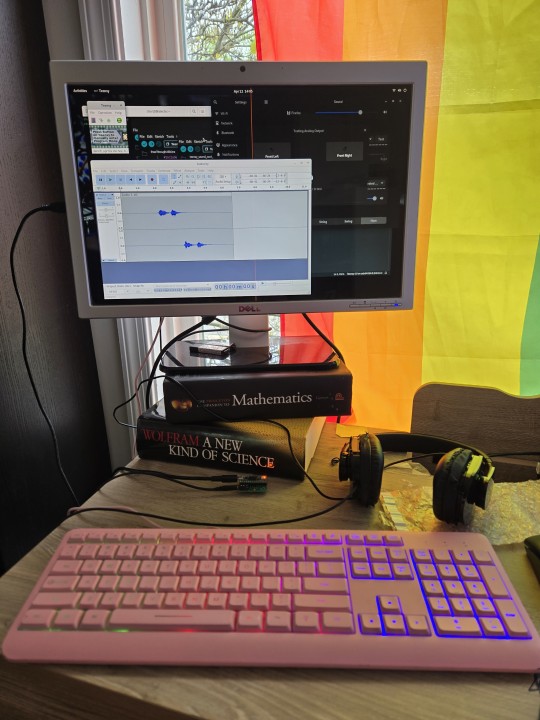
Success! I got the teesy set up as a recording device in audacity. Right now it's just doing usb audio through (with reverb, because why not). But the plan is to get line in connected to a jack to be able to listen to the Machine
42 notes
·
View notes
Text
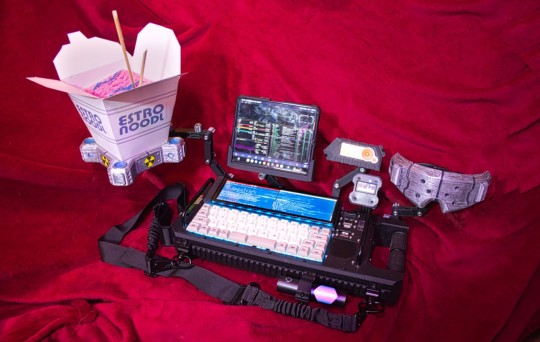
this is peak technology design, this is the eroticism of the machine, this is what using the computer should look like.
Source: https://hackaday.io/project/191858-cybersecdeck-001/details
7 notes
·
View notes
Text
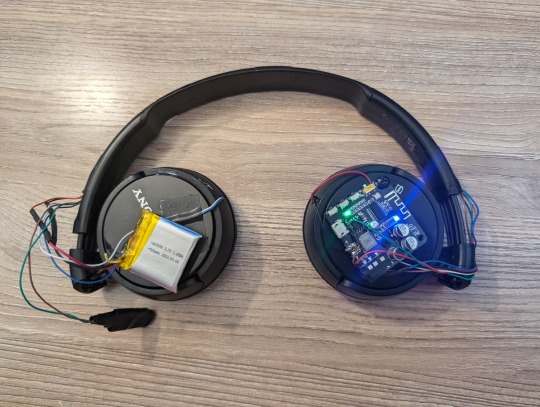


I finished this a few weeks ago but I forgot to post anywhere so what better for my first tumblr post.
Made from a pair of wired Sony headphones, a battery pulled from a broken pair of Bluetooth headphones and a Bluetooth audio board from AliExpress
4 notes
·
View notes
Video
youtube
Controlling Plastic Injection Machine Nozzle Movement with a Digital Las...
#youtube#Plastic Injection Machine#Nozzle Movement#Digital Laser Ruler#Arduino Project#Wemos D1 Mini#Stepper Motor#3D Printing#Industrial Automation#DIY Electronics#Tutorial#Arduino#Digital Control#Laser Ruler#DIY#VL53L0X#ULN2003#Maker Community
6 notes
·
View notes
Text

I gave birth to an angel
9 notes
·
View notes
Text

Old Bamp
8 notes
·
View notes
Text
EQP-1Aインスパイアドなイコライザペダルを作った
EQP-1Aのイコライザ回路を解析した結果にインスパイアされたエフェクトペダルを作った話です。

インスパイア元のEQP-1Aについては以前の記事で詳しく書いているのですが、低域および高域のカット(アッテネート、ATTEN)とブーストができるイコライザです。低域のカットおよびブーストと高域のカットはシェルピングタイプ、高域のブーストがピーキングタイプのEQになっており、カット、ブーストする周波数帯はそれぞれロータリースイッチで指定できる仕組みです。高域のカットとブーストはそれぞれ別の周波数帯を指定できるのに対し(カットは5/10/20kHz、ブーストは3/4/5/8/10/12/16kHz)、低域のカットとブーストについてはツマミは分かれているものの、周波数帯は連動して決まる(20/30/60/100Hz)、というのが特徴です。
今回作ったペダルも基本的にはそれを踏襲し、ツマミは低域のATTENとBOOST、高域のATTENとBOOST、高域BOOSTのカーブを決めるWIDTH、そして出力音量を決めるボリュームという6つのポットと、低域カット/ブーストおよび高域ブーストの周波数を決める2つのロータリースイッチ、そして高域カットの周波数を決めるトグルスイッ��、という構成になっています。オリジナルのEQP-1Aは高域カットの周波数もロータリースイッチで設定するのですが、こちらは��ダルということでスペースに制限があるためトグルスイッチに変更しています。
低域の周波数はEQP-1Aと同じ20/30/60/100Hz、高域カットの周波数も同じく5k/10k/20kHzですが、高域ブーストに関しては3/4/5/8/10/12/16kHzに加えて1k/2kHzも選択できるようにしました。これは利用したロータリースイッチが9接点であるのと(=9段階で設定できる)、個人的に1kHzあたりをブーストさせるのが好きだから、という理由です。
ケースのサイズはHAMMOND 1590N1サイズで、穴あけ加工の簡略化のためパネル部分に電源および入出力ジャックが組み込まれた形状です。とはいえ中身はかなりギリギリで、消費電力的には009P電池でも十分動くのですが、スペースの関係でACアダプタでのみの動作になります。
回路
メイン部分の回路はこんな形です。
以前紹介したEQP-1Aのイコライザ回路の前後にOPアンプを使ったバッファを入れた構成です。入力段のバッファはシンプルなボルテージフォロア回路で、このバッファ前にボリュームを入れています。イコライザ回路の後ろの出力段はゲイン21倍の非反転増幅回路です。イコライザ回路はパッシブ構成のためゲインが落ちますが、ここで落ちた分のレベルを増幅しているイメージですね。
電源はDC9Vの単電源なので、電源電圧を分圧してバイアス電圧を作り、イコライザ部分もそのバイアス電圧を仮想的なGNDとしています。電源部分にはトランジスタを使ったノイズ削減用ローパスフィルタを入れています。
カット・ブーストする周波数を決めるロータリースイッチは秋月電子で入手できる2回路4接点��ものと1回路9接点のものを使っています。薄型かつコンパクトで、これがあったからこそこのペダルが作れたと言っても過言ではありません。
また、ロータリースイッチに繋がっている部分の回路は次のようになっています。
ひたすらコンデンサとインダクタ(コイル)が並んでいます。コンデンサはフィルムタイプのもの、インダクタはこちらも秋月電子で購入できるマイクロインダクタをメインで使いました。このマイクロインダクターは最大で47mHと比較的大きめの容量なのに、サイズは一般的な抵抗器を一回り大きくしたサイズでとてもコンパクトです。インダクタは抵抗と同様に直列接続すると単純に容量が加算されていくので、これを並べることで必要な容量のインダクタを構成しています。なお、100mHのインダクタについてはマイクロインダクタが入手できなかったため、太陽誘電の電源用インダクタを使用しました。マイクロインダクタよりは大きいですが、およそ直径10mmで十分にコンパクトです。
ちなみに、インダクタは磁力を発生させるため、並べた場合の相互作用が気になるところですが、実験した結果では縦に並べても目に見える影響はなさそうでした。扱う電圧がせいぜい数100mV程度だからかもしれません。
基板実装
こちらの回路をペダルエフェクターサイズのプリント基板に起こしたものがこちらになります。

今回新たな試みとして、抵抗器とOPアンプ、コンデンサについてはスルーホール実装と表面実装の両方に対応できるようにしてみました。手作業の実装でも手間としては表面実装のほうが楽な一方、表面実装部品は秋葉原における入手性が悪いため、どちらでも対応できるようにしようという魂胆です。
あと、ロータリースイッチの各端子をショートさせるように入っている抵抗については、基板スペースの関係上泣く泣く小さい表面実装の集合抵抗を使いました。正直これは無くても動作はするはずなのですが、EQP-1Aには入っているようなのでそれに従って入れています。ピッチが小さいのではんだ付けはかなり大変です。
ちなみに高域のカットの部分のトグルスイッチのところではこの抵抗を入れ忘れていますが、特に問題ない感じで動作しています。
基板上に一通り部品を実装するとこんな感じになります。ひたすらコンデンサですね。全部直方体型タイプのコンデンサを使えれば良かったのですが、一部の容量のものが手に入らなかったため、複数のタイプのコンデンサが混在しています。

また、ボリュームポットはリード線ではんだ付けしているのですが、ロータリースイッチについてはピンソケットを噛ま��て実装しています。これで見事にぴったりな高さになります。

最初は基板を2枚に分割して、ボリュームポットやロータリースイッチは別基板に実装しようと思っていたのですが、これがうまくいったおかげで1枚基板で済んでいます。
入出力のフォンジャックと電源ジャックはコネクタ経由で接続できるのですが、なんとなくフォンジャックは直接基板にはんだ付けしています。

パネルの作成
パネルは黒色アクリル板の表面をラッカースプレーで塗装し、それをレーザー加工して作りました。

裏側にはアルミ箔を貼ってシールド効果を持たせています。これらを組み立てて、ツマミを取り付けると最初の画像のようなものが完成します。
試奏インプレッション
相変わらず試奏動画や音源はないのですが、インスパイア元のEQP-1Aが完成度の高いイコライザということで、こちらもそれを踏襲した良い感じのものになっています。EQP-1AってEQのカーブが全体的に緩いので効きが悪い的な評価をされているのを見かけるのですが、実際はちゃんと体感できるレベルで効きます。もちろん低域の周波数を20Hzとか、高域の周波数を20kHzとかに設定すると効果は分かりにくいのですが、それぞれ100Hz/5kHzにすればすぐに違いが分かります。個人的にはやはり1kHzをブーストできるのが便利ですね。
ノイズに関しても、基本的に大きく全体をブーストするようなものではないため、まったく気になりません。後段にハイゲインのブースターやディストーションなどを繋ぐと差異が出る可能性はありますが、その場合は低ノイズのOPアンプへの交換で対応できる気がします。
ただ、出音が分かりやすく変わるエフェクターではなく、またどの周波数帯を変えるとどう出音が変わるか、というのを把握していないと使いにくいエフェクターだな、という感じではあります。なのでパラメトリックイコライザーってあまり流行らないんだなあ……と思いました。
9 notes
·
View notes
Text

fucked up that I can't eat these
3 notes
·
View notes
Text
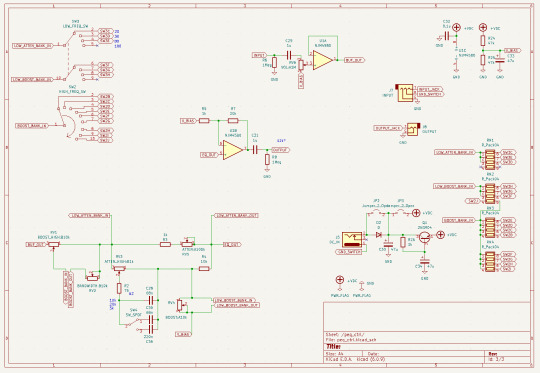
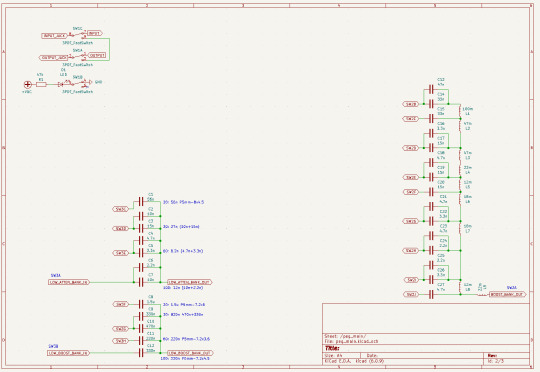
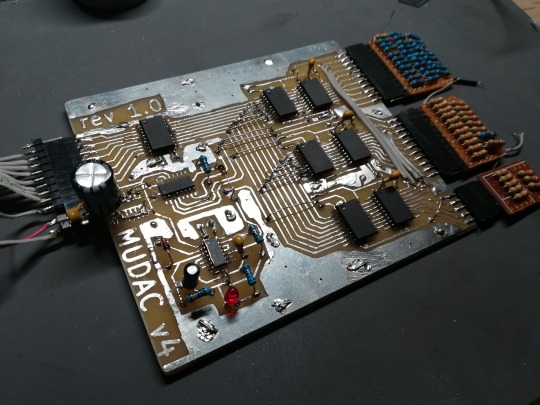
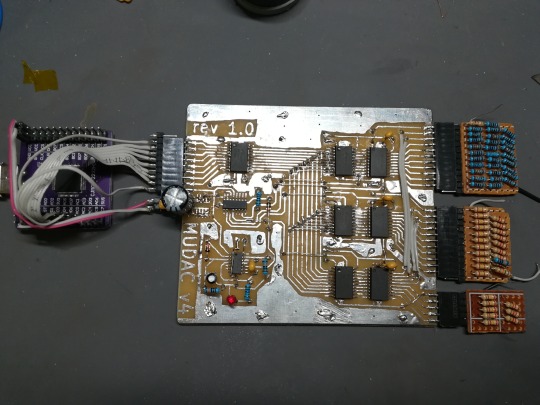
DIY FT232 3 Channel R2R DAC
In previous post i mentioned some updates in hardware.
Here i show schematic and explain how it works:
2 notes
·
View notes