#7-layer SVG
Explore tagged Tumblr posts
Visit Tumblr Blog
Explore Tumblr blogs with no restrictions, modern design and the best experience.
Last Seen Tumblr Blogs


Fun Fact
Premium Tumblr themes are available from anywhere between $9 to $49.
Text
2020: Memorial to Joey - Title Page
Working on the Memorial to Spike, our Golden Retriever, who left us in September 2023, reminded me that I had an album and a bunch of pictures of our first cat, Joey, who left us in August of 2020. For some reason I never brought myself to finish this album, and I thought it would be good to do over the Christmas Break, as part of my reflection time for the end of 2023. Joey joined our family at…

View On WordPress
#7-layer SVG#cat#creative#Cricut#decorative border#design#ideas#Joey#MASCrapping#masculine scrapbooking#memorial album#ScrapBook#scrapbooks for men#sewing#stitch#thread#Title page
2 notes
·
View notes
Text
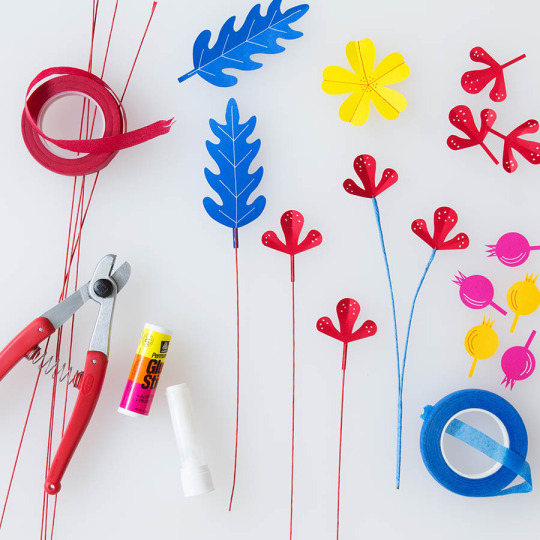
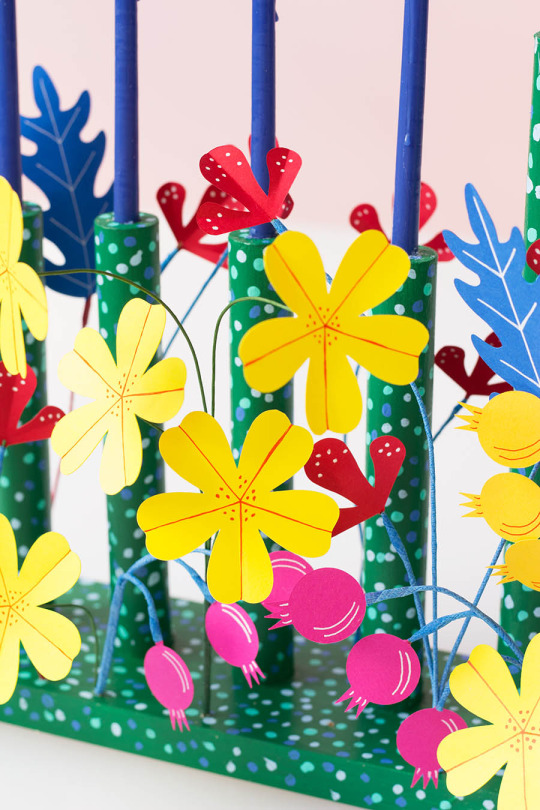
Josef Frank Inspired Menorah

Project by David Stark:
Chanukah is most often a blue and white affair, sometimes with a little silver thrown in, sometimes a little gold. But in ruminating on the holiday, we couldn’t help but ask ourselves: “Why does it need to be?”
Now, we know that the bold, floral prints of Josef Frank are, perhaps, not the most likely of Chanukah inspirations, but that’s exactly the point. We turned to a pattern we love entitled, “Vegetable Tree” as inspiration for this vibrant menorah – the perfect pop of color as we move into the darker winter months! We chose colored papers and floral shapes influenced by the motifs and palettes found in the print and are thrilled to share this how-to with you!

We opted to make our menorah base. But, it would be equally as charming to use a classic menorah you already own and wrap the wire stems around it. Or, pick up an affordable one and paint it! (Thank you to Just Scandinavian for loaning us this great Josef Frank fabric!) ––David Stark
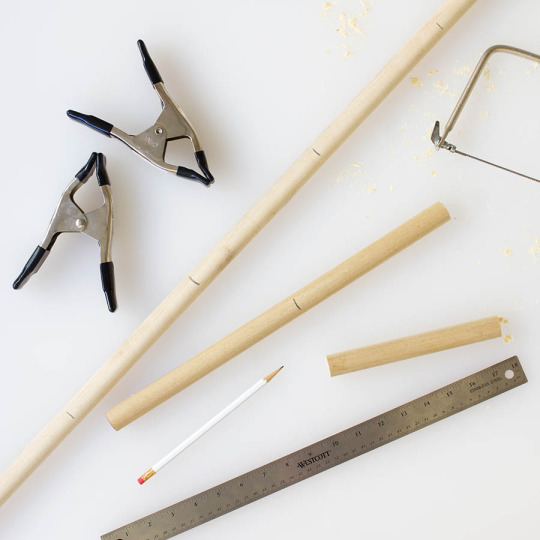
SUPPLIES
1” x 4” wood board (cut to 20”)
Coping saw (or other hand saw) and clamps
Two 1” dowel rods (either 36” or 48” long)
Drill with 1”, 3/8”, and 1/16” drill bits
Ruler and pencil
Acrylic paint and paint brushes
Red and white gel pens
Scissors and craft knife
Permanent glue stick or hot glue gun
Wire cutters
Bone folder
20-gauge straight wire (any color)
Various colors floral tape (we used: red, green, blue)
Various colors cover-weight paper (we used: red, hot pink, yellow, orange, blue)
Chanukah candles or LED candles
Craft cutter machine (optional)
PDF template (Link to download in Step 1 below)
INSTRUCTIONS
Step 1

Download the PDF template.
Using your ruler, find the center of the wood board and measure nine 2” intervals along that center line. Using your drill with the 1” drill bit, drill approximately ¼” deep holes at each mark. Use clamps to secure the board in place if needed.

Step 2
Using your ruler, measure eight 7” and one 9.5” lengths of dowel. Use your saw to cut each piece, being sure to cut as straight as possible. Use clamps to secure the dowels in place if needed.
Step 3

Assemble the menorah base by placing four 7” dowels at each end and the 9.5” dowel in the center. You may need to twist the dowels to secure them in place. Next, using your drill with the 3/8” drill bit, drill approximately ¼” deep holes on the end of each dowel. (3/8” is the width of our Chanukah candles, check yours before you begin and drill the appropriate size holes.)
Step 4
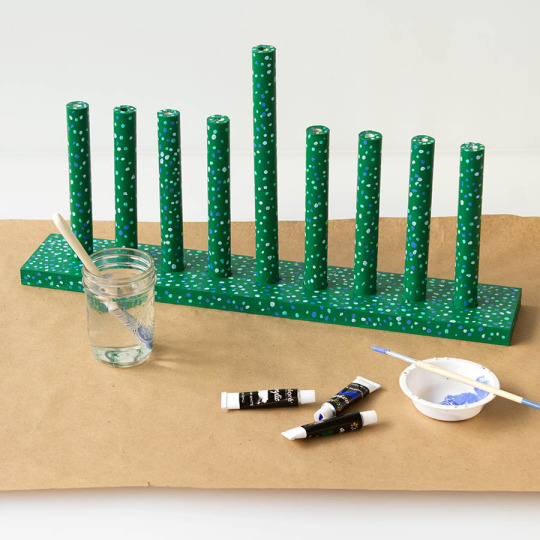
Paint your menorah! We painted a base color of dark green and added pale blue, turquoise, and grey dots. Allow the paint to dry fully.
Step 5
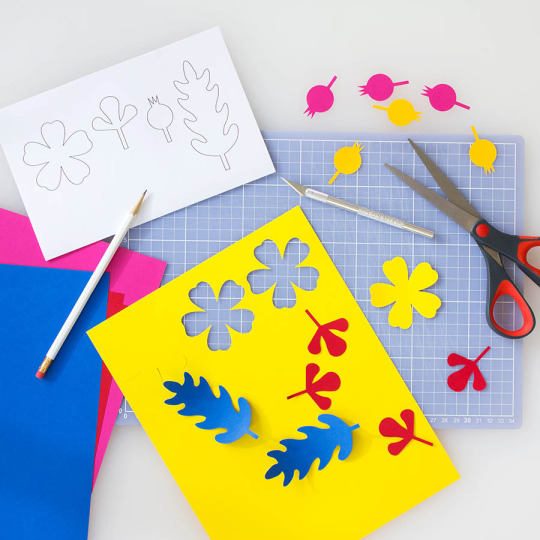
Use the template provided to cut out multiples of each shape. Or, use the SVG file to cut using a craft cutter.
Step 6
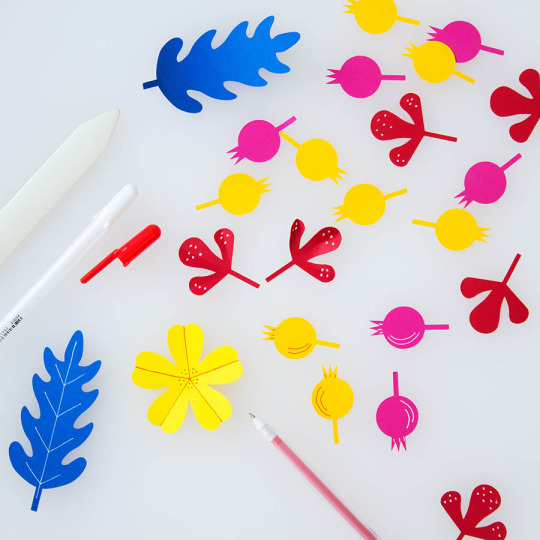
Using the red and white gel pens, add decorative details to the shapes and fold down the center or along each petal using a bone folder to press the crease.
Step 7
Apply a heavy layer of glue stick (or a line of hot glue) to the tab portion of each shape and press the wire into the glue. Once dry, cover the connection and the remaining length of wire with floral tape, occasionally attaching the wire stems together. For the yellow flowers, bend the wire and attach to the back of the flowers with hot glue.
Step 8

Using your drill with the 1/16” drill bit, drill holes into the menorah base and insert the wire stems into the holes. If you are using a menorah you already own, simply wrap the wires around it. We opted to keep our flowers low and pulled away from the candles. Be mindful of this when you are assembling. Dripped wax will not alight paper, but be cautious of the flames. We recommend if you are using this menorah with small children in the house, to use LED candles.


4 notes
·
View notes
Text
How to Make a Digital Design: A Step-by-Step Guide

Digital design is an essential skill in today’s digital world, whether you’re creating graphics for social media, websites, branding, or digital art. Whether you’re a beginner or an aspiring professional, understanding the process can help you create visually appealing and functional designs. In this guide, we’ll break down the steps to making a digital design from start to finish.
Step 1: Define Your Purpose and Audience
Before you start designing, determine the goal of your design and your target audience. Ask yourself:
Is it for a website, social media, advertisement, or personal project?
Who will see this design? What are their preferences?
What emotions or actions do you want to evoke?
Having clarity on these points will help guide your design choices.
Step 2: Choose the Right Software
There are many digital design tools available, and selecting the right one depends on your project needs:
Adobe Photoshop – Best for photo editing and raster graphics.
Adobe Illustrator – Ideal for vector graphics and logo design.
Canva – User-friendly for beginners, great for social media and presentations.
Figma – Excellent for UI/UX design and collaboration.
Procreate – Perfect for digital painting and illustrations.
Step 3: Gather Inspiration and Plan Your Design
Before starting, gather inspiration from online sources such as Pinterest, Behance, or Dribbble. Create a mood board to organize color schemes, typography, and layout ideas.
Sketch your ideas on paper or use wireframing tools to map out the structure of your design before you dive into software.
Step 4: Set Up Your Canvas
Open your chosen software and set the appropriate dimensions for your design. Consider:
Resolution: Use 72 DPI for digital designs and 300 DPI for print designs.
Color Mode: RGB for screens, CMYK for print.
Aspect Ratio: Make sure it suits the platform where it will be displayed (e.g., Instagram post vs. website banner).
Step 5: Create a Strong Composition
A well-balanced layout improves readability and visual appeal. Follow design principles such as:
Rule of Thirds: Place key elements along grid lines for balance.
Alignment and Spacing: Keep elements aligned and maintain consistent spacing.
Hierarchy: Emphasize important elements through size, contrast, and placement.
Step 6: Choose Colors and Typography
Colors: Use a color palette that complements your design's theme. Tools like Adobe Color or Coolors can help.
Fonts: Select readable and appropriate fonts. Use font pairings that work well together (e.g., bold headings with simple body text).
Contrast: Ensure good contrast between text and background for readability.
Step 7: Add Graphics and Visual Elements
Enhance your design with:
Icons and illustrations
High-quality images
Shapes and lines to guide the viewer’s eye Make sure these elements blend well with the overall design.
Step 8: Use Layers and Effects Wisely
Most design software allows working with layers. Organize your layers and name them for easier editing. Use effects like:
Shadows and gradients for depth
Transparency and overlays for a modern look
Blending modes to merge images creatively
Step 9: Review and Refine
Take a step back and analyze your design. Check for:
Spacing and alignment issues
Color consistency
Readability of text Ask for feedback from peers and make necessary adjustments.
Step 10: Export in the Right Format
Save your design in the appropriate format:
PNG – High quality, supports transparency.
JPEG – Smaller file size, good for web use.
SVG – Scalable vector format, ideal for logos and icons.
PDF – Best for print and document sharing.
Conclusion
Creating a digital design involves planning, creativity, and technical skills. By following these steps, you can improve your design process and produce stunning visuals for any purpose. Keep practicing, stay updated with design trends, and experiment with new techniques to refine your skills. Happy designing!
1 note
·
View note
Text
Top 10 Free Alternatives to Photoshop in 2025
Introduction
Adobe Photoshop is a top choice for photo editing and graphic design, but it can be expensive. Many small businesses, freelancers, and hobbyists need budget-friendly tools with similar features. Fortunately, there are free alternatives that offer powerful editing tools without the high cost.
Below is a quick list of the free alternatives for Photoshop. Keep reading for details on each tool, including features, pros and cons, and the best use cases.
Top 10 Free Alternatives to Photoshop
1. GIMP
Features: Advanced tools, layers, filters, customizable brushes, plugin support, scripting capabilities
Platforms: Windows, Mac, Linux
Pros: Powerful, highly customizable, open-source, supports various file formats, including PSD
Cons: Can be difficult to learn
Best for: Professionals, advanced users, those who need an open-source Photoshop alternative
2. Krita
Features: Brush stabilizers, vector tools, animation support, customizable workspace, HDR support
Platforms: Windows, Mac, Linux
Pros: Excellent for digital painting, open-source, supports PSD files
Cons: Not ideal for photo editing, limited text tools
Best for: Digital artists, illustrators, comic creators
3. Photopea
Features: PSD support, layers, web-based, masks, filters, vector editing
Platforms: Web
Pros: No installation needed, works directly in the browser, similar interface to Photoshop
Cons: Ads in free version, requires internet connection, lacks some advanced Photoshop features
Best for: Quick edits, PSD file access, basic graphic design
4. Canva
Features: Templates, drag-and-drop design, cloud storage, stock images, AI-powered design tools
Platforms: Web, Mobile (iOS, Android)
Pros: Extremely easy to use, great for beginners, collaborative design features
Cons: Limited advanced features, not ideal for detailed editing
Best for: Social media graphics, marketing materials, presentations
5. Pixlr
Features: AI tools, filters, layers, retouching tools, web-based editor
Platforms: Web, Mobile (iOS, Android)
Pros: User-friendly, no installation needed, quick edits
Cons: Some features behind a paywall, occasional ads
Best for: Beginners, casual users, fast online photo editing
6. Paint.NET
Features: Layers, plugins, special effects, simple UI, history tool
Platforms: Windows
Pros: Lightweight, easy to use, supports extensions
Cons: Only available on Windows
Best for: Basic photo editing, quick adjustments
7. Inkscape
Features: Vector graphics, SVG support, customizable tools, text editing, path operations
Platforms: Windows, Mac, Linux
Pros: Free alternative to Illustrator, powerful vector tools
Cons: Not ideal for photo editing, UI can be complex for beginners
Best for: Vector design, logo creation, scalable graphics
8. Fotor
Features: AI filters, batch editing, cloud storage, collage maker, one-tap enhancements
Platforms: Web, Mobile (iOS, Android)
Pros: Simple interface, fast editing, easy-to-use templates
Cons: Free version has ads, some features require a subscription
Best for: Quick social media edits, one-click enhancements
9. Darktable
Features: RAW editing, color correction, non-destructive editing, tethered shooting, curve adjustment
Platforms: Windows, Mac, Linux
Pros: Great for photographers, open-source, handles RAW images well
Cons: Steeper learning curve, interface may feel complex
Best for: RAW photo processing, professional photographers
10. RawTherapee
Features: Advanced color correction, RAW processing, noise reduction, HDR support
Platforms: Windows, Mac, Linux
Pros: High-quality image processing, free, powerful RAW editing tools
Cons: Interface can be complex, slower compared to Darktable
Best for: Professional photographers, RAW image adjustments
How to Choose the Right Alternative
Choosing the right Photoshop alternative depends on your needs. Here are some factors to consider:
Skill Level: Beginners may prefer Canva or Pixlr, while professionals may opt for GIMP or Darktable.
Primary Use: If you need vector design, Inkscape is best. For RAW image processing, Darktable and RawTherapee excel.
Ease of Use: Canva and Photopea are user-friendly, while GIMP and Inkscape have a steeper learning curve.
Compatibility: Check if the tool is available on your platform (Windows, Mac, Linux, or Web).
Need Help?
If you run into any issues while using these tools, don’t worry! Most of them have official help centers, tutorials, and active community forums where you can find answers. You can also check their official websites for FAQs, user guides, or You can get the contact details of the support teams through the online directory. Whether you need troubleshooting tips or step-by-step guides, help is just a click away!
FAQs
1. Are these alternatives really free?
Yes, all the software listed above has a free version. Some offer premium features for advanced users.
2. Can I use these tools for professional work?
Yes! GIMP, Krita, Darktable, and Inkscape are great for professional use, depending on your needs.
3. Do these alternatives support Photoshop files (PSD)?
Photopea, GIMP, and Krita can open and edit PSD files, making them good choices for users transitioning from Photoshop.
Conclusion
There are many free alternatives to Photoshop in 2025, each offering different features. Whether you need a quick design tool, professional editing software, or a simple photo enhancer, there is an option for you. Try out a few to see which one fits your workflow best!
0 notes
Text
The Intersection of Art and Technology: How Graphic Designers Create Engaging Imagery
Image editing with graphic design : Q & A Tutorial
1.Do graphic designers do Photoshop?
Yes, graphic designers often use Adobe Photoshop as a key tool in their work. Photoshop is widely employed for tasks such as photo editing, digital painting, and creating graphics for various media. It allows designers to manipulate images, develop layouts, and create visually appealing content. While graphic design encompasses various software and skills, proficiency in Photoshop is common and valuable for many designers in the industry.
2. How to create a graphics image?
To create a graphics image, start by selecting graphic design software like Adobe Photoshop, Illustrator, or free alternatives like GIMP or Canva. Choose a canvas size and resolution. Use tools to draw shapes, add text, and incorporate colours. Utilize layers for better organization and editing flexibility. Import images if needed and apply effects or filters for enhancement. Once satisfied with your design, save the image in your desired format (e.g., JPEG, PNG, SVG). Finally, ensure to check the image's quality and adjust settings as needed before exporting.
3. What are examples of graphic images?
Graphic images are visual representations that depict shocking or explicit content, often intended to provoke a strong emotional response. Examples include violent crime scene photos, explicit sexual imagery, graphic medical illustrations, or photographs of war casualties. They can also be found in media related to accidents, animal cruelty, or severe injuries. Such images are commonly used in news reporting, educational materials, and social awareness campaigns but may also be controversial due to their potential to disturb viewers.
4. What are the 7 types of graphic design?
The seven types of graphic design are:
1. **Visual Identity Design** – Focuses on branding elements like logos and color schemes.
2. **Marketing and Advertising Design** – Creates promotional materials like posters and brochures.
3. **User Interface (UI) Design** – Enhances user experience for applications and websites.
4. **Publication Design** – Involves layout and aesthetics for magazines, books, and newspapers.
5. **Packaging Design** – Designs product packaging for visual appeal and functionality.
6. **Motion Graphics Design** – Combines animation and graphic design for videos and digital media.
7. **Environmental Design** – Integrates graphics into physical spaces, like signage and wayfinding systems.
5. How do graphic designers create images?
Graphic designers create images using a combination of software tools, artistic skills, and design principles. They typically use programs like Adobe Photoshop, Illustrator, or InDesign to manipulate graphics, photos, and typography. The process involves brainstorming concepts, sketching ideas, and selecting color schemes and layouts. Designers often collaborate with clients to understand their vision and objectives, ensuring the final product effectively communicates the intended message. Additionally, they incorporate feedback and iterate on designs, ensuring that the images are visually appealing and aligned with brand identity.
Visit: VS Website See: VS Portfolio
0 notes
Text
FontLab Studio Crack + Keygen Free Download Full Activated
Free Download FontLab 8.4.2.8950 Full Version Offline Installer - Create fonts from a simple design to a complex project.
FontLab Crack Free Download full version offline installer for Windows may be downloaded for free. It is an integrated font editor for Windows that adds a little magic to type design and assists you in creating fonts from beginning to end, from a simple design to a huge project.
Overview of FontLab
Drawing fluid, even glyphs, auto-tracing bitmaps, overlapping, path-simplifying, equalizing stems, and scaling outlines without sacrificing stroke thickness are all possible. You can view numerical and visual measurements, draw in fractional or integer coordinates, and locate and correct contour flaws. Everything is colorable in FontLab. Create emoji or chromatic fonts, enhance SVG and bitmap pictures, overlay layered fonts, draw multi-color contours, add color outlines, and work with all Color OpenType-capable systems, including Adobe Photoshop and Illustrator, macOS, Windows, iOS, Android, and contemporary web.
Features of FontLab
Boost your design productivity
Next-generation drawing
Seriously better Béziers
Complete color support
Integrated ScanFont
Sketchboard
For design, space explorers
Distraction-free spacing
Powerful anchors
Glyph and character search
Embracing your workflow
Technical Details and System Requirements
Supported OS: Windows 11, Windows 10, Windows 8.1, Windows 7
RAM (Memory): 2 GB RAM (4 GB recommended)
Free Hard Disk Space: 400 MB or more
DOWNLOAD NOW
1 note
·
View note
Text
How to Create Images for Cricut: Quick and Easy Guide
If you are a regular Cricut user, you know how important the Design Space app is for your DIY projects. One of its key features is the ability to create your own images. To use this feature, you need to know how to create images for Cricut.
If you do not know how to make images in the Cricut software, don’t worry! This guide will cover everything you need to know to create your own images in Design Space. You will find 8 simple steps to follow, but first, I am going to explain how to prepare for the process.
Get Ready for Making Your Own Images in Cricut Design Space
Before you learn how to create images for Cricut, you should know what you have to do before making images. You can create images on the app, and to use the app on your operating system, you will need to do certain things.
You will need to download the software to your mobile phone or computer. It is the Cricut app that allows you to create images for your DIY projects. After downloading the app, you will need to log in with your account because Cricut needs an account for operating your Cricut machines. After creating your Cricut ID, you can now start the process of making images in the Design Space.
How to Create Images for Cricut: 8 Simple Steps
To make an image in your software, you will have to follow some basic steps. I am going to write down all of them one by one, and you can easily create images following them.
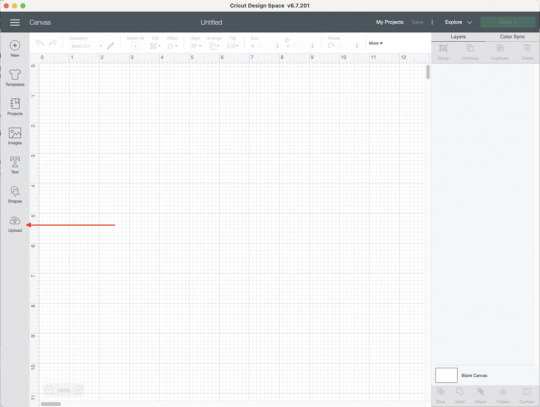
Step 1: Open Design Space on Your Device

To start creating images, open the Design Space and click on the New Project section. A blank canvas will appear on the screen. You can either upload a ready-made PNG file or start creating your own. For this project, a Free Sunflower SVG from the Design Bundles will be used.
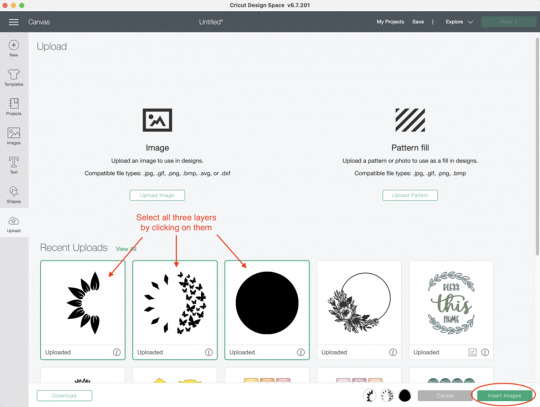
Step 2: Upload Your Image on Canvas
Once you have opened the canvas, you have to upload the image. You should click on Upload to start uploading the image and select it from your computer. Later, you will turn the image into multiple layers. After uploading the image, you will need to select the Complex option, and then you have to click on the Continue button.

Step 3: Use the Magic Wand Tool to Separate Image
In order to learn how to create images for Cricut, you have to use the Magic Wand tool afterward. This tool will help you click on the individual pieces of the image after splitting it into different layers and then remove them. You can keep one color at once. As you can see in the image, you can click any portion and then remove it.

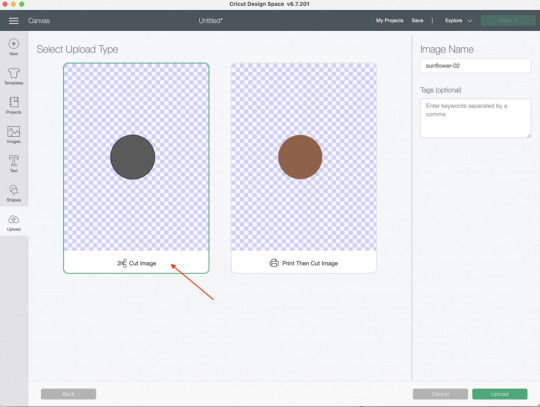
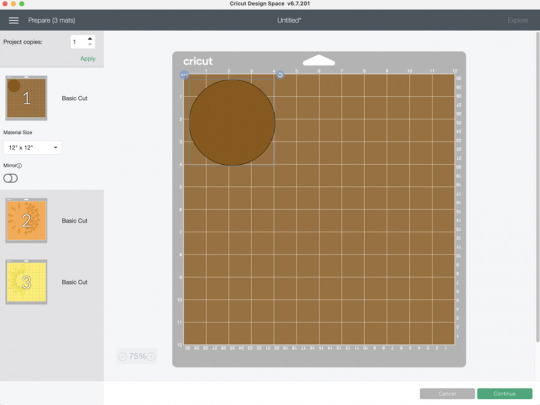
Step 4: Select the Cut Image Option
Now, you will have to select the Cut Image option. After that, you have to upload the image again.
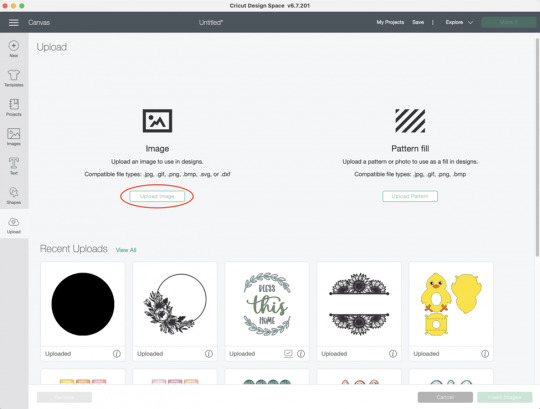
Step 5: Upload the File Again
You will have to upload the image again. To do this, you must select the Upload Image button from the files again. After that, select Complex and hit Continue again.
Steps 3-5 need to be done repeatedly until all the colors you want are saved in separate layered cut file images.
Step 6: Insert All the Images
Now that you have all the images separated into multiple layers, you can insert them by clicking on each file. This will bring all the layers into your beautiful project.
Next, all the images are in the software. If some files appear to be very large, you will have to scale them down. A change in height and width will help.
Step 7: Change the Color of Each Layer
You can change the color of the layers if you want. However, this is very optional and depends on you whether you want it or not. To change color, select a layer, go to the operation menu, and click on the black square. From there, select the color you wish. Repeat the process for each layer.

Step 8: Click on the Make It Button
Finally, you can cut each layer individually on a separate mat. It allows you to cut all the different colored pieces on various materials. You just have to put the cardstock or vinyl on a cutting mat and cut it on the image.
Conclusion
You read the whole blog, and now you know how to create images for Cricut. It is an excellent thing that you can do in the Design Space app. By creating images, you can craft beautiful projects. To do this, you will need a device and the software on it. You can follow all the steps that I have written above in this post one by one. Once you are done with that, you can cut all those newly created images on your machine individually on different colored materials, and a beautiful image will be created.
FAQs
Is It Possible to Create My Own Images?
Yes, for sure! The Design Space app offers multiple options for creating designs. You can either pick any design or upload it from your device. To create your own image on the app, you will have to upload an image, and then the app will convert it into many shapes that you can cut however you want, creating a completely new design.
How Can I Find Images in Cricut Design Space?
The app has thousands of ready-made images. You can pick any of them and customize them however you like. Here is how you will find those images
First, open the Design Space app.
After that, select the My Stuff option.
Next, you have to select the Free Projects option.
Now, choose free images and then select images.
Choose purchased, and it will show you the available images for the app.
How Can I Upload an Image to Cricut Design Space?
These are the simple steps to upload an image on the Cricut Design app.
First, visit the app and go to the New Project section.
Then, find the Upload button on the app and click on it.
Now, select an image of your choice. You can use the various eraser tools to remove the background of the image.
Finally, give the image a name and click on Upload to complete the process.
0 notes
Text
Kimberbell Holiday & Seasonal Mug Rugs Vol. 1

Stitch Up the Seasons with Kimberbell's Holiday & Seasonal Mug Rugs Vol. 1!
Calling all embroidery enthusiasts and crafters with a love for cozy corners! If you're looking for a way to add a touch of seasonal charm to your home decor throughout the year, then look no further than Kimberbell's Holiday & Seasonal Mug Rugs Vol. 1 Machine Embroidery CD (KD507). This delightful collection offers a treasure trove of festive designs, making it the perfect companion for your embroidery machine. Unwrapping the Magic: What's Included? This CD-ROM is jam-packed with everything you need to create 11 adorable "in-the-hoop" mug rugs, each designed to fit a standard 5" x 7" embroidery hoop. Here's a breakdown of what you'll find inside: Eleven Embroidery Designs: Embark on a stitching adventure through the seasons with a diverse range of designs. From a jolly snowman for winter to a charming heart for Valentine's Day, there's a mug rug to celebrate every festive occasion. Multiple Embroidery Formats: No matter what embroidery machine you own, Kimberbell has you covered. The designs come in a wide range of formats, including ART, DST, EXP, HUS, JEF, PES, VIP, VP3, and XXX. Easy-to-Follow Instructions: Whether you're a seasoned embroidery pro or a curious beginner, Kimberbell's reputation for clear and concise instructions shines through. The CD includes step-by-step guides for each design, ensuring a smooth and successful stitching experience. Bonus SVG Files: For an extra layer of creative fun, the CD also includes SVG files compatible with popular electronic cutting machines. This allows you to create coordinating fabric elements to further personalize your mug rugs. A Mug Rug for Every Season: The true magic of Kimberbell's Holiday & Seasonal Mug Rugs Vol. 1 lies in the variety of designs it offers. Let's take a peek at some of the delightful mug rugs you can create: Winter Wonderland: Bundle up with a charming snowman mug rug, complete with a playful scarf and buttons. Springtime Symphony: Welcome the blooming season with a vibrant flower-themed mug rug, a perfect pop of color for your kitchen counter. Summertime Fun: Celebrate the sunny days with a whimsical butterfly or a refreshing watermelon design. Autumn Delights: Embrace the fall harvest with a mug rug featuring a plump pumpkin or a cluster of colorful leaves. Festive Cheer: Get ready for the holidays with a delightful Santa mug rug, a sparkly snowflake design, or a classic Christmas stocking. Beyond the Basics: Embellishing Your Mug Rugs While the embroidery designs themselves are undeniably charming, Kimberbell's mug rugs are a blank canvas for your creativity. Here are some ways to take your mug rugs to the next level: Fabric Selection: Play with different fabrics to match the season and your personal style. Use flannel for a cozy winter mug rug or opt for brighter cottons for spring and summer designs. Embellishments: Don't be afraid to add a touch of sparkle! Buttons, ribbons, beads, and even small pieces of felt can add a unique dimension to your mug rugs. Quilting: For added texture and stability, consider quilting your mug rugs after the embroidery is complete. Simple straight-line quilting or a more elaborate free-motion design can elevate your creations. Binding: Finish off your mug rugs with a beautiful binding that complements the fabric and design. Bias binding tape or a simple turned-and-stitched edge are popular options. The Perfect Gift for the Crafter in Your Life (or Yourself!) Kimberbell's Holiday & Seasonal Mug Rugs Vol. 1 Machine Embroidery CD makes a fantastic gift for any embroidery enthusiast. It's a thoughtful present that keeps on giving, offering endless possibilities for creative expression. But don't wait for a special occasion – treat yourself to this delightful collection and bring a touch of seasonal charm into your crafting space! Beyond the CD: Resources and Inspiration The Kimberbell brand is known for its vibrant online community. By joining their online forums or social media groups, you can connect with other crafters who are using the Holiday & Seasonal Mug Rugs designs. Share your creations, get troubleshooting tips, and discover even more inspiration for your mug rug projects. In Conclusion: Stitching Up Joy, One Mug Rug at a Time Kimberbell's Holiday & Seasonal Mug Rugs Vol. 1 Machine Embroidery CD is more than just a collection of designs – it's an invitation to celebrate the joy of embroidery and seasonal cheer. available here Read the full article
0 notes
Text
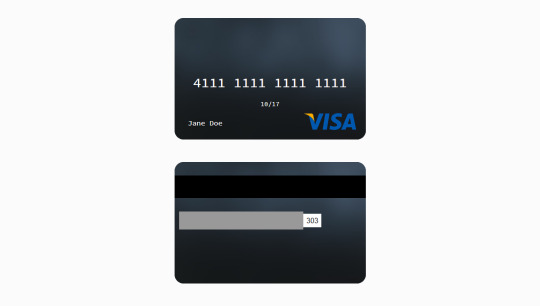
Explore 15+ CSS Credit Cards

At CSS Monster, we invite you to explore our curated collection of CSS credit cards. Within this comprehensive compilation, you'll discover a treasure trove of free HTML and CSS code examples that showcase stunning, lifelike credit card designs. These examples have been meticulously gathered from esteemed platforms like CodePen, GitHub, and other valuable resources. With our March 2023 update, we're excited to unveil six new additions to our collection. This update ensures that you have access to the latest and most innovative credit card styles available in the realm of web design. The design of credit cards is paramount in establishing a trustworthy and professional user experience, particularly for e-commerce and online payment systems. Our collection boasts an array of credit card styles, representing various card types, including Visa, Mastercard, American Express, and more. Each example in our collection is a testament to the attention to detail, as it faithfully replicates the intricacies of a real credit card, encompassing the card number, expiration date, cardholder name, and even the signature panel. The CSS credit card examples you'll find here empower you to elevate the credibility and professionalism of your online payment systems. Whether you're working on an e-commerce platform, a fintech application, or any web project that involves transactions, these realistic credit card designs add a layer of authenticity to your user interface. They not only contribute to the aesthetics but also enhance the user's trust, which is essential for secure online payments. The CSS credit card designs in our collection aren't just static visuals; they are interactive, customizable, and ready for integration into your web projects. You can adapt them to your brand's color scheme, user interface, and user experience requirements, ensuring that they seamlessly fit into your design and functionality. We encourage you to dive into our collection and unlock the potential to enhance the credibility and professionalism of your online payment systems. Whether you're a web designer, developer, or business owner, these CSS credit cards are a valuable resource to create a seamless and trustworthy payment experience for your users. Start exploring our collection now and discover how CSS credit cards can take your web design to the next level. Happy coding! Author Simon Goellner February 4, 2023 Links Just Get The Demo Link How To Download - Article How To Download - Video Made with HTML / CSS (SCSS) About a code RESPONSIVE, GLITTERY BANK CARD Compatible browsers:Chrome, Edge, Firefox, Opera, Safari Responsive:yes Dependencies:- Author Tom Miller September 10, 2021 Links Just Get The Demo Link How To Download - Article How To Download - Video Made with HTML / CSS / JS About a code SVG DEBIT CARD ANIMATION #4 Compatible browsers:Chrome, Edge, Firefox, Opera, Safari Responsive:yes Dependencies:gsap.js Author Paul September 7, 2021 Links Just Get The Demo Link How To Download - Article How To Download - Video Made with HTML / CSS About a code VIRTUAL CREDIT CARD DESIGN Compatible browsers:Chrome, Edge, Firefox, Opera, Safari Responsive:no Dependencies:-

Author Nikhil27bYt June 4, 2021 Links Just Get The Demo Link How To Download - Article How To Download - Video Made with HTML / CSS About a code GLASSMORPHISM CREDIT CARD WITH HTML & CSS Compatible browsers:Chrome, Edge, Firefox, Opera, Safari Responsive:no Dependencies:- Author Timothy Morrell March 5, 2021 Links Just Get The Demo Link How To Download - Article How To Download - Video Made with HTML / CSS (SCSS) About a code CSS CREDIT CARD WITH FLIP Compatible browsers:Chrome, Edge, Firefox, Opera, Safari Responsive:no Dependencies:-

Author crayon-code January 9, 2021 Links Just Get The Demo Link How To Download - Article How To Download - Video Made with HTML (Pug) / CSS (SCSS) About a code CREDIT CARD GRID LAYOUT Compatible browsers:Chrome, Edge, Firefox, Opera, Safari Responsive:no Dependencies:-
Author Kivanfan November 25, 2018 Links Just Get The Demo Link How To Download - Article How To Download - Video Made with HTML / CSS / JavaScript About a code 3D FLOATING CREDIT CARD Compatible browsers:Chrome, Edge, Firefox, Opera, Safari Dependencies:-

Author Filip Vitas March 3, 2018 Links Just Get The Demo Link How To Download - Article How To Download - Video Made with HTML (Pug) / CSS (Stylus) About a code PURE CSS CREDIT CARD Compatible browsers:Chrome, Edge, Firefox, Opera, Safari Dependencies:-
Author Veronica April 8, 2018 Links Just Get The Demo Link How To Download - Article How To Download - Video Made with HTML / CSS About a code FLIPPING CREDIT CARD Compatible browsers:Chrome, Edge, Firefox, Opera, Safari Dependencies:-

Author Ryan McGuinn March 4, 2018 Links Just Get The Demo Link How To Download - Article How To Download - Video Made with HTML / CSS About a code CREDIT CARD Compatible browsers:Chrome, Edge, Firefox, Opera, Safari Dependencies:-
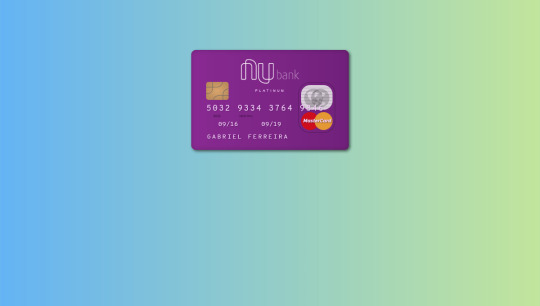
Author Gabriel Ferreira September 30, 2017 Links Just Get The Demo Link How To Download - Article How To Download - Video Made with HTML / CSS About a code NUBANK CREDIT CARD Compatible browsers:Chrome, Edge, Firefox, Opera, Safari Dependencies:font-awesome.css
Author Sergio Rojas June 15, 2016 Links Just Get The Demo Link How To Download - Article How To Download - Video Made with HTML / CSS About a code CREDIT CARD ANIMATION Compatible browsers:Chrome, Edge, Firefox, Opera, Safari Dependencies:-

Author Mohan Khadka December 6, 2015 Links Just Get The Demo Link How To Download - Article How To Download - Video Made with HTML / CSS About a code CREDIT CARD (CSS+SVG) Compatible browsers:Chrome, Edge, Opera, Safari Dependencies:-

Author James Delaney October 14, 2015 Links Just Get The Demo Link How To Download - Article How To Download - Video Made with HTML / CSS About a code CREDIT CARD MOCKUP Compatible browsers:Chrome, Edge, Firefox, Opera, Safari
Author Nika Zawila February 3, 2015 Links Just Get The Demo Link How To Download - Article How To Download - Video Made with HTML / CSS (SCSS) About a code CREDIT CARD TEMPLATE Compatible browsers:Chrome, Edge, Firefox, Opera, Safari Dependencies:-

Author Jan March 20, 2014 Links Just Get The Demo Link How To Download - Article How To Download - Video Made with HTML / CSS (Less) About a code HTML AND CSS CREDIT CARD Compatible browsers:Chrome, Edge, Firefox, Opera, Safari Dependencies:- Read the full article
0 notes
Text
How to Export Figma to HTML Code: Step-by-Step Guide
In the world of web design and development, efficiency is key. One tool that has revolutionized the design process is Figma, a cloud-based design platform that allows teams to collaborate in real-time. However, once the design phase is complete, the next step is to convert those stunning visuals into functional code. This is where knowing how to export Figma to HTML comes into play.
Understanding the Figma to HTML Process
Figma to HTML is the bridge that transforms your design files into a web-ready format. This process involves translating the visual elements, such as images, text, and layouts, into HTML code that browsers can understand and render as a website.
Step 1: Organize Your Figma Design
Before exporting to HTML, it's essential to have a well-organized Figma design. Ensure that all layers are named appropriately, and elements are grouped logically. This will make the conversion process much smoother.
Step 2: Export Assets
Start by exporting any images, icons, or other assets used in your design. Figma provides an easy-to-use export feature that allows you to select and save individual elements as PNGs, SVGs, or other common image formats. Remember to keep track of where you save these files, as you'll need to reference them later.
Step 3: Use a Figma to HTML Converter
There are several tools available online that specialize in converting Figma designs to HTML code. These converters streamline the process, saving time and ensuring accuracy. Simply upload your Figma file, and the converter will generate the corresponding HTML code.
Figma to HTML converters are equipped to handle various design elements, from basic shapes and text to more complex features like gradients and shadows. This ensures that your design is faithfully translated into code.
Step 4: Review and Adjust
Once you have the initial HTML code, it's crucial to review the output. Check for any discrepancies between the design and the generated code. This could include spacing issues, font styles, or any other visual elements that may need adjustment.
Step 5: Add Interactivity with CSS and JavaScript
While the Figma to HTML converter does an excellent job of translating the visual elements, you may need to add interactivity using CSS and JavaScript. This includes animations, transitions, and responsive design elements that enhance the user experience.
Step 6: Test Across Browsers and Devices
Before finalizing your HTML code, it's essential to test it across different browsers and devices to ensure compatibility. This step helps identify any potential issues that may arise when the website is live.
Step 7: Optimize for Performance
Optimizing your HTML code is crucial for ensuring fast load times and a seamless user experience. This involves minimizing unnecessary code, compressing images, and utilizing techniques like lazy loading to prioritize content.
Step 8: Deploy Your Website
With your HTML code ready and optimized, it's time to deploy your website to a hosting platform. Choose a reliable hosting provider that offers the resources and support you need to keep your site running smoothly.
Conclusion
Knowing how to export Figma to HTML opens up a world of possibilities for designers and developers alike. It streamlines the transition from design to code, saving time and ensuring a seamless user experience. By following these steps, you can confidently convert your Figma designs into functional, web-ready HTML code. Embrace the power of Figma to HTML conversion and elevate your web design projects to new heights.
0 notes
Text
GruvboxHypathy


Lets build a future to be proud of and grateful to live into. And I think that one way I can do so is to produce insightful explainers and creative tutorials...
Nth BRAINDUMP
Medium Light + Soft Dark Gruvbox, very dark night with dim yet soft & warm lights, Shoshona the black Angora housecat, solarpunk, 16^12, witchy coven commune, walking her way to her own home library, forested library location, night, hoof shoes, black gloves (giving the blackhand surname), relaxing 45rpm 7" vinyls’ music, bell thousers, jackets / blouse, black lipstick, white hoof shoes, daybreak / dusk, black sun, stargazing, retro warm grunge look with black white and amber tones, large backpack, amber polka dot patterned identity card, libre cyberware & libre bio-modding wares, GLOSS (gratis, libre, open source software / culture), olive & black net socks texture, soft woolen rug texture, notepad at her hand, soundscape of a forested park library with some river nearby, cozy vibe of curiosity and knowledge-seeking…
Some majestic Lisp poetry & code booklets on the shelves, puffy layered turtleneck shirt and bell cap trousers, Olive Synod Mixnet library card, autistic fem symbol talisman, keychain charms, analog medium, retro computers, axis victory?, anti-Wilsonism, Strasserism, Shoshoni language, conlangs, alternate technologies, mysticism, communion, community building, honest humble living, witch coven, STEM ladies, Chronokinesis, True Polymorphs, Toymaker, open culture, public domain, copyleft, desktop environmental storytelling, REPL feedback loops, Lisp symbolic computation machines, addventure, neo-brutalism, systemic change, historical retrospective, from grim dark to bright solarpunk, Konrad Zuse, factions, far far away future foresight, van hexcrawl, encyclopedic knowledge, life-long learning, Zettelkasten, Markdown, Argdown, DolDoc, Parade FS, DocBook, HTML, XML, SVG toons, Common Lisp, Worker Cooperatives, KDE_Plasma’s ecosystem;
Neue-Geo-Syndicalist constructivist empowerment worldview, Lisp program forms as Lisp-y poetry, shortwave radio, geofiction realms & speculative paracosms, constructed languages’ jargon / dialects and technological ecosystems…
Harmony, Progress, Liberty, Knowledge, Mysticism & Rationality syncretized, Data Transparency, Copyleft / Open Culture Movement as in GLOSS, Geosyndicalism (Georgism* mixed with Belle Epoque Syndicalism), Respect & Courtesy, Linguistic Diversity... ;
0 notes
Text
How to Make T-Shirts With Cricut? [Step-By-Step Guide]
Have you ever wondered how to make t shirts with Cricut at home? But backed away while thinking about the supplies needed, design software, and the process. If you love being creative in designing t-shirts, you’ve chosen the correct place to collect the details. There are various methods to design gorgeous t-shirts, but one of the simplest models is EasyPress 2.
The service of electric heat presses along with Design Space allows the user to make outfits using various tools, accessories & materials. In addition, it gives hands to the users by designing cool t-shirts from scratch. Furthermore, keep pursuing this tutorial for a step-by-step process about designing a custom t-shirt with a craft plotter.
To design a personal t-shirt out of the Cricut press, all the crafters are requested to follow the steps mentioned in the coming section of the blog. Ensure that you carry through the method utilizing all of them to get top-class quality results.
Step 1: First, Open Cricut Design Space
https://cricut.com/blog/wp-content/uploads/2021/11/Create-A-New-Project-In-Design-Space.jpg
Step 2: After that, Choose the Template
Next, choose any template, ensuring that you are printing a t-shirt of the correct size. Moreover, choose the Templates icon visible on the left side of the Canvas page. Followed by this, choose the T-Shirt option inside the Search bar. Now, choose Classic T-Shirts and simply insert a graphic on the middle area of the chest.
Step 3: Then, Upload Your Design
Further, after completing the template process, upload the chosen template to the Design Space. In addition, tap the Upload box appearing on the bottom left side of the page.

After that, search for the SVG image and drag it to the Upload folder page. Next, choose the Save button to add the image. Besides saving the image, select and move it to the t-shirt template on the Canvas.
Step 4: Next, Weld Up the Image
Before commencing the image-making process, ensure the layers are cleaned up and all the cut images are available. However, if you want to cut out the shape, merge them and choose Weld, given on the bottom left side of the Canvas screen.
Step 5: Heat App Set Up & Sign In
Step 6: Now, Select Press & Connect It
Once the press successfully gets setup, choose EasyPress 2, available under the My Heat Presses category. Post selecting the press, connect it wirelessly via Bluetooth with the on-screen instructions.
Step 7: Choose Material & Pre-Heat
Besides connecting the material, finalize the Heat-Transfer Material and Base Material. After that, press Cricut Pressing Mat & tap the Apply box. Moreover, pre-heat the material to 315*F for 30 s.
Step 8: Lastly, Apply Material & Peel It Off
Following this, place the selected material face down & line side up. With Firm pressure, firm it up at the chosen temperature & timing. Now, you are supposed to wait until the heating process continues. Lastly, slowly remove the liner once it cools down. You are advised to calmly detach the material to avoid your hands from getting burned.
Frequently Asked Questions
Question: What are the Supplies Needed to Prepare the T-Shirt from Cricut?
Answer: Intending to make the personalized t-shirt out from the Cricut, every user needs to have the following supplies with them. Each of the supplies will have their contribution in giving form to their creative idea. The names of the supplies needed during the heating process include:
EasyPress 2.
Cricut Pressing Mat.
Iron-On design.
Design Space software.
T-Shirt blank.
Weeding tool.
Question: What are the Tips Needed to Be Done During T-Shirt Heat Press?
Answer: Read the following tips that need to be taken during the T-Shirt heat pressing process:
Allow 24 hours to let the t-shirt dry before washing.
If the transfer paper isn’t coming off, then re-press for another 5-10 seconds.
Monitor the press carefully, and don’t close the press too tightly or too lightly.
With the Teflon sheet, a shiny coat will appear over the design.
You should read all the instructions before operating the heat press during the process.
Question: How Long Do Cricut T-Shirts Last?
Answer: Designed out of EasyPress heat press, the personal t-shirt lasts long upto 50 washes. However, it completely depends upon various reasons, which include:
Pre-wash t-shirt.
Cutting Mat.
Wedding Tools.
Pressing Mat.
Type of detergent.
Steps were taken during the process.
Heat press settings.
Avoid Bleaching.
How t-shit has been designed, cut, weeded & applied on the material.
Visit - Cricut.com/setup
design.cricut.com
www.cricut.com/setup
Cricut Design Space
#Cricut Design Space setup#Cricut Design Space install#Cricut Design Space login#Cricut Design Space software#How to Make T-Shirts With Cricut#Cricut Design Space#cricut design space download#cricut design space app#cricut setup#cricut explore air 2#design.cricut.com#cricut.com/setup
0 notes
Text
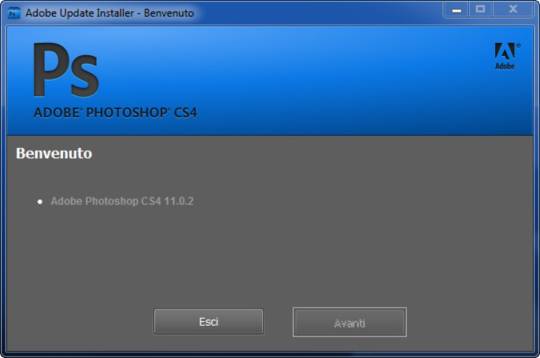
Photoshop Cs4 Download Free Mac
Photoshop Cs4 Download Free Mac Full Game
Photoshop Cs4 download free. full
Photoshop Cs4 Portable Mac Free Download
Download Adobe Photoshop CS4 Portable 32/64 bit. Use Google drive or Mega cloud link. Adobe Photoshop CS4 Portable Free Download. Photoshop portable for MAC. Photoshop Cs4 Trial Adobe Photoshop Cs4 For Mac free. Download full Version The airbrush tips, the new colors option, Adobe stock templates for the users to start work quickly. Creative cloud assets are introduced, TypeKit market the new style of font-family, SVG colors font support, the properties panel is improved, it uses the mercury engine. All of the CS4 Suites and Point Products have the same installation screens on both Windows and Mac OS. The following Adobe Captivate demonstration illustrates the CS4 installation. For more information about viewing this demo, see Viewing Adobe Captivate Demos in Knowledgebase Documents. Apr 08, 2018 Download Adobe Photoshop CS4 Free Full Version 2017/2018 Offline Installer Setup for PC. This is the latest version of photoshop cs4 download for Windows and Mac. Photoshop CS4 free. download full Version for Windows 7, 8, 8.1, Vista, XP and Windows 10. This software can be used as an alternative to Adobe Photoshop CS4 Portable.
Adobe Photoshop CS4 Portable Free Download 32/64-bit for Windows 10, Windows 7, Windows 8, 8.1, Vista, Windows XP, Linux, and for Mac. It is the full offline installer standalone setup direct single click download of Adobe Photoshop CS4 Portable offline installer for PC. You can also get. Adobe Photoshop CS4 Portable Overview Adobe Photoshop CS4 is the upgraded version of Adobe Photoshop CS3. This is the graphic designing software application developed by Adobe for the designers. The adobe photoshop cs4 is released on September 23.
Free Download Photoshop Cs4 Software
It was just like the previous versions of photoshop but with some additional features. Like the tool bar, options bar, application bar, Mac OS menu, Tabbed window document, photoshop panel, workspaces menu etc. It introduces a number of new features. The content aware scrolling is the new feature that is introduced in this version. It is capable of aware the low-quality content. For example to apply content aware tool create the duplicate layer first then click on the content aware scale in the edit menu option and then you can change the size of an image without any issue with the image.
You can also get. The airbrush tips, the new colors option, Adobe stock templates for the users to start work quickly. Creative cloud assets are introduced, TypeKit market the new style of font family, SVG colors font support, the properties panel is improved, it uses the mercury engine that has the fast performance speed. There is two more edition of Adobe Photoshop CS4 that is Adobe Photoshop CS4 Portable and Adobe Photoshop CS4 Extended.
The portable version is recently introduced that has the ability to work on the system with installation. This the quick work facility to the users, and also you can use from USB on any computer system without installation.
Photoshop Cs4 Download Free Mac Full Game
Adobe Photoshop Crack Free Download
The CS4 extended has more features than the other version. So it is released for the more expert person. You can also get. Adobe Photoshop CS4 Portable Features We mentioned all latest new features of Adobe Photoshop CS4 Portable below. The new graphical user interface with more menu and windows is introduced.
The new 3D object view and options to work are introduced. Painting on 3D objects, text editing on the 3d objects, can change the view positioning which is a great feature introduced in this. How to change the background in Adobe Photoshop CS4 is the most asked question, and the adobe photoshop provide this features.
Photoshop Free Download Crack Version
It is simple, easy to use, new interface, and interactive to the users also. Also, it can improve image quality feed. The content aware is the most amazing new feature in adobe photoshop ocs4 that gives more control to the images and other graphics. It can improve the image brightness. A powerful image editing software also.
Can edit any extension of the photo like JPEG, PNG, GIF etc. Technical Setup Details Title: Adobe Photoshop CS4 Portable Free Download Setup File Name: photoshop11.0.1muladobeupdate.zip File Size: 35.19 MB Compatibility: 64-bit (x64) and 32-bit (x86) Setup Type: Offline Installer File Type:.zip License Type: Commercial Trial Developers: System Requirements For Installation Have a look, at the system requirements before downloading the Adobe Photoshop CS4 Portable Free Download trial version offline installer setup so that either they satisfy your computer system or not. Operating System: Windows XP, Windows Vista, Windows 7, Windows 8, Windows 8.1, Windows 10, MAC. System RAM: 2.00 GB Processor: Intel Core 2 Duo. System Hard Disk: 1.00 GB Adobe Photoshop CS4 Portable Free Download You can download the Adobe Photoshop CS4 Portable by clicking on single link download button.

Also, It is a trial version offline installer of Adobe Photoshop CS4 Portable Free Download. Also, It is available for both 32-bit (x86) and 64-bit (x64) architecture system.
Photoshop Cs4 download free. full
Photoshop Cs4 Portable Mac Free Download
Real Ddrace For Mac»
1 note
·
View note
Text
Adobe Illustrator CC 2021 Full version

The drawing program “Adobe Illustrator CC” (formerly “Adobe Illustrator CS6”) is the professional solution when it comes to the design of professional vector-based illustrations for posters, business letters, business cards, brochures, websites and DVD menus. You can bundle and group up to 100 different large drawings in a single Illustrator file.
Via a selection list, you can access the desired element directly. “Adobe Illustrator” reads all major formats such as EPS, FXG, PSD, TIFF, GIF, JPEG, SWF, SVG, DWG or DXF. If you would like to pass on your designs, so-called “package files” offer themselves. Here you summarize all required fonts and graphics in one folder. Alternatively, secure your print sharing designs as multi-page PDF documents with all Illustrator layers.
Features of Adobe Illustrator CC 2021
Iconic work at any size
Gorgeous typography that says it all
Draw attention everywhere
Pro power comes standard
Freeform Gradients
Global Editing
Customizable toolbar
Presentation and Trim Preview
Visual font browsing
More accessible Adobe Fonts
Scaling to fit your monitor
Actual size preview
Puppet Warp enhancement
And so much more
System Requirements and Technical Details
Intel Pentium 4 or AMD Athlon 64 processor
Microsoft Windows 7 with Service Pack 1, Windows 8.1, or Windows 10
mac OS version 10.13 (High Sierra), macOS version 10.12 (Sierra), or Mac OS X version 10.11 (El Capitan)
2 GB of RAM (8 GB recommended)
3 GB of available hard-disk space for installation; additional free space required during installation (cannot install on removable flash storage devices)
1024 x 768 display (1280 x 800 recommended)
Download for Windows
Download for MacOS
4 notes
·
View notes
Text
Web Design Trends and Evolution of Responsive Web Design
He started worldwide web in 1989. Hence it became 30 in 2019. Over the past three decades, web trends have completely changed the world like no other technology. It has enabled the technical world and web design services to build new experiences.
The number of smart devices has grown exceptionally. That is why offering high quality and responsive web design (RWD) for desktop, mobile phone and tablet becomes important.
20 Biggest Trends in Web Design in 2020
1. Dark Mode
Dark design is one of the most important trends in 2020. Users can enable dark themes. Dark backgrounds ensure a higher contrast ratio and design elements stand out well. It also reduces eye strain and improves visual ergonomics.
They are easy to see with the ultra modern look. Darker modes are best for OLED screens because it extends the life of the screen and also saves energy. The black color of the background emphasizes the accent colors, improves visibility and results in a dynamic design. That is why web design services make many demands on the dark mode.
There are many advantages that the dark mode offers with the low light setting, for example, it extends the life of the battery and reduces the strain on the eyes.
2. Imperfections that Add Personality
In 2020 the hand drawn elements bring life and inject emotions into the websites. The heart and soul visitors crave such imperfect designs as it adds reality.
Hand drawn icons will be a big trend in the coming years. It is connected to the emotions of the users. It adds creativity and positive things that can brighten up the visitors day.
Hand drawn icons, unique designs and other elements contribute to your brand personality. Your brand can stand out from the competition with a human and lifelike appearance. In 2020, web design services will deliberately focus on messy looking elements in handmade illustrations or hand drawn icons.
3. Immersive 3D Elements:
3D technology in graphic web designs is attractive to users. The hyper realistic 3D provides an immersive experience. These 3D designs break the line between reality and digital space. Static, interactive and animated 3D web designs create a real sense of depth and realism. Designers make 3D models smooth shapes with enchanting colors and a realistic look. They give the feeling and appearance of modern, clean and balanced designs. The interactive 3D effect is another digital technology that allows visitors to stay on the site longer.
4. Soft Shadows, Layers & Floating Elements:
Use soft shadows and floating elements to create pseudo-3D effects designers. The layered designs make it more interesting. It gives your page more depth with the 3D Lite look.
5. Ultra Minimalist Navigation:
In 2020, people prefer simplistic, minimalist and mobile friendly web design to make faster navigation possible.
Designers try to make web designing easier so that users can navigate smoothly through the site.Minimalistic designs are suitable for smaller devices without any ease of use.
6. Collaboration of Photos and Illustrations:
Combining photos with handmade 2D illustrations is now becoming a trend. Designers replace different parts of images with hand drawn illustrations and this creates a nice mix of two different realities.
7. Pattern in Web Design:
Patterns are very popular in 2020. A diverse design that covers the background not only creates a refreshing look, but also a mobile friendly web design.
8. Retro Style:
The retro style of the 50s and 60s is widely used by designers. It is a source of inspiration because it reminds users of the past. In 2020, monochromatic or no color at all is a trend and old becomes new again. The use of duller colors, dust noise, black and white photos and other old design elements that remind us of the past. And other such effects with a touch of nostalgia.
9. Line Drawings:
Line art illustrations have found their way to web design companies with its sleek, creative and professional image. They are a total hit in the world of web designing.
10. Illustrations to Combine Art and Design:
Different styles of illustrations create amazing illustrations with pastel and watercolor. For creating modern and weird art, characters without features or other body parts, and more. Digital designers create three dimensional hand drawn flat illustrations with fairly versatile tools.
11. Chatbots:
This technology inevitably becomes part of websites to improve customer service. It can handle calls without a customer service representative. In 2020, it is a huge trend for a web design company to use Chatbot on the website.
12. Sketched Typography
Sketched typography is an emerging trend of 2020. It's about how designers can choose from a list of fonts to work with. 2020 more designers go through typographic experiments. Even the imperfections in the hand drawn illustrations can be used in web designs because it adds real personality.
13. Huge Font Size and Extra Large Elements
The use of the ever increasing font size on the images is another trend of 2020. This life size is even visible from the entire room. It is a trend to use brand names from great heights that can take up half the viewing window of the website's homepage.
Moreover, large photos and videos stand out and attract attention to your company. Useful design services use extra large elements such as full screen images, bold typography and large website menu icons to communicate your brand message immediately.
14. Geometric Shapes and Patterns
Liquid or organic forms, including square, circular, rectangular or any straight form, were trending in 2019. Although it is not surprising in 2020, the opposite is also trending. Geometric patterns, shapes and lines are now becoming popular.
15. User-Driven Animations
It's about combining user interaction with animations. These tasteful animations activate input from the website visitors.
16. Trendy Color Schemes:
Some of the trendy color combinations are the parts of our daily lives. In 2020 these color schemes can find their way to usability design services. For example, a trendy color combination of Instagram and Pinterest is dusty blush / light pink and primary blue. Other examples of trendy color combinations are earth tones (brown, wood texture, brown tones, green) and jewel tones (purple and green).
17. Solid Color Blocks:
Some websites split their site into different parts that form rectangular and square blocks, with a different color.
18. Vivid Colors:
Designers use bright colors for the background to enhance visual interest. Simple vivid colors of the layout can be memorable for users. Useful design services use such colors because it is one of the effective ways to keep visitors on your site.
19. Geometric Patterns:
The use of geometric patterns and shapes for digital products works well. PNGs and SVG images together with the background of geometric patterns can be scaled well.
20. Bold Typography:
Solid text is the best way to convey your brand message. With the help of screen dominating typography you can draw the attention of users to important messages. Bold fonts appear to be powerful for a functional purpose.
Source Url: https://customwebdevelopmentservices1.blogspot.com/2020/02/web-design-trends-and-evolution-of.html
Custom Web Development Services, Wordpress Web Development Company, Professional Web Development Services, Affordable Web Development Services, Wordpress Web Development Services Near Me, Web Development Services For Small Business,
Custom Web Design Services, Wordpress Web Design Company, professional web design services, web design and development services, affordable web design services, wordpress web designers near me, web design services for small business,
Mobile Application Development Company, Web Application Development Company, Application Development Company, web design applications, mobile application design and development, application design and development company, application design and development services, web application design company, application web design, best application for web design
#Mobile Application Development Company#web application development company#application development company#web design applications
1 note
·
View note
Text
DiskDigger Importance || Recover Lost Files
In the Present scenario, Technology is growing too fast and we all are experiencing that our smartphone, PC, and Laptops carrying various files with the help of SD cards and internal memory. We will think that our files are in very secure places but if any file deleted unexpectedly then what you will do?. Don't worry, I already told you that tech is growing as fast as it can. Here I'm going to discuss the best data recovery services aka (DiskDigger) which are a perfect example of it. Let's go down to get more details of DiskDigger( Deep file recovery from any drive).
DiskDigger is a tool which can recover deleted files like photos, documents, music, video and much more.
DiskDigger Features:
DiskDigger can recover lost files from most types of media that your computer can read: hard disks, USB flash drives, memory cards, CDs, DVDs, and floppy disks. (Note: Make sure that you have to connect your device with a USB port to recover lost data from Android and IOS devices ). And one more important thing is you have to download the diskdigger app on your android phone to recover lost files. Suppose if your Android device uses a microSD card for saving the data, please remove the card and connect it directly to your PC using a card reader, so that you can scan it directly using DiskDigger for Windows.)
DiskDigger has two processes which you have to choose every time while scanning a disk. These methods are named as “dig deep” and “dig deeper“.
Dig Deep:
Undelete files from FAT (FAT12, FAT16, FAT32), NTFS, and exFAT partitions.
Recover any type of file.
Filter recoverable files by name and size.
Sort recoverable files by name, size, date, and directory.
Dig Deeper:
Scan (carve) entire disk for traces of specific file types.
Supported file types include:
Photos and images:
JPG - Pictures stored in digital cameras and on the Web (Joint Photographic Experts Group)
PNG - Portable Network Graphics
GIF - Graphics Interchange Format
BMP - Windows and OS/2 bitmap image
Running in Linux
TIFF - Tagged Image File Format
ICO - Windows Icon
ANI - Windows animated cursor
CR2 - Canon raw image
SR2 - Sony raw image
NEF - Nikon raw image
DCR - Kodak raw image
PEF - Pentax raw image
RAF - Fujifilm raw image
RW2 - Panasonic/Lumix raw image
LFP - Lytro raw image
MPO - Images from 3D cameras (Multiple Picture Object)
DNG - Adobe Digital Negative
SVG - Scalable Vector Graphics
HEIC/HEIF - High-Efficiency File Format image
PSD - Adobe Photoshop image
RAS - Sun raster image
PSP - Paint Shop Pro image
Thumbcache - Windows thumbnail cache
IFF - Amiga images and other media
ART - AOL Art images
WMF - Windows MetaFile
EMF - Enhanced MetaFile
WMZ, EMZ - Compressed MetaFiles
DICOM - Medical imaging format
WEBP - WebP images
PCX - ZSoft PCX images
CDR - CorelDraw images
INDD - Adobe InDesign documents
CP - Adobe Captivate documents
AI - Adobe Illustrator documents
Documents:
DOC - Microsoft Word document (2003 and below)
DOCX - Microsoft Word document (2007 and above)
XLS - Microsoft Excel spreadsheet (2003 and below)
XLSX - Microsoft Excel spreadsheet (2007 and above)
PPT - Microsoft PowerPoint presentation (2003 and below)
Custom Heuristics catalog || Disk Digger Pro
PPTX - Microsoft PowerPoint presentation (2007 and above)
VSD - Microsoft Visio document
PDF - Portable Document Format
XML - eXtensible Markup Language
HTML - HyperText Markup Language
RTF - Rich Text Format
WPD - WordPerfect document
WPS - Microsoft Works document
PUB - Microsoft Publisher document
XPS - XML Paper Specification
WRI - Old Windows Write document
ODT, ODS, ODP, ODG - OpenDocument formats
DPP - Serif DrawPlus document
PPP - Serif PagePlus document
Audio and video:
MP3 - Audio format widely used in digital media players (MPEG layer 3)
WMA - Windows Media Audio
AVI - Audio Video Interleave
WAV - Wave audio
MID -Musical Instrument Digital Interface
FLV - Adobe Flash Video
WMV - Windows Media Video
MOV - QuickTime video
M4A - MPEG-4 audio
M4V, MP4 - MPEG-4 video
3GP - Third Generation Partnership video
F4V - Adobe Flash video based on MPEG-4 Part 12
RM - RealMedia video
RMVB - RealMedia video (variable bitrate)
MKV - Matroska video
MPEG - Motion Picture Experts Group
AU - Sun Microsystems audio
MTS, M2TS - MPEG2 Transport Stream
R3D - RED Video Camera video
APE - Monkey's Audio file
OFR - OptimFROG lossless audio
PPM, PGM, PBM - Netpbm images
WEBM - WebM videos
Compressed archives:
ZIP - Widely used a compressed format developed by PKWARE
RAR - Roshal ARchive, used by WinRAR
7Z - Compressed format used by 7-Zip
GZ - Compressed format used by gzip
SIT - Compressed format used by StuffIt for Mac
ACE - WinAce archive
CAB - Microsoft Cabinet archive
SZDD - Compressed files created by COMPRESS.EXE from MS-DOS
Miscellaneous:
ISO - Images of optical media, such as CDs and DVDs
EXE - Windows or MS-DOS executable file
DLL - Windows or MS-DOS dynamic-link library
MDB - Microsoft Access database (2003 and below)
ACCDB - Microsoft Access database (2007 and above)
PST - Microsoft Outlook Personal Folders file
DBX - Microsoft Outlook Express data file
XAC - GnuCash data file
KMY - KMyMoney data file
DWG - AutoCAD drawing
DXF - Drawing Interchange Format
CHM - Microsoft Compiled HTML Help file
TTF, TTC - TrueType font
CLASS - Java class file
KMZ - Google Earth location data
FIT - Garmin activity file
WALLET - Armory Bitcoin wallet
WALLET.DAT - Bitcoin Core wallet
Recovering documents from your Recycle Bin
Common Features:
Works in Windows 10, Windows 8, Windows 7, Windows Vista, and Windows XP. Both 32-bit and 64-bit versions of Windows are supported.
Also works in Linux.
View recoverable files as a list, or as thumbnail previews.
Thumbnails will show previews of image files, album art from MP3 and WMA files, and icons from executable files!
Selecting a recoverable file brings up a full preview of the file (insofar as possible). For image files, it will show the image (with pan and zoom). For document files, it will show a text-only preview of the document. For certain audio files, it will allow you to play back the sound.
Previews of JPG and TIFF files will show EXIF information (camera model, date taken, sensor settings, etc.).
Previews of MP3 files will show ID3 information (artist, album, genre, etc.).
Previews of ZIP files will show a list of files contained in the archive.
Advanced Features
Able to scan virtual disk image files:
E01 and EWF files (Expert Witness Format)
VMDK files (VMware disk image)
VHD files (Microsoft Virtual Hard Disk)
VDI files (VirtualBox disk image)
Direct binary disk images (acquired with <code>dd</code> or similar tools)
When digging deeper, ability to start scanning from a specific location on the disk.
When previewing files, the program optionally shows the first 4K bytes of the file as a hex dump.
To find more information go through remaining articles in our site like hard drive data recovery, SD card data Recovery, Android Data Recovery, USB flash drive data recovery, Linux Data Recovery, etc.
Also Read:
Recovering documents from a hard drive
#Recovering documents from a hard drive#DiskDigger#Recover lost files#smartphone#sd card data recovery#Deep file recovery from any drive#dig deeper#dig deep#digging#disk images#digging deeper#diskdigger importance#diskdigger features
3 notes
·
View notes