#Acnl Tutorials
Explore tagged Tumblr posts
Visit Tumblr Blog
Explore Tumblr blogs with no restrictions, modern design and the best experience.
Last Seen Tumblr Blogs

Fun Fact
Tumblr Inc. has $15.1M in annual revenue.
Text
ACNL CUSTOM VILLAGER/NPC/NPC VILLAGER GUIDE 2025
PLEASE READ THROUGH EVERYTHING BEFORE ATTEMPTING!!!
I AM NOT RESPONSIBLE FOR ANYTHING THAT HAPPENS WITH YOUR 3DS OR GAME!!!
PLEASE BACKUP YOUR FILES BEFORE ATTEMPTING!!!
Hi! I'm here to make a guide on how to make a custom villager/switch an npc to a villager in 2025, since there are not a lot of guides, and any guides out there are now old and obsolite
WHAT YOU'LL NEED:
A hacked 3DS with CFW
Computer
7-Zip or Winrar
Animal Crossing: New Leaf (cartridge or digital)
Any Image Editing Software (i.e FireAlpaca, Gimp, Photoshop)
Ohana 3DS [link]
Ohana 3DS Rebirth [link]
HxD [link]
First things first- you're gonna need the romfs files of your game. The way to get them is through GM9 (GodMode9) The way to acsess GM9 is to turn on your 3DS, and as it boots up, hold down the START button.
Besides editing the sprites, this will be the LONGEST part out of this entire process. The romfs has EVERY SINGLE GAME ASSET, so youre basically dumping every single thing from the game onto your SD. For me, this took ALMOST 2 HOURS, so be ready!
FOR CARTRIDGE
Go to [C:] GAMECART ()
Go to the file that has .3ds (NOT THE .trim.3ds)
Click NCSD image options…
Click Mount image to drive
Click yes when prompted
Click content0.game
Go down to romfs and hit Y to copy the romfs files
You can now paste the romfs files to any folder on your SD, but if you want to be organized, created a designated folder for your romfs on the root of your SD
To get to your SD, go back by hitting B until you get to the first page
Go to [0:] SDCARD and click on it, and you'll be in your SD card.
Find the folder you'd like to paste your romfs in
Open the folder and hit Y to paste the romfs, and now you wait
FOR DIGITAL
Hit the Home Menu button in GM9
Go down and click on Title manager
Click [A:] SD CARD
Find Animal Crossing: New Leaf
Go to Open title folder and click it
Click 00000000.app
Click NCSD image options…
Click Mount image to drive
Click yes when prompted
Click content0.game
Go down to romfs and hit Y to copy the romfs files
You can now paste the romfs files to any folder on your SD, but if you want to be organized, created a designated folder for your romfs on the root of your SD
To get to your SD, go back by hitting B until you get to the first page
Go to [0:] SDCARD and click on it, and you'll be in your SD card.
Find the folder you'd like to paste your romfs in
Open the folder and hit Y to paste the romfs, and now you wait
When that is finished, power off your 3DS, eject your SD, and put it into your computer.
Move your romfs to your computer or a USB, that way you don't have them clogging your 3DS' SD and you have a backup of the vanilla files
To keep things organized, make a folder to copy any files you're going to edit to that folder.
Finding NPC files
FOR VILLAGERS
romfs> Npc> Normal> Model
There you can find the .bcres files of every villager
FOR NPCs
romfs> Npc> Special> Model
There you can find the .bcres files of every NPC
Open Ohana3DS rebirth to open and view the .bcres files so you can find the villager or NPC you're looking for
Once you find them, copy them to your desiganted folder
If you want to edit a villagers name you'll need the STR_NNpc_name.umbst file
To find the file go to romfs> Script> Str and find the file, then copy it to your designated folder
If you want to edit your villager's icon go to
romfs> Item> Model
the file will look like brm_(villager id).bcres , FOR EXAMPLE brm_mus17.bcres
When making an NPC into a villager, you're going to have to find a villager to replace. FOR EXAMPLE I edited Sabel and replaced Penelope, so I renamed Sabel's file, hgc.bcres, to mus17.bcres
EDITING THE VILLAGER/NPC
use this guide when it comes to editing the textures and renaming your villager [link]
LOADING YOUR FILES
Now that you have finished your character, heres how you'll put your files on your SD so they'll load into the game
Put your 3DS's SD card into your computer
on the root, located the luma folder
now go to luma> titles> and find Animal Crossing: New Leaf's title ID
US title ID's are
0004000000198F00 for New Leaf
0004000000086300 for Welcome Amiibo
If there is no title ID folder for ACNL, make one
Inside the title ID folder make a romfs folder
In the romfs folder, make a folder for whatever files you edited, so if you edited an NPC, the script, and the NPC icon make 3 folders and name them: Item, Npc, Script
Lets start with Npc first, if you edited a villager or replacing a villager with an NPC, open the Npc folder, make a folder named Normal, open the Normal folder, and make a folder named Model, and in the Model folder put your .bcres file
So luma> title> (title ID)> romfs> Npc> Normal> Model
If you edited an NPC open the Npc folder, make a folder named Special, open the Special folder, and make a folder named Model, and in the Model folder put your .bcres file
So luma> title> (title ID)> romfs> Npc> Special> Model
Now with the script, open the Script folder, and in the Script folder, make a folder named Str, and in the Str folder is where you'll put the .umsbt file
So luma> title> (title ID)> Script> Str
Finally, the villager icon. In your Item folder, make a folder named Model, and in your Model folder, put in the .bcres file that is the villager's icon
So luma> title> (title ID)> Item> Model
Once you have finished that, put your SD back into your 3DS, turn on your console, boot up Animal Crossing, and your custom villager should be there waiting!!
That's All!!
#fan#fandom#animal crossing#animal crossing new leaf#animal crossing hacking#hacking#hack#acnl#ACNL#custom#customs#3DS#3ds#CFW#cfw#rom hack#rom hacking#guide#animal crossing hacks#mod#modding#tutorial#nintendo#Nintendo#Nintendo 3DS#nintendo 3ds#villager
17 notes
·
View notes
Text
more late night rambling about random things~~ namely daylight saving time (why?) and my current new leaf play through ~~
tho idk if my layout is good or not~~ hopefully ~~~ cause you’ve got the town hall, retail, and the campsite really close to each other, and I put my house by the waterfall ~~

Posted this picture of my map before I’m sorry
am tanking my town rating (if that’s still a thing in this game) by leaving peaches on the ground so I can tell what tree is a peach tree.
if there are 5 wasps (or bees in this game?) I missed one, or two actually. Can’t find one, and one landed on top of me and unlike new horizons, you cannot snipe a wasp that’s nest spawns on top of you. Thank you random flower for getting me stung~~ but ye turns out you can indeed shake trees w your net out in this game~~~
I guess it was my ‘watching people play gen 1 of animal crossing’ that made me think you’d need to shake the tree and then pull the net out cause I think that’s the way it works in generation 1. But tried shaking trees w net out and it worked for new leaf~~
only peach tree I didn’t leave peaches by was the one w the perfect fruit on it and idk why~~~ rip. Also all the nests, shells, and baskets of fruit sitting in front of retail while I wait for it to open, lol.
this post is gonna be tagged weird I guarantee it~~~ but why do we (United States) do daylight saving time? What’s the purpose? Is the ‘it’s for the farmers to work with more daylight in the winter’ or something a myth? Why do we do it? And what other places do that too? I’m assuming the rest of the world doesn’t, but I could be very wrong~~~
and usually you’d get an extra hour of sleep, but nope~~ not me~~| it rolled over from 01:59 to 01:00~~ so I guess I get an extra hour of waking time ~~ lol
why do I use lol so much??
#personal#thoughts#thinking#late night thoughts#gaming#nintendo#nintendo 3ds#animal crossing#animal crossing new leaf#acnl#acnl mechanics#Is town eating still a thing?#Also watering can from Isabelle after tutorial? Let’s go#daylight savings#daylight savings time#why do we do this#do other countries also do this#confused#confusion
1 note
·
View note
Note
Hi! Where did you find the Wild World Rom? Very new to the hacked 3ds community and only really mod acnl lol
here! and if you need any help, i followed this tutorial! <3
9 notes
·
View notes
Note
Hello,
I was following your ACNL tutorial for custom villagers, and while i was looking for it, i stumbled upon the custom villager you made based on your plushie Nounours.
It made me very happy because my childhood teddy bear, Manille, is the same model (from the Nicotoy baby collection) as yours, but in blue. They're in similar conditions, having lost their fur and the fabric becoming brown-ish from years of love. I also have another plushie of the same model that is more recent/unused and who has kept its white fur like you do, named Caramel.
I just wanted to share, and thank you for the tutorial, it helped me greatly. I would buy a Ko-Fi if i had access to transactions over the Internet.
Have a good day. :D
omggg we're like twinsies its so cool you found me randomly like that!!!! thank you for the message <333
2 notes
·
View notes
Text
hi there ! i'm actually playing acnl on my nintendo consoles (both modded - 2ds and 3ds xl) and not an emulator at all ! :) i upscale all of my images using waifu2x to get my pictures into beautiful high quality so that it looks aesthetically pleasing when coming across my gameplay/pics online. i've made a tutorial on this on my wordpress blog which you can find here, it's very easy and only takes 5 mins to do :)
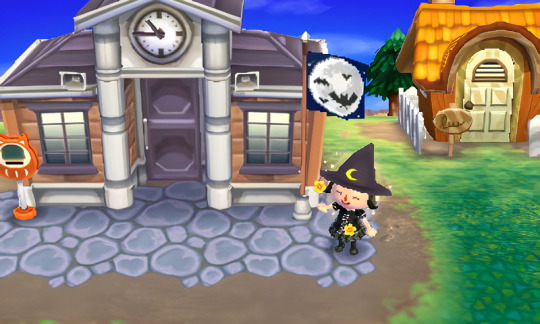
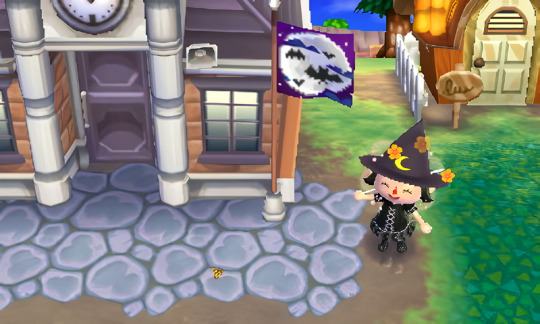
i made moonvale's flag yesterday! there's 3 versions (v3 is probably the final version unless i change it a little bit later into development), all three versions are available to be downloaded via the qr codes found on my wordpress blog here <3
8 notes
·
View notes
Text
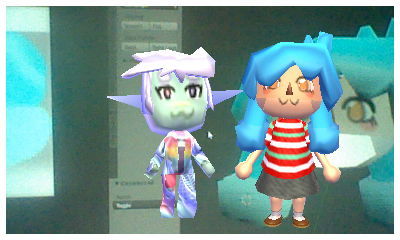
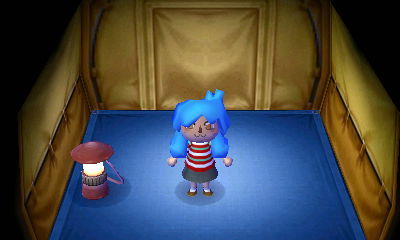

and so today marks the day i learned how to homebrew my 3ds and mod acnl
#acnl#animal crossing#welcome to waterfall#<- this will be my shenanigans tag as to not clog my main oc tag#ILL TRY N WRITE UP A TUTORIAL SOON i just dont feel like modeling another villager rn LOL
8 notes
·
View notes
Text

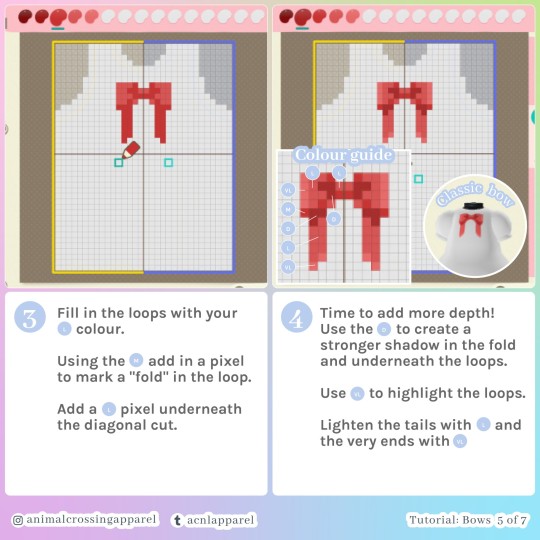
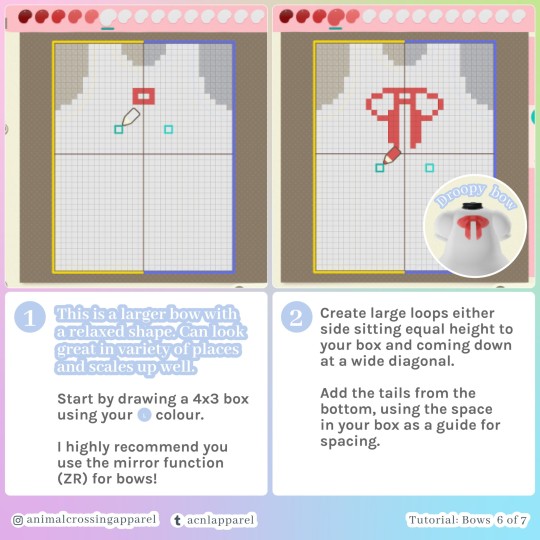

I felt it was time to update my most popular tutorial from New Leaf which was Bows! 🎀
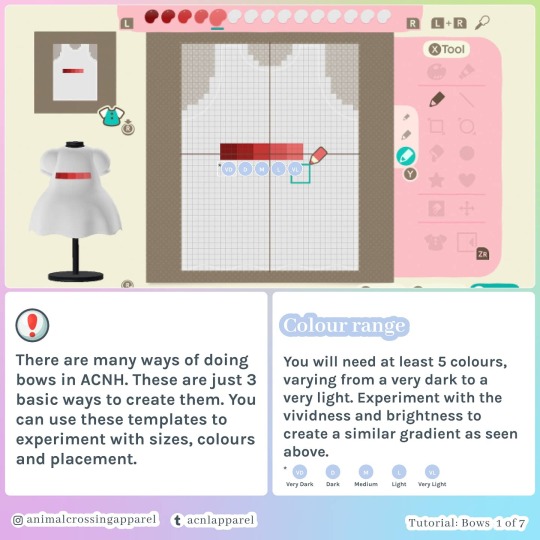
This tutorial will show you 3 simple ways of creating bows for your custom designs.
Use this as a guide to get creative with colours and placements in your own designs ✨
Like and share if you enjoy 💘
#animal crossing#acnh#animalcrossingnewhorizons#animal crossing new horizons#animalcrossingapparel#acnlapparel#acnl#animalcrossing#tutorial
5K notes
·
View notes
Photo


@acmadrono
Versión más completa del camino de piedra, creado usando el tutorial de flabbeycrossing, editando algunas partes y color del diseño original. Otro buen tutorial para un camino de piedra es el de Kimishigure, código QR.
---------------------------------------------------------------------------------------------------
More complete version of the stone path, created using the flabbeycrossing’s tutorial, editing some parts and color of the original design. Another good tutorial for a stone path is the Kimishigure’s tutorial, QR code.
2 notes
·
View notes
Note
can you make a tutorial for matching different skin tones ?
Before I start, I’d like to point out that the process I use is not perfect, but rather the closest I have gotten. I also have a different system for hat qr codes, since the lighting on a player’s face is slightly different than the arms and legs.
For those unaware, Animal Crossing New Leaf has eight skin tones, or seven “levels” of tanning in addition to the default pale skin. I use four colors in my qr codes, which I’ll label on the color palette below:

(The colors on my computer are a little off, but the highlighted boxes line up with the in-game color squares)
Starting with the palest skin tones, I use the color labeled 1. I use it on the first three shades, since the first two levels of tan are barely visible. Tan level 2 is a little darker than color 1, but too light for the next shade:

I use color 2 for the next two tan levels, 3 and 4. Once again, tan level 4 seems a little darker than color 2, but is too light for the next color. Usually I only use these colors for minor details, like around the neck or belly, so the difference isn’t too noticeable. Tan level 5 is tricky imo; I find that sometimes it’s too dark for color 2 so I use color 3 instead (which is a bit cooler). When viewed in sunlight, the color is a better match than depicted in the photo below. Honestly, using colors 2 or 3 depend on what works best for your particular qr code.

The last two levels are the darkest skin tones. I use color 4, which matches level 7 best, but also works with level 6.

I hope this helps! Pictures provided by my brother’s character 👍
37 notes
·
View notes
Text
"Hey Blue? How did you manage to pay off your loan and finish collecting donations for public works projects within hours?"
The answer? Amiibos! Here's a trick that I use for earning MEOW coupons and bells within hours. This trick is handy if you don't mind time traveling!
Things you will need:
The Welcome Amiibo update.
An amiibo from LoZ, Splatoon, AC etc. (please note that SSB amiibos will not work.)
Wisp's lamp (you can find this around town just by walking/running).
So! First thing's first. If you already have the lamp and know the procedure to scan an amiibo, go ahead and scan it! After it has registered, you get the option for the villager to come and play or for Wisp to give you something. If you select the option for Wisp to give you something, he will give you a random item and 5 MEOW coupons.
Now, you can keep these coupons and time travel a day forward and repeat these steps again. After repeating this a few times, you can visit the post office and exchange the coupons for bells (the usual rate is 3,000 bells per coupon). As for the items you've received from Wisp, you can recycle them for bells (unless you actually want to keep them).
A note about the Splatoon amiibos: I haven't tested Splatoon 2 amiibos so I'm not sure if they work. I'd presume they wouldn't though.
P.S. If you want an amiibo figure but they're too expensive, you can visit eBay, Etsy and other websites like these to find amiibos that would usually be £50-60 for £3-6. The only difference is that the figures are instead in card form but work just the same.
2 notes
·
View notes
Text
Idiot’s guide to using QR codes in New Horizons!
I had to walk myself through this, so this is both for my sanity, and to help others!!!
SO to use these QR codes from Google, DeviantArt, ETC!
Download nintendo switch app -connect your account
go to home screen on AC
-hit the ( - ) button -allow sharing.
scan code in app (you can only have one at a time ):< )
Open custom designs
hit the (+) button
DOWNLOAD YOUR SHIT :3
#animal crossing#animal crossing qr code#animal crossing qr codes#acnh#animal crossing new horizons#animal crossing nh#new horizons#animal crossing new leaf#acnl#new leaf#animal crossing help#animal crossing tutorial#animal crossing edit
26 notes
·
View notes
Text
a comprehensive guide to custom villagers
when making my custom villager it was very difficult to find good tutorials as many of them would point to deleted pages or only cover things i already knew, so i have decided to make my own complete tutorial. please let me know if you need any aditional help! i will try my best to keep this tutorial up to date and clarify it if needed.
it's important to note that these villagers will NOT show up in online play and dream towns. since only your game is edited, other players will see whichever villager you've replaced instead of the one you've made unless they also mod their game.
first things first, you will need a hacked 3ds with luma3ds and an SD card for this. you can probably play in citra, but i dont really know how using mods in citra works so i will focus on luma3ds for this tutorial.
if you haven't hacked your 3ds yet, do not follow a video tutorial: they can become outdated very easily with no indication of it and following outdated guides makes it a lot more likely that you'll brick your console. follow the guide on 3ds.hacks.guide instead.
other software you will need:
hackingtoolkit9ds to decrypt and unpack the rom
kukkii to extract the textures and put them back in
a drawing software (can be anything, even mspaint) to edit the textures
blender or another 3d editing software to preview what you're doing
010 editor to edit the bin and .umsbt files
step 1: getting a rom
if you're simply downloading the rom online, you may skip this step.
for those who wish to dump the rom from their console, you must first turn it on while pressing the START button to enter godmode9's menu. click the HOME button to see more options, then select "Title manager", then select where you've installed the title (SD card or the console itself). a list of all your installed games will appear. scroll down to Animal Crossing New Leaf or Happy Home Designer depending on which game you want your villager to be injected into.
once you've chosen the game, select "Manage title..." and choose either "Build CIA (standard)" or "Dump CXI/NDS file". you may then shut down the console and insert the SD card into your computer. the rom will be in the folder \gm9\out on the root of your SD card
step 2: decrypting/unpacking the rom
drag and drop your rom to the "PackHack" folder that hackingtoolkit9ds is in. rename it so that it doesn't contain any spaces or special characters.
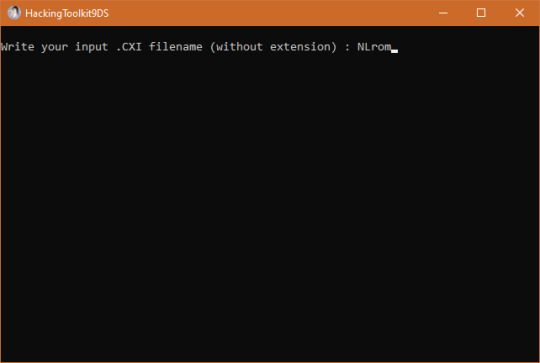
open up hackingtoolkit9ds and type either CE (for .cia roms) or CXI (for .cxi files) in the window that appears depending on the format of your rom. it will ask you to write the name of your file without the extension. type it and press enter and wait for it to do its thing.

step 3: making your textures!
you'll find your extracted villager models in the folder \ExtractedRomFS\Npc\Normal\Model
the first three letters in each .bcres file name represent the species. open up one of the files of the species you want to make yoir villager be. it doesn't have to be the file of the specific villager you want to replace as we can rename it later, but do be careful that certain villagers have slightly different models than the rest of their species (tucker having tusks or étoile having hairpins, for example)
since i wanted to make an elephant with tusks, i've picked tucker as my base. he uses model elp09.bcres

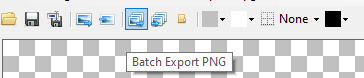
click the "Batch export PNG" button and choose the folder you want the textures to go in. you may then edit them as you wish. your textures do not need to be semi-transparent like the extracted textures are.
i like seeing the way things look as i work, so i get a copy of the model as a .dae file to open it in blender. you may get those from models-resource.com or you may extract them yourself using ohana 3ds rebirth, though ohana can be a bit unreliable at times. blender's "texture paint" tab also allows you to draw directly on the model, though i don't find it precise enough to my taste so i mostly use it to lay guidelines for me to draw over.

once you're satisfied with your model, make sure to draw the different expressions as well.
eyes 0: neutral
eyes 1: half-blink
eyes 2: blink
eyes 3: angry
eyes 4: sad
eyes 5: happy closed (think ^_^)
eyes 6: surprised
eyes 7: >_< face
mouth 0: neutral/smile
mouth 1: half-open
mouth 2: fully open
mouth 3: frown
mouth 4: half-open frown
mouth 5: fully open frown
you do not have to follow those expressions exactly: for example, being a plush elephant, tusker's mouth moves up and down as he speaks instead of opening and closing.
once everything is done, open the .bcres file in kukkii again and import all of your textures in the right slot (i've found the mass import button does not work for me), then save the file.

step 4: editing names and catchphrases
note: if the villager you are replacing is already in your town, editing the catchphrase in the game's files will NOT change it in-game. similarly, if you are putting the villager in your town with marc robledo's save editor, they will have the catchphrase of the villager you've replaced unless you change it in the save editor yourself.
editing a villager's name or default catchphrase is quite simple, but the new name/catchphrase cannot be longer than the old one. if it is, it will mess up the names and default catchphrases of all the following villagers in the game files.
since you can edit the villager's personality in the game files, simply pick a villager with a long enough name and the right gender. you may also look at the villagers' favourite colors and styles on nookipedia to find one that most closely resembles the villager you wish to make.
since i want tusker to have the sisterly personality, i looked at all the sisterly villagers and i found that pashmina's tastes were close enough, so this is who tusker will be replacing. since her id is goa08, tusker's model needs to be renamed to goa08.bcres
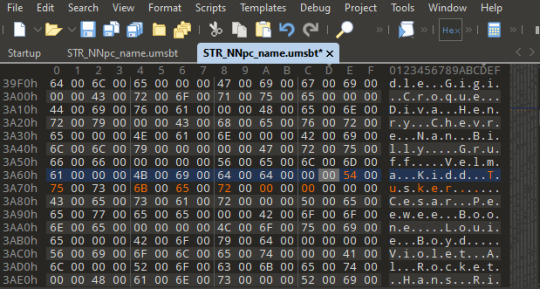
you will find villager names in \ExtractedRomFS\Script\Str\STR_NNpc_name.umsbt and \ExtractedRomFS\Script\Str\STR_NNpc_name_ASR.umsbt
scroll down until you find the name of the villager you wish to replace and change it. the dots between each letter are NOT periods! make sure not to delete them. if you do delete one, or if the villager you're replacing has too many letters in its name, you can copy a dot from another name and paste it between the letters or in place of the extra letters.

catchphrases are found in \ExtractedRomFS\Script\Str\STR_NNpc_habit.umsbt
step 5: editing birthdays, species and personalities
you may skip this step if you only wanted to edit the villager's name. as far as i know, this does not work in happy home designer.
first, download this template.
then, open up \ExtractedRomFS\Npc\Normal\ConstPack.bin in 010 editor and click View -> Line Width -> Custom Width... and enter a value of 34 to make all the villager IDs align.

next, click Templates -> Run Template and select the template we've downloaded. a list will appear at the bottom of the window. scroll through it until you reach the villager you wish to edit, (it will be highlighted in the top half of the window) mine being goa08.
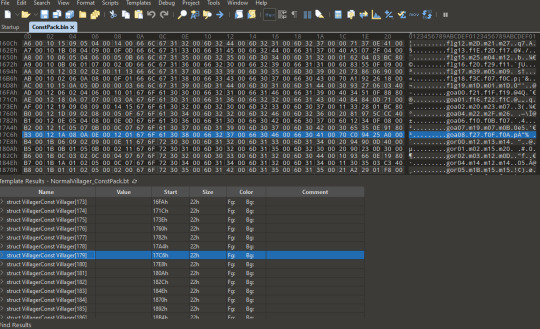
clicking the arrow to the left of struct VillagerConst will reveal a list of all the data this line contains. i will show you how to change birthday, species and personality.

the page we downloaded the template on shows a list of "cases" for each field . for example, for the species field, we want tusker to be an elephant, which is case 0x01 on the page. we will thus type 0x01 in the u8 Species field of 010 editor. the same thing goes for the u8 Personality field. sisterly is 7.
the birth month and day simply require the date. tusker's birthday is may 1st, so i typed 1 in the u8 BirthDay field and 5 in the u8 BirthMonth field. leave everything else alone.

step 6: putting them in the game
luma3ds makes it really easy to put your villagers into the game as long as you pay attention to the folder structure of the original rom.
on the root of your sd card, there should be a folder named luma, and within it a folder named titles (if there isn't, you can create it.)
within that folder, create a folder named with the title ID of your animal crossing game. that title ID will depend on the region of your game.
you can then create a folder named romfs in which you will place your mod files while respecting the path of theoriginal files. for example, the path for the models will be \luma\titles\<game title ID>\romfs\Npc\Normal\Model
when all the files are in place, pop your sd card back into your 3ds and open the game. if the villager isn't in your town, use wisp and an amiibo card (or wumiibo) to see if they show up properly.
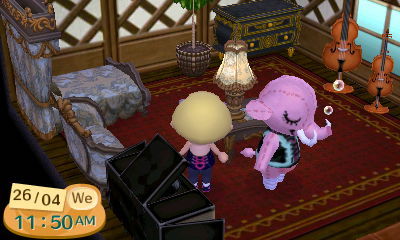
and that's it! enjoy your new villagers <3 feel free to tag me in your custom villagers, i'd love to see what you make!
did you find this tutorial helpful? you can buy me a ko-fi as thanks!
#animal crossing#acnl#acnl hack#animal crossing new leaf#animal crossing happy home designer#achhd#3ds#tutorials#nintendo 3ds
168 notes
·
View notes
Text


made a fuck ton of weezer designs for ACNH so have at it boys
#weezer#acnh#acnh qr#acnl#acnl qr#acnh design#animal crossing#animal crossing qr#animal crosing new horizons#acnh painting#anch tutorial
16 notes
·
View notes
Text


Green Cable Knit sweater
22 notes
·
View notes
Text
How to Upload ACNL Pics!
I took some screenshots to show how to get the best quality pictures you can, because I forget that not everyone knows how to do this!
First, you’re going to need to take the SD/micro SD card out of the ds. If you have a micro SD card, you’ll need an SD card shell to put it in (pic 2)


When you put this into your computer, open the SD cards files, and it should look something like this

Open the DCIM folder, and there should be folders of photos, 100 in each, all in sequential order. So now you’ve located all of your pictures!
But, I’m not satisfied with the quality of the photos when I post them. So, I use a website, waifu2x.booru.pics , to improve the quality

Drag and drop your picture to the “choose file” line, and hit the waifu2x button. I leave the default settings as they are, as shown. It takes a few seconds, but you’ll be left with a much higher quality photo! Send me your animal crossing pics if this tutorial helped you~ <3
***Before vs. After:***


131 notes
·
View notes
Text


My first tutorial for ACNH!
🌹Pixel Roses🌹
I always found pixel flowers incredibly difficult but I finally managed to crack a method for making them! 💡
I hope you find these new square formats easy to follow, I took inspiration from @8bitbish on Instagram. I think they're much more concise than my previous format.
Please share if you enjoyed this tutorial, I will continue to make more! I'd also love any feedback you have 🌟
#animalcrossing #acnh #animalcrossingnewhorizons #animalcrossingapparel #acnl #acpc #accommunity #tutorial
485 notes
·
View notes