#from tutorial
Explore tagged Tumblr posts
Visit Tumblr Blog
Explore Tumblr blogs with no restrictions, modern design and the best experience.
Last Seen Tumblr Blogs


Fun Fact
Women make up for the other 50% of Tumblr’s audience.
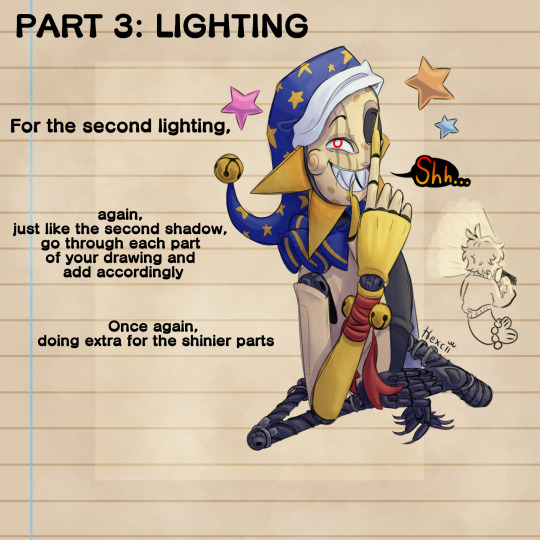
Photo

Clouds 2021
I made this following a tutorial, wherein you treat the clouds as boxes, with perspective and everything, in order to create a sense of form and 3dimensionality. I think it turned out well, though I think maybe it would have looked better with the BG gradient reversed to match the directionality of the lightsource. Also unfortunate that I no longer remember what tutorial I did it from. :// If any of you spot it, let me know!
Posted using PostyBirb
6 notes
·
View notes
Text

Another one down! I’m trying to do something in procreate every day, though I don’t know if I’ll keep posting them all here when I finish. I feel like I might be posting too much ‘not-my-own-stuff’, especially since these are all from tutorials.
Tutorial link: New Beginnings, James Julier
I really love his style though and I’m learning a lot.
#art#digital art#ipad art#procreate#learning to draw#or trying to anyway#from tutorial#youtube tutorial#james julier
2 notes
·
View notes
Text

It's in the eye of the beholder
#comic#birds#my art#I've had this idea for a while#after a lecture that talked about how traits we consider cute are traits found in babies#I feel like birds would have a very different definition of cute from us#anyway after making the bird tutorial I feel the pressure to draw perfect bird anatomy#but tbh I still just wing it a lot of the time!!#hehe “wing it”
64K notes
·
View notes
Text

small riso postcard design for one of my classes!!
#(this is the illustration from my tutorial but with a few small changes)#irl oomfs are saying i should turn this into a riso postcard series with different fruits... what do we think#my art#illustration#riso#risograph#print#strawberry#fairy#whimsical#fairytale
4K notes
·
View notes
Text
hey so i've been working on a lot of things (and also second guessing myself a lot because perfectionism) but here's some very random sneak peeks if y'all are interested!!

#and happy black history month!!#how are we already entering into the final week :((#also#i've been inspired to write some 'creating deco cc' tutorials#i saw someone ask where they could find some easy-to-follow ones on x and i thought why not???#i'm far from the best but i can do lil sumn sumn i suppose
1K notes
·
View notes
Text

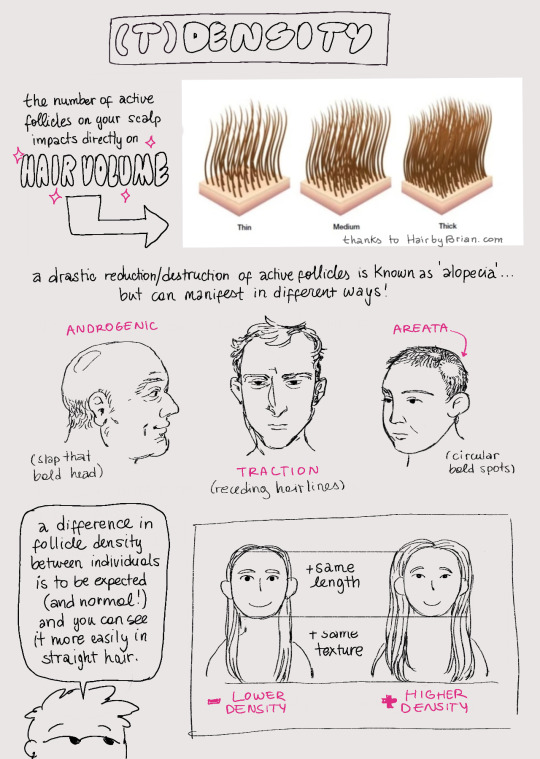
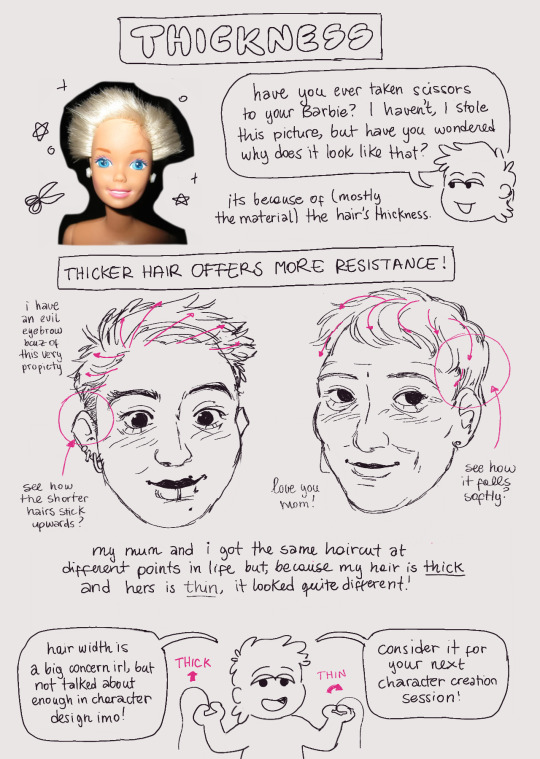


my very own hair cheat sheet! if you start factoring in these elements, i can guarantee you your hair is gonna start looking so much better :)
wanna ask for more? consider subscribing to my patreon or commission me!
526 notes
·
View notes
Text

the ultimate beginner metadata tutorial !! by a dummy :3

HEY PALS AND PEOPLE doing some tips and tutorials ,,,, kinda explaining the metadata that people do in rentry
the site already have a "tutorial" on the "how" window, these on the post are the ones who need further explanation
i will put in topics and try to do my best on this, its a long read!
• the border i will be using for example its by @/suturical on this post
• now, how to understand this and make the magic happen?
GOTCHA!!!
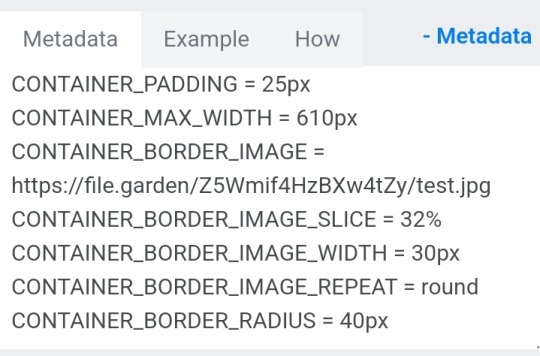
1. Borders: container adjustements
• the least important thing is the container width, you can put as you please but i use it on 400px — 610px, its just my recommendation
• now the padding is important, its basically the distance between the border and the elements of your rentry
• example: padding on 25px
• example: padding 20px

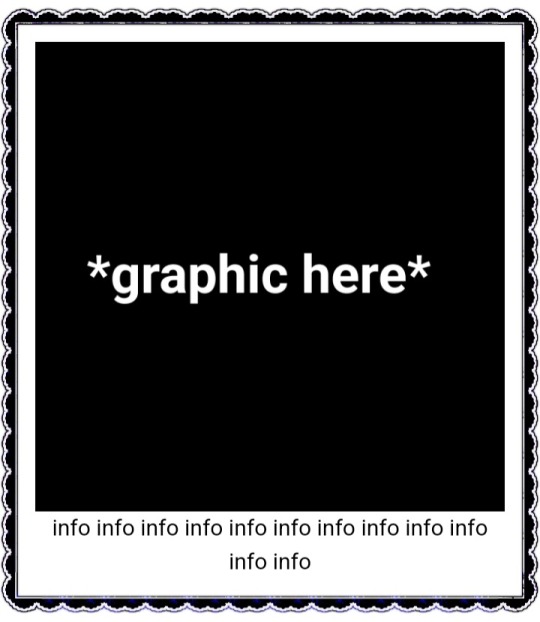
2. Borders: slice
• the image slice is basically how much it will slice your border and repeat it, i recommend using it 20% – 40%, however adjust as you please!
• example: slice 37%
• example: slice 23%
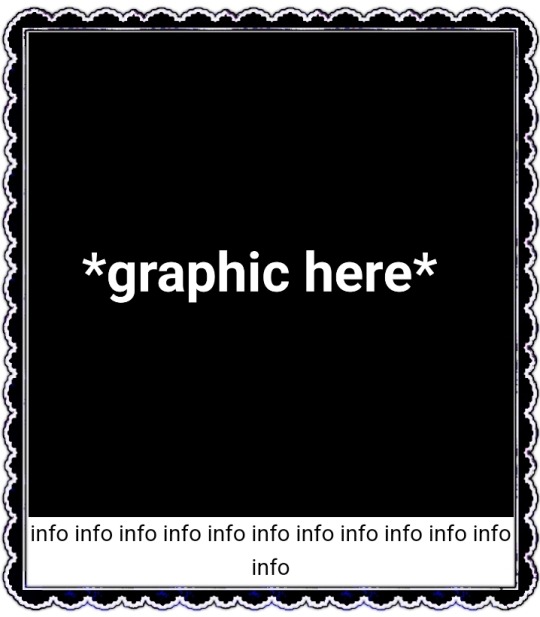
big difference isnt it? and i only changed the slice part, nothing else!
3. Borders: width
• basically the width of the border, adjust as you please but i also recommend to put on 30px as its the maximum size you can put
• example: width 30px

• example: 15px width

4. Borders: repeat
• this is another thing that dont have much secret and explanation about, there are 4 repeating types for borders, they are:
• stretch: will stretch the original size of the border across the entire container

• round: most used, 'normal', will make your border get around the container
• repeat: will repeat a certain part of the graphic image across the sides

• space: will give space between the repetitions

• onto the next part, text!

2. Text: font applying
• ngl its pretty simple, first catch ANY font of the google fonts site and do like the screenshot above, detail, if you font name has a space between the name (example: playfair display) you MUST put the _ to substitute the space, or it won't work
• but if the font name doesn't have any spaces, write it normally
2. Text: text size
• also really simple, explore the sizes on the rentry, i use it 10px – 25px, adjust to your liking!
2. Text: coloring
• tired of coloring all sentences manually? just do the code from screenshot and input your color! it can be written like i did or the hex code/whatever!
• you can still color things manually even when using this
• final with all these changes:


SO THATS IT! the most important actually :33
hope it isnt confusing, any questions please send an ask!
tagging oomfie @chokingonchairs bc finally got the courage to make this and yu asked for hehe ^___^
THANKS FOR READING!
# giftᧉd from 𐓟bove … ⟡#rentry tutorial#tutorial#rentry#rentry decor#rentry graphics#graphics tips#graphic tutorial#icon pack#icons#random headers#twitter icons#headers#icon#random icons#twitter header pack#twitter headers
636 notes
·
View notes
Text
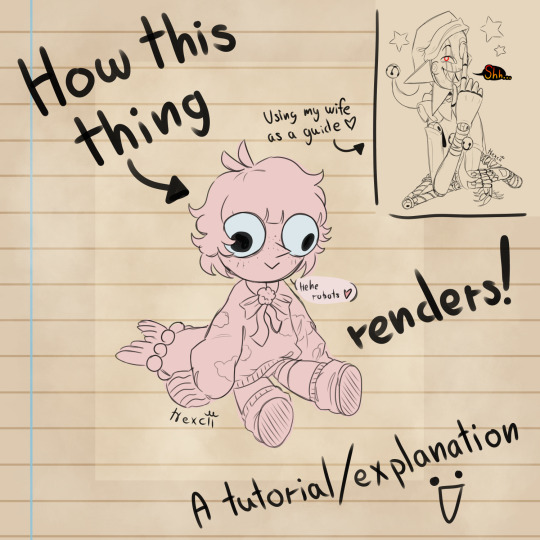
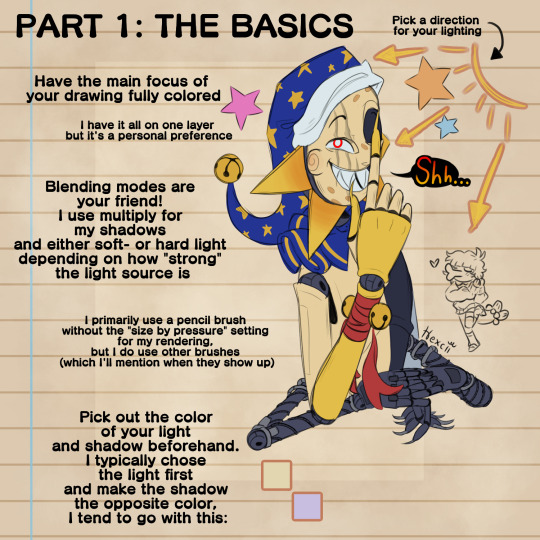
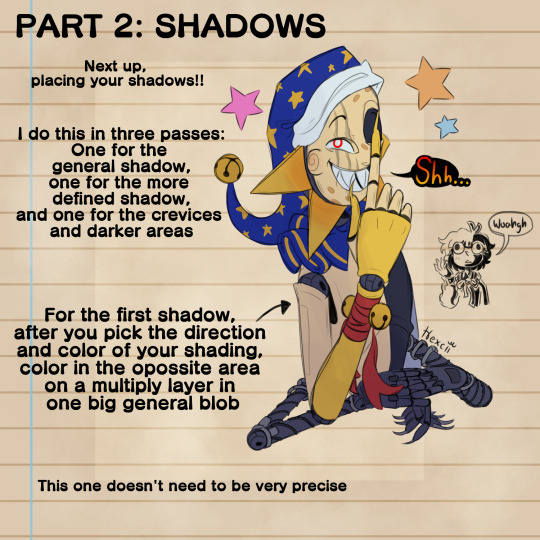
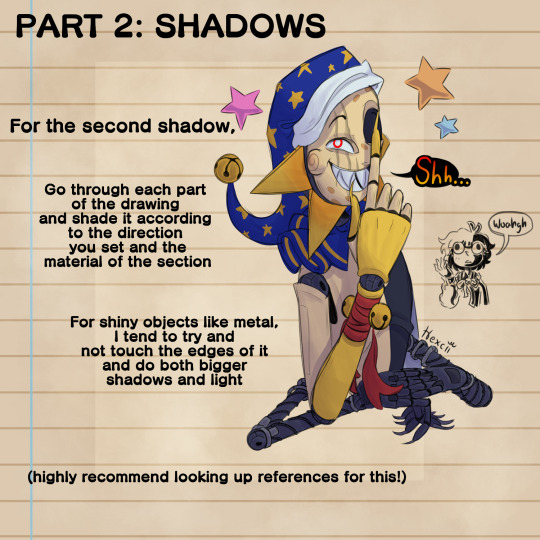


Some things might be misspelt or worded strangely. English is weird. Anyway here's the rendering thingy I promised, tosses it at you and RUNS!!!!
Oh and also the finished piece

MY WIFEEEE
I'm also open to any questions or clarifications about my process yippiiii hot artists don't gatekeep or whatever the saying is
#my art#dca fandom#fnaf eclipse#dca eclipse#eclipse#my sona#rendering#tutorial#art advice#art tips#uhhh what do i tag#hi folks#posting from my puter woahgh....#pov: you said a swear#i guess this is also how i reveal my updated eclipse design#metal arms woahgh <33
247 notes
·
View notes
Text


Don't Call Us Dead / Yellowjackets for @jackienatist
#i dont know WHAT yall put in your gifs that prevents text from being fuzzy i did everything all the bougie tutorials told me to do lol#i like this one! i tried like three different typography options and clicked that font by accident but ended up loving it the most#requests are still open#my gifs#lottielee#yellowjackets#laura lee#lottie matthews#usermiles#userbecca#tusercj#yellowjacketsnetwork#yellowjacketsedit#userlindsay#wlwsource#yj
688 notes
·
View notes
Text


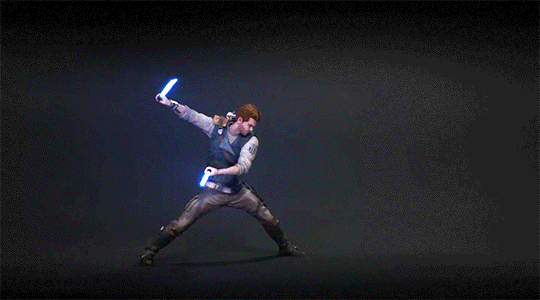
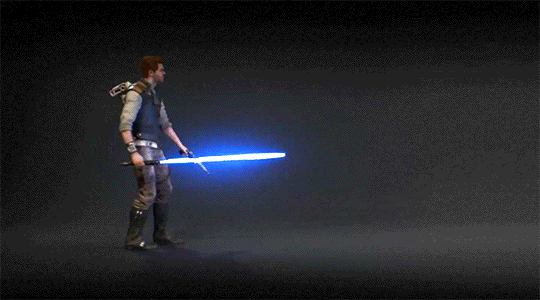

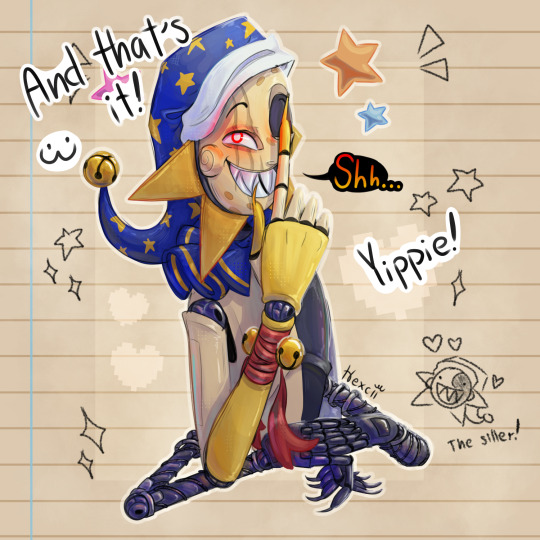
Jedi Survivor Stances Single - Double - Dual - Blaster - Crossguard
#shoutout to all the animators who created these combat sequences!#thank you for making Cal look really cool#these are from the tutorials that pop up when you unlock a new stance#i stole them from the game files mwhahaha#star wars jedi survivor#jedi survivor#cal kestis#star wars#lightsaber forms#lightsaber combat
1K notes
·
View notes
Text

Oliver Stark as Evan “Buck” Buckley 9-1-1, S08E06 - Confessions ((Guide))
#911#911edit#911verse#tvedit#911 abc#mine#evanbuckleyedit#evan buckley#tvarchive#i slept 4 hours and got home from work and said let's tackle some colouring#massive shout out to eddiesblr for their tutorial
244 notes
·
View notes
Text


💕self-tied💕
#doing a butterfly harness from memory#after not touching the tutorial for over a year#was very satisfying <3#i really like the hip harness i freestyled too :3#getting back to what i love feels so good ;-; <3#my pics
645 notes
·
View notes
Text

hello!
#i tried#its been two years forgive me#twas fun#i guess if u call trying ri download n run softwares and finding tutorials for the past six hours only to rely on my old gif intuition fun#do i hate rhe colourinf? of COURSE#the quality? yes#but its fineee#its only upwards from here#btsgif#annietrack#usersky#dailybts#userdimple#userkelli#raplineuser#pjmdaily#what WERE THE TRACKING TAGS#userines#esmetracks
272 notes
·
View notes
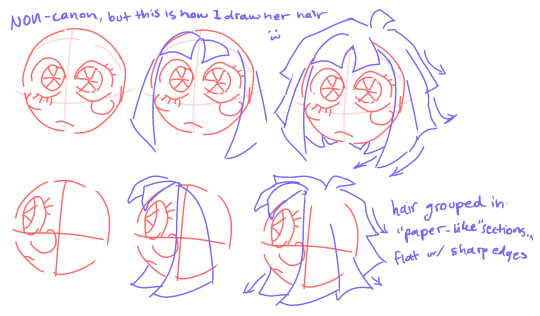
Note
Can you give some tutorials on how to/how you draw Pomni? I struggle with drawing her hat. XD
oh yeah of COURSE!!! :D i've waiting for this moment... literally! i've most of this sitting around for like, a month but, idk, i worried it'd be like, egotistical(????) to post a pomni tutorial unprompted..? but now i have been prompted so the floodgates shall open!!! >:D pomni be upon thee


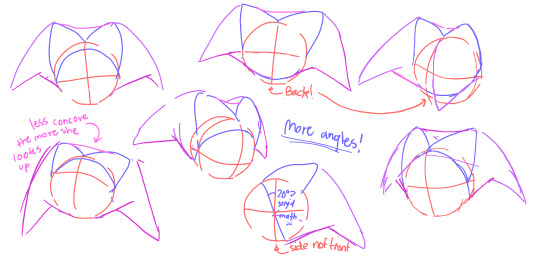


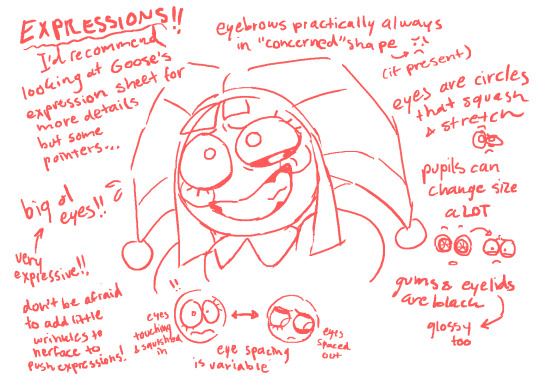
(here's goose's pomni expression sheet in case you haven't seen it yet)
and if you're interested in how i draw her with sharp teeth, i've already made a tutorial on that!! check it out here :D
#hope you don't mind the mess... ^-^;#this is a mix of studies from canon plus a couple parts where i explain how i adapt things into my own style#i think i indicated the differences clearly enough but still be mindful of those discrepancies#the amazing digital circus#tadc#pomni#my art#my tutorials#ask response
2K notes
·
View notes
Text
How do you clip GIFs onto masks?
[PT: How do you clip GIFs onto masks? /END PT]
Right click on your mask layer, click Select Pixels.
Click the Folder icon and then the Raster Mask icon on the bottom right. This should create a new folder.
Duplicate your gif into your project, either by clicking and dragging it into it or by right clicking and duplicating it into your project.
Simply put your gif into the folder that you made earlier and adjust it as needed. (make sure you have the WHOLE GIF FOLDER selected and have AUTO-SELECT OFF! otherwise it'll only edit one frame)
Export it as a gif and you're done.
You CAN do this with images that have faded borders, but it is important to note that gifs will make masks with any fading solid if you export it as a gif. Exporting it as a webp will keep the fading, though.
#𐐪 tutorials and help.#𐐪 from praysia.#𐐪 by praysia.#photopea#photopea tutorial#edit help#editing help#rentry resources#masks#rentry masks#how to#how-to#photopeablr#photopea resources#editblr
449 notes
·
View notes