#Active Directory BitLocker Recovery Keys
Explore tagged Tumblr posts
Visit Tumblr Blog
Explore Tumblr blogs with no restrictions, modern design and the best experience.
Last Seen Tumblr Blogs


Fun Fact
Tumblr was created by web developers David Karp and Marco Arment.
Text
Get MBAM BitLocker Recovery Keys from Microsoft SQL Server
Microsoft BitLocker Administration and Monitoring (MBAM) provides a simplified administrative interface that you can use to manage BitLocker Drive Encryption. Therefore, customers find this solution very useful for managing client PCs with BitLocker that are domain-joined on-premises. In this article, we shall discuss how to Get MBAM BitLocker Recovery Keys from Microsoft SQL Server. Please see…
#Active Directory#Active Directory BitLocker Recovery Keys#Active Directory Domain Services#Force BitLocker Recovery#MBAM#MBAM and BitLocker#MBAM for Bitlocker Administration#MBAM Help Desk#Microsoft Endpoint Configuration Manager#Microsoft SQL#Microsoft Windows#SQL#SQL Database#Windows#Windows 10#Windows 11
0 notes
Text
Maximize Your Control with Dedicated Windows Servers
When it comes to web hosting and managing digital resources, the need for control, reliability, and high performance is non-negotiable. This is where Dedicated Windows Servers step in, offering a premium solution for businesses, developers, and enterprises looking to elevate their web presence. Unlike shared hosting or virtual private servers (VPS), dedicated servers provide an exclusive environment, giving you full control over your resources and software configurations.
In this blog, we'll explore the benefits and reasons why dedicated Windows servers are the ideal choice for those seeking maximum control over their hosting environment.
What is a Dedicated Windows Server?
A Dedicated Windows Server refers to a physical server that is entirely dedicated to a single user or organization. This means that you don’t share resources like CPU, RAM, or bandwidth with other clients. Powered by the Windows operating system, these servers support a variety of enterprise-level applications, including SQL Server, Active Directory, and custom web hosting environments.
The Windows environment is known for its user-friendly interface and wide support for software, making it an excellent choice for businesses that rely on Microsoft-based applications and require a stable, familiar platform.
1. Full Control Over Your Server
One of the most significant advantages of using a dedicated Windows server is complete control. As the sole user of the server, you have administrative access to the entire machine. This means you can install and configure any software, change system settings, and implement custom solutions according to your needs.
With root access to the operating system, you can:
Install and update software without restrictions.
Set up complex configurations to meet business requirements.
Ensure maximum security by controlling firewall settings and access permissions.
Install custom scripts and tools that may not be available in shared hosting environments.
This level of flexibility is essential for businesses with specific software needs or those operating resource-intensive applications.
2. Enhanced Performance and Reliability
With a dedicated Windows server, performance is vastly improved compared to shared hosting or VPS. Since you're the only user, the server's resources are allocated entirely to your applications and websites, ensuring faster load times and better overall performance.
Key performance benefits include:
No Resource Sharing: Unlike shared hosting, where multiple users share the same server, a dedicated server's resources are all yours.
Better Uptime: Since the server is dedicated to your use, there's less likelihood of experiencing downtime caused by the actions of other users.
Scalability: Dedicated servers can be easily upgraded to accommodate growing needs, whether that involves adding more RAM, storage, or processing power.
This reliability is crucial for businesses that require constant uptime, such as e-commerce stores, large websites, and enterprise applications.
3. Improved Security and Customization
Security is one of the most critical factors for any business operating online. With a dedicated Windows server, you can take control of your security measures and implement custom security protocols. Unlike shared hosting, where security depends on the actions of other users, a dedicated server offers isolated resources, reducing the risk of cyber-attacks and data breaches.
You can customize security settings by:
Installing and configuring your own firewalls.
Using Windows Security features such as BitLocker and Windows Defender.
Creating isolated environments with virtual machines (VMs).
Enabling regular backups and disaster recovery plans.
Implementing SSL certificates for secure transactions.
These customizable options allow you to create a robust security framework suited to your business’s specific needs.
4. Dedicated Support and Expert Assistance
When you opt for a dedicated Windows server, you're not just paying for the hardware and software – you're also getting access to expert technical support. Most hosting providers offer 24/7 support with dedicated teams that understand the intricacies of Windows servers.
This means:
Quick Resolution of Issues: Any technical difficulties or issues are resolved faster with a team that understands your specific setup.
Proactive Monitoring: Many providers offer proactive server monitoring services to identify potential issues before they impact your operations.
Consultation and Optimization: Dedicated support staff can guide you through system optimization and help you get the most out of your server.
This hands-on support ensures you can maintain your server's performance, security, and stability with ease.
5. Cost-Effective for Large Operations
Although dedicated Windows servers are generally more expensive than shared hosting or VPS options, they can be incredibly cost-effective for larger operations or businesses with high resource demands. By consolidating multiple applications, websites, and services onto a single dedicated server, you can save money on multiple hosting solutions.
Additionally, with full control over your server, you can optimize costs by adjusting the configuration to your precise needs, avoiding unnecessary expenses for resources you don’t use.
Conclusion
A Dedicated Windows Server offers unmatched control, performance, and security, making it the ideal choice for businesses that require a customized, scalable, and reliable hosting environment. Whether you’re running mission-critical applications, handling sensitive data, or operating large-scale websites, the flexibility and power provided by a dedicated server can take your business to the next level.
If you’re ready to maximize your control and optimize your online presence, consider upgrading to a dedicated Windows server today. With the right configuration and support, you’ll experience an enhanced digital experience that positions your business for long-term success.
0 notes
Text
Understanding the BitLocker Recovery Key: What It Is and How to Use It

Hey Tumblr friends! 🌟
If you've recently enabled BitLocker on your Windows device and suddenly find yourself staring at a prompt asking for a BitLocker recovery key, you might be wondering what this mysterious key is all about. Let’s dive into the essentials of the BitLocker recovery key, why you might need it, and how to find it when necessary.
What is a BitLocker Recovery Key?
A BitLocker recovery key is a 48-digit numerical password that acts as a backup method to unlock your encrypted drive. This key is generated when you first enable BitLocker on a drive and is crucial for situations where you can’t access your drive through the usual means.
Why Might You Need a BitLocker Recovery Key?
There are several reasons why you might be prompted to enter your BitLocker recovery key:
Forgotten Password: If you forget your BitLocker password, the recovery key is your only way to regain access.
Hardware Changes: Making significant changes to your computer’s hardware, like replacing the motherboard, can trigger the recovery key prompt.
Software Updates: Major updates to your operating system or BIOS might require you to enter the recovery key.
Security Concerns: If BitLocker detects potential security threats or unauthorized access attempts, it will ask for the recovery key.
Where to Find Your BitLocker Recovery Key
If you’re in a pinch and need to find your BitLocker recovery key, here are some common places to check:
Microsoft Account: If you linked BitLocker to your Microsoft account, you can find your key on the Microsoft BitLocker recovery key portal.
USB Drive: If you saved the recovery key to a USB drive, make sure to keep it somewhere safe and accessible.
Printout: Some folks print their recovery key and store it securely.
Azure Active Directory (AAD): If your device is connected to an organization’s AAD, your IT department might have a copy.
File: If you saved the recovery key as a file, it’s usually named something like BitLocker Recovery Key.txt.
What to Do if You Can’t Find Your Recovery Key
If you can’t locate your BitLocker recovery key, your options are unfortunately limited. Without the recovery key, accessing your encrypted data is not possible. This is a vital reminder to store your recovery key securely in multiple locations.
Best Practices for Managing Your BitLocker Recovery Key
Store Multiple Copies: Keep your recovery key in several places, such as your Microsoft account, a USB drive, a printout, and a secure digital file.
Secure Storage: Ensure your recovery key is stored in a safe location, like a safe or encrypted digital storage.
Keep Updated: Regularly update your recovery key and ensure it’s accessible, especially after significant system changes.
By following these best practices, you can avoid the potential frustration and data loss associated with being locked out of your BitLocker-encrypted drive.
For a more detailed guide on BitLocker and managing recovery keys, including step-by-step instructions and troubleshooting tips, check out this Comprehensive BitLocker Recovery Key Guide.
Hope this helps you stay secure and stress-free! If you have any more questions about BitLocker or need further assistance, feel free to drop a comment. 💬✨
Also read our related articals:
How Ad Blockers Might Trigger BSOD Blue Screen
Audio Troubleshooter: Resolve No Sound Issues On Dell Laptop
Laptop Not Connecting To WiFi? Fix Laptop WiFi Issues Today!
How To Fix ‘No Sound’ Issues On Your Laptop Or PC: A Comprehensive Guide
1 note
·
View note
Text
Disable bitlocker

manage-bde –unlock drive-letter: -rp 48-digit-numerical-recovery-keyĮ.g.
Once you find the drive letter of the encrypted drive, give the following command to unlock the encrypted drive by using the recovery key. In command prompt, give the following command to view the BitLocker status of all drives:ĥ. Then go to Troubleshoot -> Advanced options -> Command promptĤ.
In the screen you asked for the recovery key, click Skip this drive.ģ. At the first screen click Next and then Repair you computer.Ģ. Boot your system from a Windows 10 Installation Media (USB or DVD).Ģ. After unlocking the drive, follow the instructions at case-1 to turn off the bitlocker encryption. Attach the encrypted drive on another Windows 10 PC and then double click on the drive and type the recovery key to unlock it. If the Bitlocker recovery key, is not accepted at system startup, then you have the following options: Type the bitlocker recovery key (48-digit number) at system startup. Unlock the drive by Entering the Recovery key. If you find the recovery key, proceed to step-2 below, otherwise proceed to step-3. if you use an MSA account to logon to Windows 10, or to download Apps from the Microsoft Store, or to get your emails, or to activate Microsoft Office), then from another device with Internet access, sign in with that Microsoft Account at Microsoft's Bitlocker Recover Key webpage to get the Recovery key for your device. Note for DELL devices: If you own a Dell PC or laptop and you have added a Microsoft account (MSA) on you device, for any reason (e.g.
On your Azure Account if you sign in with an Azure Active Directory account.
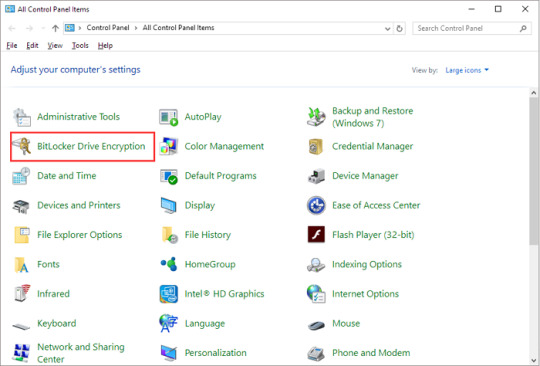
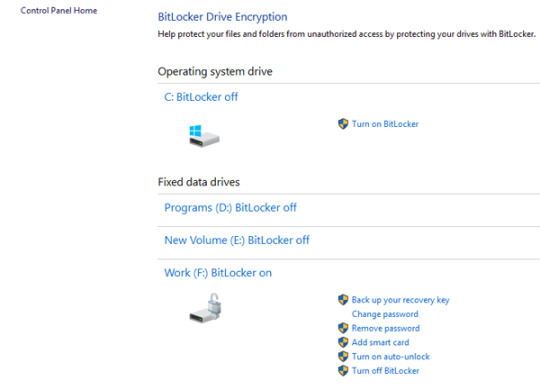
(Plug the USB drive on the locked PC and follow the instructions) (Type the 24-digit number recovery key from the printout) So, If you have enabled the Bitlocker Drive encryption on your system, then look at the following locations to find the bitlocker recovery key: First of all, you should know that there is no way to bypass the Bitlocker encryption, if you don't have the Bitlocker password or the bitlocker recovery key. How to Disable Bitlocker if you Cannot login to Windows. Click Turn off Bitlocker on the encrypted drive.Ĭase 2. At 'Manage Bitlocker' section, click Bitlocker Drive Encryption.ģ. Navigate to Windows Control Panel and open System and Security.Ģ. The normal way to disable the bitlocker encryption in Windows 10 is the following:ġ. How to Disable Bitlocker Encryption If you can login to Windows 10. How to Remove Bitlocker Encryption in Windows 10.Ĭase 1.
Related article: How to Encrypt Drive C: with BitLocker in Windows 10 Pro & Enterprise.
In this tutorial, you 'll find all the available methods to remove the Bitlocker Drive Encryption in Windows 10. In other cases, some users complained that the Bitlocker encryption was enabled automatically, after updating the BIOS on their Dell laptop. Recently, one of my customers, brought his Windows 10 Dell laptop to our service, with the following problem: When the laptop starts, it prompts to enter the BitLocker recovery key, but, as my customer says, it has never enabled the BitLocker encryption on the system.Īfter some research on the Internet, I found that on some Dell devices the bitlocker is starting automatically to encrypt the drive if a Microsoft Account (MSA) is used on the system.
0 notes
Text
Manually prepare drive for bitlocker windows 10

Encrypt a USB drive with BitLocker To Go in Windows 10.
How to Recover BitLocker: 13 Steps (with Pictures) - wikiHow.
Using BitLocker Drive Preparation Tool with Command... - The Windows Club.
BitLocker Group Policy settings (Windows 10) - Windows security.
4 Ways to Lock BitLocker Drives without Restart in Windows 10.
How to Format BitLocker Drive/USB/SD Card With or Without Password.
Bitlocker setup failed to IMPORT the bcd (boot configuration data.
BitLocker Use BitLocker Drive Encryption Tools to manage BitLocker.
How to prepare a single partition drive for BitLocker (MBAM).
Cannot Enable BitLocker.
BitLocker Setup Could not find a target system drive.
BitLocker Setup could not find a target system drive.
How to use BitLocker Drive Encryption on Windows 10.
How to Enable and Set Up BitLocker Encryption on Windows 10.
Encrypt a USB drive with BitLocker To Go in Windows 10.
May 26, 2022 · Search for a copy on a USB drive. The USB drive should be in a safe place so that you can recover BitLocker. Plug the drive in when prompted to enter your recovery key to unlock your drive. If you have the key saved as a text file, you must manually open the file on a separate computer to see the recovery key. To encrypt a USB drive in Windows 10, you have to start the BitLocker Drive Encryption wizard, which you can open either from File Explorer or from the Control Panel. If you choose to use File Explorer , go to This PC , right-click or press-and-hold on the USB drive that you want to encrypt, and select "Turn on BitLocker.".
How to Recover BitLocker: 13 Steps (with Pictures) - wikiHow.
Verify that the Windows Management Instrumentation (WMI) service is running. If the WMI service isn't running, in Control Panel, select Administrative Tools, and then select Services. Right-click Windows Management Instrumentation, and then select Start. 823: DPM Setup cannot access registry key <RegistryKey>. Search for Control Panel and click the top result to open the app. Click on System and Security. Click on BitLocker Drive Encryption. Source: Windows Central (Image credit: Source: Windows Central. Before beginning the encryption process, you must create the startup key needed for BitLocker and save it to the USB drive. When BitLocker is enabled for the operating system volume, the BitLocker will need to access the USB flash drive to obtain the encryption key (in this example, the drive letter E represents the USB drive).
Using BitLocker Drive Preparation Tool with Command... - The Windows Club.
If I try to enable BitLocker I get the following: Looking into the TPM Administration, it says TPM is enabled, but with reduced functionality: Note that the "Prepare the TPM" is greyed out. I've tried to Clear the TPM from this screen, and from within the BIOS itself. BIOS Security Boot is enabled, set to TPM 2.0, BIOS is set to UEFI. Scenario 1: You do not have sufficient free disk space "At least 10 percent of the active partition must remain free after the partition size is reduced by 1.5 gigabytes (GB). To resolve this error, move files to another partition or delete files.". You may need to manually prepare your drive for BitLocker. If you attempted to merge an existing drive into the system drive, the tool will fail to copy the required boot file onto the target drive to create the system drive. The following error message is displayed: BitLocker setup failed to copy boot files.
BitLocker Group Policy settings (Windows 10) - Windows security.
If you want to manually lock a BitLocker drive, you have to do this through Command Prompt: Open the Command Prompt as administrator. Type the following command and hit Enter. Note: substitute d: in the command below with the drive letter of BitLocker drive you want to lock. manage-bde -lock d: -forcedismount. Close Command Prompt. Your. If your hard drive only has one partition you can create the extra partition required for BitLocker using the BitLocker Drive Preparation Tool. This is a command line utility built into Windows. Open an administrative command prompt (right-click and choose Run as administrator) and type: B -target default Then press enter. Choose which encryption mode to use: New encryption mode (best for fixed drives on this device) Compatible mode (best for drives that can be moved from this device It says if you know the drive you're encrypting is only going to be used on Windows 10 PCs only, choose the "New encryption mode" option.
4 Ways to Lock BitLocker Drives without Restart in Windows 10.
System Restore points were also deleted ( cleanmgr is the command, then More Options tab, System Restore and Shadow Copies and Clean up) After this I re-run BitLocker drive encryption wizard and all was happy again!.
How to Format BitLocker Drive/USB/SD Card With or Without Password.
Insert a USB flash drive will save a recovery key on your USB flash drive. Let BitLocker automatically unlock my drive will unlock your OS automatically and you won't have to do anything. Select the appropriate option and proceed. You will see a window asking you to select your recovery key backup options. Now, you will see 3 options.
Bitlocker setup failed to IMPORT the bcd (boot configuration data.
Before you run the BitLocker Drive Preparation Tool on a Windows Server 2008-based computer, you must first install the BitLocker Drive Encryption optional component. To do this, follow these steps: Click Start, click Control Panel, and then double-click Programs and Features. The BitLocker Drive Preparation Tool ( BdeHdCfg) can be manually run before installing CREDANT Manager for BitLocker. Optionally, CREDANT Manager runs the tool in the background if it encounters a volume that must be encrypted. In either case, there can be a problem if the preparation tool is run with the policy 'Enabled'. How to Enable and Set Up BitLocker Encryption on Windows 10 - TechCult Pro, Enterprise, & Education editions of Windows 10 Pro & Enterprise editions of Windows 8 Ultimate & Enterprise editions of Vista and 7 (Trusted Platform Module version 1.2 or higher is required).
BitLocker Use BitLocker Drive Encryption Tools to manage BitLocker.
Step 1: Search Regedit in the search bar of start menu and then click the Regedit icon. Step 2: Go to Drive > Shell in the left pane. Then right-click the Shell, choose New > Key and name the Key as " runas ". Step 3: Double-click the Default option in the runas, enter " Lock the Drive " under Value data and click OK to save the change.
How to prepare a single partition drive for BitLocker (MBAM).
Open Windows File Explorer and locate the BitLocker encrypted drive. Step 2. Double-click the BitLocker drive or external drive, enter your password in the pop-up window. Step 3. And click "Unlock" to unlock the drive. Now, you can access the drive and manage everything in the BitLocker drive without any problem. If so, it seems that you need to use Samsung Magician to switch the Encrypted Drive status to ready to enable. And then need to reboot to enable BitLocker. Note: You may need to format the whole drive before switch the Encrypted drive status using Samsung Magician. Please Note: Since the website is not hosted by Microsoft, the link may change. You may need to manually prepare your drive for bitlocker." It properly shrunk the C: Drive Partition and created a 4th partiition, but it fails right after with the stated error, prior to the encryption process starting.
Cannot Enable BitLocker.
Store BitLocker recovery information in Active Directory Domain Services (Windows Server 2008 and Windows Vista) Choose default folder for recovery password Choose how BitLocker-protected fixed drives can be recovered Choose how BitLocker-protected removable drives can be recovered Configure the pre-boot recovery message and URL.
BitLocker Setup Could not find a target system drive.
Learn how to use BitLocker Drive Preparation Tool using Command Prompt in Windows 11/10 to prepare a drive for BitLocker Drive Encryption.... Prepares a partition for use as a system drive by.
BitLocker Setup could not find a target system drive.
Nov 28, 2018 · Third-party Windows To Go creation tools. Rufus is probably the most popular tool that can create a Windows To Go drive for Windows 8 and 10, though it may not be so obvious at first glance. Here. To properly enable BitLocker for the operating system volume, you'll need to use a USB flash drive as a startup key to boot (in this example, the drive letter E). You would first create the startup key needed for BitLocker using the -protectors option and save it to the USB drive on E: and then begin the encryption process. To find the commands with unapproved verbs, run the Import -Module command again with the Verbose parameter. For a list of approved verbs, type Get-Verb. Thanks. The volume needs to be prepared before BitLocker can be enabled. I found a tool that will do the preparation that I need.
How to use BitLocker Drive Encryption on Windows 10.
Bitlocker Encryption error Bitlocker setup could not find a target system drive. You may need to manually prepare your drive for Bitlocker We have a remote user that we discovered does not have bitlocker enabled. She does appear to have a partitioned logical drive(f) called HP_TOOLS. Our main concern is to bitlocker protect the C drive. Unlock BitLocker Drive Using PowerShell. Step 1: Search PowerShell in the taskbar and right-click it to choose Run as an administrator option. Step 2: Type the command: Unlock-BitLocker -MountPoint " (drive letter):" -Password (Read-Host "Enter Password" -AsSecureString) and press Enter button to run it.
See also:
Download X Men Origins Wolverine Game For Android
Download Install Disk Creator Mac
Embird Download Full
0 notes
Text
Configuration Manager Technical Preview 2002.2

Configuration Manager Technical Preview 2002.2. Improvements to support for ARM64 devices This release improves upon the support for devices with the ARM64 processor. The All Windows 10 (ARM64) platform is now available in the list of supported OS versions on the following objects: Configuration item supported platformsApplication deployment type requirementsPackage program requirementsTask sequence advanced properties Support for 64-bit macOS Catalina Configuration Manager now supports the 64-bit macOS Catalina version 10.15. Search all subfolders for configuration items and configuration baselines Similar to improvements in previous releases, you can now use the All Subfolders search option from the Configuration Items and Configuration Baselines nodes. Management insight rules for proper HTTPS configuration This release includes additional management insight rules to help you configure your site for secure HTTPS communication: Sites that don't have proper HTTPS configuration: This rule lists sites in your hierarchy that's not properly configured for HTTPS. This configuration prevents the site from synchronizing collection membership results to Azure Active Directory (Azure AD) groups. It may cause Azure AD sync to not upload all devices. Management of these clients may not function properly. Devices not uploaded to Azure AD: This rule lists devices that aren't uploaded to Azure AD because the site isn't properly configured for HTTPS. For either rule, configure Enhanced HTTP, or enable at least one management point for HTTPS. Improvements to BitLocker management In Configuration Manager current branch version 1910, to integrate the BitLocker recovery service you had to HTTPS-enable a management point. The HTTPS connection is necessary to encrypt the recovery keys across the network from the Configuration Manager client to the management point. Configuring the management point and all clients for HTTPS can be challenging for many customers. Starting in this version, the HTTPS requirement is for the IIS website that hosts the recovery service, not the entire management point role. This change relaxes the certificate requirements, and still encrypts the recovery keys in transit. Now the Client connections property of the management point can be HTTP or HTTPS. If the management point is configured for HTTP, to support the BitLocker recovery service: Acquire a server authentication certificate. Bind the certificate to the IIS website on the management point that hosts the BitLocker recovery service. Configure clients to trust the server authentication certificate. There are two methods to accomplish this trust: Use a certificate from a public and globally trusted certificate provider. For example, but not limited to, DigiCert, Thawte, or VeriSign. Windows clients include trusted root certificate authorities (CAs) from these providers. By using a server authentication certificate that's issued by one of these providers, your clients should automatically trust it. Use a certificate issued by a CA from your organization's public key infrastructure (PKI). Most PKI implementations add the trusted root CAs to Windows clients. For example, using Active Directory Certificate Services with group policy. If you issue the server authentication certificate from a CA that your clients don't automatically trust, add the CA trusted root certificate to clients. On the client, use the BitLockerManagementHandler.log to troubleshoot this connection. For connectivity to the recovery service, the log shows the URL that the client is using. Locate an entry that starts with Checking for Recovery Service at. Improvements to extend and migrate on-premises site to Microsoft Azure Extend and migrate on-premises site to Microsoft Azure now supports provisioning multiple site system roles on a single Azure virtual machine. You can add site system roles after the initial Azure virtual machine deployment has completed. To add a new role to an existing virtual machine, do the following steps: On the Deployments in Azure tab, click on a virtual machine deployment that has a Completed status.Click the Create new button to add an additional role to the virtual machine. Microsoft Endpoint Configuration Manager cloud features When new cloud-based features are available in the Microsoft Endpoint Manager admin center, or other attached cloud services for your on-premises Configuration Manager installation, you can now opt in to these new features in the Configuration Manager console. Read the full article
#Mac#MacOS#MECM#MEMCM#MicrosoftAzure#MicrosoftEndpointConfigurationManager#SystemCenterConfigurationManager#Windows#Windows10
0 notes
Text
Perform BitLocker Recovery Password Rotation in Active Directory
BitLocker Recovery Password Rotation in Active Directory Maintaining the security of BitLocker-encrypted drives is crucial. Situations may arise where users forget their PINs or significant changes in the system configuration necessitate the use of the 48-character BitLocker recovery key. Often, users are not at their desks and may need the key communicated via phone or mobile device, which…

View On WordPress
#Bitlocker#BitLocker Backup#BitLocker Drive Encryption Administration Utilities#BitLocker in Active Directory#Windows#Windows 10#Windows 11#Windows Server#Windows Server 2016#Windows Server 2019#Windows Server 2022
0 notes
Text
Azure devops recycle bin
Azure devops recycle bin
Azure devops recycle bin Azure devops recycle bin Current news stories Azure devops recycle bin How can we improve Azure Active Directory? Would be great if there was a recover-msoldevice cmdlet or some way to recover a bitlocker recovery key after a device was deleted. Thanks for your feedback. We are looking into it and evaluating different options for solving the use cases mentioned in this…

View On WordPress
0 notes
Text
Seven Things To Do Immediately After Windows 10 Update
You have just upgraded to the most recent version of Windows 10. Before returning to work, use this checklist to make sure your privacy and security settings are guaranteed.
Upgrades to a full version of a Windows PC were rare before: most people only had to experience an upgrade every three to five years, and then usually as part of the purchasing process from a new PC.
Today, in the era of “Windows as a service”, you can expect a feature update (essentially a full version update) approximately every six months. If you can skip an update or even two, you can not wait more than 18 months before being forced to update your OS.
For upgrades, the process is simple. After about an hour (more or less, depending on the underlying hardware), you should be back to work, with most of the applications and settings successfully migrated.
In any case, clean up the installation or upgrade and use this checklist to make sure you’ve covered some important basics that aren’t part of the Windows installation. Note: All of these steps have been tested with the Windows 10 update for May 2019 (version 1903) and the Windows 10 update for October 2019 (version 1909).
1. Create a recovery drive
Sure, your Windows 10 installation is working fine now, but if it doesn’t start properly, you’ll be happy to have a recovery drive handy.
Booting from this specially formatted USB drive gives you access to the Windows Recovery Environment (WinRE), which you can use to resolve the most common boot problems. You need a USB stick. Its size should be at least 512 MB for a bare recovery disc and at least 8 GB if you also want to include Windows installation files.
You can find a shortcut to the desktop application of the recovery drive on startup, under Windows Administrative Tools, or you can search for it. In either case, you will need to provide the credentials of an administrator to run the tool.
2. Secure your user account
If you are using a local account, your credentials are stored locally, and there is no way to provide a second authentication factor.
However, signing in with a Microsoft account or Azure Active Directory account (such as the account you use for an Office 365 Business or Enterprise subscription) means that you can configure two-factor authentication (2FA) that requires an external confirmation from an application on your reliable mobile device.
Both types of accounts are free. If you are concerned about privacy, create a new Microsoft account to be used only for this purpose, and do not combine @ outlook.com with another service.
To configure 2FA for a Microsoft account, log on to the following link. This page displays the options displayed here: you can enable two-step verification, configure a mobile authentication application, and manage trusted devices, among other tasks.
To manage security settings for an Azure AD account, go to this link, select Manage security and privacy, and then follow the links under Additional security verification. To add this page to your favorites, use this link.
Finally, if you have the hardware to support it, turn on Windows Hello. The options for facial recognition and fingerprint identification are available under Settings> Accounts> Connection options.
3. Enable BitLocker Drive Encryption
Encrypting each drive containing personal data is a crucial step in security. Without encryption, anyone who steals this device can mount the player in an operating system of their choice and siphon data with ease. With encryption, accessing your data requires an effectively indecipherable encryption key.
Full-strength BitLocker encryption requires a TPM (Trusted Platform Module) chip and a professional version of Windows. On modern laptops with Windows 10 Home, you can turn on device encryption if you’re signed in with a Microsoft account. This option protects the contents of the system drive but does not allow encryption of secondary drives.
Make sure, however, to save a copy (or two) of your BitLocker recovery key.
4. Configure Windows Update
The good news is that Windows 10 includes automatic and cumulative updates that allow you to continuously run the latest security fixes. The bad news is that these updates can happen when you don’t expect them, with little but any chance that an update will break an app or feature you rely on for daily productivity.
If you’d rather let the rest of the world test monthly security and reliability updates before validating the installation, you should use Windows 10 Pro or Enterprise, not Home. With these professional editions, you can postpone updates for up to 30 days.
After completing a Windows 10 upgrade, the first thing to do is go to Settings> Update & Security> Windows Update and click on Check for Updates. Install all available updates, including updated drivers.
Then, on the Windows Update page in Settings, click Change active hours to specify your normal working hours (a window of up to 18 hours), when you don’t want to be interrupted by updates. Then click on Advanced Options and define your deferral periods for monthly quality updates.
Note that you must be logged in as an administrator to see the options displayed here, and these options are not available if you are running a Windows 10 Insider build preview.
When you receive this reminder, you can choose to manually install the updates or repeat the reminder and complete the task a few days later. Automatic updates will not be downloaded and installed until the deferral period you have specified has elapsed.
It is also recommended that you open the Store app and click the three dots in the upper right corner, then click Downloads and Updates to install any available updates. Windows 10 will update these apps automatically, but you can speed up the process by checking them manually.
5. View privacy settings
By default, Microsoft collects a significant amount of diagnostic information when you use Windows 10. This information is, according to Microsoft’s privacy policies, used exclusively to personalize your experience with Windows and “to help [Microsoft] provide an experience safe and reliable. “
You cannot completely disable the telemetry feature, but you can choose to send only a limited amount of data about your use of Windows 10. To do this, go to Settings> Privacy> Diagnostics & Feedback and change the setting under the heading Diagnostic data in the section Diagnostic data from Full to Basic (here too, you must be an administrator and this option is set to Full and cannot be modified if you are using an Insider preview version).
You can also make two other changes to it. Disable the Custom Experiences option, then, under Feedback Frequency, change the setting to Never to avoid telling Microsoft that you prefer not to be asked for comments when using Windows 10.
6. Connect other accounts
The Microsoft account or Azure AD credentials you use to sign in to Windows allow you to sign in to applications using the same credentials. It is therefore particularly easy to get your email and calendar using the integrated Mail & Calendar application.
If you have additional accounts (especially Office 365 and Gmail accounts), now is a good time to add them to Windows so they can also be used in apps. If you need to use two-factor authentication for these accounts, you can do it once here and save yourself a lot of hassle later. Connecting your Office 365 account, for example, allows you to add that account to Microsoft Outlook and configure OneDrive for Business without having to enter a password or provide a 2FA prompt.
To add accounts, go to Settings> Accounts> Email & accounts and click Add account. Note that your options here include specific choices for Office 365, Google, Yahoo, and iCloud accounts.
7. Refine action center settings
One of the signature features of Windows 10 is the Action Center, a pane that appears on the right side of the screen when you swipe right on a touch screen or click the notification icon at the far right of the taskbar.
For a laptop, it is recommended to customize the quick action buttons at the bottom of the Action Center panel. Hide all the buttons you don’t use and make sure the four buttons you use most often are available in the top row so you can access them when the set of buttons is reduced to a single row.
Next, review the list of apps that are allowed to interrupt you with notifications and silence the ones you never want to hear about. Settings allow you to control pop-up messages and sounds, or to turn notifications off completely.
from WordPress https://ift.tt/2F8pwyd via IFTTT
0 notes
Text
Windows 10 Pro Update Targets Small Business Security Needs, Productivity Enhancements
Small business owners often worry about data security and productivity. If you also do the same, then the latest Windows 10 Pro update can calm your nerves.
According to the latest Windows 10 Pro update, “Hard encryption is now easy with a key-rolling feature that securely rotates recovery passwords on Mobile Device Management (MDM)-managed devices.”
What’s more, the latest update will also enhance users’ productivity in Cloud Clipboard, Calendar, Search your PC and OneDrive, states Microsoft.
With the releases of the latest updates, small businesses that have Windows 10 Pro can work more securely and smartly.
What’s New in Windows 10 Pro Update for Small Business?
The latest Windows 10 Pro update targets small businesses’ needs – security and productivity enhancement. Now business owners and IT Pros can better manage devices in their organizations.
Security
43% of data breaches targeted small businesses. As a result, data security is the top IT priority for small businesses and others. Being a small business owner yourself, you also want to ensure data security in your business.
Windows 10 Pro comes with the BitLocker feature that allows businesses to encrypt the data on their entire devices. And users will need a BitLocker key to unlock the data manually.
If users cannot unlock the drives normally, they will need to supply recovery passwords to restore access to BitLocker-protected drives.
A key rolling feature rotates recovery passwords on Mobile Device Management (MDM)-managed devices.
“Whenever Microsoft Intune/MDM tools or a recovery password is used to unlock a BitLocker-protected drive, it activates this feature. As a result, the recovery password will be better protected when users manually unlock a BitLocker drive,” reports Microsoft.
So, you can rest assured that your data will be safe in the event of accidental recovery password disclosure as part of manual BitLocker drive unlock by you.
Productivity
Small businesses are always in search of ways to improve productivity. Windows 10 Pro has received many updates to enhance users’ productivity.
With the Windows 10 Pro November 2019 Update, your employees can now:
Create calendar events directly from their taskbars. To do so, they need to click on a date and write an event’s name. Then, they will be able to add time and location
Go to one place to search for everything online, in OneDrive and on your PC, enabling your employees to see search results for files/content that live on both OneDrive and PCs
Use the cloud-based clipboard to copy and paste content from one PC to another. And employees can sign in with Microsoft Accounts or Azure Active Directory. What’s more, your employees can pin the information that needs to be pasted multiple times
In the nutshell, the latest Windows 10 Pro Update will enable your employees to work smartly and save time.
Athima Chansanchai, news reporter, Windows blogs, writes, “Windows 10 Pro includes built-in protections for your data, equipment and people, securing business information and personal identities even on lost or stolen devices.”
“Windows 10 Pro provides compatibility with more business systems, seamlessly works with the most trusted productivity and collaboration suites, and dramatically improves performance.”
If you want to know more about how these updates for Windows 10 Pro can help small business owners run their businesses more smartly, click here.
Image: Depositphotos.com
This article, “Windows 10 Pro Update Targets Small Business Security Needs, Productivity Enhancements” was first published on Small Business Trends
https://smallbiztrends.com/
The post Windows 10 Pro Update Targets Small Business Security Needs, Productivity Enhancements appeared first on Unix Commerce.
from WordPress https://ift.tt/2ECYP4u via IFTTT
0 notes
Text
So getting BitLocker enabled in an Active Directory environment is fairly painless and helps to get your end user devices more Secure. I’ll outline the steps you need to take to enable it as well as get the recovery keys stored in Active Directory. I’ll also dive into replicating this setup on Azure AD/Intune in a future post.
First thing is to create a new GPO (i.e. Configure – BitLocker) – Edit it and navigate to Policies > Administrative Templates > Windows Components > BitLocker Drive Encryption. Enable the following Options:
Choose drive encryption method and cipher strength (Windows 10 Version 1511 and later)
Choose drive encryption method and cipher strength (Server 2012, Win 8.1 etc…)
Choose how users can recover BitLocker protected drives
Store BitLocker recovery information in Active Directory Domain Services
Then go down one folder into Operating System Drives and enable the following:
Choose how BitLocker protected operationg system drives can be recovered
Once you’ve set this all up, it should look something similar to the image below.
#gallery-0-6 { margin: auto; } #gallery-0-6 .gallery-item { float: left; margin-top: 10px; text-align: center; width: 33%; } #gallery-0-6 img { border: 2px solid #cfcfcf; } #gallery-0-6 .gallery-caption { margin-left: 0; } /* see gallery_shortcode() in wp-includes/media.php */
Group Policy Settings for BitLocker
BitLocker Recovery Key in Active Directory
Now target the GPO to some machines and if you’re running 1809 (from what I’ve discovered so far) or later you’ll notice them start the BitLocker process to encrypt automatically. If not then you may need to check and ensure the TPM is enabled for the device (as we haven’t specified to encrypt devices without a TPM in this case).
What happens if you have already enabled BitLocker but now want to store the recovery keys in Active Directory? With this GPO set it will allow windows to write the recovery key to AD however we need to use the manage-bde utility, that is a command based utility that can be used to configure BitLocker
manage-bde -protectors -get c: for /f "skip=4 tokens=2 delims=:" %%g in ('"manage-bde -protectors -get c:"') do set MyKey=%%g echo %MyKey% manage-bde -protectors -adbackup c: -id%MyKey%
I saved that as a batch file and ran that on the machines that had already been encrypted prior to rolling out the GPO. Once run, it escrows the key into Active Directory.
The last bit you will need to do so you can actually see the keys in the Properties tab or via the Search function in Active Directory Users and Computers, ensure that the BitLocker RSAT is enabled in Server Features and Roles.
Enabling BitLocker with Group Policy and backing up Existing BitLocker recovery keys to Active Directory So getting BitLocker enabled in an Active Directory environment is fairly painless and helps to get your end user devices more Secure.
0 notes
Text
Latest update to Windows 10 Anniversary causing installation woes for some
We are aware of an issue with the recent Windows 10 cumulative update that impacted a small number of customers in the Windows Insider Program that were running a previous build of the OS. We expect to have a solution in place for these customers soon, and will be communicating with Insiders via the Feedback Hub.Microsoft rolled out this week the seventh Cumulative Update of fixes to Windows 10 Anniversary Update since the Anniversary (1607) version of Windows 10 began going to customers on

This week's Cumulative Update, Build 14393.222 (aka KB3194496), is causing installation issues for some users. I don't know how many are affected -- it's definitely nowhere near "all" -- but reports are coming in on Twitter and in Microsoft support forums from those who can't install the update, resulting (at least for some) in an endless loop of repeated attempts.
(For what it's worth, I just updated my loaner HP Spectre laptop to the latest Cumulative Update and had no issues doing so.)
MORE WINDOWS 10
How to run Windows 10 on your Mac
Windows 10 'forced downloads': We won't do them again, pledges Microsoft
Windows 10 Insiders: Microsoft won't tell you about known bugs anymore
Microsoft turns Windows 10 Fall Creators Update focus to 'stabilization' as of Build 16273
Windows 10 tip: Keep your Microsoft account secure and private
How to install, reinstall, upgrade and activate Windows 10
The failure is annoying enough. But a few of those affected have pointed out that when Microsoft first delivered this update to its "Release Preview" ring of Insider testers at the start of this week, some testers reported the installation failure/reboot issue. Despite those reports, Microsoft still pushed this update out to those not in the Insider program, meaning those like me who are running the RTM (release to mainstream) version of Windows 10 Anniversary Update.
Unsurprisingly, this issue is triggering a round of "What's the point of Insider testing?" questions. It looks to some like Microsoft is just ignoring Insider feedback. As I've noted, Microsoft does collect a lot of data when it pushes out a new build to testers and/or to the mainstream, and gets almost immediate intelligence on what's working, what's breaking and how many people are affected, which enables them to throttle updates and new feature releases. Unfortunately, when you're in the "affected" group, it doesn't feel like Microsoft's paying much attention.
And given the company is about to start rolling up lots of fixes and updates for Windows 7/8.x users as of October's Patch Tuesday, this latest issue is adding more worries to the already-worry-heaped plate of some IT Pros.
I've asked Microsoft if and when the company expects to make available a workaround or patch for this latest Cumulative Update for those on whose machines it won't install. No word back yet.
Here are the key changes included in 14393.222/KB3194496. (Note: As usual with a Cumulative Update, there are no new features, just fixes):
Improved reliability of the Windows Update Agent, shared drives, virtual private network (VPN), clustering, HTTP downloads, Internet Explorer 11, Hyper-V platform,multimedia playback, and Microsoft Edge.
Improved performance of push and local notifications, Hyper-V platform, and some social media websites using Microsoft Edge.
Addressed issue where mapping a drive from an elevated command prompt doesn't work with administrator credentials.
Addressed issue causing movies that were ripped using the transport stream (.ts) format to play without sound in Windows Media Player and the Xbox One Media Player app.
Addressed issue causing the Movies & TV app on the Xbox to stop working when attempting to play content that was just purchased from the Store.
Addressed issue where ActiveX can't be installed when using the ActiveX Installer Service (AXIS) in Internet Explorer 11.
Addressed issue causing "Print all linked documents" to not work in Internet Explorer 11.
Improved reliability of downloading and updating games from the Store.Addressed issue preventing some users from changing the default download location in Windows 10 Mobile.
Addressed issue causing unnecessary notifications about fixing Microsoft account in Windows 10 Mobile.
Addressed additional issues with multimedia, Windows kernel, Windows shell, enterprise security, storage file system, Remote Desktop, core platform, Hyper-V platform, Windows Update for Business, display kernel, near field communication (NFC), input and composition, Bluetooth, Microsoft Lync 2010 compatibility, Windows Storage API, app registration, Trusted Platform Module, Group Policy, Internet Explorer 11, virtual private network (VPN), BitLocker, wireless networking, datacenter networking, Cortana, PowerShell, Active Directory, connection manager and data usage, Access Point Name (APN) database, Microsoft Edge, Windows Recovery Environment, file clustering, Universal Windows Platform (UWP) apps, audio playback settings, DShow Bridge, app compatibility, licensing, cloud infrastructure, domain name system (DNS) server, network controller, USB barcode reader, and Adobe Flash Player.
Just a reminder: Not every PC and tablet that is eligible for the Windows 10 Anniversary Update has yet received that version of Windows 10. Microsoft execs have said it may take the company until early November to push the Anniversary Update to machines ready and able to accommodate it.
I know some are taking the number of updates Microsoft is making to its latest rev of Windows 10 as a sign that it's not ready for prime time. I don't see it that way. The new reality is there will be a lot of Windows 10 updates that deliver regular fixes and reliability improvements, alongside the relatively few feature updates, coming to the majority of users on a regular basis.
Microsoft also delivered on September 28 another new Windows 10 "Redstone 2" Insider preview build 14936 to PC and Mobile testers. That build included a number of fixes and updates plus some new Edge extensions for testers to put through their paces.
source:http://www.zdnet.com/article/latest-update-to-windows-10-anniversary-causing-installation-woes-for-some/
0 notes
Text
Elcomsoft Forensic Disk Decryptor

DescriptionSystem requirements New features VeraCrypt Encryption VeraCrypt is the most popular successor to open-source disk encryption tool TrueCrypt. Compared to the original, VeraCrypt supposes a wider range of encryption methods and hash algorithms. In this update, Elcomsoft Forensic Disk Decryptor receives full support for VeraCrypt volumes, enabling experts extracting hash data from VeraCrypt containers to launch brute-force or smart dictionary attacks with Distributed Password Recovery. A Fully Integrated Solution for Accessing Encrypted Volumes Elcomsoft Forensic Disk Decryptor offers all available methods for gaining access to information stored in encrypted BitLocker, FileVault 2, PGP, TrueCrypt and VeraCrypt disks and volumes. The toolkit allows using the volume's plain-text password, escrow or recovery keys, as well as the binary keys extracted from the computer’s memory image or hibernation file. FileVault 2 recovery keys can be extracted from iCloud with Elcomsoft Phone Breaker, while BitLocker recovery keys are available in Active Directory or in the user’s Microsoft Account. If neither the encryption key nor the recovery key can be extracted, EFDD can extract meta data from the encrypted container to let Elcomsoft Distributed Password Recovery do its job. Read the full article
0 notes
Text
Windows 10 Pro Update Targets Small Business Security Needs, Productivity Enhancements
Small business owners often worry about data security and productivity. If you also do the same, then the latest Windows 10 Pro update can calm your nerves.
According to the latest Windows 10 Pro update, “Hard encryption is now easy with a key-rolling feature that securely rotates recovery passwords on Mobile Device Management (MDM)-managed devices.”
What’s more, the latest update will also enhance users’ productivity in Cloud Clipboard, Calendar, Search your PC and OneDrive, states Microsoft.
With the releases of the latest updates, small businesses that have Windows 10 Pro can work more securely and smartly.
What’s New in Windows 10 Pro Update for Small Business?
The latest Windows 10 Pro update targets small businesses’ needs – security and productivity enhancement. Now business owners and IT Pros can better manage devices in their organizations.
Security
43% of data breaches targeted small businesses. As a result, data security is the top IT priority for small businesses and others. Being a small business owner yourself, you also want to ensure data security in your business.
Windows 10 Pro comes with the BitLocker feature that allows businesses to encrypt the data on their entire devices. And users will need a BitLocker key to unlock the data manually.
If users cannot unlock the drives normally, they will need to supply recovery passwords to restore access to BitLocker-protected drives.
A key rolling feature rotates recovery passwords on Mobile Device Management (MDM)-managed devices.
“Whenever Microsoft Intune/MDM tools or a recovery password is used to unlock a BitLocker-protected drive, it activates this feature. As a result, the recovery password will be better protected when users manually unlock a BitLocker drive,” reports Microsoft.
So, you can rest assured that your data will be safe in the event of accidental recovery password disclosure as part of manual BitLocker drive unlock by you.
Productivity
Small businesses are always in search of ways to improve productivity. Windows 10 Pro has received many updates to enhance users’ productivity.
With the Windows 10 Pro November 2019 Update, your employees can now:
Create calendar events directly from their taskbars. To do so, they need to click on a date and write an event’s name. Then, they will be able to add time and location
Go to one place to search for everything online, in OneDrive and on your PC, enabling your employees to see search results for files/content that live on both OneDrive and PCs
Use the cloud-based clipboard to copy and paste content from one PC to another. And employees can sign in with Microsoft Accounts or Azure Active Directory. What’s more, your employees can pin the information that needs to be pasted multiple times
In the nutshell, the latest Windows 10 Pro Update will enable your employees to work smartly and save time.
Athima Chansanchai, news reporter, Windows blogs, writes, “Windows 10 Pro includes built-in protections for your data, equipment and people, securing business information and personal identities even on lost or stolen devices.”
“Windows 10 Pro provides compatibility with more business systems, seamlessly works with the most trusted productivity and collaboration suites, and dramatically improves performance.”
If you want to know more about how these updates for Windows 10 Pro can help small business owners run their businesses more smartly, click here.
Image: Depositphotos.com
This article, “Windows 10 Pro Update Targets Small Business Security Needs, Productivity Enhancements” was first published on Small Business Trends
https://smallbiztrends.com/
The post Windows 10 Pro Update Targets Small Business Security Needs, Productivity Enhancements appeared first on Unix Commerce.
from WordPress https://ift.tt/2ECYP4u via IFTTT
0 notes