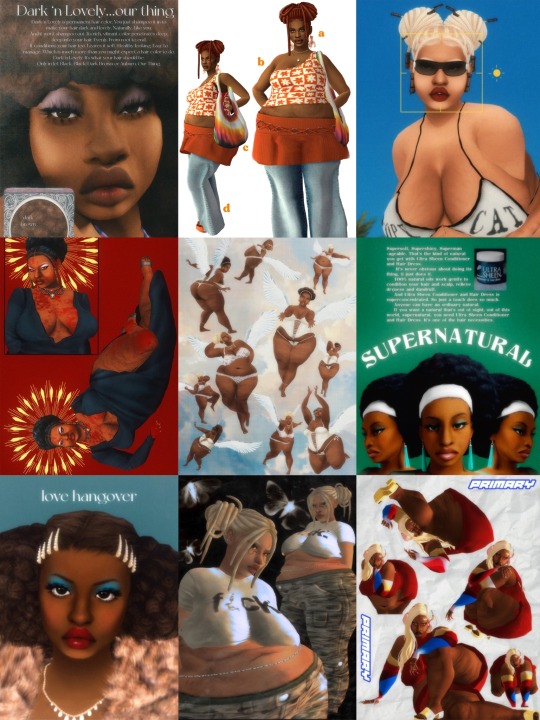
#Also I hope I did the colors well
Text
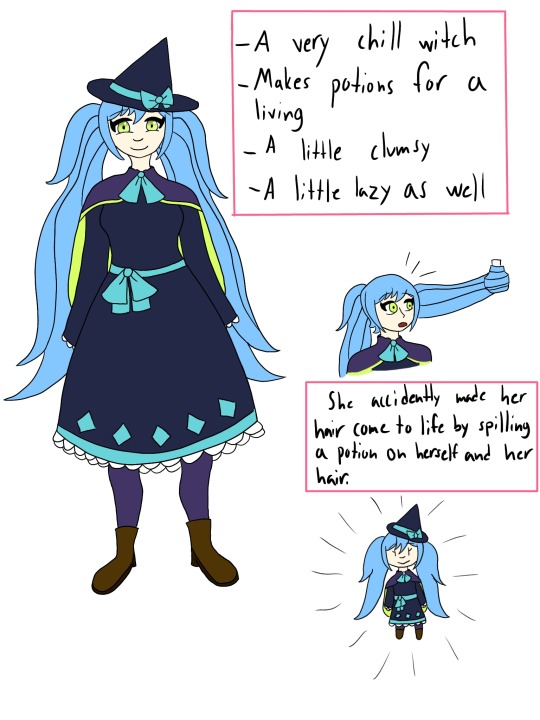
Take this goofy witch Miku I decided to make
#vocaloid#hatsune miku#Man I wish I could post more often#But I just don't feel like drawing digitally sometimes#I like to draw in my sketchbook more#But hey at least I actually posted something#I might give this Miku a friend later#And who will that be?#You'll just have to wait :)#Also I hope I did the colors well#I'm not entirely sure what I'm doing
5 notes
·
View notes
Text

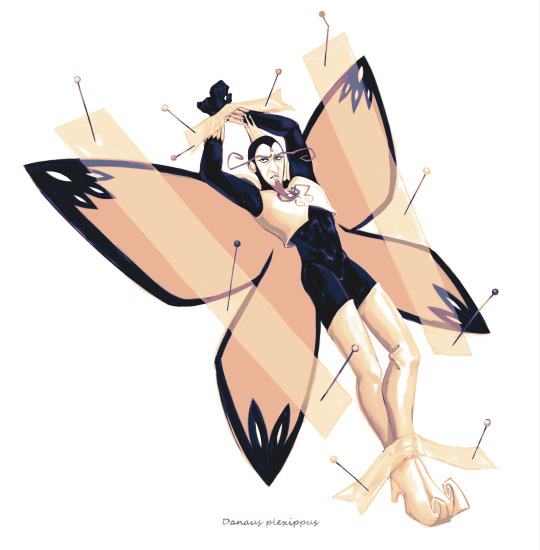

pin-up
b&w originals


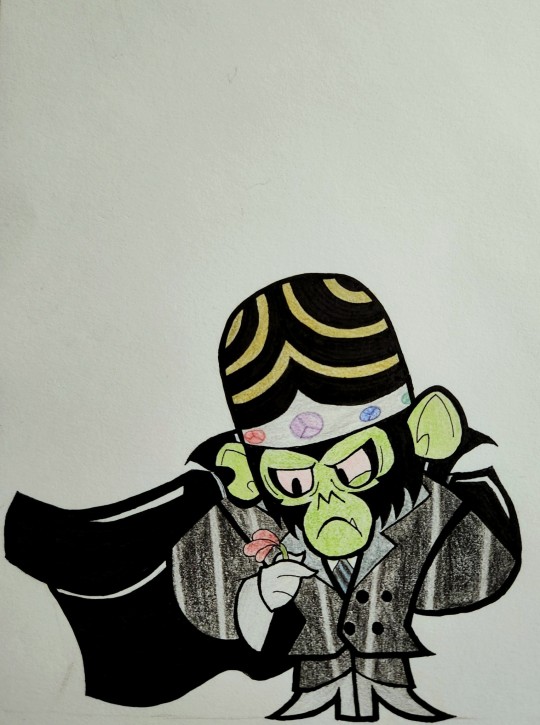
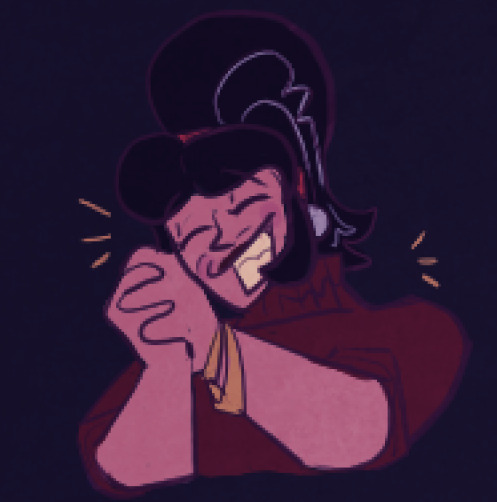
#my art#basslinegrave art#venture bros#dr. girlfriend#dr. mrs. the monarch#the monarch#henchman 21#ok so. pin up and pinned butterflies. tell me thats not the best idea ever#did i manage to pull it off how i wanted? maaybe? i do like these but i wish i had used the same color settings for all#when using the howsitcalled. gradient map things. because they dont look as uniform#but i was lazy to redo dr mrs especially plus i like how she looks i just couldnt get monarch and 21 the same#also somehow these look better and more colorful on my pc?? usually its on my phone i dont know what happened#also i ended up adding one colored thing to each because i first colored in dr. mrs' eyes#then realized the other two dont have colored eyes but 21 has the red lenses. but monarch??#i only went over the logo on his chest a bit with a more reddish color but its not too visible so well#imagine its better and they all match properly...#hope i got the butterfly names right#those were last minute additions after i learned about the viceroy butterfly yesterday#dr mrs is a queen butterfly#ask to tag#suggestive#wanted to put that as one of the top tags but i wrote it with a typo so i hope tumblr picks it up this low#also forgor to say i put my crunch handle on these cause they were meant to go on that blog ignore that#i think i forgot to add one to monarch or i hid it that well lmao#my 2 braincells rubbed the wrong way
1K notes
·
View notes
Text
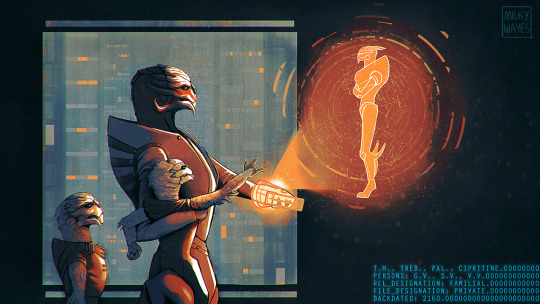
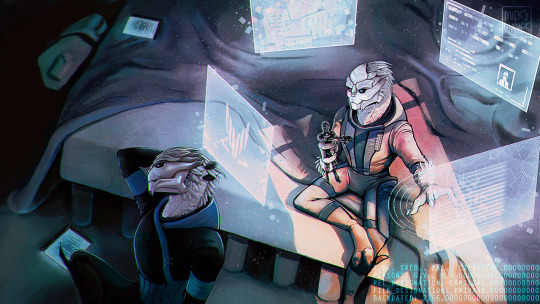
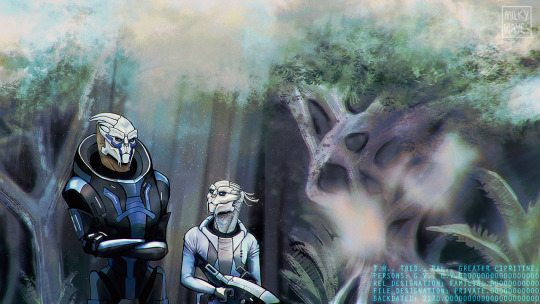
GARRUS VAKARIAN: DATABASE IMAGE ACCESS.
> PT. 1 : 2160, 2166, 2170.
> all files backdated according to user preferences: (terran_coordinated.calendar).
#mass effect#mass effect fanart#garrus vakarian#mass effect garrus#castis vakarian#solana vakarian#turians#alien#palaven#artists on tumblr#illustration#art#scifi#video games#milkyart#garrus retro#I want to make more of these so I'm giving it a tag#headcanons go as such:#turians have a downy coat from birth to toddler age after which actual feathers develop - which molt during puberty.#they're the color of the plates since feathers are modified scales! so for the vakarian siblings they're silvery.#child garrus playing spectre - solana already annoyed by it back then. but hey at least he's using sources for his make believe? nerd#first time castis takes him shooting it's a live target. have fun kid I hope this won't awaken anything in you or do irreparable damage#castis voice: I didn't raise him like this!#well buddy someone did.#also - hard to see but the leaves and tree trunks have a metallic sheen :-)#god this took SO LONG ive never done something quite like this before! also wanted to do landscape for once.#social media is so hostile to this format but I think 3 images is a good workaround#will make a detail post later on... the faces are probably getting fried by tumblr :(#oh I gave castis the comic markings. they look way better and imo make more sense. and we don’t talk about me:a here
1K notes
·
View notes
Text
these fuckass robots that I hate /aff (Ultrakill x PHIGHTING!)

the girls are PHIGHTING! again
#WOOOBOY was this a pain in my ASS to make#I had to remake the Wip for it like 3 times because I kept hating how it was coming out#And this beast actually took 11 hours in itself#Was it worth it? I would say so!#Even though it did take a LONGGGG time I feel like I improved A LOT with it#My robot anatomy/my ability to only work with two colors and mimic the ultrakill album style really has improved a bunch :3!#There’s also a lot of fun little parallels and bits I hid in this as well#If you can spot them all props to you :3!#Also yeah I hope we can all agree that this is the most unfair fucking fight of a lifetime#V1 would win hands down LMAOOOOOOOO#ANYWAYS tag time!#artists on tumblr#phighting#phighting fanart#roblox phighting#phighting art#phighting roblox#roblox#phighting!#digital art#art#ultrakill#ultrakill fanart#ultrakill v1#v1 ultrakill#v1 fanart#ultrakill art#fan art#artwork#my art
881 notes
·
View notes
Text
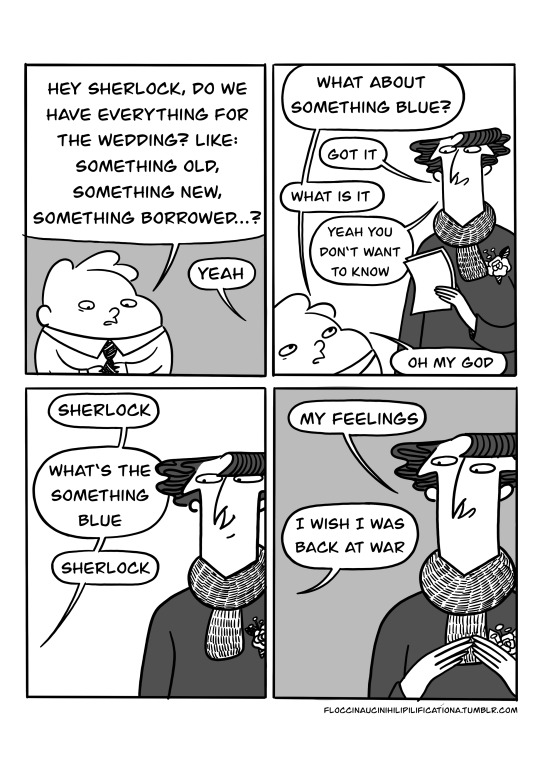
#sherlock#it might be the cough medicine but I'm really feeling the bbc sherlock wedding episode today#a good feeling ₍՞◌′ᵕ‵ू◌₎♡#like finding an old block of cheese in the back of the fridge you forgot about and its gotten super hard and chewy#i currently have half a block of gouda curating in the vegetable cupboard#waiting#how are you doing friends!! C:#I'm good! I still have the cough but I also got a new scarf#I'm still thinking about buying window colors as well but I am waiting if that is also just because of the cough medicine#I can't believe it's already been a year since I have moved! last year I was doing everything here for the first time#and now everything is happening for a second time! that year was both very long and also happened very fast#our floor in the “office” my father wanted to install still is not completly done but he threw up last time he tried#he did not threw up because of the floor but because every time he does a home renovation project he drinks 3 liters of Cherry Coca Cola#we are trying to not make him drink 3 liters of Cherry Coca Cola but he doesn't want anyone else to finish the floor I think so we just do#not mention the hole in the floor#have a nice autumn day friends!! I hope you're doing well! ( ´͈ ◡ `͈ )#♥
2K notes
·
View notes
Text


my attempt at a bunch of my fav artists styles :] idea by sootnuki!!
i would love to do more but this was already a huge challenge
if any artist here dislikes this/is uncomfortable with it/any reason i can take it down or turn off reblogs etc. otherwise i hope its ok 🫡 im not gonna tag anyone just gonna let it do its thing in the wild lol
#crunchchute art#my art#sam and max#sam & max#i hope it will be viewable as i dont know how much tumblr will crunch it#in any case i have it up on twitter also and it seems to be in good quality there#it looks like a 'the 7 human souls:' meme hfhdhf#hey i can put more thoughts in the tags right? so first i didnt really put enough effort into my own one and i kinda realized my style#is kinda mid ngl. cause im lazy + this coloring style might not really fit them. anyway.#for sootnukis style i adore the rendering of the clothing folds and stuff but i couldnt get it just right it remains a mystery to me#silcrow i tried to do a traditional drawing but kinda messed up some of the coloring especially on the pants#also couldnt figure out if its just markers or markers + pencils or what. so i kinda did my own take of 90% markers 10% pencils#mtsodie i love the color palettes and the shapes so that was a lot of fun to try; i like the outcome#narnour i absolutely love the tiny little eyes and how goofy and round they look so that was fun to try to replicate too#as well as the colors which i mostly color picked cause i couldnt get a red overlay right#zembo was a nice way to revisit a chalky brush that i havent used in ages not sure if i got it right though#applettoast i feel like theres some gorillaz influence or its at least something i used while coloring. as you might know i used to draw#gorillaz a lot and tried to replicate the coloring etc. and i think it fit here. correct me if im wrong lol#snuckeys was also hella fun cause i love the cartooniness and the details like the teeth showing gums and stuff. hope i did it justice#also the eyes! i love the big highlight and that the eyes are brown its cute#it was nice to branch out for a bit
542 notes
·
View notes
Text
@pluck-heartstrings things always look a little different under a spotlight, huh?
#pluck my heartstrings#medieval times au#remember when I said I’d likely fuck up the rendering?#I did!#tried using some color store colored pencils I got for the first time and it didn’t go well lol MY BAD#im also just… bad at coloring#but that’s ok! I had fun#anyways#I hope you like it#thanks for sharing this story#I am Very Normal about it :>#beloved moots#fanfic fanart#my art
178 notes
·
View notes
Text
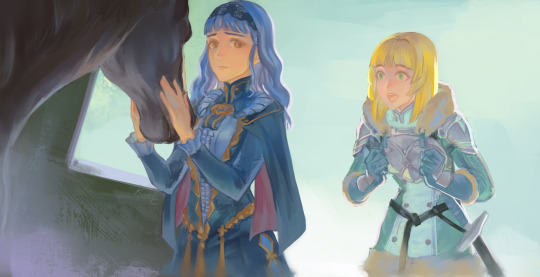
Positive things to say about FEw 3 Hopes
The extra support convos 💓
SO many good ones! I loved Ingrid and Marianne support so much 🥺
#fe3h#fire emblem warriors 3 hopes#ingrid brandl galatea#marianne von edmund#Dorte the horse#I did not nailed well what i wanted to do but still... I did what i could with this#also experimenting with colors#not really satisfy with the result but it's something#I want to see a convo between Balthus and Dimitri!!! will they fight?#or Cyril#OR Lindhart#IDK i just wanna know how everyone interact between each other#And just give me my Byleth Convos goddamnit
437 notes
·
View notes
Text
the universe of saturngalore 🪐🌈
#ts4#sims 4#the sims 4#black simblr#black simmer#ts4 edit#🪐#happy 2nd anniversary to me!!#um it seems like i was really fucking with the color blue this year cause my absolute favorite edits are the blue ones#i did so much stuff in cas and in game which im amazed at how well they turned out#i also did so much retro 70s/20s stuff this year like yasss go little history nerd#there’s so much stuff that i had planned but i didn’t get it to do which is 😕#it’s bc i either lost motivation/procrastinated/focused a lot of cc making#but nonetheless thank you so muchhhh to everyone that supported and inspired me this year it’s really means a lot 🫶🏾💗#i hope to break out my shell more and interact much more with y’all in 2024#there’s so much i got planned for 2024 both cc and edit wise so i hope will get the opportunity to do it all 🙏🏾#2023 was a rollercoaster year for me so i really hope that 2024 is muchhh better#okay byeeee tysm if you read this far 😭🫶🏾💗
223 notes
·
View notes
Text
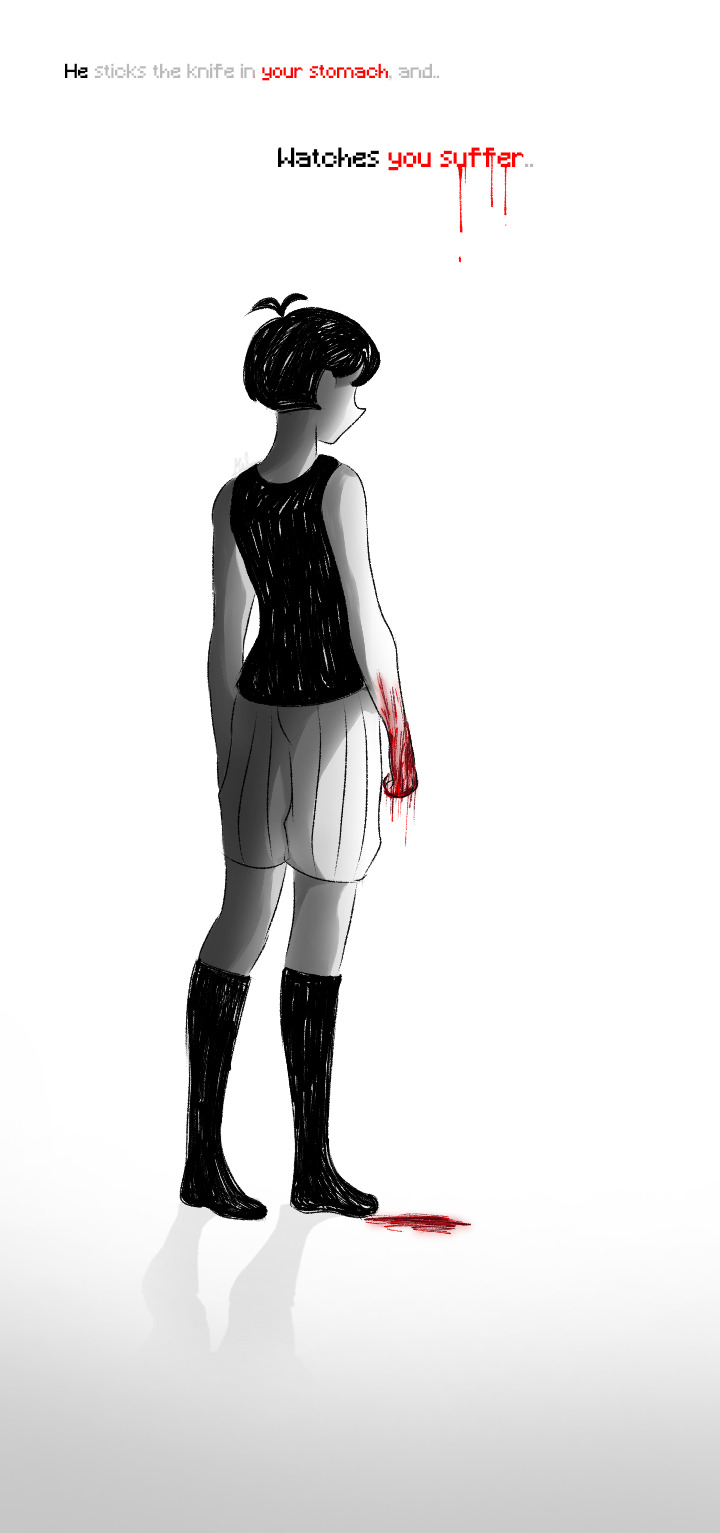
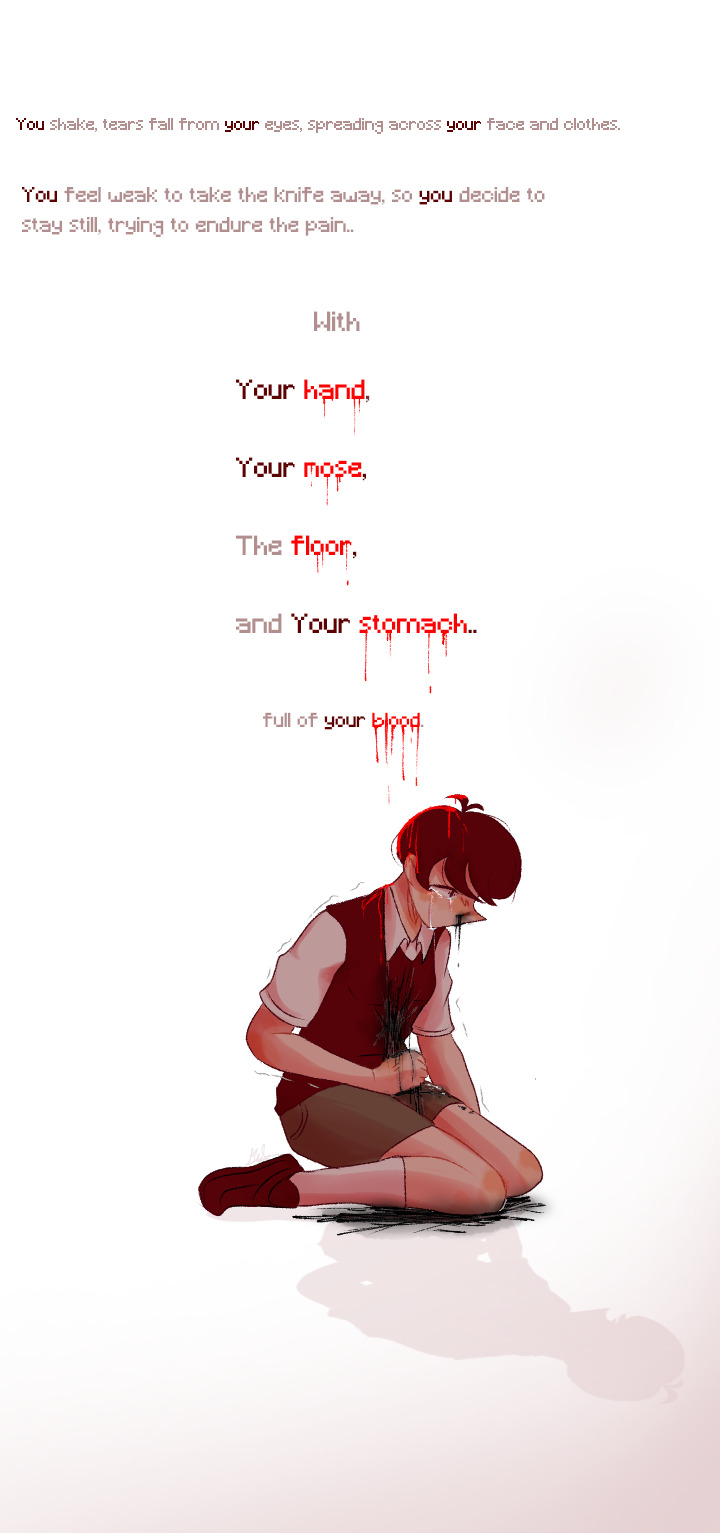
-(click for a better quality!)
#ah.. first of all! I made these two arts “to be done”. there is no lore or anything(at least for now....OQBZKAVZJVWJZVS)#and I wanted to test how I make/draw blood!#It had been a long time since I had made a drawing that contained blood.#so I had this idea (in this case. the arts you see there) in my head and I did it!#oh. and I also wanted to put the colors a little inverted. as you can see-#I did omori. normal. black and white. with BLOOD-colored blood (not pink. but RED)#and then I made sunny. with his colors but also with the touch of red and the blood in black mixed a little with the white/gray!#what did you think!? It was a good idea!?!!? Well.. if yes or even no. I still hope you enjoyed! :DD#(and sorry for not making the knife very visible..#I focused too much on the blood and forgot to add more detail to the knife- so.. sorry. ok!?)#omori omori#omori sunny#sunny omori#omori fandom#hi omori fandom!!#(I forgot to say this before :'])#omori fanart#omori#i'm mel and this is my blog✌️#my art blog#art#my art#my art <3#art mel#my art style#fanart#tw bl0od#tw blood
165 notes
·
View notes
Text
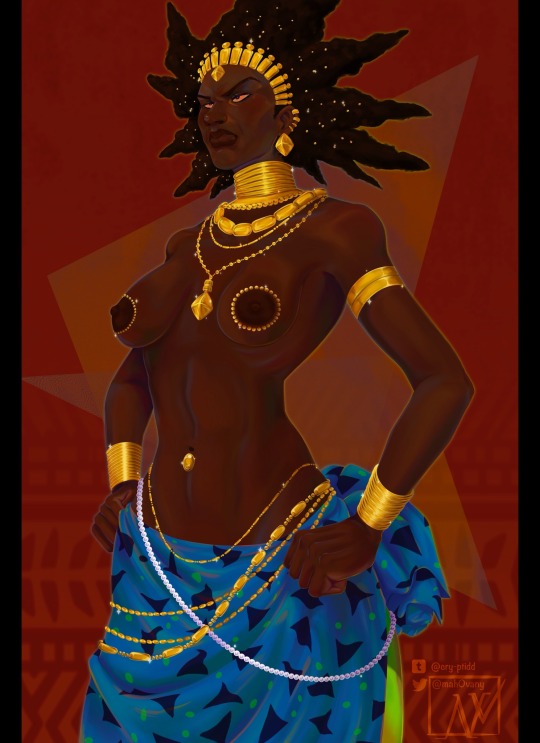
Karaba la sorcière

#my art#not hellsing#artistic nudity#cw nudity#kirikou and the sorceress#kirikou et la sorcière#west africa#the design is absolutely stunning#y'all need to check out that movie btw#it's absolutely amazing and I'll never shut up about it#i hope i did her justice. I hope the skin isn't too light bc the bg was light gray at first#and I hate color theory#also it deals with SA and gender issues as well as a more metaphorical approach to Africa's plight under colonialism#i love rendering. you put colors that shouldn't be there all over everything
124 notes
·
View notes
Text
HOLY. SHIT.
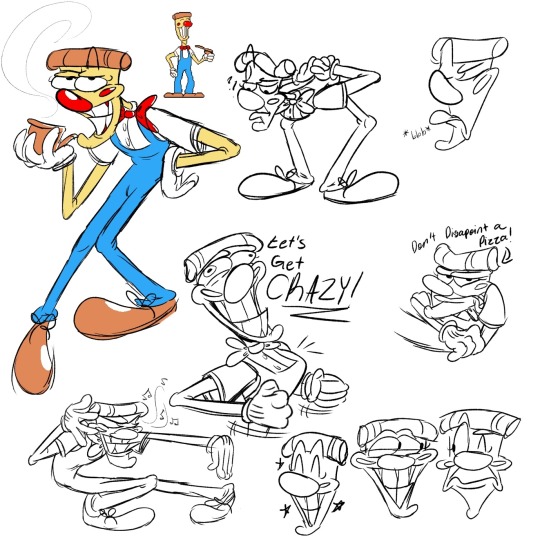
I don’t even wanna separate these?? TAKE THE WHOLE SHEET I’M SO PROUD OF IT WHAT????
I was playing around with expressions and OMG, I think I unlocked something???
It was mostly from yesterday’s post, I liked the way I drew Pizza Head so I decided to try drawing him again (since it’s been a while) AND GOD I LOVE THESE‼️‼️‼️ Seriously started out rough but then I just kind rolled with it! I like it! I like it a lot‼️ 😆😆
Also since I drew Brick yesterday as well, I decided to change the way I draw him, just a bit 🤏


Today was so fun AAAHHH!!!! 💞💞💞💞💞💞
#Pizza Tower#Looking at these so proud 😌😌#I was on the coach for what- 3 hours? It was worth it- 💀#I think the way I’ll draw Brick for now on is what he looks like in game but the legs look just a TINY bit like baggy pants#Like have you ever seen animated animals have those legs that look baggy and the feet underneath#I’ve seen it somewhere I know I have but I don’t have a good example…Still I tried to make it look sorta like that-#And I like it! I think he’s looks adorable!! 😄😄💕💕#For Pizza Head I wanted to give more life in his expressions and poses#I think I did it well enough before hand but I want to express MORE of it#Like the better parts of it- Him looking smug him looking angry him looking annoyed etc#I like the one I colored and the one where he’s singing to himself- THAT one I had fun with he looks great 😂#I also like the one where he’s doing a raspberry#I did that one without a sketch!!#I’m basically trying to focus more on the expressions I think. I had the most fun with them and that’s the thing that made me realize I#need to put more life into him. He needs to be flexible#Sorry if I rambled to much- 😅 Just spilling my ideas. Hope you don’t mind 😂#Doodles#Pizza Head#Brick#Gustavo#Gustavo and Brick
182 notes
·
View notes
Text
Silver screen, cathode ray
Brighter than the light of day
Lover, when you see that glare
Think of it as my despair
Think of it as my despair for you...
So uhhhh. Y'all know about Hadestown? 👉👈💖💖💖💖 It's not one-to-one but I do think Hades and Persephone have some parallels with my self ship, one thing led to another and here we are >w< (Also go check out my partner's @rexscanonwife art for her selfship with Utonium as Orpheus and Eurydices, it SLAPS 💖💖💖💖)
[💚 Reblogs and comments are greatly appreciated!! 🥺 Click for higher quality, tag list under the cut! 🩶]
By the way, check out my pinned post to find my Taglist form, to be added or removed!
@absentmoon @ava-ships @bee-ships @beetleboyfriend @berryshipbasket @canongf @flabbergasting @cloudyvoid @derelictdumbass @dissonantyote @edencantstopfallininlove @final-catboy @flowering-darkness @gible-love-nibles @nagirans @hoppinkiss @hotrodharts @hyperionshipping @iwishihadfangs @iyamifucker @judetama @lex-n-weegie @lficanthaveloveiwantpower @little-miss-selfships @little-shiny-sharpies @loogi-selfships @mandrakebrew @mintpecks @mothfinite @mrs-kelly @nameless-self-ships @nerdstreak @orbitingaroundyourlove @paper-carnation @p-i-t-s @qilinkisser @reds-self-ships @rexscanonwife @rotten--cotton @ship-trek @spacestationstorybook @squips-ship @toogayforthistoday @winterworlds
#my art#oc x canon#self ship#self shipping#self insert#💜: loving you's a felony#🍒🧬: emotional processing lag#SO YEAH. Y'ALL KNOW ABT H.ADESTOWN 💖💖💖💖💖💖💖💖💖💖#i dont even remember WHERE my idea to do this came from but i am so so happy that i did it 💖💖💖💖💖💖💖💖💖#im especially proud of how i kept pieces of both my s/i's and mojo's OG designs as i created these looks for them!! >w<#like keeping cherry's poofy sleeves and the maroon color of her pants#and the visual of mojo's cape but as the overcoat hanging off his shoulders. plus if i may brag i like everything i did with his helmet uwu#the black and gold looks soooooo swaggy.... and the jewels along the bottom for the dots UGH. SORRY 💖💖💖💖#ooh also cherry's headband mimicking their headphones and the colors of their hat! i like that too teehee 💖💖💖💖#ok sorry im just rly proud of this!! i hope y'all enjoy it as well 🥺💖🥺💖🥺💖🥺💖🥺💖🥺💖🥺💖
96 notes
·
View notes
Text

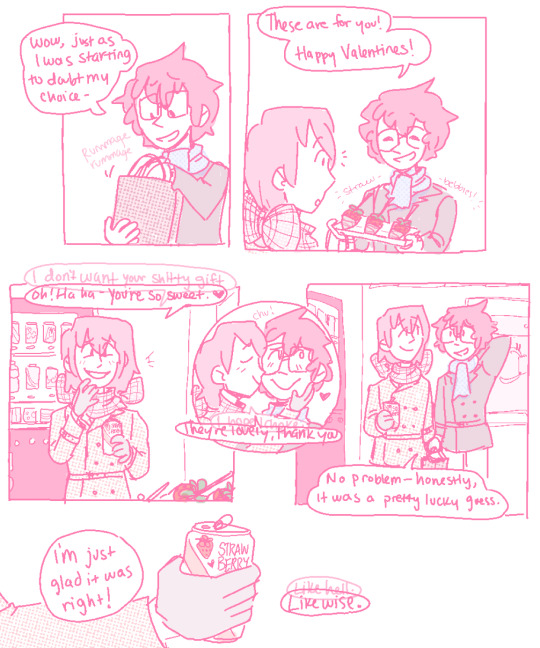

Happy Valentines, Akira.
Happy Valentines, Asshole.
If you can’t read what Akechi’s secondary inner-dialogue says cause I obscured it too much behind his regular dialogue, here’s a transcription in panel order:
Hello, you fucking-
Ah- Hello, Akira!
Fuck off, why should I tell you-
Just a soda- there’s a new flavor.
I don’t want your shitty gift.
Oh- haha! You’re so sweet.
I hope I choke.
They’re lovely, thank you.
Like hell.
Likewise.
There’s no way it’s just a coincidence.
Still though, it’s a funny coincidence.
#p5#akeshu#akechi goro#kurusu akira#wow- me?? posting a valentines comic... actually on?? valentines????? wack. absolutely wack#it's a short one! I purposefully tried to keep it short. it was a challenge and it still ended up being 3 pages. but i blame my canvas size#also in case u can't see what akira is holding out to akechi: theyre chocolate covered strawberries on sticks!#i saw them irl and was like oh god i want those. i am going to project that feeling on my favorite characters so help me god#and now! here we are! but my shitty-ass coloring & line quality make it hard to discern them so. sorry about that lmaooooo#ANYWAY i don't do enough post-maruki stuff so. i made this one a little bittersweet. :)#why did i put akechi's scarf in a bow? honestly i dont know! i think i saw some art a while ago that did that too and i thought it was cute#well. plus i guess there's the symbolism of 'akechi being alive and reciprocating your feelings (however involuntarily) IS a gift' part#hence that hes wrapped up in a bow. like a present. :)#also god. the first panel is supposed to be akechi's reflection in a vending machine window. I could NOT get it to look right#so for reference!!! just so you guys understand!!!!!! thats what that panel is supposed to be!!! he is NOT in fact a ghost. (sigh)#hope you enjoyed and had a lovely valentines!! for my part i have eaten nothing but sweets today and hoo boy will that have been a mistake#ALSO in terms of the audience-participation comic...hopefully coming soon. if i can ever gain the will to draw it.#but at least tumblr has polls now so i can do the audience-choose-y bit without needing to use a separate website! so thats good i guess#anyway anyway anway thanks for listening to me ramble if you made it this far! have a lovely rest of your day and hopefully see u again soon
723 notes
·
View notes
Text
"How about a romantic dinner just for us, ma cheie?"
(pleaseees open the image for better quality)
Good god, the idea of scouts ma and spy just being sweet, loving, domestic goobers gives me way too much joy <3
below cut: zoom in on scouts ma from the frame, without light, and spy by himself
also upside dow cuz i actually really really like how it looks and kinda gives me discord vibes lol
Edit: Also also yes this started as a redraw of this but i got hella carried away :]
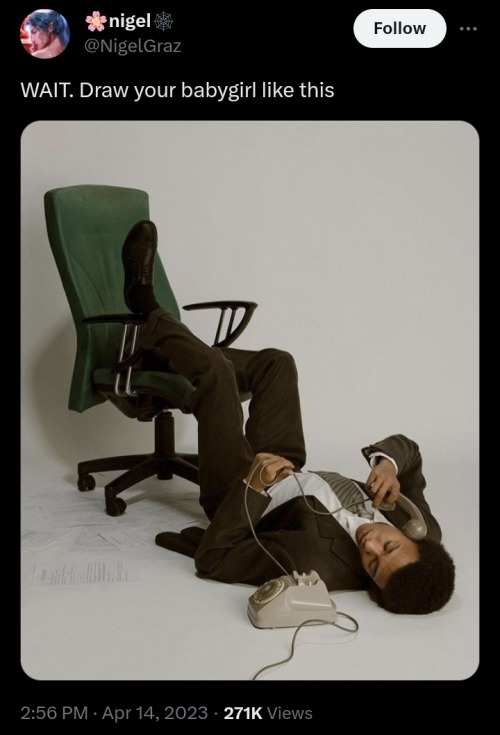
#tf2#tf2 spy#spy tf2#spy#scouts ma#i guess ill tag them..#even tho they are barely visible#tf2 scout#tf2 sniper#did this start as redrawing a “draw you babygirl thing#maybeeeee#anyways im ungodly proud of this#might be my favorite thing ive every drawn#coloring flats made me so insane thoughh#god i love this piece#and this man#i need them to invite me to join and be a throuple#pleaseeeeee🙏🙏🙏#this was orginally gonna also have some little chat bubbles with doodles perswaying a convo#but it was alittle too busy#mmm i want to eat my own art piece#tf2 fanart#fanart#my art#art#digital art#oldbird&co#hope youre all doing well#mmm its 1ammm (-∀-`; )#draw your babygirl in this
132 notes
·
View notes
Photo
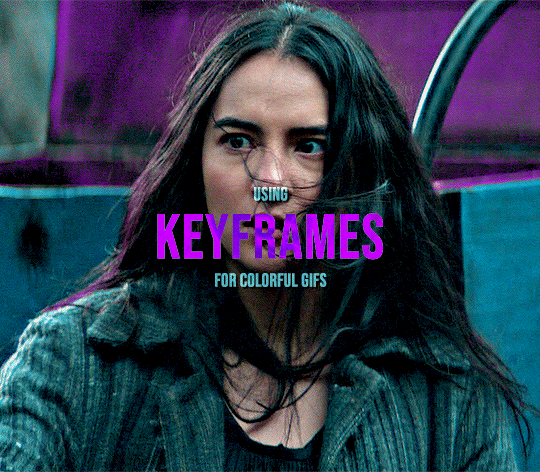
KEYFRAME TUTORIAL FOR THOSE WITH A WORKING KNOWLEDGE OF PHOTOSHOP AND GIFMAKING
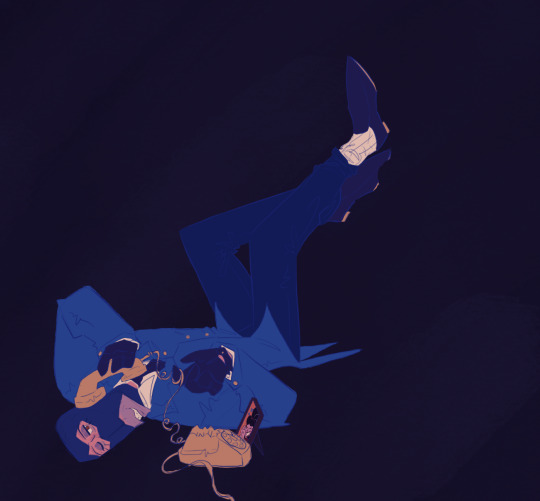
This is my gif with the coloring I want it to have eventually (including the manipulated color). I changed the yellows and reds in the scene to be purple. I want the majority of the gif to be purple and cyan, but do not want it to be on her skin.
First add a layer mask to the adjustments that are creating the color you want to remove. I used several layers to create the purple coloring, so I grouped them together and added the layer mask to the group instead of having to do them individually. In this case, I erased anywhere the purple was on her skin.

She is walking away in this scene, so this layer mask alone is not enough. This is where keyframes come in.
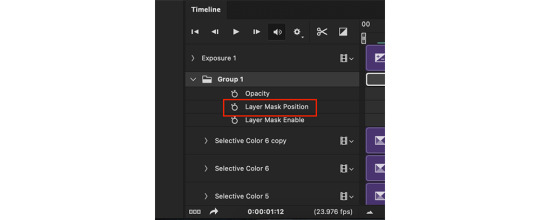
In the timeline window, scroll to the layer that your layer mask is on (or in my case, group). On the far left side, each of the layers should have an arrow which toggles a drop down menu. Click it and it will list options for Opacity, Layer Mask Position, and Layer Mask Enable. Make sure the current time indicator (small blue arrow and red vertical line in the timeline window) is positioned at 00:00:00 and then select the clock icon next to Layer Mask Position. It should place a small yellow diamond at the same place as the indicator. Each successive move of the mask will place a grey diamond at the timestamp that you move it.
CMD+click on the layer mask in the Layers window so that the area of the mask becomes outlined with a dotted line in the main workspace. Click the chain icon next to the layer mask in the Layers window to unlock the mask's movement.


The next steps are the most tedious. You have to manually move the layer mask every few frames to a new position that follows the movement of the gif. I usually zoom the timeline in so that each second is broken into six sections and pick a new layer mask position at approximately each section. If there is more rapid movement in the gif, you may have to pick new positions at more frequent intervals and vice versa.
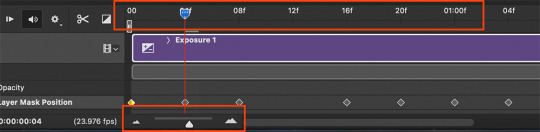
After the initial layer mask is set at the 00:00:00 point in the timeline, select the next interval that you want the layer mask to move to. Do this by moving the time indicator to your chosen point. Now with the move tool, click within the layer mask and drag it to where it needs to be to keep coverage on your desired area. The longer/more frames in the gif, the more keyframe points you will have to select. This gif was about 2.5 seconds long and I used 14 different points.


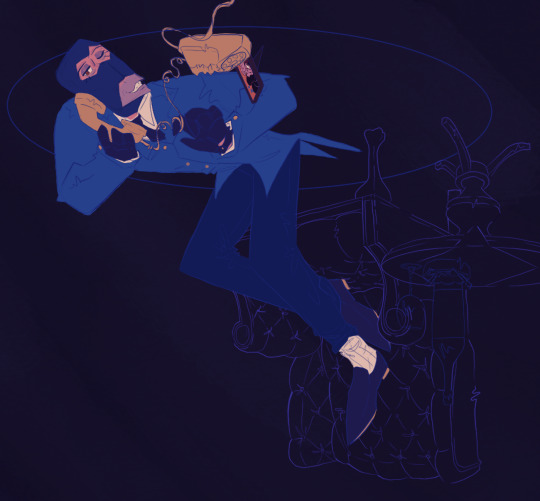
These are just a few of the keyframes I made on this gif. You can see here that the original area that I erased in the layer mask doesn't quite cover all of her skin throughout the movement. I just erase a bit more until I'm satisfied with the coverage.
Once you have mapped all the points out, deselect the mask area and click the blank space where the chain icon was to make it reappear and return the mask to a locked position.
Scrub through the gif to make sure that the mask covers everything you want and also that the keyframes make it move smoothly. Shorter intervals and minor position changes between keyframes usually keeps choppiness (this normally presents as the mask noticeably jumping to a new position) to a minimum. You should not be able to notice the mask's movement except in the way it removes color from specific areas as intended.
Export and save the gif as normal.
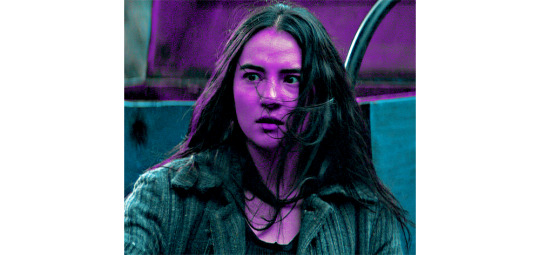
This is my finished result:

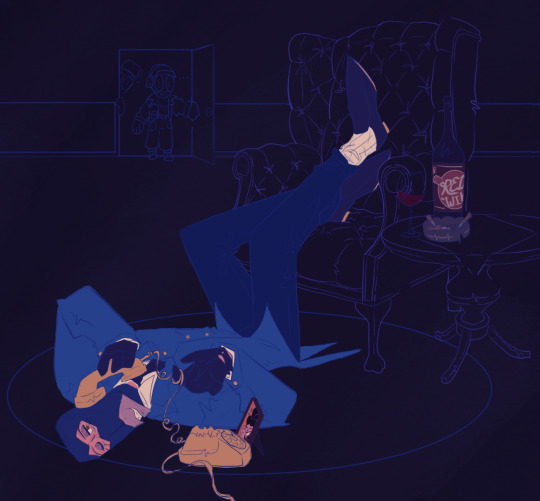
#userfanni#omgari#usersunny#userbells#userkraina#tuserabbie#tusergabriela#useroli#userangelic#supervalcsi#userphe#keyframes#*tutorial#tagging a couple of you who have been like ‘how tf did you make this’ on sets that i used this technique hope you dont mind#idk how coherently this reads or if it even explains it well enough but feel free to ask for clarification#there are also other keyframe tutorials on here that are written much better so check those out too if mine doesnt make sense#but yeah this is how i make my vibrant gifs that have movement in them#i'm going to make a tutorial explaining the actual coloring process too eventually#might make a part two of this explaining how to use this method for more complicated movements#like when your subject moves in multiple directions or there are multiple subjects#riah.gif#riah.txt
563 notes
·
View notes
Last Seen Blogs

americanhoneyx
AMERICAN HONEY

your-grand-adventure
The Madhouse
aethericwitch
🫐ZERO🫐
afleru
Afleru

botvisions-blog
Understanding Media Art