#Animstack
Explore tagged Tumblr posts
Visit Tumblr Blog
Explore Tumblr blogs with no restrictions, modern design and the best experience.
Last Seen Tumblr Blogs


Fun Fact
Tumblr.com rank in the US is 25.
Text
GIMP 3.0?
Hi there! So recently after years of development GIMP 3.0 has been released! That's good news. The bad news is that Animstack doesn't currently work with GIMP 3.0 (and neither do my other GIMP scripts from what I've seen). I'll see what I can do to get them up to date but can't promise anything since I haven't touched that code in years.
Note that installing GIMP 3.0 does not overwrite your GIMP 2.10 installation and you can still use GIMP 2.10 after installing GIMP 3.0. So for now please use GIMP 2.10 if you need to use Animstack for some reason.
4 notes
·
View notes
Text
Rolling playlist gif for GIMP: a tutorial ▬ by Joy from @creativexspirit
Credit where credit is due, I fell in love with this gif tutorial but EH I don't use Photoshop anymore so I made it my mission to recreate the effect in GIMP.
This tutorial uses AnimStack, a Script-Fu script for GIMP to give you tools for the creation of animated GIFs. As it's super useful, even if you don't follow this tutorial I highly recommend to download. How to install AnimStack to GIMP in tumblr's FAQ: https://animstack.tumblr.com/faq
IT ONLY WORKS IN GIMP 2.10.
This tutorial uses my playlist template.
Tutorial with screenshots is under the cut.
Like or reblog if you download. Please don’t request as your own, respect my work. Don’t hesitate to tag me if you follow the tutorial! I would love to see your edits.
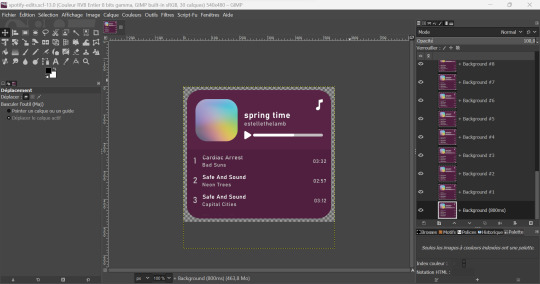
STEP 01.
Change the titles, the colors, the icons. Tip if you want to change the song title that are not visible: move the layers group "Song list", so you can see the text you modify.
Add songs by copy/pasting the "Song 5" layers group. Keep this layers group inside the "Song list" group.
Try to move the layers group so that it is aligned with above songs.
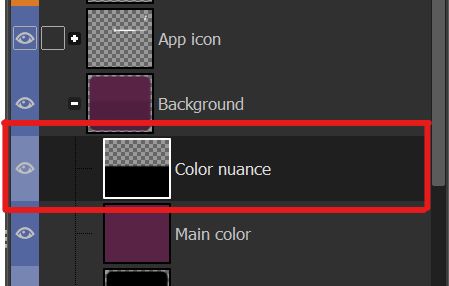
To place back correctly the "Song list", here's a tip: use the align tool and click on the "Song list" group. In the tool's options, in the "relative to" drop down menu, choose "Selection". Back to the layers window: in the "Background" group, right click on the "Color nuance" layer and choose "Alpha to selection". Now you are free to align your "Song list" layer group to the top and center of that selection, and it should be alright!
STEP 02.
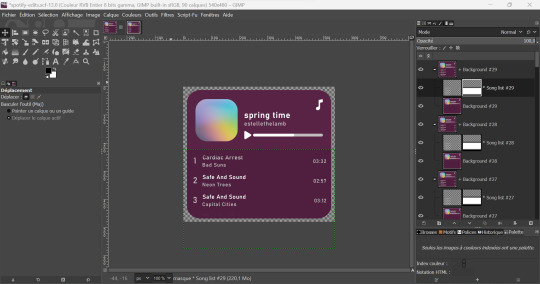
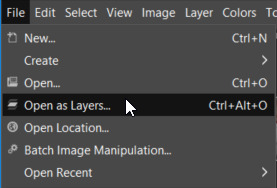
Now the tutorial actually begins. Flatten all layer groups using Image > Flatten Layer Groups. (Don't mind my GIMP language, it is in French but the AnimStacks tools are in English, you should have the same menu.)

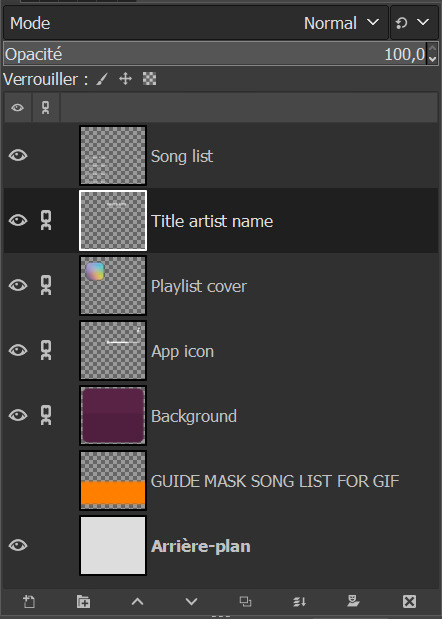
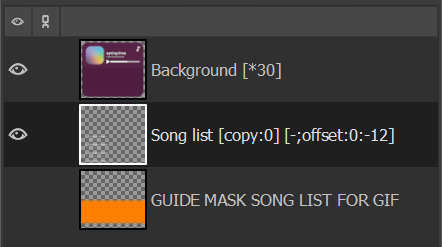
And now your layers window should look like mine, minus the links on the layers.
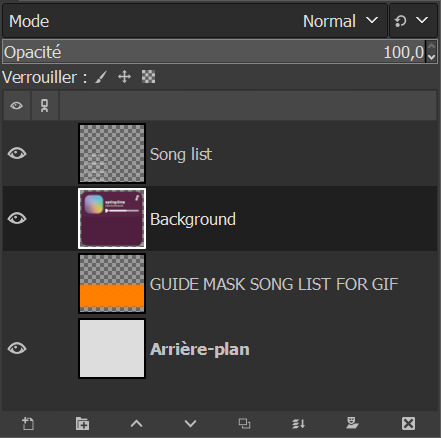
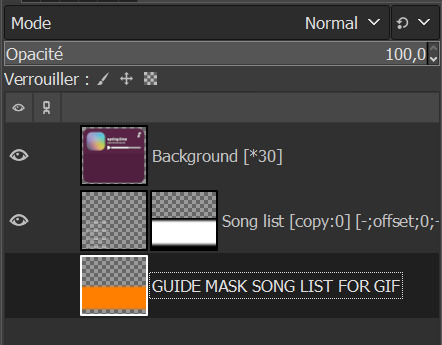
Now, see the linked layers? Merge them all together. You should end up with only 4 layers: "Song list", "Background", "GUIDE MASK SONG LIST FOR GIF", "Arrière-plan".
Note: you don't really need the "Arrière-plan" layer, so if you want to, you can delete it or you can merge it with the background layer. In my case, I will delete it.
STEP 03.
Reorder your layers. This is very important as AnimStacks will process the layers from top to bottom, so the layers order counts.
Put your "Background" layer on top, your "Song list" layer under it. As for the guide mask, we don't really care as we will delete it later.
STEP 04.
We are now going to add AnimStacks tags to our layer names. Here you'll have to do a bit of maths because you can choose the number of frames your gif will ultimately contain and adjust the tags parameters accordingly. This might seem complicated but it really isn't. I'll start by showing the tags to add, and explain how this will be processed. I will then give you the maths to choose your parameters accordingly.
Below, the tags I have added to my layers. You will have to write the same things as I do but what you might change is:
the number of "30" in Background.
the y parameter of the offset tag "-12".
YOU ARE NOT ALLOWED TO REMOVE THE [copy:0] and change it.
OK but what does each tag do? Remember, AnimStacks process is from top layer to bottom. Here the first layer is our Background layer: [*30] means it will duplicate the "Background" layer 30 times.
Now, onto "Song list" layer: [copy:0] will check all layers above the "Song list" layer that has no tag (at this point, all of our 30 "Background" layers have no tag), create a group for each found layer and place the "Song list" layer at position 0. Ok this explanation is wacky, for better explanation, please check the documentation.
The offset tag is necessary for the rolling effect: at each addition of the "Song list" layer, it won't just be a simple duplicate of the "Song list" layer, but the layer will have moved a little by (x,y) = (0,-12), allowing us to get that "rolling" effect in our gif. (And now you get why I said "y parameter".)
OK now, but how did I choose my parameters? So for reference, I only have 5 songs - I didn't add any song to the song list. For my maths, you need the height of the "Song list" layer. Check it with the scaling tool.
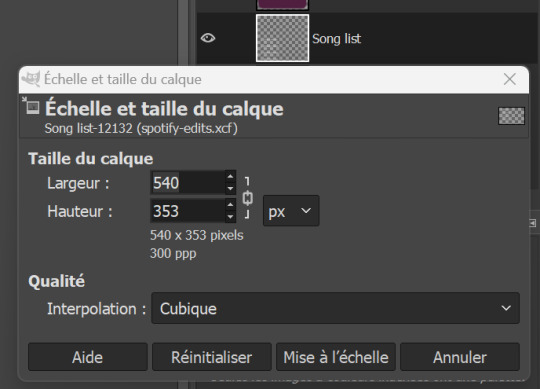
The height of my layer is 353 pixels (awful number meh). I choose to have 30 frames. So the move of the layers will have to be of 353/30 = 11.77 pixels. I choose 12 pixels because you can't have floats for the number of pixels, can you?
DO NOT FORGET the minus in front of the y parameter. My y parameter is "-12". Otherwise, the playlist will roll towards the bottom.
STEP 05.
We are now going to add a mask to the "Song list" layer to avoid seeing the title songs where we shouldn't see them. See that obnoxious orange layer "GUIDE MASK SONG LIST FOR GIF"? Yes, it is its time to shine.
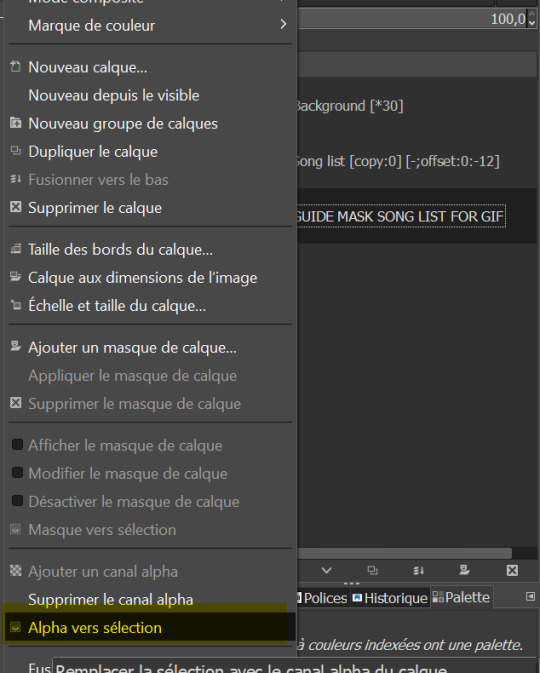
Right click on the "GUIDE MASK SONG LIST FOR GIF" layer and choose "Alpha to Selection". (Well in French it's Alpha vers Sélection.)
Now, we are going to use that selection to create a layer mask on the "Song list" layer.
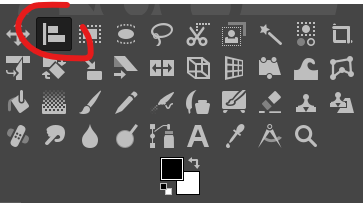
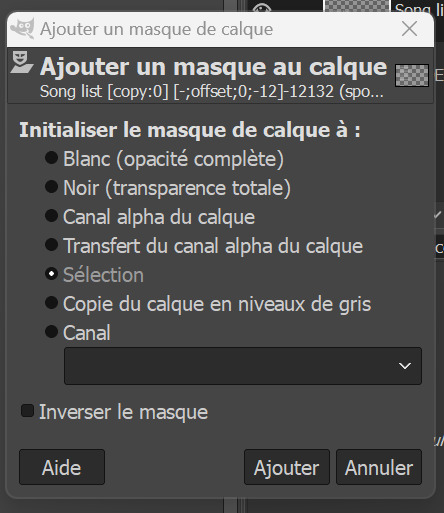
Right click on "Song list" and choose "Add a layer mask". /!\ Your selection must still be active. (Well in French it's "Ajouter un masque de calque" but you can see the icon right? By the way, you can also add a layer mask by clicking on the icon in the layer window, see circled icon in red.)

Now, choose Selection for the creation of the layer mask.
If you don't have the above results for the mask, it might be that you foreground and background colors are not the same as mine, meaning black and white respectively.

If you don't have the same colors as me above, click on the small pair of squares the blue arrow I draw is pointing to. It will default your foreground and background colors to black and white. Keyboard shortcut is D. (I don't think I changed it.)
And now, we don't need the orange guide mask layer anymore, so you can delete it.
STEP 06.
Last check before process: make sure you have no area selected (or you will get a weird result). Cancel all selection with Selection > None.
STEP 07.
We now begin the AnimStacks tags process.
In Filters > Animation, find "Process Animation Tags" and click on it.

The process might take a while depending on the number of frames you have.
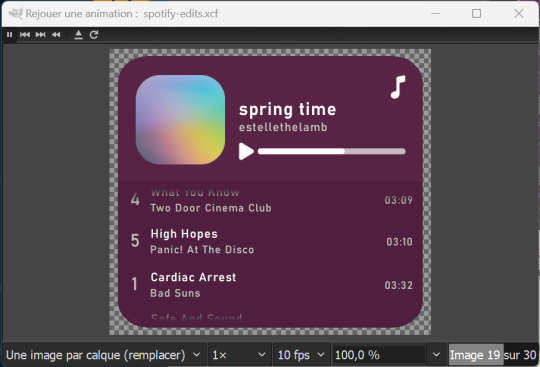
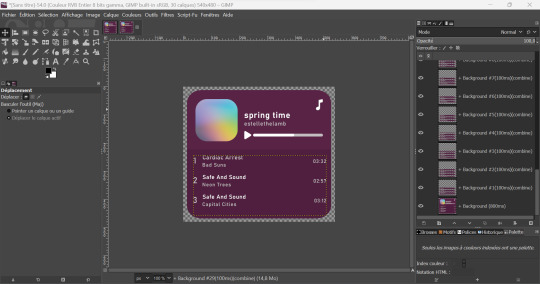
If everything is correct, you should have something similar to that. Now, we can check if the gif is correct and if we liked the number of frames and y parameter by previewing the animation in Filters > Animation > Playback...
STEP 07.
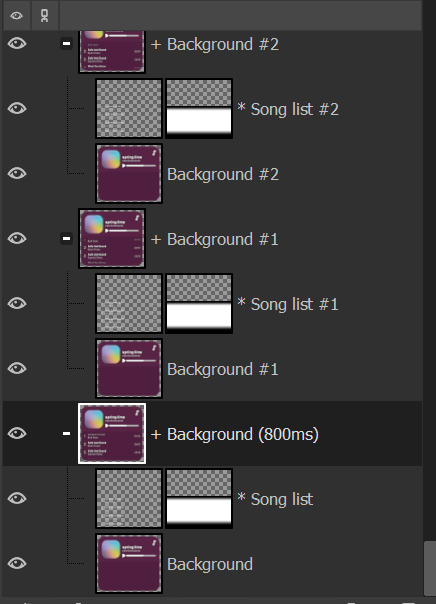
This step is optional but you might want to change the time of our first frame to be longer so people have time to read the beginning. Do so by changing the layer group name by adding (800ms) to it. This means the frame corresponding to that layer group will be 800ms.
You can check if it's long enough by doing the playback again.
STEP 08.
Now, we have to flatten all layer groups if we want to export to a GIF. In order to do so, we will just use the same trick as the beginning: Image > Flatten Layer Groups.
STEP 09.
Optional, but good to do: to make our gif lighter, we are also going to optimize the gif. In order to do so, do Filters > Animation > Optimize (for GIF) I don't know personally the difference with the other optimization method. Choose either you'll have similar results it's a difference in the implied algorithm I guess.
This step might take a while, but it's ok. When it's done processing you should have a new image created with the same results as me above. You can playback to check if everything is correct but here our job is done! We will now export the GIF.
STEP 10.
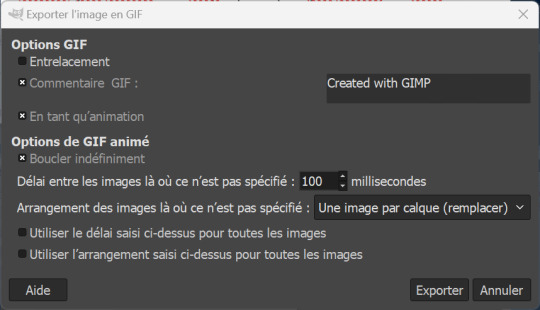
You can now export to GIF! Go to File > Export as..., choose the name of your file and end it with the .gif extension.
If you get an error message because some layers are not cropped, no worries: just choose the "crop" option (but you should not with the optimization).
Now, don't forget to check "as animation" when saving the GIF, if you haven't done the optimization, choose the delay between frames (the first frame will still be of 800ms), and choose "replace".
WITHOUT OPTIMIZATION:
(With the optimization process, all layers already have delay and animation replacement type thingy specified.)
AND VOILA, YOU HAVE YOUR GIF! If you mess around more with AnimStacks, you can do cool stuffs with it!
Now, how do you pronounce the G in gif? Also shh, don't say you saw the mistake I made when changing the title's songs in the tutorial, I wanted to write Everybody Talks by Neon Trees.
23 notes
·
View notes
Note
hi, can please you do a crash course on the animstack [render] function?
I am not an expert with the render tag but it's basically an action tag. And you will need an effect tag after the action tag to tell the plugin what effect you want to it to place.
I always add a transparent layer and put it right at the bottom of the layers and rename it [render].
Then, I add in the effect tags that I want to use. For example, here, I want to add a gaussian blur of 3px and with the opacity of 30%. This means when I run Animstack, it will duplicate the image and on the duplicated one, it will blur it and change the opacity of that duplicated layer to 30% (so you will be able to see a bit of the original image too if you merge down this duplicated layer).

Hope that makes sense.
You can learn more here and if you scroll down to the bottom, you can see the other effect tags that you can use other than gaussian blur and opacity.
1 note
·
View note
Text
My boyfriend last time: "didn't you say you were going to play the sims?"
Me: "yeah, but right now I'm editing my screenshots to post them on tumblr"
Also me at that same time: *learns about Scheme so she can write her own script-fu scripts to automate sims screenshots editing*
I love getting sidetracked with my hobbies. 💀
#but scheme is great#i also want to create more gifs with animstacks#and up my gif making skill with gimp#as speaks#.txt#non sims#kinda
2 notes
·
View notes
Text
my new bit apparently is i make gifs under the emotional duress of this one anon who will check in with me when i havent been making gifs finster style except im not girlmoding and theyre not paying me
#but other than that its basically exactly the same situation#btw love that anon literally no hate. i just have adhd#its not even hard its just that theres a bunch of steps and my brain always goes. TOO MANY. and we sit here making posts about it instead.#but in my defense it is almost midnight and i am just gonna go to bed. tomorrow though. who knows#also i want to learn animstack in more depth and i want to. learn gimp filters too (one in the same rlly)#but i need to forget that for now and just make the sets i have in my todo list lol#if its any consolation im also hardcore procrastinating on all my fics and shit. im kind of just doing a fat load of nothing most days
2 notes
·
View notes
Text
how i make gifs with only free software
this is adapted from what i did on macOS for years; i now run desktop linux due to planned obsolescence / apple's addiction to waste. if you use macOS, homebrew was my real introduction to using the shell and linux-like package management, and look at me now. every single gif i've made here (#spicagif) and on my sides @chongmiz and @buwanbyul use this method.
three programs mentioned here are command line-only, but optional; all this actually takes is VLC and GIMP.
acquire video 🏴☠️. my bittorrent client of choice is transmission, and yt-dlp (cli) is great if what you want is on youtube or vimeo
take screenshots in vlc by holding down the snapshot hotkey (sft+s is default); i tend to reduce playback speed for action sequences. you can also extract frames with ffmpeg (cli) which is a vlc dependency that should install automatically with any package manager, but it only makes sense if you've exported a clip of the part you want. both options are annoying.
open these screenshots as layers in gimp and edit away. my order of business is usually scale -> crop (save .xcf) -> sharpen -> color. this will give me a repetitive strain injury because i have not found a solution other than clicking every layer and hitting ctl+f
if you need subtitles or a watermark, which i do more on my k-pop side @buwanbyul, i recommend @animstack (yes an actual official linux-adjacent blog!)
i do not actually export gifs, they are webps:

honorable mentions
sshfs: i don't keep video on my laptop or like attaching external storage to it, so i torrent straight into my headless server over ssh. i realize normal people do not have this but this is how i "stream" from my own media library
pcmanfm: i browse files with ranger, but handling that many images without thumbnails is foolish. pcmanfm is very lightweight and is meant to replace more established file browser GUIs like thunar and dolphin
edit 2025/02/26: just mentioning @vlc-official @gimp-official
15 notes
·
View notes
Text
ok but why nobody told me about animstack before
where was I this past 11 years with my gif making skill.......... oh wait, I know. It's just when I stopped creating gifs. Applying a gimp coloring has never been so easy.
Am I going back to my gif making era?! (I badly want to) (I missed GIMP)
Rolling playlist gif tutorial is in the making though!
3 notes
·
View notes
Text
kat, 27, filipino-american
side blog; interact as @sailorspica
my gifs #♂
audio #♀
tracking #sailorspica; wld love to see any of my ults <3 (soyeon, miyeon, wheein, moonbyul)
software: yt-dlp, vlc, gimp 2.10 + @animstack
0 notes
Video
youtube
Making gifs in GIMP - My Process Part 1
**Please reblog the version that includes a link to a Google Doc of the whole process**
I’m posting the video without any links so that it shows in the tags.
#gif#gif making#gif tutorial#gimp#gimpphotoeditor#gnu image manipulation program#animstack#gmic#gifsicle#gif-making
24 notes
·
View notes
Text
Animstack 0.64 released
Recently I’ve been made aware of the fact that [matte] tag is no longer working with the new versions of GIMP. Since it’s a pretty useful tag, I decided to fix it ASAP. So here’s a new release containing the fix!
Download it here!
12 notes
·
View notes
Text
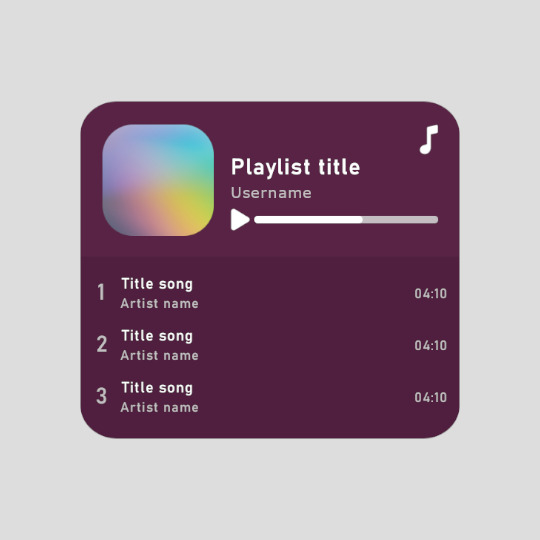
Playlist template for GIMP (XCF) ▬ by Joy from @creativexspirit
Like or reblog if you download. Feel free to add/delete/adjust some layers. Please don’t request as your own, respect my work. Don't hesitate to tag me if you use it! I would love to see your edits.
I made this after falling in love with this template by @danesdehaan and the amazing rolling effect added to it by @eddiediaaz. This template is however based on the look of embed spotify playlist. I have plans to share how I'm using this template to create a rolling playlist effect. Here is the tutorial to have a rolling playlist effect (gif tutorial) using AnimStack: click here.
Font used is Bahnschrift (already installed if you're on Windows 10+).
Icons used here are from icons8. (pls continue crediting them if you use the template!)
download: (x)
More XCFs here: (x)
More instructions under the cut.
This template is intended to be used as a base for a rolling playlist. Tutorial might come later on how I use it to do so, but for now, if you just want a static playlist of three songs: DELETE "GUIDE MASK SONG LIST FOR GIF" and the layers groups "Song 4" and "Song 5" inside the "Song" layers group.
I use GIMP 2.10 and some layers (or groups) are color coded:
Blue mark: change the color layer to another of your liking.
Orange mark: change the picture (here the playlist cover picture) by putting another picture in the layer group specified for this pic. (I created a group so you don't have to change the composite mode of your layer upon adding it to your image).
Red mark: change the text.
You have two options for the small icon in the upper right corner (icons from icons8) either a music note like in the preview or the Spotify logo. Choose either or none by toggling the visibility of the layers. Of course you're free to add your own logo as well, you do you.
If you have any more questions, I am an ask away!
10 notes
·
View notes
Note
Hey Dhabitah! Could you post a tutorial on how to make frames like this? burnhamandtilly /post/654281171430211584
Hi, take a look at these tutorials. https://dekaythepunk.tumblr.com/post/631746195826556928/im-back-with-another-request-to-make-multiple
https://dekaythepunk.tumblr.com/post/173051615515/heres-a-tutorial-requested-its-really-simple
The rest of the gifs are very simple text gifs and adding a white border and they all use the same method of using Animstack to place them on all the gif frames.
0 notes
Text
GIMP TUTORIAL: BATCH PROCESSING & EXPORTING
necessary downloads and plugins can be found here.
watch out kiddos, i’m about to automate your entire life. got your icons ready? let’s roll. if not, see my other tutorial.
BATCH PROCESSING.
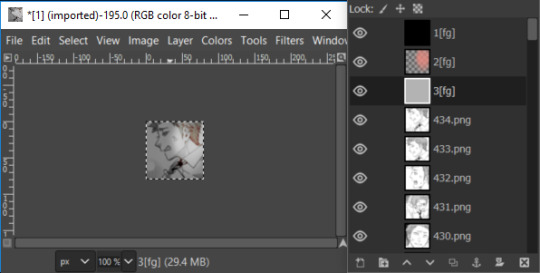
we’re gonna load all of our icons in. i don’t know about you guys, but i’ve processed over 1000 icons at a time before and gimp handles it like a damn beast.
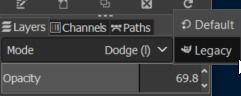
feel free to make a psd as you please. for mine, i made my icons 80x80 and added and multiply, dodge(l), and overlay layer (from top to bottom, for reference) with some splashes of color for instant fanciness.
a new feature to gimp, as it has faced its gigantic overhaul last year, is that some of the layer modes function differently. and there are new ones. if you’re used to old-gimp’s layer modes, you can get the legacy (l) version of the layer modes by clicking the little button next to the layer modes and changing it to legacy.
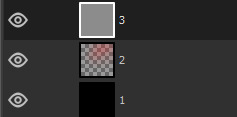
when you’ve made your psd, for the love of god, name your layers. you’ll want them to be in order later, especially if you have more than two layers in your psd. mine are simply 1, 2, and 3. you’ll see why in just a sec.
when you’re happy with your psd, now we’re going to make use of animstack, which uses a tag system to apply changes. the tag we’re going to use is [fg], which will tell the plugin to apply the layer to the foreground of every untagged layer. put the tag on the end of your psd’s layer names like so:
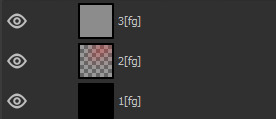
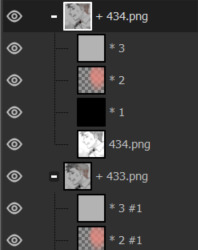
because animstack works from top to bottom, you have to invert the order of your psd layers, or else they’ll process backwards. if your psd layers are in order of 3, 2, 1, they will now be 1, 2, 3. it’ll look weird, but just bear with it.
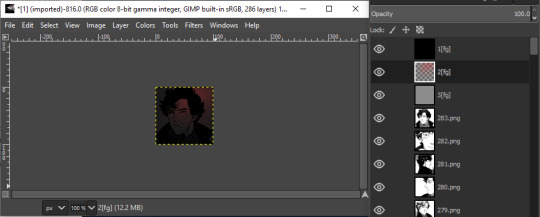
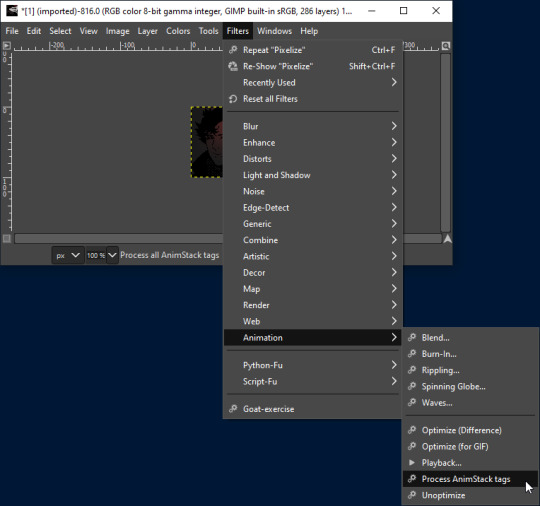
now for processing! you’ll want to navigate to filters > animation > process animstack tags. and then, you get to watch as it applies your psd layers to every icon. it’ll take a while if you have a lot of icons, but it’s nice if you need a pee break and/or a cup of coffee.
zooooooooooooooom.
when everything’s done, each of your icons has its own respective folder with the psd inside.
now, let’s batch save these bad boys.
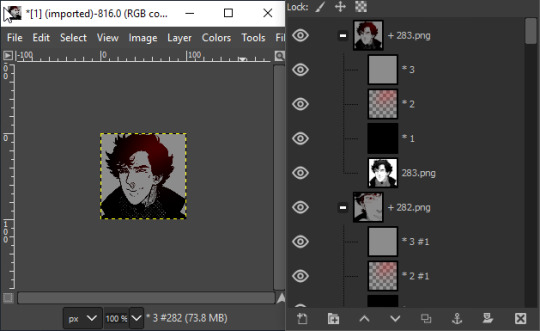
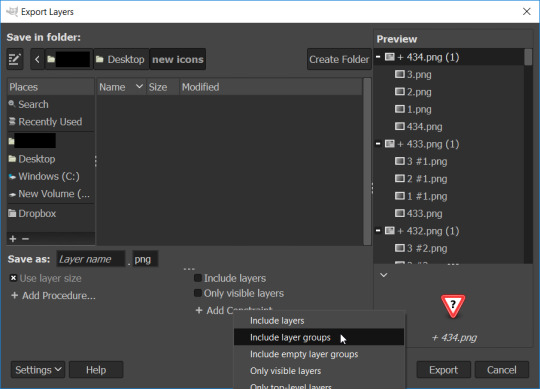
go to file > export layers...
and choose the folder you want to export to.
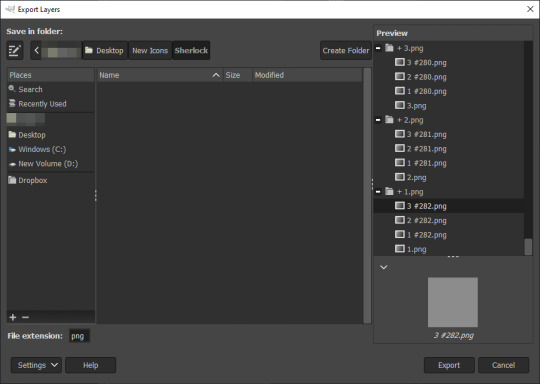
it should look like this, but DON’T SAVE YET! there are some changes to make. if you look at the preview on the right, it shows how the images are going to export. it will try to export your psd layers individually, which is no bueno.
go to settings > show more settings on the bottom left.
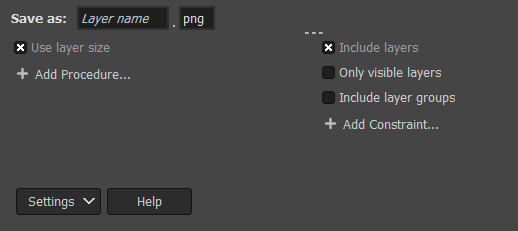
it should open up some settings that look like this. uncheck the box that says include layers. then, click add constraint... and select include layer groups.
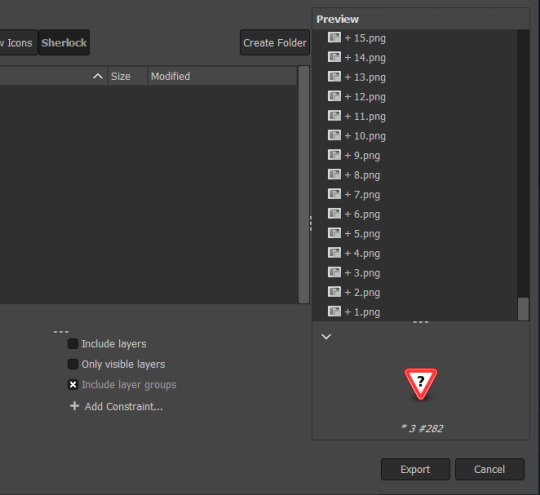
see how it compresses your folders into individual files. that’s what we want.
export! it should bring up another pop-up (sometimes it comes up minimized, so open it up) and hit export again.
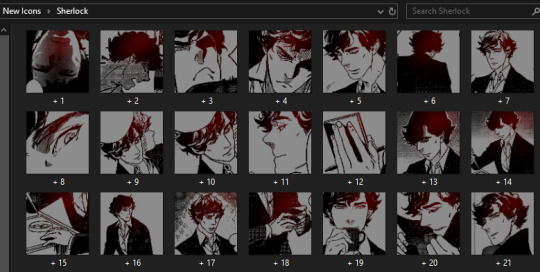
new icons, done!
#gimp tutorial#photoshop tutorial#rp tutorial#rp resource#resources#tutorials#update 9/30 rerecorded the gifs on this post to fix lag
82 notes
·
View notes
Text
batch editing rp icons using gimp
UPDATED (MARCH 2019): this is an updated version of my previous tutorial (for GIMP 2.0-2.8), in order to accommodate the newest version of GIMP (2.10).
so i know that a lot of people don’t have access to photoshop or other paid programs, and probably one of the closest alternatives is a free program called gimp. it’s a wonderful program for image manipulation, and it’s what i’ve been using to make my icons and graphics for years.
this will be a comprehensive guide on batch editing and batch saving your icons. instead of taking the time to spend hours doing everything one by one, this method only takes minutes!
things you’ll need:
gimp 2.10 or higher
bimp plugin
export layers plugin - scroll down and click ‘download latest release’
animstack - navigate to ‘documentation and download’
(optional) all layers add alpha - download the attachment in post #4
make sure your files are in the proper places!
export layers should be placed in C:\Program Files\GIMP 2\lib\gimp\2.0\plug-ins animstack and all layers add alpha should be placed in C:\Program Files\GIMP 2\share\gimp\2.0\scripts and i’m pretty sure bimp installs on its own.
now that you’re all set up, you can boot up your gimp!
BATCH RESIZING.
if all of your icons are different sizes (with uniform ratios), here’s where bimp comes in handy. navigate to file > batch image manipulation, which will give you this friendly popup!

load up all of your icons by clicking on add images. if all of your icons have their own folder, you can click add folders and select the folder that you want to apply the changes to. if not, use add single files to shift-select or ctrl-select your files.
once they’re all loaded up, you should designate your output folder, where it’ll export all of your new icons to. it defaults to C:\Users\User but if you don’t want that, you ought to change it. i usually route it back to the source folder so that it overwrites the files.
now, to choose your alterations! hit the big square that says add. for this example i’ll choose resize but add more or something else if you’d like; but you’d have to figure them out yourself.
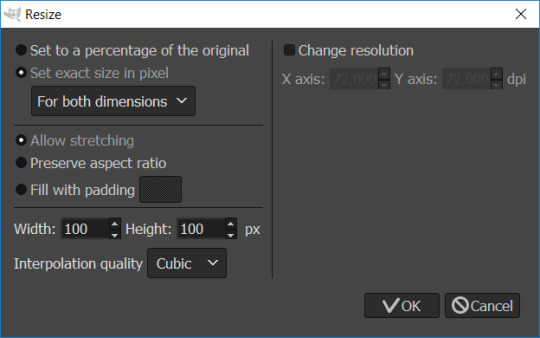
if you want all of your icons to be 100x100, you want to select set exact size in pixel. then, set your width and height to 100 and hit OK and then apply your batch edit. if you’re overwriting, go ahead and tick the little box that says to apply your decision to everything, then hit yes. after everything’s done, your new icons should be in your output folder!
BATCH FORMATTING.
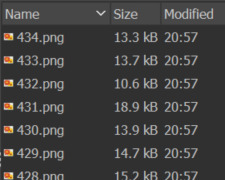
got your new icons? good. load them all up using open as layers.

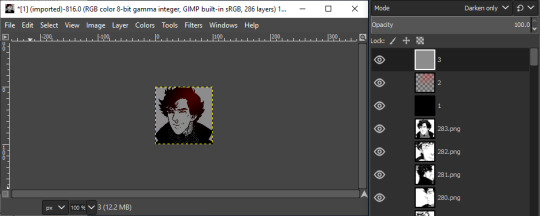
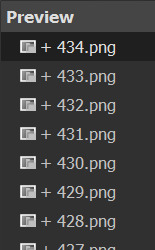
i’m using 400+ icons to show that it works with pretty high numbers of icons. give your program a minute to load up everything.
feel free to make a psd as you please. for mine, i made my icons 80x80 and added and multiply, dodge(l), and overlay layer (from top to bottom, for reference).
a new feature to gimp, as it has faced its gigantic overhaul, is that some of the layer modes function differently. if you’re used to old-gimp’s layer modes, you can get the legacy (l) version of the layer modes by clicking the little button next to the layer modes and changing it to legacy.
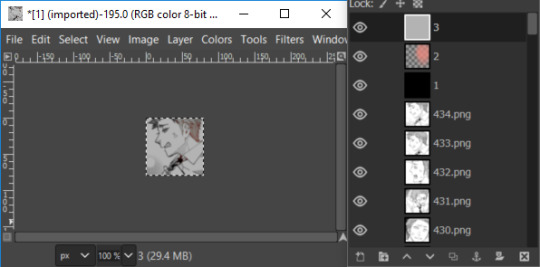
when you’re happy with your psd, now we’re going to make use of animstack, which uses a tag system to apply changes. the tag we’re going to use is [fg], which will tell the plugin to apply the layer to the foreground of every untagged layer. put the tag on the end of your psd’s layer names.
because animstack works from top to bottom, you have to reverse the order of your psd layers, or else they’ll process backwards. it’ll look weird, but just bear with it.
now for processing! you’ll want to navigate to filters > animation > process animstack tags. and then, you get to watch as it applies your psd to every icon. it’ll take a while if you have a lot of icons, but it’s nice if you need a pee break and/or a cup of coffee.
look at it go!!
when everything’s done, each of your icons has its own respective folder with the psd inside. now to save!
file > export layers…
after you choose where you want to save your icons, you need to change a few things. firstly, un-tick include layers. if you don’t, you’ll export every layer in every folder. then, click add constraint and select include layer groups. this will tell the program to only export the folders as files.
your preview should look a lot prettier.
this is also where you can change your file extension from .png to .jpg or whatever else you use. when you’re happy, export!
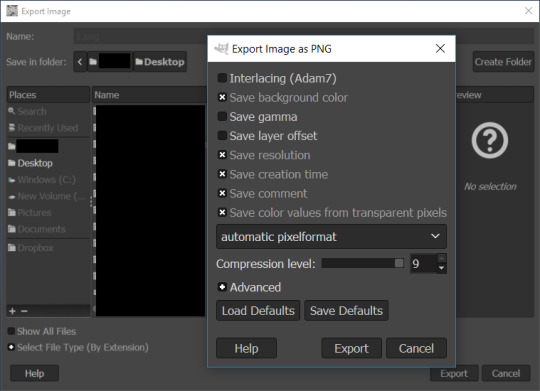
this jazz isn’t really important. just hit export again.
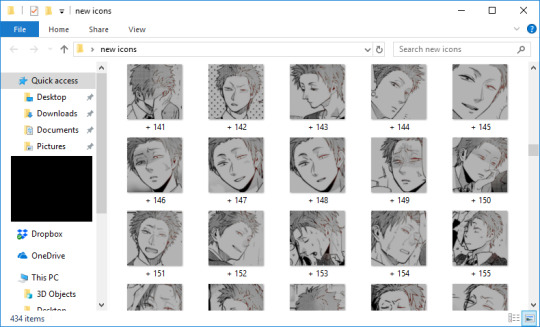
and congrats! you’ve got some new fancy icons.
ALPHA LAYER STUFF.
if your icon layers are doing a thing where they have bold layer name, it’s because it doesn’t have an alpha channel! without an alpha channel, any ‘transparent’ places that the icon may have will turn up white. if you want circular icons, this is important because they are square image files with transparent corners.
what’s the difference between a circular icon with and without the alpha channel? let’s put them on a gray background to compare.


i think it goes without saying that we want the former, or else it’ll look like this on your theme:
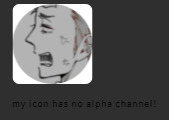
so how are we getting rid of this nasty automatically-white background?
layer > all layers > add alpha to all layers done!
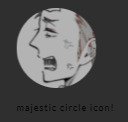
an icon with an alpha channel is a happy icon!
I HOPE THIS HELPED!
i don’t know if this is faster or slower than photoshop, but you can’t complain when it’s free! it’s also something that you can have running while you do other things, since a lot of the busy work is automated. if you have any questions, hit me up. i’m always happy to help.
7 notes
·
View notes
Text
OK.... animstack coming THRU for me rn
0 notes
Text
I literally took an aura test/quiz thing today to find out what color Marko’s aura was in order to do his Tarot reading online. And the crazy thing is, I guessed right even before doing the long ass’d quiz! Yes, I pride myself in knowing his character, I’ve only been writing him for the last fifteen years!!!!
Then, I went shopping for a baby gift for my cousin’s baby shower coming up, had sushi with my sister, came home and sat here for five plus hours trying to create an edit with a gif, only to find out that my new stupid laptop doesn’t have animstack in the Gimp program and I desperately need it, but I can’t figure out how to install the damn thing and David want’s his playlist!!! I made myself a matcha latte, because I’m obsessed with it right now and had a late dinner of pepperoni pizza because I didn’t want to take time to cook tonight. I wanted to get that damn edit done!!! All in the name of the Lost Boys and I still have not figured out the damn installation. That is my munday. But hey, Marko is happy. That’s all that counts right? LOL
#the lost boys#lost boys#my munday#Marko's aura#quizes#tarot reading#matcha lattes#edits#pepperoni pizza#personal
14 notes
·
View notes