#Arduino Alarm System
Explore tagged Tumblr posts
Visit Tumblr Blog
Explore Tumblr blogs with no restrictions, modern design and the best experience.
Last Seen Tumblr Blogs


Fun Fact
There are dozens of funny blogs to kill time on Tumblr.
Text
DIY Laser Tripwire Security System Using Arduino

The project consists of a laser module that continuously emits a beam aimed at a laser receiver sensor. When an object (such as a person) obstructs the laser, the receiver detects the interruption and triggers an alarm via a buzzer. This system is ideal for securing doorways, hallways, or any restricted area.
COMPONENTS REQUIRED
Arduino Uno
Laser LED Module
Laser Receiver Sensor Module
Buzzer
Jumper wires
Breadboard
Circuit Diagram

CODE
#define LASER_PIN 7
#define RECEIVER_PIN 8
#define BUZZER_PIN 9
void setup() {
pinMode(LASER_PIN, OUTPUT);
pinMode(RECEIVER_PIN, INPUT);
pinMode(BUZZER_PIN, OUTPUT);
digitalWrite(LASER_PIN, HIGH); // Laser ON
Serial.begin(9600);
}
void loop() {
int status = digitalRead(RECEIVER_PIN);
if (status == 1) { // If laser beam is blocked
Serial.println("⚠️ Intruder Detected!");
digitalWrite(BUZZER_PIN, HIGH);
} else {
Serial.println("✅ Area Secure");
digitalWrite(BUZZER_PIN, LOW);
}
delay(500);
}
youtube
9 notes
·
View notes
Text
AH I REMEMBERED WHAT I WAS GONNA SAY EARLIER but it's kind of stupid, lmao.
So my partner is getting into brewing beer and I got them a Tilt, which is a Bluetooth hydrometer. It measures specific gravity and temperature, which are things you want to know so that you don't kill your yeast or whatever. Except the sensor's Bluetooth range is super short, and it basically runs via a phone app, and the temperature we're logging currently is the crawlspace, accessible via the staircase closet. So they were like, wait, what do we do about this, because I can't leave my phone in the closet, that's my alarm clock.
In a kind of ridiculous turn of life imitating art, I was like, hold up, I got just the thing right at my desk. Bam. Old phone. We just needed to scrounge up a charger because the battery is so dead that after charging just enough to power on it claimed it was at 53% (to be fair to it, there is a very real chance that it's correct, and it just holds no charge at this point so the capacity is just THAT low) and now it lives in the closet logging sensor data.
And I was like, you know...didn't I just solve a major story detail with a much larger version of this...yeah, no, this is all vaguely familiar somehow, power supply issues and all. Kind of cool that the concept works though. Kind of weird that it came up at all?
We are not gonna talk about the fact that I still have at least two more ancient-ass phones in a drawer where that came from because look, man, sometimes you just need a camera/mic/mini computer with Bluetooth and wifi that fits in a pocket, and people just get rid of these things, but not me. I actually could build a shitty security system out of them if I was reaaaally inclined. I mean. I'm not. But it's technically possible.
For real though, If I pick up any stupid maker projects I still high-key am thinking about slapping Bluetooth into a necomimi headset and running that through an Arduino and learning to code just enough to let me skip songs/change the volume on Spotify with my brain, because it's entirely doable, and I mean yeah I could do that on my phone remotely too, but that's not funny, now, is it. I'm just not sure it's $350+ of parts funny. Kind of a big investment just to prove the point that haha look I am the extremely ADHD type of lazy where I would rather solve a problem via the most convoluted and complicated Rube-Goldberg type ass machine way possible rather than just perform a single simple action.
YEAH I'VE BEEN THIS SCATTERED ALL DAY AND I REALLY SHOULD GO TO BED SHOULDN'T I. I started playing Satisfactory. Mistakes were made. I'm going to dream about conveyor belts again and I did it to myself...
#you know I used to mostly blog about witchcraft and paganism#and now I'm like. you know what I want to do? chain an EEG sensor to the Spotify API and skip songs with my brain.#it's kind of like magic when you put it like that. maybe things haven't actually changed that much after all#the headset idea actually came about bc I'd gotten so far into the writing zone that I literally just. tried to skip a song with my brain.#because I had so much reploid characters on my mind that it just sounded like a normal course of action I should be able to take#obviously it didn't work and cue me sitting there for a full 3 seconds going 'why didn't it. wait. why did I think it would?'#followed immediately after by 'YEAH BUT I PROBABLY COULD DO THAT ACTUALLY'#because you just Cannot write a character like Glitch without it rubbing off on you a little bit and WWGD kicked in real hard lmao#well obviously he'd [ridiculous chain of ideas ending in 'anyway I installed some shit and now I can control Spotify with my mind']#and I gotta say I do not like the idea of sticking a sensor on the *inside* of my skull. sounds very bad.#but it doesn't have to be on the inside to work soooo there's that!#I have a friend who for quite a long time had a rare earth magnet in one finger so he could find live wires by touch#he ended up removing it for work eventually but when I say I was jelly. man. but also kinda squeamish about it.#I do not like sharp things and I am Very funny about my fingers as an artist/writer/used to be musician.#but man that sounds cool. I want the magnet senses. I don't think I want them enough to have a magnet under my skin though#I think I wouldn't use them enough for that to be helpful actually lmao#anyway do I even need more senses? probably not. mine are already unfiltered and loud as shit.#'boy I wish I could sense magnetic fields' says idiot guy who can hear the mains hum even with no electronics currently turned on#like when the power goes out I can FEEL the fucking difference in the air and it's unnaturally quiet and kinda spooky#I do not think I need help on this front actually. I think I got it handled pretty okay lol
3 notes
·
View notes
Text
12V DC Adapter: A Comprehensive Guide
Introduction
A 12V DC adapter is a common power supply unit used in various electronic devices, from routers and LED strips to security cameras and small appliances. It converts alternating current (AC) from a wall outlet into a stable 12-volt direct current (DC), ensuring safe and efficient operation. This guide explores its functions, types, applications, and how to choose the right one for your needs.
What Is a 12V DC Adapter?
A 12V DC adapter is an external power supply that provides 12 volts of direct current to electronic devices. It typically consists of:
A plug for the AC wall outlet
A transformer to step down voltage
A rectifier to convert AC to DC
A regulator to maintain a steady 12V output
These adapters come in different sizes, power ratings, and connector types to match various devices.
Types of 12V DC Adapters
Not all 12V DC adapters are the same. Key variations include:
1. Fixed vs. Adjustable Voltage
Fixed 12V adapters deliver a constant voltage, ideal for devices requiring stable power.
Adjustable adapters allow voltage adjustment (e.g., 3V-12V), useful for testing electronics.
2. Regulated vs. Unregulated
Regulated adapters maintain a steady 12V output even under load fluctuations.
Unregulated adapters may vary in voltage, suitable for simple, low-power devices.
3. Plug Types & Polarity
Connector types (barrel jack, USB, etc.) must match the device.
Polarity (center-positive or center-negative) must align to avoid damage.
Common Uses of a 12V DC Adapter
12V DC adapters power a wide range of devices, including:
Networking Equipment: Routers, modems, and switches.
LED Lighting: Strips, bulbs, and signage.
Security Systems: Cameras, monitors, and alarms.
Consumer Electronics: Radios, speakers, and portable TVs.
DIY Electronics: Arduino projects and small motors.
How to Choose the Right 12V DC Adapter
Selecting the correct 12V DC adapter involves checking:
1. Voltage & Current Rating
Must match the device’s requirements (e.g., 12V, 2A).
Higher amperage is acceptable, but voltage must be exact.
2. Connector Size & Polarity
Measure the device’s jack diameter (e.g., 5.5mm x 2.1mm).
Verify polarity markings (e.g., "+" on the inner pin).
3. Safety Certifications
Look for UL, CE, or RoHS compliance for reliability.
Troubleshooting a Faulty 12V DC Adapter
If your device isn’t working, check:
Loose connections (wiggle the plug).
Burnt smell or overheating (indicates internal failure).
Voltage output (use a multimeter to test).
If the adapter fails, replace it with a compatible model.
Conclusion
A 12V DC adapter is a versatile power solution for many electronics. Understanding its types, applications, and selection criteria ensures optimal performance and device safety. Always verify specifications before purchasing to avoid compatibility issues.

1 note
·
View note
Video
youtube
The GPRS-Based Smart Medicine Reminder is a microcontroller-based health monitoring system designed to assist individuals—especially the elderly, patients, and busy professionals—in remembering their medication schedules. This intelligent system combines the functionality of an RTC (Real-Time Clock), Arduino, GSM/GPRS Module, and Voice Playback to deliver timely medicine reminders using audio alerts, SMS notifications, and automated voice calls. This innovative solution ensures that a user never misses a dose by triggering alerts at pre-set times throughout the day. The system is designed to be user-friendly, reliable, and portable, making it suitable for home or clinical environments.***********************************************************If You Want To Purchase the Full Working Project KITMail Us: [email protected] Name Along With You-Tube Video LinkWe are Located at Telangana, Hyderabad, Boduppal. Project Changes also Made according to Student Requirementshttp://svsembedded.com/ https://www.svskits.in/ http://svsembedded.in/ http://www.svskit.com/M1: 91 9491535690 M2: 91 7842358459 We Will Send Working Model Project KIT through DTDC / DHL / Blue Dart We Will Provide Project Soft Data through Google Drive1. Project Abstract / Synopsis 2. Project Related Datasheets of Each Component3. Project Sample Report / Documentation4. Project Kit Circuit / Schematic Diagram 5. Project Kit Working Software Code6. Project Related Software Compilers7. Project Related Sample PPT’s8. Project Kit Photos9. Project Kit Working Video linksLatest Projects with Year Wise YouTube video Links152 Projects https://svsembedded.com/ieee_2024.php133 Projects https://svsembedded.com/ieee_2023.php157 Projects https://svsembedded.com/ieee_2022.php135 Projects https://svsembedded.com/ieee_2021.php 151 Projects https://svsembedded.com/ieee_2020.php103 Projects https://svsembedded.com/ieee_2019.php61 Projects https://svsembedded.com/ieee_2018.php171 Projects https://svsembedded.com/ieee_2017.php170 Projects https://svsembedded.com/ieee_2016.php67 Projects https://svsembedded.com/ieee_2015.php55 Projects https://svsembedded.com/ieee_2014.php43 Projects https://svsembedded.com/ieee_2013.php1600 Projects https://www.svskit.com/2025/01/1500-f...***********************************************************1. Smart Medicine Reminder Box | e-pill Medication Reminders,2. MeDuino - Automatic Medicine Reminder. Arduino diy,3. Medicine Reminder using Arduino by Saddam Khan,4. Smart Medicine Box,5. Arduino Uno based Medicine reminder project,6. Pill Reminder with Arduino version,7. Automatic patient medicine reminder system || Best project center in Bangalore,8. Automatic Pill Reminder Using Arduino uno,9. Raspberry Pi Based Speaking Medication Reminder Project,10. IoT Based Smart Medicine Box,11. Medicine Reminder simulation on proteus,12. Automatic Medicine Reminder with date using Arduino,13. Medicine reminder,14. Smart Medicine Pill Reminder IOT Project using Aurdino,15. Medicine Reminder Box Using Arduino,16. Smart Medicine Dispenser,17. Medicine reminder/Alarm using Arduino,18. MedBox: Smart Medication Box with Arduino - self test,19. Medicine Reminder System | Smart Medicine Pill Reminder Project,20. Medicine reminder using Arduino,21. Best Medicine Reminder DIY,22. Explanation of our Medicine Reminder Project,23. SmartSF Smart Pill Box,24. Medication Reminder using PIC Microcontroller,25. Medicine Reminder Using Home Made Arduino,26. Medicine Reminder System Using Microcontroller,27. ANDROID APP BASED SMART MEDICATION REMINDER SYSTEM,28. IOT Based Medicine Reminder System with Email Alert,29. Simulation: Photoresistor-based Smart Pill Dispenser | Schematic Diagram, Arduino Code
0 notes
Text
Smarter Schalter für Gleichspannung: Der Shelly i4 DC im Detail

Wer sein Smart Home mit intelligenten Schaltern erweitern möchte, stößt schnell auf die Shelly-Serie. Mit dem Shelly i4 DC bietet Shelly eine spezielle Version des beliebten Shelly i4, die ausschließlich für Gleichspannung (DC) im Bereich von 5 bis 24V ausgelegt ist. Achtung: Im Gegensatz zur AC-Variante des Shelly i4, die für Netzspannung von 110 bis 240V geeignet ist, darf der Shelly i4 DC keinesfalls an Wechselspannung (AC) betrieben werden! https://youtu.be/XHFnV_hSHxE Dieses Gerät eignet sich ideal für Niederspannungsanwendungen, sei es zur Steuerung von Niedervolt-Schaltkreisen, Mikrocontroller-Systemen oder Gleichstrominstallationen in Fahrzeugen, Solaranlagen und Industrieumgebungen.
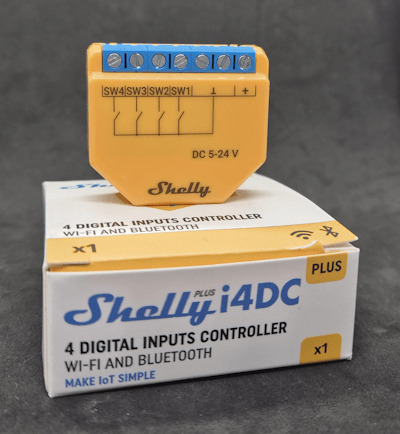
Shelly i4 DC
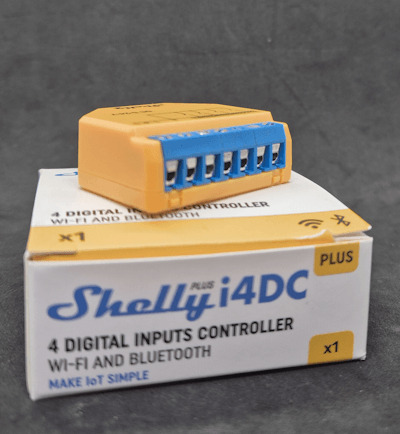
Shelly i4 DC - Schraubklemmen

Shelly i4 DC - Rückseite
Einsatzzweck des Shelly i4 DC
Der Shelly i4 DC besitzt vier Eingänge, die als digitale Schalter für Smart-Home-Systeme dienen. Er kann keine Verbraucher direkt schalten, sondern sendet die Schaltsignale über WLAN oder MQTT an andere Shelly-Geräte mit Relais wie den Shelly 1 Plus oder den Shelly 1PM Mini, der zusätzlich Strom, Spannung und Leistungsaufnahme messen kann. Durch diese Funktion eignet sich der Shelly i4 DC ideal für die folgenden Anwendungen: - Taster-Integration für Shelly-Relais Der Shelly i4 DC kann als externer smarter Taster für Shelly-Relais fungieren. Beispielsweise kann ein herkömmlicher Taster mit 12V oder 24V angeschlossen werden, dessen Signal dann über WLAN an ein Shelly 1 Plus oder Shelly 1PM Mini weitergeleitet wird. Damit lassen sich Lampen, Ventilatoren oder andere Verbraucher gezielt steuern – ohne direkte Verkabelung zwischen Schalter und Verbraucher. - Erweiterung für Mikrocontroller-Projekte (Arduino, ESP32) In Arduino- oder ESP32-Projekten kann der Shelly i4 DC als smarte Eingabe-Schnittstelle genutzt werden. Über MQTT oder Webhooks lassen sich Signale an den Mikrocontroller senden, um bestimmte Aktionen zu triggern, etwa das Aktivieren einer LED-Anzeige, das Speichern von Sensordaten oder das Starten eines Motors über ein externes Relais. - Smarte Steuerung in 12V- oder 24V-Systemen (Wohnmobile, Solaranlagen) In Wohnmobilen, Booten oder Solaranlagen gibt es oft Niederspannungs-Systeme mit 12V oder 24V. Der Shelly i4 DC kann dort als Taster-Schnittstelle eingesetzt werden, um beispielsweise über WLAN ein Shelly-Relais zu steuern, das die Beleuchtung schaltet oder eine Solarbatterie umschaltet. - Virtuelle Szenen-Steuerung mit Home Assistant & Co. Der Shelly i4 DC kann in Smart-Home-Systeme wie Home Assistant, ioBroker oder MQTT eingebunden werden, um komplexe Automatisierungen zu ermöglichen. Beispielsweise könnte ein Taster am Shelly i4 DC eine Lichtszene aktivieren, eine Jalousie fahren oder einen Alarm-Modus schalten – alles ohne direkt mit der jeweiligen Hardware verbunden zu sein.
Technische Daten
Der Shelly i4 DC ist ein smarter Eingangsschalter für Gleichspannung (5–24V) mit vier unabhängigen Eingängen. Er unterstützt WLAN (2,4 GHz) und Bluetooth 4.2 und ermöglicht die Steuerung von Smart-Home-Geräten über MQTT, Webhooks oder Skripting. Stand 16.02.2025 gibt es keine Gen3-Version, sondern nur die Gen2-Variante, die mit einem etwas älteren ESP32-U4WDH ausgestattet ist. Für die Hauptfunktion des Geräts – die Weiterleitung von Schaltsignalen – reicht die Rechenleistung jedoch vollkommen aus. KategorieTechnische DatenBetriebsspannung5–24V DCLeistungsaufnahmeEingänge4 digitale Taster-EingängeProzessor (MCU)ESP32-U4WDHSpeicher4 MB FlashKommunikationWLAN 2,4 GHz (802.11 b/g/n), Bluetooth 4.2RF LeistungUnterstützte ProtokolleMQTT, Webhooks, SkriptingGehäusegröße (HxBxT)37 × 42 × 16 mmGewicht17 gUmgebungstemperatur-20 °C bis 40 °CLuftfeuchtigkeit30 % bis 70 % RHMontageUnterputz, WanddoseAnschlussklemmen0,5–1,5 mm² Leiterquerschnitt, max. 0,4 Nm Drehmoment Die offizielle Dokumentation findest du unter https://www.shelly.com/de/products/shelly-plus-i4-dc dort gibt es derzeit auch die Möglichkeit einpaar Prozente zu sparen ;). Erweiterungsmöglichkeiten und Reset-Funktion Auf der Rückseite befindet sich die Schnittstelle für das bekannte Shelly AddOn. Über diese Erweiterung lassen sich analoge und digitale Sensoren anschließen und auswerten, wodurch der Funktionsumfang des Geräts erheblich erweitert werden kann.

Rückseite des Shelly i4 DC Ebenfalls auf der Rückseite befindet sich der Reset-Taster, mit dem das Gerät bei Bedarf neugestartet werden kann. Hält man die Taste länger gedrückt, wird der Shelly auf die Werkseinstellungen zurückgesetzt – praktisch, falls Probleme auftreten oder eine neue Konfiguration notwendig ist.
Vergleich mit dem Shelly i4 für Wechselspannung
Auf meinem Blog habe ich bereits den Shelly i4 AC der dritten Generation in verschiedenen Beiträgen vorgestellt. Dabei habe ich gezeigt, wie sich das Gerät in unterschiedliche Smart-Home-Umgebungen integrieren lässt und welche praktischen Einsatzmöglichkeiten es bietet. Falls du mehr über die bisherigen Anwendungen erfahren möchtest, findest du hier eine Übersicht der relevanten Beiträge: - Shelly i4 Gen3 im Test: Vier Eingänge, unendliche Möglichkeiten - Shelly i4 und Shelly Wall Switch: Intelligente Szenen für smarte Gerätesteuerung

Shelly i4 Version für Wechselspannung und Gleichspannung Ein wesentlicher Unterschied zwischen den beiden Varianten ist die Betriebsspannung: - Der Shelly i4 AC ist für Wechselspannungen zwischen 110 und 240V ausgelegt. - Der Shelly i4 DC hingegen arbeitet mit Gleichspannungen zwischen 5 und 24V und darf nicht an Wechselspannung betrieben werden. Zusätzlich gibt es den Shelly i4 für Wechselspannung bereits in der dritten Generation (Gen3). Diese neue Version ist optisch unter anderem daran zu erkennen, dass die Anschlussklemmen schwarz sind und mit Kreuzschrauben befestigt werden. Die DC-Variante gibt es bisher (Stand 16.02.2025) nur in der zweiten Generation (Gen2). Hier ist eine übersichtliche Tabelle mit den wesentlichen Unterschieden zwischen dem Shelly i4 AC und dem Shelly i4 DC: MerkmalShelly i4 AC (Gen3)Shelly i4 DC (Gen2)Betriebsspannung110–240V AC, 50/60 Hz5–24V DCStromverbrauchMicrocontroller (MCU)ESP-Shelly-C38FESP32-U4WDHFlash-Speicher8 MB4 MBAnschlussklemmenSchwarz, KreuzschraubenNeon Orange, SchlitzschraubenLeiterquerschnitt0.2–2.5 mm² / 24–14 AWG0.5–1.5 mm² / 20–16 AWGMax. Drehmoment der Klemmen0.4 Nm / 3.5 lbin0.4 Nm / 3.5 lbinAbisolierlänge6–7 mm5–6 mmGehäusefarbeOrangeNeon Orange (Pantone 2010C)Gewicht19 g17 gWLAN-Protokoll802.11 b/g/n802.11 b/g/nWLAN-Frequenzband2401–2483 MHz2400–2495 MHzBluetooth4.2 mit BLE4.2Bluetooth ReichweiteBis zu 10 m (indoor), 30 m (outdoor)Bis zu 10 m (indoor), 30 m (outdoor)MQTT-UnterstützungJaJaWebhooks (URL-Actions)20 mit 5 URLs pro Hook20 mit 5 URLs pro HookScriptingJaJaInterner TemperatursensorJaJa
Praktischer Einsatz: Fenster- und Türüberwachung mit Reed-Kontakten
Ein idealer Anwendungsfall für den Shelly i4 DC ist die Überwachung von Fenstern und Türen mithilfe von Reed-Kontakten. Diese magnetischen Sensoren erkennen, ob ein Fenster oder eine Tür geöffnet oder geschlossen ist. Durch den Anschluss der Reed-Kontakte an die Eingänge des Shelly i4 kann das Gerät den Status erfassen und über WLAN an ein Smart-Home-System wie Home Assistant, ioBroker oder MQTT weiterleiten. Mögliche Szenarien: - Smarte Alarmanlage: Bei einem unbefugten Öffnen wird eine Benachrichtigung an das Smartphone gesendet oder eine Sirene ausgelöst. - Lichtsteuerung: Das Licht im Raum schaltet sich automatisch an, wenn eine Tür geöffnet wird. - Fenster-Check für Heizungssteuerung: Falls ein Fenster geöffnet ist, wird die Heizung automatisch heruntergeregelt, um Energie zu sparen. Da der Shelly i4 DC ausschließlich mit Gleichspannung (5–24V) arbeitet, eignet er sich hervorragend für batteriebetriebene oder Niederspannungs-Überwachungssysteme. Damit bietet er eine einfache, aber leistungsstarke Möglichkeit zur smarten Fenster- und Türüberwachung. Für den Aufbau der kleinen Schaltung verwende ich nachfolgende Bauteile: - einen Shelly i4 DC* - vier Reed-Kontakte* - ein Universalnetzteil* - diverse Kabel Hinweis von mir: Die mit einem Sternchen (*) markierten Links sind Affiliate-Links. Wenn du über diese Links einkaufst, erhalte ich eine kleine Provision, die dazu beiträgt, diesen Blog zu unterstützen. Der Preis für dich bleibt dabei unverändert. Vielen Dank für deine Unterstützung!

Shelly i4 DC mit Universalnetzteil Wie funktioniert ein Reed-Kontakt? Ein Reed-Kontakt ist ein magnetisch gesteuerter Schalter in einer Glasröhre. Ohne Magnet bleibt der Kontakt offen. Nähert sich ein Magnet, ziehen sich die Metallzungen an und schließen den Stromkreis. Entfernt sich der Magnet, öffnet der Kontakt wieder. Perfekt für Tür-/Fensterüberwachung mit dem Shelly i4 DC.

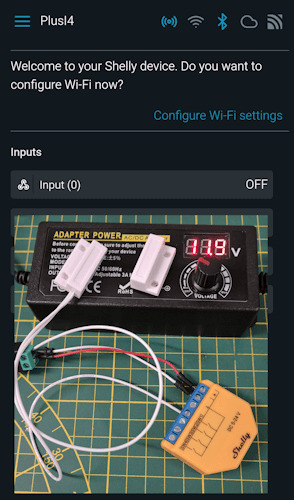
Reed Kontakt als einfaches Bauteil Einrichtung in der Shelly Smart Control App Der Shelly i4 DC lässt sich, wie alle anderen Shelly-Geräte, bequem in der Shelly Smart Control App einrichten. Der Einrichtungsprozess unterscheidet sich nicht wesentlich von anderen Shelly-Geräten. Falls du eine detaillierte Anleitung sehen möchtest, schau dir mein Video zur Einrichtung des Shelly 2PM an – der Ablauf ist nahezu identisch! 🎥⬇️ https://youtu.be/SgIFZ1vCXxY Nutzung außerhalb des lokalen WLANs Möchtest du deinen Shelly außerhalb deines Heimnetzwerks betreiben, etwa in einem Wohnwagen, kannst du die Einbindung ins WLAN überspringen. Stattdessen lässt sich der Shelly auch über seine integrierte Web-Oberfläche steuern. Dazu einfach: - Mit dem vom Shelly bereitgestellten Access Point verbinden. - Im Browser die IP-Adresse 192.168.33.1 eingeben. So kannst du den Shelly direkt lokal konfigurieren und bedienen, ohne Internetverbindung. 🚀 Anschluss eines Reed-Kontakts an den Shelly Der Anschluss eines Reed-Kontakts am Shelly ist denkbar einfach: - Der Reed-Kontakt hat nur zwei Drähte, die nicht vertauscht werden können. - Ein Draht wird mit dem Minuspol (GND) des Shelly verbunden. - Der andere Draht kommt an einen der vier Eingänge (SW1–SW4).
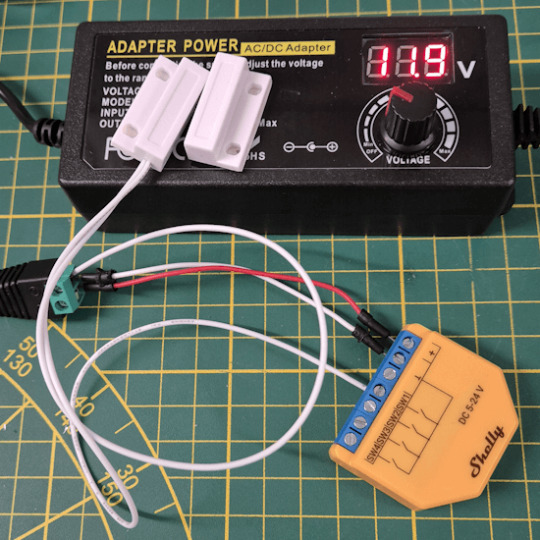
Shelly i4 DC mit Reed-Kontakt an SW1

Schaltung - Shelly i4 DC mit Reed-Kontakt In der Shelly-Software ist keine zusätzliche Konfiguration erforderlich – der Kontakt wird direkt erkannt und kann für Automationen genutzt werden. 🔧✅

Shelly i4 DC - Reed-Kontakt - ON
Shelly i4 DC - Reed-Kontakt - OFF Mit sollch einem Reed-Kontakt könnte man ebenso nun den bereits gezeigten smarten Briefkasten nachbauen, du bräuchtest, somit lediglich eine Stabile Spannung zwischen 5 und 24V neben diesem. Worauf muss man bei Reed-Kontakten achten? Reed-Kontakte sind empfindliche Schalter für geringe Ströme und sollten entsprechend vorsichtig eingesetzt werden. Hier sind die wichtigsten Punkte, die du beachten solltest: - Maximale Strom- und Spannungsbelastung - Reed-Kontakte sind nicht für hohe Ströme ausgelegt. Üblicherweise liegt die Belastungsgrenze im Milliampere- bis niedrigen Ampere-Bereich. - Zu hohe Ströme oder Spannungsspitzen können die Kontaktzungen verschweißen, sodass der Schalter dauerhaft geschlossen bleibt. - Einsatz mit Shelly i4 DC - Der Shelly arbeitet mit niedriger Spannung und minimalem Stromfluss, weshalb Reed-Kontakte hier sicher verwendet werden können. - Sie dienen lediglich als Eingabeschalter, sodass keine Last über den Kontakt selbst fließt. - Entprellung und Kontaktalterung - Mechanische Schwingungen beim Schließen des Kontakts können kurzzeitige Mehrfachschaltungen auslösen (Prellen). - Moderne Mikrocontroller und Smart-Home-Geräte wie der Shelly filtern diese Störungen meist automatisch. - Magnetposition beachten - Damit der Reed-Kontakt zuverlässig schaltet, muss der Magnet korrekt ausgerichtet sein. - Ein zu starker Magnet kann den Kontakt dauerhaft geschlossen halten.
Fazit und Ausblick
Der Shelly i4 DC ist eine leistungsstarke Ergänzung für Smart-Home-Systeme, insbesondere in Niederspannungsumgebungen wie Wohnwagen, Solaranlagen oder batteriebetriebenen Schaltungen. Durch die Möglichkeit, Taster oder Sensoren zu integrieren und Signale per WLAN oder MQTT weiterzugeben, lässt er sich vielseitig einsetzen. Da ich selbst keinen Wohnwagen habe und meine Solaranlage autark arbeitet, werde ich den Shelly in meinem nächsten Mikrocontroller-Projekt mit dem Arduino UNO R4 und dem "Plug and Make Kit" einsetzen. Ich bin gespannt, welche neuen Möglichkeiten sich dabei ergeben und werde die Ergebnisse im nächsten Beitrag vorstellen! 🚀 Read the full article
0 notes
Text
Arduino Projects
Arduino is a microcontroller platform made to facilitate hardware integration and programming. Each of its boards, including the Arduino Uno, Nano, and Mega, is designed to meet a distinct set of requirements. When used in conjunction with the Arduino IDE, users may easily write, upload, and execute code.
Users can design projects ranging from basic LED blinkers to intricate robotics and Internet of Things systems thanks to the platform's extensive library of sensors, modules, and components.
Top Arduino Project Ideas
System for Home Automation
An Arduino with a smartphone app can be used to control lights, fans, and other appliances. Your system can become more intelligent and energy-efficient by integrating sensors like temperature or motion detectors.
The weather station
Construct a personal weather station to track air pressure, temperature, and humidity. You can gather data using sensors like the DHT11 and BMP180, show it on an LCD screen, or post it online for remote access.
Robot That Avoids Obstacles
This well-liked project for robotics novices is teaching a robot to use ultrasonic sensors to navigate around obstacles.
Intelligent Plant Monitoring System
An Arduino-based monitoring system that measures temperature, light intensity, and soil moisture can help you keep your plants healthy. Even when it's time to water your plants, it may let you know.
Alarm System with Arduino
Create an Arduino-powered alarm system with a buzzer, keypad, and motion sensors to increase security. For workplace or home security, this project is perfect.
Pet Feeder with Automation
Construct a pet feeder that automatically delivers food depending on a weight sensor reading or at predetermined intervals.
Internet of Things Door Lock
Create a smart door lock that you can operate from a distance using Bluetooth or Wi-Fi by integrating an Arduino with an RFID scanner or fingerprint sensor.
Make Your Own Game Console
Convert an Arduino board with basic buttons and a display into a vintage game console.
How to Get Started with Arduino Projects
Select the appropriate board:
Choose an Arduino board based on the needs of your project. The Arduino Uno is an excellent place to start for the majority of novices.
Assemble the parts:
Determine the sensors, actuators, and other parts your project needs. A wide range of Arduino-compatible components are available on websites like Adafruit, SparkFun, and Amazon.
Set up the Arduino IDE:
Install the Arduino IDE by downloading it from Arduino.cc. You can develop code and upload it to your board using this software.
The universe of creativity and invention is unlocked by Arduino projects. Arduino offers the resources and network to realize your ideas, whether you want to study robotics, automate your house, or develop a ground-breaking technology.
Explore the world of Arduino now and unleash your creative side! Do you have a favorite idea for an Arduino project? Tell us about it in the comments section below.
To know more, click here.
0 notes
Text
Mittlerweile befinden wir uns bereits in der zweiten Woche unseres Aufenthaltes in Estland. Die Menschen, die wir im Astangu College kennengelernt haben, sind sehr freundlich, und die anfänglichen Schwierigkeiten im Hotel haben sich inzwischen seit ein paar Tagen wieder gelegt. Die Bilder in diesem Post sind nur ein Bruchteil dessen, wie die erste Woche soweit abgelaufen ist.
Im Laufe der ersten Woche haben die Auszubildenden des EuroBBWs im IT-Bereich jeweils ein Projekt mit einem Arduino begonnen, welches ein Mikrocontroller ist, welcher für kleinere Anwendungsgebiete genutzt werden kann, die nicht viel Rechenleistung benötigen. In meinem Fall ist dies eine Art Wecker. Ich musste mich zwar erstmal mehr mit dem Arduino im Allgemeinen beschäftigen, da ich mit dem physischen Aspekt des Verbindens von Komponenten, wie zum Beispiel Knöpfen, mit den verfügbaren Pins mit Hilfe von Kabeln noch nicht so vertraut war, aber trotz den zu Beginn noch mangelnden Kenntnissen habe ich es bis zum Ende der Woche geschafft, dass man bei meinem Wecker die Uhrzeit und das Datum umstellen konnte. Auch wenn theoretisch auch eine Zeit für einen Wecker eingebaut war, bei welchem auch ein Geräusch ertönt bis ein Knopf gedrückt wird, hatte ich in der ersten Woche noch keine Zeit dafür einzubauen, dass man die Zeit des Alarms über Knöpfe umstellen kann.
Am Wochenende waren wir unter anderem auf einem Wanderpfad unterwegs, wo wir eventuell erst recht spät bemerkt hatten, dass wir eben nicht im Kreis gelaufen sind, und haben an einem anderen Tag ein japanisches Restaurant mit äußerst leckeren Gerichten und Getränken besucht.
Am Montag habe ich die manuellen Einstellungen für den Wecker eingerichtet und zwei von anderen Usern online zur Verfügung gestellten Lieder für den Alarm eingebaut. Somit fehlt eigentlich nur noch, dass man auch Per Knopfdruck zwischen diesen wechseln kann, wofür ich am Montag allerdings nicht mehr die Zeit hatte. Somit konnte ich dies erst am Folgetag einbauen, und habe zudem vier weitere Klingeltöne eingefügt.
In der Zwischenzeit hat unsere HW-lerin folgende Erfahrungen gemacht:
In der Küche des Astangu ist es sehr angenehm, da man hier wirklich seinen eigenen Arbeitsplatz mit allem grundlegend wichtigem hat. In der Küche und auch in der Backstube lernt man vieles leckeres zu kochen und zu backen. Meistens sind es eher klassisch estnische Speisen, wie zum Beispiel Käseschnecken, Jubiläumsbrot, aber auch Brotsuppe und Eintöpfe, die man herstellen und probieren darf.
Zudem möchte ein weiterer IT-ler über sein im Astangu geführtes Projekt und seine Erfahrungen hier berichten:
Im Verlauf der letzten paar Tage, die ich im Astangu verbracht habe, habe ich zuerst die kuriose digitale Welt in Estland erkundet, im Zuge dessen uns die verschiedenen stadlichen Systeme zur Verwaltung gezeigt wurden.
Daraufhin fing ich ein Projekt an, bei dem ich mit einem Arduino ein kleines Schloss gebaut habe, das mit einem RFID-Chip entsperrt wird.
Dies habe ich in 3 Abschnitte aufgeteilt:
1. Ich habe ein Programm geschrieben, mit dem ich die verschiedenen Blöcke eines RFID-Chip überschreiben kann.
2. Anschließend habe ich ein Programm erstellt, das die Inhalte ausliest. Desweiteren diente dieses Programm dazu zu entdecken, wie man die Werte in einem Block zu einem String formieren kann.
3. Der letzte Teil war die Implementierung des Schlosses.


0 notes
Text
Fire Detection and Alarm System for Home and Industrial Safety
Introduction Project Overview Components Used Circuit Diagram and Working Principle Step-by-Step Guide Applications Benefits Conclusion Introduction Fire Detection and Alarm System for Home and Industrial Safety is an innovative project designed to detect potential fire hazards and alert users in real-time. Utilizing an Arduino UNO microcontroller, sensors, and a relay module, this system…
0 notes
Text
A Passive Infrared (PIR) sensor detects infrared radiation emitted by objects, especially humans. The sensor outputs a digital signal (HIGH or LOW) depending on whether it senses motion. It’s called "passive" because it doesn’t emit any energy; it just senses the infrared rays from the surrounding environment.
How PIR Sensors Work:
The PIR sensor consists of two key components:
Pyroelectric sensor: Detects infrared radiation.
Fresnel lens: Focuses the IR signals on the pyroelectric sensor. When a warm body (like a human) moves across the sensor’s field of view, the infrared radiation changes, and the sensor detects this change, sending a HIGH signal.
Components Required:
Arduino (e.g., Uno, Nano, or Mega)
PIR Sensor
Jumper Wires
Breadboard
LED (for visual feedback)
220Ω Resistor (for the LED)
Circuit Diagram:
sql
Copy code
[Insert a simple diagram showing the connections between Arduino, PIR sensor, and LED]
Connections:
Connect the VCC pin of the PIR sensor to the 5V pin of the Arduino.
Connect the GND pin of the PIR sensor to GND on the Arduino.
Connect the OUT pin of the PIR sensor to digital pin D2 on the Arduino.
Optionally, connect an LED to pin D13 (with a 220Ω resistor for safety) to provide a visual indicator when motion is detected.
Arduino Code:
Now that you have connected the PIR sensor, let’s upload some code to the Arduino. The following code reads the PIR sensor’s output and lights up an LED when motion is detected.
cpp
Copy code
// PIR Sensor Pin Definitions
int pirPin = 2; // Connect the PIR sensor output pin to D2
int ledPin = 13; // LED pin (optional for motion indication)
void setup() {
pinMode(pirPin, INPUT); // PIR sensor as input
pinMode(ledPin, OUTPUT); // LED as output (optional)
Serial.begin(9600); // Initialize Serial Monitor
}
void loop() {
int pirState = digitalRead(pirPin); // Read PIR sensor's output
if (pirState == HIGH) { // Motion detected
digitalWrite(ledPin, HIGH); // Turn on LED
Serial.println("Motion detected!");
} else { // No motion
digitalWrite(ledPin, LOW); // Turn off LED
Serial.println("No motion");
}
delay(1000); // 1 second delay between readings
}
Explaining the Code:
pinMode(): Defines whether the pin is an input or output.
digitalRead(): Reads the PIR sensor output (HIGH or LOW).
digitalWrite(): Controls the LED based on sensor output.
Serial.begin(): Starts serial communication for debugging.
When the PIR sensor detects motion, the pirState variable becomes HIGH, turning on the LED and printing "Motion detected!" to the serial monitor.
Testing the Setup:
Connect your Arduino to your computer and upload the code.
Open the Serial Monitor from the Arduino IDE (Tools > Serial Monitor).
Wave your hand in front of the PIR sensor to test if it detects motion.
If motion is detected, the LED will light up and the message will appear in the Serial Monitor.
Adjusting the PIR Sensor Sensitivity:
Most PIR sensors come with two potentiometers for adjusting sensitivity and delay time. Sensitivity determines the range of detection, and delay time sets how long the output remains HIGH after motion is detected.
Sensitivity Potentiometer: Rotate to increase or decrease detection range.
Delay Time Potentiometer: Adjust how long the PIR sensor output stays HIGH after motion.
Applications of PIR Sensors:
Home Security Systems: Detect intruders and trigger alarms or cameras.
Smart Lighting: Automatically turn lights on when someone enters a room.
Automatic Door Openers: Use PIR sensors to detect approaching people and open doors.
Energy-Efficient Devices: Turn off appliances or lights when no motion is detected, reducing power consumption.
Troubleshooting:
False Positives: If the sensor triggers without motion, reduce the sensitivity or place the sensor in a more controlled environment.
No Motion Detection: Double-check the wiring and ensure that the sensor is properly powered and connected to the correct pins.
Conclusion:
You have successfully interfaced a PIR sensor with an Arduino to create a basic motion detection system. This simple project can be expanded into various applications like security alarms, smart home systems, and automation projects.
By following this blog, beginners will get a solid foundation in interfacing a PIR sensor with an Arduino. Advanced users can add features like buzzer alarms, wireless communication, or integra
ChatGPT can make mist
0 notes
Video
youtube
KALIAN WAJIB PUNYA! Stop Kontak Timer dan kontrol jarak jauh Rabit Smart...
Link Pembelian TERMURAH : https://s.shopee.co.id/8AAYWpwBfK
Link Grup Komunitas Meja Unbox : Grup WhatsApp : https://chat.whatsapp.com/BiEQ2v8IDsg... Grup Telegram : https://t.me/+Yg5a0rFFgmc2ZDFl
Hal pertama yang membuat baterai kita cepat rusak adalah ketika kita lupa melepaskan charger ketika baterai kita sudah 100% yang dimana hal tersebut bisa membuat baterai soak, rusak, bahkan juga bisa menyebabkan overheat pada smartphone kita, oleh karena itu, colokan dari rabit yang memiliki smart system ini bisa membuat seluruh perangkat elektronik kami memiliki timer, dan juga bisa dikontrol dari jarak jauh, bahkan support google asisten loh ! untuk selengkapnya silahkan tonton video sampai selesai
YouTube : youtube.com/MejaUnbox TikTok : tiktok.com/mejaunbox Instagram : instagram.com/meja.unbox Facebook Page : facebook.com/mejaunbox Twitter : x.com/MejaUnbox
smart home smart home gadgets smart home china smart home cleaning asmr smart home system smart home parody smart home indonesia smart home arduino smart home bardi smart home murah stop kontak stop kontak listrik stop kontak timer stop kontak broco stop kontak tanpa kabel stop kontak ac stop kontak panasonic stop kontak anti jeglek stop kontak saklar stop kontak paralel stop kontak terbaik stop kontak ada arus listrik semua stop kontak anti konslet smart door smart door lock smart door lock murah smart door lock 2 pintu smart door lock terbaik smart door lock kadonio smart door lock paloma smart door lock bardi smart cctv smart cctv terbaik smart cctv murah terbaik smart cctv v380 smart cctv xiaomi smart cctv outdoor terbaik smart cctv camera smart cctv tanpa wifi smart cctv terbaik 2023 smart cctv ezviz smart cctv outdoor smart cctv alarm smart cctv avaro smart cctv acome smart led smart led bulb smart led strip lights smart led philips smart led strip smart led ws2812b smart led avaro smart led light smart led bardi smart led hannochs colokan listrik colokan listrik di arab saudi colokan listrik tidak berfungsi colokan listrik 3 kabel colokan listrik nyala keduanya colokan listrik longgar colokan listrik yang bagus colokan listrik di jepang colokan listrik di thailand colokan listrik terbaik
#youtube#KALIAN WAJIB PUNYA! Stop Kontak Timer dan kontrol jarak jauh Rabit Smart Extension Wifi Power Strip Link Pembelian TERMURAH : https://s.sho
1 note
·
View note
Video
youtube
KALIAN WAJIB PUNYA! Stop Kontak Timer dan kontrol jarak jauh Rabit Smart...
Link Pembelian TERMURAH : https://s.shopee.co.id/8AAYWpwBfK
Link Grup Komunitas Meja Unbox : Grup WhatsApp : https://chat.whatsapp.com/BiEQ2v8IDsg... Grup Telegram : https://t.me/+Yg5a0rFFgmc2ZDFl
Hal pertama yang membuat baterai kita cepat rusak adalah ketika kita lupa melepaskan charger ketika baterai kita sudah 100% yang dimana hal tersebut bisa membuat baterai soak, rusak, bahkan juga bisa menyebabkan overheat pada smartphone kita, oleh karena itu, colokan dari rabit yang memiliki smart system ini bisa membuat seluruh perangkat elektronik kami memiliki timer, dan juga bisa dikontrol dari jarak jauh, bahkan support google asisten loh ! untuk selengkapnya silahkan tonton video sampai selesai
YouTube : youtube.com/MejaUnbox TikTok : tiktok.com/mejaunbox Instagram : instagram.com/meja.unbox Facebook Page : facebook.com/mejaunbox Twitter : x.com/MejaUnbox
smart home smart home gadgets smart home china smart home cleaning asmr smart home system smart home parody smart home indonesia smart home arduino smart home bardi smart home murah stop kontak stop kontak listrik stop kontak timer stop kontak broco stop kontak tanpa kabel stop kontak ac stop kontak panasonic stop kontak anti jeglek stop kontak saklar stop kontak paralel stop kontak terbaik stop kontak ada arus listrik semua stop kontak anti konslet smart door smart door lock smart door lock murah smart door lock 2 pintu smart door lock terbaik smart door lock kadonio smart door lock paloma smart door lock bardi smart cctv smart cctv terbaik smart cctv murah terbaik smart cctv v380 smart cctv xiaomi smart cctv outdoor terbaik smart cctv camera smart cctv tanpa wifi smart cctv terbaik 2023 smart cctv ezviz smart cctv outdoor smart cctv alarm smart cctv avaro smart cctv acome smart led smart led bulb smart led strip lights smart led philips smart led strip smart led ws2812b smart led avaro smart led light smart led bardi smart led hannochs colokan listrik colokan listrik di arab saudi colokan listrik tidak berfungsi colokan listrik 3 kabel colokan listrik nyala keduanya colokan listrik longgar colokan listrik yang bagus colokan listrik di jepang colokan listrik di thailand colokan listrik terbaik
#youtube#KALIAN WAJIB PUNYA! Stop Kontak Timer dan kontrol jarak jauh Rabit Smart Extension Wifi Power Strip Link Pembelian TERMURAH : https://s.sho
1 note
·
View note
Text
Awesome Arduino Projects That You Must Try 2021
Arduino Project Ideas
Arduino is basically an open-source Micro-controller board. It is based on Microchip ATMega328P Micro-controller developed by Arduino.cc. The board has sets of analogue and digital input/output (I/O) pins that can interface different expansion boards and other circuits. Arduino has 6 analog pins, 14 digital pins, and students of top MTech colleges in Jaipur can program using the Arduino IDE (Integrated development environment) via a type B USB cable. It also accepts the voltages between 7 and 20 volts and powered up by USB cable or a 9V battery.
The production files and layout for some hardware versions is also available for the students of top engineering colleges in Rajasthan. Arduino UNO version 1.0 board is first in the series of USB Arduino boards and reference model for multiple Arduino platform. The ATmega328 on the Arduino Uno offers pre-programmed with a bootloader which enables you to upload new code to it without the use of an external hardware programmer. It communicates via the original STK500 protocol. The Arduino UNO 1.0 does not utilize the FTDI USB-to-serial driver chip. Instead, it uses the Atmega16U2 (Atmega8U2 up to version R2) majorly programmed as a USB-to-serial converter.
Special Pin Functions
Students of best MTech colleges in Rajasthan uses each of the 14 digital pins and 6 Analog pins on Arduino Uno as an input or output, using pinMode, digitalWrite, and digitalRead functions. However, these pins mainly operate at 5 volts. Each pin can offer or receive 20 mA as recommended operating condition and has an internal pull-up resistorof 20-50k ohm. A maximum value of 40mA must not be exceeded on any I/O pin to avoid permanent damage to the micro-controller. It has 6 analog inputs, that is labeled as A0 through A5, each of which provide 10 bits of resolution (i.e., 1024 different values).
Additionally, some pins have specialized functions as follows:
1. External Interrupts – Pins 2 and 3 can be configured to trigger an interrupt on a low value, a rising or falling edge, or a change in value.
2. Serial- Pins 0 (RX) and 1 (TX) can be used to receive (RX) and transmit (TX) TTL serial data. Students of top Engg colleges can connect these pins to the corresponding pins of the ATmega8U2 USB-to-TTL Serial chip.
3. PWM (Pulse Width Modulation) – 3, 5, 6, 9, 10, and 11 can provide 8-bit PWM output with the analogue Write () function.
4. SPI (Serial Peripheral Interface) – 10 (SS), 11 (MOSI), 12 (MISO), 13 (SCK) support SPI communication using the SPI library.
5. TWI (Two Wire Interface) – A4 or SDA pin and A5 or SCL pin support TWI communication using the Wire library.
6. AREF (Analog REFerence) – Reference voltage can be used for the analog inputs.
Project Ideas for beginners
A giant pixel display using Arduino ?????
To read continue with ARYA COLLEGE
#Arya 1 Old Campus#Arduino RFID Smart Lock#Arduino Alarm System#Arduino Traffic Light Controller#Arduino Powered Temperature Controller#Make Your Own Amblight#Pulsating LED Cube#Gaint Pixel Display#Special Pin Function#Arduino Project Ideas
0 notes
Video
youtube
Design & Implementation of an Automated Reminder Medicine for Old People in Hospitals Using Arduino | Design and implementation of Automatic Medicine Reminder Using Arduino with GSM - SMS Alert | Design of Automatic Medication Dispenser | Automatic Pill Dispenser | Design and implementation of automatic medicine dispensing | Design and Implementation of Hospital Automatic Nursing | IOT based Medicine Reminder System with Email Alert. *********************************************************** If You Want To Purchase the Full Working Project KIT Mail Us: [email protected] Title Name Along With You-Tube Video Link We are Located at Telangana, Hyderabad, Boduppal. Project Changes also Made according to Student Requirements http://svsembedded.com/ https://www.svskits.in/ http://svsembedded.in/ http://www.svskit.com/ M1: +91 9491535690 M2: +91 7842358459 We Will Send Working Model Project KIT through DTDC / DHL / Blue Dart / First Flight Courier Service We Will Provide Project Soft Data through Google Drive 1. Project Abstract / Synopsis 2. Project Related Datasheets of Each Component 3. Project Sample Report / Documentation 4. Project Kit Circuit / Schematic Diagram 5. Project Kit Working Software Code 6. Project Related Software Compilers 7. Project Related Sample PPT’s 8. Project Kit Photos 9. Project Kit Working Video links Latest Projects with Year Wise YouTube video Links 157 Projects https://svsembedded.com/ieee_2022.php 135 Projects https://svsembedded.com/ieee_2021.php 151 Projects https://svsembedded.com/ieee_2020.php 103 Projects https://svsembedded.com/ieee_2019.php 61 Projects https://svsembedded.com/ieee_2018.php 171 Projects https://svsembedded.com/ieee_2017.php 170 Projects https://svsembedded.com/ieee_2016.php 67 Projects https://svsembedded.com/ieee_2015.php 55 Projects https://svsembedded.com/ieee_2014.php 43 Projects https://svsembedded.com/ieee_2013.php 1100+ Projects https://www.svskit.com/2022/02/900-pr... *********************************************************** 1. Smart Medicine Reminder Box | e-pill Medication Reminders, 2. MeDuino - Automatic Medicine Reminder. Arduino diy, 3. Medicine Reminder using Arduino by Saddam Khan, 4. Smart Medicine Box, 5. Arduino Uno based Medicine reminder project, 6. Pill Reminder with Arduino version, 7. Automatic patient medicine reminder system || Best project center in Bangalore, 8. Automatic Pill Reminder Using Arduino uno, 9. Raspberry Pi Based Speaking Medication Reminder Project, 10. IoT Based Smart Medicine Box, 11. Medicine Reminder simulation on proteus, 12. Automatic Medicine Reminder with date using Arduino, 13. Medicine reminder, 14. Smart Medicine Pill Reminder IOT Project using Aurdino, 15. Medicine Reminder Box Using Arduino, 16. Smart Medicine Dispenser, 17. Medicine reminder/Alarm using Arduino, 18. MedBox: Smart Medication Box with Arduino - self test, 19. Medicine Reminder System | Smart Medicine Pill Reminder Project, 20. Medicine reminder using Arduino, 21. Best Medicine Reminder DIY, 22. Explanation of our Medicine Reminder Project, 23. SmartSF Smart Pill Box, 24. Medication Reminder using PIC Microcontroller, 25. Medicine Reminder Using Home Made Arduino, 26. Medicine Reminder System Using Microcontroller, 27. ANDROID APP BASED SMART MEDICATION REMINDER SYSTEM, 28. IOT Based Medicine Reminder System with Email Alert, 29. Simulation: Photoresistor-based Smart Pill Dispenser | Schematic Diagram, Arduino Code & Simulation, 30. PILL REMINDER USING ARDUINO BOARD, 31. Pill Reminder Using Raspberry Pi, 32. Our first mini project(Vishva- automatic medicine reminder), 33. Automatic Medication Reminder for People to Take Medicines in Time, 34. Arduino Automatic Medicine Reminder, 35. smart medicine reminder using arduino, 36. Medicine reminder using arduino, 37. Medicine Reminder for Elder people, 38. Renesas: Smart Medicine Box, 39. Smart Medicine Box App, 40. Medicine Reminder System Using Arduino, Design
0 notes
Text
Academic Innovative Projects on Adruino
Arduino Project Ideas
Arduino is basically an open-source Micro-controller board. It is based on Microchip ATMega328P Micro-controller developed by Arduino.cc. The board has sets of analogue and digital input/output (I/O) pins that can interface different expansion boards and other circuits. Arduino has 6 analog pins, 14 digital pins, and students of top MTech colleges in Jaipur can program using the Arduino IDE (Integrated development environment) via a type B USB cable. It also accepts the voltages between 7 and 20 volts and powered up by USB cable or a 9V battery.
The production files and layout for some hardware versions is also available for the students of top engineering colleges in Rajasthan. Arduino UNO version 1.0 board is first in the series of USB Arduino boards and reference model for multiple Arduino platform. The ATmega328 on the Arduino Uno offers pre-programmed with a bootloader which enables you to upload new code to it without the use of an external hardware programmer. It communicates via the original STK500 protocol. The Arduino UNO 1.0 does not utilize the FTDI USB-to-serial driver chip. Instead, it uses the Atmega16U2 (Atmega8U2 up to version R2) majorly programmed as a USB-to-serial converter.
Special Pin Functions
Students of best MTech colleges in Rajasthan uses each of the 14 digital pins and 6 Analog pins on Arduino Uno as an input or output, using pinMode, digitalWrite, and digitalRead functions. However, these pins mainly operate at 5 volts. Each pin can offer or receive 20 mA as recommended operating condition and has an internal pull-up resistorof 20-50k ohm. A maximum value of 40mA must not be exceeded on any I/O pin to avoid permanent damage to the micro-controller. It has 6 analog inputs, that is labeled as A0 through A5, each of which provide 10 bits of resolution (i.e., 1024 different values).
Additionally, some pins have specialized functions as follows:
1. External Interrupts – Pins 2 and 3 can be configured to trigger an interrupt on a low value, a rising or falling edge, or a change in value.
2. Serial- Pins 0 (RX) and 1 (TX) can be used to receive (RX) and transmit (TX) TTL serial data. Students of top Engg colleges can connect these pins to the corresponding pins of the ATmega8U2 USB-to-TTL Serial chip.
3. PWM (Pulse Width Modulation) – 3, 5, 6, 9, 10, and 11 can provide 8-bit PWM output with the analogue Write () function.
4. SPI (Serial Peripheral Interface) – 10 (SS), 11 (MOSI), 12 (MISO), 13 (SCK) support SPI communication using the SPI library.
5. TWI (Two Wire Interface) – A4 or SDA pin and A5 or SCL pin support TWI communication using the Wire library.
6. AREF (Analog REFerence) – Reference voltage can be used for the analog inputs.
Project Ideas for beginners
A giant pixel display using Arduino ?????
To read continue with ARYA COLLEGE
#Arya 1 Old Campus#Arduino RFID Smart Lock#Arduino Alarm System#Arduino Traffic Light Controller#Arduino Powered Temperature Controller#Make Your Own Amblight#Pulsating LED Cube#Gaint Pixel Display#Special Pin Function#Arduino Project Ideas
0 notes