#Best Gradient Generator
Explore tagged Tumblr posts
Visit Tumblr Blog
Explore Tumblr blogs with no restrictions, modern design and the best experience.
Last Seen Tumblr Blogs


Fun Fact
Tumblr’s website traffic is steadily declining.
Text
CSS Gradient Color generator , gradient generator , background gradient generator
Link: CSS Gradient Color Generator Now!
In the realm of web design, gradients add depth, dimension, and visual interest to websites, creating captivating visual effects and enhancing user experience. EditBoxPro’s CSS Gradient Color Generator offers a user-friendly solution for creating custom CSS gradients that elevate the aesthetics of your web projects. Let’s explore how EditBoxPro’s CSS Gradient Color Generator can empower web designers to unleash their creativity and bring their design visions to life.
Harnessing the Power of CSS Gradients
CSS gradients allow web designers to create smooth transitions between two or more colors, resulting in visually appealing backgrounds, buttons, overlays, and other design elements. Gradients add depth and texture to web interfaces, making them more engaging and immersive for users. With EditBoxPro’s CSS Gradient Color Generator, designers can easily experiment with different gradient styles, angles, and color combinations to achieve the desired visual effect for their websites.
Key Features of EditBoxPro’s CSS Gradient Color Generator
Intuitive Gradient Editor: EditBoxPro’s CSS Gradient Color Generator features an intuitive gradient editor that allows designers to create custom gradients with ease. Whether you prefer linear gradients, radial gradients, or conic gradients, our tool offers a range of options to suit your design needs.
Color Picker and Gradient Stops: Customize your gradients by selecting colors from a comprehensive color picker or entering hex codes manually. EditBoxPro’s Gradient Color Generator also allows you to add multiple gradient stops and adjust their positions and opacity levels for precise control over your gradient design.
Gradient Angle and Direction: Experiment with different gradient angles and directions to achieve the desired visual effect for your web design projects. EditBoxPro’s CSS Gradient Color Generator allows you to specify linear gradient angles, radial gradient shapes, and conic gradient starting points for endless design possibilities.
Preview and Code Export: Visualize your gradient designs in real time with EditBoxPro’s live preview feature. As you make changes to your gradient settings, our tool provides instant feedback, allowing you to see how your gradients will appear on the web. Once you’re satisfied with your design, you can easily export the CSS code and integrate it into your web projects.
Cross-Browser Compatibility: EditBoxPro’s CSS Gradient Color Generator ensures cross-browser compatibility by generating CSS code that works seamlessly across modern web browsers. Whether you’re targeting desktop or mobile users, our tool helps you create gradients that render consistently across different devices and platforms.
Advantages of Using EditBoxPro’s CSS Gradient Color Generator
Enhanced Visual Appeal: Elevate the visual appeal of your websites with stunning CSS gradients created using EditBoxPro’s Gradient Color Generator. Whether you’re designing headers, buttons, backgrounds, or overlays, gradients add depth, dimension, and sophistication to your web interfaces, making them more visually appealing and memorable for users.
Time-Saving Design Solution: Streamline your design process and save time with EditBoxPro’s CSS Gradient Color Generator, which offers a user-friendly interface and intuitive controls for creating custom gradients in minutes. Instead of manually coding gradients from scratch, designers can use our tool to experiment with different gradient styles and color combinations effortlessly.
Versatile Design Applications: Whether you’re designing personal websites, portfolio sites, e-commerce platforms, or corporate landing pages, EditBoxPro’s CSS Gradient Color Generator offers a versatile solution for integrating gradients into your web projects. From subtle color transitions to bold gradient effects, our tool empowers designers to create custom gradients that reflect their brand identity and design aesthetic.
Accessible Design Tool: EditBoxPro’s CSS Gradient Color Generator is accessible to designers of all skill levels, from beginners to experienced professionals. With its user-friendly interface and visual editor, our tool makes it easy for designers to experiment with gradients and create visually stunning web designs without the need for advanced coding knowledge.
Conclusion
Transform your web design projects with EditBoxPro’s CSS Gradient Color Generator. Whether you’re a seasoned web designer or just starting out, our tool provides the functionality, flexibility, and convenience you need to create custom gradients that enhance the visual appeal of your websites. Experience the power of CSS gradients, unleash your creativity, and elevate your web design game with EditBoxPro today!
Create Custom CSS Gradients with EditBoxPro’s CSS Gradient Color Generator Now!
gradient generator, gradient generator javascript, css gradient generator, background gradient generator, javascript gradient background generator, multiple color gradient generator, linear gradient generator, gradient color generator, gradient image generator, ultimate css gradient generator, background color generator, random color gradient generator, gradient, gradient color generator javascript, css gradient tutorial, linear gradient
1 note
·
View note
Text
I think 90% of my gripes with how modern anime looks comes down to flat color design/palettes.
Non-cohesive, washed-out color palettes can destroy lineart quality. I see this all the time when comparing an anime's lineart/layout to its colored/post-processed final product and it's heartbreaking. Compare this pre-color vs. final frame from Dungeon Meshi's OP.
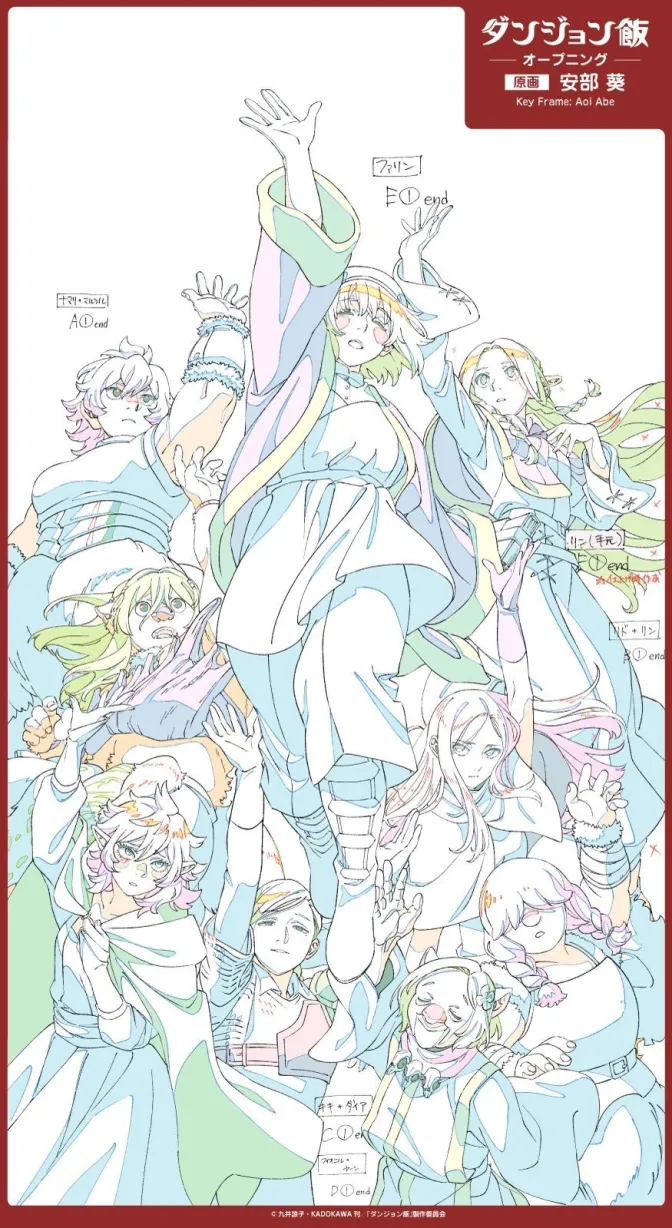
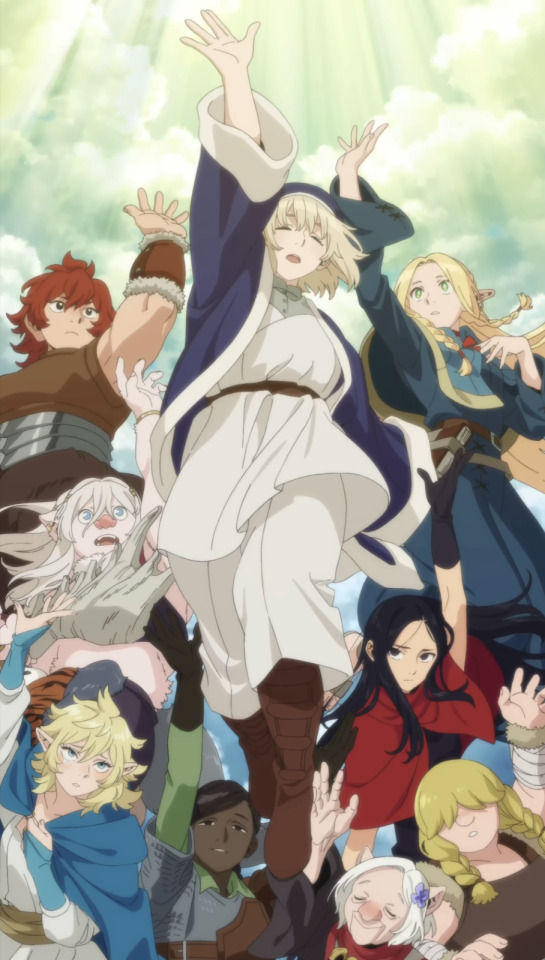
So much sharpness and detail and weight gets washed out and flattened by 'meh' color design. I LOVE the flow and thickness and shadows in the fabrics on the left. The white against pastel really brings it out. Check out all the detail in their hair, the highlights in Rin's, the different hues to denote hair color, the blue tint in the clothes' shadows, and how all of that just gets... lost. It works, but it's not particularly good and does a disservice to the line-artist.
I'm using Dungeon Meshi as an example not because it's bad, I'm just especially disappointed because this is Studio Trigger we're talking about. The character animation is fantastic, but the color design is usually much more exciting. We're not seeing Trigger at their full potential, so I'm focusing on them.
Here's a very quick and messy color correct. Not meant to be taken seriously, just to provide comparison to see why colors can feel "washed out." Top is edit, bottom is original.
You can really see how desaturated and "white fluorescent lighting" the original color palettes are.
[Remember: the easiest way to make your colors more lively is to choose a warm or cool tint. From there, you can play around with bringing out complementary colors for a cohesive palette (I warmed Marcille's skintone and hair but made sure to bring out her deep blue clothes). Avoid using too many blend mode layers; hand-picking colors will really help you build your innate color sense and find a color style. Try using saturated colors in unexpected places! If you're coloring a night scene, try using deep blues or greens or magentas. You see these deep colors used all the time in older anime because they couldn't rely on a lightness scale to make colors darker, they had to use darker paints with specific hues. Don't overthink it, simpler is better!]
#not art#dungeon meshi#rant#i'm someone who can get obsessive over colors in my own art#will stare at the screen adjusting hues/saturation for hours#luckily i've gotten faster at color picking#but yeah modern anime's color design is saddening to me. the general trend leans towards white/grey desaturated palettes#simply because they're easier to pick digitally#this is not the colorists fault mind you. the anime industry's problems are also labor problems. artists are severely underpaid#and overworked. colorists literally aren't paid enough to do their best#there isn't a “creative drought” in the anime industry. this trend is widespread across studios purely BECAUSE it's not up to individuals#until work conditions improve anime will unfortunately continue to miss its fullest potential visually#don't even GET ME STARTED ON THE USE OF POST-PROCESSING FILTERS AND LIGHTING IN ANIME THOUGH#SOMEONE HOLD ME BACK. I HATE LENS FLARES I HATE GRADIENT SHADING I HATE CHROMATIC ABBERATION AND BLUR
2K notes
·
View notes
Text


Beat the Heat Collection
I know it's already Fall lmao. Originally planned for a June release, here is The Beat the Heat Collection consisting of 21 Summer (yet still versatile) inspired pieces. It's Summer somewhere!
General Info:
• 4 Hairs • 4 Tops • 5 Bottoms • 2 Shoes • 4 Accessories • All are Base Game Compatible
• Twitter | Youtube | Instagram | Twitch | TikTok
Cali Waves
My first attempt at strands! 2 Versions (Strands and No Strands) • 24 Swatches • T-E; Masc Frame • NOT hat compatible • All maps, Lods
7.9k | 3.4k poly
Credit: Gradients by @simandy, @aharris00britney, @qwertysims, @marsosims
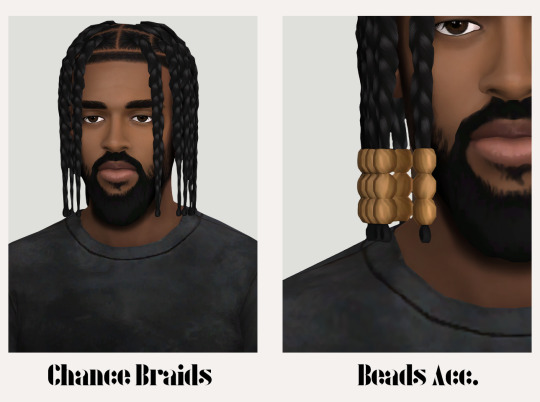
Chance Braids
Been wanting to make these for a while and this is the result • 24 Swatches • T-E; Masc Frame • Hat compatible • Spec and Normal map, Lods • Bead Accessories found in Left Lip Ring - 25 Swatches
13.6k poly | Beads are 3.5k poly
Credit: Gradients by @simandy, @aharris00britney, @qwertysims, @marsosims and @qicc for the braid mesh
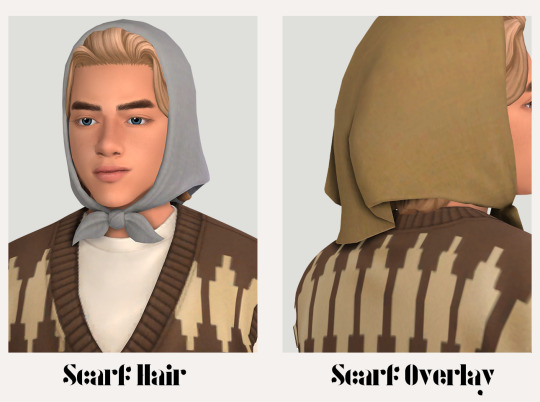
Scarf Hair
• 24 Swatches • T-E; Masc Frame • NOT hat compatible • Spec and Normal maps; Lods • Scarf Overlay found in Left Index Finger - 45 Swatches
2.8k poly
Credit: Gradients by @simandy, @aharris00britney, @qwertysims, @marsosims
Tank Top
a Summer staple!
• 8 Swatches • Masc Frame ; T-E • All maps ; LODs
3k Poly
Credit: @synthsims Ribbed Bod-E Tank
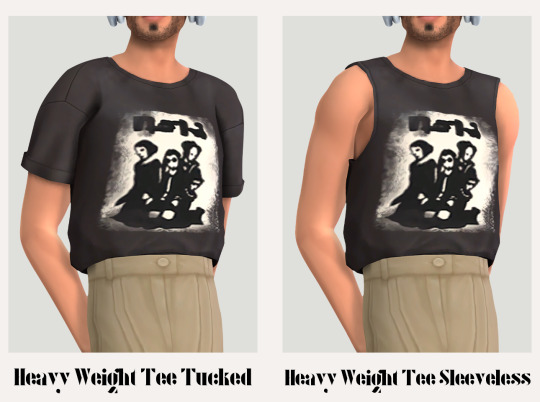
Heavyweight Tee
More tees yipee! 3 versions- Loose, Tucked and Sleeveless
• 15 Swatches • Masc Frame ; T-E • All maps ; LODs
3.6k | 3.5k | 3.5k Poly
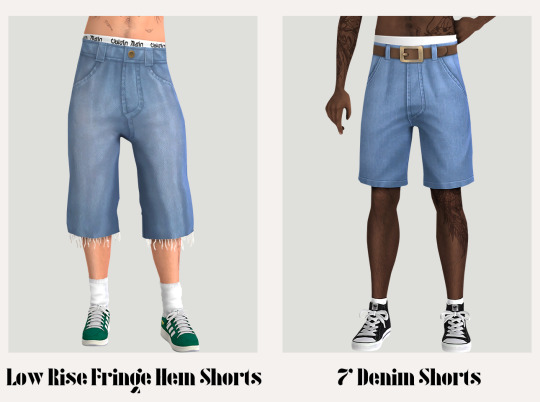
Low Rise Fringe Hem Shorts
These shorts put me through the ringer but love the way they turned out!
• 14 Swatches • Masc Frame ; T-E • All maps ; LODs
1.1k Poly
Credit: @liliilisims Half pants | @ridgeport classic jeans | @xldkx for always being willing to help out. without them, this would not be possible
7' Denim Shorts
more bottoms with exposed boxers!
• 16 Swatches • Masc Frame ; T-E • All maps ; LODs
1k Poly
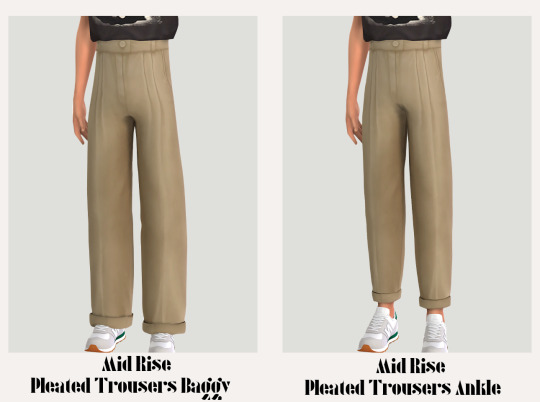
Mid-Rise Pleated Trousers
2 versions cause we love options here- Baggy and Fitted
• 11 Swatches • Masc Frame ; T-E • All maps ; LODs
1.3k | 1.7k Poly
Credit: @captainstreasure Drake trousers
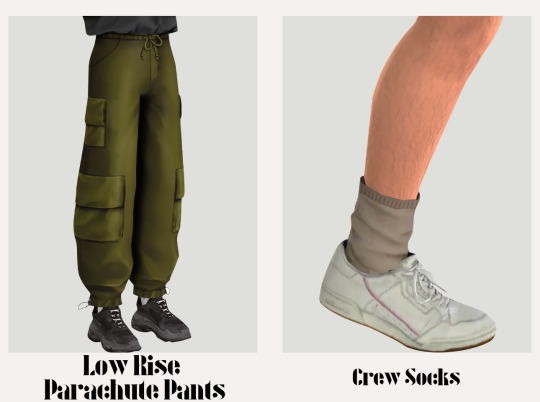
Parachute Pants
My attempt at some parachute pants and I think they came out ok!
• 17 Swatches • Masc Frame ; T-E • All maps ; LODs
2.6k Poly
Credit: @liliilisims Keely Skirt
Crew Socks
a conversion and slight edit
• 70 Swatches • Masc Frame ; T-E • Spec and Normal maps ; LODs
448 Poly
Credit: @liliilisims Gillian Socks
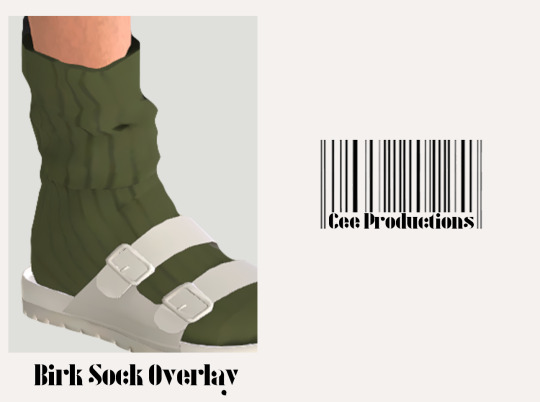
Birkenstock Arizona EVA
I love creating items I own in real life. 2 versions- Socks and No socks
• 25 Swatches • Masc Frame ; T-E • Spec and Normal maps; LODs • Sock Overlay Found in Socks - 25 Swatches
13.8k | 9.9k Poly
Credit: @dallasgirl79 Birkenstocks | @magic-bot Feet V7 and Socks
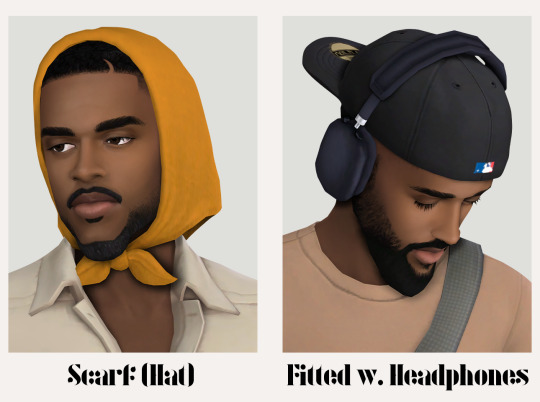
Scarf Accessory
a hat version of the scarf to be used on other hairs. Will most likely be clipping depending on the hair, meant to be paired with short cuts
• 45 Swatches • Masc Frame ; T-E • All maps; LODs • Found in Hats
1.1k Poly
Fitted with Headphones
ya'll. My all-time favorite piece. Yes, the hat and headphones come together and function as a hat so you can wear it with any hair that has hat chops!!!
• 15 Swatches • Masc Frame ; T-E • Spec and Normal maps; LODs
2.5k Poly
Credit: @joliebean Joliepods
As always, let me know if you run into any issues and I'll do my best to fix it
Download: Patreon (Free!) | ALT (Google Drive) | SFS
#ts4 custom content#ts4 cc#ts4 download#ts4cc#the sims 4 custom hair#ts4 cas#custom content#CeeP#CeeProductions#ts4 male cc
6K notes
·
View notes
Text
Flowers of Contempt
Pre-series - Don’t worry, Robin is still there.
Welder Eddie X ‘King’ Steve
To show his hatred for one King Steve, Eddie begins to weld beautiful flowers with insults imbued into them to gift Steve. Steve does not know flower language.
Misunderstandings, Falling in love, etc.
Will be on AO3 soon.
<Part1>Part 2
Steve was having a pretty shit day. Sure he had a party later and it would be great, but he had failed another test and was unsure if he would pass his classes. Maybe if he went to Nancy she’d help him study, but he didn’t feel the best about running to the cute girl he wanted to date about how stupid he was. Tommy assured him that a few drinks would cheer him up and he had reluctantly agreed to go to Emma’s party.
The shrill bell invaded his ears and made him wince, it reverberated in his ears and he could almost feel the first inklings of a headache. He was frustrated and annoyed and just generally wanted to punch something. All these little things accumulated under his skin and itched fiercely.
He walked to the bathroom just trying to do something with his legs to sort through the mess of adrenaline filled emotions invading his head. He opened the door and went to the sink, turning on the faucet and using his hands to splash his face. His hands lingered, fingertips pressing at the hard line of his brow. The cold water had done little more than soothe the tense muscles in his face.
He patted his face with a paper towel and tossed it in the trash. Steve reentered the busy hall with a straight back and hard steps that spoke to years of not only belonging but dominating every space he entered. People generally avoided knocking into him because wherever Steve lingered his lapdog Tommy always seemed to be present.
When a purposeful, unfamiliar hand landed on his shoulder Steve’s lips immediately prepared to curl in distaste. He followed the hand and found soot smeared skin with grease lines making veins down his arm. He wore a dirty wife beater that clung to his sweat slicked skin. A fluffy and wild halo of curls shrouded his face and hung just above his shoulders. His face was similarly soot streaked which contrasted sharply with the pale skin but maintained a cohesive aesthetic with the hard lines of his face. His wide, coal pit eyes pierced into Steve.
His demeanor made Steve pause and the strange boy gave him a wolf-ish grin that flashed blinding white. Before Steve could get a word out from his parted lips, the boy was on one knee, head tilted defiantly at Steve as he knelt at his feet. He presented a flower, with an oil slick iridescence a twisted hunk of metal gave the form of a sunflower.
The flower was a dark opalescent with swirls of color that reflected in the light. There was a faint gradient of yellow on the edges that subtly blended with the shining grey of the metal. The petals were finely crafted and looked soft. They lacked the hard edges that welded objects always seemed to have. If not for the fact it didn’t yield to the boy’s movement Steve would have assumed it was spray painted.
“My liege, please accept my humble offering.” The boy said it with a tightness in his body and a goading glint in his eyes.
Steve took it, admiring the delicate handiwork. All Steve could do was gawk at it. All the previous tension and frustration Steve held melted from his body. But, The boy was already up on his feet though, pushing past Steve.
“Thank you.” Steve barely managed to get out, but the boy gave no indication of hearing him.
There were many shocked onlookers, but Steve ignored them. He made his way to his next class in a daze, ignoring the way his fingers became similarly tainted with soot left over from the strange boy’s hand. He traced over the grooves in the flower and the subtle feathering of yellow along the ends of the petals. Tommy soon fell into step beside him, his hushed criticisms falling on deaf ears.
“How could Eddie ‘the freak’ Munson have the goddamn audacity to pull that shit? I should beat the shit out of him.” Tommy smiled with a tense jaw, bumping shoulders with Steve.
“Don’t” Steve interrupted quietly.
“What?” Tommy’s sneer dropped as he barked out in surprise.
“I said don’t.” Steve repeated in a stronger tone.
“Fine, your fucking funeral when that fag comes back around.” A jealous sneer emerged on Tommy’s face, but none of its ire was actually directed at Steve.
Steve got to his next class, quickly checking in for attendance before heading to the office with a pep in his step.
“Hello, I was wondering if the school was still running that tutoring program?” Steve asked, nervously tapping the ornate flower he had been unable to put down.
“Yes, we are. Sessions are after school and we can match you to a tutor based on the classes you’re having trouble in.”
“Uh, I’m having trouble in History.” Steve supplied quietly.
“You’ll be with Robin Buckley then.” The receptionist supplied.
“Oh okay, that’s it?” Steve questioned.
“You’ll meet in the library after the last bell.” The woman replied in a flat tone.
With the ghost of another ok on his lips, he left. He couldn’t help but trace the name of that strange boy in his mind.
“Eddie Munson”
He was like a curly haired spector. Steve couldn’t help but have his attention drawn to the little whispers of information about Eddie he was given. The flower was the fruition of what had to be hours of hot and heavy labor. Each petal was painstakingly crafted, which left Steve a little dizzy at the thought.
He twirled and twisted his fingers about the flower, feeling every subtle contour. He privately wondered if he would ever be able to put the thing down.
Steve had never received a better gift and he wasn’t sure if he ever would unless another artist expressed their love for him in a large mural.
No.
Not even that would be enough.
Because he could see the pain of burnt fingers and sweat imbued into this gift. It was a labor of intense emotion and determination to see its fruition.
He knew it was wrong, but Eddie had endeared himself to Steve in a way nobody ever had before.
Steve was giddy for the remainder of his classes, he was unsure if he could even go to the party tonight because he couldn’t imagine spending his evening any other way than admiring this flower.
When he arrived at the library after school, he spoke to the librarian who directed him to an empty table. It was maybe 5 minutes later that there was a girl with a pale, freckled face and wavy bob. Her hair was either half highlighted or the result of too much time spent at a pool. She glared at him as she moved towards him. She dropped herself into the seat across from him.
Steve could tell that she was waiting for an opportunity to sneer.
“Hi, I’m Steve.”
The air between them seemed to tense and strain, her lack of a response creating a malicious silence.
“I’m curious Steve, What are you going to do to Eddie?” She asked, the sneer finally blooming on her face and rage embedded itself between his brows.
“What?” Steve jolted back, shocked at the accusation.
“I mean he’s another one of us freaks, what are you going to do to him for daring to speak to royalty such as yourself?” She leaned forward, her voice lowering dangerously.
“Why would I do anything?” Steve shrunk into his seat when faced with her ire.
“Because all your fucking cronies are going to jump him once he leaves Hellfire tonight.” Her hands planted on the table, raising herself and staring furiously into his eyes.
“What?” Steve asked, but she revealed no answer.
She instead continued to glare at him, righteous fury pouring off her in waves. Steve sputtered.
“I- I know you’re angry, but I swear I had nothing to do with this. I can explain but you have to promise not to tell anyone.” Steve begged as he pulled the flower from his bag, clenching the stem as he prepared to impart his shameful feelings to a stranger.
“Fine, it’s not like anyone would believe me anyway.” She sneered.
“It’s the best gift I’ve ever received, it’s beautiful, just look at it.” Steve offered the flower to her for her inspection with shaking fingers.
She seemed similarly bewitched by the beauty and detail of the flowers. Her eyes and posture softened and she collapsed back into her seat.
“Wow, I heard about it, but I never saw it.” She breathed out.
Suddenly skittish she said “Sorry about that, I’m Robin.” She winced a bit at her misplaced anger.
“Hellfire ends at 4 if you want to do something about it.” Robin said quietly. “If it’s the best gift you’ve ever gotten, then maybe it’s worth doing something about.”
Steve nodded, fingers beginning to move restlessly.
“If they’re going after him, then they’d probably wait by his car.” Steve recounted, shameful at his admission of knowing what his cronies got up to.
“Okay, so we just need to pick them up.” Robin suggested with a smile. “I’ll get him to come with me. Then I’ll bring him out to your car. Wait at the entrance by the gym, it’s on the opposite side of the building from where Hellfire is held.”
“You’re not a tutor for no reason, you’re really smart.” Steve stated, in mild awe of how easily the plan came to her.
“Well, I’ve never had the power and confidence of King Steve behind me.” Steve wasn’t sure what it was, but when she said that nickname there was still a sort of resentment in her eyes, despite the fact she was smiling.
“Now!” Robin clapped, drawing the attention of the librarian who shushed her. “We can get some studying, we’ll need to be done around 3:45, so we have about an hour and a half.”
“Great, um I suck at the unification of Germany and Italy. I can never remember the wars.”
“Well they both used France. Bismarck used France as a way to threaten the German States to run into his arms for Prussian Protection.”
…
Robin waved goodbye to Steve as he left to get his car. Steve jumped in his car and drove around, uneased by a group of his friends hidden behind a van. It was one of the last cars left in the lot.
Steve waited by the gym entrance. Tapping the steering wheel as a shouting Eddie Munson left the building.
“Of course, He’d pull some shit like this, nothing without his goddamn mongrels!” Eddie sneered, manic laughter emerging from his throat. Robin seemed uncomfortable next to him, a sharp contrast with her earlier furious defense of him.
Robin wordlessly tapped Eddie’s shoulder and gestured at Steve’s beemer.
Eddie looked up, his brows furrowing and the beginnings of furious anger tickling at his tensed jaw. Before Eddie could speak, Robin interrupted.
“The King liked your gift.” Robin said sharply. “Decided he didn’t want to see you beat to shit.”
“Then why doesn’t he call off his fucking dogs?!” Eddie asks in an accusatory, rage filled tone.
“I didn’t know what they were doing. Tommy said something earlier, but I told him no.” Steve said with a mouselike tilt to his voice.
Robin opened the passenger’s side door and ushered Eddie inside.
“Now, fair lady it is time to get in your carriage.” Robin says mockingly, pushing Eddie towards the seat.
Eddie gets in, he’s still tense. Steve’s eyes trace the lines of his arms which unexpectedly bulge with more muscle then Eddie seems to have at first glance.
Robin crumples into the backseat, looking fatigued.
“Address?”
“Forest Hills, the trailer park.” Eddie spat with a sneer on his face.
They drove in silence, Eddie departing as quickly as possible once they stopped at the trailer park. Robin seemed tired from dealing with Eddie, social fatigue rolling off of her in waves. Steve dropped Robin off too, she smiled at him wearily before departing to her house.
Sunflower: False Riches, Haughtiness
Part 2
AN: I’m using Victorian Flower language.
#stranger things#steve harrington#eddie munson#steddie#fanfic#robin buckley#platonic stobin#stobin#tommy hagan#welding#flower language
415 notes
·
View notes
Text
My Favorite Cheap Art Trick: Gradient Maps and Blending Modes
i get questions on occasion regarding my coloring process, so i thought i would do a bit of a write up on my "secret technique." i don't think it really is that much of a secret, but i hope it can be helpful to someone. to that end:

this is one of my favorite tags ive ever gotten on my art. i think of it often. the pieces in question are all monochrome - sort of.

the left version is the final version, the right version is technically the original. in the final version, to me, the blues are pretty stark, while the greens and magentas are less so. there is some color theory thing going on here that i dont have a good cerebral understanding of and i wont pretend otherwise. i think i watched a youtube video on it once but it went in one ear and out the other. i just pick whatever colors look nicest based on whatever vibe im going for.

this one is more subtle, i think. can you tell the difference? there's nothing wrong with 100% greyscale art, but i like the depth that adding just a hint of color can bring.
i'll note that the examples i'll be using in this post all began as purely greyscale, but this is a process i use for just about every piece of art i make, including the full color ones. i'll use the recent mithrun art i made to demonstrate. additionally, i use clip studio paint, but the general concept should be transferable to other art programs.


for fun let's just start with Making The Picture. i've been thinking of making this writeup for a while and had it in mind while drawing this piece. beyond that, i didn't really have much of a plan for this outside of "mithrun looks down and hair goes woosh." i also really like all of the vertical lines in the canary uniform so i wanted to include those too but like. gone a little hog wild. that is the extent of my "concept." i do not remember why i had the thought of integrating a shattered mirror type of theme. i think i wanted to distract a bit from the awkward pose and cover it up some LOL but anyway. this lack of planning or thought will come into play later.
note 1: the textured marker brush i specifically use is the "bordered light marker" from daub. it is one of my favorite brushes in the history of forever and the daub mega brush pack is one of the best purchases ive ever made. highly recommend!!!
note 2: "what do you mean by exclusion and difference?" they are layer blending modes and not important to the overall lesson of this post but for transparency i wanted to say how i got these "effects." anyway!
with the background figured out, this is the point at which i generally merge all of my layers, duplicate said merged layer, and Then i begin experimenting with gradient maps. what are gradient maps?
the basic gist is that gradient maps replace the colors of an image based on their value.

so, with this particular gradient map, black will be replaced with that orangey red tone, white will be replaced with the seafoamy green tone, etc. this particular gradient map i'm using as an example is very bright and saturated, but the colors can be literally anything.

these two sets are the ones i use most. they can be downloaded for free here and here if you have csp. there are many gradient map sets out there. and you can make your own!
you can apply a gradient map directly onto a specific layer in csp by going to edit>tonal correction>gradient map. to apply one indirectly, you can use a correction layer through layer>new correction layer>gradient map. honestly, correction layers are probably the better way to go, because you can adjust your gradient map whenever you want after creating the layer, whereas if you directly apply a gradient map to a layer thats like. it. it's done. if you want to make changes to the applied gradient map, you have to undo it and then reapply it. i don't use correction layers because i am old and stuck in my ways, but it's good to know what your options are.

this is what a correction layer looks like. it sits on top and applies the gradient map to the layers underneath it, so you can also change the layers beneath however and whenever you want. you can adjust the gradient map by double clicking the layer. there are also correction layers for tone curves, brightness/contrast, etc. many such useful things in this program.
let's see how mithrun looks when we apply that first gradient map we looked at.

gadzooks. apologies for eyestrain. we have turned mithrun into a neon hellscape, which might work for some pieces, but not this one. we can fix that by changing the layer blending mode, aka this laundry list of words:

some of them are self explanatory, like darken and lighten, while some of them i genuinely don't understand how they are meant to work and couldn't explain them to you, even if i do use them. i'm sure someone out there has written out an explanation for each and every one of them, but i've learned primarily by clicking on them to see what they do.
for the topic of this post, the blending mode of interest is soft light. so let's take hotline miamithrun and change the layer blending mode to soft light.

here it is at 100% opacity. this is the point at which i'd like to explain why i like using textured brushes so much - it makes it very easy to get subtle color variation when i use this Secret Technique. look at the striation in the upper right background! so tasty. however, to me, these colors are still a bit "much." so let's lower the opacity.

i think thats a lot nicer to look at, personally, but i dont really like these colors together. how about we try some other ones?

i like both of these a lot more. the palettes give the piece different vibes, at which point i have to ask myself: What Are The Vibes, Actually? well, to be honest i didn't really have a great answer because again, i didn't plan this out very much at all. however. i knew in my heart that there was too much color contrast going on and it was detracting from the two other contrasts in here: the light and dark values and the sharp and soft shapes. i wanted mithrun's head to be the main focal point. for a different illustration, colors like this might work great, but this is not that hypothetical illustration, so let's bring the opacity down again.

yippee!! that's getting closer to what my heart wants. for fun, let's see what this looks like if we change the blending mode to color.

i do like how these look but in the end they do not align with my heart. oh well. fun to experiment with though! good to keep in mind for a different piece, maybe! i often change blending modes just to see what happens, and sometimes it works, sometimes it doesn't. i very much cannot stress enough that much of my artistic process is clicking buttons i only sort of understand. for fun.
i ended up choosing the gradient map on the right because i liked that it was close to the actual canary uniform colors (sorta). it's at an even lower opacity though because there was Still too much color for my dear heart.

the actual process for this looks like me setting my merged layer to soft light at around 20% opacity and then clicking every single gradient map in my collection and seeing which one Works. sometimes i will do this multiple times and have multiple soft light and/or color layers combined.
typically at this point i merge everything again and do minor contrast adjustments using tone curves, which is another tool i find very fun to play around with. then for this piece in particular i did some finishing touches and decided that the white border was distracting so i cropped it. and then it's done!!! yay!!!!!
this process is a very simple and "fast" way to add more depth and visual interest to a piece without being overbearing. well, it's fast if you aren't indecisive like me, or if you are better at planning.

let's do another comparison. personally i feel that the hint of color on the left version makes mithrun look just a bit more unwell (this is a positive thing) and it makes the contrast on his arm a lot more pleasing to look at. someone who understands color theory better than i do might have more to say on the specifics, but that's honestly all i got.

just dont look at my layers too hard. ok?
2K notes
·
View notes
Text
Imagine, for a moment, that your internet just stopped loading images one day. Your dash might look pretty different (and less usable), but at least you can still make posts — whether about your internet situation, or about completely unrelated topics.
Now, imagine that one or more of your posts blew up, to the tune of hundreds if not thousands of notes. Imagine people started adding images to your posts.
Imagine your post circulating almost entirely in the form with four or five images attached, and with everyone in the notes laughing about those images — except you, who started the post in the first place, who can't even see those images because you're trapped in Tumblr's loading gradient hellscape.
You're excluded from any further conversations on your own post, because someone added a mystery image with the caption "don't leave this in the tags," but you have no idea which set of tags it is, and can't tell if it's one of the good takes from the tags or one of the horrible takes from the tags. You're excluded from the Tumblr users playing with JPEGs like dolls. You can try to guess the contents of the images based on people's reactions, but it's hard. And no one adding images even seems to notice the irony.
This is, of course, a real problem plaguing Tumblr users with regularly slow internet. And it's also a huge, insidious problem plaguing blind and low vision people who rely on either screen readers, or image descriptions in combination with enlarged text on their device.
People with disabilities around comprehending images, people who have images (or gifs) disabled due to photosensitivity, and many others are also affected.
If you add an image to a post without either alt text, an in-post image description, or even both for maximal inclusivity, you don't know if OP — or the person whose tags you're peer reviewing, or whose reply you're screenshotting — will actually be able to see it. From their perspective, you might just be shoving a mystery rectangle in their face, expecting them to be able to guess — or responding to them without them being able to know.
Imagine being on the receiving end of that expectation constantly. Imagine how isolating that must feel.
We need, collectively, to stop making assumptions that everyone we interact with online will be able to access, physically see, and mentally process images. The assumption that disabled people are vanishingly rare and statistically shouldn't really need to be considered is an assumption of structural and/or implicit ableism.
Write image descriptions. Write image descriptions for every image you post, if you're able — but if you have limited energy, or you're still learning, you should at least start trying your absolute best to describe images you add to other people's posts. If you're starting a conversation, even an online conversation, you should make your best effort to be accessible.
So: Write IDs, especially if they're as simple as just text, like screenshotted tags (link to guide). Write IDs even if you think the best ID you can write is too short, or too incomplete (link to post explaining why even "bad" IDs help).
Write IDs in general (link to a huge compilation of guides). Challenge ableist assumptions and inaccessibility.
#this is not a callout post or anything - i've actually reminded a few people in my notes about this recently#pointing out the disability flag in my icon - and they've all been very courteous#it's just that the site culture as a whole needs to change. urgently#accessibility#image descriptions
1K notes
·
View notes
Text

~ SHIPPAMOR a.k.a SHIPPAMOR ATTRACTION
[PT. Shippamor, also known as Shippamor Attraction ; No IDs]
An attraction label where your attraction/s (whether your general attraction*, or specific types**) are best defined by how a character feels for the other character/s in a ship.
*An example would be: Nuzi Shippamor, a term for when your attraction/s are best defined by how N feels for Uzi, or how Uzi feels for N. Can also be for when you're not sure what specific attraction you experience, but you know that it resembles the feelings N has for Uzi, or Uzi has for N.
**An example would be: Nuzi HetShippamor, a term for when your hetero/straight attraction is best defined, or only felt, in the way N feels for Uzi, or the way Uzi feels for N.
The specified attraction doesn't have to be straight/gay/lesbian/etc. It can also be changed to romantic/sexual or any other tertiary attractions.
Tagging @radiomogai, @vndead-pvppy, @rabidbatboy, and @the-astropaws

[DNI ID in alt text]
Templates under the cut!
Note: the heart in the middle has two halves because monoamorous ships are the most common, you can divide it into more parts depending on your ship. The parts are meant to have the main colors of your ship (i.e Nuzi would have a yellow half and a purple half) If one or more of your ship's characters have more than one main color, you can use gradients, or anything you like, as it is your flag.. Just have fun with it!


#flag making#mogai#flag coining#mogai flag#coining post#mogai coining#term coining#liomogai#qai#qai coining#liomogai coining#liom#liom label#mogai label#mogai term#qai term#liom term#liomoqai#tertiary attraction#attraction label#shippamor#shippamor attraction
194 notes
·
View notes
Note
HOLY SHIT raven someone on twitter dropped previews of the lantern wish event artwork! it’s @__qm____/ if you want to see for yourself


YES 😳 I saw the post a few hours ago, actually!! Perfect timing www

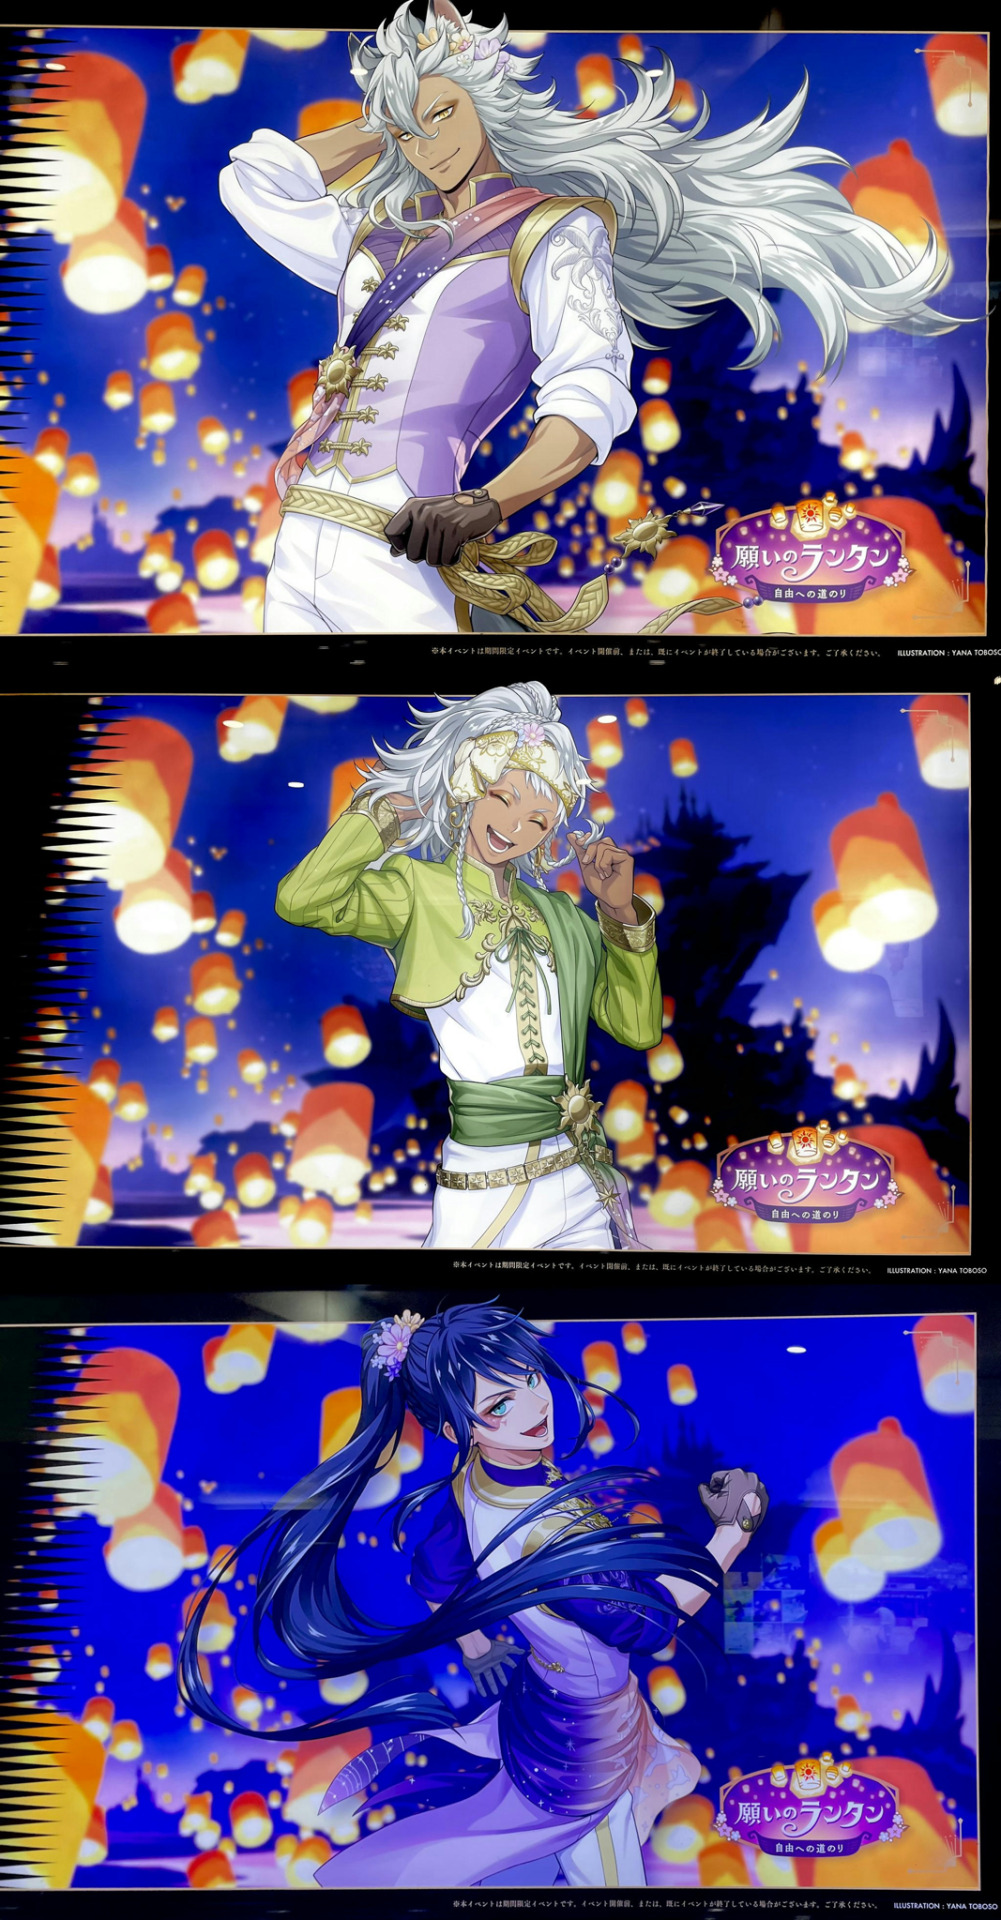
I already saw a lot of fan art and excitement for these designs, especially since they all feature long hair on our beloved Twst boys! The looks are very different than what were used to. I'm still deciding how to feel about these designs myself. The long hair looks very odd on Kalim (probably because he originally has the shortest hair of the group), and those greens on him remind me less of Tangled (even if that’s supposed to be Pascal colors) and more of The Princess and the Frog. The colors are a lot more flattering on the other three characters; Deuce and Riddle's colors look a lot better... ah, but Deuce does sort of look like a male love interest in a Chinese comic. It must be the high ponytail. I do love the detail of the sun symbol of the Corona, flowers in the hair (a la Rapunzel's festival hairstyle), the Sundrop flower on their clothes, and braided belts being incorporated into the general looks. Weirdly enough, I think I like Jack's artwork the best of the four???? It's saying a lot coming from me because I typically really dislike Jack's mullet and super muscular physique. The tunic is really flattering on him, and that gradient sash is so pretty. I also gotta say, whoever did the golden eye makeup on Fairy Gala Leona must have returned to do the eye makeup for this iteration of Jack because WOW did that come out looking so good 😭
#disney twst#disney twisted wonderland#twst#twisted wonderland#Riddle Rosehearts#Kalim Al-Asim#Jack Howl#Tangled#The Princess and the Frog#Rapunzel#Deuce Spade#notes from the writing raven#jp spoilers#Leona Kingscholar#Pascal
134 notes
·
View notes
Text
#1 FAN ACTUALLY
SUMMARY – you couldn't help but swoon over him
PAIRING – thunderclash x reader
NOTE – I gave him a full page because why not? I mean all the love in the universe is definitely not enough for him ❤️🩹🎀

“You gotta tell us—what’d you do to get booted out of the Wreckers and dumped on our doorstep?”
The question rang out loud and proud in the middle of the mission briefing room, thrown like a well-aimed grenade straight into the center of your new team’s attention. Heads swiveled. Sensors perked. Optical ridges lifted. Everyone suddenly looked like they’d just been handed front-row seats to the best drama of the solar cycle
"Voluntary transfer" you said, deadpan. No hesitation, cool as cryo-freeze
It was supposed to be the end of the conversation. You had practiced the line, after all—practiced the exact angle of your shoulders, the particular tilt of your helm that conveyed “I am mysterious and slightly unhinged, so don’t ask follow-ups” You knew this game. You owned this game
—a former Wrecker, part-time chaos generator, full-time professional badass—shifted one shoulder with slow, calculated nonchalance. Face? Neutral. Posture? Unbothered. Internal systems? Screaming. Because how exactly were you supposed to say “I left because the captain smiled at me and I had a full-on core meltdown” without getting laughed out of the room
Unfortunately, your new team was composed entirely of nosy, over-caffeinated gossipmongers with too much free time and absolutely no respect for emotional privacy
“Voluntary? You?” one mech blurted out, optics wide “You mean you, the Wrecker who threw a live grenade into the command tent because ‘someone gave you attitude’?”
“Wasn’t even a real grenade” you muttered under your breath “Just a concussion charge”
“You tried to hotwire a shuttle with a plasma cannon!”
“I got it working, didn’t I?”
A different voice chimed in, theatrical as slag “This is the same bot who chucked a plasma grenade at Springer during a debrief?
“That was justified”
“You blackmailed High Command just to get five extra minutes of nap time!”
“That was creative problem-solving” But none of them were listening anymore. The room had devolved into chaotic speculation. You could practically see the fanfics being written in real time behind their optics
The doors hissed open
And there he was
Thunderclash
You didn’t even need to look up. You felt him enter the room like the temperature had risen by ten degrees. Like the emotional spectrum of your entire processor had been overrun by soft harp music and sparkling gradients. The kind of presence that made people instinctively stand up straighter, or reevaluate their entire belief system
Your helm turned on autopilot, and there he was: walking in like some kind of solar-powered messiah. The lighting in the hallway behind him flared like stage lights. He gleamed. Literally. His armor gleamed so brightly you could see your soul in the reflection, like it had been waxed by angels. Every servo moved with noble precision. His posture was textbook perfection—military, yes, but with the warmth of someone who genuinely cared whether your coolant levels were low. His optics were the exact shade of “please tell me your problems, I will listen and not judge you” And then he smiled
Oh Primus
That smile
That soft, earnest, “I believe in you” smile. That “no one’s ever too far gone for a second chance” smile. That “I water plants and mean it” kind of smile. That soft, warm, too-good-for-this-world smile that could make a war criminal cry and a Wrecker go weak in the knees (you)
Your CPU blue-screened on the spot
“Apologies for the delay” he said, voice deep and melodic, like a lullaby designed specifically for war criminals trying to go straight. Then he looked directly at you. At you “Welcome aboard. I’m glad you chose to be here”
You had exactly 0.2 seconds to think of a reply, and the only thing your mouth could produce was—
“ah.. yes”
Your systems dropped six error messages
The room did not let it go
It was like someone had pressed the big red button labeled “group humiliation” Everyone burst into synchronized snickering. One mech nearly fell out of his chair. Another whispered “..It’s always the quiet murdery ones”
You did not react. You had evolved beyond reacting. You were floating in the astral plane of pure internal screaming, while your face remained stoic and unfazed
You weren’t going to deny it. Because, honestly?
They were right
—
Later That Cycle…
You found yourself tucked away in one of the quiet maintenance rooms—alone, mercifully, with nothing but your own spiraling thoughts and a broken cable junction you were pretending to fix
You were doing fine
Totally fine
…Until your optics replayed that smile again. And again. And again
You made a noise. A very specific, very undignified squeaking sort of noise that had no business coming from someone with your reputation. You slapped a hand over your faceplate “What the frag is wrong with me…”
You’d survived countless battlefields. Punched out two generals. Stole a tank once, on a dare. You’d told an Autobot diplomat to “bite your shiny aft” to their face and got promoted afterwards. You were a beast
And now?
You were blushing. At a smile. From just one mech. A shiny, too-good-for-this-galaxy, moral-as-all-slag captain
“…I’d say ‘kill me now’ but if he told me to die, I’d probably just thank him politely and lay down” you muttered
You thumped your helm against the wall. Just once. For emphasis. Maybe it’d knock some sense back into you
Did it work? No
Your brain was already spiraling into another round of: He looked right at me. He was glad I’m here. He smiled. He SMILED. You melted into a puddle of shame and ridiculous longing
—
The mission was routine. Patrol. Scan. Report. The kind of job that didn’t require much brainpower—just optics sharp enough to catch movement, and feet quiet enough not to trip over rocks
And yet, somehow, with him walking just a few paces ahead of you, the mission had become the emotional equivalent of a live-wire overload. Thunderclash moved like he belonged in some sort of recruitment holovid—steady, sure, posture perfect. Every time he looked back to check on the team, your processor short-circuited for half a nanoklik. Just a smile. Just a glance
But for you?
It was everything
You hated how easy it was to fall into that line of thinking. Thinking that he care of you, and that is the fact. This wasn’t some old Earth romance series, and you weren’t some starry-opticed rookie tripping over their own servos
Except… you kind of were, especially when he paused at a ledge and held out a hand without thinking
“Steep edge” he said calmly “Careful”
His servo hovered, palm up. Just in case
You didn’t need the help. You could clear the drop in one jump. You could do it backward. In your recharge. While reciting Wrecker code of conduct backwards
But your core thrummed like you were about to be knighted and so—very casually, totally cool and not at all screaming inside—you placed your hand in his and let him steady you as you stepped up beside him
Your servo stayed in his a microsecond too long
He didn’t pull away and neither did you
The silence that followed wasn’t awkward.
It was… oddly warm. You didn’t look at him. Couldn’t. But you were very aware of the fact that he was still watching you
And smiling
Your internal monologue screamed into the void: 'This is fine. This is perfectly professional. Holding hands to cross a ledge is normal. You’re not reading into it. You’re NOT—'
Then his voice came, quiet and steady
“Thanks for keeping pace”
You nodded too quickly “u-yea. You too. I mean—same. Good pace. Great.. team... pacing”
Smooth. Real smooth
He smiled again. Not just with his mouth this time. His optics softened—almost like he knew 'He knows. He totally knows. And I’m going to explode'
You stared at your own servo. The one he’d held. Still warm or maybe your imagination was broken. Probably both. You lay back on the recharge slab, arm thrown over your face, and let out the softest, most mortified groan
“I held hands with him. I HELD HANDS WITH THUNDERCLASH”
...
..
“I am never recovering from this”
“So” your new teammates cornered you like vultures that had scented drama “Serious question: when Thunderclash gives you an order, do your optics sparkle because of admiration or is that just a software glitch from full ‘Obedient Soldier Protocol: Activated’?”
You grunted “It’s called being a team player. Look it up"
“Oh sure” said one, grinning “Team player. The kind who’d throw themselves off a cliff if he so much as gestured vaguely toward the edge”
Discharge sipped her energon delicately “Bet he says ‘fetch,’ and you roll over and present a mission report on your belly"
You stared at them, unblinking. Deadpan. Calm like a lake right before a bomb goes off
“He tells me to dig” you said “I ask how many meters down and if he wants it landscaped. He tells me to kneel, I ask which knee would best reflect the ambient lighting. Thunderclash is a beacon of moral brilliance and the only reason this galaxy hasn’t burst into flames from sheer incompetence"
The table fell quiet for a beat
“…Okay” Discharge said slowly “So you’re not just whipped. You’re writing love letters to the leash”
You raised your energon cube in solemn salute “To being whipped—elegantly. Artistically. With conviction”
They all lost it
One fell out of his chair. Someone wheezed. Another slammed the table hard enough to spill energon. Laughter echoed off the ceiling
And somewhere—somewhere deep in the universe’s core—you swore you could hear the faint, radiant chuckle of Thunderclash himself. Warm. Gentle. Forgiving and just like that, your last shred of dignity burst into stardust
…And honestly? You were at peace with that
—
“I saw the symbol first” you admitted
“I won’t pretend otherwise – but I stayed… because I saw you”
—
It had been nearly a full planetary cycle since you arrived
Thunderclash wasn’t the type to track time in anniversaries or make note of meaningless metrics—not for personal reasons, at least. He logged rotations when necessary, marked deployments, scheduled rotations like any disciplined commander would. But the passage of days meant very little to him—until lately
Because lately, he had started to notice the subtle shift in his internal chronometer. Not because anything had changed loudly, or suddenly. Not because of any grand gesture.
But because you were still here
And your presence didn’t blaze in and out like a comet. You settled instead like gravity. Steady. Unspoken. Something he felt not in his optics, but in the soft shifts of rhythm—his routines bending imperceptibly to accommodate yours. He didn’t realize he’d started measuring time in the way you entered a room. The way your gait, once braced like you were entering hostile ground, had softened into something more instinctive. Less guarded. How your optics no longer scanned every corner, no longer flicked toward the exit as if keeping it warm in your mind. How your voice had learned silence—not as a weapon or a wall, but as comfort shared in stillness
“Sometimes I wonder if I deserve the version of me they believe in"
There was no illusion in his voice now. No practiced composure. Only the quiet, desperate ache of someone who’d borne too much grace for too long and didn’t know if it still belonged to him and you saw him—not as the captain, not as the symbol, not even as the figure who’d once made your spark stammer with a single glance But as a man who had stood too long in the light, until he forgot how to cast a shadow without guilt — so you stepped forward. Not to touch. Not to rescue. But to stand—truly stand—with him and your words, when they came, were steady. Unadorned. Simple truths, offered with no demand for return
"then stop being the symbol"
You sat across from him now, at one of the quiet communal tables nestled in the Stellar Apex’s heart. Not a formal space. Not a war room. Just a patch of ship meant for breathing
He was reviewing mission logs, the glow of his interface casting long lines of blue across the curve of his shoulders. You were hunched, one leg braced up, hands deft and precise as you disassembled a tactical visor with a kind of lazy expertise—your tools clinking in a rhythm that had become familiar, unspoken, even strangely reassuring
Neither of you spoke
You didn’t need to and it was that lack of need—that absence of obligation—that made Thunderclash pause for a breath he didn't realize he was holding
He remembered your first week
How you sat, spine stiff, as if chairs were not to be trusted. How your shoulders stayed locked, never resting, as though the weight of your past assignments might still fall at any moment. How you placed yourself against walls, corners, exits. The places people retreat to when they don’t expect to stay — He’d watched, but never cornered you. Never tried to ease you open like a knot. That had never been his way
He had simply given you structure. Quiet. A place where no one asked more than what you chose to offer and over time, without asking, you stayed and he still didn’t fully understand why that mattered so much to him.
But it did
Because bots like you—wound tight, fire-forged, with exits already mapped before they entered—didn’t usually remain. You weren’t built for stillness. You were trained to move, to disengage before anyone noticed the way you lingered
And yet—you hadn’t gone.
Not even when the first mission went sideways. Not even when there was nothing left to prove. Not even when it would've been easy
Instead, you had become something integral in a way that crept up on everyone, himself included.. the one who recalibrated the comm relays up late without being asked
The one who growled at the diagnostics scanner like it owed you money—and made the others laugh. The one who spoke rarely in briefings, but with such distilled clarity that no one dared interrupt and now—Thunderclash realized, with a strange flutter in his chest—you had become the one he listened for at night
Not consciously. Not like an order but in those quiet hours, when patrols returned and the ship stilled, he would catch himself pausing mid-report—waiting, just for the low scrape of your steps outside the command corridor. Just to know you’d made it back. Whole
He didn’t record that in any log. He didn’t speak it aloud
But that’s when he knew
Time had become something felt, not measured and the reason… was sitting across from him now, wrist-deep in a visor and muttering about misaligned optics like the ship wasn’t holding its breath to keep you here
109 notes
·
View notes
Text
How I make my Covers and Dividers

Hi.👋 So, the idea to make these posts came about because @cat1705 asked me in private how I made my dividers and that made me wonder if other people would be interested in knowing how I made my covers and dividers. I made a poll and a lot of people were interested in knowing how I made them.
I make them in Canva, so anyone can make them, but I would like this to be more of a help for you to create your own and not for you to do exactly like me. Even though I'm always playing around with the font and the way I place the images, I have a guiding line, so to speak, and that's what I'm going to try to show you.

👉COVERS
Well, first things first, apparently I use the dimensions of an Etsy cover photo template. I just chose it because the dimensions looked good. Choose any one and delete all the elements in it until you have only the white background.
To make covers with several characters I use these frames that serve to drag the image inside and adjust it within the defined limits.
I always use only official images from the game so as not to steal anyone's fanart. I usually get the images from the wikis.
You can also upload the image by just dragging it.


To make sure the title won't cover the characters' faces, I put some temporary text on top to adjust the images.
After uploading the image, drag it to the correct frame and drop it.
To adjust the image, double-click, enlarge, rotate, reduce and move it as you wish. When you think it is ready, click outside the image or press the enter key.
When the image is ready, I remove the text and download the image with the characters.
To download, click the button in the top right corner that says "Share". Then click on "Download", the first button on the last line. It should already be in PNG format, so you won't need to change it.
Attention: If you have more than one page: in "Select pages" choose the option "Current page", click “Done” and only then click on "Download". Otherwise, you will download ALL the pages you have and not the specific one you want.
On another page I usually have a gradient background and a little frame. I make the gradient by clicking on "Background color" and in "add a new color" there is the option "Gradient". I don't remember where I got the frame I use, but you can look for some free ones in "Elements".
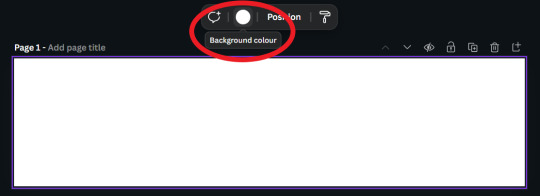

Use the colors that you think look best, I usually put the light color in the center and the dark color at the ends. For this example I will use white and a golden yellow.

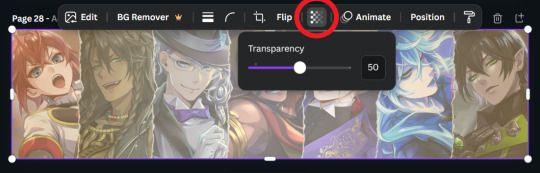
Then, I upload the previous character image and make it 50% transparent. On top of the white frame too (It's just my thing, I don't have a reason to do it, I just think it looks good)
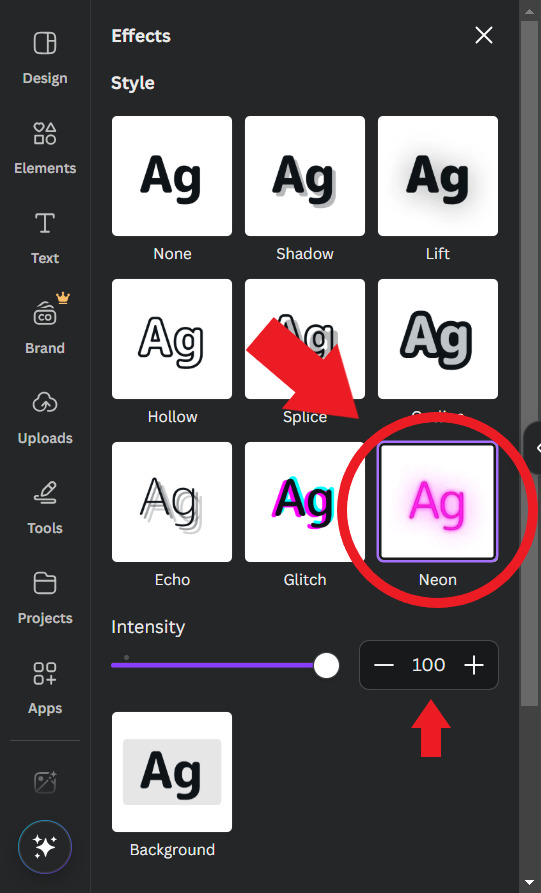
Then I'll put the title. I usually use the "Chewy" font. The font size depends on the size of the title I decided to give it, but it's usually around 80/90. And I add the Effect: "Neon"

To finish, I look for some images in "Elements" to decorate a little more. Searching for "line art" is usually a good tip.
When you're ready, download the image and you're done.
.
👉CHARACTER DIVIDERS
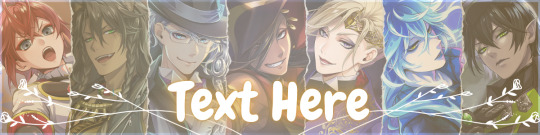
The dividers follow a similar pattern to the covers to match. Create a new page with the same background color gradient.
For the background, I use game backgrounds that match the theme of the fic. For this example, I'm going to make a generic Riddle divider with an image of his room with transparency at 50%.

Then I reduce the height of the image until it is half the height of the canva and place it in the center. Remembering that you can adjust the image by double clicking.

I keep the color of the ends the same, but I adjust the color of the center to the color of the dorm to which the character belongs. In this case, red from Heartslabyul. But I will leave an image with the colors I use for each room, taken from the colors of their personal icons.

For the character name, copy and paste the title, as the font and effect is the same, and adjust to the size of the divider.
And also change the color of the letters to the dorm color.

Then I upload the png image of the character's chibi that can be found on the wikis. In this case I'll use the chibi with Riddle's dorm uniform.
I crop the image to help me orient myself better, but you don't need to do that.
Then I upload the character's personal icon, also found on wikis, adjust the size and set the transparency to 60%.
To finish, I download the image and crop the top and bottom in Paint.
Yes... in Paint... it works ok, shut up!

.
👉LINE DIVIDERS
Finally, for the line dividers, you can copy the Cover because the background colors are the same and erase everything except the image with 50% transparency.

Then I cut it in half, like in the character divider, and again in half to make it thinner, and I place it in the middle of the canvas. (These measures may not be exactly the same as the ones I use today, but the logic in the beginning was this.)

I replace the image with one that seems to fit the theme of the fic. You can do this by dragging it. I usually use game backgrounds, but when none of them seem to look good I look for images from Canva, in "Elements"
That's what I'm going to do to show you. In Elements, write what you want to search for, I'll simply write "background" and choose one of the images without the crown icon (this icon means it's a paid image).
I'll choose any one.


Then I upload the personal icons of the characters that are the focus of the fic. For this example it's the overblot students (because they're my favorite)
Drag them in, place them in a line and adjust the size to that of the line. You can do this one at a time or all at once by selecting them all.
When it's just one character I put one icon upright and the one on the side upside down.

To repeat the pattern, select all of them, copy, paste, and drag until the new set is next to the first. Repeat until the entire line is filled.

Then select all the icons again and set their transparency to 50%.

And finally, download the image and crop the top and bottom parts in Paint. Or wherever you want.
Aaand... I think that's it.
If there's anything you'd like me to explain better, you can ask in the comments. I hope you enjoyed it and that it can help you if you create your own covers and dividers.😘
83 notes
·
View notes
Text
Emergency Commissions
tl;dr, I was in a car accident. I need help to get it back on the road if possible as my insurance isn't going to cover it. I don't know the total cost yet, will update once I do, but I'm going to set a starting goal as of now. Longer explanation and details below the read-more
This will be a Pay-as-you-Want through Ko-fi
kofi: https://ko-fi.com/moonlightsylph

----
Basics
This is the starting point, where you pick the level of what you want. From sketch (basic blocking out and concept, typically will be done in traditional pencil) to full (shading and rendering)
Sketch- pay-as-you-want (done traditionally, in pencil, before scanned/photographed to be resized and uploaded. Can also be done as digital line if preferred) Lines- pay-as-you-want (Digitally, Unless specified. If traditional, it will be done in ink. It will be scanned/photographed before resizing) Flats- pay-as-you-want (Digitally, Unless specified. If traditional, we can discuss materials wanted. It will be scanned/photographed before resizing) Full- pay-as-you-want (Digitally, Unless specified. If traditional, we can discuss materials wanted. It will be scanned/photographed before resizing)
Examples


Traditional Only: Flairs. This will be done in gold and/or silver pen to add flourishes
eaxmples:


----
Background
Backround options. Simple (for me is either a solid background or a gradient. I pick the colours for this one unless you have requests.) to Basic detail (being in a room, set-dressing for the character, ect) to Complex (fighting scene, detailed background like cityscapes or nature scenes. Here you have more control on what exactly you want, instead of a generalized idea. I will complete this to the best of my ability)
Simple background- free Basic detail- pay-as-you-want Complex scenes- pay-as-you-want
Example:


----
Style
Here is where we get a little creative. I've toyed with different styles and challenges. For limited pallets, you can provide me with a colour pallet you want to see me transform into your character, or I can generate a few for you to pick from.
As for the Random Blorbo, this is a fun challenge I wish to do where I build you a new character. You can give me a few details you want seen, otherwise its completely up in the air what you get.
Lineless- pay-as-you-want Limited pallets- pay-as-you-want Chibi- pay-as-you-want Random blorbo machine- pay-as-you-want [comes with two-three head shots and one full body]
Examples:


----
Fun Stuff
For this section, you can have custom borders done for your personal use. Be it for framing a picture you like, to spruce up your page or blog, or to frame up a personal project you have going (example: making your own tcg, tarot card, ect)
As for the cards, this is where I create a card featuring one of your characters each. Like a tcg or a tarot, or whichever you want to see.
Ref sheets are pretty straight forward. I'll provide two-three headshots + full body + interesting facts you want included. This also included, if you wish it, personal items said character may have to showcase.
Custom borders- pay-as-you-want Cards- pay-as-you-want Ref sheets- pay-as-you-want
Avatars: pay-as-you-want
Examples:

Hello,
I know this is out of the blue, but when things happen they don't give you a forewarning.
I was involved in a car accident yesterday. Fresh with a new N, only had my car for a week to myself, I found myself hydroplaning into a traffic control post and side-swiping a car in the process.
Thankfully, they got off with cosmetic damage and a cracked tail-light as i avoided rear-ending them.
Myself, however, ended up with a banged bumper, a passenger mirror nearly beheaded and a crack radiator. Lucky, considering what could have happened, but still terrifying.
It was after this i learned that my insurance wouldn't cover the collision, meaning I'd have to cover everything out of pocket. Money I don't really have at the moment. Not with the other debts I've been steadily paying off.
I don't know the grand total yet, I'm still waiting for my car to be released so I can take it to a body shop. But from how expensive cars can be, with some insight from those around me, I can make a good guess at a "starting" amount. I'll update the total once I know though.
But I'm now asking for help. I don't expect anything for free, I will be making things in exchange. I've wanted to open commissions for a while, its just sad that what made me finally pull the trigger is when I'm in trouble. I'll link my kofi, the prices will be set to pay-as-you-want. I'll work out details for what people want, and I'll have a list of things I don't think I can do.
But I appreciate that you took the time to read this. Any help will be greatly appreciated and even if you can't, please share. If you just want to donate and not get a work in exchange, just say so in the notes. (that said, you might end up with a doodle anyways as thank you <3)
#commisions open#emergency commissions#tw car accident#moon spam#art stuff#artist on kofi#kofi commission#kofi
224 notes
·
View notes
Note
Hihi, I'm not the same anon from the other question, but may I ask how do you make grading maps look so good? I just keep messing up and they look ugly af or change all the colors
<|:(
i'm actually going to just paste a post i made about it on main with an example from my graphic novel
this at 50%, set to normal, turned the mess on the left to the harmony on the right.


but when you intend to work with a gradient map or any sort of color overlay, the best thing you can do for yourself is have it on the entire time. like while working on it i never saw that version on the left. it's a bit of trial and error but generally if you have a good idea of your color values, you can make anything look good with a map. also if you want something to Look like a particular color that isn't on the map, you'll have to saturate it like crazy. like that's why the colors look so fucked over on the left. if i wanted something to look bluish or gray, it had to be Very Very blue to compete with the yellow. and even then it wasn't going to be straight up blue.
basically my take home advice for you is that if you want to use a gradient map, figure it out before you color, and color with it on. an overlay applied at the last minute on top of something colored normally won't give you the results you want, because gradient maps operate off value, not hue or saturation. so you need to have a solid understanding of the values in your image before you can start using them effectively.
156 notes
·
View notes
Note

they're calling us ableist for pointing out ai art XD
Ok. Let me understand what's going on here
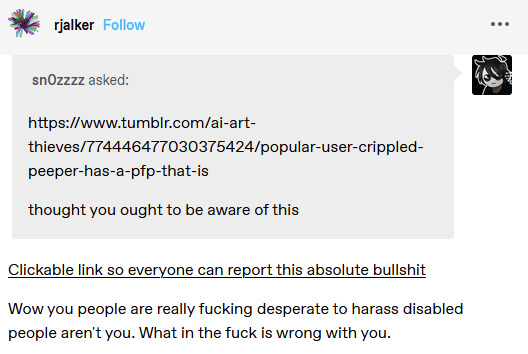
You try to alert someone about this, but it didn't go too well and now rjalker is demanding for a witchhunt for anyone that goes against crippled-peeper.
And I thought shit like this only happens on twitter....
Might as well clear my name and debunk the claims present here.

To clarify, transmisic is not a misspelling of transmisogynic. It is another word for "transphobic".
First of all, I had never interacted with crippled-peeper before I got the tip from anon. At all.
I never even heard of that user before in my life.
I probably bet that the users that rjalker claim to be ableist or transmisic have never heard of or interacted with crippled-peeper either.
Next point:

Let me answer rjalker's question with a question. Have you ever seen JPEG artifacts before?
And, more specifically, do you know the difference between ai pixel art and regular pixel art?
The fact that it don't show evidence/proof that the icon is not ai generated and shows examples of jpeg artifacting clearly shows that its post is a reactionary response. (I know this sentence structure sounds kind of weird, but I'm trying my best with the pronouns that I have been provided.)
Luckily, I can debunk that claim right away because I am quite familiar with pixel art myself.
I have done my fair share of sprite edits.
And before this user claims that I'm stealing another person's art, no. I am not. My main account is @magicalmysteryperson, and here is the proof.

Here's links to the pieces as well.
Now, with that out of the way, allow me to prove why rjalker's claims make no sense.
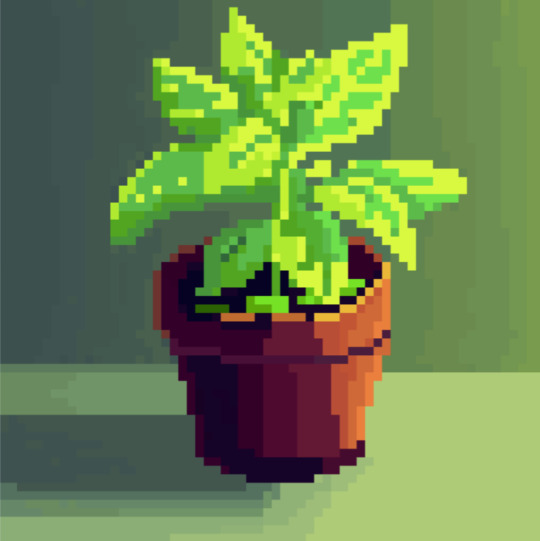
By redrawing the image from scratch. Here's the image.

here's the original, for reference

Already something is amiss.

There are a whole bunch of varying line weights and splotches that are considered by most sprite artists as serious faux pas.
Some parts of the image are blending with each other.
The gradients with both the floor and the wall are way too smooth for an image like this.

And the small leaves on the soil are an extremely big give away that the image was ai generated.
I am not demonizing the person for ai generating their icon.
Yes, ai art is bad, but some people do use it, even disabled artists.
I'm not going to demonize someone just because they play with that tool.
It's the dishonesty that is the main issue here.
Remember: their story behind this icon was that they made it over three years ago.

And their stance on AI on September 25th, 2024:

However, the claim that they made the image over three years ago is put into question when in 2021, 2022, and 2023, they had various other icons... as well as using ai art constantly.


The images in the latter two screenshots have not been archived by the wayback machine, and these posts have been scrubbed by the user. Again, everything prior to 2023 is scrubbed from the account.
I will also do what rjalker did and provide wayback machine links. here, and here, and here, and especially here.
Now, let's tackle the second claim: "It's JPEG compression".
Here's both the png and the jpeg files of the plant I drew.


Note that with the jpeg compression, you can also see that even though the image looks softer, there is still a form of pixelation. It's still made up of little squares, not rounded splotches.
You can simply look up "compression artifacts" and find that what's going on in crippled-peeper's image is not the result of jpeg compression artifacting.
If you want to see what my image looks like in a bigger form, here you go.
I have also did numerous forms of jpeg compression to see if I could replicate what crippled-peeper did.


I wasn't able to.
I just got more cronch and more pixels.
And before rjalker claims that the icon was an ai upscale of a jpeg...
I upscaled my own images on various sites to check if that claim even had any legs to stand on.

While some of the effects were present, it wasn't enough for me to replicate what crippled-peeper did unless I made the same thing with an ai image generator.
Until crippled-peeper has proof that the image was made over three years ago and made on a tablet in the hospital, the allegations presented here stand.
And please, do not harass rjalker.
I get that it made a post that, while it had the best intentions, was poorly researched and reactionary.
But I don't want that post to ruin its life.
I want that post to be used as a teachable moment.
To think before you type or post.
Don't let your gut control you. Just stop and think.
You don't want to post a call out post that completely backfires and hits you instead.
Not that it matters, they already blocked me.
#case type: ai scumbaggery#case: crippled-peeper#and also adding rjalker for how poorly they tackled this
108 notes
·
View notes
Text
Tesla’s Wardenclyffe Tower: Built on Sound Math, Undone by Cost and Misunderstanding

Let’s set the record straight—Nikola Tesla’s Wardenclyffe Tower was a high-voltage experimental transmission system grounded in quarter-wave resonance and electrostatic conduction—not Hertzian radiation. And the math behind it? It was solid—just often misunderstood by people applying the wrong physics.
In May 1901, Tesla calculated that to set the Earth into electrical resonance, he needed a quarter-wavelength system with a total conductor length of about 225,000 cm, or 738 feet.
So Tesla’s tower design had to evolve during construction. In a letter dated September 13, 1901, to architect Stanford White, Tesla wrote: “We cannot build that tower as outlined.” He scaled the visible height down to 200 feet. The final structure—based on photographic evidence and Tesla’s own testimony—stood at approximately 187 feet above ground. To meet the required electrical length, Tesla engineered a system that combined spiral coil geometry, an elevated terminal, a 120-foot vertical shaft extending underground, and radial pipes buried outward for approximately 300 feet. This subterranean network, together with the 187-foot tower and carefully tuned inductance, formed a continuous resonant conductor that matched Tesla’s target of 738 feet. He described this strategy in his 1897 patent (No. 593,138) and expanded on it in his 1900 and 1914 patents, showing how to simulate a longer conductor using high-frequency, resonant components. Even with a reduced visible height, Tesla’s system achieved quarter-wave resonance by completing the rest underground—proving that the tower’s electrical length, not its physical height, was what really mattered.
Tesla calculated his voltages to be around 10 million statvolts (roughly 3.3 billion volts in modern SI), so he had to consider corona discharge and dielectric breakdown. That’s why the terminal was designed with large, smooth spherical surfaces—to minimize electric surface density and reduce energy loss. This was no afterthought; it’s a core feature of his 1914 patent and clearly illustrated in his design sketches.
Now, about that ±16 volt swing across the Earth—what was Tesla talking about?
He modeled the Earth as a conductive sphere with a known electrostatic capacity. Using the relation:
ε × P = C × p
Where:
ε is the terminal’s capacitance (estimated at 1,000 cm)
P is the applied voltage (10⁷ statvolts)
C is the Earth’s capacitance, which Tesla estimated at 5.724 × 10⁸ cm (based on the Earth’s size)
p is the resulting voltage swing across the Earth
Plugging in the numbers gives p ≈ 17.5 volts, which Tesla rounded to ±16 volts. That’s a theoretical 32-volt peak-to-peak swing globally—not a trivial claim, but one rooted in his framework.
Modern recalculations, based on updated geophysical models, suggest a smaller swing—closer to ±7 volts—using a revised Earth capacitance of about 7.1 × 10⁸ cm. But that’s not a knock on Tesla’s math. His original ±16V estimate was fully consistent with the cgs system and the best data available in 1901, where the Earth was treated as a uniformly conductive sphere.
The difference between 7 and 16 volts isn’t about wrong numbers—it’s about evolving assumptions. Tesla wrote the equation. Others just adjusted the inputs. His premise—that the Earth could be set into controlled electrical resonance—still stands. Even if the voltage swing changes. The vision didn’t.
Wouldn't that ±16V swing affect nature or people? Not directly. It wasn’t a shock or discharge—it was a global oscillation in Earth’s electric potential, spread evenly across vast distances. The voltage gradient would be tiny at any given point—far less than what’s generated by everyday static electricity. Unless something was specifically tuned to resonate with Tesla’s system, the swing had no noticeable effect on people, animals, or the environment. It was a theoretical signature of resonance, not a hazard. While some early experiments in Colorado Springs did produce disruptive effects—like sparks from metal objects or spooked horses—those involved untuned, high-voltage discharges during Tesla’s exploratory phase. Wardenclyffe, by contrast, was a refined and carefully grounded system, engineered specifically to minimize leakage, discharge, and unintended effects.
And Tesla wasn’t trying to blast raw power through the ground. He described the system as one that would “ring the Earth like a bell,” using sharp, high-voltage impulses at a resonant frequency to create standing waves. As he put it:
“The secondary circuit increases the amplitude only... the actual power is only that supplied by the primary.” —Tesla, Oct. 15, 1901
Receivers, tuned to the same frequency, could tap into the Earth’s oscillating potential—not by intercepting radiated energy, but by coupling to the Earth’s own motion. That ±16V swing wasn’t a bug—it was the signature of resonance. Tesla’s transmitter generated it by pumping high-frequency, high-voltage impulses into the Earth, causing the surface potential to oscillate globally. That swing wasn’t the energy itself—it acted like a resonant “carrier.” Once the Earth was ringing at the right frequency, Tesla could send sharp impulses through it almost instantly, and tuned receivers could extract energy.
So—was it feasible?
According to Tesla’s own patents and 1916 legal testimony, yes. He accounted for insulation, voltage gradients, tuning, and corona losses. His design didn’t rely on brute force, but on resonant rise and impulse excitation. Tesla even addressed concerns over losses in the Earth—his system treated the planet not as a passive resistor but as an active component of the circuit, capable of sustaining standing waves.
Wardenclyffe wasn’t a failure of science. It was a casualty of cost, politics, and misunderstanding. Tesla’s system wasn’t just about wireless power—it was about turning the entire planet into a resonant electrical system. His use of electrostatics, high-frequency resonance, and spherical terminals was decades ahead of its time—and still worth studying today.
“The present is theirs; the future, for which I really worked, is mine.” —Nikola Tesla
#nikola tesla#science#history#quotes#electricity#wireless#technology#mathematics#math#engineering#power#Wardenclyffe#ahead of his time#ahead of our time
81 notes
·
View notes
Note
Can I ask How do you color and render your art? I frickin love the way you choose colors esp for lighting and bounce light, it's really pretty
thanks so much :) this took a little bit because i'm not a teacher. but hope you can understand some concepts i put out.
I'm going to go over mostly on how I shade/render. Picking out initial base colors is something that just comes with practice, preference, and from someone more eloquent.

The top is what 'not' to do. The bottom is generally what i do.
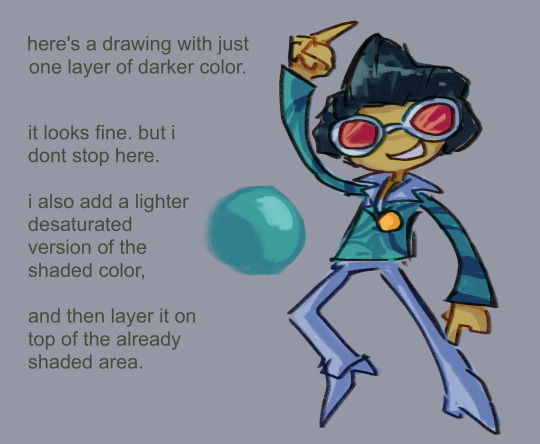
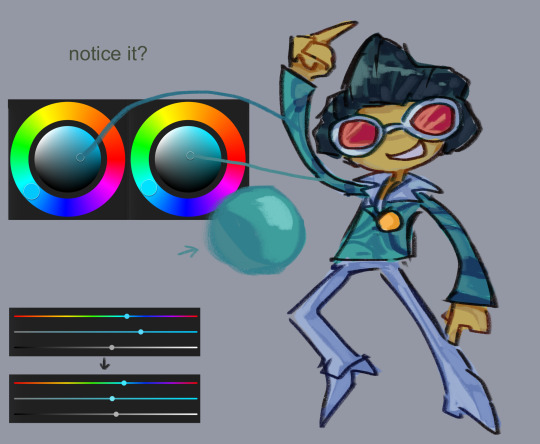
below is another example


i could do more. i meant to do more. but every other tip/tutorial i tried doing seemed like i was teaching abc's. I realized i don't know exactly what was being asked. I do have a few general tips though.
my process usually goes: Sketch, lineart, coloring, filtering/post processing.
'Post processing' can be a lot of things like; Painting over the drawing(fixing errors or adding details), or adding a noise filter, adding an overlaying photo. And/or changing the colors with gradient maps.
If you use a program that supports gradient maps then use them. they can be your best friend. Especially when colors don't look cohesive or just how you want them to.
Experiment with layer modes. At the moment I'm really into Pin-Light and Luminosity. Like I said, experiment. This is included in post-processing.
Use more than one shading color for each section. Go darker, go lighter while using that color picking method. Ex: It's usually darker under the neck than the side of the face. So use a darker color than the face.
if anythings confusing or you'd like something more specific then you're more than welcome to ask.
#the hard part about this was putting down base colors without shading. i usually do it as im just coloring everything else#my art#art tips#art tutorial#honestly i didnt know what to add exactly. are these too confusing. or too simple. or are they fine. i didnt want to be too long.#because what i do isnt majorly complicated. and the actual complicated parts come from practice and talk that would need to happen irl.#i messed up the photos me n my stupid baka life#thats why u check your posts
102 notes
·
View notes
Text

Hi! I got asked if I have an icon tutorial so I thought I'd do my best to go through my (probably way too long) process :) I'm going to show how I made that icon up there 👆
When I first started making icons I used this great tutorial by @/strwrs and then slowly added my own preferences to make this chaotic process 💕
First for getting screencaps of things i normally just google "[name of show/movie] screencaps" but one of the ones I use a lot is this site.
1. Open the pic in photoshop and crop it
Here's the full image:

Here's where I'm cropping it:

I like to make the size of my icons 250x250 but it can be more of a preference thing, a lot of people use 200x200 or I've seen 100x100 too.
I also like to crop a little above the image sometimes to give more space above the head
2. Removing the background
Removing the background is way easier on animation than on real people sometimes so I can show 2 examples even though I do it the same way...
First I go to select > select and mask:

Then I use the quick selection tool to select as much of the head as i can and the brush tool to remove/re-add parts that got missed so it should look like this:


(is the quick selection tool great? not all the time but when it works well it's great 🤡)
For something like this where her hair has a lot of texture in it and it's difficult to get a good outline, I'll zoom in really far and use the brush tool to get as many of the big pieces as I can so it looks a little more natural when the background color is added

Sometimes there can be a white/black line around the icon that got missed from erasing the background and you can use the brush tool to erase that as well.
3. resizing and sharpening
Now everything should look like this:

I'm going to go to the right where my layers are at and create a new group by clicking on the folder at the bottom
Then I drag the layer mask up to link it to the group instead of just the image and drag the image into the folder:

Next I like to sharpen before I resize the image so I open the group and highlight the image layer and then go filter > convert for smart filters and then for sharpening: filter > sharpen > smart sharpen with these settings:

Now with the image layer still highlighted i go to image > image size and set it to 250x250

4. the fun part ✨
Now we can add the background color and everything else ✌️
I have a lot of previous templates saved to save me time so what I normally do is open a psd template I have then highlight the group layer i just made then right click > duplicate group and have the destination be the psd and then I can just change the colors of gradients i've already made (For this tutorial though I'll show you how I make the gradients/paint layers)
For coloring this is pretty much what my process usually looks like (im probably going way overboard with it but oh well lol) it really depends on the pic being used, some don't need to be colored as much.
I have found that over brightening/upping the vibrance isn't necessarily a bad thing sometimes (not all the time though) because of how small the icons are it kind of helps the image stand out more when they're used but it's up to you!
(I also put all the adjustment layers into one group because it gets a little chaotic if I don't)

Next we're going to make a gradient ✨ first i go to the adjustment fill button (?) and pick gradient

Then I just pick one of the generic photoshop options that kind of has the look I want ( it doesn't matter too much since it will be edited so it can be any color)

Now to change the color of the gradient click on the color part in the gradient section and you'll see this

I deleted the bottom middle square because I didn't want it, but to change the colors double click on the bottom left or right squares and a color wheel will pop up.
When I pick the lighter color i normally just go up to a lighter section above the darker color
This is the change i made, you can move the middle diamond slider to have the darker or lighter color be more prominent

Next is playing with the angle/scale until it's how you want it, these are what mine ended up being

I also normally adjust the angle so that the lightest part of the gradient is in the top corner where the light source is coming from in the icon pic to make it look more natural
Next I add a solid color layer over the coloring layers with a color that's similar to the background gradient color im using and switch to the brush tool with black paint and with the layer mask selected on the solid color layer paint over everything i don't want colored with black
Then I do a second solid color layer set to a lightish brown, normally on just the hair, to add a bit more contrast

then i set the color fill layer that matches the background to either overlay, soft light, or color (depending on which one looks best for the image) and adjust the opacity/fill to where I want it.
I always set the brown layer to soft light with the opacity at around 80%
And NOW just when you think I might be done...I'm not...because I have to make this process as long as possible 😂
Now I do another color fill layer but this time over the entire image group layer. I normally make the color a slightly lighter color than the darkest part of the background color, set it to soft light, lower the opacity/fill to about 50% or lower, (depending on how much it changes the pic) and then right click > create clipping mask so it only effects the image and not the background
This kind of just tints the image a little with the color to bring it together a little more

Now the icon looks like this:

You can add more fun stuff like doodles/background textures i've used these and these but there's a lot of resource blogs like @/completeresources and @/allresources that have long lists of different textures
If i wanted to add a texture though i would put it over the gradient layer and set it to overlay or soft light


And to add a doodle you just put it at the very top of everything and resize it/turn it using the move tool :)


Then you're done! you can go file > export > quick export as png and thats it 👏
Hopefully this makes sense! I've uploaded the template i made in the tutorial here if that's easier to follow but feel free to ask if you have any questions!
#icon tutorial#dailyresources#completeresources#icons#tutorial#tutorial*#photoshop tutorial#usertana#userzo#tusertha#ps*
62 notes
·
View notes