#Gradient Generator Tool
Explore tagged Tumblr posts
Visit Tumblr Blog
Explore Tumblr blogs with no restrictions, modern design and the best experience.
Last Seen Tumblr Blogs


Fun Fact
Celebrities use Tumblr as well.
Text
CSS Gradient Color generator , gradient generator , background gradient generator
Link: CSS Gradient Color Generator Now!
In the realm of web design, gradients add depth, dimension, and visual interest to websites, creating captivating visual effects and enhancing user experience. EditBoxPro’s CSS Gradient Color Generator offers a user-friendly solution for creating custom CSS gradients that elevate the aesthetics of your web projects. Let’s explore how EditBoxPro’s CSS Gradient Color Generator can empower web designers to unleash their creativity and bring their design visions to life.
Harnessing the Power of CSS Gradients
CSS gradients allow web designers to create smooth transitions between two or more colors, resulting in visually appealing backgrounds, buttons, overlays, and other design elements. Gradients add depth and texture to web interfaces, making them more engaging and immersive for users. With EditBoxPro’s CSS Gradient Color Generator, designers can easily experiment with different gradient styles, angles, and color combinations to achieve the desired visual effect for their websites.
Key Features of EditBoxPro’s CSS Gradient Color Generator
Intuitive Gradient Editor: EditBoxPro’s CSS Gradient Color Generator features an intuitive gradient editor that allows designers to create custom gradients with ease. Whether you prefer linear gradients, radial gradients, or conic gradients, our tool offers a range of options to suit your design needs.
Color Picker and Gradient Stops: Customize your gradients by selecting colors from a comprehensive color picker or entering hex codes manually. EditBoxPro’s Gradient Color Generator also allows you to add multiple gradient stops and adjust their positions and opacity levels for precise control over your gradient design.
Gradient Angle and Direction: Experiment with different gradient angles and directions to achieve the desired visual effect for your web design projects. EditBoxPro’s CSS Gradient Color Generator allows you to specify linear gradient angles, radial gradient shapes, and conic gradient starting points for endless design possibilities.
Preview and Code Export: Visualize your gradient designs in real time with EditBoxPro’s live preview feature. As you make changes to your gradient settings, our tool provides instant feedback, allowing you to see how your gradients will appear on the web. Once you’re satisfied with your design, you can easily export the CSS code and integrate it into your web projects.
Cross-Browser Compatibility: EditBoxPro’s CSS Gradient Color Generator ensures cross-browser compatibility by generating CSS code that works seamlessly across modern web browsers. Whether you’re targeting desktop or mobile users, our tool helps you create gradients that render consistently across different devices and platforms.
Advantages of Using EditBoxPro’s CSS Gradient Color Generator
Enhanced Visual Appeal: Elevate the visual appeal of your websites with stunning CSS gradients created using EditBoxPro’s Gradient Color Generator. Whether you’re designing headers, buttons, backgrounds, or overlays, gradients add depth, dimension, and sophistication to your web interfaces, making them more visually appealing and memorable for users.
Time-Saving Design Solution: Streamline your design process and save time with EditBoxPro’s CSS Gradient Color Generator, which offers a user-friendly interface and intuitive controls for creating custom gradients in minutes. Instead of manually coding gradients from scratch, designers can use our tool to experiment with different gradient styles and color combinations effortlessly.
Versatile Design Applications: Whether you’re designing personal websites, portfolio sites, e-commerce platforms, or corporate landing pages, EditBoxPro’s CSS Gradient Color Generator offers a versatile solution for integrating gradients into your web projects. From subtle color transitions to bold gradient effects, our tool empowers designers to create custom gradients that reflect their brand identity and design aesthetic.
Accessible Design Tool: EditBoxPro’s CSS Gradient Color Generator is accessible to designers of all skill levels, from beginners to experienced professionals. With its user-friendly interface and visual editor, our tool makes it easy for designers to experiment with gradients and create visually stunning web designs without the need for advanced coding knowledge.
Conclusion
Transform your web design projects with EditBoxPro’s CSS Gradient Color Generator. Whether you’re a seasoned web designer or just starting out, our tool provides the functionality, flexibility, and convenience you need to create custom gradients that enhance the visual appeal of your websites. Experience the power of CSS gradients, unleash your creativity, and elevate your web design game with EditBoxPro today!
Create Custom CSS Gradients with EditBoxPro’s CSS Gradient Color Generator Now!
gradient generator, gradient generator javascript, css gradient generator, background gradient generator, javascript gradient background generator, multiple color gradient generator, linear gradient generator, gradient color generator, gradient image generator, ultimate css gradient generator, background color generator, random color gradient generator, gradient, gradient color generator javascript, css gradient tutorial, linear gradient
1 note
·
View note
Text

I cannot stop drawing Raiden with iridescent hair and I am not sorry
Birthday gift for my lovely girlfriend @e6as95 💕
#Raiden#Raiden MGS#Raiden MGR#mgs#mgr#mgrr#Metal Gear Solid#Metal Gear Rising#Metal Gear Rising Revengeance#metal gear fanart#mgs fanart#golden art#is him doing heart hands ooc? maybe#maybe not#either way it's cute#also I totally went with the flow here and after struggling for nearly 2 years with art in general this was so freeing#like I feel finally happy with my art again#practiced a lot#got help from Lilicat and hedge with this#also figured out some other things#and learned some new tools in CSP#and also made my first gradient map
97 notes
·
View notes
Text

CSS Gradient Text Generator is a CSS code generation tool that helps developers and designers create visually appealing colorful gradient text effects. It allows you to apply gradient colors to text elements effortlessly.
#CSS Gradient Text Generator#CSS Code Generator#Gradient Text Generator#free online tools#online tools#web tools#online web tools#free web tools#online tool#a.tools
2 notes
·
View notes
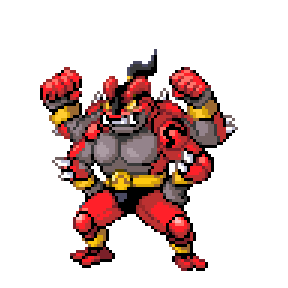
Text
Chillin'
#playing with the lasso and gradient tool#Dudunsparce#as chosen by the good old random pokemon generator#pokemon#pokemon Dudunsparce#pokemon fanart#digital#digital art
5 notes
·
View notes
Text
2 notes
·
View notes
Video
youtube
The only gradient generator you will ever need! Your Complete Guide to ...
#youtube#color#gradient#graphic design#graphic designer#graphic reasources#graphic design tools#graphic design resources#design tools#tutorial#design tutorial#color inspiration#online tools#online color pallet generator#free design tools
1 note
·
View note
Text

I finally got an idea to draw my lil girl! Rin my beloved <3
Also I'm obsessed with the concept of creepy Rin. I'm a firm believer of the fan theory that Rin never really appears in canon. We always see her through someone else's biased point of view, so the ghost of Rin that appeared when Obito died (again) was most likely just the version of her that he wanted to see (like how Kakashi saw the whole of team Minato after he died in the pain arc even though Obito was still alive).
I love the idea of Rin haunting the narrative, she's so relevant but we have never even seen the real her.
And about the art style: it takes a long time to do, but the results are amazing and thankfully it's faster every time.
Once I get the general theme or idea that I want to do, the process is really just using a bunch of tools like symmetry and stuff to kinda choose how swirly or pointy or jaggedy I want my lines to be, and then going with the flow. Then I color it with gradient maps (I use this part to experiment with colors a lot), and bon appetit! It's hard to describe because it's really intuitive (which is why it takes so long), but it's really fun to do!
722 notes
·
View notes
Text
Let’s Grow the RPG Hobby
Inspired by this post and the conversation surrounding it.
So the RPG world is facing a multitude of interconnected problems. Let’s talk about them, shall we?
---
1: The Problem(s)
Writing this, I find it hard to pinpoint a way to frame the subject of this post as a single thing. But it’s also impossible to treat it as it it’s a collection of separate problems. In reality, the issues facing the indie RPG world are A Hydra; a many-headed conglomeration of related issues, which each require organized, dedicated work to solve. A few examples:
The Normie-Indie Divide
A problem close to my heart, The Normie-Indie Divide describes the gradient between the mainstream of an artistic hobby and the really independent stuff. I compare this to movies a lot, but the more apt analogy is video games. The N-I-D in the videogame industry is so small as to be virtually nonexistent.
We can see this via a number of factors – one example being that the same outlets which cover massive blockbusters & sequels like Assassin’s Creed and God of War, also cover popular indie titles like Celeste and Hollow Knight. Then, freelance journalists who write for those publications (Jacob Geller is an example) go on to cover much smaller games on their own time, and so on. There’s a smooth gradient between the media coverage of the huge stuff, all the way down to a thriving (if still underserved) super-independant industry.
The N-I-D in RPGs feels uncrossable. The most well known RPG is so big it’s currenly riding the high of its second major hollywood adaptation in 20 years, and the second most popular – Vampire the Masquerade – is an unknown even to some indie RPG fans.* This hobby is shockingly impenetrable, even to those of us who spend our days swimming in the deepest end of the pool.
The Supply & Demand Problem
This one’s simple: People are pumping out RPGs by the truckload, and there are just too many! Not only does this make it hard to sift through everything to find the thing you want to read, play, or review, it also makes it nearly impossible to get anyone’s eyeballs on the cool thing you just released!
As others have pointed out, this problem is exacerbated by the fact that relative to some other art media, it’s pretty quick and painless to whip up your own zine or one-pager and publish it on itch. This disincentivises even the most invested of us from looking at a ton of new games, and means that sharing your work can feel like you’re being ignored by a huge crowd.
A Road To Solutions
If all of that is making you feel pretty bad for the future of this medium, you’re not alone. It can feel pretty hopeless facing all of these problems as an indie designer when all the tools you have at your disposal are a tumblr account and a few indie friends to complain to.
But the truth is, I think that this Hydra is eminently slayable. I just don’t think we can do it alone. That in mind, I’ve spent a large portion of my day putting together…
The Call to Action
I think there needs to be organized, persistent effort put into the future of this hobby and this industry, and I think it needs to start the way all good movements do: with a lot of petty, semantic argumentation over definitions and implementation. And to kick things off, here’s my step zero: If you’re reading this post because I’ve tagged you in it (or because I’ve sent you a link to it), my Dms are open. I want to put together a discord group chat† of my peers within RPG tumblr who are invested in tackling The Hydra, such that we can start brainstorming plans of attack to disseminate into the wider community.
The issues I wish to address are these:
The Normie-Indie Divide: How do we go about cultivating a casual audience of indie RPG fans who can bring sustainability and longevity to the industry?
The Supply & Demand Problem: How do we minimize the cognitive load of sorting through the huge volume of work extant in this medium, and more generally encourage peer-to-peer interaction within the community, like news coverage, reviews, and marketing?
The Cognitive Frontload Problem: How do we make it easier to actually engage with a given RPG, considering the amount of cognitive & temporal investment needed? Further, how do we make RPGs, both general and specific, more accessible to readers with a wide variety of abilities, preferences, and available time?
The Insular Community Problem: How do we better connect this hobby with itself, such that it feels a little less like several dozen cliques across 4-6 platforms, and more like the growing, evolving single hobbyist community that it is? Further, how do we make this hobby more accessible to newbies outside the influence of The Hegemons of the Coast?
And more. I’m positive I haven’t thought of everything, and that’s exactly why this needs to be a group effort.
As a last note: Please tag other people! The folks I’ve mentioned here are just those who I personally feel I know well enough to tag; let’s get the rest of the community involved! If you know someone who would be interested who isn’t on tumblr, they can email me: [email protected].
*I’m not kidding. Multiple times within the last four months, I’ve introduced VtM to people who I would consider pretty in the sauce of RPGs. I’m talking folks who’ve played Heart: The City Beneath or Wanderhome. It’s bizarre.
†I need to stress that this is only a start. I’m not looking to start a big public discord unless that’s what a group of folks decide is the right call. By “group chat,” I mean “a chat which exists for long enough to hold 1-3 group voice calls to discuss and hash things out, before it’s dissolved in favor of the execution of whatever plans we devise.”
@theresattrpgforthat; @omophagic-beast; @ladytabletop; @rowansender; @monsterfactoryfanfic; @arsene-inc; @toyourstations
256 notes
·
View notes
Note
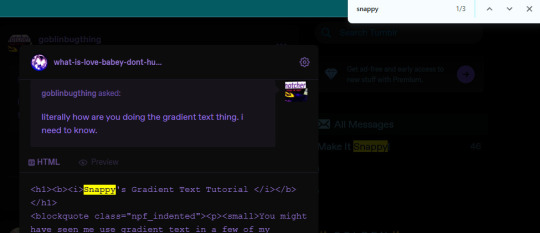
literally how are you doing the gradient text thing. i need to know.
✨ Snappy's Gradient Text Tutorial
You might have seen me use gradient text in a few of my artworks, and it is a great tool to make a posts tand out! I learned from this post, but find some of the information outdated, so I am making a tutorial of my own!
To my knowledge, this is only possible via desktop mode* (mobile method at end), but not the app, as access to the HTML function is necessary. Alongside that, you need access to a text color fader! There's a few options out there, but I use:
Patorjik's Text Color Fader
Let's get to the tutorial!
Have the text you want to turn into a gradient ready and copy it to your clipboard.

2. Open the text color fader and paste your text into the box labeled "your message".
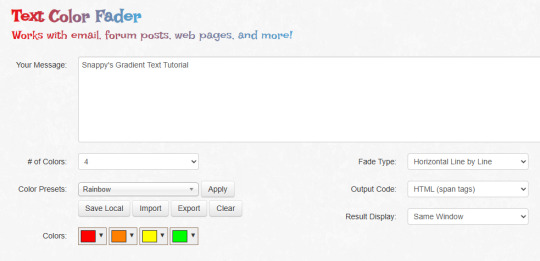
3. For the most basic gradients, you may ignore the boxes on the right. The leftmost boxes allow you to choose between preset colors or making your own colors.
Tip: if you are making a gradient for something such as art, I reccoment grabbing a few hex codes from the image to use for your gradient. This allows you to have control over your colors. You may also save a pallet if you want to use it again

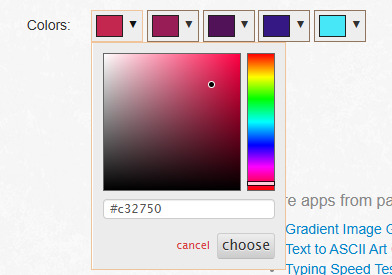

4. When you are happy with your colors, generate your text.

5. You will be brought to this page. If you are happy with the colors, click "select all" and copy the HTML to your clipboard.
TIP: check your text against both a dark and light background to ensure it will be readable to viewers on dark and light mode. If it is not you can tweak the colors by choosing "create new fade".

6. Open Tumblr again and open your post. At the top right there is a grear icon. Click the icon and scroll down to the text editor. Change the setting from "rich text" to "HTML"


7. When you move to HTML, your post will look very different! In the HTML, your goal is to find the text you want to replace in the code.
TIP: If you can't find it, use "Ctrl + F" to open the keword search function and it will highlight your word.
8. Highlight your plain text, right click it, and paste your HTML from Patorjik into the space.
TIP: The HTML is a confusing mess to look at. Click the "preview" tab to check if your code worked


9. You should see a gradient when you swicth modes!

If the HTML broke your formatting, you can edit it in the preview mode. Once you have done a gradient a couple of times this process is very easy and takes LESS than two minutes. It looks intimidating but after you get the hang it is very achievable! I believe in you guys being able to do it. Happy gradient texting for you guys!
*EDIT: It is possible via mobile through the method of entering your account on a web browser and putting it on computer mode, then following the same process. Reportedly it is less comfortable but it works, thank you to chocokeyboard for letting me know!
#sent to snappy#asks#snappy speaks#web resources#tumblr resources#gradient text#tumblr tutorial#gradient text tutorial#loveee doing this for my posts it adds so much#if anyone DOES know if it can be done on mobile let me know! I will edit this post to include it#EDIT: mobile method found! to my knowledge not app compatable but if anyone knows how to do it via app let me know and I will include it!
213 notes
·
View notes
Text
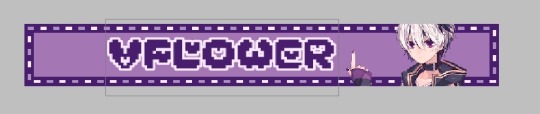
EXPLAINING HOW I MAKE BLINKIES :3
like these guys


websites / apps: blinkies.cafe , ibis paint x , ezgif.com !
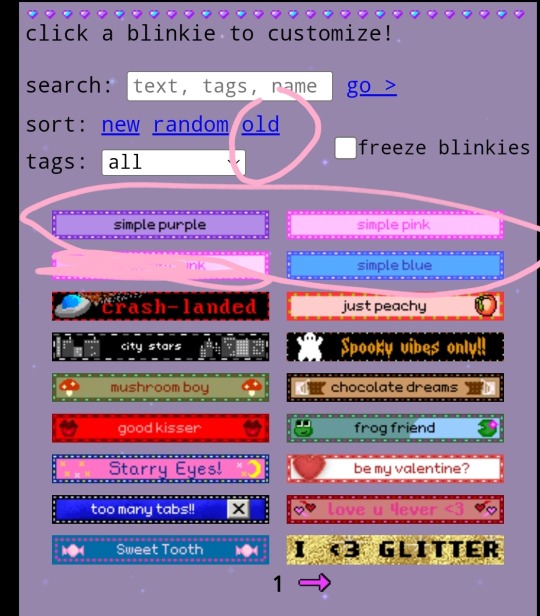
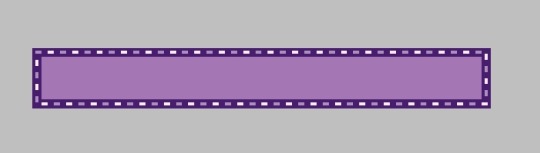
STEP ONE !! go to blinkies.cafe and select a blinkie. i reccomend going to old and selecting one of the very simple ones !! DO NOT SELECT THE GRADIENT ONE YOU WILL SUFFER
STEP TWO !! click on it btw. anyways, since spaces won't work, put " " !! it will register !! this is also how to make videos on yt title-less i think... anyways, choose the biggest size
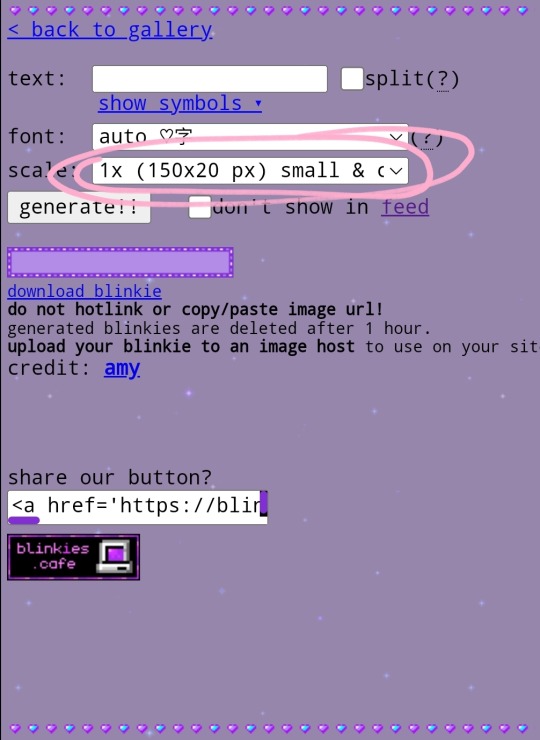
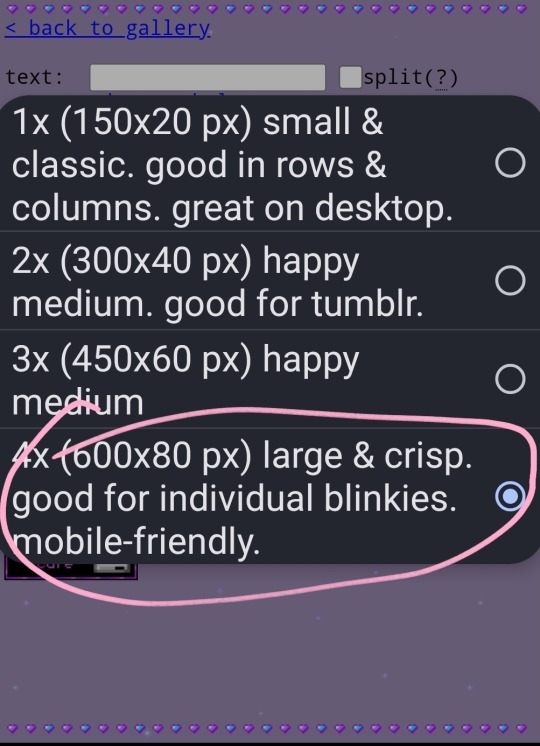
then click generate and download the blinkie!!
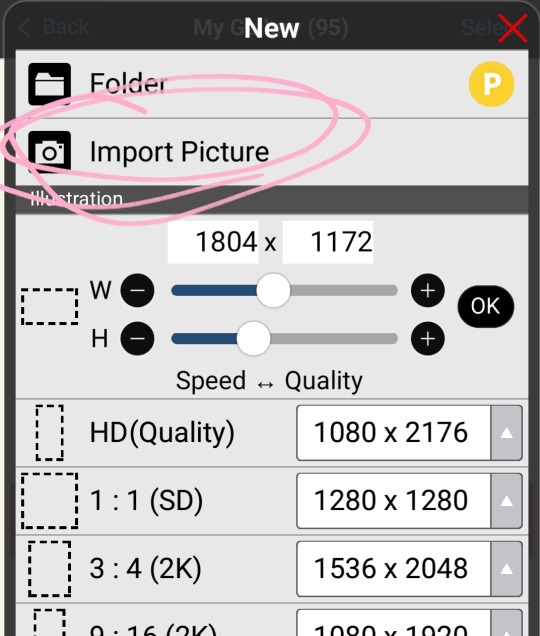
STEP THREE !! import into ibis paint !!
now i reccomend putting a reference of whatever character in your ref window. won't explain that, look it up.
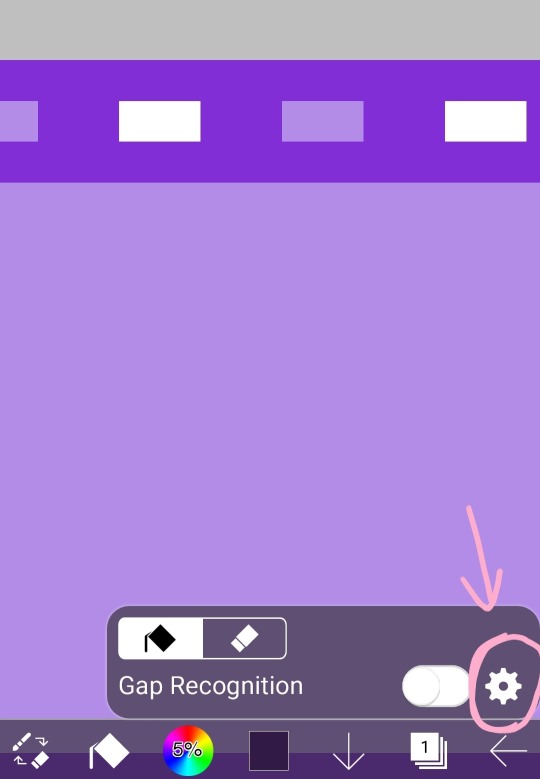
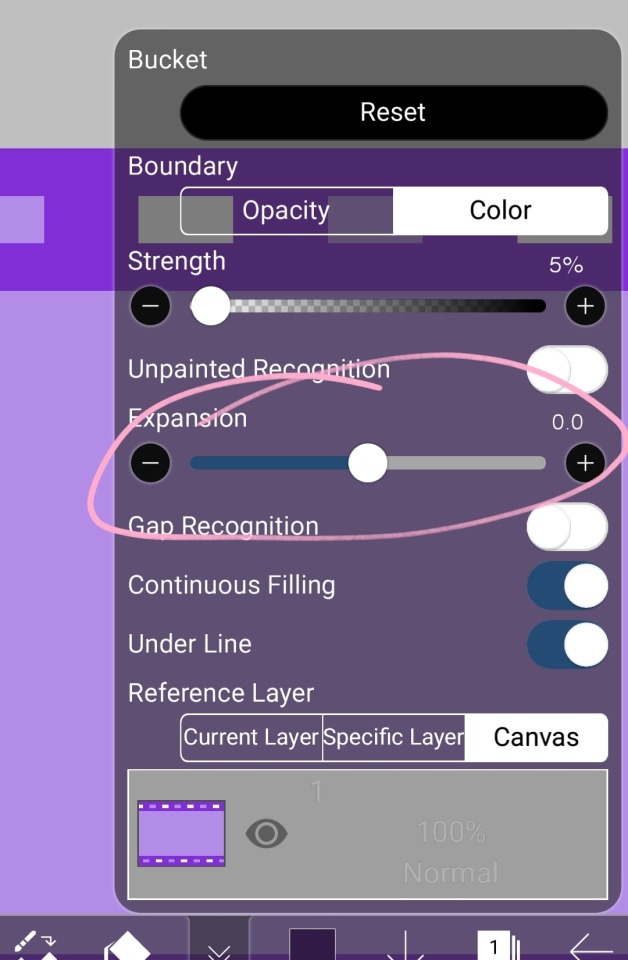
STEP FOUR !! choose colors and recolor with bucket tool on 0
wow, look at that !!
STEP FIVE !! import a transparent image of your character and put the text of your choice.
heres the font i use !!
advice for choosing colors of the text: make the body the color of the blinkies border and the outside the brightest light !!
STEP FIVE AND A HALF !! this is optional, but i make a very small border around the text. duplicate layer and bring it on top, make all other layers invisible, alpha lock, make it the color of the border, turn off alpha lock, use bucket tool on expand 0.5 or 1 and tap a few times on the blob, turn other layers back on, put the duplicate under the original thing and merge so it's a small border. it's very subtle but i like it.
see the difference?


STEP SIX !! download it, then flip ONLY THE BLINKIE LAYER horizontal and vertical then save again

if you want another set of words, add them now!!
STEP SEVEN !! go to ezgif.com and imput them
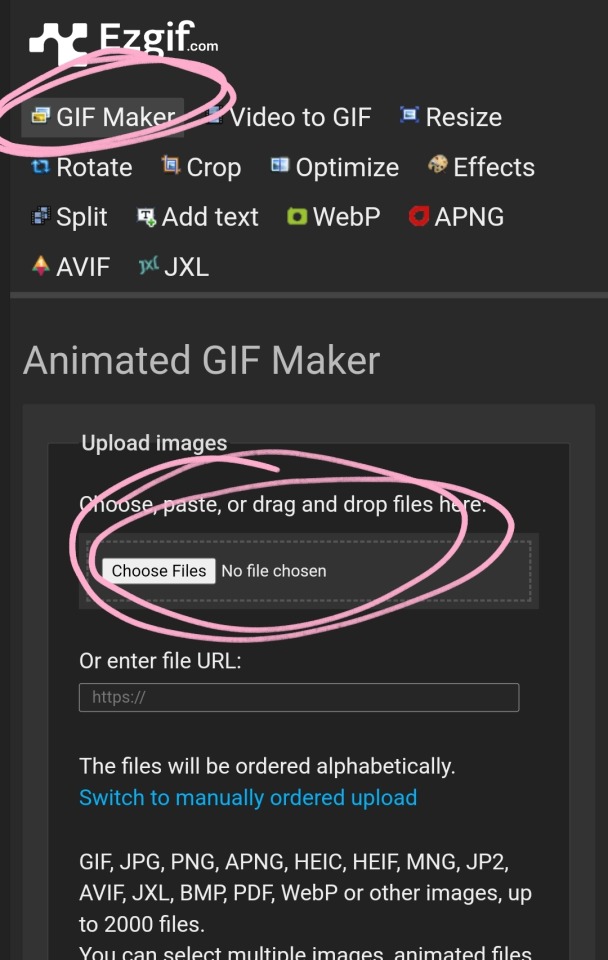
the click upload files. then click make a gif :3

the end (≡・x・≡)
#🧁 sweet shenanigans#jiraiblr#vflower#blinkie#blinkie tutorial#web graphics#web resources#blinkies#tutorial
187 notes
·
View notes
Text

and here are the kompot!af2 designs! morward, pasless and voixer aren't really my favorites so they didn't get a spot. and verfection is not in af2 o_o
if you guys want me to draw any stuff of these guys please lmk?! or ship art... i ship everyone here (Excluding Cyalm!!) with everyone so ask and you shall receive. i want to interact with the fandom even if its small :-)
ramblings, artist commentary and design notes below! (it's a LOT)
holy crap it's finally done. i've been chewing on this for at least a month. not because i had no ideas for the designs (most of the time) but because drawing this many characters is so tedious...
it was even worse than the kompot!regretevator references i did, which had 17 characters! LORD
general design notes:
all of the points' bodies are completely made of glass, through and through. it's "anomalous" glass because they move like people obviously but you get it
all of the points must have their gradients be very prominent. in fact, when stylizing, you can just omit all of the details and color them in only as their gradient lol
all of the points must have their symbol on their clothing, except solgon, naen and yawgate, which have cyalm's symbol instead!
they are wearing pants trust me its just.. gradient pants.. h
SPEAKING OF THE LEGS THEY LOOK LIKE THAT DUE TO LAZINESS. no need to tell me .
per character notes/inspirations (WALL OF TEXT apolocheese):
👽 kompot: who is this guy? you might recognize his hands from the new af2 icon! he's my design for ss2, just an oc :-) if anyone wants to know about him feel free to inquire! (inb4 "isn't he you?" - he's more of a mascot than a sona!)
☁️ cyalm: supposed to look angelic, classy and have a holier-than-thou vibe. clothes are always perfectly pristine. the cloud patterns are animated! the wings are optional, the halo is not!
🛠️ shallare: engineer/mechanic thingy. always carries tools and spare nuts n bolts around. their glasses are safety goggles! also they have soot or oil stains on them most of the time.
🎶 signol: performer, bartender, classy lil thing! their sleeves are rolled up for the sake of playing instruments more easily. long ass coattails and for what... the pizazz...? tch
❄️ compale: cozy winter dweller. kinda russian-esque... i'm balkan so forgive me for that. the inside of their coat is super fluffy! can have optional mittens!
🪓 ploque: woodworker/woodcarver type design. has two bandannas for no reason, but uses the one on their neck while working to deal with the sawdust. only has one protective glove on their non-dominant hand!
⭐ anshine: their outfit is meant to match the angels'/residents of maytown's clothes. wings optional, halo mandatory! their watch is also heavily preferred. their 'sleeves' are a separate, singular piece of fabric draped around their arms
🌒 ulipse: supposed to look like they live in the desert! very covered up to protect from the sun. their shawl/scarf has dangling moon symbol charms all around!
🐉 arrolin: sorry i just love qipao so much.. LNY chinese festivities based! the shawl/scarf draped around their elbows has floaty properties and always remains in place. the dragon patterns are animated!
🤖 mino: robot!! their torso is completely exposed, the only clothing they have is the shrug and the stirrups! the antenna extends, mostly for comedic effect lol
🌔 ixol: probably the one i took the most liberties with? tropical vacation mixed with weirdo freak vibes! their cape is animated like a flame at the bottom! the cracks on their arm are permanent and display a glitched screen. the flame around their head doesn't hurt.
❌ stratosfear: their cape is similar to ixol's, but it tears instead of "burning". their stinger is part of their body despite being disconnected - it also wags LOL. supposed to have both a hero and villain vibe? ended up a cowthey??
⁉️ solgon, 💲 naen, 🔒 yawgate: cyalm's lackeys! they all have the same uniform styled differently. solgon and naen swap their bandannas every few days for fun! yawgate's is based on a conductor's and stewardess' uniform!
thank you for coming to my yapfest..! i hope it was fun to read. i want to talk about af2!!
#af2#adventure forward#adventure forward 2#roblox#roblox art#roblox fanart#kompot artpost#oc#roblox oc#k!af2
81 notes
·
View notes
Text

CSS Gradient Background Generator allows you to create beautiful and colorful gradient background using CSS. You can choose from a variety of gradient types, and customize the colors, angles, positions, and sizes of the gradient.
#CSS Gradient Background Generator#CSS Background Generator#CSS Code Generator#free online tools#web tools#online web tools#ai tools#a.tools
0 notes
Note

they're calling us ableist for pointing out ai art XD
Ok. Let me understand what's going on here
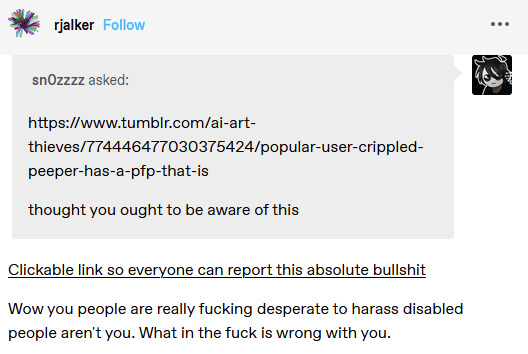
You try to alert someone about this, but it didn't go too well and now rjalker is demanding for a witchhunt for anyone that goes against crippled-peeper.
And I thought shit like this only happens on twitter....
Might as well clear my name and debunk the claims present here.

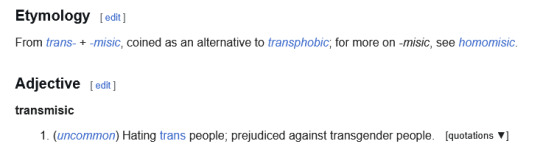
To clarify, transmisic is not a misspelling of transmisogynic. It is another word for "transphobic".
First of all, I had never interacted with crippled-peeper before I got the tip from anon. At all.
I never even heard of that user before in my life.
I probably bet that the users that rjalker claim to be ableist or transmisic have never heard of or interacted with crippled-peeper either.
Next point:

Let me answer rjalker's question with a question. Have you ever seen JPEG artifacts before?
And, more specifically, do you know the difference between ai pixel art and regular pixel art?
The fact that it don't show evidence/proof that the icon is not ai generated and shows examples of jpeg artifacting clearly shows that its post is a reactionary response. (I know this sentence structure sounds kind of weird, but I'm trying my best with the pronouns that I have been provided.)
Luckily, I can debunk that claim right away because I am quite familiar with pixel art myself.
I have done my fair share of sprite edits.
And before this user claims that I'm stealing another person's art, no. I am not. My main account is @magicalmysteryperson, and here is the proof.

Here's links to the pieces as well.
Now, with that out of the way, allow me to prove why rjalker's claims make no sense.
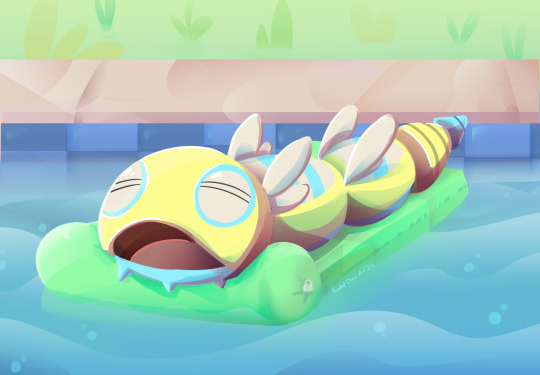
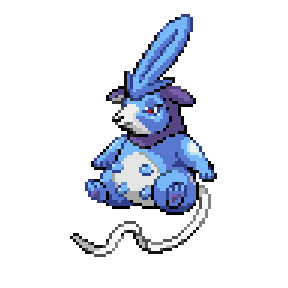
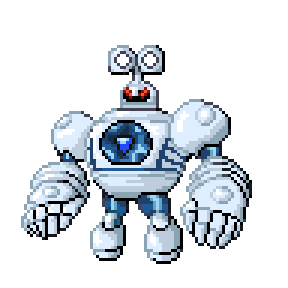
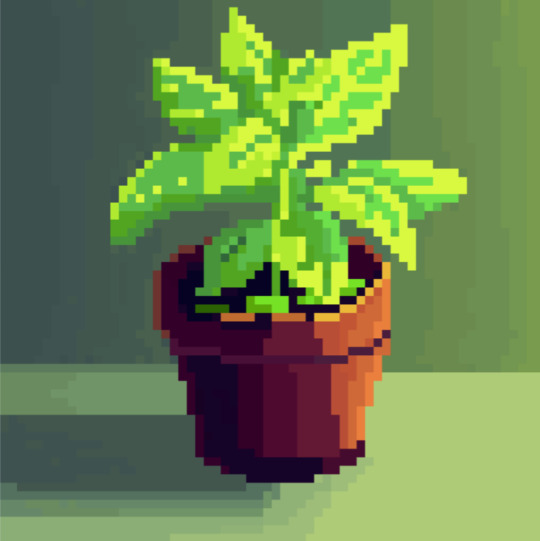
By redrawing the image from scratch. Here's the image.

here's the original, for reference

Already something is amiss.

There are a whole bunch of varying line weights and splotches that are considered by most sprite artists as serious faux pas.
Some parts of the image are blending with each other.
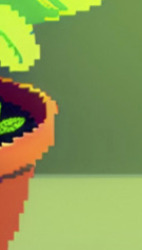
The gradients with both the floor and the wall are way too smooth for an image like this.

And the small leaves on the soil are an extremely big give away that the image was ai generated.
I am not demonizing the person for ai generating their icon.
Yes, ai art is bad, but some people do use it, even disabled artists.
I'm not going to demonize someone just because they play with that tool.
It's the dishonesty that is the main issue here.
Remember: their story behind this icon was that they made it over three years ago.

And their stance on AI on September 25th, 2024:

However, the claim that they made the image over three years ago is put into question when in 2021, 2022, and 2023, they had various other icons... as well as using ai art constantly.


The images in the latter two screenshots have not been archived by the wayback machine, and these posts have been scrubbed by the user. Again, everything prior to 2023 is scrubbed from the account.
I will also do what rjalker did and provide wayback machine links. here, and here, and here, and especially here.
Now, let's tackle the second claim: "It's JPEG compression".
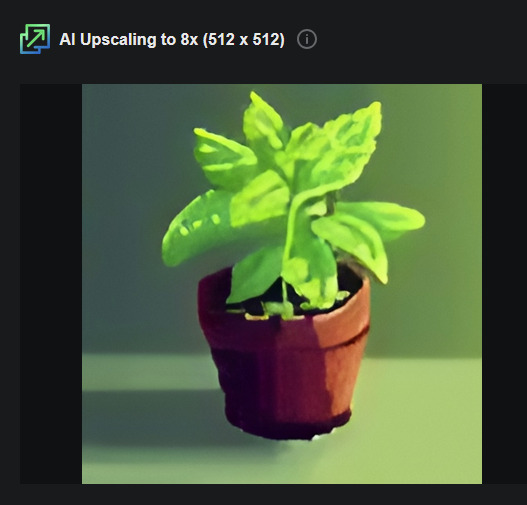
Here's both the png and the jpeg files of the plant I drew.


Note that with the jpeg compression, you can also see that even though the image looks softer, there is still a form of pixelation. It's still made up of little squares, not rounded splotches.
You can simply look up "compression artifacts" and find that what's going on in crippled-peeper's image is not the result of jpeg compression artifacting.
If you want to see what my image looks like in a bigger form, here you go.
I have also did numerous forms of jpeg compression to see if I could replicate what crippled-peeper did.


I wasn't able to.
I just got more cronch and more pixels.
And before rjalker claims that the icon was an ai upscale of a jpeg...
I upscaled my own images on various sites to check if that claim even had any legs to stand on.

While some of the effects were present, it wasn't enough for me to replicate what crippled-peeper did unless I made the same thing with an ai image generator.
Until crippled-peeper has proof that the image was made over three years ago and made on a tablet in the hospital, the allegations presented here stand.
And please, do not harass rjalker.
I get that it made a post that, while it had the best intentions, was poorly researched and reactionary.
But I don't want that post to ruin its life.
I want that post to be used as a teachable moment.
To think before you type or post.
Don't let your gut control you. Just stop and think.
You don't want to post a call out post that completely backfires and hits you instead.
Not that it matters, they already blocked me.
#case type: ai scumbaggery#case: crippled-peeper#and also adding rjalker for how poorly they tackled this
108 notes
·
View notes
Text
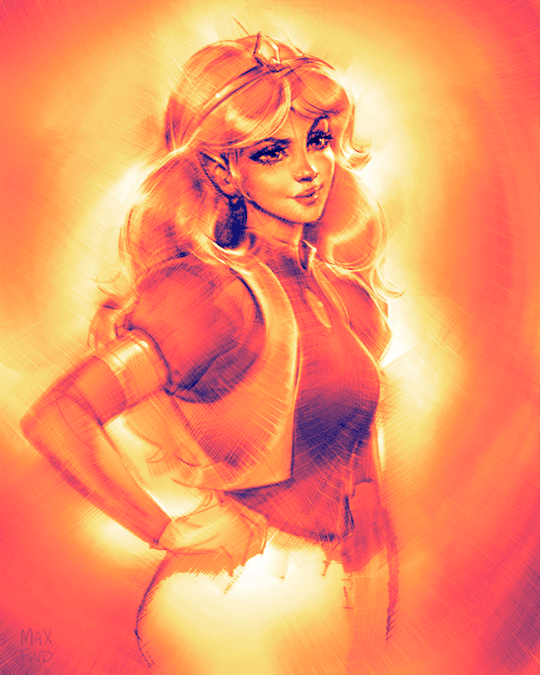
Rough Sketch to Final process GIF of Princess Zelda from the Animated Series! Those who are curious (or dubious) of my process will be delighted to see the full 3-hour livestream VOD, from blank page to final color, is available here: https://www.youtube.com/watch?v=rjzcpfPxm8g Start with a solid sketch, follow the process, and you can push the values to 11... then a gradient map to add a color finish ! If you like this style, I really encourage you to share and check out my other Zelda portraits on my profile. I've been under lock and key in the entertainment industry for a long time. Now that things are slow, I'm hoping to transition to more of an educational role and help popularize some proven effective illustration techniques to make sure the next generation of digital artists have all the tools they need to survive in these unprecedented times... I'll keep trying to be as transparent as possible and learn as i follow this new path wherever leads.
#zelda fanart#the legend of zelda#tloz#rough sketch#art process#concept art#art#art timelapse#zelda#figuredrawing#gradient map#fanart#excuse me princess#art tutorial#fantasy art#art tips#artists on tumblr#art resources
95 notes
·
View notes
Text

Hi! I got asked if I have an icon tutorial so I thought I'd do my best to go through my (probably way too long) process :) I'm going to show how I made that icon up there 👆
When I first started making icons I used this great tutorial by @/strwrs and then slowly added my own preferences to make this chaotic process 💕
First for getting screencaps of things i normally just google "[name of show/movie] screencaps" but one of the ones I use a lot is this site.
1. Open the pic in photoshop and crop it
Here's the full image:

Here's where I'm cropping it:

I like to make the size of my icons 250x250 but it can be more of a preference thing, a lot of people use 200x200 or I've seen 100x100 too.
I also like to crop a little above the image sometimes to give more space above the head
2. Removing the background
Removing the background is way easier on animation than on real people sometimes so I can show 2 examples even though I do it the same way...
First I go to select > select and mask:

Then I use the quick selection tool to select as much of the head as i can and the brush tool to remove/re-add parts that got missed so it should look like this:


(is the quick selection tool great? not all the time but when it works well it's great 🤡)
For something like this where her hair has a lot of texture in it and it's difficult to get a good outline, I'll zoom in really far and use the brush tool to get as many of the big pieces as I can so it looks a little more natural when the background color is added

Sometimes there can be a white/black line around the icon that got missed from erasing the background and you can use the brush tool to erase that as well.
3. resizing and sharpening
Now everything should look like this:

I'm going to go to the right where my layers are at and create a new group by clicking on the folder at the bottom
Then I drag the layer mask up to link it to the group instead of just the image and drag the image into the folder:

Next I like to sharpen before I resize the image so I open the group and highlight the image layer and then go filter > convert for smart filters and then for sharpening: filter > sharpen > smart sharpen with these settings:

Now with the image layer still highlighted i go to image > image size and set it to 250x250

4. the fun part ✨
Now we can add the background color and everything else ✌️
I have a lot of previous templates saved to save me time so what I normally do is open a psd template I have then highlight the group layer i just made then right click > duplicate group and have the destination be the psd and then I can just change the colors of gradients i've already made (For this tutorial though I'll show you how I make the gradients/paint layers)
For coloring this is pretty much what my process usually looks like (im probably going way overboard with it but oh well lol) it really depends on the pic being used, some don't need to be colored as much.
I have found that over brightening/upping the vibrance isn't necessarily a bad thing sometimes (not all the time though) because of how small the icons are it kind of helps the image stand out more when they're used but it's up to you!
(I also put all the adjustment layers into one group because it gets a little chaotic if I don't)

Next we're going to make a gradient ✨ first i go to the adjustment fill button (?) and pick gradient

Then I just pick one of the generic photoshop options that kind of has the look I want ( it doesn't matter too much since it will be edited so it can be any color)

Now to change the color of the gradient click on the color part in the gradient section and you'll see this

I deleted the bottom middle square because I didn't want it, but to change the colors double click on the bottom left or right squares and a color wheel will pop up.
When I pick the lighter color i normally just go up to a lighter section above the darker color
This is the change i made, you can move the middle diamond slider to have the darker or lighter color be more prominent

Next is playing with the angle/scale until it's how you want it, these are what mine ended up being

I also normally adjust the angle so that the lightest part of the gradient is in the top corner where the light source is coming from in the icon pic to make it look more natural
Next I add a solid color layer over the coloring layers with a color that's similar to the background gradient color im using and switch to the brush tool with black paint and with the layer mask selected on the solid color layer paint over everything i don't want colored with black
Then I do a second solid color layer set to a lightish brown, normally on just the hair, to add a bit more contrast

then i set the color fill layer that matches the background to either overlay, soft light, or color (depending on which one looks best for the image) and adjust the opacity/fill to where I want it.
I always set the brown layer to soft light with the opacity at around 80%
And NOW just when you think I might be done...I'm not...because I have to make this process as long as possible 😂
Now I do another color fill layer but this time over the entire image group layer. I normally make the color a slightly lighter color than the darkest part of the background color, set it to soft light, lower the opacity/fill to about 50% or lower, (depending on how much it changes the pic) and then right click > create clipping mask so it only effects the image and not the background
This kind of just tints the image a little with the color to bring it together a little more

Now the icon looks like this:

You can add more fun stuff like doodles/background textures i've used these and these but there's a lot of resource blogs like @/completeresources and @/allresources that have long lists of different textures
If i wanted to add a texture though i would put it over the gradient layer and set it to overlay or soft light


And to add a doodle you just put it at the very top of everything and resize it/turn it using the move tool :)


Then you're done! you can go file > export > quick export as png and thats it 👏
Hopefully this makes sense! I've uploaded the template i made in the tutorial here if that's easier to follow but feel free to ask if you have any questions!
#icon tutorial#dailyresources#completeresources#icons#tutorial#tutorial*#photoshop tutorial#usertana#userzo#tusertha#ps*
62 notes
·
View notes