#Bootable Disk
Explore tagged Tumblr posts
Visit Tumblr Blog
Explore Tumblr blogs with no restrictions, modern design and the best experience.
Last Seen Tumblr Blogs


Fun Fact
Women make up for the other 50% of Tumblr’s audience.
Text

Bad mood. Kinda smad
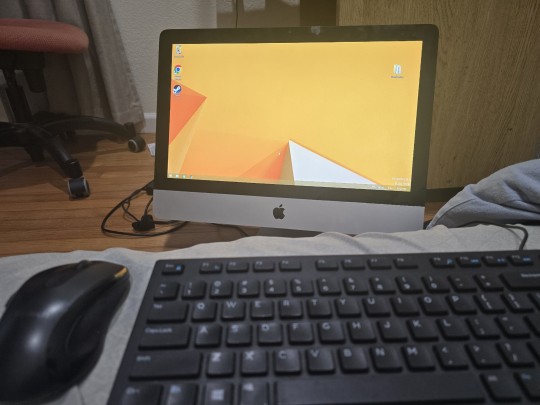
#azurarts#typhlosion#doodle#I was trying to replace windows with linux - which I did finally accomplish! - but I had to redo the bootable USB thing#and I KNEW that would probably delete the other stuff I'd backed up on that USB so I copied it back onto the pc#and then I forgot to check and re-backup those files until well after I'd wiped the disk#goodby 12 out of 16 badges heartgold save file#I swear I'm never gonna encounter that fucking snorlax#so. I made a doodle my favorite mon with my bad mood to make me feel a little better
55 notes
·
View notes
Text
Up next: windows 10
#i got it with windows 8.1 and if i destroy it now i know how to do it again#so the steps are: downgrade from yosemite to mountain lion#go into info.plist and delete the word Pre from preusbbootable or whatever#add 12.1 as the model in that list#run bootcamp#if the windows says no bootable disk just press alt until its in that booting mode and then click the usb#start installing windows and custom set it to whichever partition you want#if it says the parition is in the wrong format-- theres an indian guy online who said click out and go to repair settings#and then advanced. open terminal#and then do some funny little disk list commands (forgot. FIND THE VIDEO!!!!!!!)#then try again to install windows and then chilling. and then go into usb open bootcamp and run the exe for drivers#and then youre back at windows 8.1 again on the imac12.1#indian guy is an uncle and the video is 4-5 minutes long with only a few hundred likes#my ass is never finding that video again#my work account keeps browser history on autodelete
2 notes
·
View notes
Text
Create Multiboot OS ISO files on a single bootable USB Disk
Learn how to use WinSetupFromUSB to create multiboot OS ISO files
Create Multiboot OS ISO files on a single bootable USB Disk If you’re tired of juggling multiple USBs for different operating systems, WinSetupFromUSB might be exactly what you need. With it, you can create a USB stick loaded with several ISO bootable images—Windows, Linux, or even utilities—all on a single drive. This guide covers how to set it up, comparisons to other similar tools, and tips…
#Bootable USB drive#Create Bootable USB#Microsoft Windows#USB#USB Disk#USB Drive#Windows#Windows 10#Windows 11#Windows Server
0 notes
Text
Repair Your PC and Access Your Data with Active@ Data Studio
Active@ Data Studio provides you with a useful set of tools for accessing your data and repairing your PC in the event that Windows fails to start up and you cannot find any other way to access your data.
#disk utilities#disk manager#partition manager#partition recovery#bootable usb#burn cd#burn dvd#burn iso#cd burner#dvd burner#iso burner#clone disk#file recovery#data recovery#undelete#password recovery#backup#backup software#backup and restore#data backup#winpe#disk burner#burn disk#boot disk#erase disk#erase hard drive#wipe disk#disk image#create partition#unformat
0 notes
Text
Recently I was able to do an SSD upgrade in my ASUS Terminator P4 thanks to receiving a gift card from a friend as a birthday gift. The normal Startech adapter that I use to adapt SATA SSDs to 40-pin IDE was out of stock on Amazon, so I bought a cheaper, no-name one instead.


After cloning the hard disk to the SSD, I tried to boot it up only for it to not be recognized as bootable. This was strange to me, because it was detected in PartedMagic just fine and was properly identified by the BIOS. So I tried cloning using a different method, same result. Once more, tried cloning only for it to produce the same result.
Stumped, I took to Google, only to find a Reddit post where someone was describing the exact issue I was having. According to one of the comments, the solution was to disable UDMA on the SSD/adapter. So that's what I did, and it worked, albeit at a major speed decline.

But, I increased my storage capacity more than sixteen times what it was previously, so I was happy with it.


I fully expect the issue and solution to vary based on BIOS/IDE controller/motherboard, and I know the AwardBIOS in this machine is a bit weird at times.
The video covering this topic can be found here:
youtube
22 notes
·
View notes
Note
Hi, can you tell me about btrfs? It was a default choice for the filesystem when I installed fedora on my laptop and I read little bit about how it is different from like ext4 and what cool stuff it supports etc. But I newer, like, utilised all that stuff in it. So, if you don't mind, can you tell me what am I missing and how do I utilise it potential?
btrfs! what is btrfs? btrfs is a copy-on-write journaling filesystem with various other goodies. my experience is mostly using it on one disk on my personal machine, which seems to be what you're doing with it also. you may have heard some bad things about btrfs eating your data silently and then the mailing list being really mean about it, and all that is true but it's only true if you're using btrfs raid4 or raid5, which you aren't. for our use case there's absolutely nothing to fear- btrfs is an absolutely rock solid filesystem and i wouldn't accept any other for my daily driver
i was planning on writing this whole long thing summarizing my notes because when i was learning all this stuff i couldn't find any source that had everything i needed in one place. but that was 4 years ago, and since then fedora switched to using it by default. nowadays there are a bunch of articles explaining all the fundamental concepts and commands and such. the two linked at the bottom ive read and can vouch for, and they cover basically all the intuition for the concepts and commands and such. so im going to focus on cool things you can do with a COW filesystem
basically all the cool things you can do are snapshots. snapshots, better explained in the links, are lightweight copies of entire file trees. you can, for instance, take a snapshot of your home directory and then be able to access all your files at the time of the snapshot whenever you want, even if you change them in the "real" version. but you can do better than this. if your subvolume layout is correct (and don't worry, fedora's is), you can rollback to a previous snapshot whenever you want. with a little configuration you can make all your root snapshots bootable, so you can select in grub or whatever which version of your filesystem you want to boot into. with a little bit of doing, which im not sure is easy on fedora but certainly might be, i got my computer set up so that my boot directory is just a btrfs subvolume on my regular filesystem. if an update breaks my setup, which does happen from time to time, i can go back to exactly the state i was in, files packages kernel and all
you can and should use btrfs for your backups also. not local snapshots, those aren't very good backups, but incremental backups to an external drive or over ssh to another machine. for this i use btrbk, which is a pretty simple script that just makes use of btrfs features to make safe, fast, and reliable backups to wherever you might want them. then, because it's using native features of the filesystem, recovering from just about anything is dead simple. you can send over the subvolumes and mount them wherever. the one thing is that for most of these you need a bootable drive with btrfs and enough drivers to work on your system. whatever you used to install fedora should work fine
and with that you basically need fear no file loss event, big or small. i mean i wouldn't give up git or anything, but now you can retrieve your desktop layout, your browser settings, your /etc, whatever you want. its absolutely magic. since doing an install with this btrfs setup 4 years ago i have had absolutely nothing break in a way i couldn't fix in under 15 minutes, even running arch objectively badly. imagining life without snapshots feels barbaric now. its one of a handful of things which are just objectively better on linux for any user at any skill level. data loss is a choice, and it has been for almost a decade. take my hand
additional notes:
APFS: yeah apple has this too. time machine is a brilliant piece of software and the apple ppl are lucky to have it. however! i have needed to actually go back and use my backup like 2 times ever. most of the time i just use the snapshots locally. plus afaik you don't have the same range of options to deal with snapshot size- i dont hang onto my steam directory for very long
ZFS: if you need raid id say zfs is definitely better (zpool is awesome). but a lot of the things you can do with snapshots and subvolumes on btrfs aren't actually possible on zfs. a rollback on zfs is a very specific action which invalidates everything that came after- it's not to be done lightly. with btrfs you just move subvolumes around and they're available whenever you need them
encryption: its annoying but you should put your filesystem inside of lvm inside of LUKS and it'll work fine. its the same as using LUKS normally, and once it's open it's the same as using btrfs normally. this would probably suck for multiple disks, in which case you should use zfs
hibernation: use LVM to have a swap partition and call it a day, storage is cheap these days. ive heard swap files are improved somehow (?) but i dont use one and there really isn't any reason to
compression: imo not a showstopper or anything but it comes in handy. i wouldn't expect huge gains in space usage (storage is cheap anyway) but a lot of modern cpus are good enough at compression that it's actually faster to store everything compressed bc the bottleneck is disk IO. you can test what algorithm and level works best for you, and tune it by subvolume. on my nvme i dont notice a difference, but my server has some hard drives and compression speeds things up
9 notes
·
View notes
Text

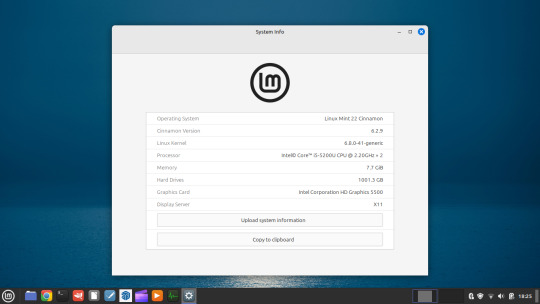
05.09.24
Linux laptop project 2024.
I decided to upgrade my old laptop by making it a Linux dual boot system. I had never done this before. I downloaded the ISO files for Linux Mint 22 'Wilma' and Ubuntu 24.04.1 'Noble Numbat' LTS.
The selected files include the standard desktop environments for each, Cinnamon, for Linux Mint and GNOME for Ubuntu.
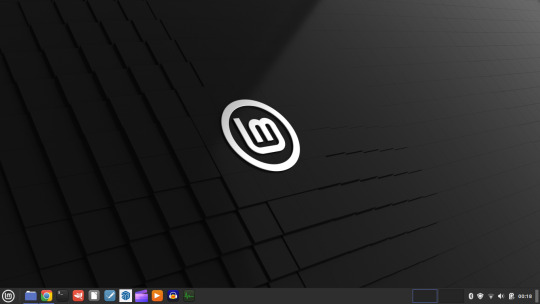
Then using the built in USB disk creator on Linux Mint, I created bootable USBs, one for Linux Mint and one for Ubuntu. I decided to install Linux Mint first. The installation includes creating partitions and I used the installation partition creator to create a 25 Giga-byte partition in which I installed Linux Mint. The installation went ahead smoothly, and when it completed, I booted up Linux Mint. It looked perfect.
See screenshots below.


I then installed GParted, which is a more powerful partition manager to create the additional partitions I needed. I created a 25 Giga-byte partition for Ubuntu, two other 25 Giga-byte partitions and I hundred Giga-byte data partition formatting them all using ext4.
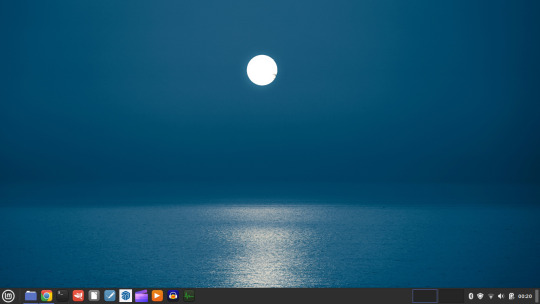
I then installed Ubuntu. During the installation, I selected the extended install, rather than the minimal install, so I had a full Ubuntu desktop installation on the second partition on my laptop hard drive. This all went well and at the end of it all I had a system which could boot either Linux Mint or Ubuntu.


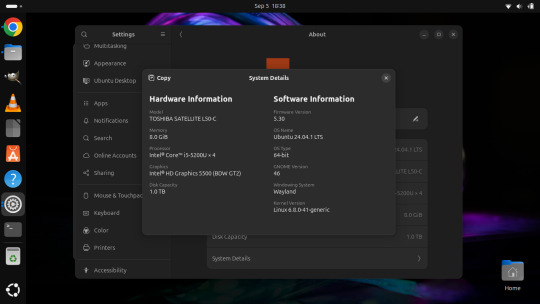
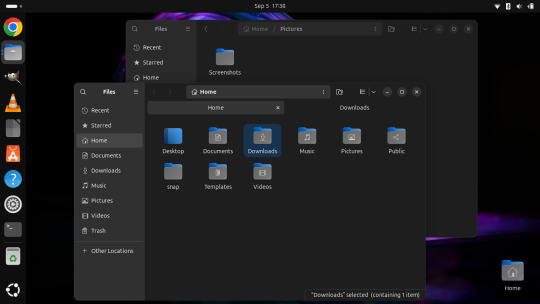
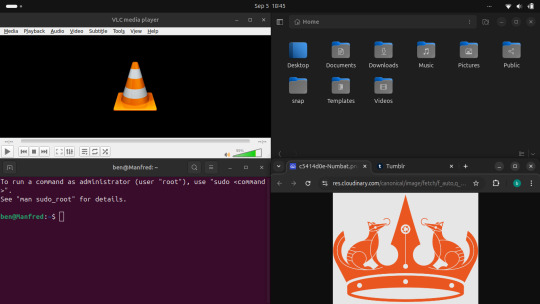
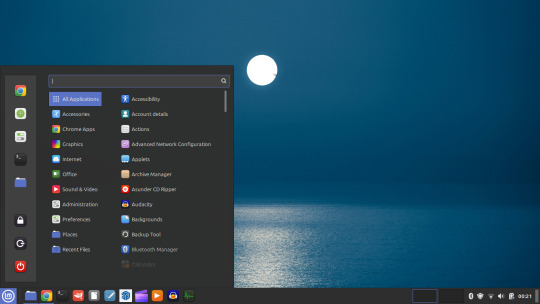
After installation, I booted each system up individually and updated them with the latest updates available, and then I installed necessary software that I wanted such as the Google Chrome Browser, Audacity, VLC Media Player, GIMP, Asunder CD ripper.
I also reinstalled the Chrome web apps for Microsoft Clipchamp and Trimble SketchUp web.
The majority of software bundled on these Linux distros is already preinstalled. I then had fun tweaking each install and making them look how I wanted.
Here is a list of some of the tasks I did in both installs:
- configuring the desktop environment to my liking, e.g. background, theme colour, dark theme (Ubuntu) mixed colour scheme (Mint). - added Bluetooth devices (headphones, Mini-Rig speaker) - added the printer device - dual booted into each one to check them out!
-
After this, Dad wanted to finish the set-up in such a way that I could link my local laptop Documents, Downloads, Pictures, Music and Video folders directly to the data partition, which would mean that I could access those folders automatically from any installed Linux distributions, however this didn't quite go to plan and messed some things up, so we decided to re-install both operating systems again and I repeated all the previous steps and left out the folder sharing part for now.
-
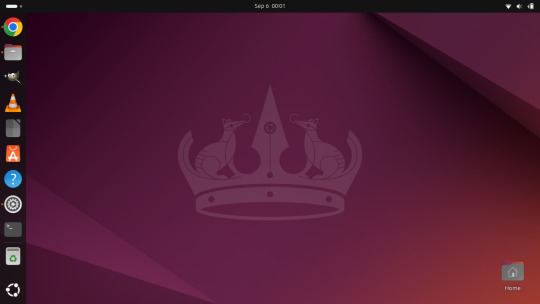
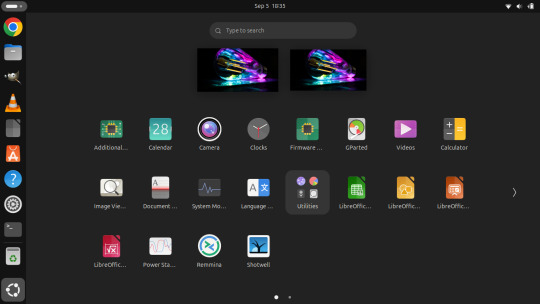
The images underneath show the final desktop installs with my various theme and desktop personalisation's applied and all the installed apps.
Here is a screenshot of the 'GNOME image viewer' in Mint and Ubuntu.

Ubuntu Linux is celebrating its 20th anniversary with a web post.
See link below:
https://ubuntu.com/20years
For more information about the Linux laptop project, search 'Linux' on my Tumblr blog!
6 notes
·
View notes
Note
You are the mutual I know who uses linux, and I have a half-broken dinosaur of a laptop I want to see if linux would make usable again.
Its 8+ years old, cannot connect to the internet for a reason that may be software related or might not(its a mystery), and has other various issues.
My use of it would Primarily be as a on-the-go text & html editor and if I can get the internet running on it then also firefox as well. Maybe some offline emulation of some older games or a simple linux supported drawing program but that isnt essential.
The question is Thus: If I download a linux mint installer and copy to a flashdrive(presuming you can download the file without it starting to set up the OS instantly), is that all thats necessary to upload linux mint onto a laptop that has no internet capabilities?
Also which version of linux mint should I use? I see there are several. This laptop 3 years ago ran windows 10 ok enough to boot up chrome and use the internet, but now it takes like 15 mins to finish loading enough that you can open programs, as a metric.
Thanks and hope you have a nice day!
Yes, most linux distros will run on a machine that age, and with a surprising degree of vitality. Game emulation should work just fine, unless the computer was very low power even for 2015.
On a mech that old, I'd suggest just checking if the tiny wire for the wifi card has popped loose over time. They are snap-on wire heads that don't lock, so especially with laptops, disconnections like that happen.
Your wifi card should look a lot like this:

I've circled the two tiny ports, and drawn arrows to identify which cables. The whole wifi card will be about an inch across, and is the ONLY thing that uses those kind of wires, so it's very identifiable.
Linux mint is designed to install offline, and includes a wide variety of open source and generic drivers for just.... so much hardware. When you begin installation, it will ask you if you want to use, "third party, private and proprietary drivers." If you say yes, it will want an internet connection to download those drivers. If you say no, it will install entirely offline without issue.
As for which version: the only difference is the visuals. I, personally, like XFCE because it has very minimal visual noise. Everything is simple rectangles with sharp corners and clear boundaries. This lack of visual flair also means it uses the least resources to run the OS, leaving more hardware power available for actual tasks. However, it's a very intimidating desktop. If you liked Windows XP but haven't enjoyed much since, grab XFCE.
If you are a Mac/apple user, I actually recommend Kubuntu instead of Mint, because it has the most similar interface visually and will cause the least transition pains. Kubuntu has equally if not even more robust hardware support to Mint, as both of them are built on top of the Ubuntu framework.
For everyone else, I suggest starting with Mint Cinnamon. I have actually, with no reservations, had way better results teaching confused retirees to run Cinnamon than Windows or Mac. It's a very user friendly interface.
The start bar search, for example, literally just shows results for files/programs installed to your computer, none of this bs about integrated web searching.
As for installation tools:
You must burn the ISO file to the flashdrive as a bootable disk, rather than simply copying the file to it. I'm sure you know that; it's the same for installing windows. But! People often forget that detail and wonder why their computer keeps booting to windows instead of the installation media.
I personally use LiLiUSB because I'm stuck mentally in the year 2014 which is when it stopped updating. For a more sane approach, try Balena Etcher. Or whatever bootable drive software you like; it doesn't really matter. You just need to make the drive bootable before installation.
47 notes
·
View notes
Text
Understanding the Boot Process in Linux
Six Stages of Linux Boot Process
Press the power button on your system, and after few moments you see the Linux login prompt.
Have you ever wondered what happens behind the scenes from the time you press the power button until the Linux login prompt appears?
The following are the 6 high level stages of a typical Linux boot process.
BIOS Basic Input/Output System
MBR Master Boot Record executes GRUB
GRUB Grand Unified Boot Loader Executes Kernel
Kernel Kernel executes /sbin/init
�� Init init executes runlevel programs
Runlevel Runlevel programs are executed from /etc/rc.d/rc*.d/
1. BIOS
BIOS stands for Basic Input/Output System
Performs some system integrity checks
Searches, loads, and executes the boot loader program.
It looks for boot loader in floppy, cd-rom, or hard drive. You can press a key (typically F12 of F2, but it depends on your system) during the BIOS startup to change the boot sequence.
Once the boot loader program is detected and loaded into the memory, BIOS gives the control to it.
So, in simple terms BIOS loads and executes the MBR boot loader.
2. MBR
MBR stands for Master Boot Record.
It is located in the 1st sector of the bootable disk. Typically /dev/hda, or /dev/sda
MBR is less than 512 bytes in size. This has three components 1) primary boot loader info in 1st 446 bytes 2) partition table info in next 64 bytes 3) mbr validation check in last 2 bytes.
It contains information about GRUB (or LILO in old systems).
So, in simple terms MBR loads and executes the GRUB boot loader.
3. GRUB
GRUB stands for Grand Unified Bootloader.
If you have multiple kernel images installed on your system, you can choose which one to be executed.
GRUB displays a splash screen, waits for few seconds, if you don’t enter anything, it loads the default kernel image as specified in the grub configuration file.
GRUB has the knowledge of the filesystem (the older Linux loader LILO didn’t understand filesystem).
Grub configuration file is /boot/grub/grub.conf (/etc/grub.conf is a link to this). The following is sample grub.conf of CentOS.
#boot=/dev/sda
default=0
timeout=5
splashimage=(hd0,0)/boot/grub/splash.xpm.gz
hiddenmenu
title CentOS (2.6.18-194.el5PAE)
root (hd0,0)
kernel /boot/vmlinuz-2.6.18-194.el5PAE ro root=LABEL=/
initrd /boot/initrd-2.6.18-194.el5PAE.img
As you notice from the above info, it contains kernel and initrd image.
So, in simple terms GRUB just loads and executes Kernel and initrd images.
4. Kernel
Mounts the root file system as specified in the “root=” in grub.conf
Kernel executes the /sbin/init program
Since init was the 1st program to be executed by Linux Kernel, it has the process id (PID) of 1. Do a ‘ps -ef | grep init’ and check the pid.
initrd stands for Initial RAM Disk.
initrd is used by kernel as temporary root file system until kernel is booted and the real root file system is mounted. It also contains necessary drivers compiled inside, which helps it to access the hard drive partitions, and other hardware.
5. Init
Looks at the /etc/inittab file to decide the Linux run level.
Following are the available run levels
0 – halt
1 – Single user mode
2 – Multiuser, without NFS
3 – Full multiuser mode
4 – unused
5 – X11
6 – reboot
Init identifies the default initlevel from /etc/inittab and uses that to load all appropriate program.
Execute ‘grep initdefault /etc/inittab’ on your system to identify the default run level
If you want to get into trouble, you can set the default run level to 0 or 6. Since you know what 0 and 6 means, probably you might not do that.
Typically you would set the default run level to either 3 or 5.
6. Runlevel programs
When the Linux system is booting up, you might see various services getting started. For example, it might say “starting sendmail …. OK”. Those are the runlevel programs, executed from the run level directory as defined by your run level.
Depending on your default init level setting, the system will execute the programs from one of the following directories.
Run level 0 – /etc/rc.d/rc0.d/
Run level 1 – /etc/rc.d/rc1.d/
Run level 2 – /etc/rc.d/rc2.d/
Run level 3 – /etc/rc.d/rc3.d/
Run level 4 – /etc/rc.d/rc4.d/
Run level 5 – /etc/rc.d/rc5.d/
Run level 6 – /etc/rc.d/rc6.d/
Please note that there are also symbolic links available for these directory under /etc directly. So, /etc/rc0.d is linked to /etc/rc.d/rc0.d.
Under the /etc/rc.d/rc*.d/ directories, you would see programs that start with S and K.
Programs starts with S are used during startup. S for startup.
Programs starts with K are used during shutdown. K for kill.
There are numbers right next to S and K in the program names. Those are the sequence number in which the programs should be started or killed.
For example, S12syslog is to start the syslog deamon, which has the sequence number of 12. S80sendmail is to start the sendmail daemon, which has the sequence number of 80. So, syslog program will be started before sendmail.
There you have it. That is what happens during the Linux boot process.
for more details visit www.qcsdclabs.com
#qcsdclabs#hawkstack#hawkstack technologies#linux#redhat#information technology#awscloud#devops#cloudcomputing
2 notes
·
View notes
Text
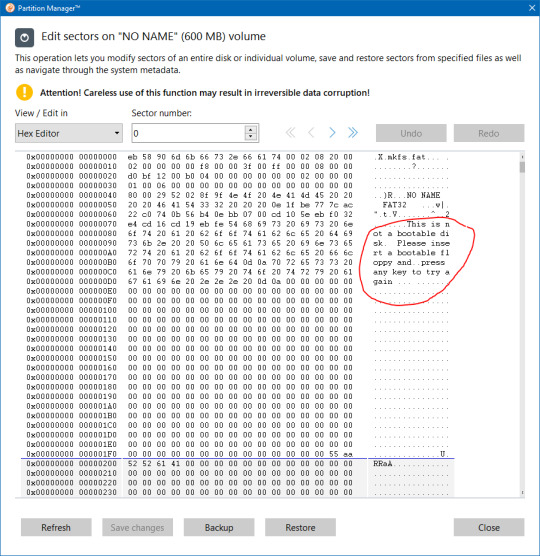
Shoutout to Linux for being capable of telling me when I need to insert a bootable floppy disk, instead of booting from my EFI system partition.
5 notes
·
View notes
Text

Guess who just remembered that best girl GUM exists?!
(boring sort-of related story below)
Holy hell this one. I don't usually get into this kind of personal stuff online, but I originally posted this picture yesterday, but took it down because I really didn't like it. Chalk it up to insecurities and PTSD of people actually harassing me over my bad art in the past (which itself is worth an entire post on its own). Since yesterday, I've made a lot of minor adjustments and I'm much happier with how this looks now.
You'd think these fixes would be easy -- and you'd be right, except that my computer completely screwed up last night. As a result, I had to make the last updates to Gum on my MacBook.
Lesson to Linux users: DON'T OPEN KRITA DURING AN UPDATE. This choice may have singlehandedly wasted my weekend, as I'm currently in the process of backing EVERYTHING up to my external HDD so that I can upgrade to the newest Manjaro and fix my GRUB, because even the GRUB settings aren't working anymore. I don't know for sure how I'm going to fix this other than reinstalling, but I'm just glad to be savvy enough to get all my files back before something else could happen. Best-case scenario now is I'll have to reinstall Manjaro and also reinstall GRUB, after which GRUB will be able to determine which disks on my system are bootable.
So when it comes to kernel-related updates, you should do what Windows XP users did when installing anything: turn off all other programs until the update is done. I could blame the fact that my PC is 7 years old (custom built, received several upgrades since), but the only way I can justify this entire conundrum is by saying that I was on Linux kernel 5.15 when the newest is version 6.2 or something. But that's less of a justification and more of a cope.
#jet set radio art#jet set radio fanart#jet set radio gum#jet set radio future#jet grind radio#artists on tumblr#character art#female character#jet set radio#sega#sega dreamcast#fan art#fandom#video games#video game art#artwork#digital art#made with krita#skatergirl#punk girl#spraypaint
13 notes
·
View notes
Text
So I just took the LSAT today and to be completely honest… wasn’t as bad as I thought it’d be. Somehow finished every section with time leftover to doublecheck my work! Feeling pretty good about it 🥰 even though I pulled an all-nighter before it and still haven’t slept… 🫠
Not intentionally, mind you—LSAC’s new online LSAT Proctor software isn’t compatible with the new MacOS Sonoma 14.0… so spent all night trying to learn how to downgrade my MacOS version in order to download the testing/proctoring software before my 7am exam.
Turns out, on silicon-chip Macs (M1+), you can’t just simply downgrade or restart/reboot your laptop to the software it originally came in. That’s apparently only an available option on Intel Macs.
Instead, if you have a silicon Mac, you have to go through the complicated process of:
1. Backing up your Mac using Time Machine on some other external hard drive or disk (since downgrading completely wipes your startup disk and erases all data)
2. Setting up a Bootable Installer—also on an external hard drive (separate)
3. Downloading the version software from Apple’s App Store (the easiest part of the entire process! Though, of course, you can’t even run it until you’ve done everything else first)
4. Using the Terminal app and running the specific (in my case, Ventura) command as found on Apple’s website and proceeding with the rest of the commands to get it working.
which… don’t get me started on figuring out how to set up a Bootable Installer. This was all completely foreign to me and honestly I was two “error” messages away from a complete mental breakdown.
At 5am, I gave up and woke up my poor friend to beg her to let me use her laptop for my LSAT.
If anyone can send me a crash course on using the Macbook’s Terminal app, it would be more than welcomed!
At this point, I gotta set up a Bootable Installer just for the spite of it. Never letting myself get blindsided like this again! Will always have a backup version. Learned my lesson lol
#macos sonoma#lsat#technology#programming#coding#macos#macos 14#LSAC#silicon#macbook#personal#lialifelounge
7 notes
·
View notes
Text
cara menginstall windows di komputer anda.
halo semua perkenalkan nama saya bintang,kali ini saya akan meng share cara menginstall windows di komputer anda,okey sebelumnya apakah kalian sudah pernah menginstall windows?jika kalian belum pernah menginstall windows sebelumnya anda bisa mencoba nya di virtual box/mesin virtual.Tapi kali ini topik saya bukan tentang menginstall windows di mesin virtual,kali ini saya akan membahas tentang penginstall an windows langsung di komputer kalian.
Pertama kalian dapat menyiapkan flashdisk,apakah kalian tau guna flashdisk dalam penginstallan windows kali ini?ya,flashdisk ini berperan sebagai tempat kita menyimpan file windows,tapi apakah kita hanya perlu menginstall file windows lalu menyimpan nya di flash disk dan berharap si komputer kita langsung bisa mendetect file tersebut?oh tentu tidak semudah itu ferguso. Sebelum kita siap menginstall,kita harus membuat flash disk kita menjadi bootable,bagaimana caranya? kalian bisa menggunakan software atau aplikasi bernama rufus,mungkin ada aplikasi atau softwrae lain tapi saya hanya berpengalaman menggunakan rufus,saya tidak tahu apakah mekanisme nya akan sama jika kalian menggunakan aplikasi yang berbeda. Jika memang kalian ingin menggunakan aplikasi lain kalian bisa mencari referensi mengenai hal ini selain di blog saya, dan maaf juga jika penjelasan saya sedikit sulit atau saya tidak pandai merangkai kata kata yang pas agar mudah di mengerti. Sudah sudah ayo kita lanjut ke menu hidangan utama, setelah kalian sudah menginstal rufus,pasang flashdisk kalian dan buka aplikasi rufusnya,*warning : sebelum kalian membuat bootable flash disk kalian,kalian harus memastikan bahwa flashdisk kalian tidak terdapat file penting,karna saat melakukan bootable,flashdisk akan terformat dan semua file di dalamnya akan hilang,ingat itu. ohiya kalian bisa menyiapkan file iso windows dengan mengunduhnya di website,kalian ketik saja di search bar "media creation tool".websitenya ada di paling atas daftar pencarian,setelah itu kalian cari sendiri saja ya caranya,panjang banget soalnya klo dijelasin,durasi bos durasi,cara menginstal rufusnya juga kalian cari sendiri saja ya,kita akan langsung ke cara mengbootable dan penginstallan saja,gasss.
ayo kita buka file rufus nya
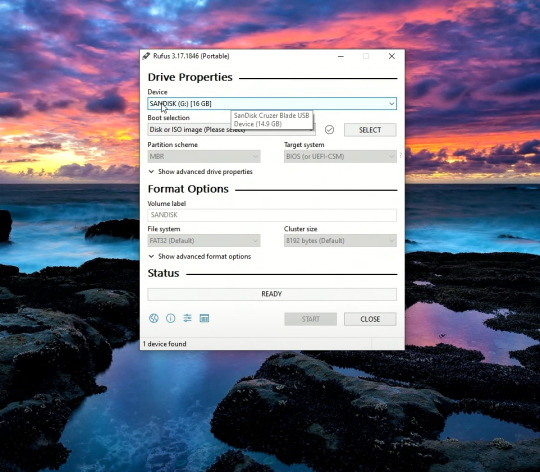
kira kira seperti itulah tampilan awal rufusnya,dan kalian lihat flash disk saya sudah ter detect oleh rufus,kita lanjut.

yang saya lingkari silahkan kalian klik dan pilih file iso windows yang tadi kalian unduh,lalu untuk partition scheme nya gpt/mbr kalian pilih sesuai tipe dari pc/laptop kalian,banyak tutorial cara ngecek nya kalian bisa cari ga ush manja.
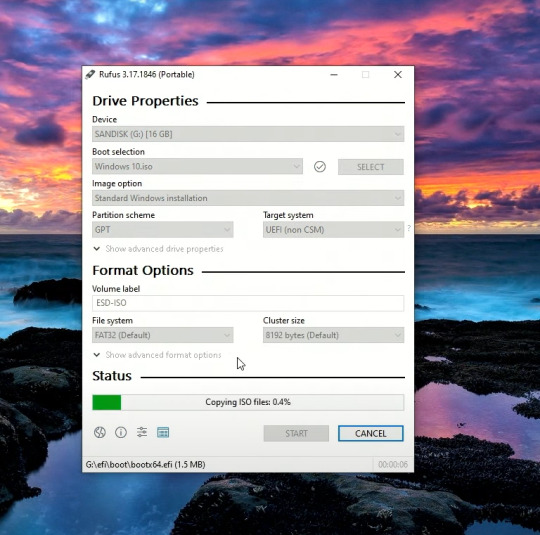
kalian bisa klik start untuk memulai proses bootablenya,tunggu sampai loadingnya menjadi ready,seperti pict dibawah.
flash disk sudah menjadi bootable,langsung kita gas ke pc yang akan di install.
masuk ke bios komputer kalian,cara masuknya?saat prooseng booting kalian bisa klik f2,f3,f12,atau delete tergantung seri pc kalian,setiap pc bisa berbeda beda ya man teman.

kurang lebih beginilah tampilan bios komputer saya,bisa saja berbeda dengan kalian,menyesuaikan saja yaa.

setelah kalian masuk ke bios kalian bisa masuk ke menu boot,lalu pilih boot option #1,klik dan pilih uefi:sanDisk,jika tadi kalian memilih mbr makan pilih yang ada tulisan sanDisk saja,karna saya pakai gpt,jadina seperti itu.klik enter dan kita lanjut.

setelah kalian klik enter,kalian bisa save dan exit disini saya menggunakan f10 untuk save & exitnya,untuk kalian menyesuaikan saja ya. setelah ini kita akan me restart pc kita.

dan kita sudah masuk ke menu penginstallan windows,huhhh cape juga guys ngetik panjang lebar seperti ini,karna sudah panjang kali lebar saya menjelaskan, kita lanjut part 2 saja yaa,dan jika kalian tidak sabar,kalian bisa mencari tutorial dalam tahap ini,mudah kok guys. see uu>>>
4 notes
·
View notes
Text
For those looking for a change, and i cannot stress this enough i've been repeatedly telling people to change because windows 11 is starting to go off of the seriously terrible to handle end, GET A LINUX DISTRO
Here's some counter arguments for every person making excuses
I'm too used to windows!
Here's a distro you might like, it's called Winbuntu, it is Ubuntu with a full on windows skin to make the transition to linux smoother!
I'm not smart enough to use the command line!
First off, stop talking yourself down, everything is learnable. Second off, With modern linux distros you actually have to use the command line VERY LITTLE, as always, everything wants to make it as easy as possible for you
But how will i play my games made for windows??
Wine or Proton. Steam will allow you to play any game you want with an EXE using their new proton system!! To use it, simply install steam, and you're done! For wine, it can practically emulate any EXE now, and its incompatibilities are pre windows 7 games, much like modern windows versions can't handle. Again, just install from the website, and you're done.
I'm not sure how to change!
Simple solution! You find the installer, create a bootable disk, plop in a USB, make it on the USB, then simply restart your computer and you're done.
Scared of losing your old data? That's fair! Wait until you can get your hands onto another drive or SSD, if you know anything about computers you can probably make out the wires that are supposed to fit together, then in your pc you can use that one to install linux on it!
Seriously! The way windows 11 is going is not good for the health of your pc AT ALL and i use it only because i don't yet have a place to install linux on safely. Consider switching if you can, i know i will.
"windows 11 upgrade ready!" "your computer is eligible for windows 11!" "download windows 11 now!"

56K notes
·
View notes
Text
Resolving Computer Startup and Login Challenges
Computers are essential tools in our daily lives, but they can sometimes present frustrating issues that disrupt our workflow. From a Mac failing to boot properly to being locked out of a Windows system due to a forgotten password, these problems can feel overwhelming. This article explores practical solutions to common computer startup and login issues, offering step-by-step guidance to restore access and functionality. Whether you're troubleshooting a sluggish system or regaining access to a locked account, these methods will help you navigate the challenges with confidence.
Understanding Startup Issues on a Mac
When a Mac refuses to start correctly, it can manifest as a blank screen, endless loading, or an error message. This issue, often described as How to Fix Your Mac Did Not Start Correctly, can stem from software glitches, corrupted files, or hardware malfunctions. The first step is to restart the device in Safe Mode. By holding the Shift key during startup, the system loads only essential components, which can help identify whether third-party software is causing the problem. If the issue persists, resetting the System Management Controller (SMC) can address hardware-related problems, such as power or thermal issues. This involves shutting down the device, then pressing a specific combination of keys—typically Shift, Control, Option, and the power button—for a few seconds before restarting.
Another approach is to use Disk Utility in Recovery Mode. By restarting the device and holding Command and R, users can access a recovery environment to repair disk errors. Running First Aid on the startup disk often resolves file system inconsistencies that prevent proper booting. If these steps fail, reinstalling the operating system from Recovery Mode can restore functionality without erasing personal data, provided a backup exists. Always ensure critical files are backed up before attempting major repairs, as unexpected issues can lead to data loss.
Addressing Windows Login Problems
Forgetting a password on a Windows system can lock users out entirely, leaving them searching for solutions to the issue of Forgot Windows Password & Cant Sign In. This problem is particularly frustrating when no password reset disk or secondary account is available. One effective method is to use Safe Mode to access a built-in administrator account. Restart the computer and press F8 or Shift and F11 (depending on the system) to enter the Advanced Boot Options. From there, select Safe Mode and check if an administrator account appears on the login screen. This account, if active, allows users to log in and reset the password for the locked account through the Control Panel’s user management settings.
If Safe Mode doesn’t provide access, a password reset disk is another option, though it requires prior creation. For those without such a disk, using a bootable USB drive with password recovery software can be a lifesaver. These tools, available online, allow users to create a bootable drive on another computer, which can then be used to reset the password. The process involves booting from the USB, following the software’s prompts, and selecting the user account to modify. This method requires caution, as downloading software from unverified sources can introduce security risks.
Preventive Measures for Future Access
Preventing these issues requires proactive steps. For Mac users, regular updates to the operating system can patch vulnerabilities that cause startup failures. Creating a bootable backup using an external drive ensures that data remains safe even if the system becomes unbootable. Enabling automatic backups through built-in tools like Time Machine adds an extra layer of protection. Additionally, keeping a record of system changes, such as recently installed apps or updates, can help pinpoint the cause of future problems.
For Windows users, creating a password reset disk or linking the account to an online profile can simplify recovery. An online account allows password resets through a web browser on another device, bypassing the need for complex recovery tools. Regularly updating passwords and storing them securely in a password manager reduces the likelihood of being locked out. Enabling two-factor authentication adds an additional security layer, ensuring that even if a password is forgotten, alternative verification methods can restore access.
When to Seek Professional Help
While many startup and login issues can be resolved independently, some situations require professional intervention. Persistent Mac startup errors, especially those accompanied by unusual noises or hardware warnings, may indicate failing components like the hard drive or logic board. In such cases, contacting a certified technician for diagnostic testing is advisable. Similarly, Windows users facing repeated login failures despite attempting recovery methods may need expert assistance to diagnose deeper system corruption or hardware issues.
Professional services can also help recover data from unbootable systems, ensuring minimal loss. When seeking help, choose reputable providers to avoid scams or further damage. For both systems, maintaining a regular maintenance schedule, such as clearing cache files or defragmenting drives, can prevent many issues from arising in the first place.
Final Thoughts
Encountering problems like a Mac failing to start or being locked out of a Windows account can disrupt productivity, but they are often solvable with patience and the right approach. By following systematic troubleshooting steps, such as booting in Safe Mode, using recovery tools, or resetting passwords via external media, users can regain control of their systems. Preventive measures, like regular backups and secure password management, further reduce the risk of future issues. For complex problems, professional assistance ensures a safe resolution. With these strategies, users can confidently tackle computer challenges and maintain seamless access to their devices.
1 note
·
View note
Text
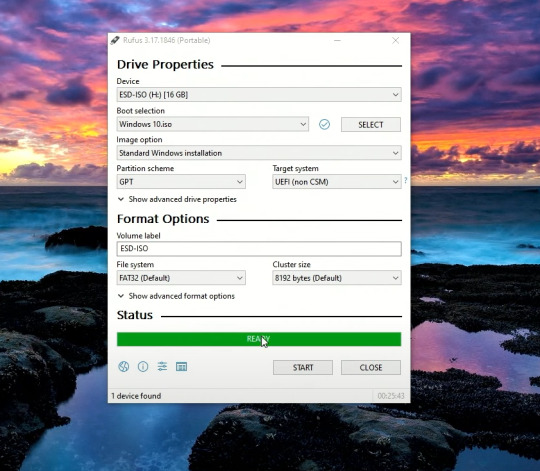
How to Create a Bootable USB Stick for Windows

AUS, Wholesale/Bulk/Lot 10Pcs USB Flash Drives Thumb Data Storage Pen U Disk Memory Stick (10PCS - 4GB)
Product Information
Interface: USB 2.0
Size: picture shows
Capacity: 8MB/16MB/64MB/128MB/512MB/1GB/2GB/4GB/8GB/16GB/32GB/64GB
Color: Multicolor
Fast data transfer rate--Read
Features:
Easy to carry
Hot plug & play
Compatible with USB 1.1/2.0
Compatible with PC, Notebook, MAC
Store your pictures, videos, and songs and any kind of data.
Support Windows 7/8/10,Windows Vista,Windows 98/2000/XP,Mac OS X, Linux.
Easy to read and read in high speed ,No need drive/power supply only plug in Small style and fashionable products, as an impressive gift for your beloved, friends or even customers. Thumb Drive
Package Included:
10x Flash Memory Stick
(Pack the USB flash drive reasonably)
Note:8MB,16MB Suitable for storing small data such as bytes, it is not suitable for storing large capacity, otherwise they may be damaged,Please determine if it is right for you ! Thank
Ability to work:
USB 1.0/1.1 LOW SPEED
8MB approximately 6-7MB.
16MB approximately 13-14MB.
About capacity:
64MB = approximately 58MB-60MB
128MB = approximately 100MB-120MB
256MB = approximately 220MB-240MB
512MB = approximately 480MB-500MB
1GB = approximately 960MB-980MB
2GB = approximately 1.6GB-1.8GB
4GB = approximately 3.6GB-3.8GB
8GB = approximately 7GB-7.5GB
16GB = approximately 14GB-15GB
32GB = approximately 28GB-30GB
64GB = approximately 58GB-60GB (EXFAT format)
This is calculation difference between manufacturer and our PC,just for you reference.
0 notes