#CentOS8
Explore tagged Tumblr posts
Visit Tumblr Blog
Explore Tumblr blogs with no restrictions, modern design and the best experience.
Last Seen Tumblr Blogs


Fun Fact
Total funding amounts to $125.3M.
Text
This system is not registered to Red Hat Subscription Management. You can use subscription-manager to register.
On a CentOS8 box, i got this notice: “This system is not registered to Red Hat Subscription Management. You can use subscription-manager to register.” easy fix: sed -i ‘s/enabled=0/enabled=1/’ /etc/yum/pluginconf.d/subscription-manager.conf Cheers,
View On WordPress
0 notes
Text
As a sysadmin/developer, you are responsible for applying security and other patches. Here is how to install and enable auto-updates on your RHEL or CentOS 8 Linux box.
1 note
·
View note
Photo

Nyobain #Centos 8 yang baru rilis. #RHEL #GnomeShell #GnomeDesktop #Centos8 #RHEL8 #Linux #GNULinux #GNOME https://www.instagram.com/p/B23qmDAAwMG/?igshid=1r5zx6o8fycy0
2 notes
·
View notes
Photo
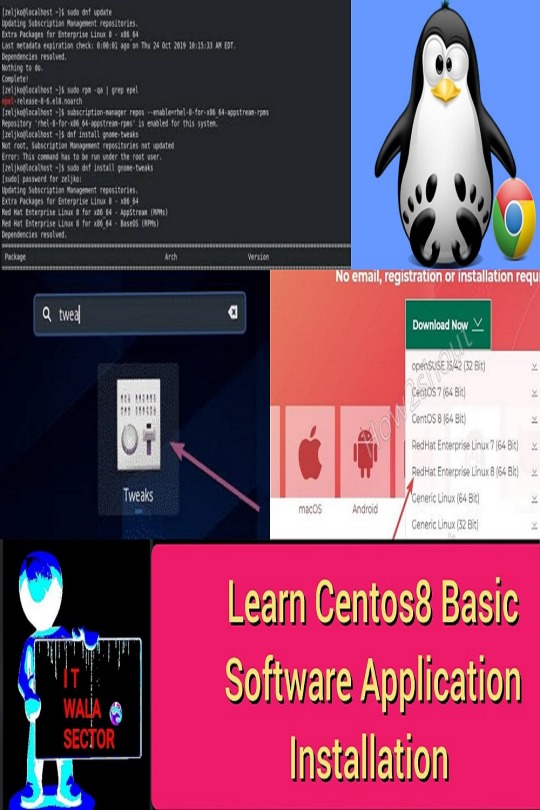
youtube
Linux Centos Mandatory Software's Application Installation Guide
#computer#computerscience#computerengineer#networkingengineer#hardwareengineer#linuxinstallation#redhat#centoinstallation#centos8#cento6#rpmpackage#centosisoinstallation#centosapplicationinstallation#centossotwareinstallation#centosconfigure#tweakinstallation#centostweakconfigure#centosgooglechromeinstallation#centosanydeskconfigure#centosanydeskinstallation#centosjavainstallation
0 notes
Text
New Post has been published on 나만의 세상~!
New Post has been published on https://blog.seabow.pe.kr/?p=8379
RHEL8(CentOS8) Bridge 장치 정보 보기
# ip link show master br1
7: enp65s0f1: <NO-CARRIER,BROADCAST,MULTICAST,UP> mtu 1500 qdisc mq master br1 state DOWN mode DEFAULT group default qlen 1000
link/ether 00:1b:21:d7:88:15 brd ff:ff:ff:ff:ff:ff
64: vnet16: <BROADCAST,MULTICAST,UP,LOWER_UP> mtu 1500 qdisc fq_codel master br1 state UNKNOWN mode DEFAULT group default qlen 1000
link/ether fe:54:00:a7:ac:a1 brd ff:ff:ff:ff:ff:ff
66: vnet18: <BROADCAST,MULTICAST,UP,LOWER_UP> mtu 1500 qdisc fq_codel master br1 state UNKNOWN mode DEFAULT group default qlen 1000
link/ether fe:54:00:8d:d4:16 brd ff:ff:ff:ff:ff:ff
157: vnet4: <BROADCAST,MULTICAST,UP,LOWER_UP> mtu 1500 qdisc fq_codel master br1 state UNKNOWN mode DEFAULT group default qlen 1000
link/ether fe:54:00:17:88:c2 brd ff:ff:ff:ff:ff:ff
0 notes
Photo

半分化石になりそうだったサーバのバージョンアップ、半分くらいiPadで全然いけました😎 CentOS8にしたので、次は2028年ごろかな…🤔 #workspace #iPad #centos8 #letsencrypt #dehydrated #apache https://www.instagram.com/p/CCi07KZJ3lK/?igshid=q4tdi6qjt8p1
0 notes
Text
Route internet traffic through a specific interface in Linux Servers - CentOS / RHEL
Route internet traffic through a specific interface in Linux Servers – CentOS / RHEL

I have a server with multiple network interfaces. Out of that two of them were connected to two different networks. My requirement is to route the internet traffic through the second interface. The Server is running with CentOS 7 operating system. The second interface is connected to a network with higher internet bandwidth and the first interface is connected to a network with lower bandwidth.…
View On WordPress
#amal#amal g jose#amalgjose#CentOS#centos 7#CENTOS 8#centos8#change default interface#change default route#change primary interface#change primary route#how to change the default inteface#how to change the default route#how to change the network interface priority#how to change the primary interface#internet route#ISP#ISPs#linux#linux server#multiple ISP#order#priority#redhat#RHEL#RHEL 8#rhel8#route internet traffic#route ISP#route network traffic
0 notes
Text
CENTOS 8 FİREWALLD KURALLARI AYARLAMA
CENTOS 8 FİREWALLD KURALLARI AYARLAMA

Giriş – İş istasyonunuzu veya sunucunuzu istenmeyen trafikten korumak için kullanılan bir Linux güvenlik duvarı. Trafiği engellemek veya üzerinden izin vermek için kurallar ayarlayabilirsiniz. CentOS 8, D-Bus arayüzüne sahip dinamik, özelleştirilebilir ana bilgisayar tabanlı bir güvenlik duvarı ile birlikte gelir.��Güvenlik duvarı arka plan programını veya hizmetini yeniden başlatmadan güvenlik…
View On WordPress
0 notes
Text
How to install Microsoft Teams Linux on Ubuntu and CentOS

Microsoft team which is a part of Office 365 application and work as a chatting application is now available natively for Linux operating systems in Debian and RPM package formats. The testing phase for the Linux Team client has been done in September, however, after a little bit delay, finally, the preview version of Team Linux made public. The company will maintain a Debian repository and a Yum repository for use, which distributes the application's debug and RPM packages. Ubuntu 16.04 LTS, 18.04 LTS, Fedora 30, RHEL 8 and CentOS 8 are the officially supported Linux distros for Microsoft Team. Read the full article
0 notes
Photo

I Will Manage Your Linux Server Centos Ubuntu http://bit.do/Centos1
0 notes
Text
Установка и настройка QEMU/KVM в Ubuntu

В этой статье я хочу рассмотреть установку и настройку QEMU/KVM в Ubuntu.
Оглавление
ВведениеПроверка аппаратной поддержкиПодготовка сервераУстановка и запускНастройка сетиНастройка сетевого мостаВиртуальные сети (NAT forwarding)Создание виртуальной машиныУправление виртуальной машиной Введение в QEMU/KVM KVM (Kernel-based Virtual Machine) — это комплекс программ для виртуализации с аппаратной поддержкой в среде Linux x86. Виртуализация позволяет нам устанавливать полностью изолированные, но работающие бок о бок операционные системы на одном и том же железе. Гипервизор KVM представляет из себя загружаемый модуль ядра Linux. Он обеспечивает только уровень абстракции устройств. Таким образом одного гипервизора KVM недостаточно для запуска виртуальной ОС. Нужна еще эмуляция процессора, дисков, сети, видео, шины. Для этого существует QEMU. QEMU (Quick Emulator) — эмулятор различных устройств, который позволяет запускать операционные системы, предназначенные для одной архитектуры, на другой. Обычно такой комплекс программ для виртуализации называют QEMU/KVM. Проверка аппаратной поддержки виртуализации Во-первых, перед настройкой KVM необходимо проверить совместимость сервера с технологиями виртуализации: cat /proc/cpuinfo | egrep -c "(vmx|svx)" Числа отличные от нуля говорят о том, что процессор имеет поддержку аппаратной виртуализации Intel-VT или AMD-V . Подготовка сервера Во-вторых, для удобства создадим каталоги для хранения образов жестких дисков наших виртуальных машин и образов ISO, с которых будет производиться установка операционных систем. sudo mkdir -p /kvm/{hdd,iso} В результате будет создан каталог /kvm/hdd для виртуальных жестких дисков и каталог /kvm/iso для образов ISO. Установка и запуск QEMU/KVM в Ubuntu В качестве интерфейса к технологиии виртуализации QEMU/KVM в Ubuntu мы будем использовать библиотеку libvirt. С помощью следующей команды мы установим гипервизор, эмулятор, библиотеку и утилиты управления. sudo apt-get install qemu-kvm libvirt-bin virtinst libosinfo-bin Где qemu-kvm — сам гипервизор; libvirt-bin — библиотека управления гипервизором; virtinst — утилита управления виртуальными машинами; libosinfo-bin — утилита для просмотра списка вариантов гостевых операционных систем. После успешной установки всех пакетов настроим автоматический запуск сервиса. sudo systemctl enable libvirtd Запустим его. sudo systemctl start libvirtd Пользователя, под которым будем работать с виртуальными машинами, включим в группу libvirt: sudo usermod -aG libvirt user И установим права доступа на ранее созданные каталоги: sudo chgrp libvirt /kvm/{hdd,iso} sudo chmod g+w /kvm/hdd Настраивать виртуальные машины, хранилища и сети можно как из командной строки, так и с помощью GUI-инструмента virt-manager. Причем установить его можно как на сервер, так и на другой компьютер, например, на ваш ноутбук. В последнем случае вам придется добавить удаленное соединение к libvirt. Установку virt-manager и работу при помощи него с libvirt и виртуальными машинами мы рассмотрим в следующей статье. Настройка сети Итак, виртуальные машины могут работать через свою виртуальную сеть с NAT или получать IP-адреса из локальной сети через сетевой мост, который нам необходимо настроить. Настройка сетевого моста В старых версиях Ubuntu большая часть настроек конфигурации сети Ethernet находится в файле /etc/network/interfaces. На всякий случай создадим его резервную копию: mkdir -p ~/backup && sudo cp /etc/network/interfaces ~/backup Затем устанавливаем утилиты для конфигурирования Ethernet-моста: sudo apt-get install bridge-utils Открываем файл /etc/network/interfaces в своем любимом реда��торе (vim, nano): sudo vim /etc/network/interfaces И приводим его к примерно такому виду: source /etc/network/interfaces.d/* auto lo iface lo inet loopback #allow-hotplug eno1 #iface eno1 inet static # address 192.168.7.2/24 # gateway 192.168.7.1 # dns-nameservers 127.0.0.1 192.168.7.1 8.8.8.8 # dns-search home.lan auto br0 iface br0 inet static address 192.168.7.2/24 gateway 192.168.7.1 bridge_ports eno1 bridge_stp on bridge_fd 2 bridge_hello 2 bridge_maxage 20 dns-nameservers 127.0.0.1 192.168.7.1 8.8.8.8 dns-search home.lan Все, что закомментировано — старые настройки сети; br0 — название интерфейса создаваемого моста; eno1 — сетевой интерфейс, через который будет работать мост. Если вы получаете адрес динамически через DHCP, то конфигурация сократится до такой: source /etc/network/interfaces.d/* auto lo iface lo inet loopback auto br0 iface br0 inet dhcp bridge_ports eno1 bridge_stp on bridge_fd 2 bridge_hello 2 bridge_maxage 20 Внимательно проверяем конфигурацию и перезапускаем службу сети: sudo systemctl restart networking Начиная с релиза Ubuntu 17.10, для управления конфигурацией сети по умолчанию используется утилита Netplan, которая добавляет новый уровень абстракции при настройке сетевых интерфейсов. Конфигурация сети хранится в файлах формата YAML. Предоставляется эта информация бэкендам (network renderers), таким как NetworkManager или systemd-networkd. Файлы конфигурации Netplan хранятся в папке /etc/netplan. Для настройки сети открываем в редакторе файл 01-netcfg.yaml vim /etc/netplan/01-netcfg.yaml и приводим его к такому виду: network: version: 2 renderer: networkd ethernets: ens3: dhcp4: false dhcp6: false bridges: br0: dhcp4: false dhcp6: false interfaces: addresses: gateway4: 192.168.7.1 nameservers: search: addresses: parameters: stp: true forward-delay: 2 hello-time: 2 max-age: 20 Ну а при использовании динамической адресации файл конфигурации будет выглядеть так: network: version: 2 renderer: networkd ethernets: ens3: dhcp4: false dhcp6: false bridges: br0: dhcp4: true dhcp6: true interfaces: parameters: stp: true forward-delay: 2 hello-time: 2 max-age: 20 В файлах конфигурации указываем свои адреса, имена интерфейсов и доменов и после тщательной проверки применяем сетевые настройки: sudo netplan apply Виртульные сети (NAT forwarding) Каждая стандартная установка libvirt обеспечивает подключение виртуальных машин на основе NAT из коробки. Это так называемая виртуальная сеть по умолчанию. Вы можете проверить, что она доступна таким образом: sudo virsh net-list --all Name State Autostart Persistent ---------------------------------------------------------- default active yes yes Для того, чтобы виртуальные машины с сетевым интерфейсом NAT могли выходить в интернет необходимо настроить перенаправление сетевого трафика. Для этого надо убрать комментарий строки #net.ipv4.ip_forward=1 в файле /etc/sysctl.d/99-sysctl.conf и сохранить настройки: sudo vim /etc/sysctl.d/99-sysctl.conf sudo sysctl -p /etc/sysctl.d/99-sysctl.conf Создание виртуальной машины Для создания виртуальной машины нам понадобятся две утилиты: osinfo-query — для получения списка ��оступных для установки вариантов операционных систем и virt-install — непосредственно для самой установки. Итак, создадим нашу первую виртуальную виртуальную машину с ОС Ubuntu 16.04, 1024MiB ОЗУ, 1 процессором, сетью через мост и 12GiB жестким диском. sudo virt-install \ --name ubuntu1604s \ --os-type=linux --os-variant=ubuntu16.04 \ --vcpus=1 \ --ram 1024 \ --network network=bridge:br0 \ --disk path=/kvm/hdd/ubuntu1604s.qcow2,format=qcow2,size=12,bus=virtio \ --cdrom=/kvm/iso/ubuntu-16.04.6-server-amd64.iso \ --graphics vnc,listen=0.0.0.0 --noautoconsole \ --hvm --virt-type=kvm Обратите внимание на параметр --os-variant. Он указывает гипервизору под какую именно ОС следует адаптировать настройки. Список доступных вариантов можно получить, выполнив команду: osinfo-query os Подробнее с параметрами virt-install вы можете ознакомиться на страницах руководства, а я приведу команду создания ВМ c сетью через NAT: sudo virt-install \ --name ubuntu1604s \ --os-type=linux --os-variant=ubuntu16.04 \ --autostart \ --vcpus=2 --cpu host --check-cpu \ --ram 2048 \ --network network=default,model=virtio \ --disk path=/kvm/vhdd/ubuntu1604s.qcow2,format=qcow2,size=12,bus=virtio \ --cdrom=/kvm/iso/ubuntu-16.04.6-server-amd64.iso \ --graphics vnc,listen=0.0.0.0,password=vncpwd --noautoconsole \ --hvm --virt-type=kvm После запуска установки в консоли сервера вы увидите текст похожий на этот: Domain installation still in progress. Waiting for installation to complete. Значит все нормально и для продолжения установки ОС в виртуальной машине нам нужно соединиться к ней по VNC. Чтобы узнать номер порта на котором он поднят для нашей ВМ откройте новую консоль или в текущей переведите задание в фоновый режим с помощью CTRL+Z, bg и выполните команду: sudo virsh dumpxml ubuntu1604s | grep graphics В моем случае это порт 5903: или выполнив команду sudo virsh vncdisplay ubuntu1604s вы получите примерно такой результат: :3 Это число нужно сложить с базовым портом 5900. Далее подключаемся с помощью клиента VNC (Remmina, TightVNC) к нашему серверу по полученному порту и устанавливаем Ubuntu 16.04 в нашей ВМ.

После успешного завершения установки в консоли вы увидите примерно следующее: Domain has shutdown. Continuing. Domain creation completed. Restarting guest. Управление виртуальной машиной Для управления гостевыми системами и гипервизором существует текстовая утилита virsh. Она использует libvirt API и служит альтернативой графическому менеджеру виртуальных машин virt-manager. Я коснусь только основных команд управления ВМ, так как описание всех возможностей утилиты — тема для отдельной статьи. Список всех доступных команд вы можете увидеть так: virsh help Описание параметров отдельной команды: virsh help command где command — это команда из списка, который мы получили выше. Для просмотра списка всех виртуальных машин используйте: sudo vish list --all Вот что она показала у меня: Id Name State ---------------------------------------------------- 1 ubuntu16 running 3 centos8 running 6 ubuntu18 running 10 ubuntu1604server running - win10 shut off - win2k16 shut off - win2k16-2 shut off - win7 shut off Если же вам нужны только работающие в данный момент виртуалки, то введите: sudo virsh list Для запуска виртуальной машины выполните в консоли: sudo virsh start domain где domain — имя виртуальной машины из списка, который мы получили выше. Для выключения: sudo virsh shutdown domain И для ее перезагрузки: sudo virsh reboot domain Редактирование конфигурации ВМ: sudo virsh edit domain Read the full article
1 note
·
View note
Text
Laravel 7 installation (CentOS8 / PHP7.4)
Laravel 7 installation (CentOS8 / PHP7.4)
Laravel 7 was released the other day. This time I’d like to install Laravel 7 in the environment of CentOS 8 and PHP 7.4.
Laravel 7 requirements
The following requirements must be met in order to install and operate Laravel 7.
PHP version7.2.5 or above
PHP extensions
BCMath
Ctype
Fileinfo
JSON
Mbstring
OpenSSL
PDO
Tokenizer
XML
We will install Laravel 7 after aligning these areas.
Install PHP 7.4
View On WordPress
0 notes
Video
youtube
How to set up a LAMP stack on Centos8 / RHEL 8
0 notes
Text
How to Install Elasticsearch on Linux CentOS

lasticsearch is an open-source distributed full-text search and analytics engine. It supports RESTful operations and allows you to store, search, and analyze big volumes of data in real-time. Elasticsearch is one of the most popular search engines powering applications that have complex search requirements such as big e-commerce stores and analytic applications.
This tutorial covers the installation of Elasticsearch on CentOS
Installing Java
Elasticsearch is a Java application, so the first step is to install Java.
Run the following as root or user with sudo privileges command to install the OpenJDK package:
sudo dnf install java-11-openjdk-devel
Verify the Java installation by printing the Java version:
java -version
The output should look something like this:
openjdk version "11.0.5" 2019-10-15 LTS OpenJDK Runtime Environment 18.9 (build 11.0.5+10-LTS) OpenJDK 64-Bit Server VM 18.9 (build 11.0.5+10-LTS, mixed mode, sharing)
Installing Elasticsearch
Elasticsearch is not available in the standard CentOS repositories. We’ll install it from the Elasticsearch RPM repository.
Import the repository’s GPG using the rpm command:
sudo rpm --import https://artifacts.elastic.co/GPG-KEY-elasticsearch
Open your text editor and create the repository file the /etc/yum.repos.d/ directory:
sudo nano /etc/yum.repos.d/elasticsearch.repo
Paste the following content into the file:
/etc/yum.repos.d/elasticsearch.repo
[elasticsearch-7.x] name=Elasticsearch repository for 7.x packages baseurl=https://artifacts.elastic.co/packages/7.x/yum gpgcheck=1 gpgkey=https://artifacts.elastic.co/GPG-KEY-elasticsearch enabled=1 autorefresh=1 type=rpm-md
Save the file and close your text editor.
At the time of writing this article, the latest version of Elasticsearch is 7.6
. If you want to install a previous version of Elasticsearch, change 7.x in the command above with the version you need.
Now that the repository is enabled, install the Elasticsearch package by typing:
sudo dnf install elasticsearch
Once the installation process is complete, start, and enable the service:
sudo systemctl enable elasticsearch.service --now
To verify that Elasticsearch is running, use curl to send an HTTP request to port 9200 on localhost:
curl -X GET "localhost:9200/"
The output will look something like this:
{ "name" : "centos8.localdomain", "cluster_name" : "elasticsearch", "cluster_uuid" : "V_mfjn2PRJqX3PlZb_VD7w", "version" : { "number" : "7.6.0", "build_flavor" : "default", "build_type" : "rpm", "build_hash" : "7f634e9f44834fbc12724506cc1da681b0c3b1e3", "build_date" : "2020-02-06T00:09:00.449973Z", "build_snapshot" : false, "lucene_version" : "8.4.0", "minimum_wire_compatibility_version" : "6.8.0", "minimum_index_compatibility_version" : "6.0.0-beta1" }, "tagline" : "You Know, for Search" }
It may take 5-10 seconds for the service to start. If you see curl: (7) Failed to connect to localhost port 9200: Connection refused, wait for a few seconds and try again.
To view the messages logged by the Elasticsearch service, use the following command:
sudo journalctl -u elasticsearch
At this point, you have Elasticsearch installed on your CentOS server.
Configuring Elasticsearch
Elasticsearch data is stored in the /var/lib/elasticsearch directory, configuration files are located in /etc/elasticsearch.
By default, Elasticsearch is configured to listen on localhost only. If the client connecting to the database is also running on the same host and you are setting up a single node cluster, you don’t need to change the default configuration file.
Remote Access
Out of box Elasticsearch, does not implement authentication, so it can be accessed by anyone who can access the HTTP API. If you want to allow remote access to your Elasticsearch server, you will need to configure your firewall and allow access to the Elasticsearch port 9200 only from trusted clients.
For example, to allow connections only from 192.168.121.80, enter the following command:
Run the following command to allow assess from the remote trusted IP address on port 9200 :
sudo firewall-cmd --new-zone=elasticsearch --permanentsudo firewall-cmd --reloadsudo firewall-cmd --zone=elasticsearch --add-source=192.168.121.80/32 --permanentsudo firewall-cmd --zone=elasticsearch --add-port=9200/tcp --permanentsudo firewall-cmd --reload
Do not forget to change
192.168.121.80
with your remote IP Address.
Later, if you want to allow access from another IP Address use:
sudo firewall-cmd --zone=elasticsearch --add-source=<IP_ADDRESS> --permanentsudo firewall-cmd --reload
Once the firewall is configured, the next step is to edit the Elasticsearch configuration and allow Elasticsearch to listen for external connections.
To do so, open the elasticsearch.yml configuration file:
sudo nano /etc/elasticsearch/elasticsearch.yml
Search for the line that contains network.host, uncomment it, and change the value to 0.0.0.0:
/etc/elasticsearch/elasticsearch.yml
network.host: 0.0.0.0
If you have multiple network interfaces on your machine, specify the interface IP address to force Elasticsearch to listen only to the given interface.
Restart the Elasticsearch service for the changes to take effect:
sudo systemctl restart elasticsearch
That’s it. You can now connect to the Elasticsearch server from the remote location.
Conclusion
We’ve shown you how to install Elasticsearch on CentOS 8.
To learn more about Elasticsearch, visit the official documentation page.
If you hit a problem or have feedback, leave a comment below.
1 note
·
View note
Text
CentOS 8 Released Last week.
CentOS 8 Released Last week.
CentOS 8 released last week and I just downloaded the iso file locally. It is around 6.6 GB.

There are a lot of exciting updates in this new release. I will share my experience after installing it.
View On WordPress
0 notes
Text
In this guide we’ll explore how you can create Local repositories of CentOS 8 by using Rsync and hosting them with Nginx web server. The Local CentOS 8 mirrors are created by having a Local cron job which regularly checks for updates in the upstream repositories and update them locally accordingly. By Creating CentOS 8 Local repository mirrors, you’ll be able to configure your CentOS 8 servers to access packages without the need for internet access. This will improve your security and reduces the amount of bandwidth consumed by pulling RPM packages from external sources. In this setup, we’ll use a CentOS 7 or CentOS 8 server to perform the actions. You should have an external storage with enough capacity to host repository packages and potential growth. For CentOS 7 & CentOS 6, check: How To Create Local CentOS 7 6 & EPEL Repository Sync Mirrors Step 1: Install Nginx Web Server As Nginx is used as a web server of choice, install it in your CentOS 7 system. CentOS 8 sudo dnf -y install @nginx CentOS 7: sudo yum -y install epel-release sudo yum -y install nginx After installation, start and enable the service. sudo systemctl enable --now nginx Confirm that the service is running. $ systemctl status nginx ● nginx.service - The nginx HTTP and reverse proxy server Loaded: loaded (/usr/lib/systemd/system/nginx.service; enabled; vendor preset: disabled) Active: active (running) since Fri 2019-11-01 00:28:39 EAT; 4s ago Process: 7378 ExecStart=/usr/sbin/nginx (code=exited, status=0/SUCCESS) Process: 7376 ExecStartPre=/usr/sbin/nginx -t (code=exited, status=0/SUCCESS) Process: 7375 ExecStartPre=/usr/bin/rm -f /run/nginx.pid (code=exited, status=0/SUCCESS) Main PID: 7380 (nginx) Tasks: 2 (limit: 11512) Memory: 9.4M CGroup: /system.slice/nginx.service ├─7380 nginx: master process /usr/sbin/nginx └─7381 nginx: worker process Nov 01 00:28:39 centos8.novalocal systemd[1]: Starting The nginx HTTP and reverse proxy server... Nov 01 00:28:39 centos8.novalocal nginx[7376]: nginx: the configuration file /etc/nginx/nginx.conf syntax is ok Nov 01 00:28:39 centos8.novalocal nginx[7376]: nginx: configuration file /etc/nginx/nginx.conf test is successful Nov 01 00:28:39 centos8.novalocal systemd[1]: nginx.service: Failed to parse PID from file /run/nginx.pid: Invalid argument Nov 01 00:28:39 centos8.novalocal systemd[1]: Started The nginx HTTP and reverse proxy server. Open http port in the firewall. sudo firewall-cmd --add-service=http --permanent sudo firewall-cmd --reload Step 2: Create Repository directories I have a secondary disk in my server that will be used to store repository data – /dev/vdc of 100GB. $ lsblk NAME MAJ:MIN RM SIZE RO TYPE MOUNTPOINT vda 252:0 0 20G 0 disk ├─vda1 252:1 0 1G 0 part /boot └─vda2 252:2 0 9G 0 part ├─cl-root 253:0 0 8G 0 lvm / └─cl-swap 253:1 0 1G 0 lvm [SWAP] vdc 252:32 0 100G 0 disk I’ll create a partition on this block device and mount it under the /data directory. Let’s start by creating a partition on it. sudo parted -s -a optimal -- /dev/vdc mklabel gpt sudo parted -s -a optimal -- /dev/vdc mkpart primary 0% 100% sudo parted -s -- /dev/vdc align-check optimal 1 Create a physical volume and volume group in it. $ sudo pvcreate /dev/vdc1 Physical volume "/dev/vdc1" successfully created. $ sudo vgcreate data /dev/vdc1 Volume group "data" successfully created Create a Logical volume $ sudo lvcreate -n repos -l+100%FREE data Logical volume "repos" created. Create a file system $ sudo mkfs.xfs /dev/mapper/data-repos meta-data=/dev/mapper/data-repos isize=512 agcount=4, agsize=1965824 blks = sectsz=512 attr=2, projid32bit=1 = crc=1 finobt=1, sparse=1, rmapbt=0 = reflink=1 data = bsize=4096 blocks=7863296, imaxpct=25
= sunit=0 swidth=0 blks naming =version 2 bsize=4096 ascii-ci=0, ftype=1 log =internal log bsize=4096 blocks=3839, version=2 = sectsz=512 sunit=0 blks, lazy-count=1 realtime =none extsz=4096 blocks=0, rtextents=0 Create directory for mounting the Logical volume. sudo mkdir /data Create a mount point $ sudo vim /etc/fstab /dev/mapper/data-repos /data xfs defaults 0 0 Mount it. sudo mount -a Confirm: $ df -hT /data Filesystem Type Size Used Avail Use% Mounted on /dev/mapper/data-repos xfs 100G 247M 100G 1% /data Create base directory for CentOS 8 repository data. sudo mkdir -p /data/repos/centos/8/ Confirm all directories are created. $ tree /data/ /data/ └── repos └── centos └── 8 3 directories, 0 files Step 3: Create Repositories Sync script Let’s now create a script that will be used to sync contents from the remote repositories to our local system. $ sudo vim /etc/centos8_reposync.sh Paste below data. #!/bin/bash repos_base_dir="/data/repos/centos/8/" # Start sync if base repo directory exist if [[ -d "$repos_base_dir" ]] ; then # Start Sync rsync -avSHP --delete rsync://mirror.liquidtelecom.com/centos/8/ "$repos_base_dir" # Download CentOS 8 repository key wget -P $repos_base_dir wget https://www.centos.org/keys/RPM-GPG-KEY-CentOS-Official fi Make the script executable. sudo chmod +x /etc/centos8_reposync.sh Install Tmux and initiate first execution. $ sudo yum -y install tmux $ tmux $ sudo /etc/centos8_reposync.sh The script should start running. A number of directories should be created. $ ls -1 /data/repos/centos/8/ AppStream BaseOS centosplus COMPOSE_ID cr extras fasttrack isos PowerTools Wait for the initial script to finish running then create a cron job for weekly sync. I’ll set my sync to run every Sunday 6pm. $ sudo crontab -e 00 18 * * 7 /etc/centos8_reposync.sh Step 4: Configure Nginx Create Nginx configuration file to serve the repository contents. $ sudo vim /etc/nginx/conf.d/centos.conf server listen 80; server_name repos.example.com; root /data/repos/; location / autoindex on; Where repos.example.com is the domain name you’ll use to access the repositories. Configure SELinux Labels. sudo semanage fcontext -a -t httpd_sys_content_t "/data/repos(/.*)?" sudo restorecon -Rv /data/repos Restart nginx after the change. sudo nginx -t sudo systemctl restart nginx Open the server URL to confirm it is working. Step 5: Configure CentOS 8 Client machines Now that our mirror is ready, we can configure our CentOS 8 machines to use the local repositories. Start by backing up current repositories cd /etc/yum.repos.d/ sudo mkdir old-repos sudo mv *.repo old-repos Create a new repository file sudo vim local.repo Modify below and paste it. [BaseOS] name=CentOS-$releasever - Base baseurl=//repos.computingpost.com/centos/$releasever/BaseOS/$basearch/os/ gpgcheck=1 enabled=1 gpgkey=//repos.computingpost.com/centos/$releasever/RPM-GPG-KEY-CentOS-Official [AppStream] name=CentOS-$releasever - AppStream baseurl=//repos.computingpost.com/centos/$releasever/AppStream/$basearch/os/ gpgcheck=1 enabled=1 gpgkey=//repos.computingpost.com/centos/$releasever/RPM-GPG-KEY-CentOS-Official [centosplus] name=CentOS-$releasever - Plus baseurl=//repos.computingpost.com/centos/$releasever/centosplus/$basearch/os/ gpgcheck=1 enabled=0 gpgkey=//repos.computingpost.com/centos/$releasever/RPM-GPG-KEY-CentOS-Official [extras] name=CentOS-$releasever - Extras baseurl=//repos.computingpost.com/centos/$releasever/extras/$basearch/os/ gpgcheck=1 enabled=1 gpgkey=//repos.computingpost.com/centos/$releasever/RPM-GPG-KEY-CentOS-Official [PowerTools] name=CentOS-$releasever - PowerTools baseurl=//repos.computingpost.com/centos/$releasever/PowerTools/$basearch/os/
gpgcheck=1 enabled=0 gpgkey=//repos.computingpost.com/centos/$releasever/RPM-GPG-KEY-CentOS-Official [cr] name=CentOS-$releasever - cr baseurl=//repos.computingpost.com/centos/$releasever/cr/$basearch/os/ gpgcheck=1 enabled=0 gpgkey=//repos.computingpost.com/centos/$releasever/RPM-GPG-KEY-CentOS-Official [fasttrack] name=CentOS-$releasever - fasttrack baseurl=//repos.computingpost.com/centos/$releasever/fasttrack/$basearch/os/ gpgcheck=1 enabled=0 gpgkey=//repos.computingpost.com/centos/$releasever/RPM-GPG-KEY-CentOS-Official Where: repos.computingpost.com is the Domain used for repos access Clean current repo cache: sudo yum clean all The update: $ sudo yum makecache CentOS-8 - AppStream 1.2 MB/s | 4.3 kB 00:00 CentOS-8 - Base 3.9 kB/s | 3.9 kB 00:01 CentOS-8 - Extras 881 kB/s | 1.5 kB 00:00 Metadata cache created. List repositories: $ sudo yum repolist Last metadata expiration check: 0:02:10 ago on Fri 01 Nov 2019 12:41:38 PM EAT. repo id repo name status AppStream CentOS-8 - AppStream 5,089 BaseOS CentOS-8 - Base 2,843 extras CentOS-8 - Extras 3 Run system update from it. sudo yum -y update Step 6: Enabling Disabled repositories Some repositories are disabled by default. To enable them, install yum-utils package. sudo yum install yum-utils To activate the repository, use the command: sudo yum-config-manager --enable reponame Below are the examples to enable PowerTools and centosplus repositories: sudo yum-config-manager --enable PowerTools sudo yum-config-manager --enable centosplus Confirm: $ sudo yum repolist CentOS-8 - AppStream 1.7 MB/s | 4.3 kB 00:00 CentOS-8 - Base 2.0 MB/s | 3.9 kB 00:00 CentOS-8 - PowerTools 75 MB/s | 1.8 MB 00:00 CentOS-8 - Plus 58 MB/s | 833 kB 00:00 CentOS-8 - Extras 783 kB/s | 1.5 kB 00:00 repo id repo name status AppStream CentOS-8 - AppStream 5,089 BaseOS CentOS-8 - Base 2,843 PowerTools CentOS-8 - PowerTools 1,507 centosplus CentOS-8 - Plus 26 extras CentOS-8 - Extras 3
To disable, substitute –enable with –disable. You now have working Local CentOS 8 Mirrors. Enjoy and check a similar guide we have for users running Satellite / Katello / Foreman. How To Sync CentOS 8 repositories on Satellite / Katello / Foreman
0 notes