#Clip studio paint vs paint tool sai
Text
Clip studio paint vs paint tool sai

#Clip studio paint vs paint tool sai android#
#Clip studio paint vs paint tool sai software#
#Clip studio paint vs paint tool sai code#
#Clip studio paint vs paint tool sai trial#
#Clip studio paint vs paint tool sai download#
#Clip studio paint vs paint tool sai android#
Each Appenate package promises the rapid creation and publishing of branded business apps across Windows, Android and iOS devices.
#Clip studio paint vs paint tool sai trial#
Try a 30-day free trial and then let us help migrate 5 of your paper-based forms once you subscribe.Įnjoy Enterprise-level features, scaling across screen design types, data connectors and form submissions. Run your numbers through our ROI calculator if you're unsure ).
#Clip studio paint vs paint tool sai software#
The software will have you streamlining processes, pinpointing and removing unnecessary, time wasting tasks and increase your ROI. Reduce the time spent on paperwork and improve the way you record, track and store data.Ĭreate online forms and apps in under 5 minutes with our affordable, drag-and-drop, no-code platform. With M1, you also have access to differentiators like Alora Machine Intelligence, Avalara, uniPoint, KnowledgeSync, Net1, and many others.
#Clip studio paint vs paint tool sai code#
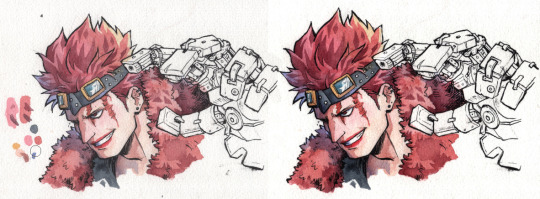
Other key features include MRP, BAM, free “view only” licenses for users who only need to view and edit reports, “Smart Screen Technology” that automatically changes screens based on users’ input and a free M1 Design Studio that allows users to customize the system without accessing the source code or requiring extensive programming knowledge. Users can also add additional rules and formulas after the wizard is complete. M1’s product configurator provides a multi-level, automated configuration that builds product configurations from a BOM, including all sub-assemblies. The solution is suitable for small to midsize companies that manufacture via repetitive, make-to-stock, make-to-order and engineer-to-order processes. It lets you coordinate and share data across various functions within your business from sales, inventory, scheduling, production, shipping, and more. M1 is a subscription cloud-based or on-premise ERP software for manufacturers, enabling you to tie your business operations together in one system to centralize your data. With the 360° Panorama Multi-point feature, you can easily navigate from different viewpoints and perspectives to show off your design from all angles. Present all your designs from different viewpoints with the latest enhancement made to the 360° Panorama feature. Showcase products or elements within your design that are most important to your clients by putting them in focus while blurring out the background. Live Share is the future of design collaboration.Īdd artistic effects to all your designs with the Bokeh effect. Make changes on the fly and allow your customers to collaborate on the design process. Share design renderings for live feedback from your customers. Get ready to step into the future with 2020 Design Live V13įrom space planning to photorealistic renderings to 360° panoramas, 2020 Design Live is equipped with all the advanced tools that will help designers create stunning kitchens & bathrooms that are easy to show off to clientsĬollaborate in real-time with the Live Share feature. If you have a vision bring it to life with 2020 Design Live, the leading kitchen & bath design software on the market. And to further elevate your customer’s experience you can choose between our standard or fully branded solutioĭesign the perfect kitchen & bathroom. Our simple and seamless payment process quickens the customer journey from our widget or app to your studio’s doorstep with as few clicks as possible. Through these tools you can facilitate good customer relationships whilst monitoring and improving client acquisition and retention. Through our effortless back-end management, you can spare hours of administrative work through many helpful features such as teacher payroll, automated invoices, custom reports etc. Our Zoom and VOD integration enables you to expand your business virtually and gain new members worldwide. With simplifying and centralizing your bookings and its management you have more time to focus on your studio and clientele using our automated marketing suite. Manage all of your studio's locations through one master account. A comprehensive system that is fully streamlined with everything you need to run your studio through one platform, tailored to fit specific studio's needs from Pilates and Yoga to Crossfit and Fitness. We hope you do not use it for commercial purposes.Bsport is the next generation all-inclusive booking, management and marketing platform for your boutique fitness or wellness studio. Note: Copyright of all images in manga studio paint tool sai content depends on the source site. If want a higher resolution you can find it on Google Images.
#Clip studio paint vs paint tool sai download#
You can access all contents by clicking the download button. Manga studio paint tool sai is a summary of the best information with HD images sourced from all the most popular websites in the world. Paint Tool Sai Vs Manga Studio Fish And Chips Makes A Blog manga studio paint tool sai
0 notes
Text
Clip studio paint vs paint tool sai

CLIP STUDIO PAINT VS PAINT TOOL SAI UPDATE
CLIP STUDIO PAINT VS PAINT TOOL SAI UPGRADE
CLIP STUDIO PAINT VS PAINT TOOL SAI SOFTWARE
CLIP STUDIO PAINT VS PAINT TOOL SAI LICENSE
CLIP STUDIO PAINT VS PAINT TOOL SAI PROFESSIONAL
Some other features include, channel rename, skip pause/rewind, channel switch, lock focus, image zoom, image despeckle, animated backgrounds, and photo effects. Manga Studio paint includes many features like, importing and exporting files from other sources and can export and import comics from your computer or you can import from a flash drive. This feature allows you to save your artwork onto multiple PDF's that you can then use to print them out or put them on your computer's desktop for viewing.
CLIP STUDIO PAINT VS PAINT TOOL SAI SOFTWARE
You can change these positions in real time as you draw your sketches and paintings.Īnother great feature of this software is the skeletal frame that comes bundled with the package. This tool also includes a skeletal frame that allows you to edit the positions of your layers. With this feature you are able to map out different shading effects and color conversions on the canvas. One of the great functions is the powerful and flexible Shading Map feature, which is unavailable even in the best free manga drawing software. Another feature that is highly appreciated by many users is its support for advanced features that allow users to manipulate their paintings with ease. You can even choose to export your artwork in one of these formats if you so desire. This includes a large number of standard formats including PICT, TIFF, GIF, PNG, BMP, etc. Tagged Adobe Adobe Creative Cloud Adobe Inc.One of the best features of Paint Tool SAI is its support for a wide range of rasters and images. The first tests are already underway with Canadian users. CSP’s move is particularly bad timing given that Adobe also plans to release a stripped down, free, web-based version of its Photoshop program. Photoshop is priced at $20.99 per month or all Adobe apps at $54.99 per month, making it much more expensive over time, especially for long-time dabblers and professionals alike. Photo and art programs like GIMP and Krita, while somewhat less user-friendly, are free and open source, while programs like Paint Tool SAI and Procreate are one-time purchases, although the latter program is limited to iPads and can only be purchased from the App Store. Photoshop is industry standard software, so other services have to try to stand out from the crowd to get users on board. Some Twitter users openly shared links to pirate the CSP software. The company wrote that it planned to switch to version 2 in the first half of 2023. We reached out to ArtSpark - which owns Celsys as a subsidiary - for comment, but had not yet heard back by the end of Monday, ET.
CLIP STUDIO PAINT VS PAINT TOOL SAI UPDATE
Those who want to keep receiving new features will have to purchase a one-year update pass, but the company hasn’t revealed what price tiers we could see from any of these options.
CLIP STUDIO PAINT VS PAINT TOOL SAI LICENSE
Developers will also end support for perpetual license users when they eventually release version 4. Existing users of version 1 can purchase a permanent license for version 2, but they won’t have access to updates from 2.1 and further.
CLIP STUDIO PAINT VS PAINT TOOL SAI UPGRADE
What doesn’t help any of this is the confusing structure for users who want to upgrade from version 1 to version 2. Most of the negative comments hit on the point that they went with CSP to avoid paying a monthly subscription for the likes of Photoshop, all while dealing with Adobe’s heavy-handed DRM. As you might expect from an artistic community, the memes were well-produced and fairly accurate. Users took to Twitter to reject the change. Celsys added that it would provide free stability updates for any bugs caused by the operating system “into next year and after the transition to version 2.” It was “necessary,” the company said, to “continue developing the app and keep delivering a better creative tool.”
CLIP STUDIO PAINT VS PAINT TOOL SAI PROFESSIONAL
The current version 1 - which is a one-time purchase with a base license offered for $49.99 or $219 for the professional version - will be replaced by version 2, which comes with a monthly subscription price.Ĭurrent users can still keep their version 1 license, but the company said that by 2023 it will no longer offer any feature updates to version 1 users. That’s exactly what happened Monday, when Celsys-owned Clip Studio Paint announced they were about to introduce a new version of their illustration and animation program, and alongside that they created a new subscription-based model. If enough ordinary internet users were able to drag that Sonic the Hedgehog the film’s old design through the legendary mud enough that the studio completely redesigned it, how do you think you’ll move forward when the people behind the pencil get disgruntled enough to tell you so via Twitter? In general, it is a very bad idea for any company to disrupt the online artistic community. Digital artists have quite a few art and photo programs to choose from, but one of the most used, aside from Adobe Photoshop, is Clip Studio Paint.
0 notes
Note
How do you make your templates?
Here’s what you gotta do!
The Internetoverdosed Method (patent pending)
1. Gather what you need
You’ll need an image-hosting website, editing software, and a gif-editing website.
I personally use postimages.org (imgur used to be good, but they’re starting to delete accounts when they’re not active), Clip Studio Paint, and ezgif.com. But you can use whatever!
For image hosting in particular, I can also recommend imgbox.com for image hosting that doesn’t require an account.
I also use Pinterest for inspiration, as well as to gather assets for editing~
2. Find an image you want to use
This image should have a very strong color palette! This color palette can be anything, though, really…
3. Edit the image
As much or as little to your liking! I typically clip my images onto a shape. Like a star or heart.
4. Find small pixel art pieces that match your color palette
I use tumblr for this! I search the tags “#favicon(s)’, ‘#decome’ and ‘#pixel(s)’. But there are lots of carrds, Neocities sites and rentries that gather a ton of pixel art pieces in one place, too!
If the pixel art doesn’t exactly match your main image, throw it in your editing or gif editing tool and edit it to match better!
5. Set it all up!
Rentry’s ‘how’ tab is a great place to start if you’re confused on how anything works!
As for the contents of your site, I personally always include names, pronouns, age and race. Plus room for other misc labels, whether that be LGBT+ labels, diagnoses or other such things. But you can put whatever you see fit!
Lastly, here are some general
Tips!
Accessibility over aesthetics ALWAYS!! People moved from rentry to carrd because rentry is easier to read… So making your rentry hard to read defeats the point!! In the words of Dieter Rams, “Good design is as little design as possible.” In this vein: don’t skimp out on alt text either!
Check how your rentry looks on mobile. And in dark vs light mode too!
The limited amount of colored text you can use (blue and pink text, yellow highlights and blue, green, yellow and red spaces) is great if it matches your color palette!
You can also use text deco to fancy it up even more. (Just make sure it doesn’t turn into an emoji on mobile!) I don’t use a particular website for this. I just Google it! BUT don’t use those fancy fonts! Screenreaders can’t read those, and what did we just say about accessibility?
CREDIT YOUR ARTISTS! You can link to someone via an image.
There are lots of places that host small LGBT+ pride flags and other such things for your rentries! In fact… I’m an admin on one! /pixelflags is a super extensive LGBT+ flag-hosting resource and has a even requesting form.
Similarly, /madpride is another rentry resource that I admin! It hosts disability and disorder pride flags / symbols, and also has a requesting form.
Happy rentry-making!
73 notes
·
View notes
Note
heyyy I'm new to digital art, would you mind sharing some tips regarding programs and tutorials and etc? also on how to turn a real life piece into a beautiful and clean digital piece... really love your art
oh good luck with your art journey!
my experience with digital art is pretty dated (as in a decade + levels dated) and i might be too out of touch to give beginner tips but regardless, allow me to attempt
Programs: it would help to know which hardware you have for digital but ill put down some i have experience in
1. Clip Studio Paint Pro - PC/Android/ipad/everywhere i think? unfortunately they betrayed humankind and its now a subscription everywhere but on PC. i bought a one-time license years years years ago on sale and its probably the best available on my end. I also got it on subscription on android so i can sync works between my PC and tablet. its very flexible in a way that you can draw with it in the most basic way single layer sketches or whatever but they have so many features and keep adding more.
2. procreate - ipad only
never been an apple user but my friend is, and he's been a procreate user forever. he recently tried CSP on ipad though and he still claims he likes procreate better for ease of use and compatibility with tablet ergonomics and apple pen
3. medibang paint - pc/android/ipad
free forever. and out of all the free programs i recommended my other digital art newbie friend this is what he liked best.
4. adobe photoshop - dont even look at this the only reason i have one is im leeching off company license. its still unfortunately the industry standard tho but CSP is much cheaper and has the same controls and most of the basic functions
5. Paint Tool SAI - my first art program but i haven't tried it again. honestly still think this has the best brush flexibility and pen pressure control
-----
As for tutorials, i find digital art has such a steep and high skill ceiling and its a challenge im still tackling and probably will forever tackle haha. I'm trying to osmosis painting techniques from splash art painters from League of Legends who most of them post complete timelapses (my favorite being Bo Chen) where you can study not just their techniques but like, art directions that make their pieces striking.
Anyway, I also promised a friend I would make a simple coloring tutorial so maybe after inktober hustle, I would look for a piece there I'd use for the guide.
----
Traditional to digital is never a satisfactory process to me but if you can, invest on a scanner. I use an epson v39, had it for years.
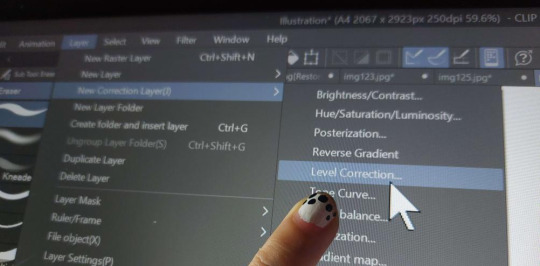
scanned vs edited. the goal is to at least get the white of the paper as white as possible and the blacks the blackest, without whitewashing/burning the rest of the colors. Level correction function is your best friend here and most art programs have that.
Then i just clean dust and errors and slide the contrasts around until it looks as close to the original piece
If you have a decent phone camera, you can get away just posting instagram aesthetic pics with materials framing it or smth and just edit as usual. natural light tends to be a lot more forgiving than the harsh light of scanners anyway.

Anyway I hope this helps and have fun learning!
#granpa voice: back in my day we didnt have phones or tablets capable of drawing#we had to use dodge and burn on pirated photoshop apps using a mouse on the family computer#i think i also started digitals a bit late in life so unlike younger millenials and gen Zs its not easy as second nature to me#compared to traditional mediums at least
30 notes
·
View notes
Note
OK I have to know what program or brushes you use?? Whenever I try to paint digitally the edges look too soft if that makes sense??
Hello! i've a fair idea of what style specifically you mean, but let me know if I didnt cover what you're asking about!
I mainly use Clip Studio Paint (Pro 1.0?), on the side I use Rebelle 7 Pro. Rebelle is for the traditional looking stuff I occasionally do, and everything i used for that comes with the programme. If what youre looking at is traditional-mimicking, its that! Other than that, probably CSP youre here for so... for that:
Main brushes? I use a collection of Daub brushes! Pretty much exclusively this brush... like... outside my sketch brush I basically only use this one:


Rectangular, textured. This is how it came Im pretty sure, but just showing you the shape and stuff because the shape i find is key in cutting lines into paintings. I dont remember which daub pack its in, but I can try and figure it out if you want it!


You can see it here in these pieces, it gives that fuzzy frayed end to things. That's genuinely fine? I find it's good for making sure shadows and edges aren't too defined without giving the very artificial digital art feeling airbrushes give, like as an example I dont really notice it in this piece at full size but it's very distracting zoomed in:


I just. am not liking it personally, which... I tell you to let you know I actually kinda struggle to get it to work the job I want it to and ive been looking to replace it. Used it for years, but it has flaws. It's been decent for my recent couple years break from serious art because its loose and gets the job done, but its kinda tough to work with (as any traditional-mimicking brush would be)
I've recently started using it edited a little to get rid of the fuzzy texture, which really just involved taking away the texture in settings. Theres some places on the arms here where i was using the textured version, and... yeah this is roughly rendered bc it was a quick piece but you get the idea:

I find it really helpful because it has an edge - it can paint proper lines - but then can be smoothed

Rough textured vs untextured, and heres.. where you can see it falls apart for what i do. That was solid black I was painting on the grey and i was pushing hard (more so going over and over it), textured version's way better for painting and blending but texture gets in the way, uh, trade off
It's definitely... not actually ideal for my art, I can say that much. i took a detour into using this brush exclusively after losing my last muse, it's definitely.... how do i word this. its not good at laying down colours and blending - Ive been hoping i can even that out in settings so maybe if you grab it you can iron that out but. Thats what I use!
It's probably more helpful to tell you what works? Uh. given that the brush i use I struggle against so
For things getting back to the style I used before - which. unfortunately i dont think i have current (relatively) sfw examples, so time to dig up the literal at the time old style art.... - for example in this:

deviantarts quality is fucking abysmal holy shit. This is kinda... What my personal style is, which is blending stark lines and colours, juxtaposing textures and stuff. To do that? I recommend having two brushes, something like what I just showed you and then something like Clip Studio Paint's default watercolour brushes. Theyre like airbrushes blended with paint brushes

I also then go over things with my pen tool, which is my own brush. I dont know if i can properly share it in any capacity because I cant remember where I got the textures from, but you know, under the table passed along, its here, its meant to mimic how i draw with pens on paper (light and almost invisible if you go light and fast, proper linework if you slow down and purposely draw)
You can see the whole entourage (Daub brush, watercolour brushes, pen brushes, if watercolours were even used) here:


Didnt circle everything that was pen because Im sure you get the idea. Its basically just... that brush to paint, waters if i need to smooth something extra smooth, and then anything that needs contrast and oomf gets added in pen, if your brushes cant provide edges its probably best to mix them up, use your soft brush for blending, a harder painting brush for laying down colours and loose blending.
Something that lays down paints with an edge - I really do recommend a non-round brush head, and something built for painting - and then something to smooth it out.... honestly ideally thatd be the exact same brush, thats a key i used to like with the Daub square brush is that i could paint and blend with it, I think I maybe manipulated the settings too much and took it way too far out of what it was or something because i swear it used to be easier to work with but. whatever the issue is its never been ideal, honestly for a brush id say seek out something that: Is square/rectangular (probably rectangular is best); lays down paint without too much pressure on your wrist and blends smoothly so you're laying paint and blending in the same stroke; puts down colour when you're pressing down over a certain percentage of its pressure limit and then only blends when you're pressing under that percentage. CSP lets you do this. Best brush experiences Ive had ticked all of those boxes
uh. if youre shopping around (buying or getting for free) you dont need to look for the "paints over x blends under y" because in CSP and other programmes (do check) you can add that in yourself, but yeah Id suggest some kind of shaped brush that isnt shy with paint to combat the soft edges!
#god. i really have been on an art break for like 4 years now. bruh. i did not realise how long itd been til i put this together#Yeah my recent art doesnt really have good examples bc ive had 0 patience for art since 2020/2021 but back when i was really comfortable#with my brushes and stuff? yeah. insert what i said about the type of brush to look out for#not art#an ask //
2 notes
·
View notes
Note
Do you use physical mediums of your art, or do you do it digitally? ❤️
I dabble in a little bit of everything to be honest! The majority of my art is digital, because it's more convenient vs having to set up all my traditional supplies, but I also enjoy playing around with a lot of different traditional mediums. My favorites are watercolors and more recently, alcohol markers, but I also have some varying experience with inks, colored pencils, pastels, and acrylic paint due to art classes I've taken in and out of school over the years :>
I mostly use Clip Studio for my digital art these days, but I used to use Paint Tool Sai as my primary program, and I still like to crack it open when I need a change of pace.
3 notes
·
View notes
Note
Ik you've answered this/similar questions before but I've looked through some of ur tags and can't find it. I want to buy my sister a drawing tablet but really have no idea which ones are the best. Like I did look some things up, but I thought I'd ask for some people (who like draw on tablets) too.
no worries, for whatever reason my art advice tag is like 90% nonfunctional and it’s like, the only tag of mine that does that ☹️ i will say, i have only owned a couple different tablets (so obviously i’m not gonna be able to tell you if there are better models out there) but i’ve liked all of them!
i think this is the first tablet i ever used? it’s hard for me to be sure, because it was really long ago. basic wacom tablet with a black screen. it takes more effort to pick up the skill of putting your hand on a blank black surface while creating an image on the screen, but something cheap like this is nice if you’re not able to commit to something more expensive and aren’t sure how far you want to take the hobby.
(to be clear, it’s not like this kind of tablet necessarily limits you—ikimaru, who’s been a super popular digital artist for years, makes gorgeous art on a bamboo CTH-460 which is a model you can buy on ebay for $18. it’s just that it takes a little more getting used to.)
also, wacom is the brand i used for a basic tablet, and I didn’t mind mine, but i have heard wacom sometimes is a little sketchy with planned obsolescence type stuff 😵💫 like the pen nibs supposedly wear out way quicker than, for example, the huion brand, so you might want to check out what huion’s got. i will say: i used that wacom tablet for 1-6 hrs/day for several years and had no problems, BUT many people on the internet seem to prefer huion over wacom. up to you.
still, i honestly think you can do well with any tablet that has a stylus and pen pressure lol (which is basically all of them). like there are lots of different tablets with lots of different features out there, but the only feature that i found made a real difference to me was touchscreen vs. non-touchscreen.
non-touchscreen tablets are totally usable and usually way less expensive, but the touchscreen is really nice to have if it’s in your budget. it feels closer to traditional art and is easier to pick up.
I personally have never used a touchscreen tablet that was just a drawing tablet—i’ve used a surface pro 4 (a touchscreen computer) and an ipad pro. both were very nice. honestly, I didn’t notice a huge difference in the feeling of drawing on the screens of the surface pro vs the ipad—the biggest thing for me was the art programs. some programs are only compatible with computers and some programs are only compatible with ipads. here’s what I personally noticed:
krita (nice for painting) and ms paint (fun for dicking around in) are both NOT available on ipad, at least as far as i know
rebelle 5 pro (supposedly a very cool program for emulating real painting), which is currently on a huge sale rn (it’s $20, normally costs $150) and is also NOT available on ipad
paint tool sai, as far as i know, is not available on ipad
clip studio paint is available on BOTH ipad and computer, but is more expensive on ipad (it’s a monthly subscription instead of a one-time purchase).
procreate is ONLY compatible with ipad, and is, personally, my favorite art program i’ve ever used. there’s a brush or two from krita that i miss, but for the most part, procreate is solidly better than any other art program i’ve used.
most of the nicest animation programs seem to be incompatible with ipad; the ones that work on ipad are quite basic. this is the only major sticking point for me lol
one thing about ipad that you might’ve read about in your research is this feature that lets you tilt the pencil and draw as if you’re using the “flat” side of it:
this is sometimes cool and sometimes inconvenient, so it kinda balances out to neutral. if you’re torn between ipad and a different touchscreen tablet then don’t decide off this feature lol.
if your sister already has an ipad (or if you’ve got a family one that she has decent access to), it might be a nice thing to just get her a compatible apple pencil, so you can save money on the tablet.
but yeah! those are the models i’ve used and i’ve liked them all. even if you get her a relatively cheap non-touchscreen tablet she can still make really cool art with it and have a lot of fun. good luck!
13 notes
·
View notes
Note
Hiiii i saw you wanted to try getting into digital art!! I have an ipad and apple pen so I usually play around with procreate (one time payment app) or ibis (free but you can view adds to use certain brushes for 24 hours) for art. but there are also drawing tablets like wacom and huion that you can use for the computer and laptop. Wacom is known and usually used by professionals but it can get expensive. Huion is also known as a good cheaper alternative that works just as great.
Art programs on the computer that are free and used by a lot of artists are fire alpaca, medibang and krita. I’ve tried medibang and krita theyre great, didn’t really like fire alpaca much but that’s more of a personal/user issue 😅. if you have extra money you can try paint tool sai (i think tina uses version 2 of this program!) or clip studio paint. If you have it already (or can pirate it), photoshop is also great and is used by professionals in the industry.
For tutorials, I recommend looking for it on youtube based on the program you’re using such as “[art program] [thing you want to practice/draw] tutorial” and usually a ton pops up! There are also brushes that are meant to mimic watercolor or charcoal painting online! Just search for it by “[art program] [type of brush you’re looking for] brush free” and some should pop up!
Sorry for the whole info dump ahaaa. But you dont really need fancy equipment or art program to get into art especially if it’s just a hobby. I know there are a lot of artists (even here in the fandom) who uses their phone and finger paints using free apps like ibis. There is definitely a learning curve when it comes to digital art vs traditional but once you learn a bit on how some things work it gets easier. Just have fun with it, and learn at your own pace! Hope this helps :]
i have an ipad!! so i might just work there but i also have a drawing tablet like one of the ones you plug into a computer i got it as a birthday present a few years ago so that's also an option ig, im still looking at different programs but thank you for your suggestions :))
#i have gimp (← for photo editing and stuff i used it for a school project) and i know there's brush tools there but i'm not confident that#it's any good 😭 idk i'll just try a bunch of things out and see where it gets me lmao#don't worry about the info dumb it's helpful!!! thank you <3#ask#anonymous
2 notes
·
View notes
Note
art asks : 1 4 5 29 :)
hi!!!
1-Art programs you have but don't use -> i have paint tool sai 1 and 2, and artrage on my current pc that i don't use ! ive also had firealpaca, krita, clip studio paint and medibang !
4-Fav character/subject that's a bitch to draw ->i have soooo much trouble drawing expressions!! i think it's because of my autism tbh... but yeah i usually need to redraw my expressions multiple times when i usually just do everything once and be satisfied with it
5-Estimate of how much of your art you post online vs. the art you keep for yourself -> i post about mhhhh 80% on my art on tumblr! and like 30% on instagram and 10% or less on twitter!!! i often forget to post stuff lol but there are also things like. doodles for friends and more personal art that i dont want to show
29-Media you love, but doesn't inspire you artistically -> OH THIS ONE IS HARD, since i draw so much of my art from things i love.... i'd say uhm most of the shows i watch that have a style similar to free! or sk8 if you see what i mean? gekkan shoujo and the like... i love the stories and the art too, but even though i admire it, it's not something i want to incorporate in my art..
1 note
·
View note
Text


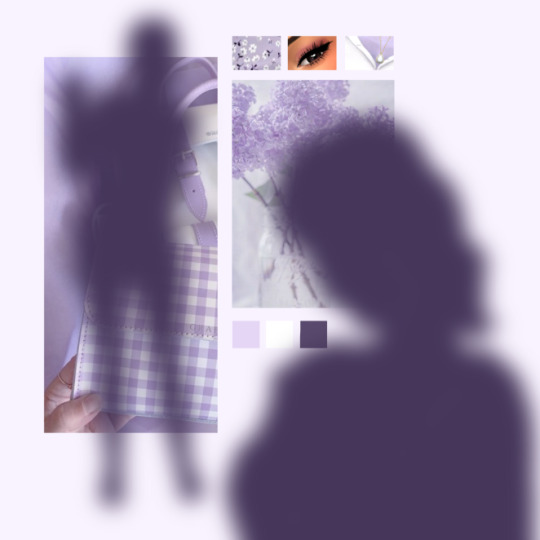
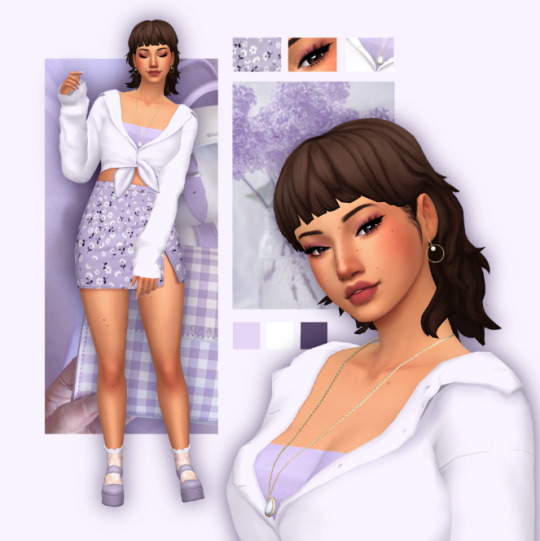
"Forever", 2020 vs. 2022, Paint Tool Sai/Medibang Paint vs. Clip Studio Paint/Canva
#saging art#yowamushi pedal#fan art#yowapeda#paint tool sai vs. csp#paint tool sai#clip studio paint#弱虫ペダル
4 notes
·
View notes
Photo

I never posted this here, so have an art vs Artist for this year! Last day to possibly post it!
#ArtVsArtist#Art vs artist#2020#2020art#Digital Art#My Art#Year of art#My face#Commission art#Commission#concept#Fanart#Pixel Art#Original characters#OCs#Paint Tool SAI#Clip Studio Paint#MrTreeFingers#MrTreeFingersArt
0 notes
Text
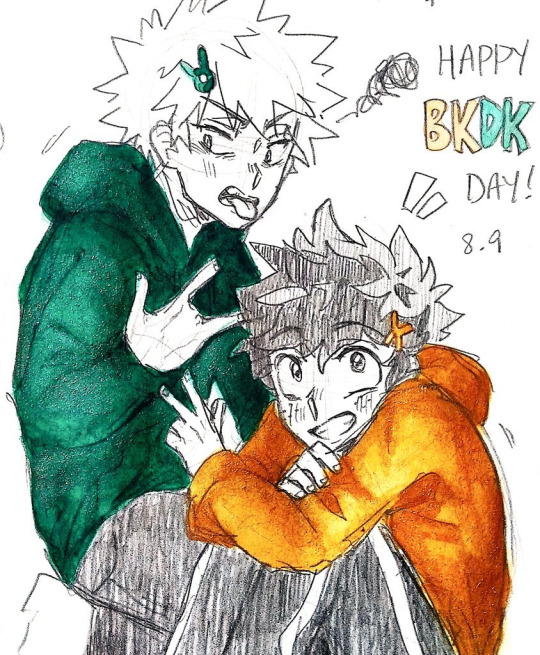

i've been publicly drawing bakudeku for officially one year. technically for much longer, but this brainrot has been going for a whole year straight with no signs of stopping. so i figured i could show my bkdk day art from 2020 (left) vs from 2021 (right)! 2020's was traditional because i just switched to clip studio paint from paint tool sai and i didn't know how anything worked lol
during this past year we've seen significant canon strides in this ship which is freaking EPIC and i'm excited to see how their relationship develops even further. they were my og favorite characters from this series back when i first watched in 2017 and, unsurprisingly, they remain my favorites to this day :) deku has been my favorite character ever, not limited to this series, for a long time now and bakugou's character arc is personally one of the best ones out there. they mean a lot to me :') it's cheesy and totally lame but they have changed my life in very small but meaningful ways; thanks to them i've been inspired to improve on my art (as unnoticable as those improvements may be) and make new friends on the internet!
if you've stuck with me since the very start of my bkdk posting (and have seen this account drastically shift from my old fixations to my new ones LOL), thank you for your support! i hope to draw even more of these guys in the future <3 plus ultra!!! ��💚
221 notes
·
View notes
Note
hi! i was wondering how do you make your lookbooks? im horrible at photoshop/gimp so if you could, could you describe it in detail of what to do?
hi there! i'm so sorry for the late reply! i made a mini tutorial here going into detail on how i take pictures of my sims in cas and how i edit them! i use paint tool sai for the majority of my edits and add filters in photoshop. here’s a more detailed process on how i edit my lookbooks after this step (under the cut)
this part of my editing process mostly uses clipping layers and selection tool, so it’s a good idea to get familiar with those. i’ve never used gimp before, but i know that photoshop has both of these tools and i know there are other art/photo editing programs that do too (procreate, clip studio paint, sai, etc).
once i’m finished cutting out the background from cas and editing my sims, i arrange them on my canvas in a way i like:
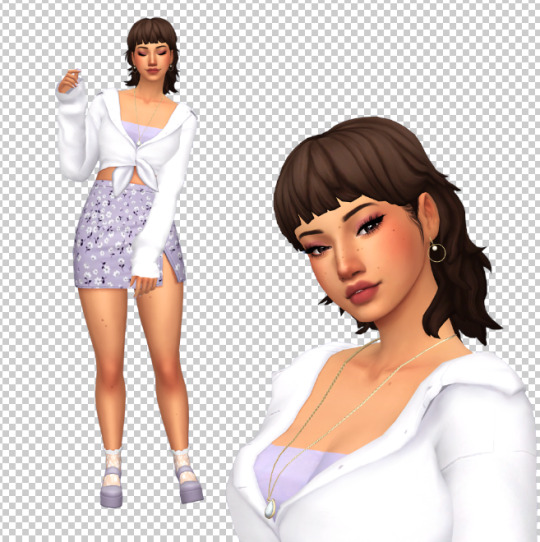
the checkered background shows that it is transparent, so i am able to add a background underneath the sim
i add a layer below my sim to act as my “photo template”. i use a template so i know where to put my images below my sim. i included the png below so you can feel free to use it for your own lookbooks. you can also make your own if you’d like and mess around with the layout for your background.
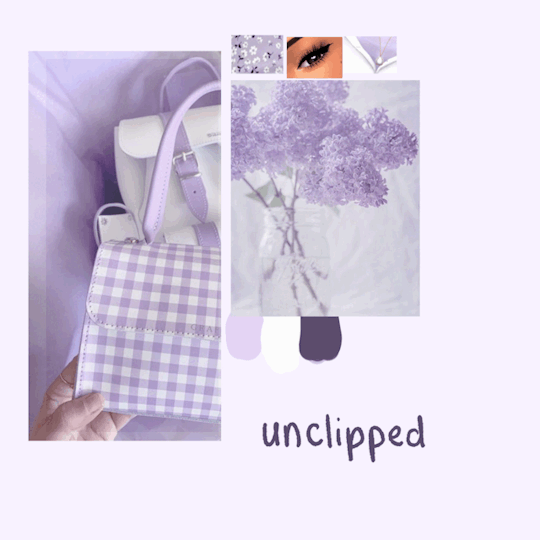
once i have my template ready, i gather some photos from pinterest that i feel match my lookbook. i usually try to go by the colour scheme or general aesthetic of the look. i then loosely arrange the photos over the template. they don’t have to perfectly overlap since we’ll be clipping them in the next part
this next part can be a bit tricky to describe so just bear with me haha,, basically, i use clipping layers to add my photos and cut them to the template without having to erase any of the excess. when you “clip” a layer to another layer in photoshop, it will essentially take the shape of that layer?? i’m not the best at explaining it but its a really easy way to add my photos without having to specifically crop them to perfectly fit the template.
to clip layers in photoshop, first put your photo layer above your template layer
then go up to your “layer” option in the menu bar and select “create clipping mask”.

you can also hold the alt key and position your mouse so it’s between the two layers, then click, as a shortcut. i prefer doing this since it’s faster and especially more helpful when i have to clip multiple layers
here’s a look at what the photos look like clipped vs unclipped:
if you’re still confused on clipping layers, you can find a more in depth explanation here :)
once i have my background ready, i’ll add my sim and make adjustments if necessary
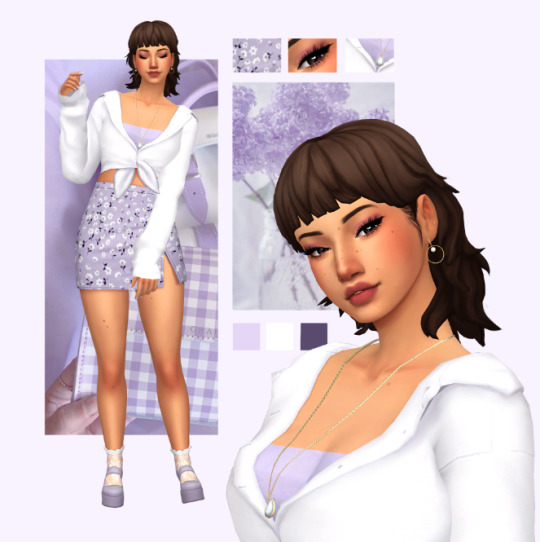
you can leave it here if you’d like, but i like to take it one step further by adding a subtle shadow underneath to add some dimension and separate the background from the sim! i start by making a selection of my sim. this can be done easily by holding + clicking the ctrl key over the thumbnail of your sim layer. its important to make sure that your sim is on a transparent layer so you get a clean selection of the sims silhouette
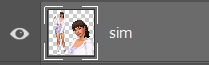
your selection should look something like this
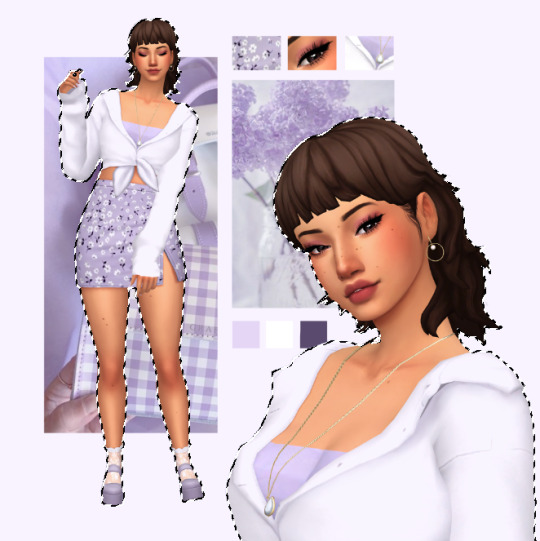
with the selection made, make a new layer below your sim layer for your shadow. then, select a dark colour and use the paint bucket tool to fill in your selection. i try to avoid using a pure black for the shadow since it tends to look pretty harsh, and try and pick something similar to the colours of the layout. for this one, i went with a dark purple.
your layer should look something like this
i then add a blur by going into filter > blur > gaussian blur, then adjust according to preference. you should have something like this
i then add my sim back and adjust the opacity of my shadow layer if needed
and here’s what the finished lookbook looks like! i hope this made sense and was helpful in some sort of way,, feel free to experiment with this method and create some cool stuff :)
31 notes
·
View notes
Note
First off, I want to say, your art is beautiful. the subtle surrealism and abstractness (idk if that's a real word lmao) you use is just fucking amazing. I don't know how you do it but your art is all just so cool. I literally look at your art for inspo when i have art block-
Second, If you don't mind me asking, what program+tablet do you use to draw? I'm trying to work more with digital art, but I don't really know what to do. I have a cheap entry-level tablet I'm currently working with, and I use some free art program i can't even remember the name of (yeah hella scuffed ik). I'm feeling somewhat confident where I'm at and would like to 'upgrade', but I just don't know where to go from here. With the digital art stuff I aspire to do, you'd definitely be one of the people I'd want tips/advice from! :)
(sorry for the long ask btw)
😭💕 djvivjgjgkgkgi thank u so much! That is super kind of u! And I may not be the best person to ask about tablets cuz I have a 12” ipad pro which I shelled out on but it’s also basically my laptop and I use it constantly for everything. I dunno if u would want a screen tablet if u have been working with a plug in one (I’ve literally forgot what that type of called rip) but a small iPad (double check if it’s compatible with the pencil and which one) would work great and I heard there are also some great Samsung tablets available which I’ve not tried out personally but I’ve seen people praise
For programmes I switch between procreate and clip studio paint. U do need to pay for both but they are worth it, but they both have their pros and cons. Procreate is wonderful but I don’t know why it takes up a lot of storage (21gb vs csp’s 3gb on my ipad) im sure I’m just too lazy to look into it, but that’s something to consider. Procreate has lots of really cool options for effects and brushes right under ur hand which I love. Csp is also really awesome, but I feel like it’s more geared toward people who are working with print specifications and who already have tools to load onto the app. It also seems like csp is meant more for desktop cuz of the layout and small tabs and it could be an issue if u are using a small screen. So consider which works best for u and start there, but whichever u choose its a great app
I hope that helps even just a little bit and I’m happy to give advice on anything else if u want!
#ask hedge#god just thinking about the prices of tablets makes me so angry#praise procreate and csp for their prices tho#also csp is on sale a lot and I’m pretty sure they have a week trial or something
19 notes
·
View notes
Text
Art Advice #4 - A Beginner’s Guide to Digital Art
Hi all!
This weeks entry into my Art Advice tag, where I offer various advice for artists of any skill level, is about digital art! Now, I am by no means an expert at digital (I’ve been doing it for nearly 8 years at this point and that is almost entirely self taught), but I have picked up a few pointers in that time which will hopefully help anyone just starting out!
(this blogpost is a little over 2000 words long btw)
A Beginner’s Guide to Digital Art
I know that the world of digital art has changed drastically in the 8 odd years since I started, but I’d still say that some of the options I started out with will be just as good for anyone who’s starting out now!
As always, I’ll be splitting this into sections to make it easier for you to navigate this post!
Part 1 - Equipment/Hardware
There are a lot of drawing tablet options on the market at the moment, and I’m not going to pretend that I know anything about half of them lol. But I think for a beginner, don’t worry about going for the most expensive option, even if the reviews are really good or your favourite artist uses it, especially if it is way above your budget!
An important thing to know is that there are two types of tablet. One is the plug-in kind. These are essentially a pad which you plug into your laptop or computer and draw on that whilst looking at the screen (they basically work the same way as a plug in mouse works). The other kind is the screen variety, which is a lot more like what most of us know as ‘tablets’ nowadays. And you draw directly onto the screen.
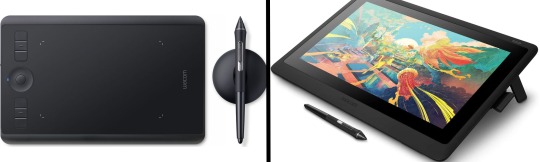
(a plug-in vs on screen tablet, both from Wacom)
Now, as for choosing between these, it is honestly a personal choice. But I’d say if you’re just wanting to try digital and you’re on a budget, a plug-in tablet can be really useful since it gets you used to the mechanics of what digital is like, and they are often significantly cheaper than the screen alternatives. I would say that plug-in tablets are a big learning curve, especially if you’re used to doing traditional stuff, but I do know a lot of professional artists who still use this kind of tablet when doing their work, so if it’s something you can get used to I would definitely consider it! Also, they’re often a lot more portable than some screen tablets! The first one I had was a Huion (a model so old that I can’t even find a link to it now lol), and I also know that Wacom are a well known brand that do some decent plug-in tablet. I’d recommend you do your own research on other brands and options, though!
Screen tablets are often a lot more expensive, but if you’re used to traditional art, they are a lot easier to get a handle of! But I know if you already have something like an iPad, or other general use tablets, then they offer apps that you can use to draw on (as well as things like the Apple pen, or other stylus’). The big difference between using these general tablets and ones specifically designed for drawing is pretty much purely a personal choice. I personally prefer the bigger screen of my XP-Pen tablet, along with a special screen protector that removes the shininess of the tablet screen and makes it feel more like ‘paper’ over when I used a general use tablet it draw. But if you already have an iPad, or something similar, then it’s honestly a really great starting point!
I think it’s important for me to mention that you don’t need fancy equipment to be an artist. The incredible Elicia Donze has revealed countless times how she has very basic equipment but still manages to produce the most stunning artworks! All you really need is some kind of drawing apparatus and a lot of patience lol! Getting good at any kind of art takes a lot of time and effort, but I would definitely say it’s worth it when you’re able to look back at your progress!
Part 2 - Software/Drawing Programs
Much like with the hardware discussion, choosing which program to use is entirely down to personal preference. I personally have never really liked Photoshop purely because it’s really complicated, but I know so many artists swear by it.
I think the main aspect to consider when you’re starting out is whether you want to pay for a program. Software like Photoshop, Clip Studio Paint and Procreate are some of the popular ones I hear about a lot of people using, but all require you to purchase or subscribe to them. So if you’re young or on a very tight budget, I’d honestly recommend the free alternative versions of these, such as Krita (Krita is quite a large program, but it has a lot of really awesome features and is very similar to Photoshop!), Gimp (this one is similar to Krita, but has slightly less options, I’d honestly recommend Gimp for anyone who does photo editing though!) or FireAlpaca (this is the one I use, by the way and it’s a pretty simple program, but has a lot of fantastic features and is perfect for how I work!). These don’t have as many features as some of the paid alternatives, but I honestly think all you really need to start digital art is some kind of ‘canvas’ and set of brushes!
Another great free program for beginners I’d recommend is MyPaint, which is great for doodling and just getting used to how digital art feels in comparison to traditional! It also has a bunch of ‘traditional style’ brushes, to make it look like charcoal or watercolour (which I’m sure the paid alternatives have too, but it’s always better when it’s free, I find lol...)

(this is an example of a drawing I did on MyPaint using the ‘charcoal’ effect brush!)
Most of the sites are pretty self explanatory, with sections dedicated to different brushes (I’ll go into the types of brushes later on in this post btw!), adjusting brush size, shape and opacity, a colour wheel, etc. You also have a section dedicated to ‘layers’ (another thing I’ll go into more detail later), and various ‘filters’ and editing options and effects you can add to your work to make it more interesting!
I’d really just recommend playing around with programs until you find your one!
Part 3 - The Pros of Digital Art!
I realise this section should probably earlier in this blog post lol, but I kinda wanted to go into what digital art can achieve in comparison to traditional art, and how beginner artists can utilise this!
I definitely didn’t take advantage of certain aspects of digital art when I first got into it, and they’re things that would have definitely made my life a whole lot easier lol!
Digital art allows you to tweak drawings as you do them. So if you accidentally drew the eye too far to the right, then you can easily move it to the right place. (I usually do this by selecting whichever area is wrong, cutting it out and then pasting it into a new area... And yes, there is probably a better and quick way of doing this but...I haven’t found that way yet lol...). And I honestly think that this has allowed me to look a lot more at a reference image in order to figure out where I’ve gone wrong with a drawing! Whereas with traditional art, I usually spend so long trying to get an eye right, that even if it’s slightly in the wrong place, I don’t want to completely redo that section. Digital allows you to completely rub out sections without leaving indents, which is honestly such a saving grace!
Another pro of digital is the Undo/Ctrl Z function! This means you can easily go back to before you made a major mistake with just a click of Ctrl Z... Though I have to say that this function has honestly ruined traditional art for me... Oh what wouldn’t I give for a real life Ctrl Z... But yeah, this is a great part of digital art and definitely something you will grow to love lol!
Another great thing about digital is that it allows you to flip and turn a canvas as you’re drawing on it. I spent a lot of time trying to turn my tablet around in order to draw certain parts of a piece before I realised you can turn the canvas itself without having to move yourself or your tablet!
Layers are another part of digital that can be super useful, and I have to be honest but I don’t really use them a lot. I know a lot of artists create layers for every section of their artworks (so, one for the linework, one for colouring, a separate one for the background, etc etc...). And there’s something really great about being able to paint without worrying about smudging into a previous section of the painting. This works well for my work since I do a lot of bright backgrounds. I also often create a lot of ‘versions’ of my works, so it’s useful to be able to change the background without affecting the main figure of the piece! (I have to say that I often work in one big layer when I’m doing paintings, just because I like how it feels more like ‘traditional’ art that way, but layers are such a brilliant tool, and definitely something you should play around with!)
The eyedropper tool is another one that is really useful! Although I never colour pick from my reference photos, I know some artists find this useful when they were just starting out (especially if you’re not sure what colour to make shadows or how to mix skin tones, etc etc). The eyedropper basically means you don’t need to mix your colours every time
Part 4 - Just some other things I wish I had known about when I was starting out lol...
This last section is just dedicated to a few things that I would have liked to have known when I was just starting out all those years ago.
First one is fluffy/textured brushes!
I spent most of my art life from 2013 until 2016 using ‘round’ brushes which are notoriously hard to blend with, so I’d recommend either downloading some fluffy/textured brushes (DeviantArt was where I got mine from a few years back, but there are probably other places you can get them for free too!) to your program of choice, since most of the programs I’ve used haven’t had fluffy/textured brushes as pre-set.
I may make another post about how I blend in my artworks if that’s something people would be interested in?
(this is an example of textured brush blending vs round brush blending... I usually opt for round brushes for rougher blending styles and the textured brushes for more smooth and ‘realistic’ blending... for a lot of pieces, though, I use both brushes (the round brushes are good for details!) in the same way that you use different sized brushes for real paintings!)
The next thing I wish I’d discovered earlier is the Brush Stabiliser option. Some programs may do this automatically, but the one I use (FireAlpaca) requires you to manually change the amount of stabilising you have on your brush. This is particularly useful if you want to draw neat lines or straight lines (the stabiliser essentially slows down the ‘ink’ as you’re drawing). I only recently started using the stabiliser, and although I still like having it mostly turned ‘off’ for doing sketchy work, it does make doing line work a lot easier, and also gives pieces a more polished look!
Next advice is to explore all the options you can in whatever program you use!
I feel like with certain programs, you can get overwhelmed by choice and you end up just using a few of the functions. But I’d really recommend just playing around with these programs, trying all the filters and editing options to get used to how the program works. You can often find interesting ways to adjust your artworks this way! In a way I’d recommend this way of working more than finding tutorials made by other people... Unless there’s a specific function you want to learn how to do, just having fun with digital art is a major part of it’s appeal to me!
~
There are probably a lot of other options I could go into, but this is already over 2000 words long, so I’ll leave it here for now lol! (I may do a part 2 though so... keep a look out for that!)
As always, if you have any questions to things I’ve said here, or are just looking for more advice, don’t hesitate to message me!
And if you like my work on here (art & blog posts) feel free to support me on my Ko-Fi! <3
#art advice#digital art#art advice for beginners#digital art for beginners#artist advice#digital art tips#artists on tumblr#just want to say again that i am not an expert at this at ALL lol#i just want to offer some really basic advice to anyone interested in starting out with digital!
101 notes
·
View notes
Note
Art question: your colors and lighting are always so gorgeous - what’s your process look like for colors in terms of layering/combining colors?

Ok, time for the end boss, this is probably gonna be a long one so I hope this is still gonna be understandable and not too much as a text post.
First up I’m just gonna put a quick and very basic break down of how I often approach coloring before I go more into detail.
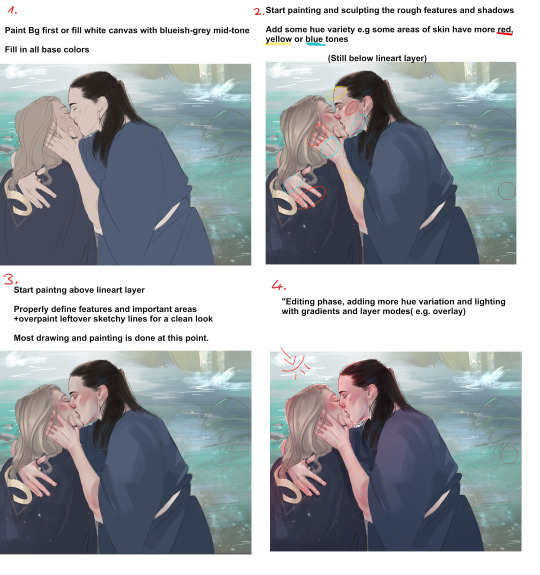
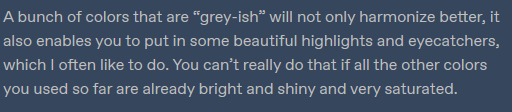
I’d definitely recommend to not leave your canvas white while painting, I either rough in my background first or give the canvas a grey-ish blue color if it doesn’t have one. The bright white of the canvas will make it harder for you to judge colors, having a nice midtone will help you make better color decisions and get more accurate colors!

Here’s a little snippet from a previous post about how I pick color! (check out full post for some useful links)
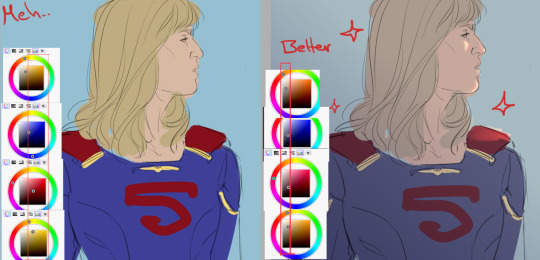
Here is one of the brushes I really like using in paint tool sai2! Other than that I might use the standard marker tool with a square shape. In clipstudio i try to use similar textured brushes.
To blend or to create soft edges, which really helps you to sculpt your drawiing/painting, I often just start painting on a new layer above the one with the base color and then use a soft eraser! I might also use paint tool sai’s water tool, which I find really useful and pretty unique, I sadly haven’t really been able to replicate it in programs like clip studio.
In the two pictures above I already did a lot of defining and painting before I moved to a layer ontop of the lines because the lines were fairly clean already. Sometimes my “underpainting” looks way rougher though and I just put in some blobs of color for hue variation, especially the more red-ish areas and then do most of the painting above the lineart layer!
Not sure if there’s much to say to the overpainting stage, as mentioned before this is just where I clean up the whole drawing and define the features more, especially the eyes, eyebrows and lips.

NOW, the real fun begins....
After I’m mostly done with painting, I start to properly establish the lighting, some people find it easier to do it the other way around, and sometimes I do so too. But often I push for the strong lighting at the end so I can focus more on painting.
This is where I play around a lot with layer modes, usually I use a combination of overlay and shine to put in some bright warm light from one direction!

The way I do it is I usually put all the layers of the person/object into a folder so it’s separated from the background, then I make a new layer on top of that folder and use clipping group. It works similar to a layer mask, whatever i do in those clipped layers will only affect the layers that are in the folder! Since only my character is in that folder, my background will be left alone.

As mentioned before, I now use gradients to give the entire picture more hue variation and to properly give it strong lighting. Make sure the gradient tool is set to “color to transparency”. I use a warm orange/red color for the top right side where I want the light to hit and put it in overlay mode. And then use a colder purple/blue color on multiply mode and pull it up from the bottom to the middle.
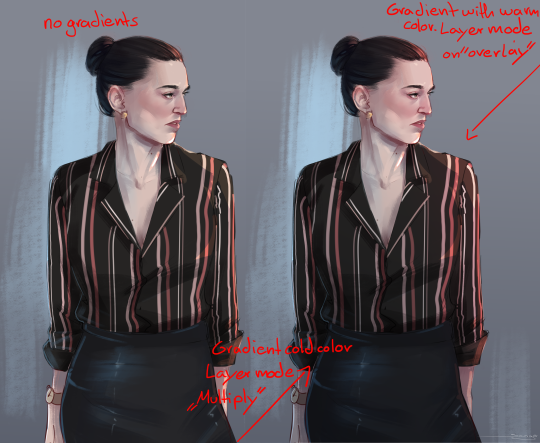
At the end I often adjust the colors a bit, I like to use cool colors in the background to make the warm colors of the skin etc pop! So often I push those reds of the characters a little more! In paint tool sai I just adjust the hue and saturation a bit. In more complex programs like CSP I do it in the color balance option.

You can see how I pushed it a bit more towards red here, to make it stand out more against the blue-ish background. I also pushed the blue’s in the hair color. Giving dark hair blue-ish undertones can make for a really good contrast compared to the warm colors in the skin!
I think this last part is really the most important to me,lighting can REALLY change your entire picture, and I think gradients are a super easy and fast way to do it! If I pull up the picture from the beginning again, you can see just HOW MUCH the picture changed again after I was pretty much done painting by adding strong lighting! It’s a good way to pull the attention to a certain spot, in this case the faces/the kiss, where all the strong saturated colors are!
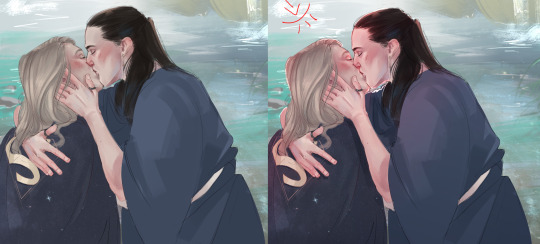
I also think that a good contrast between warm and cool colors is really important! As you can see I often use that to make my characters stand out from the background. If you put everything in cool colors or everything in warm colors it’s easy to make your object get lost in the background.
I recently found this guys YT channel, he talks alot about warm vs cold colors, which I think is so helpful! I’ve hardly seen any other artists talk about it that much.
If any parts were unclear or I left something out/ someone wants to know more about a certain topic just let me know! Thanks to everyone who’s sent me asks
945 notes
·
View notes
Last Seen Blogs

luiz-schumacher
Luiz Schumacher Galdiks

amagirintarou69
雑多な何某

popsigloss
PopsiGloss

789game2
789 CLUB - Link đăng nhập chính thức game bài 789 club

hank-is-going-to-some-location
war doesn't change