#Convert JSON to String
Explore tagged Tumblr posts
Visit Tumblr Blog
Explore Tumblr blogs with no restrictions, modern design and the best experience.
Last Seen Tumblr Blogs


Fun Fact
When “GIF” was named word of the year in 2012, Oxford Dictionaries U.S.A. credited Tumblr for pushing the word.
Text
Streamlining Your Data Workflow: Unveiling the Power of JSON Conversion and Formatting
In the dynamic world of data manipulation and communication, JSON (JavaScript Object Notation) has emerged as a versatile and widely-used format. From web APIs to data exchange between applications, JSON plays a pivotal role. To navigate this landscape effectively, tools such as the JSON Formatter, JSON Parser, and the ability to Convert JSON to String have become essential.
Handling JSON data can sometimes be intricate, especially when dealing with complex structures. However, the ability to Convert JSON to String is a transformative solution that simplifies the way data is presented and shared. Whether it's for better integration within applications or for sharing structured data across platforms, this capability bridges the gap between intricate data structures and human-readable content.

As data flows become more intricate, presenting JSON data in an organized and visually appealing format is crucial. This is where the JSON Formatter comes into play. It not only structures JSON data for optimal readability but also aligns it with coding conventions, enhancing collaboration among developers. The JSON Formatter tool ensures that your data communicates effectively and maintains a professional look, whether it's for internal use or public consumption.
Data manipulation requires the ability to understand and interpret JSON structures accurately. The JSON Parser tool acts as your guide in this journey, breaking down intricate JSON objects into manageable components. With the JSON Parser, you can easily navigate through data, extract specific information, and comprehend the relationships within complex data sets. This tool empowers developers and data analysts alike to work with confidence and accuracy.
1 note
·
View note
Text
In the final version of the original Animal Crossing, Dōbutsu no Mori E+, they had an interesting way to support what could be considered DLC.
The E-Reader.
Those cards very pretty data-dense, and what is an AC villager if not a set of textures, some short strings, and a dozen numbers?
Which is how this can exist: an editor to create your own E-Reader villager data, that you can then inject into your game with a save editor, by Cuyler36. It's really quite impressive that this is possible.

This requires a specific format, of course, and some means to either convert the result to an actual E-Reader dot code or a save game editor, but it's the same kinda data that the official extra characters used. Which is neat!
I figure for something like Project Special K it'd be significantly more... off the shelf, so to say. A villager in later AC games is still mostly just a pile of textures, some strings, and a bunch of numbers. Except that at least in New Horizons every single one of 'em has a complete copy of their 3D model but what ever mooom.
But in PSK I suppose it'd be pretty simple. You don't need any special file formats or bespoke compression systems when it's literally just a pile of PNG textures and a JSON definition file.
Then you can just stick all that in a .zip file, plonk it in the mods folder, share it, and have it probably just work. Barring things like two villager mods trying to use the same folder and/or internal ID.
20 notes
·
View notes
Text
AvatoAI Review: Unleashing the Power of AI in One Dashboard

Here's what Avato Ai can do for you
Data Analysis:
Analyze CV, Excel, or JSON files using Python and libraries like pandas or matplotlib.
Clean data, calculate statistical information and visualize data through charts or plots.
Document Processing:
Extract and manipulate text from text files or PDFs.
Perform tasks such as searching for specific strings, replacing content, and converting text to different formats.
Image Processing:
Upload image files for manipulation using libraries like OpenCV.
Perform operations like converting images to grayscale, resizing, and detecting shapes or
Machine Learning:
Utilize Python's machine learning libraries for predictions, clustering, natural language processing, and image recognition by uploading
Versatile & Broad Use Cases:
An incredibly diverse range of applications. From creating inspirational art to modeling scientific scenarios, to designing novel game elements, and more.
User-Friendly API Interface:
Access and control the power of this advanced Al technology through a user-friendly API.
Even if you're not a machine learning expert, using the API is easy and quick.
Customizable Outputs:
Lets you create custom visual content by inputting a simple text prompt.
The Al will generate an image based on your provided description, enhancing the creativity and efficiency of your work.
Stable Diffusion API:
Enrich Your Image Generation to Unprecedented Heights.
Stable diffusion API provides a fine balance of quality and speed for the diffusion process, ensuring faster and more reliable results.
Multi-Lingual Support:
Generate captivating visuals based on prompts in multiple languages.
Set the panorama parameter to 'yes' and watch as our API stitches together images to create breathtaking wide-angle views.
Variation for Creative Freedom:
Embrace creative diversity with the Variation parameter. Introduce controlled randomness to your generated images, allowing for a spectrum of unique outputs.
Efficient Image Analysis:
Save time and resources with automated image analysis. The feature allows the Al to sift through bulk volumes of images and sort out vital details or tags that are valuable to your context.
Advance Recognition:
The Vision API integration recognizes prominent elements in images - objects, faces, text, and even emotions or actions.
Interactive "Image within Chat' Feature:
Say goodbye to going back and forth between screens and focus only on productive tasks.
Here's what you can do with it:
Visualize Data:
Create colorful, informative, and accessible graphs and charts from your data right within the chat.
Interpret complex data with visual aids, making data analysis a breeze!
Manipulate Images:
Want to demonstrate the raw power of image manipulation? Upload an image, and watch as our Al performs transformations, like resizing, filtering, rotating, and much more, live in the chat.
Generate Visual Content:
Creating and viewing visual content has never been easier. Generate images, simple or complex, right within your conversation
Preview Data Transformation:
If you're working with image data, you can demonstrate live how certain transformations or operations will change your images.
This can be particularly useful for fields like data augmentation in machine learning or image editing in digital graphics.
Effortless Communication:
Say goodbye to static text as our innovative technology crafts natural-sounding voices. Choose from a variety of male and female voice types to tailor the auditory experience, adding a dynamic layer to your content and making communication more effortless and enjoyable.
Enhanced Accessibility:
Break barriers and reach a wider audience. Our Text-to-Speech feature enhances accessibility by converting written content into audio, ensuring inclusivity and understanding for all users.
Customization Options:
Tailor the audio output to suit your brand or project needs.
From tone and pitch to language preferences, our Text-to-Speech feature offers customizable options for the truest personalized experience.
>>>Get More Info<<<
#digital marketing#Avato AI Review#Avato AI#AvatoAI#ChatGPT#Bing AI#AI Video Creation#Make Money Online#Affiliate Marketing
3 notes
·
View notes
Text
My face when converting a JSON response to a JS object I can use for react formatting (yknow, what should be simple) forces me to do the following type conversions:
Parse into an any type -> any
Split into an array -> any[]
Take only the first element -> any
Which is actually an array of "any" type -> any[]
Concat the array into a string -> string
Split that by commas -> string[]
Push a '}' to the last array element -> still string[]
Then JSON.parse into the object I actually need -> jsObject
I love hard type systems but I hate
Type systems
#react#codeblr#typescript#unironically so upset with how bad ts's system is#why cant it be like rusts??
1 note
·
View note
Text
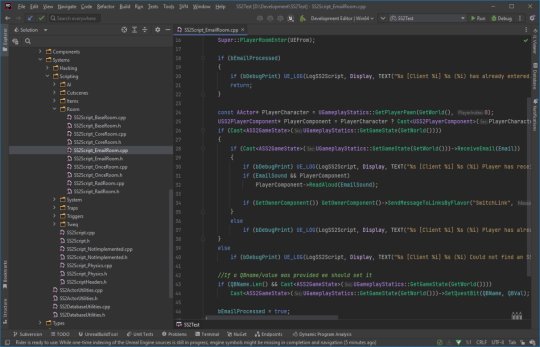
System Shock 2 in Unreal Engine 5

Tools, tools, tools
Back when I worked in the games industry, I was a tools guy by trade. It was a bit of a mix between developing APIs and toolkits for other developers, designing database frontends and automated scripts to visualise memory usage in a game's world, or reverse engineering obscure file formats to create time-saving gadgets for art creation.
I still tend to do a lot of that now in my spare time to relax and unwind, whether it's figuring out the binary data and protocols that makes up the art and assets from my favourite games, or recreating systems and solutions for the satisfaction of figuring it all out.
A Shock to the System
A while back I spent a week or so writing importer tools, logic systems and some basic functionality to recreate System Shock 2 in Unreal Engine 5. It got to the stage where importing the data from the game was a one-click process - I clicked import and could literally run around the game in UE5 within seconds, story-missions and ship systems all working.
Most of Dark engine's logic is supported but I haven't had the time to implement AI or enemies yet. Quite a bit of 3D art is still a bit sketchy, too. The craziest thing to me is that there are no light entities or baked lightmaps placed in the levels. All the illumination you can feast your eyes on is Lumen's indirect lighting from the emissive textures I'd dropped into the game. It has been a fun little exercise in getting me back into Unreal Engine development and I've learnt a lot of stuff as usual.
Here is a video of me playing all the way up to the ops deck (and then getting lost before I decided to cut the video short - it's actually possible to all the way through the game now). Lots of spoilers in this video, obviously, for those that haven't played the game.
youtube
What it is
At it's core, it's just a recreation of the various logic-subsystems in System Shock 2 and an assortment of art that has been crudely bashed into Unreal Engine 5. Pretty much all the textures, materials, meshes and maps are converted over and most of the work remaining is just tying them together with bits of C++ string. I hope you also appreciate that I sprinkled on some motion-blur and depth of field to enhance the gameplay a little. Just kidding - I just didn't get around to turning that off in the prefab Unreal Engine template I regularly use.
Tool-wise, it's a mishmash of different things working together:
There's an asset converter that organises the art into an Unreal-Engine-compatible pipeline. It's a mix of Python scripting, mind numbingly dull NodeJS and 3dsmaxscript that juggles data. It recreates all the animated (and inanimate) textures as Unreal materials, meshifies and models the map of the ship, and processes the objects and items into file formats that can be read by the engine.
A DB to Unreal converter takes in DarkDBs and spits out JSON that Unreal Engine and my other tools can understand and then brings it into the Engine. This is the secret sauce that takes all the levels and logic from the original game and recreates it in the Unreal-Dark-hybrid-of-an-engine. It places the logical boundaries for rooms and traps, lays down all the objects (and sets their properties) and keys in those parameters to materialise the missions and set up the story gameplay.
Another tool also weeds through the JSON thats been spat out previously and weaves it into complex databases in Unreal Engine. This arranges all the audio logs, mission texts and more into organised collections that can be referenced and relayed through the UI.
The last part is the Unreal Engine integration. This is the actual recreation of much of the Dark Engine in UE, ranging all the way from the PDA that powers the player's journey through the game, to the traps, buttons and systems that bring the Von Braun to life. It has save-game systems to store the state of objects, inventories and all your stats, levels and progress. This is all C++ and is built in a (hopefully) modular way that I can build on easily should the project progress.
Where it's at
As I mentioned, the levels themselves are a one-click import process. Most of Dark engine's logic, quirks and all, is implemented now (level persistence and transitions, links, traps, triggers, questvars, stats and levelling, inventory, signals/responses, PDA, hacking, etc.) but I still haven't got around to any kid of AI yet. I haven't bought much in the way of animation in from the original game yet, either, as I need to work out the best way to do it. I need to pull together the separate systems and fix little bugs here and there and iron it out with a little testing at some point.
Lighting-wise, this is all just Lumen and emissive textures. I don't think it'll ever not impress me how big of a step forward this is in terms of realistic lighting. No baking of lightmaps, no manually placing lighting. It's all just emissive materials, global/indirect illumination and bounce lighting. It gets a little overly dark here and there (a mixture of emissive textures not quite capturing the original baked lighting, and a limitation in Lumen right now for cached surfaces on complex meshes, aka the level) so could probably benefit with a manual pass at some point, but 'ain't nobody got time for that for a spare-time project.


The unreal editor showcasing some of the systems and levels.
Where it's going
I kind of need to figure out exactly what I'm doing with this project and where to stop. My initial goal was just to have an explorable version of the Von Braun in Unreal Engine 5 to sharpen my game dev skills and stop them from going rusty, but it's gotten a bit further than that now. I'm also thinking of doing something much more in-depth video/blog-wise in some way - let me know in the comments if that's something you'd be interested in and what kind of stuff you'd want to see/hear about.
The DB to JSON tool that churns out System Shock 2 game data as readable info
Anyway - I began to expand out with the project and recreate assets and art to integrate into Unreal Engine 5. I'll add more as I get more written up.
#game development#development#programming#video game art#3ds max#retro gaming#unreal engine#ue5#indiedev#unreal engine 5#unreal editor#system shock 2#system shock#dark engine#remake#conversion#visual code#c++#json#javascript#nodejs#tools#game tools#Youtube
1 note
·
View note
Text
Insecure Deserialization in Symfony: Explained with Code
In today’s threat landscape, web application security can be compromised through overlooked weaknesses in serialization. One such vulnerability is known as "Insecure Deserialization." If you're using Symfony, understanding and defending against this attack vector is vital.

In this article, we'll break down what insecure deserialization is, why it’s a threat to Symfony-based applications, and how to detect and mitigate it—with real-world code examples and references to our website vulnerability scanner tool.
🔍 What is Insecure Deserialization?
Deserialization is the process of converting a stream of bytes back into an object. In Symfony, PHP’s native serialization mechanisms (serialize() and unserialize()) or Symfony’s Serializer component can expose vulnerabilities when user-controllable data is deserialized without validation.
If attackers can manipulate serialized objects, they can potentially inject malicious payloads that lead to:
Remote Code Execution (RCE)
Object Injection
Application state manipulation
⚠️ Real-World Impact in Symfony
Let’s take a look at a simplified insecure example:
❌ Vulnerable Symfony Controller
// src/Controller/VulnerableController.php namespace App\Controller; use Symfony\Bundle\FrameworkBundle\Controller\AbstractController; use Symfony\Component\HttpFoundation\Request; use Symfony\Component\HttpFoundation\Response; class VulnerableController extends AbstractController { public function deserialize(Request $request): Response { $data = $request->get('data'); $object = unserialize($data); // DANGEROUS return new Response('Deserialized!'); } }
If an attacker sends a specially crafted serialized object (e.g., via POST or GET), this could lead to arbitrary code execution or manipulation of system behavior.
✅ Secure Deserialization Techniques in Symfony
Instead of directly unserializing raw input, use Symfony’s Serializer component securely or switch to formats like JSON which are safer by default.
✔️ Safer Approach Using Symfony Serializer
use Symfony\Component\Serializer\SerializerInterface; use Symfony\Component\HttpFoundation\Request; use Symfony\Component\HttpFoundation\JsonResponse; use App\Entity\User; public function safeDeserialize(Request $request, SerializerInterface $serializer) { $json = $request->getContent(); $user = $serializer->deserialize($json, User::class, 'json'); return new JsonResponse(['message' => 'Deserialized safely!']); }
By using JSON and Symfony’s serializer, you avoid exposing internal PHP objects to untrusted input.
🧪 Test Your Symfony App for Insecure Deserialization
You can instantly check if your website has this or other vulnerabilities using our free security scanner.
📸 A screenshot of the Website Vulnerability Scanner landing page

Screenshot of the free tools webpage where you can access security assessment tools.
This tool performs vulnerability assessments without needing access to your code. It's fast, user-friendly, and completely free.
📄 Sample Vulnerability Report Output
Here’s how an insecure deserialization issue might appear in a vulnerability scan report:
📸 Screenshot of a report to check Website Vulnerability.

An Example of a vulnerability assessment report generated with our free tool, providing insights into possible vulnerabilities.
The report details:
Vulnerability name
Severity level
Affected endpoint
Suggested mitigation steps
To generate a free report, visit: https://free.pentesttesting.com
🧰 Symfony Deserialization Exploit Example
Here's an example of exploiting deserialization using a malicious payload:
Attacker-Crafted Serialized String
O:8:"ExploitMe":1:{s:4:"data";s:18:"phpinfo(); exit;";}
This payload assumes a class ExploitMe exists with a __destruct() or __wakeup() method executing eval() or dangerous functions.
Recommended Symfony Hardening Tips
Avoid using PHP’s unserialize() on user input.
Use JSON and Symfony’s Serializer instead.
Validate all incoming data types and values.
Restrict class autoloading to trusted namespaces.
Leverage a WAF (Web Application Firewall).
💼 Need a Deeper Security Review?
If you're concerned your app may be vulnerable, our cybersecurity experts can help.
🔐 Explore our professional penetration testing service here: 👉 Web App Penetration Testing Services
We test your application for OWASP Top 10, business logic flaws, and framework-specific misconfigurations—including Symfony.
📰 Stay Informed — Subscribe to Our Newsletter
Join 1,000+ developers and security engineers staying updated on threats and defenses.
📩 Subscribe to our LinkedIn Newsletter
🧠 Final Thoughts
Insecure deserialization isn’t just a theoretical risk—it’s been used in real-world breaches. If you're using Symfony, avoid using native PHP deserialization unless you're 100% confident it’s safe. Even then, sanitize everything.
🔗 More posts like this on our blog: https://www.pentesttesting.com/blog/
Let us help you secure your code—before someone else finds your flaw.
📌 Has your site been tested for this vulnerability? Try it now: https://free.pentesttesting.com
1 note
·
View note
Text
What is Structured Data and Why Do Lists Need It?
Structured data refers to information organized in a clearly defined format, such as tables with rows and columns. This structure allows software systems and users to efficiently search, analyze, and manipulate data. In contrast, a simple list—whether it's a bullet-pointed list in a document or a string of values—is not inherently useful without structure. For example, a list of names and phone numbers is just text until it’s divided into two columns labeled “Name” and “Phone Number.” This conversion gives meaning and order to the information, making it readable for both humans and machines. Lists are useful for brainstorming, capturing quick notes, or collecting raw input—but structured data unlocks their full potential.
Step-by-Step: Converting Lists to Tables in Excel and Google Sheets
One of the easiest ways to structure a list is by using spreadsheet tools like Excel or Google Sheets. Start by pasting your list into a column. If each item includes multiple parts (e.g., “John Doe, New York, 32”), you can use Excel’s “Text to Columns” feature or Google Sheets’ SPLIT() function. These tools allow you to divide each entry into multiple columns using whatsapp data like commas, tabs, or spaces. After splitting, you can add headers to each column to define your dataset (e.g., Name, City, Age). This small step transforms your raw list into an organized data table. From here, you can sort, filter, and even create charts.

Using Online Tools to Convert Lists Automatically
There are many free online tools designed specifically to convert lists into structured formats such as CSV or JSON. These include platforms like CSVLint, TableConvert, or ConvertCSV.com. Simply paste your list, select your delimiter, and the tool instantly formats your input into a data table. Some tools even let you preview your data before downloading. These web-based utilities are perfect for users without spreadsheet software or coding experience. They’re especially handy for quick jobs like formatting data for reports, email campaigns, or import into databases or CMS platforms.
Tips for Clean and Accurate Data Transformation
Successful list-to-data conversion depends on consistency. Always check that each list item follows the same structure—no missing commas, extra spaces, or inconsistent formatting. Use functions like TRIM() in Google Sheets to remove unwanted spaces, or CLEAN() to get rid of hidden characters. Standardize formats for dates, phone numbers, or capitalization. If working with large lists, apply conditional formatting to highlight errors. Finally, always validate your converted data before using it—whether for analysis, uploads, or automations. Clean data is reliable data, and a little attention early on saves time down the line.
0 notes
Text
AI Generate Table: Extracts Structured Data From Images

Generate Table AI
Due to social media, cellphones, and other digital sources, a lot of unstructured data has been created, including documents, movies, and photos. BigQuery works with Google Cloud's powerful AI platform, Vertex AI, to analyse this data. This lets you use advanced AI models like Gemini 2.5 Pro/Flash to find meaning in unstructured data.
Google's AI systems can analyse text, images, audio, and video. They can extract names, dates, and keywords from raw data to provide organised insights that work with your products. These models can also deliver structured JSON data with innovative constrained decoding methods to ensure workflow compliance.
To speed up this process, Google Cloud added AI.GENERATE_TABLE() to BigQuery, expanding on ML.GENERATE_TEXT(). This program automatically converts unstructured data insights into a structured BigQuery table using the prompt and table schema. With this simplified way, you can analyse the collected data with your current data analysis tools.
Extracting picture data structure
We'll use a three-image sample to explore this new feature. The first is a Seattle skyline and Space Needle shot. A New York City perspective follows. Finally, there is a non-cityscape photo of flowers and cookies.
You must give BigQuery these photographs to leverage its generative AI features. Create a table called “image_dataset” that links to the Google Cloud Storage bucket with the photos.
Now that your image data is ready, connect to the powerful Gemini 2.5 Flash model. Through a BigQuery “remote model” to this advanced AI, this is achieved.
Let's use AI.GENERATE_TABLE() to inspect the images. The function requires the remote model you made (connected to Gemini 2.5 Flash) and the photo table.
The model must “Identify the city from the image and provide its name, state of residence, brief history and tourist attractions.” Please output nothing if the photo is not a city. It will create a structured output format with the following fields to provide organised and user-friendly results:
String city_name
String state
History_brief = string
String array attractions
This style ensures output consistency and compatibility with other BigQuery tools. This schema's syntax matches BigQuery's CREATE TABLE command.
When run, AI.GENERATE_TABLE() builds a five-column table. The fifth column has the input table photo URI, while the other four columns—city_name, state, brief_history, and attractions—match your schema.
The model successfully identified the first two photos' cities, including their names and states. It listed attractions and brief histories for each city using its own data. This shows how large language models can directly extract insights from pictures.
Structured medical transcription data extraction
Let's use AI.GENERATE_TABLE again to obtain unstructured data from a BQ controlled table. The Kaggle Medical Transcriptions dataset will be used to sample medical transcriptions from various specialities.
Transcriptions are lengthy and include a patient's age, weight, blood pressure, illnesses, and more. Sorting and organising them manually is tough and time-consuming. It may now use AI.GENERATE_TABLE and LLM.
Say you need these details:
Int64 age
struct (high, low int64) blood_pressure
Weight (float64)
Conditional string array
A diagnosis (string array)
Drug strings
AI.GENERATE_TABLE() converts data into a BigQuery table for easy analysis and workflow integration.
#AIGenerateTable#VertexAI#BigQuery#Gemini25Flash#schema#GenerateTableAI#technology#technews#technologynews#news#govindhtech
0 notes
Text
Decoding Data in PHP: The Ultimate Guide to Reading File Stream Data to String in 2025 Reading file content into a string is one of the most common tasks in PHP development. Whether you're parsing configuration files like JSON or INI, processing uploaded documents, or consuming data from streams and APIs, being able to efficiently and correctly read file data into a string is essential. With PHP 8.x, developers have access to mature, robust file handling functions, but choosing the right one—and understanding how to handle character encoding, memory efficiency, and errors—is key to writing performant and reliable code. In this comprehensive guide, we’ll walk through the best ways to read file stream data into a string in PHP as of 2025, complete with modern practices, working code, and real-world insights. Why Read File Stream Data to String in PHP? There are many scenarios in PHP applications where you need to convert a file's contents into a string: Parsing Configuration Files: Formats like JSON, INI, and YAML are typically read as strings before being parsed into arrays or objects. Reading Text Documents: Applications often need to display or analyze user-uploaded documents. Processing Network Streams: APIs or socket streams may provide data that needs to be read and handled as strings. General File Processing: Logging, data import/export, and command-line tools often require reading file data as text. Methods for Reading and Converting File Stream Data to String in PHP 1. Using file_get_contents() This is the simplest and most widely used method to read an entire file into a string. ✅ How it works: It takes a filename (or URL) and returns the file content as a string. 📄 Code Example: phpCopyEdit 📌 Pros: Very concise. Ideal for small to medium-sized files. ⚠️ Cons: Loads the entire file into memory—can be problematic with large files. Error handling must be explicitly added (@ or try/catch via wrappers). 2. Using fread() with fopen() This method provides more control, allowing you to read file contents in chunks or all at once. 📄 Code Example: phpCopyEdit 📌 Pros: Greater control over how much data is read. Better for handling large files in chunks. ⚠️ Cons: Requires manual file handling. filesize() may not be reliable for network streams or special files. 3. Reading Line-by-Line Using fgets() Useful when you want to process large files without loading them entirely into memory. 📄 Code Example: phpCopyEdit 📌 Pros: Memory-efficient. Great for log processing or large data files. ⚠️ Cons: Slower than reading in one go. More code required to build the final string. 4. Using stream_get_contents() Works well with generic stream resources (e.g., file streams, network connections). 📄 Code Example: phpCopyEdit 📌 Pros: Works with open file or network streams. Less verbose than fread() in some contexts. ⚠️ Cons: Still reads entire file into memory. Not ideal for very large data sets. 5. Reading Binary Data as a String To read raw binary data, use binary mode 'rb' and understand the data's encoding. 📄 Code Example: phpCopyEdit 📌 Pros: Necessary for binary/text hybrids. Ensures data integrity with explicit encoding. ⚠️ Cons: You must know the original encoding. Risk of misinterpreting binary data as text. Handling Character Encoding in PHP Handling character encoding properly is crucial when working with file data, especially in multilingual or international applications. 🔧 Best Practices: Use UTF-8 wherever possible—it is the most compatible encoding. Check the encoding of files before reading using tools like file or mb_detect_encoding(). Use mb_convert_encoding() to convert encodings explicitly: phpCopyEdit$content = mb_convert_encoding($content, 'UTF-8', 'ISO-8859-1'); Set default encoding in php.ini:
iniCopyEditdefault_charset = "UTF-8" Be cautious when outputting string data to browsers or databases—set correct headers (Content-Type: text/html; charset=UTF-8). Error Handling in PHP File Operations Proper error handling ensures your application fails gracefully. ✅ Tips: Always check return values (fopen(), fread(), file_get_contents()). Use try...catch blocks if using stream wrappers that support exceptions. Log or report errors clearly for debugging. 📄 Basic Error Check Example: phpCopyEdit Best Practices for Reading File Stream Data to String in PHP ✅ Use file_get_contents() for small files and quick reads. ✅ Use fread()/fgets() for large files or when you need precise control. ✅ Close file handles with fclose() to free system resources. ✅ Check and convert character encoding as needed. ✅ Implement error handling using conditionals or exceptions. ✅ Avoid reading huge files all at once—use chunked or line-by-line methods. ✅ Use streams for remote sources (e.g., php://input, php://memory). Conclusion Reading file stream data into a string is a foundational PHP skill that underpins many applications—from file processing to configuration management and beyond. PHP 8.x offers a robust set of functions to handle this task with flexibility and precision. Whether you’re using file_get_contents() for quick reads, fgets() for memory-efficient processing, or stream_get_contents() for stream-based applications, the key is understanding the trade-offs and ensuring proper character encoding and error handling. Mastering these techniques will help you write cleaner, safer, and more efficient PHP code—an essential skill for every modern PHP developer. 📘 External Resources: PHP: file_get_contents() - Manual PHP: fread() - Manual PHP: stream_get_contents() - Manual
0 notes
Text
How to Handle File Uploads with Contact Form to Any API
Handling file uploads from Contact Form 7 can be tricky, especially when you want those files sent directly to another platform. Fortunately, the Contact Form to Any API plugin makes this process seamless by allowing file attachments to be transferred alongside form data to any external API.
Step 1: Set Up Your Contact Form 7 with File Upload Field
Begin by adding a file upload field to your Contact Form 7 form. Use the [file] tag, like so:
[file your-file limit:10mb filetypes:pdf|doc|docx|jpg|png]
This allows users to upload files up to 10MB with accepted formats like PDFs, Word documents, and images.
Step 2: Install and Configure Contact Form to Any API
If you haven’t already, install the Contact Form to Any API plugin. Once installed:
Go to your WordPress dashboard.
Navigate to Contact > Contact to API.
Choose the form you want to connect.
Enter the endpoint of the API you want to send data to (e.g., a CRM, file management service, or email API).
Step 3: Enable File Upload Handling
In the API setup section:
Make sure your external API accepts file uploads.
For the file field, use a key that matches what the API expects (e.g., file, attachment, etc.).
Reference the form file field by name (e.g., your-file).
Example JSON Body (if using multipart/form-data):
{
"name": "[your-name]",
"email": "[your-email]",
"file": "[your-file]"
}
If the API expects a base64 string, the Pro version supports converting the file content before sending.
Step 4: Test Your Integration
Submit a test form with a sample file. Check the external API or platform to ensure the file was received successfully. Look at the plugin’s log viewer to debug any issues—it will show the full request payload and response from the API.
Pro Tips for Better File Handling
Limit file sizes to ensure smooth uploads.
Restrict file types for security.
Use secure endpoints (HTTPS) to protect file data.
Consider file storage APIs like Dropbox, Google Drive, or AWS S3 if your primary platform doesn’t handle file uploads natively.
Final Thoughts
The ability to handle file uploads through Contact Form 7 and pass them directly to external APIs opens up a wide range of automation possibilities—from submitting resumes to syncing contracts and more.
With Contact Form to Any API, you can make file uploads part of a fully automated, secure, and professional workflow.
0 notes
Text
Developing The Server Pt.2:
06/03/2025 With the explanations of buffers and packets done, I can finally finished the server I was developing yesterday.

Finishing The Server: I started with a buffer interpreter and json parse script like I mentioned in the previous post. I opened a script for this rather than doing it in the object so I can call it anywhere. A script works like a function where I can call it anywhere in event code and supply arguments like an array. This then gets sent to the script as an array of data. I am able to call it from the variable "argument". I can get array info either from functions like array_get(array name, index), or from having the index in square brackets next the variable. I will likely do both at different times for different reasons but here I get argument 0 (Which will be the buffer).

I then I get the buffer data and convert it into an array. I then check if the player to variable is -1. This will be when talking directly to the server. Players can either start a lobby, join a specific lobby through a code, or join a random lobby through matchmaking.
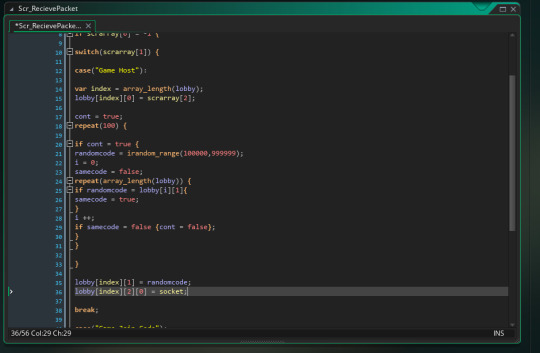
For game host code, it will create a new array section in the lobby and add the players publicity settings to the first variable. Then it generates a random 6 digit code and scans through every other lobby to make sure ever code is unique. Then it adds the first player in the lobby as the person who created it.
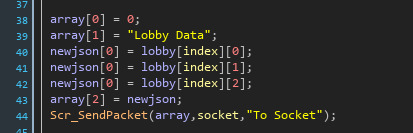
I then create an array with what data I want to send in the way I was sending it, the socket used and the type of sending I want to use, to another script for sending packets.

To briefly put it, a new buffer gets created and the array gets turned into a json and and prepared for sending. Then if the type is "To Player", it will check the array[0] for which player it wants to send it to in the lobby. It then finds the lobby that the socket belongs to and gets the index. Then sends the packet to the socket in the index in the array from that lobby. "To Socket" just sends to packet to the socket provided.

To make sure I can keep track with the data structure of each packet, I have created a txt file documenting it. This is so I can reference what data goes where in each packet based on what string identifier I use.
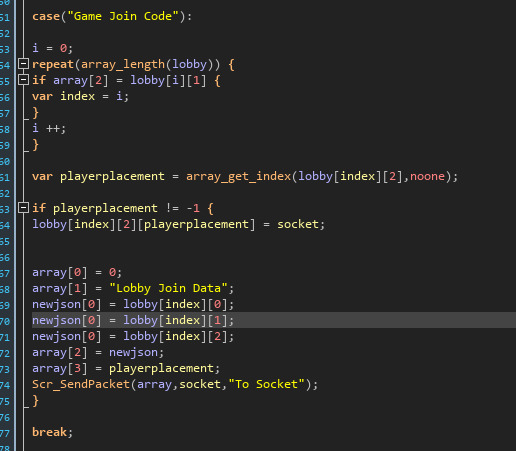
The code join gets a code based in a packet and uses that to scroll through games and get the right lobby matching the code. Then it simply relays the Lobby Join Data back to the client. This is similar to the host data but also includes the player position that you get assigned to.
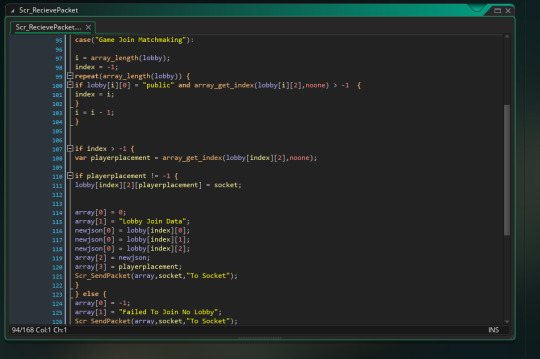
Matchmaking is similar but checks for public servers and puts the client in the first open one.
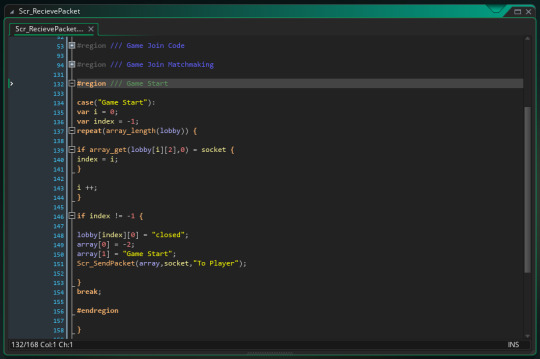
I then added a game start function that works similar to all previous ones.
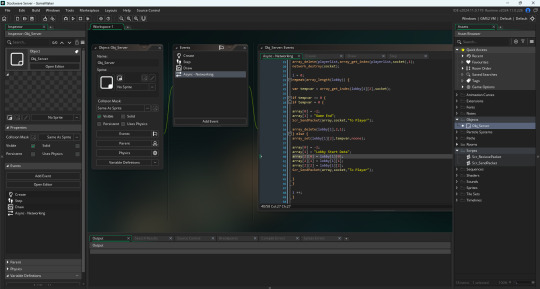
I then finally went back into the server networking event and made events for players leaving the game. This is the whole server basically set up. I've likely messed up somewhere, but I can always make changes to it when necessary. I knew I could get this done quickly as it only took 18 hours between starting the project to when I've finished it, and only under 500 lines of code too! I unfortunately cannot test any of these functions yet since I have no game to send these messages between. Luckily, that is what I'm going to start making. Since this server is setup I can now work on the game.
0 notes
Text
Data import and export in R
R is a versatile tool that can handle a wide range of data sources, making it a go-to language for data analysis and statistical computing. Whether you’re working with CSV files, Excel spreadsheets, or databases, R provides powerful functions and packages to import and export data efficiently. In this section, we’ll explore how to import data from various sources and export your results back into different formats.
Importing Data from CSV Files
CSV (Comma-Separated Values) is one of the most common formats for storing and exchanging data. R has built-in functions to read and write CSV files, making it easy to import data for analysis.
Using read.csv():
The read.csv() function is used to read data from a CSV file into a data frame.# Importing a CSV file data <- read.csv("path/to/your/file.csv") # Display the first few rows of the data head(data)
Customizing the Import:
You can customize how the data is imported by using additional arguments such as header, sep, and stringsAsFactors.# Importing a CSV file with custom settings data <- read.csv("path/to/your/file.csv", header = TRUE, sep = ",", stringsAsFactors = FALSE)
header = TRUE: Indicates that the first row contains column names.
sep = ",": Specifies the separator used in the CSV file.
stringsAsFactors = FALSE: Prevents character strings from being converted into factors.
Importing Data from Excel Files
Excel is another widely used format for storing data, especially in business environments. R provides several packages to read and write Excel files, with readxl and openxlsx being two popular options.
Using readxl Package:
The readxl package allows you to read Excel files without needing to install external dependencies.# Install and load the readxl package install.packages("readxl") library(readxl) # Importing an Excel file data <- read_excel("path/to/your/file.xlsx", sheet = 1) # Display the first few rows of the data head(data)
sheet = 1: Specifies which sheet to read from the Excel file.
Using openxlsx Package:
The openxlsx package offers more flexibility, including writing data back to Excel files.# Install and load the openxlsx package install.packages("openxlsx") library(openxlsx) # Importing an Excel file data <- read.xlsx("path/to/your/file.xlsx", sheet = 1) # Display the first few rows of the data head(data)
Importing Data from Databases
R can also connect to various databases, allowing you to import large datasets directly into R. The DBI package is a standard interface for communication between R and databases, and it works with several backend packages like RMySQL, RPostgreSQL, and RSQLite.
Using DBI and RSQLite:
Here’s an example of how to connect to a SQLite database and import data.# Install and load the DBI and RSQLite packages install.packages("DBI") install.packages("RSQLite") library(DBI) library(RSQLite) # Connect to a SQLite database con <- dbConnect(RSQLite::SQLite(), dbname = "path/to/your/database.sqlite") # Importing a table from the database data <- dbGetQuery(con, "SELECT * FROM your_table_name") # Display the first few rows of the data head(data) # Disconnect from the database dbDisconnect(con)
Connecting to Other Databases:
Similar procedures apply when connecting to MySQL, PostgreSQL, or other databases, with the appropriate backend package (RMySQL, RPostgreSQL, etc.).
Importing Data from Other Sources
R supports data import from various other sources such as: JSON: Using the jsonlite package.
XML: Using the XML or xml2 packages.
Web Data: Using the httr or rvest packages to scrape data from websites.
SPSS, SAS, Stata: Using the haven package to import data from statistical software.
Here’s an example of importing JSON data:# Install and load the jsonlite package install.packages("jsonlite") library(jsonlite) # Importing a JSON file data <- fromJSON("path/to/your/file.json") # Display the first few rows of the data head(data)
Exporting Data from R
Once you’ve processed or analyzed your data in R, you may want to export it for reporting, sharing, or further use.
Exporting to CSV:
The write.csv() function allows you to export data frames to a CSV file.# Exporting data to a CSV file write.csv(data, "path/to/save/your/file.csv", row.names = FALSE)
row.names = FALSE: Prevents row names from being written to the file.
Exporting to Excel:
If you used the openxlsx package, you can also write data frames to Excel files.# Exporting data to an Excel file write.xlsx(data, "path/to/save/your/file.xlsx")
Exporting to Databases:
You can use the dbWriteTable() function from the DBI package to export data back into a database.# Connecting to the database con <- dbConnect(RSQLite::SQLite(), dbname = "path/to/your/database.sqlite") # Writing data to a new table in the database dbWriteTable(con, "new_table_name", data) # Disconnecting from the database dbDisconnect(con)
Best Practices for Data Import and Export
Data Validation: Always inspect the first few rows of your imported data using head() to ensure it has been read correctly.
Customizing Imports: Use the various arguments available in the import functions to handle specific file structures or formatting issues.
Keep a Clean Workspace: After importing and exporting data, clean up your workspace by removing temporary objects or closing database connections to prevent memory issues.
Full details available at https://strategicleap.blogspot.com/
0 notes
Text
DataCAMP is a Cutting-edge Platform Designed for Big Data Intelligence | AHHA Labs

AHHA Labs' DataCAMP is a cutting-edge platform designed for big data intelligence, catering to the needs of modern industrial, enterprise, and data-driven ecosystems. It harnesses advanced AI and big data technologies to streamline data processing, analysis, and actionable insights.
DataCAMP Compatible with Legacy Systems Manage all manufacturing big data in an integrated manner with easy compatibility with legacy equipment, existing production systems, and commercial analysis tools.
Batch collect and transmit manufacturing data using various communication protocols.
DataCAMP widely supports most communication protocols used in industry, including FTP, network drives, TCP/IP sockets, Modbus/MELSEC, REDIS, and AMQP. Through this, users can conveniently collect all types of data, such as inspection images, inspection results, CCTV images, sound data, vibration data, and PLC data generated from various facilities and sensors. DataCAMP supports a user-friendly data query interface and data set export function, allowing easy transfer to various legacy systems such as MES and ERP as well as external commercial analysis tools.
Easy and fast automatic pre-processing
The data produced by numerous devices comes in various formats, such as CSV, JSON, and YAML. Since this equipment data is not directly compatible, each data set must be checked individually. To understand the entire factory status, you must convert each file format one by one and collect the data.
DataCAMP automates this process. Use the recipe function to convert and integrate various structured/unstructured data into the desired format. Users can directly specify the output data format for transmission and storage to legacy systems such as NAS and DB. DataCAMP also supports multiple techniques, including regular expressions (RegEx), a powerful string processing tool, to automatically perform data referencing, insertion, removal, merging, statistical pre-processing, and event triggering.
If you are looking for big data intelligence, you can find it at AHHA Labs.
Click here to if you are interested in AHHA Labs products.
View more: DataCAMP is a Cutting-edge Platform Designed for Big Data Intelligence
0 notes
Text
I've been begrudgingly using ChatGPT for work for about a week now. My boss (to whom I have repeatedly explained how LLMs work and why they don't fit our usecase too well, but I digress) is getting inceasingly annoyed I don't use it and write my own shit instead. Figured I could get rid of some heat by using it for ONE project, like, I can say I "tried" it and can go back to actually doing things properly after this is done.
So I decided to use it as "spicy regex": I gave it multiple examples of how to convert structured plaintext data from a public website into a JSON; nothing I couldn't do with a sufficiently long regex string. This is legitimately the perfect use case for a LLM! Yet it's fucking failing at least once for EVERY SINGLE INPUT!
Repeatedly forgetting instructions, hallucinating random bullshit, giving answers that have nothing to do with my request, giving me incomplete outputs and ignoring direct instructions to complete them just to character-for-character repeat the same mistake it just did...
The moral panic and misinformed environmentalist fearmongering have obviously been useless at taking this thing off the pedestal tech oligarchs paid to get it put on, but, like,,, It's honestly MISERABLE to use??? You don't need a moral panic, like, just make someone use this thing for something they're good at and watch them slowly realize how fucking awful it is. How the fuck do AI bros cope.
At this point I've wasted enough time repeating instructions on how to do shit correctly that it would've been MUCH faster to write a script to grab all the information and format it without any user input. But nope. Gotta finish the project with this useless fucking toy or eventually get fired for "not catching up to new technologies". Lovely.
#if you suggest improving the prompt ur getting blocked. ive refined the prompt provided examples and instructed it multiple times. i tried.#deerbleats
1 note
·
View note
Text
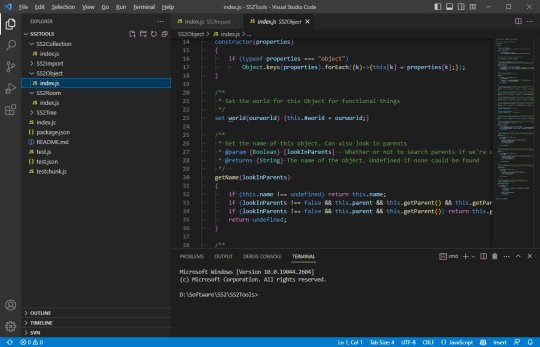
How JS2TS Enhances Collaboration in Large-Scale Projects | Improved Team Integration
Introduction
In web development, there is the need to have proper communication between the teams, especially the frontend and backend. Whenever a frontend team relies on data structures generated by a backend team, even a minor discrepancy can cause problems. That is why the JS2TS tool is useful here, as it is designed to convert JavaScript code to TypeScript.
JS2TS is a tool that is used to convert JSON data to TypeScript interfaces to help the teams be on the same page when it comes to data structures. This blog will discuss how tools such as JS2TS help in collaboration, maintaining data integrity, and preventing miscommunication when integrating new developers into the project.
How can tools like JS2TS simplify collaboration?
When frontend and backend developers are working on a project, they depend on each other’s data definitions. Some backend programmers may write data structures in JSON, while frontend programmers expect them and then use them to represent data or make changes on a website or application.
If the format of this data changes unexpectedly, then it leads to bugs, misunderstandings, and additional work to rectify the problems. This whole process is made much easier by a tool like JS2TS, which takes JSON data provided by the backend team and generates TypeScript interfaces for you.
By using JS2TS, frontend developers do not have to create interfaces themselves and do not have to worry about minor details regarding the changes in data structures. This automated conversion helps both teams to be on the same page most of the time and makes the coordination easier.
How does the JS2TS tool help teams maintain consistent data structures?
Data structures should be consistent, especially when working on large projects where the data structures are created by different people. If the data format or structure keeps changing or isn’t consistent, it creates errors, breaks functionality, and takes at least an hour to fix.
The JS2TS tool guarantees that each time there is a new JSON format created or modified by the backend, the TypeScript interface is created. This means that the frontend team always has the latest, accurate data structures in TypeScript, which is a direct mirror of the JSON format of the backend.
Through the incorporation of accurate TypeScript interfaces, it becomes easier to keep a check on things by having team cohesiveness refrain from having constraints that could result in problems, and the integrity of data passing through a TypeScript structure is achieved, hence making it accurate throughout the use of the project.
Importance of having unified TypeScript interfaces
Interface definitions in a project help in achieving a single definition of truth in the project. When frontend and backend teams are using the same interfaces, there are no misunderstandings and everyone is in harmony. However, TypeScript interfaces provide a better vision of what data can be expected, which helps to understand the relationships between data.
Using JS2TS, teams can generate such unified TypeScript interfaces from JSON and ensure that all members of the team will work with the same format. This eliminates the possibility of different teams coming up with different views on a given data set, which can be bad in the future.
This is especially beneficial because having one interface across the project means that any changes to the data structure are made everywhere that interface is used, resulting in a more solid, less error-prone code base.
How does using the JS2TS tool prevent data miscommunication between frontend and backend teams?
Data miscommunication occurs when there is a slight difference between the data stored in the backend and how the frontend processes that data. For example, imagine the backend defines the date field as a string while the frontend is expecting the date as an object; this is erroneous. Such misunderstandings can lead to problems that are expensive if not corrected at the initial stage.
The JS2TS tool effectively prevents such situations with the help of generating TypeScript interfaces that mimic the JSON structure of the backend. This automated approach eliminates the possibility of guesswork, which means that the frontend has all the type definitions it requires.
Frontend developers receive accurate TypeScript interfaces from backend data, and they know what to expect from the data; if there are any mismatches, they are identified during the development process. This alignment minimizes the probability of data-related issues and makes certain that both groups view data in a consistent manner with the framework for developing the application.
How do JS2TS-generated TypeScript interfaces make it easier for new developers to understand the project’s structure?
When new developers enter the framework of a project, knowing how things are structured and how the data flows can be problematic, especially in large applications. Using interfaces created by JS2TS, it is easy for new team members to understand the structure of the data used in the project.
These TypeScript interfaces give a good idea of the data types, their associations, and expected values, which helps new developers to jump right into the code and see how data is processed within the application. They will not have to spend as much time trying to figure out how data should fit or questioning their assumptions.
Also, TypeScript’s static typing assists new developers in avoiding simple mistakes because the code editor will inform them of incorrect data processing. This layer of guidance assists them in gaining confidence much faster and makes the onboarding process less time-consuming.
Conclusion
Therefore, the JS2TS tool is significant in supporting a team to improve communication within the project since it addresses concerns to do with frontend and backend disparities in data expectations.
It makes the process easier by generating TypeScript interfaces from JSON, which makes it easier to ensure that everyone is on the same page and doesn’t misunderstand each other and bring new developers into the project.
Using reliable and modern data structures mentioned previously not only saves time but also contributes to the building of a much more stable and dependable program. For any team involved in work with TypeScript projects, the JS2TS tool is one of the valuable tools that may help to facilitate work, guarantee the accuracy of data obtained, and improve collaboration of different developers.
Also Read:
JSON to Typescript
CSS to JSON.
CSS to Tailwind
Object to JSON.
0 notes
Text
0 notes