#DIY art tutorials
Explore tagged Tumblr posts
Visit Tumblr Blog
Explore Tumblr blogs with no restrictions, modern design and the best experience.
Last Seen Tumblr Blogs


Fun Fact
In 2020, 44% of users from Denmark used Tumblr daily.
Text
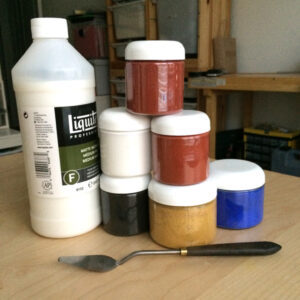
DIY Art Supplies: Getting by on very little as a beginning artist
I’ve been on this kick lately about making my own art supplies. I mean, we all know how pricey those art store trips can get, right? Plus, there’s something incredibly satisfying about using tools and materials you’ve crafted yourself. It’s like adding an extra layer of creativity to the whole process. Let me share a few of my favorite DIY art supplies with you because I don’t think we have…
View On WordPress
#air-dry clay#art supplies on a budget#budget art supplies#craft your own art tools#creative art supplies#DIY art projects#DIY art supplies#DIY art tips#DIY art tutorials#DIY brushes#DIY collage supplies#DIY paintbrushes#eco-friendly art supplies#homemade air-dry clay#homemade art materials#homemade art tools#homemade crafting supplies#homemade ink#homemade journals#homemade paint#junk journaling#make your own art supplies#natural ink#recycled art materials#sustainable art supplies
6 notes
·
View notes
Text
DIY lace bobbins from dollar store supplies 🥳
#fiber art#artists on tumblr#bobbin lace#lace making#craft tutorial#diy#arts n crafts#tutorial#crafts
839 notes
·
View notes
Text
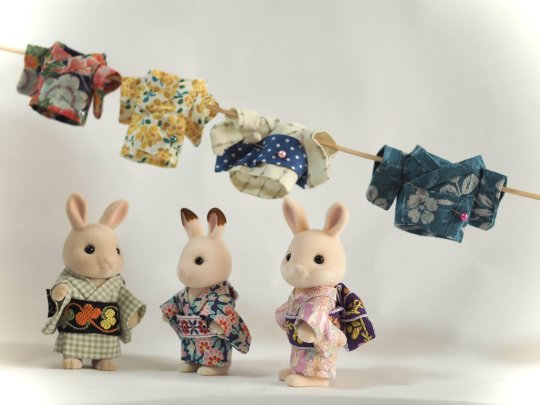
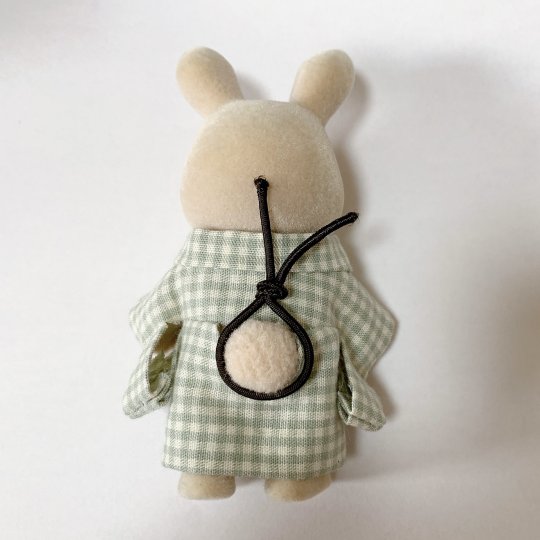
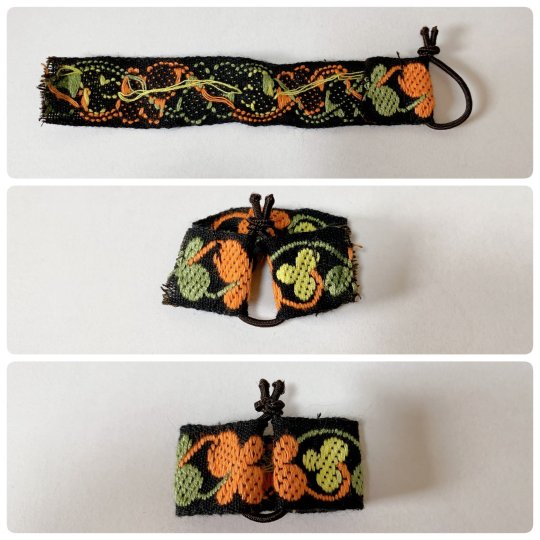
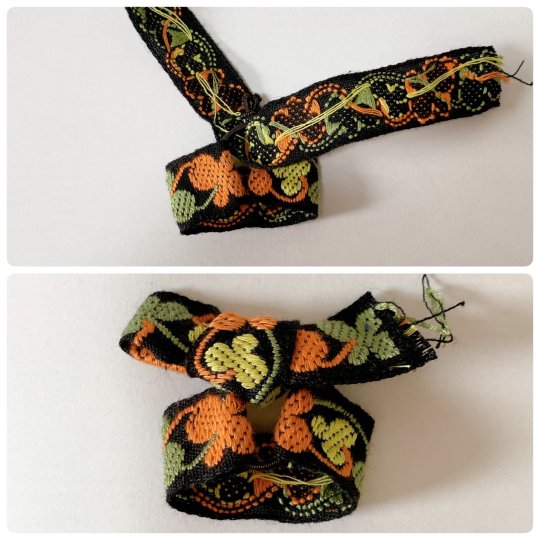
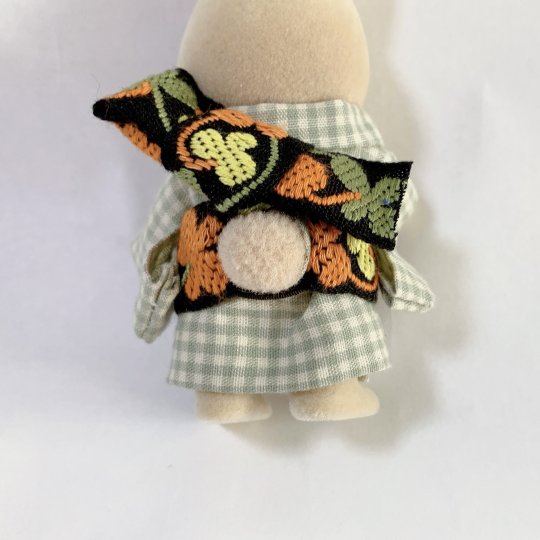
To complete past diy kimono dressing for Sylvanians Families/Calico Critters I shared before (see 1 / 2), here is a new step by step by @haluchobin to create cute easy to put on obi :
Tie a thin elastic into a loose loop around the tail
Slip both ends of a ribbon through the loop and sew into place
Tie another ribbon around the elastic covering the knot. Style it into a bow, you can try to mimic real musubi if you want
Put on the finished obi and enjoy!
#japan#art#craft#sylvanian families#doll#figurine#doll clothes#sylvanian family clothes#diy#step by step#tutorial#kimono#obi#着物#帯
1K notes
·
View notes
Text
Soda tab flower tutorial post! 🌻🌼🌸 lots of pictures included. ****This is part one, check the reblogs for the other half!! *****
****also this is not my idea. It's been done before and I got inspired by pinterest where I saw really similar diys****
What you'll need: scissors, yarn or string (any color) and soda tabs. 6 tabs for one flower (or 7, but I use 6 personally)
Step 1: take 2 tabs and lay them over each other so that the hole on the bottom of one lines up with the hole on the top of the other, like this-


And tie them together. Then cut the short end of the string sticking up to get rid of the excess. You'll want to tie it with the back of he tabs facing up so the knot will be on the back side. Make sure to tie it tightly so the knot doesn't slip around when you're wrapping the tabs with the yarn
Step 2: wrap the side edges of the 2 tabs 3 times. You'll want to do it relatively tightly, but not as tight as possible. The tension is a little tricky to figure out because you want the flower to keep its shape well but also be loose enough to bend into a flower shape with ease. This takes practice.


Step 3: On the 3rd wrap, add another tab under the 2nd tab, like this-


And pull the string through the back of the new tab you put under the 2nd tab. And wrap 3 times to attach it to your other tabs. Pulling the string over the edges to the back, through the lined up holes, and pulling it out towards you. On every 3rd wrap, add another tab the same way until you have 6 tabs wrapped together like this-

#solarpunk#punk#solarpunk diy#punk diy#solarpunk fashion#solarpunk aesthetic#punk fashion#diy#fashion#tabistry#soda tabs#upcycled jewelry#goth jewelry#jewelry making#jewelry#punk jewelry#goth diy#goth#goth fashion#hatchet makes stuff#tutorial#long post#crafting#art#recycling#recycled jewelry#hopepunk#ecopunk
405 notes
·
View notes
Text


Running a little promo: free tutorial on how to knit hedgehog's clothes with every Hedgehog DIY Kit between 19 and 31 of May 25.
#diy tutorial#ferntales#australia#grandma vibes#etsy#grandmacore#diy#felt#diy craft#diy projects#diy or die#crafts#handmade#sewing#arts and crafts#fibre art#fibre arts#needlework#textile art#fiber arts#embroidery
254 notes
·
View notes
Text
cheapskate bleach tutorial

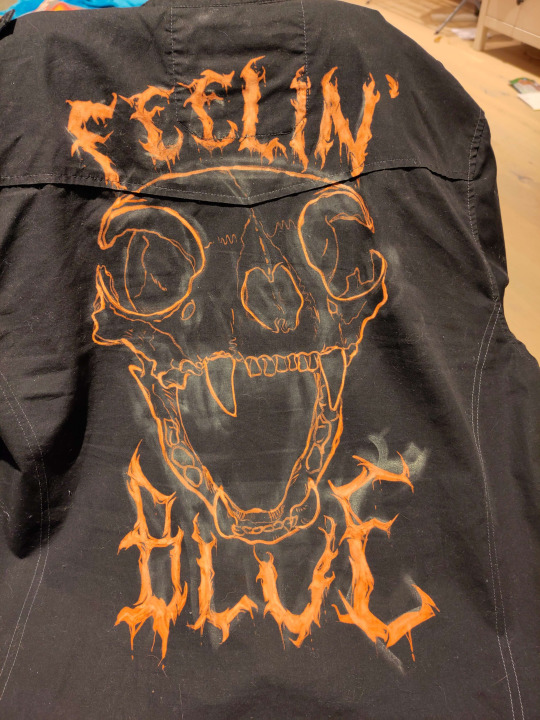
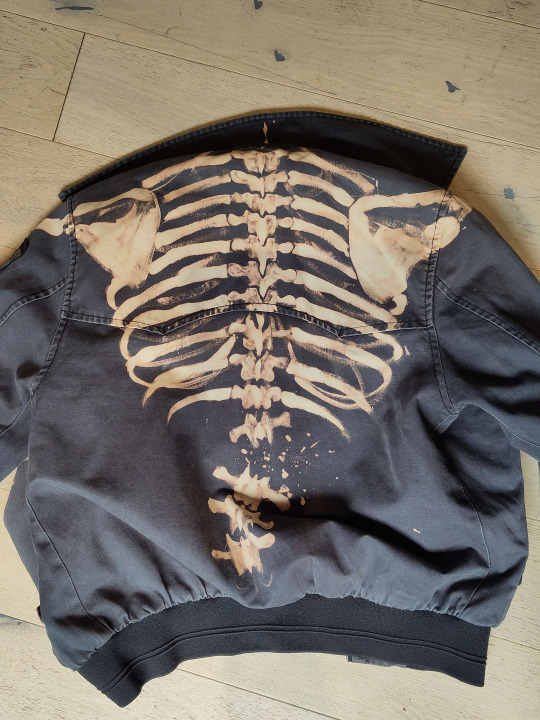
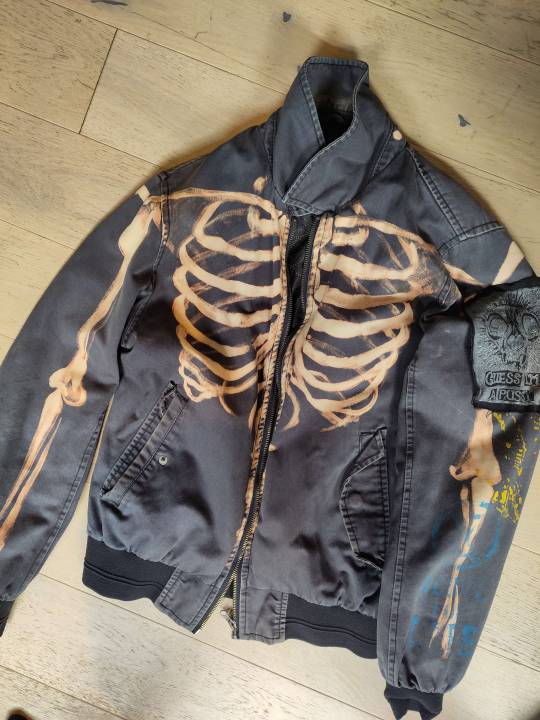
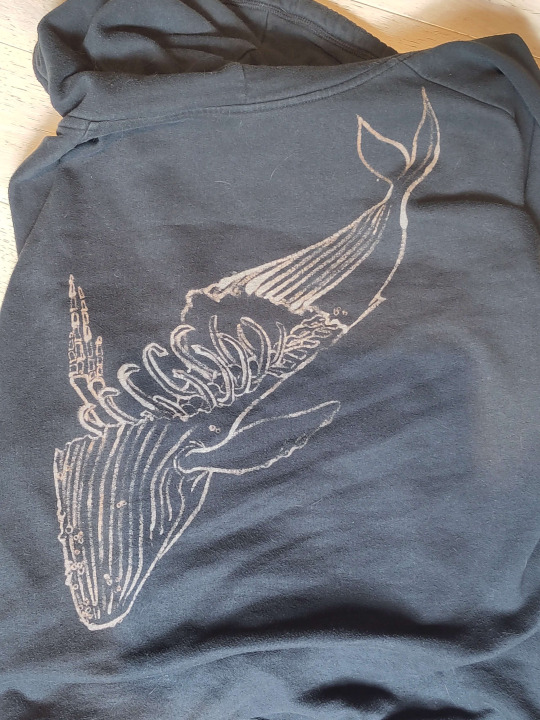
Sticking it under a readmore but this is how i make my shirts etc for like a fiver's worth of materials. I am far from being an expert btw im just playing with chemicals. also probably do this in a ventilated area or something
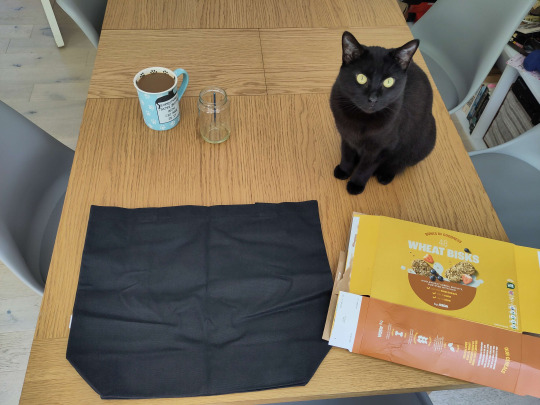
You will need:
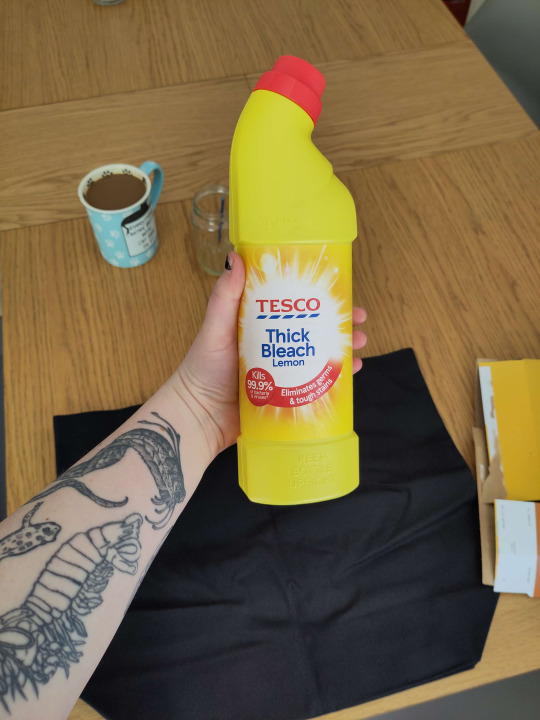
Bleach (I use thick toilet bleach it's like 80p)
The thing you want to bleach onto (In this case, a tote bag for a friend. usually i thrift old black shirts.) You should do a patch test before any real bleaching -- dab a tiny bit on the inside of a hem somewhere before you commit. I don't show that below because i forgot to do it but you should. You should ALSO iron the thing before you bleach it. So it's flat. Do as I say not as I do etc.
Something to put inside / between your garment and the table (Asda brand weetabix box babyyy)
Paintbrush (Mine is from a multipack from Poundland. I also accidentally left it in bleach last time and it kind of dissolved so I had to cut off the most egregious of the stray bristles.)
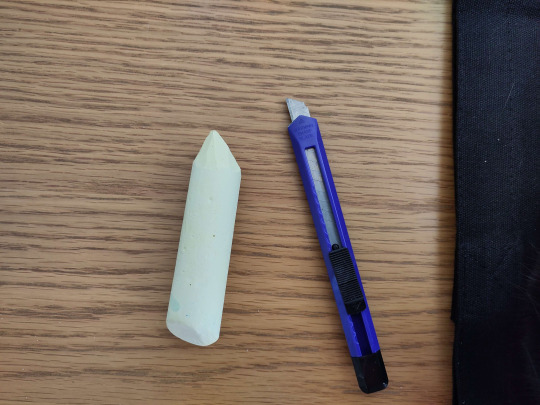
Chalk (For snacking) (I'm joking please don't eat the chalk) (I only have big pavement chalk, again, from Poundland, but you can get a good point with a craft knife)
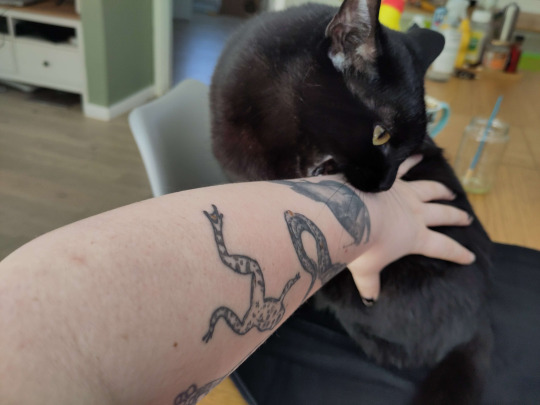
Step one: move the cat
Step two: insert cereal box into / behind the thing you are bleaching.
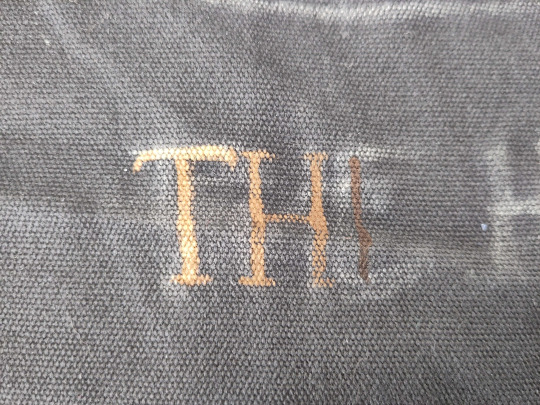
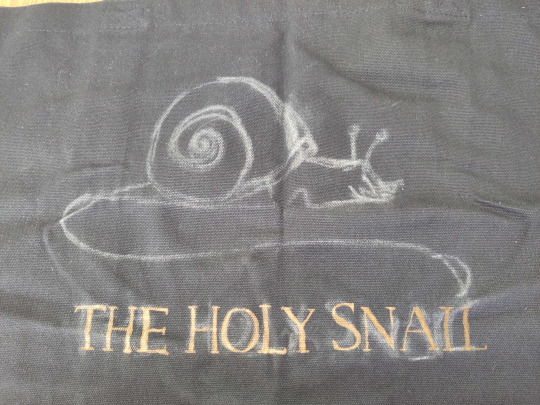
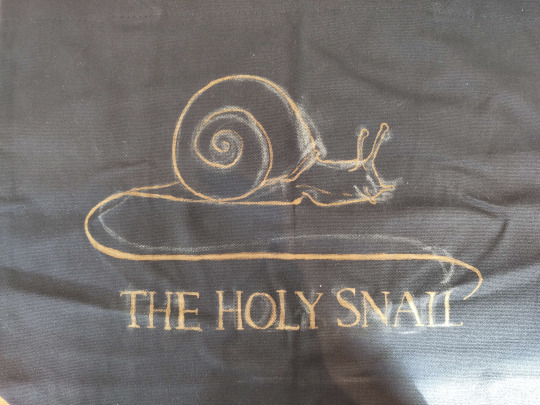
Step three: chalk on your design. this is the logo of a wine brand i have never tried but i like the snail. It can be super rough or very precise, whichever helps you know where to put your lines.
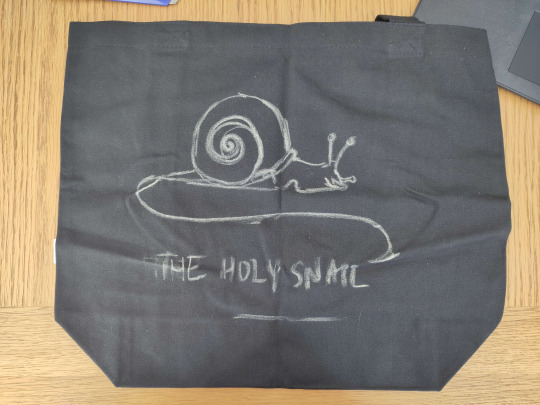
As you can tell it's easy to move stuff and redo it by just smudging the chalk away, or, worst case scenario, giving it a wash. Though that sucks if you're impatient like me bc you do NOT want to bleach this while it's wet. Once you're happy with your design, smack it around a bunch to take off most of the chalk, so you wind up with a vague outline. I didn't get a pic of this stage but here's what the iasip one looked like:
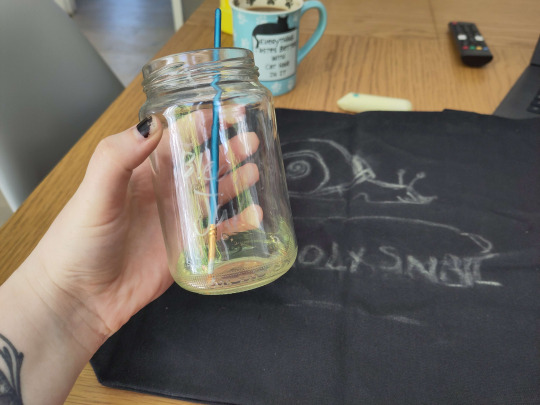
Step four: Acquire your bleach and put it in the special bleach jar your hosuemates labelled so you would stop drinking normal water out of it. Accept that Nyx hates you for not letting her drink it.

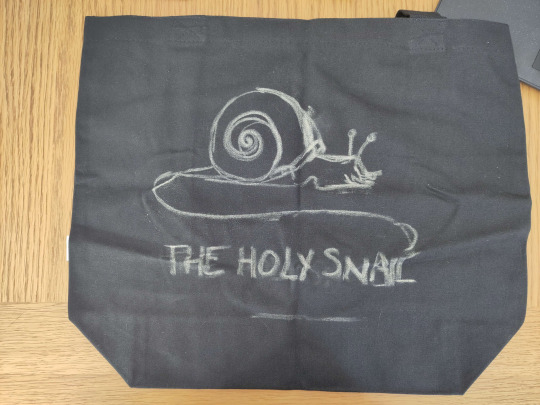
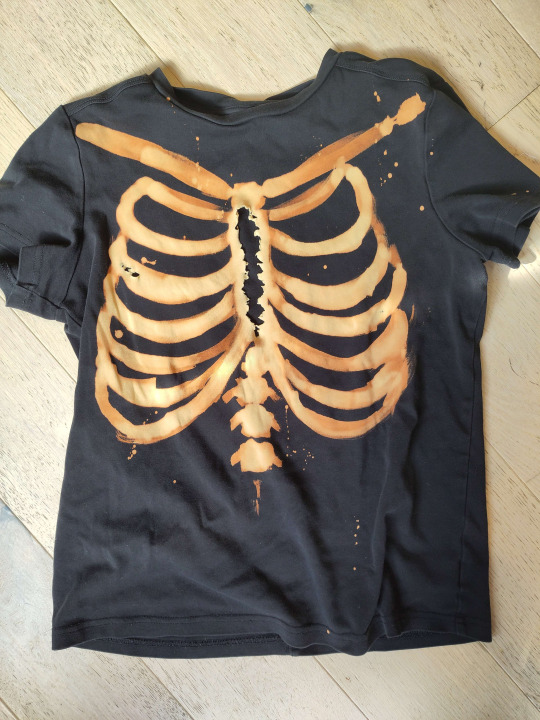
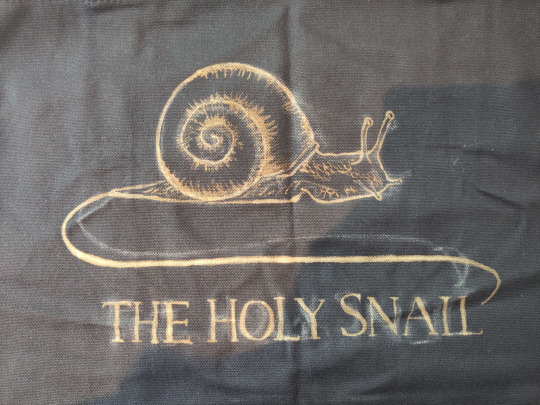
Step five: Go for it man. The bleach is kinda goopy so don't expect it to come out like paint, but it does mean that you can control the line crispness and width quite easily depending on how hard you press the brush down. I find it really helps for stuff like serif fonts.
You can dilute your bleach with water, which can help it get into all the little crevices esp if your fabric is a little bumpy, but do another small patch test before committing to anything on the main piece, because some fabrics absolutely suck up water and your lovely crispy lines will blow out like an old tattoo. don't do it. Unless you want that look, in which case get silly with it
The other weird thing abt it is obviously that you can't see what you painted right away, it takes a couple seconds to show up, so it's a pretty slow process. The fabric will first go darker where you painted, then lighten from orange to a pale yellow over about 30 seconds. DON'T go "this bleach aint shit" and paint over it to make it lighten faster -- overbleaching it can weaken the fabric and make it tear.
Tragic.
Here are some progress shots of the snail! When you're finished, you should wait for it to develop properly, but it depends how light you want it to be. I let the lines sit for a while before doing the details, and then washed it a bit prematurely so they'll stay a little darker. For nice pale yellow you want to wait around an hour.
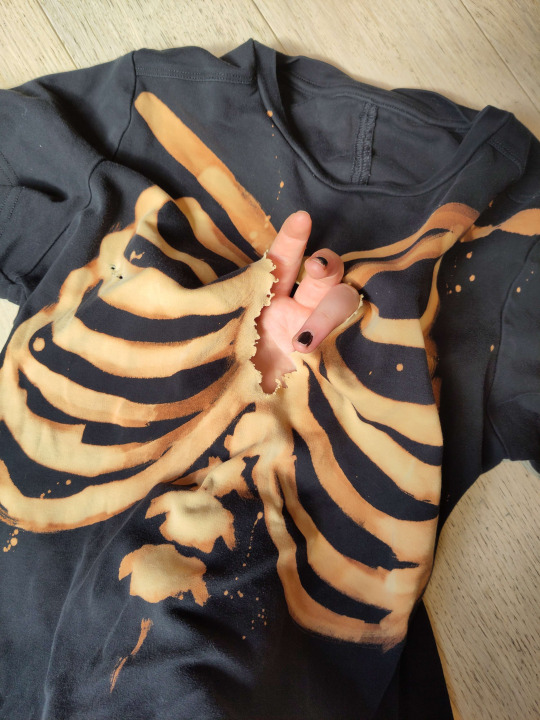
Step six: drown her
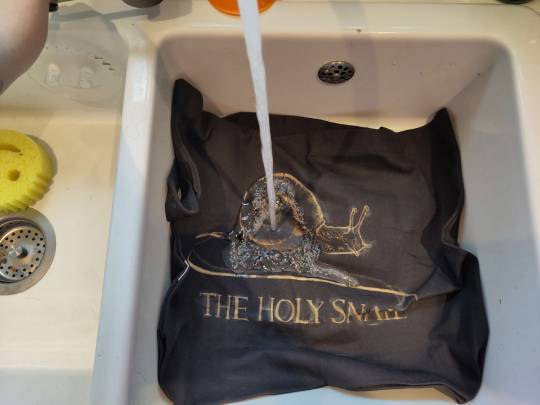

Nice cold water, wash out all the remaining bleach and chalk. I chucked it in the wash for ten minutes because it's a weird shape and size to wash in the sink and I'm a lazy bastard. but handwashing works just as well.
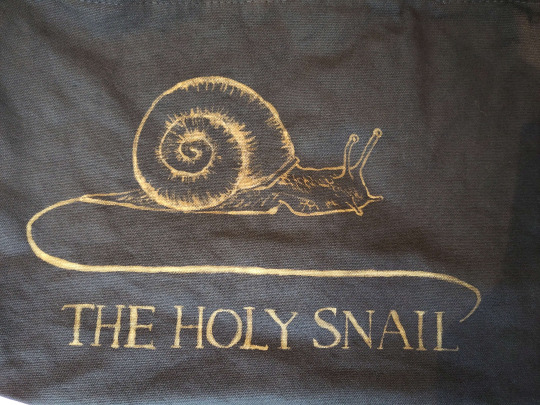
Step seven: revel in your new bootleg merch. You made that. You did that. thrive. go forth and make weird shit.
#bleach#art tutorial#clothes#diy#i've never done a tutorial before so hopefully this is coherent lol#img descriptions are all in alt text#it got dark while i was making this so pls excuse the varying image quality loll
210 notes
·
View notes
Text
➩ Tutorial on a Paper Star 🌱
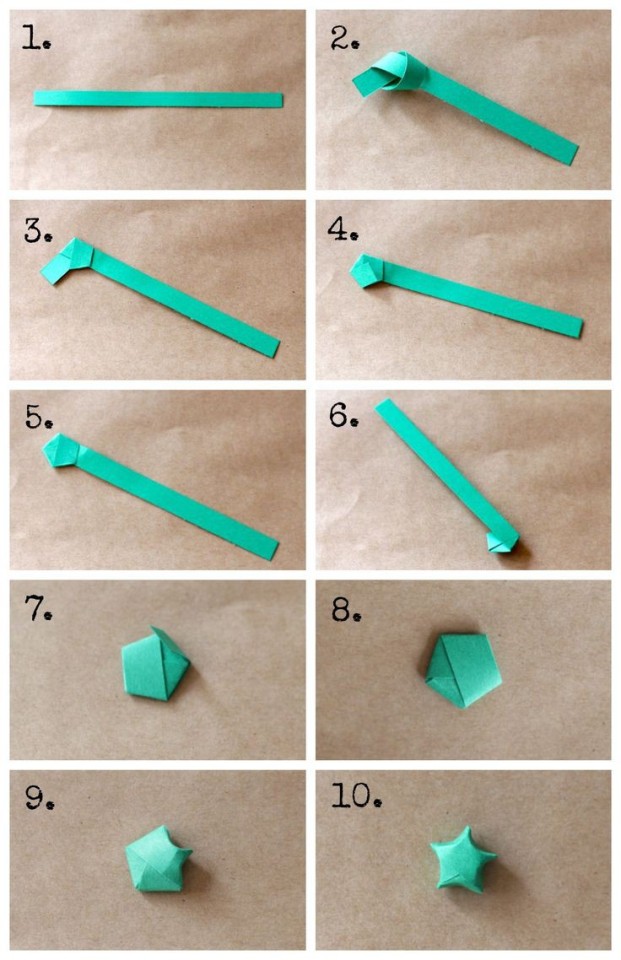
#tutorial#paper stars#paper star#star#papercraft#paper art#origami#aesthetic#greencore#green aesthetic#handmade#diy#crafts#starcore#design#art#goblincore#goblin aesthetic#green#green goblin#fairycore
1K notes
·
View notes
Text
"What even IS Solarpunk?"
It's a social, artistic and environmental movement that aims toward a sustainable future via environmental activism and cultural education. (hence the "solar") Against climate doomerism, capitalism, and profit over anything else. Very DIY, counterculture, anarchism (hence the "punk")
So like: creating micro-self sufficient strategies that are accessible to everyone can apply to everyday life, helping pollinators, picking up trash, learning and teaching how to repair stuff, A LOTTTTT of upcycling, advocating for environmental causes, educating masses via literature and art and events and whatnot
(that's like, the "brochure" explanation. Then there's also the more chaotic and less legal actions like clandestine seed bombing, local creatures feeding, company boycotting in any fun way you can think of and moss grafitti)
How to stay active year-round?
Winter
- Host art workshops/soirées (nature themed, to make ornaments and stuff that can be sold in exhibitions, or just for fun and to raise awareness)
- Inside greenhouse prepping
- Teas and tincture making to give as gifts
- Donating clothes and shoes
- Looking into all the activist activities for the upcoming year, note important dates, be aware of demonstrations, colloques, expos, etc
Spring
- Early spring: throwing green grenades/ seed bombs
- Managing small outside cultures and inside greenhouse cultures: herbs, fruity , seasonals, etc
- Flower picking (to dry or whatever)
- garbage picking strolls
Summer
- Fruit drying/curing (to make ornaments, compostable water plates and infusions, etc)
- Herbs drying
- Making water drinking stations for local animals (out of hollow fruits) in dry areas
- Materials gathering (hay, seeds, dry branches, etc)
Fall
- Early fall: moss grafitti
- Knitting scarves to donate or sell for environmental organizations support
- Ornament making (to gift or sell in winter time)
- Art soirées (ornaments making, collages, "watchbooks")
- Garbage picking strolls
- Materials gathering (leaves, pinecones, sticks, etc)
- Feed local creatures and make safe spaces for them during winter
Year-round activities:
- Crafting, learning and educating: zines, tutorials, posters, books, etc
- Building stuff out of recycled materials
- Volunteering and donating to verified organizations
#solarpunk#environmental activism#Seasonal activism#diy projects#Seed bombs#Green grenades#educate yourself#arts and crafts#Tutorials#Reduce reuse repair and recycle#climate justice#Climate positivity#Reckless optimism
82 notes
·
View notes
Text
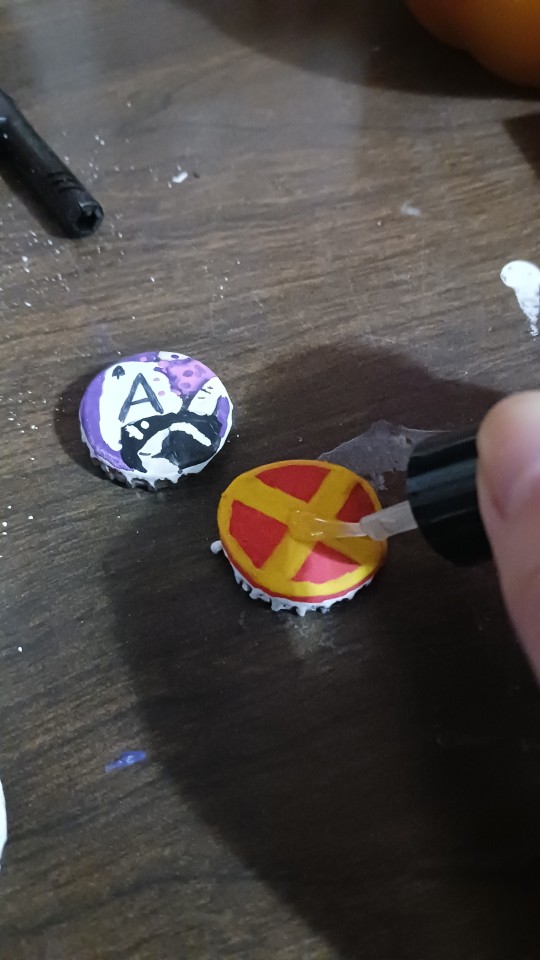
IDK WHO NEEDS THIS
But here's how to make diy pins with a bottle cap!
☆ You will need: A bottle cap, a soda tab, and a safety pin first
☆ Then: Pliers, paint (optional), and clear nail polish later

Put the safety pin through the soda tab like this, make sure the part of the safety pin that opens is facing up


Place the soda tab with safety pin in the bottle cap, double check to make sure the opening part of the safety pin is facing up!
Then use pliers to crunch the sides of the bottle cap down on the soda tab
This will keep the tab and safety pin in place!


Then you can paint whatever you want onto the bottle cap or keep it plain
If you paint it you might want to sand the surface first or cut it up lightly to make the paint stick better
After you're done painting you can use clear nail polish as a top coat!


#diy pins#bottle cap pins#diy pin tutorial#diy tutorial#punk diy#pin diy#pin making#traditional art#art#illustration#artists on tumblr#art tutorial#tutorial#how to make pins#how to make bottle cap pins#recycling pins#ace artist#trans artist#x man pins#recycling#recycling bottle caps#romanisweirdart
176 notes
·
View notes
Text
How to Paint on Leather Jackets:
A Relatively beginner friendly guide.

Things you will need:
- A leather jacket.
-Card stock ($6 for 50 sheets at staples, or steal it from work)
-Xacto knife ($12 or wander around an art campus for a few minutes, and you'll find one)
- A surface to cut on (cutting mats are relatively affordable, but a flat piece of glass or ceramic will probably also work fine. The mat I use for this is a tempered glass one)
Paint markers. the main thing is to make sure you are NOT using oil-based paint. Some brands make both oil and water/acrylic based pens, and it can be hard to tell which is which at a glance.
Ok lets start!
Find an image you want to use. Once you get used to it, you can get extremely detailed results with this method, but for now we'll use a more simple example.

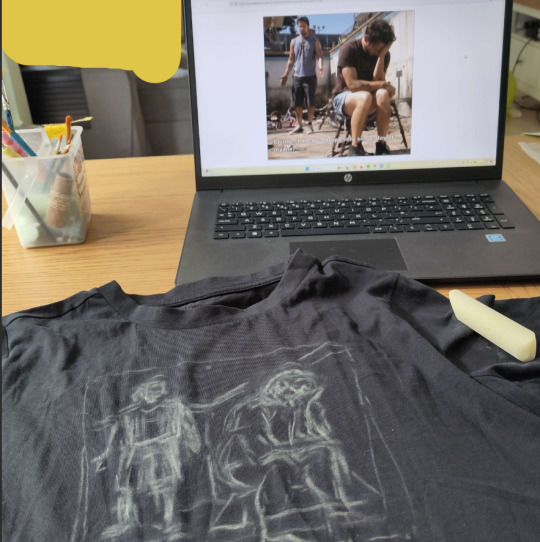
Ok, I don't really like the common Mischief Brew patch logo, so were using the twxt from this album instead. I'm doing this all at work, so you can also see that you don't need any fancy software for this. I'm using MS Photos for this whole process.

So crop the image close to your text

Fiddle with the settings in edit if you want, i usually think making it b&w with a higher contrast helps.

Now we're gonna cut. With stencils, start with fine details near the center of the design and work outward. This way you keep as much solid paper around your cuts as possible, which helps prevent ripping or deformation and mis-cuts. I also usualy cut in two stages, all horizontal cuts and vertical cuts.

Heres the big difference between what we're doing here and making a regular stencil. We don't care about islands. You see the empty spaces in the B, the e's, the S, etc. We arent cutting that out, we're taking the whole shape and we'll add that shit back in later.
So now we cut it out, we have something like this:

You can see how anything I came across that seemed mildly irritating to cut out, I ignored.
Thin lines connecting parts? We can draw a line. Islands? We can do the basic shape and refine it later. The point is that this stencil will put the right shapes together with the right scale and spacing.
Next we'll put it on the jacket.

Tape that shit down, you don't want if moving more than it's already going to. Next, trace the outline, that's it, then remove the stencil and burn it or something.
Should have somethong like this

Now by hand, fill in the stencil. I advise tracing the outline again as you fill. It helps prevent overflow. If you feel confident, try and build the empty space here instead of later.

So it's filled in and we have a general shape. I recommend at least two layers with 10-15 min dry time between. More layers might look a little better but also run the risk of cracking if it gets too thick (this ended up needing 3 layers).
You may have noticed that the outline looks kinda shit, here's the main thing we're gonna do here, editing.
I hit the photo limit here, so hang on for the next part.
72 notes
·
View notes
Text


Heres a tutorial on how i make thease badges! Have fun yall🌟💖
#badges#diy#diy patches#diy projects#diy craft#diy punk#diy ideas#handmade#dbd craft#crafts#art and craft#craftblr#hand crafted#paper craft#easy crafts#tutorial#craft tutorial#fallout 4 fanart#fallout fanart#fallout#fallout art#fall out#fallout chems#fallout merch#dbd#dbd ghostface#ghostface fanart#ghostface#dbd fanart#dbd art
107 notes
·
View notes
Text
Turn your tiniest scraps into snazzy, stuffed bugs! - perfect for making a wall a little less boring
youtube
#solar punk#solarpunk#bugs#insects#scrap fabric#sewing#hobbies#crafts#crafting#art and craft#diy#diy projects#upcycle#upcycling#cute#beetles#tutorial#diy tutorial#diy sewing#no waste#Youtube
62 notes
·
View notes
Note
resident evil banners?
[REQUESTED] Resident Evil Banners


#carrd moodboard#carrd graphics#carrd inspo#carrd stuff#discord chat#discord roleplay#design tutorial#banner design#tumblr banner#banners#carrd resources#discord server discord chat discord roleplay aesthetic#resident evil#leon kennedy#ada wong#ethan winters#discord server discord chat discord roleplay aesthetic banners tumblr banner banner design template aethstetic black and white#design#diy#digital art#blinkies
100 notes
·
View notes
Text
youtube
Threads that tell a story—basket design in bloom! 🌿🧺
#flower embroidery#threadskalakari#handmade#embroidery tutorial#embroidery#hand embroidery#embroidery stitches#embroidery pattern#diy#art#crafts#knitting#etsy#youtube
63 notes
·
View notes
Text


You can grab the PDF pattern for my Rose Pearl Afghan from my Etsy shop or Ravelry shop! 🌹✨️👏
#yarn#art#crochet#crocheting#crocheted#crochetpattern#crochetpatterns#etsy#etsyshop#etsyseller#etsymaker#etsystore#etsypatterns#ravelrypattern#ravelry#creative#diy#howtocrochet#howto#crafts#crafting#crafty#handmade#handmadeisbetter#crocheteveryday#blanket#tutorial#pdfpattern#patterns#photooftheday
32 notes
·
View notes