#Default methods in interfaces
Explore tagged Tumblr posts
Visit Tumblr Blog
Explore Tumblr blogs with no restrictions, modern design and the best experience.
Last Seen Tumblr Blogs


Fun Fact
Tumblr has 411 employees.
Text
Downloading fanfic from AO3
I've been downloading a lot of fanfic lately for personal archival purposes, and I figured I'd share how I do it in case it's useful to anyone else (and so I have it written down in case I forget!).
There are lots of different ways to save fic, including the file download built into AO3, but I find that this gives me the nicest ebooks in the most efficient way.
(Under a cut cause long.)
Download Calibre: https://calibre-ebook.com/ or (clickable link).
Calibre is about the best ebook management and control program around and it's free. You can get it for windows, mac, and linux or download and run it from a portable storage device (I'm using a windows PC).
Install it and run it. It's gonna ask you where you want to put your library. Dealer's choice on this one. I recommend your internal drive (and then back up to external/cloud), but YMMV.
If you want to keep fanfic separate from the rest of your ebooks, you can create multiple libraries. I do, and my libraries are creatively named 'Books' and 'Fic'.
Customise Calibre
Now you're gonna install some plugins. Go to Preferences on the menu bar (far right), click its little side arrow, then choose 'Get plugins to enhance Calibre'.
At the top right of the box that pops up is 'Filter by name'. The plugins you want to get are:
EpubMerge
FanFicFare
Install them one at a time. It will ask you where you want them. I recommend 'the main bar' and 'the main bar when device is attached' (should be selected by default). When you're done, close and reopen Calibre.
The plugins you just installed should appear on the far right of the toolbar, but if you can't see one or both of them, fear not! Just click Preferences (the button, not the side arrow), then Toolbars and Menus (in the 'Interface' section) then choose the main toolbar from the drop down menu. That will let you add and remove things - I suggest getting rid of Donate, Connect Share, and News. That'll leave you room to add your new plugins to the menu bar.
(Do donate, though, if you can afford it. This is a hell of a program.)
Now you're ready to start saving your fave fanfic!
Saving fanfic
I'll go through both methods I use, but pick whatever makes you happy (and/or works best for what you're downloading).
ETA: if the fics are locked you can't easily use FanFicFare. Skip down to the next section. (It does ask for a username/password if you try and get a locked fic, but it's never worked for me - I had to edit the personal.ini in the configuration options, and even then it skips locked fics in a series.)
Calibre and FanFicFare
You can work from entirely within Calibre using the FanFicFare plugin. Just click its side arrow and pick from the menu. The three main options I use are download from URL, make anthology from a webpage, and update story/anthology.
Download from URL: pick Download from URL (or just click the FanFicFare button) and paste the fic's URL into the box (if you've copied it to your clipboard, it will be there automatically). You can do more than one fic at a time - just paste the URLs in one after the other (each on a new line). When you're done, make sure you have the output format you want and then go.
Make Anthology Epub From Web Page: if you want a whole series as a single ebook, pick Anthology Options, then Make Anthology Epub From Webpage. Paste the series URL into the box (if you've copied it to your clipboard, it will be there automatically), click okay when it displays the story URLs, check your output format and go.
Update series/anthology: if you downloaded an unfinished fic or series and the author updates, you can automatically add the update to your ebook. Just click on the ebook in Calibre, open the FanFicFare menu using its side arrow, and select either Update Existing FanFic Books or Anthology Options, Update Anthology epub. Okay the URLs and/or the output format, then go.
Any fic downloaded using FanFicFare will be given an automatically generated Calibre cover. You can change the cover and the metadata by right clicking on the title and picking edit metadata. You can do it individually, to change the cover or anything else specific to that ebook, or in bulk, which is great for adding a tag or series name to multiple fics. Make sure you generate a new cover if you change the metadata.
Browser plugins, Calibre, and EpubMerge
You can also use a browser addon/plugin to download from AO3. I use FicLab (Firefox/Chrome), but I believe there's others. FicLab: https://www.ficlab.com/ (clickable link).
FicLab puts a 'Save' button next to fic when you're looking at a list of fics, eg search results, series page, author's work list etc. Just click the 'Save' button, adjust the settings, and download the fic. You can also use it from within the fic by clicking the toolbar icon and running it.
FicLab is great if you're reading and come across a fic you want to save. It also generates a much nicer (IMO) cover than Calibre.
You can add the downloaded fic to Calibre (just drag and drop) or save it wherever. The advantage to dropping it into Calibre is that all your fic stays nicely organised, you can adjust the metadata, and you can easily combine fics.
Combining fics
You can combine multiple fics into an anthology using EpubMerge. This is great if you want a single ebook of an author's short fics, or their AUs, or their fics in a specific ship that aren't part of a series. (It only works on epubs, so if you've saved as some other format, you'll need to convert using Calibre's Convert books button.)
Select the ones you want to combine, click EpubMerge, adjust the order if necessary, and go.
The cover of the merged epubs will be the cover of the first fic in the merge list. You can add a new cover by editing the metadata and generating a new cover.
Combing with FanFicFare
You can also combine nonseries fics using FanFicFare's Make Anthology ePub from URLs option by pasting the individual fic URLs into the box.
Where there's more than a few fics, I find it easier to download them with FicLab and combine them with EpubMerge, and I prefer keeping both the combined and the individual versions of fic, but again YMMV.
Reconverting and Converting
Once I'm done fussing, I reconvert the ebook to the same format, to ensure everything is embedded in the file. Is this necessary? YMMV, but it's a quick and easy step that does zero harm.
If you don't want your final ebook to be an epub, just convert it to whatever format you like.
Disclaimers
Save fanfic for your own personal enjoyment/offline reading/safeguarding against the future. If it's not your fic, don't distribute it, or upload it to other sites, or otherwise be a dick. Especially if the author deletes it. Respect their wishes and their rights.
This may work on other fanfic sites, eg FFN, but I've never tried so I don't know.
If you download a fic, do leave the author a kudo or a comment; you'll make them so happy.
This is how I save fic. I'm not pretending it's the only way, or even the best way! This is just the way that works for me.
#fanfic#fic#ao3#ficlab#calibre#fanficfare#epubmerge#downloading fanfic#adding the my fic tag so I can find this again#my fic
1K notes
·
View notes
Text
Welp, I've been using external methods of auto-backing up my tumblr but it seems like it doesn't do static pages, only posts.
So I guess I'll have some manual backing up to do later
Still, it's better than nothing and I'm using the official tumblr backup process for my smaller blogs so hopefully that'll net the static pages and direct messages too. But. My main - starstruckpurpledragon - 'backed up' officially but was undownloadable; either it failed or it'd download a broken, unusable, 'empty' zip. So *shrugs* I'm sure I'm not the only one who is trying to back up everything at once. Wouldn't be shocked if the rest of the backups are borked too when I try to download their zips.
There are two diff ways I've been externally backing up my tumblr.
TumblThree - This one is relatively straight forward in that you can download it and start backing up immediately. It's not pretty, but it gets the job done. Does not get static pages or your direct message conversations, but your posts, gifs, jpegs, etc are all there. You can back up more than just your own blog(s) if you want to as well.
That said, it dumps all your posts into one of three text files which makes them hard to find. That's why I say it's 'not pretty'. It does have a lot of options in there that are useful for tweaking your download experience and it's not bad for if you're unfamiliar with command line solutions and don't have an interest in learning them. (Which is fair, command line can be annoying if you're not used to it.) There are options for converting the output into nicer html files for each post but I haven't tried them and I suspect they require command line anyway.
I got my blogs backed up using this method as of yesterday but wasn't thrilled with the output. Decided that hey, I'm a software engineer, command line doesn't scare me, I'll try this back up thing another way. Leading to today's successful adventures with:
TumblrUtils - This one does take more work to set up but once it's working it'll back up all your posts in pretty html files by default. It does take some additional doing for video/audio but so does TumblThree so I'll probably look into it more later.
First, you have to download and install python. I promise, the code snake isn't dangerous, it's an incredibly useful scripting language. If you have an interest in learning computer languages, it's not a bad one to know. Installing python should go pretty fast and when it's completed, you'll now be able to run python scripts from the command line/terminal.
Next, you'll want to actually download the TumblrUtils zip file and unzip that somewhere. I stuck mine on an external drive, but basically put it where you've got space and can access it easily.
You'll want to open up the tumblr_backup.py file with a text editor and find line 105, which should look like: ''' API_KEY = '' '''
So here's the hard part. Getting a key to stick in there. Go to the tumblr apps page to 'register' an application - which is the fancy way of saying request an API. Hit the register an application button and, oh joy. A form. With required fields. *sigh* All the url fields can be the same url. It just needs to be a valid one. Ostensibly something that interfaces with tumblr fairly nicely. I have an old wordpress blog, so I used it. The rest of the fields should be pretty self explanatory. Only fill in the required ones. It should be approved instantly if everything is filled in right.
And maybe I'll start figuring out wordpress integration if tumblr doesn't die this year, that'd be interesting. *shrug* I've got too many projects to start a new one now, but I like learning things for the sake of learning them sometimes. So it's on my maybe to do list now.
Anywho, all goes well, you should now have an 'OAuth Consumer Key' which is the API key you want. Copy that, put in between the empty single quotes in the python script, and hit save.
Command line time!
It's fairly simple to do. Open your command line (or terminal), navigate to where the script lives, and then run: ''' tumblr_backup.py <blog_name_here> '''
You can also include options before the blog name but after the script filename if you want to get fancy about things. But just let it sit there running until it backs the whole blog up. It can also handle multiple blogs at once if you want. Big blogs will take hours, small blogs will take a few minutes. Which is about on par with TumblThree too, tbh.
The final result is pretty. Individual html files for every post (backdated to the original post date) and anything you reblogged, theme information, a shiny index file organizing everything. It's really quite nice to dig through. Much like TumbleThree, it does not seem to grab direct message conversations or static pages (non-posts) but again it's better than nothing.
And you can back up other blogs too, so if there are fandom blogs you follow and don't want to lose or friends whose blogs you'd like to hang on to for your own re-reading purposes, that's doable with either of these backup options.
I've backed up basically everything all over again today using this method (my main is still backing up, slow going) and it does appear to take less memory than official backups do. So that's a plus.
Anyway, this was me tossing my hat into the 'how to back up your tumblr' ring. Hope it's useful. :D
40 notes
·
View notes
Text
Permanent Blacklists for AO3
Would you like to permanently remove fics with your squicks, triggers, and dislikes from all AO3 searches by default so that you never have to think about or encounter them again? Well now you can!
The ability to do this has actually been around for a little while but it relies on some new CSS functionality that wasn't supported on all major browsers until fairly recently (though you may still have to enable it manually on some). I'm not going to explain how this method works or how to code AO3 skins in general, as I've only dabbled in it a little and there are already some very good tutorials out there. If you want all of the details, check out these guides:
Skins and Archive Interface FAQ – The official skins guide created by AO3. Lots of good information but might be overwhelming and confusing for a beginner.
A Non-Extensive Guide on How to Start Creating a Skin for AO3 by ao3skin – Some good, fairly easy to understand, beginner info on CSS and specifically how it applies to AO3 skins.
Permablocking Specific Tags - Site Skin by Eli0t – Everything you need to know to create permablock lists. If your blacklist doesn't seem to be working as expected, check this for troubleshooting tips.
What I can offer though are some handy pre-made blacklists that you can use as-is or as a starting point to create your own so that you don't have to go to the trouble of figuring out how any of this works or hunting down relevant tags. Just copy the code, open AO3, go to My Preferences > Skins > Create Site Skin, paste it in the box, title it, and click Submit!
Note: The following lists are very specific to me and my own personal tastes. Absolutely no judgement if you love any of the things that I choose to blacklist. You do you. I just happen to like my fics fucked up and relatively canonical.
★ No Reader Fic – Hides all self-insert and reader fic.
★ No Alternate Universes – Hides anything tagged with the most common AU tags. There are so many incredibly specific AUs there's no way to list all of them and AU tagging is also extremely inconsistent from fic to fic so this blacklist may only catch 80% of AUs, but that's better than nothing. You could always exclude the entire alternate universe tag, rather than trying to list specific ones, but unfortunately canon divergence and other less extreme AUs would get caught in the crossfire, which is not worth it for me.
★ No Fluff – Hides anything tagged with the most common fluff and romance tags. I specifically left out "fluff and angst" though because sometimes that's used for things that are mostly angst with only a bit of fluff and I do love angst.
★ Bonus: No Dead Dove – This list is not mine (for obvious reasons) but I know some people may find it useful. Hides anything with the main archive warnings and many common problematic, taboo, or controversial tags. Some of these I wouldn't even classify as dead dove, they're literally just kinks, so I'd suggest reviewing the list carefully and removing any that don't apply to you.
Additional Notes:
This system doesn't work exactly the same as AO3's exclusion filters because you can't use top-level wrangled tags to block all subtags. It only blocks exact matches.
Once the blacklist is implemented you'll see no indication that anything was blocked (except for fewer fics listed on each search page); the entire blurb will be hidden. The tags and fic counts listed in the filter bar will remain unchanged. If you want more advanced features like whitelisting or adding something to indicate when a fic was removed, check out the permablocking guide by Eli0t.
Here's a link with info on which browsers currently support the new "has()" element, which this blacklist system relies on. As of right now Firefox for desktop still has to be manually enabled (for instructions see the section on flag enabling in the permablocking guide). Firefox for iOS isn't listed on this website but it seems to work fine for me.
There are other browser-specific extensions that let you permablock tags, such as this one and this one, that may be more a little more user friendly, but I've never tried them so I can't vouch for them and they may not work consistently between different devices. The good thing about doing blacklists via skins is that, after setting it up once, it should work automatically on pretty much any device (as long as you're logged in to your AO3 account).
#I'm so stoked about this feature#it's a GAME CHANGER#I put a lot of effort into creating my blacklists#I couldn't not share them and hopefully make someone's life easier now that I've already done all the work#assuming anyone shares my preferences#ao3#ao3 skins#ao3 help#tutorial#wendy's help desk
385 notes
·
View notes
Text
it's really crazy to me how many people out there in the world are just like. walking around with basically their entire cognitive setup + way of interfacing with other people being structured around Avoiding Discomfort at all costs. like their default response to any mildly unpleasant thing is to IMMEDIATELY find a way to make it not their fault, someone else's fault, and something they can be righteously angry over to self-soothe. and the methods they employ with the automaticity of breathing can range from run-of-the-mill uncharitable interpretations of others intentions, up to and including just like. reshaping the contours of reality in their own minds to create a bespoke subdimension where that thing didn't happen, it was actually other stuff that happened, stuff that wasn't their fault because they've never done anything wrong in their life and they're the ultimate victim of everything bad ever, actually
and like to be clear this is a deeply human response and something that no one is immune to. but one would hope that 1) the tendency arises in proportion to the severity of the circumstances (aka the intense reality-reshaping only occurring in times of truly severe psychological distress ie a loved one dying or something), and 2) the person doing it is at least somewhat able, some of the time, to take a step back and say "oh, that was me being unreasonable, i was being a dick there"
but like. people for whom this is literally their primary method of coping with the outside world not going their way 100% of the time tend not to have, or at least to exercise, that ability. which makes them really fun and not at all torturous to talk to
30 notes
·
View notes
Text
honestly still not sure how much I'm really on board with WPF - there's definitely some things like Bindings which can be quite nice to work with, but the way events tend to require a fair bit of manual cleanup feels like it runs contrary to a language that otherwise generally expects you to just trust the Garbage Collector to handle the majority of that for you and can't guarantee that the destructor gets called on an object before it goes away.
plus the whole MVVM concept seems just really loosely defined? There doesn't seem to be a whole lot of agreement of where and how to delineate between Model and ViewModel, and far too many edge cases where you either end up with the Model becoming the ViewModel, or having to basically make the ViewModel into an almost feature-complete reimplementation of the Data Model, resulting in almost twice the work.
It kind of feels to me like for a lot of situations it would be easier to bake the majority of ViewModel functionality into a handful of common interfaces that you could just attach to classes within the Data Model? Except that WPF can't access methods or properites defined via default implementations in an interface, nor does it seem to really have a simple and convenient way to handle polymorphism - at least not without a potentially significant performance cost.
I dunno, the whole ViewModel versus Code-Behind distinction feels kind of overplayed to me? Like it seems to be mostly a question of where the code goes rather than what it does, with all the actually important stuff like DataContext and Binding kind of working pretty much the same regardless of whether it exists within a ViewModel or is baked into the objects of the DataModel itself?
Like ok, if you have a number of temporary pop-up windows or dialogs that have to interact with the data in a way that's drastically different from how the rest of the UI does it and also have a generally short lifespan, I could see the reason for emphasising the ViewModel as being its own separate thing, but to me that feels like a relatively uncommon use case?
I don't know, it seems to be a lot of unnecessary faff adding a bunch of extra encapsulation and nested methods and properties when you could just bind directly to the source data?
7 notes
·
View notes
Text
Convert Samsung Emojis to iPhone, Without Application or Root!
If you'd like to use iPhone-style emojis on your Samsung device without rooting it, zFont 3 is a popular and effective solution. Here's how you can set it up:
📲 Method: Using zFont 3 (No Root Required)
Step 1: Install zFont 3
Download zFont 3 – Emoji & Font Changer from the Google Play Store.
Step 2: Select and Apply iOS Emoji Pack
Open the zFont 3 app.
Navigate to the Emoji tab.
Browse and select an iOS emoji pack (e.g., iOS 16.4).
Tap Download, then Apply.
Follow the on-screen instructions. For Samsung devices, this typically involves:
Changing the font style to a custom one provided by zFont 3.
Restarting your device to apply changes.
This process replaces the default emojis with iOS-style ones across most system interfaces, including the Samsung Keyboard .
🔄 Reverting to Original Samsung Emojis
If you wish to switch back to the default Samsung emojis:
Go to Settings > Display > Font size and style.
Select Font style.
Choose Default to revert to the original font and emoji set.
⚠️ Important Notes
App Compatibility: While the iOS-style emojis will appear in most system apps, some third-party apps like WhatsApp and Discord use their own emoji sets, so changes might not reflect there.
Font Appearance: Applying iOS emojis may alter the system font to Roboto or another default font. If you prefer Samsung's original font, you might need to explore additional customization options.
2 notes
·
View notes
Text
192.168.1.250 Netgear Setup: A Beginner’s Guide
The netgear extenders are widely used by many of the networking users to create a reliable network. Netgear extender devices are known for their performance and stable network. Setting up the extender device is not a daunting task if you are aware of the setup process. In this article we are going to elaborate in detail how you can perform 192.168.1.250 Netgear Setup using the web. Web based setup method is the most reliable way to add the netgear extender into your existing network. Gather the important details and configure any model of netgear wireless range extender device. Scroll up the page and read the information till the last to boost up your network.
Unboxing The Extender
Unboxing the wireless range extender is the first step of the 192.168.1.250 Netgear Setup. In the box you will find an extender along with power adapter, user guide and ethernet cable (optional). You need all such items for the setup process. In addition to these items you also need host router network details, working internet connection, electric power socket, and computer/ laptop device.
Placement
Second step is placement of the device. Proxy placement is needed for the setup. Put the device closer as possible. Also there is no signal interface closer to the router & extender device.
Boot Up
Next step of the process is boot up. For booting up you have to use the power adapter you got with the extender. In case your device is a wall plug compact design device then you have to directly connect it with a wall outlet. Boot process might take around 1 to 2 minutes. Before proceeding further towards 192.168.1.250 Netgear Setup using the web, wait for LED lights to stabilize.
Connect To Extender Network
Step ahead and connect the extender device to the client device using any of the given methods:
Ethernet: Use the ethernet cord you got with the range extender and connect the extender with the client device. Inject the cord’s one end into the ethernet port of the extender and other in the client device ethernet port. Make sure the connection is secured.
Wireless: Using the wireless network of ethernet you can establish a connection. Check out the device label to know the default SSID & password. Use your client device and run a scan for available wireless networks. Enter the details and connect the devices.
Access 192.168.1.250 Netgear Setup Page
Now you have to access 192.160.1.250 netgear setup page by follow the given steps:
Launch google chrome or any other similar browser.
Thereafter, mention 192.168.1.250 IP in the URL bar.
A new page appears where you have to provide default information.
Enter admin and password in the fields.
Further press login and netgear installation assistant will guide you.
Configure Extender
Once you get access to the configuration page, choose the language first and then your router’s network name. Choose next and enter the password on the screen. Further click on connect option and then next.
Secure Network
Now you have to secure the wireless network by creating an SSID & password for your extender network. Also make changes in the admin account user details. This step is important to keep your existing network secure.
Update Firmware
Afterwards, you need to look for the firmware version. In case the firmware is outdated then you should install the latest version. For installation you can opt for an online update option and follow the prompts. You can update the firmware manually also by downloading it from the official portal of netgear.
Finalize Setup
Finalize the setup by choosing the submit button once you made all the important changes in the network. Review the changes you made to verify every step. Note down the extender security details you have created and keep them secure. Submit the changes and then you can step further to reposition the device.
Reposition The Extender
Repositioning the extender is a very important step to optimize the network performance. Unplug the extender from the proxy position. Search for a midway position (from the router and the area where the dead spot was). Then plug it in again to the power at the new position. Wait for the device to boot up and monitor the router LED on your extender device. If it’s green then the position is perfect. On the contrary if it turns amber or red then relocate it.
Test New Network
Lastly, test the new network using a wireless handset. Using the new SSID & password connect the device with the extender network and browse, stream or play online to check speed.
Conclusion
Lastly, I would like to rest my words by saying that the 192.168.1.250 Netgear Setup process is a super easy task. By following the above mentioned step by step breakdown of the extender setup process, anyone can configure the extender easily without a tech expert. Setting up an extender device will boost your existing network signal strength and terminate the dead spots from your home or office area.
2 notes
·
View notes
Text
When Does Your Cash App Weekly Limit Reset? Full Guide
Cash App has grown into one of the most widely used peer-to-peer payment platforms in the United States. With its sleek interface, instant transfers, and ability to buy Bitcoin or stocks, it's become a go-to financial tool. But many users run into a common question: “When does the Cash App weekly limit reset?” If you're trying to send or withdraw large amounts and you’ve hit a wall, this guide will walk you through everything you need to know about Cash App limits, including how to increase them.
What Time Does Cash App Limit Reset Weekly?
Cash App’s weekly sending and receiving limits operate on a rolling 7-day basis, not a fixed calendar week. This means your Cash App limit resets exactly 7 days after a transaction was made.
For example:
• If you sent $2,500 on a Wednesday at 3 PM, that amount will fall off your rolling limit the next Wednesday at 3 PM.
• The same principle applies to receiving limits and Bitcoin withdrawals.
There’s no set day or time for a universal reset. It all depends on your own transaction history. To check when your weekly window will reset, monitor your transaction timestamps closely.
Can I Send $5,000 Through Cash App?
Yes, you can send $5,000 on Cash App, but only if your account is verified. By default, unverified users can only send up to $250 per week and receive up to $1,000 in 30 days.
Once you verify your identity (usually by providing your full name, date of birth, and the last 4 digits of your SSN), your weekly sending limit increases to $7,500, and your receiving limit becomes unlimited.
So, to send $5,000 in a week:
• Ensure your identity is verified.
• Make sure your transaction history within the 7-day window allows it (i.e., you haven’t sent more than $2,500 already).
What Is the Max Limit on Cash App?
Once verified, the maximum limit on Cash App varies depending on the transaction type:
• Cash App Sending Limit (Verified): Up to $7,500 per week
• Cash App Receiving Limit (Verified): Unlimited
• Cash App Cash Card Spending Limit: Up to $7,000 per transaction, $7,000 per day, and $15,000 per month
• Cash App Bitcoin Withdrawal Limit: Up to $2,000 per day and $5,000 per week
If you’re unverified, your limits are significantly lower. Verification unlocks the full potential of Cash App.
How Do I Increase My Cash App Limit from $2,500 to $7,500?
To increase your Cash App sending limit from $2,500 to $7,500, you need to verify your identity through the app. Follow these steps:
1. Open the Cash App on your mobile device.
2. Tap your profile icon in the top right.
3. Scroll down and tap on “Personal”.
4. Enter your:
Full legal name
Date of birth
Last 4 digits of your Social Security Number
5. Submit and wait for approval (usually completed within 24–48 hours).
Once approved, your weekly sending limit will automatically increase to $7,500.
Can You Send $10,000 on Cash App?
Cash App doesn’t allow $10,000 in a single transaction, but there are ways to send that amount by breaking it up over multiple transactions within your Cash App weekly limit. Here are some scenarios:
• Verified account holders can send up to $7,500 per week.
• If you need to send $10,000, you must:
Wait for the 7-day window to reset.
Or send $7,500 now, then $2,500 after the limit resets.
Pro tip: If time-sensitive, consider using alternative methods (e.g., bank transfers or another platform like Zelle or PayPal for the remainder).
How Do I Increase My Weekly Limit on Cash App?
Beyond the initial verification step, there are no publicly advertised ways to increase your weekly limit above $7,500 on Cash App accounts. However, here’s what you can try:
• Maintain a clean transaction history. No chargebacks, fraud flags, or reversals.
• Contact Cash App Support directly via the app and request a higher limit.
• Provide proof of income or business documentation if asked (this may help if you're using Cash App for business).
For Bitcoin limits, consider applying for additional verification, which includes submitting a government-issued ID and possibly a selfie.
How to Increase Cash App Limit from $2,500 to $7,500?
The process to increase your Cash App limit online mirrors the mobile app steps since Cash App is designed primarily for mobile use:
1. Launch the Cash App mobile application.
2. Tap on your account profile.
3. Navigate to “Personal” settings.
4. Provide the requested information:
Legal name
DOB
Last four digits of SSN
5. Submit and wait for identity confirmation.
After verification, your Cash App limit increases to $7,500 automatically—no further action is needed.
There is no separate browser-based process for increasing limits. All verification must happen through the mobile app.
How to Check Your Cash App Limits?
To stay within your limits, keep an eye on your transaction history:
• Tap the Activity tab (clock icon) to see your recent transfers.
• For limit-specific details, contact Cash App support or review your account settings.
• Cash App does not provide a detailed breakdown of your remaining weekly limit in the app, so manual tracking may be necessary.
Important Cash App Limits to Remember
Transaction Type Limit (Unverified) Limit (Verified)
Weekly Sending $250 $7,500
Receiving $1,000 per 30 days Unlimited
Bitcoin Withdrawals $2,000 per day $5,000 per week
Cash Card Purchases $7,000/day $15,000/month
ATM Withdrawals (Cash Card) $310 per transaction $1,000 per 24-hour period
Final Thoughts
Cash App provides convenience, speed, and simplicity in sending and receiving money, but understanding its Cash App weekly limit reset policy and how to increase your limits is crucial to making the most of the platform.
• Your weekly sending limit resets exactly 7 days from each transaction.
• Verification is key to accessing higher limits.
• You can send up to $7,500 per week when verified, but must break up larger amounts like $10,000 over time.
Maximizing your Cash App experience means staying on top of these limits and verifying your account as soon as possible.
2 notes
·
View notes
Text
Lifesaving Tech with Hidden Risks: Medical IoT Devices
Hey, so… what even are Medical IoT Devices?
Okay, let’s start with the basics. Medical IoT (Internet of Things) devices are basically smart gadgets that help doctors and patients manage health in real-time. Think of them as the Fitbits of the medical world, but way more advanced and sometimes implanted inside your body.
Here’s a quick rundown of the most common types:
Wearables: Smartwatches, glucose monitors, patches that track your vitals.
Implantables: Pacemakers, insulin pumps, neurostimulators that keep your heart ticking, your blood sugar in check, your brain functioning properly respectively.
Hospital Gear: Things like infusion pumps, ventilators, or MRI machines that are connected to the hospital’s network.
These devices are amazing because they can send data straight to your doctor, so they can monitor you without you having to camp out in a hospital bed. But (and there’s always a but), this connectivity comes with a price: security risks.
Wait, How Can a Pacemaker Get Hacked?
Okay, so let’s get into the nitty-gritty of how these devices can be exploited. It’s not just about “hackers being hackers”, there are specific technical flaws that make these devices vulnerable.
1. Encryption (or Lack Thereof)
Encryption is like a secret code that scrambles data so only authorized parties can read it. For medical IoT devices, encryption is crucial because they’re transmitting sensitive health data. But here’s the problem: not all devices use strong encryption.
What’s Happening: Some devices send data in plaintext (unencrypted) or use weak encryption algorithms that can be cracked by hackers.
Example: If an insulin pump sends unencrypted data to a doctor’s computer, a hacker could intercept it and alter the dosage instructions, potentially causing harm to the patient.
2. Authentication Protocols
Authentication is how a device verifies that someone (or something) is who they claim to be. Think of it like a password or a fingerprint scan. But many medical IoT devices use weak or default authentication methods.
What’s Happening: Devices might use hardcoded passwords (e.g., “admin” or “1234”) or lack multi-factor authentication (MFA).
Example: A hacker could use a default password to gain access to a hospital’s network of infusion pumps and change their settings, leading to incorrect medication doses.
3. Specific Attack Vectors
Let’s break down how a hacker might exploit a vulnerability in a real-world device, like an insulin pump:
Step 1: Reconnaissance
The hacker scans for vulnerable devices connected to the internet. Many medical IoT devices are discoverable through tools like Shodan, a search engine for connected devices.
Step 2: Exploiting Weak Authentication
The hacker tries default credentials or brute-forces the password to gain access to the insulin pump’s control interface.
Step 3: Intercepting or Altering Data
Once inside, the hacker can intercept data (e.g., blood sugar levels) or send malicious commands (e.g., delivering an incorrect insulin dose).
Step 4: Covering Their Tracks
The hacker might delete logs or use encryption to hide their activity, making it hard for healthcare providers to detect the attack.
This isn’t just theoretical. Researchers have demonstrated these attacks in controlled environments to highlight the risks.
Real-Life Examples That’ll Make You Side-Eye Your Smartwatch
Let’s talk about some real-world incidents that’ll make you go, “Oh no, this is actually happening”:
The St. Jude Medical Hack (2017): Researchers found that certain implantable cardiac devices had vulnerabilities that could let hackers mess with the device’s functionality. Imagine your pacemaker getting hacked and delivering random shocks to your heart. Terrifying, right?
The Hacked Pacemakers (2018): In a chilling demonstration, the FDA confirmed that nearly half a million pacemakers were vulnerable to hacking. Hackers could potentially alter the device’s settings, drain its battery, or even deliver fatal electric shocks. Abbott (the manufacturer) had to issue a firmware update to patch the vulnerability, but not all devices could be updated remotely, leaving some patients at risk.
Ransomware in Hospitals (2020): A ransomware attack on a German hospital disrupted its systems, and a patient who needed urgent care died because the hospital couldn’t operate properly. This wasn’t a direct attack on a medical device, but it shows how vulnerable healthcare systems are.
These aren’t just hypothetical scenarios. They’re happening, and they’re putting lives at risk.
Who’s Behind These Attacks?
Not all hackers are created equal. Here’s who might be targeting medical IoT devices:
Cybercriminals: They’re in it for the money. They might steal patient data to sell on the dark web or lock down hospital systems with ransomware.
Nation-States: Some governments use cyberattacks as a form of espionage or warfare. Targeting medical devices could be a way to destabilize a country or gather intel.
Hacktivists: These are hackers with a cause. They might attack a hospital to make a political statement or expose security flaws.
So… What Can We Do About It?
The good news is that there are ways to protect medical IoT devices. It’s not a lost cause...yet. Here’s what needs to happen:
1. For Manufacturers:
Stop Using Default Passwords: Imagine leaving your front door unlocked with a sign that says, “Welcome, hackers!” That’s what default passwords like “admin” or “1234” do. Manufacturers need to make sure every device has a unique, strong password right out of the box.
Lock Down Data with Strong Encryption: Encryption is like putting your data in a safe. Manufacturers should use the strongest locks available (like AES-256 encryption) to keep patient information safe from prying eyes.
Test for Weak Spots Before Selling Devices: Before releasing a device, manufacturers should hire ethical hackers to try and break into it. This is called penetration testing, and it helps find and fix vulnerabilities before they can be exploited.
Follow the Rules (FDA Guidelines): The FDA has a set of rules for making sure medical devices are secure. Manufacturers need to follow these guidelines to keep patients safe.
2. For Hospitals and Doctors:
Keep Medical Devices on a Separate Network: Think of it like having a VIP section at a concert. Hospitals should keep medical devices on their own secure network, away from the rest of the hospital’s systems. This makes it harder for hackers to sneak in.
Watch for Suspicious Activity: Hospitals should use tools that act like security cameras for their networks. These tools, called intrusion detection systems (IDS), can spot hackers trying to break in and alert the staff.
Train Staff to Spot Cyber Threats: Doctors and nurses are experts at keeping patients healthy, but they might not know much about cybersecurity. Hospitals should train their staff to recognize and respond to cyber threats, like phishing emails or suspicious device behavior.
3. For Patients:
Keep Your Device’s Software Up to Date: Just like you update your phone to get the latest features and security fixes, you should update your medical devices. These updates often include patches for known vulnerabilities.
Avoid Public Wi-Fi: Public Wi-Fi is like shouting your secrets in a crowded room, anyone can listen in. If your medical device connects to the internet, make sure it’s using a secure, private network.
Use a VPN for Extra Security: A VPN is like a secret tunnel for your internet traffic. It keeps your data safe from hackers, especially if you’re accessing medical information remotely.
The Bigger Picture: Why This Matters for Everyone
Okay, so this isn’t just a tech issue. It’s a public health issue. Vulnerable populations, like the elderly, people with chronic illnesses, or those who rely on medical devices to stay alive, are often the most at risk. And let’s be real: it’s not fair that some people are more at risk than others just because of their income or where they live.
Here’s the thing: wealthier patients might have access to the latest, most secure devices or private healthcare, while lower-income patients could be stuck with outdated or less secure options. Imagine needing a pacemaker but only being able to afford one that hasn’t been updated in years and is vulnerable to hacking. That’s not just unfair; it’s dangerous. And it’s something we need to fix as a society.
But it’s not just about money. There’s a bigger ethical responsibility here. Manufacturers need to prioritize patient safety over profits. That means investing in strong encryption, regular updates, and rigorous testing before releasing devices. And governments? They need to step up and enforce stricter cybersecurity standards to hold manufacturers accountable.
And let’s talk about the legal side for a sec. Laws like the FDA’s cybersecurity guidelines and the EU’s Medical Device Regulation are supposed to keep us safe, but they often lag behind the fast pace of tech advancements. Plus, there’s the whole question of liability: if a hacked device harms someone, who’s responsible? The manufacturer? The hospital? The patient? It’s a legal gray area that needs clarity.
Oh, and it’s not just a problem in wealthy countries. In developing nations, where healthcare systems are already stretched thin, a cyberattack on medical devices could be catastrophic. Access to secure healthcare is a basic human right, and we’re failing to protect that right when we ignore these vulnerabilities.
So yeah, this isn’t just about fancy gadgets or tech jargon. It’s about people’s lives. It’s about making sure that everyone, no matter their income or where they live, has access to safe, secure healthcare. And that’s something we all need to care about.
Final Thoughts
Medical IoT devices are a game-changer for healthcare, but their security flaws are a ticking time bomb. We can’t afford to ignore this issue, not when lives are on the line. Whether you’re a patient, a doctor, or just someone who cares about tech and ethics, it’s time to start paying attention.
So, the next time you hear about a smart pacemaker or a glucose-monitoring app, remember: with great tech comes great responsibility.
Further Reading
If you’re as obsessed with this topic as I am, here are some links to dive deeper:
MuddyWater’s Exploitation of Medical Devices (CISA Alert)
FDA Cybersecurity Guidelines for Medical Devices
Shodan: The Search Engine for Connected Devices
European Union Medical Device Regulation (MDR)
TL;DR
Medical IoT devices are amazing but have serious security flaws. Hackers can exploit these flaws to harm patients, and we need better safeguards to prevent this. Everyone (manufacturers, hospitals, and patients) has a role to play in making these devices safer.
2 notes
·
View notes
Text
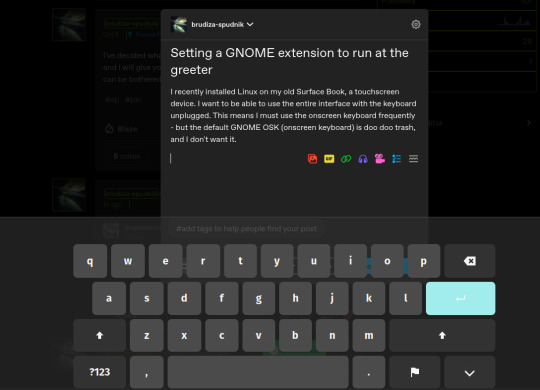
Setting a GNOME extension to run at the greeter
I recently installed Linux on my old Surface Book, a touchscreen device. I want to be able to use the entire interface with the keyboard unplugged. This means I must use the onscreen keyboard frequently - but the default GNOME OSK (onscreen keyboard) is doo doo trash, and I don't want it. You will need root access for this tutorial.
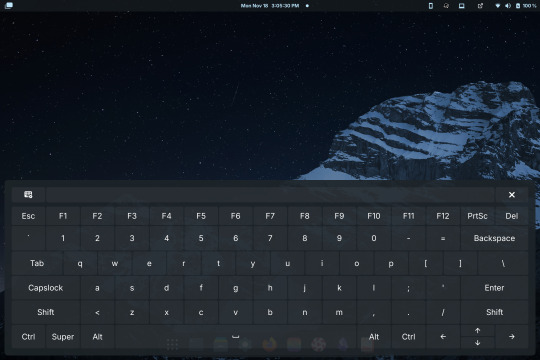
Compare the default GNOME OSK (left) to the new and improved one (right).
This tutorial involves copying a standard GNOME extension into a folder that's readable by any user, then enabling it for use by the GDM user, which governs GNOME's greeter (login screen).
The extension I will be installing using this method is the above keyboard, [email protected] (which can be found via GNOME's extension manager). This is done with the purpose of accessing this significantly improved onscreen keyboard even at the login screen - without this tutorial, the extension does not load until after you have logged in. This method can be done with any extension, although I'm told the GDM user is more restricted than the actual user so some things may not work.
Step 1: Set up the extension in userspace.
Modifying the extension config after it's copied over will be a pain in the ass. Get all your configs ready using the extension's own menus or config files. No rush, as you can still do this bit up until step 5.
Step 2: Move the extension from user-install to system-install.
In order for the GDM user to access the extension it must be in the system-installed folder. For my OS (Zorin) it will be in good company.
sudo mv -r ~/.local/share/gnome-shell/extensions/[email protected] /usr/share/gnome-shell/extensions/
You can also copy it instead of moving it, but you have to rename the user-install folder (in ~/.local) to break it. Otherwise the system would rather use the user-installed one, and will ignore the system-installed one on boot. I think.
Make sure that the gdm user can actually access the files as well:
sudo chmod -R a+rX /usr/share/gnome-shell/extensions/[email protected]
Step 3: Modify the extension metadata file to let it run on the login screen.
sudo nano /usr/share/gnome-shell/extensions/[email protected]/metadata.json
look for the line that says
"session-modes": ["user"],
If the line doesn't exist, just add it. You need it to say
"session-modes": ["user", "gdm", "unlock-dialog"],
Step 4: Enable the extension for the gdm user.
To do this and the following step, you must be able to log in as the gdm user. There are multiple ways to do this, but the way I used is via `machinectl`. If you try to run this command on its own it should tell you what package you need to install to actually use it. I do not know the ramifications of installing this, nor do I know its compatibility; all I can say is it worked for me. If you are uncertain you will have to carve your own path here.
Once it is installed, log into the gdm user from a terminal:
machinectl shell gdm@ /bin/bash
and enter your sudo password.
At this point I recommend checking the current list of enabled extensions:
gsettings get org.gnome.shell enabled-extensions
On my computer, this came back saying "@as []", which means it's blank. To enable your desired extension:
gsettings set org.gnome.shell enabled-extensions "['[email protected]', 'if the above command did NOT come back blank just put the rest in here.']"
Step 5: Transfer the settings from the userspace install to the system install.
Right now, the extension should be working on the login screen. To make sure, press ctrl + alt + delete to log out, or restart your computer. You will notice that while the extension is functioning, none of your settings saved. To fix this you must use dconf to dump and then reimport the settings. Get back to a regular user terminal and run:
dconf dump /org/gnome/shell/extensions/[email protected]/ > extension.ini
Now you have your settings in a nice neat file. The gdm user can't access this though since it's in your user folder. My quick and dirty solution:
sudo mv ~/extension.ini /extension.ini sudo chmod 777 /extension.ini
If you want it in a better place than the system root folder you can put it there. I don't really care.
Now you log into the GDM user and import the settings file there.
machinectl shell gdm@ /bin/bash dconf load /org/gnome/shell/extensions/[email protected]/ < /extension.ini
Now log out of the gdm user and clean up after yourself.
sudo rm /extension.ini
Now restart or log out and you will see that your extension is now functioning with all its settings.
Huge thank you to Pratap on the GNOME Discourse site. This post is basically just a tutorialized adaptation of the thread I followed to do this.
3 notes
·
View notes
Text
Guide to Boosting Your Cash App Bitcoin Withdrawal Limit
Cash App is a popular choice for buying, selling, and managing Bitcoin due to its user-friendly interface and integrated features. However, many users find themselves constrained by the default withdrawal limits on Bitcoin transactions. If you're looking to increase Cash App Bitcoin withdrawal limit, follow these five simple steps to enhance your trading capabilities.
1. Verify Your Identity
Verifying your identity is a critical step in increasing your Cash App Bitcoin withdrawal limit. This process ensures that your account is secure and compliant with financial regulations.
Step 1: Open the Cash App on your mobile device and tap on the profile icon or the account icon located in the top-right corner of the screen.
Step 2: From the profile menu, navigate to "Personal" and select "Verify Identity."
Step 3: You'll be prompted to upload a photo of your government-issued ID. Ensure the photo is clear and all details are legible.
Step 4: Take a selfie as directed to match the ID photo. This step helps Cash App confirm that you are the person in the ID photo.
Step 5: Submit the required documents and wait for the Cash App to review and approve your verification request. The verification process may take a few hours to a few days. Once completed, your account will be eligible for higher withdrawal limits.
2. Link a Bank Account
Linking a bank account to your Cash App account not only facilitates easier transactions but also enhances your Cash App withdrawal limit.
Step 1: On the Cash App home screen, tap on the "Banking" tab, represented by a bank icon or the "$" symbol.
Step 2: Select "Linked Accounts" or "Add a Bank Account" from the options available.
Step 3: Follow the on-screen instructions to link your bank account. Please provide your bank details and log in to your bank account for verification.
Step 4: Confirm the linking process. This step allows Cash App to securely connect your bank account with your Cash App account, which can positively impact your Bitcoin withdrawal limits.
3. Enable Two-Factor Authentication (2FA)
Two-factor authentication (2FA) adds an extra layer of security to your Cash App account, which is essential for handling higher withdrawal limits.
Step 1: Go to the Cash App home screen and tap on your profile icon.
Step 2: Select "Privacy & Security" from the menu.
Step 3: Tap on "Two-Factor Authentication" and choose your preferred method for receiving authentication codes (e.g., SMS or an authenticator app).
Step 4: Follow the prompts to enable 2FA. You'll need to enter a code sent to your phone or generated by the authenticator app.
Step 5: Once 2FA is activated, Cash App will use this additional security measure to protect your account, which can help in raising your Bitcoin withdrawal limits.
4. Upgrade Your Account to Cash App Pro
Cash App offers different account tiers, and upgrading to Cash App Pro can increase Cash App Bitcoin limit:
Step 1: Tap on the profile icon or account icon in the top-right corner of the Cash App home screen.
Step 2: Select "Settings" and then "Upgrade to Pro" or "Account Upgrade."
Step 3: Follow the instructions to complete the upgrade process. This may involve additional verification steps or providing more detailed personal information.
Step 4: Once upgraded, you'll benefit from higher limits on Bitcoin withdrawals and other enhanced features available to Pro users.
5. Contact Cash App Support
If you've completed the above steps and still face limitations, contacting Cash App support can provide personalised assistance and potentially increase your Bitcoin withdrawal limit.
Step 1: Open the Cash App and tap on the profile icon.
Step 2: Navigate to "Support" and select "Something Else."
Step 3: Choose the option related to Bitcoin limits or transactions.
Step 4: Follow the instructions to contact support. You can send a message or request a call to discuss your needs.
Step 5: Provide any required information and explain your request to increase your Bitcoin withdrawal limit. The support team will review your case and may adjust your limits based on your account history and verification status.
Frequently Asked Questions (FAQs)
Q1: What is the Cash App Bitcoin withdrawal limit?
A1: The default Cash App Bitcoin withdrawal limit is typically set at $2,000 per week. However, this limit can vary based on your account status and verification level.
Q2: How can I increase my Cash App Bitcoin withdrawal limit?
A2: To increase your Bitcoin withdrawal limit, verify your identity, link a bank account, enable Two-Factor Authentication, upgrade to Cash App Pro, or contact Cash App support for assistance.
Q3: What is the Cash App Bitcoin daily withdrawal limit?
A3: The daily withdrawal limit for Bitcoin on Cash App can be up to $2000, but it may vary depending on your account verification level and other factors.
Q4: Are there limits on Cash App Bitcoin purchases?
A4: Yes, Cash App imposes limits on Bitcoin purchases as well. The daily purchase limit is generally set at $10,000, with a weekly limit of $50,000.
Q5: How can I check my current Cash App Bitcoin limits?
A5: You can check your Bitcoin limits by navigating to the Bitcoin section within the Cash App and reviewing your account settings. For specific details, you may also contact Cash App support.
By following these steps, you can increase your Cash App Bitcoin withdrawal limits and enjoy greater flexibility in managing your cryptocurrency transactions.
2 notes
·
View notes
Text
Max 4 Live Devices
Here I'll be posting max 4 live devices that may be useful to the community. If you have feedback, or if you need specific modification to suit your needs, feel free to contact me at : vair . nicolas at gmail . com
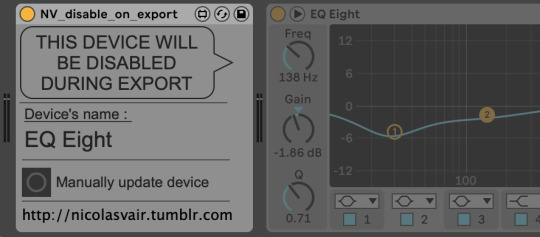
Disable on export
Download here
Fairly simple. During export, the next device will be disabled (next device to the right of this one). Work before or inside Effects Racks. Super useful to disable the EQ of your monitoring while exporting.
I tried various methods that resulted very unreliable (plugin would stay on with 1 in 10 exports), so I finally chose to keep it off as default state and goes on while "playing and not exporting".
Clip color
Download for free here
Simple little device to change the color of the selected clip. You can map the buttons to keyboard.
I use it mainly when tracking, using the following color code : red -> Bad take orange -> Ok take green -> Great take white -> time issue pink -> something else to be taken care of blue -> pitch issue
You can easily open the patch to change colors or add colors.
Collaboration is welcome but the device is available for free. No need to put a real email.
Note : currently it doesn't work on a selection of various clips. It's a real bummer for linked tracks (current workaround is right click and select color).
Insert again
Download for free here
Simple device to load a plugin and map with a keyboard shortcut (similar to shortcut buddy).
This device make use of 11live.tools available here. It's included in the patch so no need to download it (I hope so at least 🫠).
Collaboration is welcome but the device is available for free. No need to put a real email.
Notes : - You can't load a plugin directly, but you can create a group rack with your plugin, then save your group rack somewhere and drag this group rack to the device. - I added an option to "extract' the plugin from the group rack and delete the group rack. This way you don't clutter the visual interface with useless groups. - If you need to add another plugin to a keyboard shortcut, insert a second instance of "Insert again".

Gain staging
***after download, load it on your session and follow instructions to load the correct path to "Gain.adg" file. ***
Ok.. so this one is a bit trickier but without a doubt the patch I use the most daily.
Use it to manage gain staging in a session :
1 - at track level - map to keyboard shortcut to insert a gain anywhere in your session
2 - at clip level - map to keyboard shortcut to apply gain to a clip
1 - TRACK GAIN
Trigger anywhere to add a gain in your plugin chain.
If your fader is at -5, click on fader then trigger, a gain with -5 is added as last object of track and fader reset to 0. If last object was already a gain, then values are summed. (This works ok until +/-24 dB then it behaves weird.)
I created this because I use my faders only for automation and/or temporary adjustments (like voice at +6 dB while editing vocals). Waay more space for your brain to focus on what matters.
2 - CLIP GAIN
Select a clip then trigger to apply gain.
There are a lot of M4L devices for clip gain, I wanted one as simple as possible when editing breath.
I use "e" as keyboard shortcut so I have "cmd+e" to cut, "e" to clip gain.
Available here
Print
Print tracks and groups to stéréo in one key.
Click on a track, keymap to the PRINT button. When you press it, it will create a new track which input is the output of the previous track and arm it for record. Then press record and unleash the power of the wav.
Great for printing groups, FX, sampling, layering, searching textures etc..This one is 2€ here
3 notes
·
View notes
Text
Enhance Your PC Starfield Graphics

PC Starfield Tweaking Guide — Mods and Tweaks
After receiving positive reviews, Bethesda Game Studios’ new RPG debuted on Steam with 245K concurrent users today, including owners of the $100 Starfield Premium Edition until September 6th.
BGS games have always inspired PC modders, and Starfield is no exception. Even though the official modding tools won’t be published for a few months, the community has come up with several changes and proto-mods to improve the experience. We’ve included the most significant community improvements below.
performance
Starfield doesn’t stutter like other current PC games, but its nature makes it hefty. Thus, performance optimisation should be sought wherever possible.
We haven’t verified reports that manually activating Resizable BAR for NVIDIA GeForce GPUs improves performance. This is the overall method if you want to attempt.
Bulwarkhd created a Performance Texture Pack to reduce VRAM usage by lowering the typical texture resolution from 2K to 1K or even 0.5K for those with a configuration near the minimal requirements.
In a recent post, Nexus Mods user Erok posted optimised graphic preset.ini files for Low, Medium, High, and Ultra to boost PC frames.
Starfield’s visuals are enhanced by Bethesda’s newest Creation Engine, which the makers claim is the most advanced technology in their game. The most notable changes from Bethesda games are the animations and Global Illumination lighting.
Visuals
There are methods to improve the visuals even at this early stage of its public release. Many players noted the yellow/green tinge and high black levels first. Both may be part of the developer’s creative vision, but the gamma cannot be changed in-game.
The settings usually darken evenings. Depending on the ReShade setting, performance may drop by 5% or 10%. You may always use the ReShade option to deactivate shaders unrelated to colour fixes if you like.
Epiphany Absolute is developing the first Starfield HD Texture Pack mod. The author revealed that AI upscalers are doubling texture resolution from 2K to 4K. Of course, this effort is ongoing. Currently available upscaled textures: Aquatic, bladed, flowers, forest, rocks.
Epiphany Absolute posted another ship HD Texture Pack mod a few hours ago. The installation is identical. Remember that only Discovery, Hopetech, Pirate, Ship Common, and Starborn have been revised.
Gameplay
While playing Starfield, I realised that stealth is more harder than in prior Bethesda games. The devs may have overtuned NPCs”senses’
Thanks to two modifications, they may be adjusted. Zzyxzz’s ‘Better Out of Line of Sight Sneaking’ reduces foes’ hearing accuracy when you’re hiding behind obstructions. According to the creator, the game’s default setting is 0.4, but the mod lowers it to 0.33 like earlier BGS games.
Also, transfer SneakSoundLosMult.txt from the mod to the Starfield folder.
Gameplay Tweaks and Fixes by Ixion XVII reduces NPC view cone detection (from 190 to 170) and opponent visibility in exteriors (by 5%) in Starfield.
It functions similarly to the previous mod. StarfieldCustom.ini’s [General] section needs the following command:
Zzyxzz, who made the first mod in this area, also released a Less Spongy Enemies mod that decreases NPCs’ health gain when they level up. The default amount is 20, but this mod may change it to 15, 10, 5, or 0.
Quality of Life
Starfield, like other BGS games, is complicated. Sometimes that shows in the User Interface or other ways the game may be more accessible or responsive. Quality-of-life changes will aim to solve it.
First, how to enter the game faster. The ‘Undelayed Launching’ mod by Seb263 skips the Bethesda logo and health warning messages by tweaking StarfieldCustom.ini and adding a new file.
Increase the spaceship’s Field of View optionally. Again, adjust the value to your liking.
Want a more immersive interface? You need franchfroise’s ‘Immersive Tactical Hud’ mod. It eliminates opponent health bars, names, hip-fire crosshairs, compresses crosshairs and the level-up indication, changes the experience bar, and improves hit marks and crit notifications. Installation is same to above.
However, Stentorious’ Simple Compact Inventory adds 12 displayed items and an optional file to organise goods by Value:Mass ratio.
TomLikesGuitar added this option and a beneficial Value:Weight ratio sorting mod.
In both circumstances, extract the Data files into the main Starfield folder and check StarfieldCustom.ini:
Last but not least, McGuffin’s IconSortingTags adds additional icons to Starfield’s inventory and loot window to help players see what they have. Same installation process as above.
The iceberg is merely the tip. Stay tuned for years of coverage of the finest Starfield modifications and improvements!
2 notes
·
View notes
Text
Adding a persistent route to Raspbian 11
June 28th, 2023
In Rasbian 11, you use dhcpcd (note the extra ‘c’ in that name). You add hooks, scripts that run after the dhcp client runs. If you read the man pages for dhcpcd, you’ll find that the hooks are located in /lib/dhcpcd/dhcpcd-hooks/. You’ll find files that start with numbers which defines the execution order woth low numbers being executed first. I added my ‘route add’ command to a file I called 70-routeadd and rebooted. Magic.
Try searching on how to add a persistent route to Raspbian 11 and you’re 99% likely to find old, wrong answers. The reason is there are several ways, some no longer really supported, to manage networking. The venerable interfaces method is deprecated, as near as I can tell, but you can still find the configuration structure and services in a brand new default installation. Network configuration has moved to DHCP even for static addresses.
There is the dhclient set of utilities, configuration files, and the service daemon for it. It won’t work either and I have no idea why its installed. I stumbled across the dhcpcd daemon looking at a list of services and finally decided its something different from dhclient. After reading the man pages, I figured it was a shot in the dark and followed it and Voila! Success.
Linux’s a mess. Networking sucks.
2 notes
·
View notes
Text
According to my AI class (taken before the modern AI boom), a LOT of things that attempt to simulate intelligence in one way or another have historically been in the field of AI, including various types of completely regular algorithms. Examples hallmarks of AI in the 80s-2000 would have been: responsiveness to different situations, ability to be altered without code (either on its own or through simpler interfaces), anything that would be considered a 'Smart' version of an older algorithm (better tolerances, more available adaptation to user specific requirements). Detecting red eye and removing it, for example, would easily have been in that category. It's probably more accurate to say it was removed from it in the public eye when it stopped being trendy.
Historically, as I understand it, AI has never been about 'labor issues, creativity loss, jobs stolen.' That is a more modern concern. (And I caution against redefining AI to be just based on consequences of the current forerunning usage of it)
I would hazard that this is one of many situations where the privileged class simply doing what is natural and normal to them (capitalizing on a hot new buzzword in this case) also naturally has other effects that help maintain the status quo. Individually, I assume the vast majority of the people making these decisions have nothing of the sort in mind other than wanting to make it seem like they have the latest technology. In the end, the people they care most about advertising to with buzzwords are investors and shareholders, who have different priorities from regular people. Venture capital culture means that a lot of tech is about seeming ahead of the curve to people with money, and less about appealing to the average consumer (not to mention, the average consumer is less aware of this than many people who are active on social media)
AI can also be used in a lot of ways that are not visible from a surface level. A lot of algorithms use sets of tolerances, defaults, and templating that are technically just a bunch of numbers, but in a lot of cases those numbers can now be tuned using automated testing before publishing. Nvidia's ray tracing algorithms are in significant part sustained by using what would still be considered modern AI-derived methods to approximate information that is too expensive to calculate in real time.
Context-sensitive translation also has a close relationship with AI, because language processing is historically a very close field (for obvious reasons, the two fields have fed into one another consistently for decades).
Many senior developers and computers-adjacent executives and marketers are likely aware of these older trends, and they probably don't seem as out of touch to bring back from the perspective of being sentient since the 80s and being trendy again in the 2020s.
(I got nothing for calculator AI though)
Latest tech pet peeve is the use of the term "AI" to refer to basically anything that does any amount of automation or uses computers in any way
12K notes
·
View notes
Text
Unlock Java Interview Success: OOP Concepts Every Candidate Must Know
Why OOP Matters in Java Modular, scalable design: OOP's emphasis on encapsulation, inheritance, and polymorphism enables well-structured, reusable code—it’s what makes Java maintainable and extensible. Industry alignment: Major companies use OOP principles to design systems that evolve gracefully over time, making OOP fluency a professional imperative. Read For More Info : Java OOPs Concepts The 4 Pillars of Java OOP Master these foundational concepts: Abstraction Focuses on exposing what an object does while hiding how it does it. For example, using methods without worrying about internal logic exemplifies abstraction. Encapsulation Bundles data (fields) and behavior (methods) while enforcing privacy via access modifiers. This mechanism promotes data integrity and prevents external misuse . Inheritance Enables a class (subclass) to inherit attributes and behaviors from a parent class, reflecting an "is-a" relationship. It promotes code reuse and logical hierarchy. Polymorphism Allows objects of different classes to respond differently to the same method call. Supports both: Compile-time (overloading): Same method name, different parameters. Runtime (overriding): Subclass provides its specific version of a method Read For More Info : Java Frameworks Bonus: Advanced OOP Insights Composition vs Inheritance: Favor composition ("has-a") over inheritance to reduce tight coupling. Access modifiers: Understand private, protected, default, public, and when each is appropriate. Abstract classes & interfaces: Know when to use each—abstract classes for shared code, interfaces for contract separation. Final Prep Checklist 1. Review definitions and examples for each OOP pillar. 2. Write and test sample classes demonstrating each principle. 3. Prepare clear analogies to explain your thought process. 4. Practice common OOP interview questions along with polished answers. Code your future with Java! Enroll at Fusion Software Institute, master Java concepts, and secure placements starting at ₹4 LPA. 📞 7498992609 / 9503397273 📧 [email protected]
0 notes