#File transfer from Mac to PC
Explore tagged Tumblr posts
Visit Tumblr Blog
Explore Tumblr blogs with no restrictions, modern design and the best experience.
Last Seen Tumblr Blogs


Fun Fact
In 2020, 27% of US Tumblr users had an annual household income of over $100,000.
Text
xender better than airdrop
#xender#fast#filesharingtransfer#files#video#Xender#$transfer file from iphone to Mac#airdrop#transfer file to PC
0 notes
Text
youtube
In this video, we'll show you how to easily transfer photos and videos from your iPhone to your desktop. Say goodbye to storage issues and learn how to quickly move your media files for safekeeping! 1. Turn your phone on and unlock it. Your PC can’t find the device if the device is locked. 2. On your PC, select the Start button and then select Photos to open the Photos app. 3. Select Import - From a USB device, then follow the instructions. You can pick the items you want to import and select where to save them. Allow a few moments for detection and transfer.
#How to Transfer Photos and Videos from IPhone to Desktop#how to transfer photos from iphone to computer#how to transfer videos from pc to iphone#transfer photos from iphone to mac computer#how to transfer photos from iphone to laptop#transfer files from iphone to pc#transfer photos from iphone to computer#how to transfer photos from iphone to pc#Youtube
0 notes
Text
How to play the original Secrets Can Kill in 2025 without game discs
oh my god I almost just wrote 2015 instead of 2025
I've successfully been playing the original SCK for the past couple hours (including "changing discs" and reopening save files), but it's possible I could run into problems later, so no promises that this is a perfect solution.
This method still requires installing the game files, so I think it'll only work on Windows, sorry Mac users. I'm using Windows 11. I was also able to install and open the game on a Windows 10 computer, but I didn't actually attempt to play it there.
All you need are copies of the game .iso files and a virtual hard disk drive program. The post got long, so details are under the Keep Reading. It's not actually complicated, but apparently I talk a lot lol
The .iso files:
.iso files are digital replicas of optical discs (CDs, DVDs, etc). You probably don't have the original Secrets Can Kill discs, so you will need to...acquire these files.
[NOTE: My personal ethics say to not pirate shit from small studios or independent creators. HeR is a small studio and if people don't buy stuff from them, they can't afford to make new games. However, the original SCK is abandonware and literally can't be purchased, so imo, it's perfectly acceptable to pirate it.
I want to strongly discourage anyone from pirating any of the other games which can be purchased. They have 50% off sales all the time (including through today, 1/5/25) and a bunch of the games are as low as $5 when on-sale. The digital downloads don't come with any kind of restrictive licenses, so if you get a new computer, you can transfer the files and keep your games forever. Pls keep supporting HeR so that we can maybe keep getting new games]
I recommend getting the SCK .iso files from archive.org. That link will take you to a software search for Nancy Drew Secrets Can Kill. As of this post, there's only 1 result that's actually for the original SCK.
Anytime you're downloading software from a site where anyone can upload stuff, there's always a possibility of viruses. Check and see if the uploader seems sketchy (Are there comments on any of their uploads warning about viruses? Is the account brand new?). You could run the files through a virus checking program, but apparently .iso files frequently throw false positives. The SCK uploader seemed legit, but I initially downloaded and installed these on an old computer that I don't use, just in case.
There will be a bunch of files available to download. You specifically need to download the "ISO IMAGE" files. There should be two of them- disc 1 and disc 2. After downloading, I recommend moving the files out of your downloads folder because you'll need to access them frequently.
The virtual hard disk drive program:
Like I said above, .iso files are digital copies of physical discs. Similarly, the way to use the files is via a digital version of a physical disk drive. "Mounting" the .iso files to a virtual disk drive is analogous to inserting a disk into a physical drive.
Windows 8 and above has a built-in ability to mount .iso files, but when I tried that, I got a notice that the file was corrupted. The internet recommended that a dedicated program might have more functionality. I chose the Elby Virtual CloneDrive program, which is free.
Installing the game:
After downloading and installing the virtual disk drive software, navigate to your .iso files, and right click on the file for disc 1. Scroll to "Open with", and choose "Mount Files with Virtual CloneDrive". It will now show up as a CD drive in This PC in the file explorer:

Double-click to open the drive and scroll to "setup.exe". Open the file to run the game installer.
The game will install in a typical way. I think the only non-default option I chose was "No, I will install DirectX myself". I didn't actually install DirectX, but everything is working fine ¯\_(ツ)_/¯ idk, maybe now it's built-in to Windows or something.
Running the game:
To run the game, just open the game shortcut like a normal program. If you can't find the shortcut or didn't create one during the install, go to your C: drive -> Program Files (x86) -> Nancy Drew -> Secrets Can Kill -> Game.exe
In order for the game to run, you need to have Disc 1 still mounted to your virtual drive. Unless you specifically unmounted it, it should still be there, but if you get a pop-up that says to insert the disc, the problem is probably that the disc isn't mounted.
I was expecting that I would have to run the game in Compatibility Mode to handle that it was made for fucking Windows 98, but I didn't have to do anything. It just worked with no adjustments. A miracle!!
Changing discs:
The original Secrets Can Kill was too big to fit on a single disc at the time it was made! They split it across multiple discs by location. The school is on disc 2, while all other locations are on disc 1. So if you need to move from the diner to the school for example, you have to change discs.
When you need to change discs, you'll get this screen:

WITHOUT closing the game program, minimize the game. Easiest way is by either pressing the windows key or alt+tab. Navigate to your .iso files, right click on the new disc, and choose Mount.
Navigate back to the game and click OK. Easy as that!
Whenever you fully exit and re-open the game, you have to open it with disc 1 mounted. So if you saved while at the school, you'll open the game with disc 1, load your save, and immediately switch over to disc 2.
And I think that's everything! Phew! This got a lot longer than I planned on. Feel free to send me questions if you're having trouble, but I may not know the answer. I'm not an expert in this stuff, I just spent some time poking around at it last week is all.
Have fun! Go manatees!
142 notes
·
View notes
Text
Offline Library
In light of all the Ao3 issues lately I'm gonna throw this up as something people should consider doing. Make your own library of your favorite fics and any you might like to read in the future/are currently reading.
How do you do this? To start: Calibre & ReadEra app
Calibre is a free ebook management software, available on windows, mac, and linux - but also comes in a portable version you can put on a flash drive. Ebooks are very small files, 100s of fics can easily take less than 1GB of space. You can create categories for everything and all the tags on the fics will stay attached to them. You can download directly through ao3, or you can use the browser extension Ficlab which can make the process a little quicker, plus give you a book cover(or you can add your own cover). Epub or Mobi format is best.
ReadEra, is a free reading app with no ads that you can tell to only access a single file where you keep your ebooks. It's open source and the Privacy Statement and Terms & Conditions are very short and easy to read. You can transfer files from Calibre to your phone, but this is also a good option if you don't have a PC to use Calibre. You can make folders to organize all your fics.
Quality of life plugins for Calibre: Preferences > Plugins > Get New Plugins
Look up: EpubMerge, EpubSplit, FanFicFare, Generate Cover (restart calibre once you've added them all) Fun fact, with FanFicFare, you can download new chapters to update fics that are currently in progress directly in Calibre instead of having to open up ao3.
Also, to be clear - back them up for yourself only, don't you fucking dare repost them anywhere.
You can also backup Kindle books (and you should) with Calibre, though that's a bit more complicated; instructions under the read more
Firstly what is DRM? TLDR: digital rights management (DRM) is meant to prevent piracy, however, this also means you never really own your ebooks. If Amazon decides to take down a book you bought? That's it, it's gone and it doesn't matter that you paid for it.
Removing DRM If you're on PC and don't have a kindle device, you'll want kindle version 2.4.0 or it won't work in Calibre.
In Calibre, navigate to Preferences > Plugins > Load Plugin From File - DeDRM - Use the latest Beta or Alpha release, follow instructions on the github page
Preferences > Plugins > Get New Plugins
Look up: KFX Input
You'll have to restart Calibre once you install so just add them all at once before you restart it.
If you need some troubleshooting help setting anything up just ask and I'll try to help!
48 notes
·
View notes
Note
Helloo again,
I know I sent an ask about “transferring files” like an hour ago, but I wanted to look into it cuz there has to be a better way. And there is for chrome users ;D (this could also work on Mac but again, I have no idea i only tested this on PC, sorry!)
this involves more steps than the “save to disk,” but you get to keep all your saves (not just your game but every web itch.io game that someone has played. at least from my testing)
on your old PC/laptop:
windows key + R (brings up the ‘Run’), and once you see it, type in %appdata% and from there simply follow this:
%appdata% >> (if it lands you on roaming just go to AppData) local >> Google >> Chrome >> User Data >> *profile* file (i used ** to indicate the profile you used to play the game, which can be ‘Default’ or ‘Profile #’) >> And look for ‘Local Storage.’
note: you can just copy the entire *profile* file, but from my tests, you only seem to need ‘Local Storage.’ That said, if just the ‘Local Storage’ file alone doesn’t work, just grab the entire *profile* file. both methods work. And if you go the entire *profile* file route, just do the same thing but with that file:
once you have the ‘Local Storage’ file, email it to yourself or upload to Drive (i recommend Drive if it’s a heavier file).
Thennn
on your new or other PC/laptop:
download chrome first (but make sure it’s closed before next steps)🙂↕️. Also, download the file from email or Drive or whatever, and repeat the same thing really
Windows + R >> %appdata% >> local >> Google >> Chrome >> User Data >> *Profile* file >> delete the ‘Local Storage’ file that’s already there and drag in the ‘Local Storage’ from your old PC/Laptop.
note 2: if you went the whole *profile* file route just stop at >> User Data, and delete the ‘Default’ profile on your new chrome. And if your old *profile* file isn’t already named ‘Default,’ change its name to ‘Default.’ Honestly, you can play around with the name and name it ‘Profile #’ if you like that more, and you don’t have to delete the new chrome’s ‘Default’ file. Try it all it’s up to you
was this explanation overkill? Absolutely. but what am I if not excessive. As long as it can help someone preserve their hard earned saves i am content to be dramatic 💛
I was also gonna use yellow text highlights instead of orange (to somehow make this less confusing) to match your blog aesthetic in case you decided to respond do this essay of an explanation, but tumblr does not give out yellow easily, how sad 😔
51 notes
·
View notes
Text
I've been at my local computer club for 10 minutes and following shit happened:
- everyone made fun of someone who installed windows and they recommended a py installer for bottles for that one program he needed instead
- people were surrounding another guy trying to transfer files from a blackberry to a mac
- some dude threw cables at another guy
- i left my laptop at home, when i mentioned it, some guy placed two macbooks in front of me and said (threateningly) "replace the motherboards."
- i got a keychain sd card reader for free because why not
i am now returning home and gathering supplies (my trusty thinkpad and my pc ssd)
38 notes
·
View notes
Note
Hello! Do you have any tips on how to make Isla Paradiso playable? Thanks!
Hey lovely! Yes I do :)
IP is still noticeably laggier than other worlds for me but it's still totally playable, it's just because I'm used to having no lag at all in most towns since I installed the smoothness patch and got a good pc lol - it does still freeze occasionally for a couple seconds but I haven't had a crash yet 🤞
So first of all, I recommend watching @acottonsock's great video on fixing Island Paradise, I followed most of the steps in that:
youtube
But to give a rundown of the steps that have really helped me personally:
LazyDuchess's Smoothness Patch
Without this I used to really struggle with lag and it has pretty much eliminated it for me in most worlds (although IP is not completely lag free as I said)
2. Reduce / Remove Lag caused by Houseboats by Marydehoyos
This mod massively helps lag, afaik houseboats are the main source of lag in IP so this mod stopping them from moving around autonomously hugely helps
3. Limit your mod folder size, merge your CC & remove incompatible mods
I am a certified mod hoarder and it really doesn't help my game performance - once I merged my CC a few years ago I noticed a HUGE difference in my game performance overall
I also did a mod clear out a couple months ago because I noticed in the crash logs (found in the scripterror files in your game folder) that some particular ones kept causing crashes - unfortunately I did have to remove one of my favourite mods called the randomizer but it really massively helped with avoiding crashes in big towns once it was gone :(
My advice is to look comb through your mods folder and create a new one where you only bring over the essentials you can't play without - then do a process of elimination if you're still having issues until you find the culprit of lag / crashes
4. Regularly delete your cache files
I think for most TS3 simmers this goes without saying ATP
5. Fix game performance in general
If you're still looking for tips on improving game performance in general, there's another video by acottonsock I'd recommend:
youtube
I also have a section on my blog (here) filled with performance guides I personally followed when setting up my game
Also worth saying that I start over with a clean sims 3 folder about once a year and re-install all of my mods / cc, I find that this tends to be necessary once the lag / crashes start to get a bit too much, and it hugely helps to eliminate them - there's a guide here on this, but my advice would be don't delete your old TS3 folder as that guide says, just move it over to your desktop so you can still transfer over your mods, screenshots, settings, saves etc.
Also in order to do this step you must have a backup somewhere for your .sims3pack files, because they won't be saved. If you don't already keep a backup your sims3pack files you should do so asap!
6. Have a good setup
My last piece of advice (which is not cheap / accessible to everyone, sorry!) is to get a good PC, I played for years on shoddy laptops & even on a mac for my first few years of simming, and since I upgraded my setup about 2 years ago I have noticed an immense difference in crashing, performance issues, lag etc. because my computer is just better built to handle it
If you're considering doing this, never get a gaming laptop if you can avoid it, I've had really bad experiences with them personally & you can get a good PC for around the same price, if not cheaper in some cases (mine was around £800 total)
I really hope that's helpful! Let me know if you have any more questions on how to implement this stuff I can give you comprehensive instructions for each step, I just didn't want to make this too long :)
9 notes
·
View notes
Text
Stardew Valley Mods!
Below are a list of mods (organized as best as I can) that I use when I play Stardew Valley! Here are instructions on how to install on PC/Mac: ☆ Install SMAPI! This is important when later running the actual mods with the game. When installing and running SMAPI, it will give step-by-step instructions. ☆ Download your desired mods! Make sure you read the other required mods to run the ones you download. Without them, they will not run! ☆ Unzip the downloaded mods! A zipped file will not run unfortunately... ☆ Open the Stardew Valley mods folder. You can do this by opening the game (not launching) in your steam library, hitting the cog on the right-hand side of the screen, hovering over manage, and hitting 'browse local files'. From here you should see a folder labeled 'mods' ☆ Transfer your downloaded and unzipped mods into the folder! ☆ From here you should be able to run the game with mods! It may take some tweaking if mods aren't updated-- using this website shows whether or not the mods run and the latest version!
**if i missed anything please let me know! the SDV mod guide is much more coherent than me so be sure to use your resources!
Required for most: ☆ SMAPI ☆ SpaceCore ☆ Json Assets ☆ Generic Mod Config Menu ☆ Farm Type Manager (FTM) ☆ Content Patcher ☆ Fashion Sense ☆ Shop Tile Framework ☆ Event Repeater ☆ Non Destructive NPCs ☆ Mail Framework Mod ☆ Anti-Social NPCs ☆ SAAT - Audio API and Toolkit ☆ Expanded Preconditions Utility
Expansions: ☆ Stardew Valley Expanded ☆ Ridgeside Village
Gameplay altering: ☆ Skip Fishing Minigame ☆ Skull Cavern Elevator ☆ Chests Anywhere ☆ Destroyable Bushes ☆ Automate ☆ Ui Info Suite ☆ Show Birthdays ☆ Friends Forever ☆ Customize Anywhere ☆ Ellie's Ideal Greenhouse
Add-ons: ☆ Tractor Mod ☆ New Years Eve ☆ Pregnancy and Birth Events ☆ Date Night ☆ Spouses in Ginger Island
Texture/Recolor: ☆ DaisyNiko's Earthy Interface ☆ DaisyNiko's Earthy Recolour ☆ Medieval buildings & Medieval SV Expanded ☆ Elle's New Coop Animals ☆ Elle's New Barn Animals ☆ Rustic Country Town Interiors
Item Replacements: ☆ Firefly Torch ☆ Fox - Pet Replacer ☆ Gwen's Lamps for CP and AT
Appearance: ☆ Seasonal Outfits - Slightly Cuter Aesthetic for SVE ☆ Seasonal Outfits for Ridgeside Village ☆ Coii's All Hats Pack ☆ Coii's Girls Sets Pack ☆ Hats Won't Mess Up Hair ☆ Babies Take After Spouse ☆ Sugarmaples' Cafe Clothes
Other: ☆ Canon-Friendly Dialogue Expansion ☆ BusLocations (Required for Desert mod) ☆ Sprites in Detail
3 notes
·
View notes
Text
How I download fics and give them covers before sending them to my Kindle.
Hi all, I've been considering making a post about this for a while and now seems as good a time as any. I'm not an expert, and there is more than one way you can do this; I'm just going to show you my process using "Call It What You Want To" by @separatist-apologist as an example. [This will only work on computers FYI.]
Part One — Getting Started
Download Calibre (it's free.) Calibre for PC. Calibre for Mac. They also have it for Linux but idk if that's still relevant.
Follow the program's setup instructions, and then those for wirelessly connecting Calibre with your Kindle account. Alternatively, you can connect your Kindle/e-reader to your computer with a cable and transfer files manually or download the file to your hard drive and share it another way. I highly recommend taking a few extra minutes to set up the wireless sharing as I think it's far more convenient.
Create a folder in which to store fanfiction downloads so that you can be an organized human.
Part Two — The Fanfiction
Find the fic you want to download on ao3 and click it so that you're on the fic's first page.
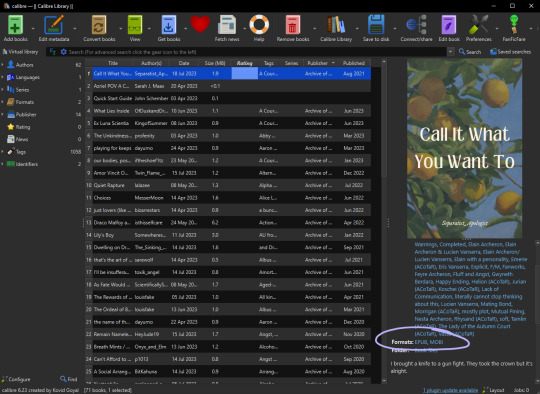
Above the box of metadata (ratings, warning, tags, etc.) on the far right click the "download" option. When prompted to select a file type, choose "MOBI."
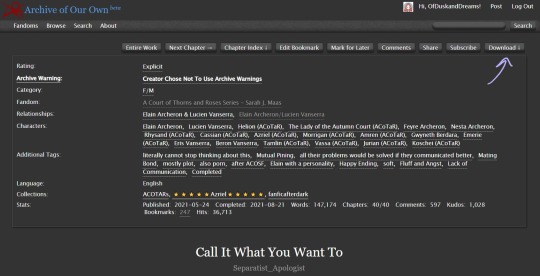
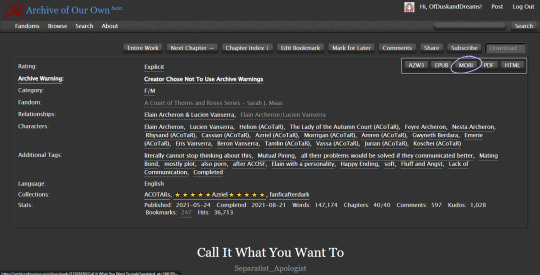
Note: Though ao3 has an "EPUB" option I've noticed a bug that removes the chapter navigation from the fic when downloading the EPUB directly from ao3. If you enjoy the "x minutes left in this chapter/book" feature on your e-reader, you will want to download "MOBI" and we will be converting it later in Calibre.
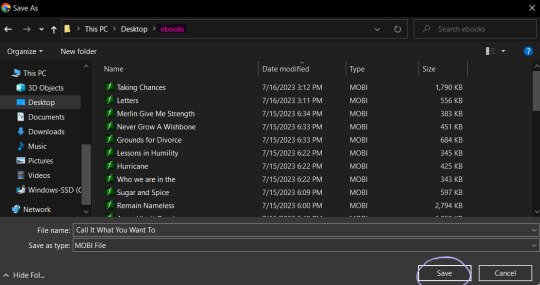
Save the file to the folder you created.
Launch Calibre if it isn't already running.
In Calibre, click "add books" on the toolbar at the top of the screen.
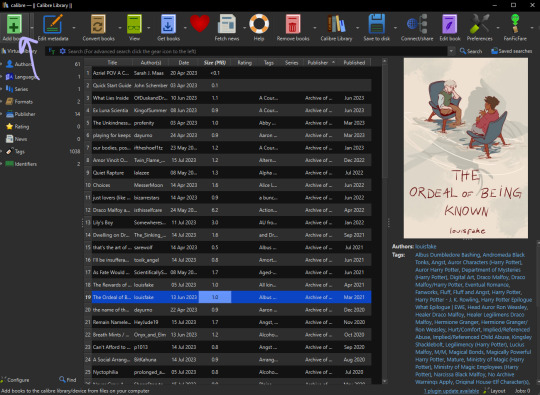
Navigate to the folder you saved the fic in, select the fic, then click "open." Calibre will import the MOBI file to your library.
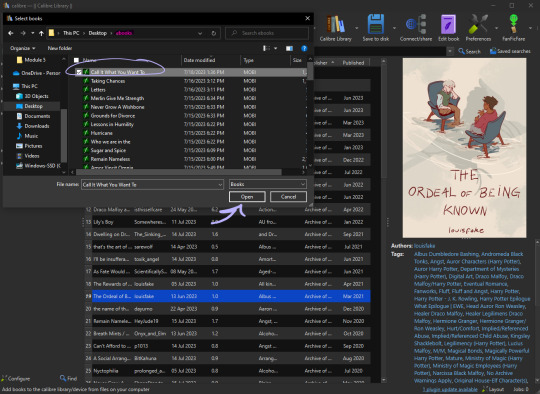
Now as you can see, "Call It What You Want To" already has a cover when we imported it to the library. That is because the cover image is embedded in the fic on the archive. Some fics will already have covers embedded such as this one.
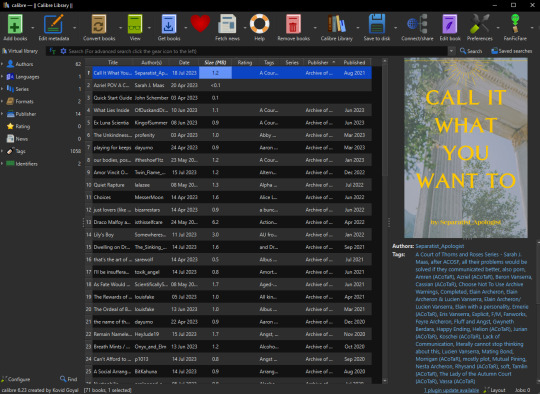
Calibre is not a genius. If there are multiple images in the fic it will usually take the first one and default it to the cover. In the next section, I will go over how to add/change the cover of a fic in Calibre and how I like to create them.
Note: Even if the fic doesn't have embedded images, covers may have been made by readers and linked to the fic either in the notes or related works sections so it's worth checking if a cover already exists. If a fic is popular enough, a Google search of the fic's title + "cover" or "cover art" will show you if there have been covers already created for it.
Part Three — Making The Cover (I use Canva)
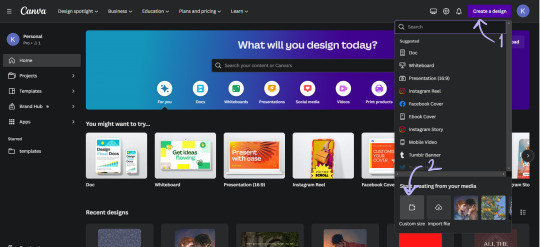
On the Canva homepage click "create a design" then select the "custom size" option. Canva does have a book cover template but I've found that it's awkwardly tall compared to the default size for Kindle books so I make my own.
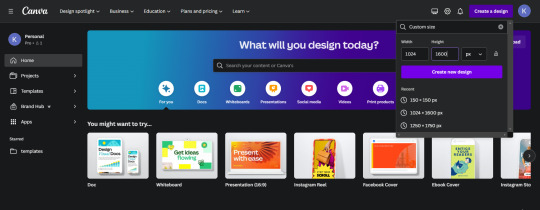
I set the dimensions of the design to be 1024 pixels wide, and 1600 pixels tall, then click "create new design."
This is where you can get creative, make whatever you want. These basic steps are shown in a gif at the bottom of the section:
One: Choose a background image (you'll want to make sure it's a high enough quality that it won't be pixelated.) I used an image I had already uploaded into Canva, but you can use whatever you would like.
Two: On the sidebar, select "elements" and then "rectangle."
Three: Make sure the rectangle covers the whole design, then change the color. I like using the colors from the photo that Canva suggests and then making them a darker shade. Once you have the color that you want, reduce the transparency of the rectangle to anywhere between 40-50%. (This step ensures that the text we put on top of the image is easily legible, play around with it a bit.)
Four: On the sidebar, select "text" and then "add a text box." Then type in the author's username and change the font, the color, and the size until you like it. Repeat the same steps for the fic's title. I like to center the title on the page and put the author toward the bottom but that's just my preference.
Once your cover looks the way you want it to, click "share" at the top right and follow the steps to download the file as a PNG. I usually just save the image to my desktop so I can grab it easily once I'm in Calibre.
Part Four — Adding the Cover in Calibre
In your Calibre library, hover over the fic and right-click. Then hover over "edit metadata" and click "edit metadata individually."
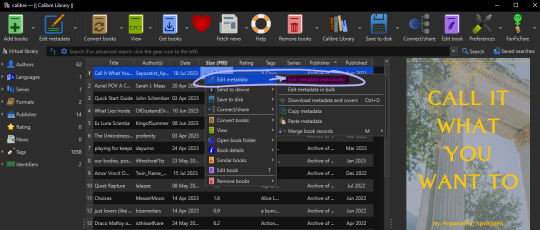
On the "edit metadata" screen, find the section that says "change cover" and click "browse."
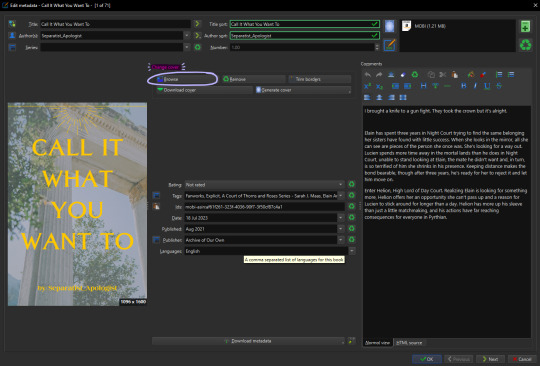
When the file upload dialog box appears, navigate to the PNG you just saved from Canva, select it, and click "open." This will add your cover to the fic. You can use these same steps to add any cover image that you've saved to your computer.
Make sure to click "ok" at the bottom of the screen to save your new cover and navigate back to the library page.

Part Five — Converting to EPUB
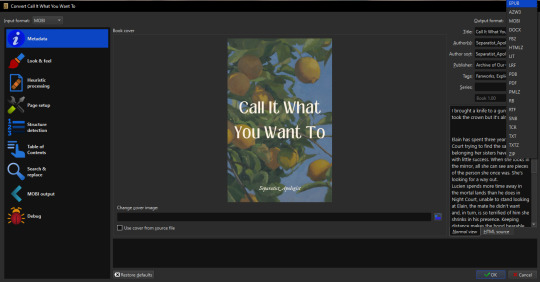
In your Calibre library, select the fic and then click "convert books" on the toolbar. At the top right of the converting screen, set the "output format" to "EPUB."
Now, the following steps are unnecessary little things I do to make my reading experience more seamless.
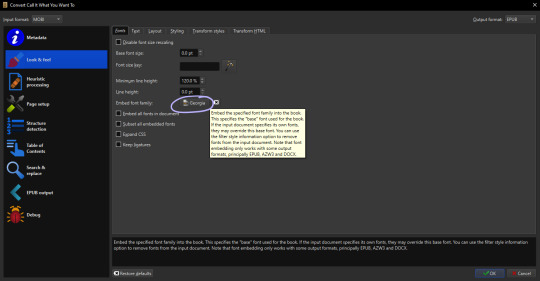
Click "Look & Feel" on the left sidebar. Under the "fonts" tab, I embed the "Georgia" font family. I do this because I prefer reading in Georgia which is not a default option on my PaperWhite*. I have my Calibre conversion settings in place to do this automatically. You can embed any font that you have on your computer.
*It might just be me, but when opening a downloaded fic (following the methods in this post) for the first time on my Kindle the font is always weird. The trick to fix it is to go and change the font from whatever is selected (Baskerville in my case) to "publisher's font" and then I've found that switching it back to "Baskerville" on the font selection screen activates the embedded Georgia... even though it will say that it's Baskerville? Idk why this is, I just wanted to let you know how I fix it.
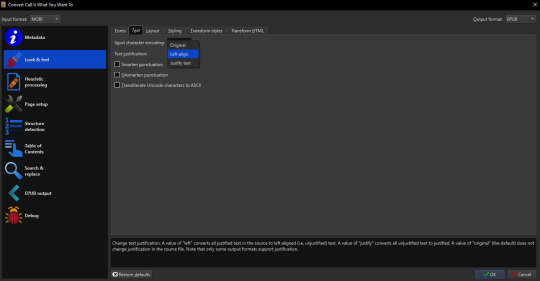
Calibre defaults to a justified text alignment unless you change the default settings. This appears as "original" in the alignment options. The random too-large spaces between words of a justified alignment give me the ick so to make everything left aligned, I stay on the "look & feel" page but move to the "text" tab where I can change the alignment.
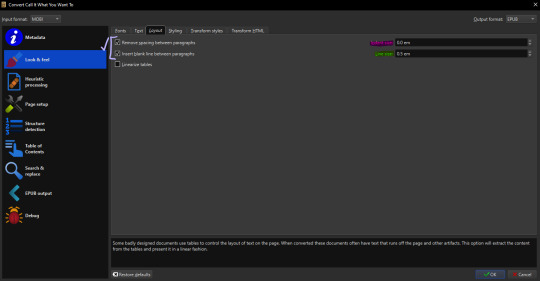
Staying on "look & feel," move to the "layout" tab. To ensure even paragraph spacing regardless of how it appeared on the archive, I select both the "remove spaces between paragraphs" and "insert blank line between paragraphs" options.
On this page, you can also change the indent size of the first line of every paragraph (highlighted pink,) and the size of the blank lines Calibre will insert between paragraphs upon conversion (highlighted green.) I set the indent to 0.0 and leave the line size 0.5 which is the default.
The last thing I do is go to "EPUB output" on the left sidebar and check the box labeled "insert inline table of contents." This just means that Calibre will add a table of contents to the beginning of the EPUB. (By default it puts the TOC at the end which I don't like.)
When everything is set as you'd like it, click "ok" on the bottom right and Calibre will convert the MOBI file you downloaded from ao3 to an EPUB containing the settings we just changed. Both file types will appear in your library when you click on the fic and scroll within the right-side window. I usually delete the MOBI format after I have the EPUB because I don't need it any longer.
And you've done it! Now all you have to do is either right-click and share it to your Kindle, or you can "save to disk" and download the EPUB file to transfer to your e-reader by a method of your choosing.
I hope someone finds this marginally helpful. In truth, I was just bored so I made this post but in light of the recent DDoS attacks against ao3, I think everyone should look into downloading their favorites so that you're never left out in the cold again.
Happy fanfic downloading <3
#fanfiction#acotar fanfiction#ao3#archive of our own#download fanfiction#downloading fanfic#calibre#fanfic#fanfiction cover#how to guides#fanfiction on ao3#fanfiction on kindle#read fanfiction#fandom things
126 notes
·
View notes
Text
(can't wait to pick up my gaming laptop, playing on a mac is convenient, but it's destroyingggg my CPU and i need this for work!)
anyway! does anyone know how to transfer CC files from macbook to PC without corrupting anything? i could redownload everything but lol i have 200 GB of mods, and while i love a project, i'm kinda short for time this week.
#sims 4#sims 4 cc#sims 4 help#the sims community#sims 4 community#sims 4 resources#sims 4 gameplay#ts4 community#ts4 help
5 notes
·
View notes
Text

MacCharlie advertisement, 1985, scan sourced from vintagecomputing.com
Manufactured and released by Dayna Communications in 1985, the MacCharlie was a hardware add-on for the original Macintosh 128K and the Macintosh 512K that enabled users to run DOS software designed for the IBM PC on their Macintosh.
It did so by literally being an entire IBM PC compatible with an 8088 microprocessor, 256 KB RAM, and a 360 KB floppy disk drive. The RAM was upgradeable to 640 KB and a second disk drive was also available, with the MacCharlie Plus including 640 KB RAM and two floppy drives as standard.
The MacCharlie also included a keyboard extension that added a number pad and function keys, as the Macintosh keyboard lacked a numpad, function keys, or arrow keys (a deliberate choice by Apple who thought that developers would just port their old software to the Macintosh rather than developing software around the GUI paradigm if they had included those keys).
The MacCharlie connected to the Macintosh via a 9-pin serial cable and performed all DOS operations itself (obviously), with the Macintosh serving as a terminal for the MacCharlie. This required you to run the MacCharlie application software that was included on a 3.5 inch floppy disk for your Macintosh along with MS-DOS, which was also (naturally) included on a 5.25 inch floppy disk for the MacCharlie.
While the MacCharlie software included the ability to transfer files from itself to the Macintosh (and vice versa), you could not run a DOS program and a Macintosh program simultaneously (the System Software, later renamed to Mac OS, for the Macintosh did not support the running of multiple programs simultaneously until the release of the MultiFinder extension in 1987, with the feature eventually becoming integrating into the operating system with System 7 in 1991).
The MacCharlie software was also limited to running text-based DOS software only.
(Oh and if you're curious about the name 'MacCharlie', it was in reference to the advertising campaign for the IBM PC featuring Charlie Chaplin's Little Tramp character)
3 notes
·
View notes
Text
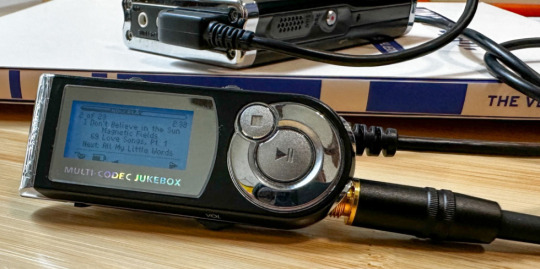
An ode to the iRiver iHP-120
For whatever reason, I've found myself deeply nostalgic for high school as of late. And for me, that is intractable from nostalgia for what is perhaps the peak mp3 player ever made:
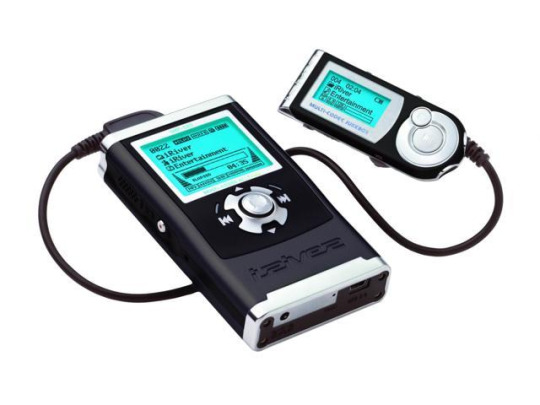
The iRiver iHP-120 was released in 2003, my sophomore year of high school, and it changed my life. This thing held an astounding 10GB of music—for comparison, most mp3 players at the time were flash based, and held 128 or 256 MB of music. The only big competitor at the time was the 1st generation iPod, a mac-exclusive device that transferred data over firewire and had to be synced using the fledgling iTunes. Juxtapose that to iRiver, who took what I like to call the "we don't give a fuck" approach:
When you plugged in the iHP-120 with USB 2.0, it just showed up as an external hard drive—you could throw whatever you wanted on there. Naturally, it could read mp3 files, but this thing introduced me to the world of audio codecs and processing in a way nothing could have prepared me. WMA files worked fine (a big deal at the time because of DRM issues, during the heyday of KaZaA and Limewire). You want to play uncompressed .WAV files? No problem, put them on there. FLAC files? Absolutely, let your audiophile freak flag fly. Fucking OGG Vorbis files played on this thing. Hell, you could put text files on here and read them.
(The firmware for these was also basically open-source, and people did even crazier stuff with them. By the time I retired my player, it could do gapless playback, crossfading, 10-band equalizing, normalization and more. I think I also changed the boot screen to a picture of Sailor Moon.)
But the magic didn't end at uploading music to the iHP-120—controlling this thing was more intuitive than any other device around at the time. All of your music was displayed on the player in whatever folder structure you loaded onto the device—navigating the music was as simple as using Windows Explorer. You had your standard play/pause, skip forward/back and volume controls on the front joystick, but what are the other buttons for?
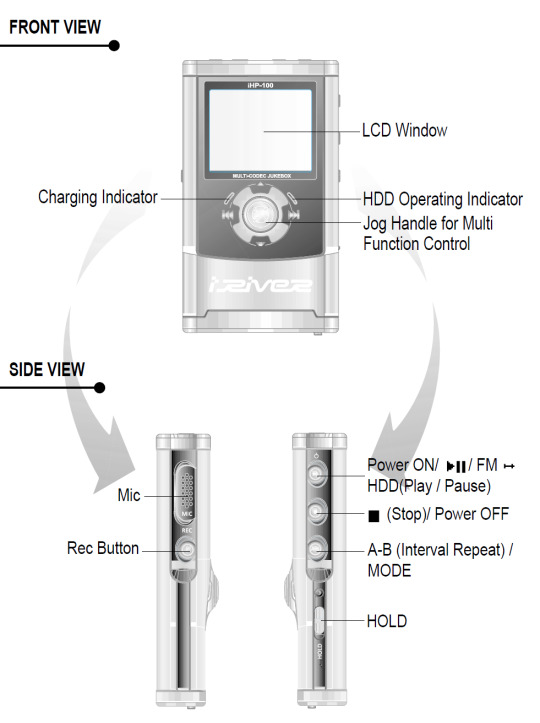
Yeah. This thing was also a portable recorder. At anytime you could just hold down the Rec button and start recording with the onboard mic, or using an external input (more on that later). On the right side, an A-B Interval control. You ever wanted to just listen to one part of a song on repeat to learn the lyrics? Just hold down the button. Lastly a hold switch to disable control inputs while it was in your pocket—no accidentally pausing the music.
Okay, back to the external input mentioned before. The top of the iHP-120 is wild.
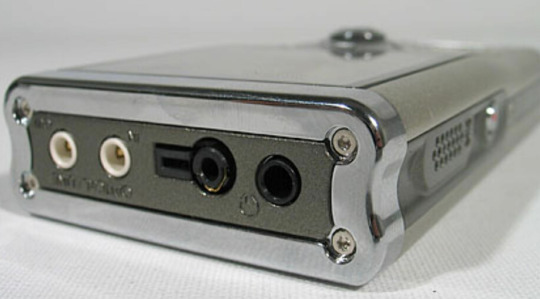
The top I/O panel of the iRiver iHP-120, with 4 jacks.
From right to left, you have a 3.5mm headphone jack (naturally), a 2.5mm microphone jack, the remote control port (more on this in a bit), and in white you have Line In/Out jacks which you could use to record as well as just plug in a second pair of headphones for a friend—jacks which support both 3.5mm analog input, as well as 3.5mm TOSLINK optical cables.

The TOSLINK 3.5mm male plug. A plug I only ever encountered on this device and the Sound Blaster X-Fi Titanium, a sound card I wrote a review of in 2009 which seems to still be up at PC Gamer and reading it now I don't know how any of my writing was ever published, let alone in print.
Chances are good you've never encountered this, it's phenomenally uncommon, and TOSLINK as a whole largely died with the emergence of HDMI—but this fucking mp3 player could both record and transmit fiber optic audio in uncompressed stereo or lossy 7.1 surround sound. In high school, I would plug the iHP-120 into our home theatre and listened to Porcupine Tree's Stupid Dream on repeat (side tangent, I'm pretty sad 5.1 album recording never really caught on, but the Dolby Atmos music format is better in every way, and I'm grateful Apple is bringing it into the mainstream).
"Okay, so we have an music player/text reader/voice recorder with optical audio, and basically every codec under the sun, what else could you go on about Erika?"
-you, the person reading this
THE REMOTE
Let me take you back to 2003. I was a depressed theatre kid teenager who would listen to Rooney on repeat on my Koss UR40s while crying over a girl who wanted nothing to do with me.
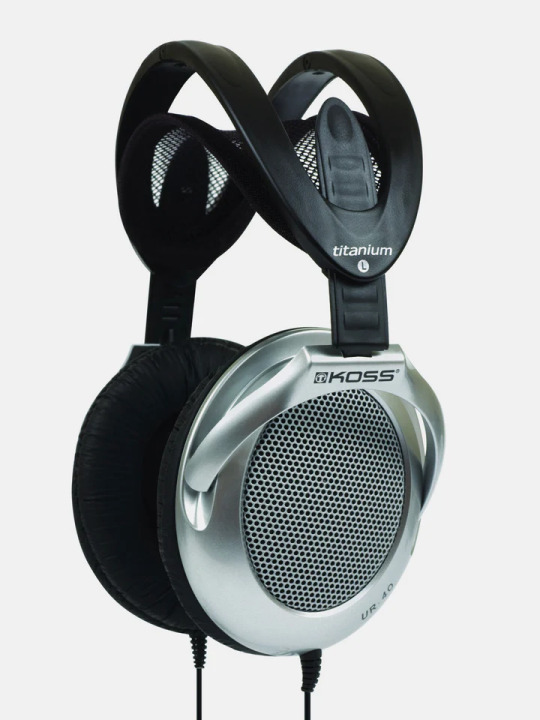
The Koss UR40 Headphones I wore like a fashion accessory everyday.
The other thing I wore everyday besides those headphones? Baggy cargo pants (it was acceptable at the time, I swear). Inside the right cargo pocket was my iRiver iHP-120, and clipped to the velcro flap of that cargo pocket was the iHP-115R remote control.
The iHP-120 remote unit
Every function of the iHP-120 could be controlled from this little fucker. Play/pause and stop buttons. Volume, skip track and recording are all here on rocker switches. You could even change the fucking bitrate of playback on this little thing, all without taking the actual mp3 player out of your pocket because the LCD screen on the remote has all the same info you'd get on the main unit.
The remote itself connected to the iRiver with that big plug you can see in the picture above (shamelessly stolen from Nathan Edwards who I worked with at PC Gamer in the late 2000s and only while writing this post discovered has already written a much more professional ode to the beauty of the iHP-120 this year).
You would plug your headphones into the remote, (or in my case you could also plug in your 1988 Chevrolet 2500 suburban's tape deck adaptor and have controls at your fingertips. No more distracted driving).
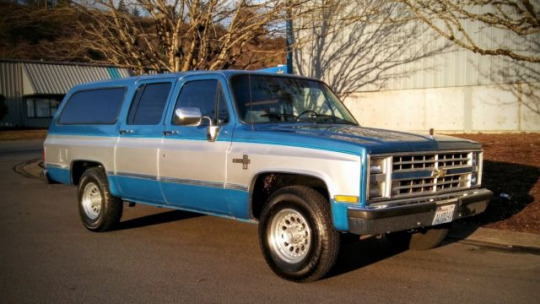
An image of a 1988 Chevorlet 2500 diesel Suburban. Not super relevant but god I miss my high school suburban. We would take the rear and middle benches out and put a queen-size mattress in the back, which 9 of my friends would ride on as we went to Little Caesar's for lunch. Also, cars just looked way fucking better back then.
I think I'm about done waxing nostalgic, but I really do miss the days of discrete devices—I kind of find myself fighting back against my smartphone. I have a camera I carry around, a pen and paper planner and writing notebook, and a kindle for reading. There's something appealing about not having my phone be my access to music either—rather, having a device that I just threw my music on and it plays it really well was rad. The iHP-120 was really fucking rad.
12 notes
·
View notes
Text
Backup Your Kindle Books!
Amazon is getting rid of the "download and transfer via usb" option on Feb 26th!

So what this means is you can no longer get hard copy files to your kindle device with this method.
Where to start:
Calibre is a free ebook management software, available on windows, mac, and linux - but also comes in a portable version you can put on a flash drive. Ebooks are very small files, 100s of books can easily take less than 1GB of space.
And if you want and alternative reading app for your phone:
ReadEra app is an ad free reading app that is a good alternative to the kindle app if you need it. They also have a premium version for a one time payment of $15 which has a few extra features if you want them.
How to backup your books:
Details on your options to get your files this post has the most updated information and links needed.
what is DRM? TLDR: digital rights management (DRM) is meant to prevent piracy, however, this also means you never really own your ebooks. If Amazon decides to take down a book you bought? That's it, it's gone and it doesn't matter that you paid for it.
Removing DRM (extra instructions if needed) If you're on PC and don't have a kindle device, you'll want kindle version 2.4.0 or it won't work in Calibre.
In Calibre, navigate to Preferences > Plugins > Load Plugin From File - DeDRM - Use the latest Beta or Alpha release, follow instructions on the github page
Preferences > Plugins > Get New Plugins
Look up: KFX Input
You'll have to restart Calibre once you install so just add them all at once before you restart it.
You can find the folders with your ebooks under documents -> my kindle content, each book will have it's own folder and you're looking for the .azw file. If it says .azw3 double check the pc app version because that format will not work with DeDRM. Download a single book first, drag and drop it into Calibre and double click it to open and test that DeDRM is working properly. You should be to convert all the .azw files to epubs or any other format you want. To do this, either look in the top menu for 'convert books' or right click on the individual file to convert it, you can do this one at a time or select to convert in bulk. If you have 100s or even 1000+ books? focus on getting the files backed up first, once you have the book files you can take your time actually getting them into calibre.
If you need some troubleshooting help setting anything up just ask and I'll try to help!
#kindle#amazon kindle#ebooks#drm#e reader#amazon#ebook library#calibre#posting cause the other posts I'm seeing don't have enough info on everything that's needed
13 notes
·
View notes
Text
Price: [price_with_discount] (as of [price_update_date] - Details) [ad_1] High-Speed 500GB Ultra Slim Portable Hard Disk with Carrying Case 2-in-1 Type C & USB 3.0, Compatible with PC, Mac, Laptop, PS4, Xbox, iPad, Tablet, Mobile (Black) - 1 Year Warranty System Compatibility & High-Speed Transfers: Our 2.5" HDD External Hard Drive with 2-in-1 Type C & USB 3.0 is compatible with Windows, Mac, Linux, and Android. It supports PC, Mac, Laptop, PS4, Xbox, iPad, Tablet, and Mobile devices, offering lightning-fast data transfer speeds for improved performance Massive Storage: Enjoy ample 500 GB storage capacity to store all your data, photos, movies, and documents with ease. Carrying Case gives the extra protection from accidentally fall down the hard disk. Multi-Platform Compatibility: Works seamlessly with Windows, MAC, and Linux operating systems External Storage Drive: Expand your storage instantly with our Portable Hard Drive. Perfect for on-the-go, it lets you carry movies, music, games, photos, and large files wherever you need them Plug and Play: Simply connect the drive – no software required – and enjoy instant access to your files Package Includes: 1 x Portable Hard Drive, 1 x USB 3.0 Cable, 1 x Type C Connector [ad_2]
0 notes
Text
Everything You Need to Know About AnyDesk Descarga Gratis for Fast and Secure Remote Access
Introduction to AnyDeskDescargaGratis
What is AnyDeskDescargaGratis AnyDeskDescargaGratis is a remote desktop software that allows users to connect to and control another computer securely over the internet.
Why Use AnyDeskDescargaGratis It enables fast and secure remote support, making it ideal for businesses, tech support teams, and remote workers.
What Makes AnyDeskDescargaGratis Special
Key Features and Benefits Features like file transfer, clipboard syncing, session recording, and low-latency performance make AnyDeskDescargaGratis stand out.
Comparison with Other Remote Tools Unlike heavier alternatives, AnyDeskDescargaGratis is lightweight, easy to install, and performs well even with slow connections.
Download and Installation Guide
How to Download AnyDeskDescargaGratis The application is available for Windows, Mac, Linux, Android, and iOS, and can be downloaded from its official site.
Installing and Running the Software Simply run the downloaded file, follow the prompts, and start your first remote session in seconds.
Security and Privacy in AnyDeskDescargaGratis
Encryption and Safe Connections It uses TLS 1.2 encryption and RSA key exchange to keep sessions secure and private.
Permission Settings and Access Control Users can configure access rights, require passwords, and approve connections manually for added control.
Platform Compatibility
Supported Operating Systems AnyDeskDescargaGratis works across multiple platforms including desktops and mobile devices.
User Experience Across Devices It provides a seamless interface and functionality, regardless of whether you’re on a PC or smartphone.
Common Use Cases
Using for Remote IT Support Technicians can quickly access and resolve issues on client systems without being onsite.
Perfect for Remote Work and Access Employees and freelancers can access their home or office computer from anywhere with AnyDeskDescargaGratis.
Custom Settings and Advanced Options
Personalizing the Interface Users can adjust display quality, enable auto-start, or set up a custom alias for easier identification.
Exploring Advanced Features Options like session recording, custom permissions, and command-line integration are available.
Support and Help Resources
In-App Help and Tutorials Built-in documentation helps new users set up and use the application effectively.
Getting Further Support Users can contact the support team or explore community forums for additional guidance.
FAQs
Is AnyDeskDescargaGratis free to use? Yes, it is free for personal use. Commercial users need a license.
Can I use AnyDeskDescargaGratis on my mobile device? Yes, it supports both Android and iOS devices.
Is AnyDeskDescargaGratis secure for remote access? Absolutely. It uses encrypted connections and multiple security layers.
Do I need to install AnyDeskDescargaGratis on both devices? Yes, both the local and remote computers need the app installed.
Can I transfer files between devices? Yes, the software supports fast and secure file transfers during remote sessions.
1 note
·
View note
Text
hello all , been a minute. just wanted to pop in with a quick update to let everyone know that i'm still planning on finishing the gif packs i have lined up , slowly but surely. i had to replace my laptop last minute and so i've been working to not only transition from a mac laptop to a desktop pc but also transfer all of my files and applications which is taking a bit longer than i expected.
#this blog was never really meant to be a place for me to frequent anyway tbh#mostly just for occasional resources at this point#but i figured i'd drop this regardless for anyone who was looking forward to the packs i promised#and were wondering why i disappeared#the xolo pack is almost done i just need to finish coloring and upload them
0 notes