#GarageBand Tutorial
Text
GarageBand iPad YouTube Tutorials
I’ve recently uploaded my first 5 videos for a new GarageBand iPad YouTube playlist.
Check the playlist out here… and here’s a quick rundown of the content. Also, please don’t forget to subscribe to the channel for all the latest uploads and updates here. The YouTube channel isn’t just about GarageBand, I also have playlists for:
Guitar Reviews
Guitar Tips
Guitar Amplifier Reviews
Original…
View On WordPress
#Apple Garageband#Garageband#Garageband iOS#Garageband iPad#GarageBand Lesson#GarageBand Tips#GarageBand Tutorial#GarageBand YouTube#Music#Music Business#Music Industry#Music Production
1 note
·
View note
Text
Me going to do homework then getting distracted trying to figure out how the hell to make the notes sound smoother in garageband for an hour and a half:

#i have never used this program in my life and i think i'm starting to figure some thingsout but HNNNNGTRRRRGRJGNAHDGNAHDNGAHRNRBARKGRRRRRGRN#WHY WON'T YOU BEND TO MY MIND LITTLE COMPUTER NOTES HHN-#garageband#music#memes#swear to god a few times i felt like punching the computer lol (i looked up a tutorial eventually. still needs work)
2 notes
·
View notes
Text
Making Beats on Your iPhone
Garage Band is a powerful piece of software available for free if you have an iPhone, iPad, Mac or virtually any other Apple device.

View On WordPress
1 note
·
View note
Text
youtube
iPad Tricks for Beginners. Let’s check out 6 iPad tricks if you are new to using one. Also, if you are planning to give this to your grandparents then save yourself from the questions and just show them this video!
#ipad tricks#ipad tips and tricks#ipad for beginners#ipad tips and tricks for beginners#tips and tricks for ios 7#5 tips for beginner ipad lettering#ipad basics for beginners#ipad tutorial for beginners#ipad tips for seniors#procreate for beginners ipad#procreate for beginners#digital art for beginners ipad#procreate layers for beginners#garageband tutorial for beginners#tips and tricks for ios 8#ipad mini 5 tips and tricks#ipad pro#ipad tips#ht tech#tricks#Youtube
1 note
·
View note
Note
Oh I didn't realise it had to be a question question, sorry!
I do have a question then: you're a music creator right? And you did some work for SiIvaGunner? There's some ideas I have often for doing some instrumentation swapping in music I hear, making one song have the instruments/sound font from another. However, I'm really not experienced at all in music production and it can feel a bit daunting trying to understand it, I'm not sure where to start.
What are some resources you'd recommend to someone trying to start music work like that? Both the editing software itself (is GarageBand still a thing? Does it cost money?) and also how to go through songs and figure out stuff like what instruments they're using to repurpose them?
No worries! I just prefer actual questions over random meme pictures, i have no idea what i can add to those or how i could respond besides "ok"
Yes, i'm part of SiIva, but i was more active in the earlier years
I'm mostly busy with original compositions for games nowadays
If you want to make melody/soundfont/MIDIswaps, the first thing you will need is a DAW, Garageband will work fine (i think?), but i can't say for sure, i use FL Studio myself, so i'll answer with my knowledge based on using FL Studio primarily
For the sake of this tutorial, we will focus on games that used sequenced music, which usually means MIDI files and soundbanks/soundfonts (for more advanced non-sequenced/MIDI recreations, you will usually have to recreate songs from scratch, or invest in expensive hardware in the case of Touhou music for example)
There is an FL Studio demo available, it's pretty good, but personally i just reccomend obtaining it legally since it's pretty cheap (and if that is not an option, then, well, yarr harr, you know (note to cover my ass from a legal perspective: i am a professional and i do not use pirated software))
Download VGMTrans (and the ROM of the game you wanna fuck around with, legally of course (wink wink)), it's software that can extract MIDI (the notes) and .dls (the instruments) files (you can also extract .sf2 files, which are the more traditional "soundfont" format, but .dls is easier for editing existing songs from games since the MIDI data and the .dls can get imported together to be more accurate, more on that later (basically, export .dls for accuracy, export .sf2 for fucking around if you just want 1 instrument from a game))
Okay, so now you have a DAW (we use FL Studio in this example), the MIDI file, and the .dls file
So, now, open FL Studio, drag the MIDI file in a new project, and then it will ask you what you want to import it as (do not use FLEX, use MIDI OUT with LSD) (fuck FLEX all my buddies hate FLEX)
Then you will see this thing
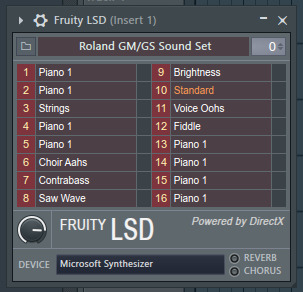
Okay so click the little folder icon on the top left, and then select the correct .dls file you exported for that MIDI file with VGMTrans
Then, if you did everything correctly, you will hear the MIDI file WITH the correct instruments from the game, and it will sound (mostly) like how the original game sounds
From there, you can start, then, you can edit the little bits, change the instruments easily, change the notes, and add funny fleentstones if you want
So, tl;dr quick version:
1. Download FL Studio
2. Download VGMTrans
3. Throw ROM file in VGMtrans
4. Export the MIDI and .dls data from a song from the ROM
5. Throw MIDI in FL Studio, choose "MIDI OUT with DLS"
6. Choose .dls soundbank file with the little folder icon
7. The song will now sound like how it is in the game (or at least, close enough), so now you can go crazy and replace instruments and/or melodies and have fun
#ask#tutorial#music#vgmtrans#fl studio#melodyswaps#midiswaps#midi#dls#sf2#soundfont#siiva#siivagunner
13 notes
·
View notes
Note
Sorry if you've answered this before but was wondering what your audio setup is? I'm thinking of recording a podfic and I thought about how crisp and clear your audio is, so I thought I'd ask! Ty for the good content
Hey there!
I don't have anything fancy. My hardware is over 10 years old: a t.bone 450 USB microphone (together with pop filter and mic stand I think that was about 100 EUR in total) and a macbook from 2011 that still runs a very old version of garageband with a lot of in-built features that I believe are no longer included in newer versions. I have tentatively started looking into audacity as recording software for when my laptop will inevitably die and I'll most likely switch to Windows. You'll probably want to look for tutorials on how to use compression, equaliser and a hipass filter to improve sound quality and reduce background noise. This looks like a promising guide for audacity:
https://www.instructables.com/How-to-Improve-Vocal-Quality-in-Audacity/
And here is a much more comprehensive guide that should have you well covered on your podfic endeavor from a fellow podficcer on ao3: https://archiveofourown.org/works/14223324/chapters/32791683
Or this one:
Hope you have fun recording 😘
11 notes
·
View notes
Note
Hey! I saw your tags about learning to compose music and being overwhelmed about what programs to start with so I thought I could offer some insight into some of the options available. Generally the programs people use to compose music fall into three categories.
1) DAWs, or Digital Audio Workstations: These are programs where you have multiple tracks of audio (either recorded or you can generate them in the program) and you work with sound more than visuals. If you’ve ever used Audacity to edit audio before, that’s a DAW! Good for: if you want to record your own vocals/instrumental parts, if you prefer to work with sound than sheet music, for much more detailed mixing and effects options than other programs. Recommended starter software: I don’t have much personal experience with these but if you’re on Mac than GarageBand is probably a solid place to start, or I’ve heard Cakewalk is good too for a Windows option. Or you can google “best free DAWs” and you’ll find lists with all sorts of options. If you know how to find notes on a piano keyboard, finding a DAW with a “piano roll” input mode is an especially intuitive way to get started composing (and even if you don’t, it can still be useful as a visual representation).
2) Music notation program: this is software meant to create sheet music like you would see in a piano book or larger arrangement. Most modern notation programs have playback as well which you can either export and use as-is or use it as a base to mix in other programs (like a DAW). Good for: if you can read sheet music and are comfortable in that format, if you intend to have your music played by real musicians. Recommended starter software: MuseScore is a really amazing free and open-source notation program that is easier to use than most of the paid options (though I recommend MuseScore 3 atm since 4 is fairly new and has some issues that still need to be ironed out).
3) Tracker software: These are specialized programs that are best for emulating older styles of VGM and electronic music, especially chiptune music. They work similar to programming where you input a bunch of numbers that correspond to notes and parameters for sound. Heads up that this is probably the least intuitive option compared to the other two, but some people really like it. Good for: if you like working with numbers and computers, if you want to emulate a specific sound chip. Recommended starter software: FamiTracker is meant to emulate the NES chip and the limitations of that can be helpful if you get overwhelmed by lots of fancy options.
Personally, unless you’re more comfortable with sheet music I would recommend going for a DAW since it’s the most “all-in-one” option of these. If you’re interested in more information on this topic please feel free to send me a message or ask! Composing music is a lot of fun and it would be great if it were accessible to more people. There are also many great tutorials on YouTube if you search for your software of choice there. If you’re interested in composing VGM then I have some specific channels I could recommend as well.
Oh my gosh yes thank you! Generally I learn best by seeing other people do things and then copying it a lot
5 notes
·
View notes
Note
Both of your series give me art zoomies, but I was wondering if you could enlighten someone who plans to start their own va stuff (eventually 😓). What does your recording/editing process look like?
Big caveat: I'm not an expert. Entirely self-taught. All trial and error and YT tutorials.
But I'm happy to share what I've learned 🌻
1. Set-up:
a. Microphone: Rode NT-1 with a Focusrite Scarlett audio interface
b. Software: Garageband (for most things) + Audacity (for fixing things)
c. "Studio": I have the microphone on a floor stand in my walk-in closet. I also recently added a sound blanket as a curtain on the outside of my closet. I found it does make a difference which way I point the mic: away from the window that opens to the street.
A fancy microphone matters far less than the recording environment, I have found. It's important to check for things like appliances, fans, vents, etc. that might make extra sound. I'm pretty picky about getting a clean, crisp recording. (For example, if a car passes on the road as I'm recording a line, I do it again.)
The reason the closet is a good place to record is because the fabric absorbs the sound.
2. Recording
a. I record each character on her own track in GarageBand, and whenever I can, I will record as much content for the same character as I can (i.e. over multiple episodes).
b. It's much easier in the editing process to record A-A-A, B-B-B, C-C-C style for lines rather than A-B-C, A-B-C. In other words, if I mess up a line or think I might want a different take, I just immediately redo it as many times as I have to (rather than recording the whole script in one go, getting to the end, and starting over).
c. It's helpful to have a nonverbal signal that shows up as a spike on the recording. (I learned that from Erik's little Audacity tutorial video.) So, if I know I have a section that I want to mark for some reason (ex. I know I messed up, I was doing foley, etc.), I just snap my fingers.
d. Foley: If I have to make my own sound effects, I usually do not record them simultaneously as I act. It's much easier to make changes later if they're separate. It's not easy to 'extract' sounds.
3. Editing
a. First, I export each track/character from GarageBand to Audacity and run the Noise Reduction and Declick plugins. Then I save those and bring them back into GarageBand. This step gets rid of most of the background noise.
b. Then, I start lining everything up and clipping the recordings into regions. I usually make an extra track I call "Discard" so I can line up my back-up options for certain lines. (Usually, I'm just deleting the things I don't want but..sometimes I can't decide so I line one up in the Discard track in the same position/timestamp.)
c. I usually add the sound effects and soundscapes at the same time. It's a bit more tedious to line everything up all at once, but much prefer it over going back and adding sound effects later, after I finish the voices. If you just have a few effects, it's doable to add them afterwards, but...timing matters for everything.
I get most of my sound effects and soundscapes from Freesound.org and sometimes I get them from Pixabay. Pixabay is also good for finding royalty-free music. Every once in a while, there's a specific sound I need that I can't find for free. For those, I get a license from Pond5 (which I like because it has a subscription like most stock libraries, but you can also buy what you need à la carte).
d. Because I'm used to accessing MIDI for my musical projects, I've also found that that's a fun way to make special effects, especially when I need m a g i c. I just sift through the MIDI library in GarageBand (or use some plug-in instruments) until I find the sound I want, and I can change it up by playing different combinations on the MIDI keyboard.
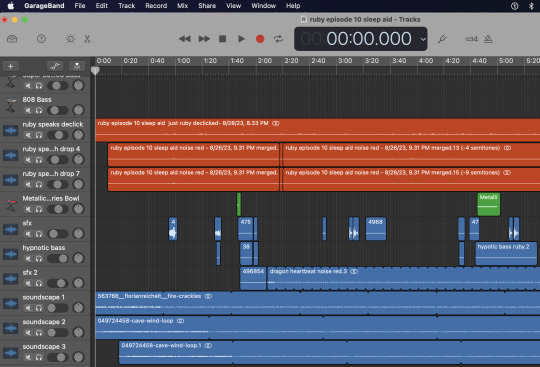
e. I spend a lot of time (probably too much) making micro-adjustments to the Automation. For example, I like the soundscape to fade in at the beginning and out at the end. And I make corrections--mainly Volume and Gain--for the main vocal tracks. That's also my way of keeping the SFX tracks down to just one or two: I can change the volume of each individual section.
I'm not sure how helpful it is, but if you're curious, here's a screenshot of the next Ruby audio. (This is an unusually high number of tracks, even for a Ruby project.)
4. Finishing
I do not consider myself a 'video editor'. I like designing the thumbnails, but I wanted something where it would be super easy to make an interesting still image and just stick a sound file with it. Canva is good for that, and it's what I always use now. The only time I broke down and used iMovie to edit was for the Ruby vs. Carol puppet show, and I still finished that up in Canva.
These are just the basics, but there are some other tips and tricks when it comes to different effects and stuff.
(Musical projects are a completely different method. In a lot of ways, they're easier because ✨tempo✨. I still use GarageBand, and my recording set-up is the same, but how I record and edit is much different.)
Note: You do NOT need to have all of this equipment right away to get started. A decent microphone does make a difference, but other than that, everything else is extra.
#frenchie answering asks#echo 🌻#audio editing#audio roleplay#frenchie makes audio rp#keep the art zoomies going pls#I love the art zoomies
9 notes
·
View notes
Text

How To Make Beats at Home
Making beats at home can be a fun and rewarding hobby or even a career path. Here are some steps you can take to get started:
Choose a digital audio workstation (DAW): A DAW is software used for recording, editing, and producing audio. There are many options available, including free ones like GarageBand and LMMS, as well as paid ones like Ableton Live and FL Studio. Choose one that fits your needs and budget.
Get some equipment: You'll need a computer, a MIDI controller (optional but recommended), and headphones or speakers to monitor your work.
Learn the basics: Familiarize yourself with your DAW and learn how to use its features, such as sequencing, mixing, and mastering. There are many tutorials available online to help you get started.
Find inspiration: Listen to music and analyze the beats to get ideas for your own. Experiment with different genres and styles to find what you like best.
Start creating: Use the tools in your DAW to create drum patterns, basslines, and melodies. Experiment with different sounds and effects to add depth and interest to your beats.
Collaborate and share: Share your beats with friends and other musicians for feedback and collaborate with others to learn and grow.
Get Started Here
Remember, making beats takes time and practice, so don't get discouraged if your first few attempts aren't perfect. Keep experimenting and learning, and you'll be making professional-sounding beats in no time.
#hip hop#hiphop#hip hop producer#hip hop beats#hip hop instrumental#hip hop album#rap#rapper#rap music#beats#pete rock beats#dj premier
21 notes
·
View notes
Text
How to start a podcast: a complete step by step tutorial- Podcast Insights
Part 1 l Part 2 l Part 3
The fourth article in the excellent post Sydney provided is by a website called Podcast Insights. They laid down a mind-boggling stat- there are over two million podcasts out there. But they were making a comparison between podcasting and blogging, and said that podcasting isn't as crowded as blogging because there are over six hundred million blogs.
The article goes over the basics of planning. It says to choose a topic that you can talk about for over a hundred episodes, which seems daunting.
It talks about the pros and cons of having a co-hosted show, too- scheduling conflicts are a thing, but having someone to talk to is great. The article also talks about naming briefly, and includes a handy search bar to see if the domain link is already taken.
Then the article moves onto format, length, and style. It doesn't go into full detail with any, but the article stresses that you should do what's right for you and your podcast, not just chase trends.
Then it's onto podcast cover art and music (the link is to another article that goes into more detail about it, including sites you can use to get music for your show easily).
Microphones are brushed past, including a helpful starter kit article, then it's onto guests if you choose to have any.
The article lists a few options for recording and editing, plus a second article that covers software from the ones for beginners to the ones for more advanced users.
The article offers several tips on recording and editing, including how to build a template in garageband on apple computers.
Then it's time to find a hosting site and launch!
After launching, the article recommends some further steps- like building a website and making transcripts.
2 notes
·
View notes
Note
Patrick girls* if you have GarageBand I can HIGHLY recommend downloading his tutorial for how to play I don't care, there is some ACE hand content there, jfc I NEED him to finger me so so so badly
.
9 notes
·
View notes
Text
right now percy and apollo are staying in, percy’s brow furrowing as he watches a youtube tutorial on garageband in an attempt to write a song for his boyfriend. apollo is napping on their bed, a habit that remained from his time as a mortal. he’ll be in for a surprise when he wakes up.
24 notes
·
View notes
Text
The Great Equalizer: How Technology Democratized Music Production by Gary Dranow

Hey there, fellow music lovers!
I'm Gary Dranow, and today, we're diving deep into a phenomenon close to my heart: the democratization of music production through technology. Gone are the days when you needed a multi-million dollar studio to craft a masterpiece. In this modern era, your laptop and a spark of creativity might just be enough!
From Exclusivity to Accessibility
Historically, the realm of music production was reserved for those with the means to access high-end studios and equipment. However, technology has been a great equalizer, leveling the playing field and providing everyone the opportunity to become a music producer.
Affordable Beginnings with GarageBand
Enter GarageBand – Apple's gift to budding musicians. This free software, preloaded on every Mac, offered a suite of production tools that, while basic, were more than enough for many to start their journey. GarageBand made it possible for anyone to dabble in music creation, recording, and mixing without any initial investment.
The Rise of Advanced DAWs
For those who sought more advanced capabilities, software like Ableton Live, Logic Pro, and FL Studio entered the scene. They offered a professional-grade music production environment at a fraction of the cost of traditional studio setups. Ableton Live, for instance, is not just a DAW but a performance instrument in its own right, empowering DJs and electronic musicians globally.
Online Platforms: The Power of Collaboration and Learning
The internet has further pushed the boundaries. Platforms like SoundCloud and Bandcamp provide artists a space to share and monetize their music. Meanwhile, collaboration tools such as Splice and Endlesss have made remote collaborations seamless.
For those keen on learning, there's a vast universe of online resources. Websites like Coursera, Udemy, and Skillshare offer courses on everything from basic music theory to advanced production techniques. And let's not forget the plethora of YouTube tutorials, where seasoned professionals and enthusiastic amateurs alike share their knowledge.
Conclusion: A New Era of Music Production
The landscape of music production has undeniably transformed. Today, a teenager in their bedroom has the same power to produce music as a professional in a high-end studio. This shift has led to a beautiful diversity in music, with genres and sub-genres flourishing, and voices from all corners of the world being heard.
While technology has made music production accessible, it's the passion, creativity, and soul of the artist that truly makes a piece resonate. So, to all the budding producers out there – the world is your oyster, and your soundtrack is waiting to be written.
Until our next musical discourse, keep experimenting, keep learning, and most importantly, keep producing.
Warm regards,
Gary Dranow
3 notes
·
View notes
Text
life update: i was gonna make the stranger things theme tune on garageband, but all the tutorial videos were from like 2017, so none of them worked since i have the 2023 version of garageband. thought i could do it without a tutorial, realised i couldn’t, gave up, started making up my own shit (it sounds horrible, by the way), got distracted, closed the ipad i was using, got my phone out, got some choccy, started watching cooking with matt. a successful evening, if i do say so myself.
3 notes
·
View notes
Text
I posted 111 times in 2022
35 posts created (32%)
76 posts reblogged (68%)
Blogs I reblogged the most:
@altindie
@wordbite
@supportcontentcreators
@acuite
@southcodes
I tagged 109 of my posts in 2022
Only 2% of my posts had no tags
#blog - 97 posts
#theme rec - 44 posts
#1c - 40 posts
#sidebar - 38 posts
#responsive - 37 posts
#fave - 33 posts
#minimal - 31 posts
#header - 25 posts
#page rec - 18 posts
#dark mode - 17 posts
Longest Tag: 30 characters
#pantone color of the year 2023
My Top Posts in 2022:
#5


Farbenfroh
Page 1 Revamp
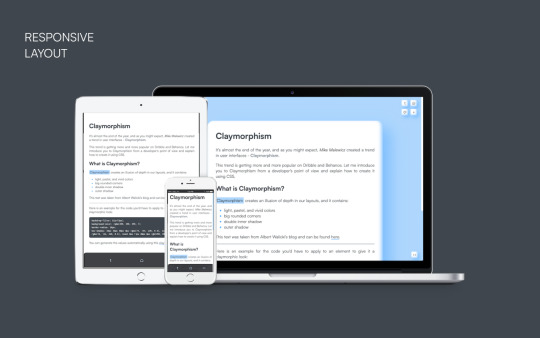
A responsive page for displaying colors (or other elements) with standard Isotope filtering and a smart dark mode.
Preview | Code: here or here
Key Features: Isotope filtering. Masonry layout. Responsive. Sidebar layout. Smart dark mode.
For information in regards to resources and customization, please read the page guide here.
19 notes - Posted June 28, 2022
#4
While it’s not yet clear what Adobe will do with Figma, and while the Figma CEO has claimed that Figma will operate autonomously, here’s a free alternative just in case.
22 notes - Posted September 15, 2022
#3
See the full post
41 notes - Posted January 8, 2022
#2
hi! sorry to bother but i was wondering if you know some resources at how can i learn to make themes? im already learning html/css but im finding hard to find good resources to learn how to make themes :( btw: love your work!
Hello! Thank you for the compliment and your interest in making themes.
Since you’re already learning HTML and CSS, I don’t think I need to tell you about w3schools or stackoverflow – you probably came across them yourself already. :)
The best way to understand tumblr themes is to look at the official guide for creating custom themes. There, all of the (necessary) variables are listed and their purpose is described as well.
Base codes can be very helpful to see how these elements look when they are put together, plus the HTML works already so you can focus on manipulating elements with CSS.
@buildthemes is an entire blog dedicated to teaching people how to code themes. You have to view the blog in its own tab to access the different chapters.
@theme-hunter also has a neat list of tutorials you can use for creating amazing themes.
I hope these resources are helpful!
110 notes - Posted January 8, 2022
My #1 post of 2022
Adobe Alternatives
This post on instagram lists free and paid alternatives to adobe’s creative cloud … well, I’m going to provide you with the links to the free versions. Please refrain from commenting your personal opinions on the CC or any of these free alternatives.
Ae – After Effects
Blender | DaVinci Resolve
Ai – Illustrator
Boxy SVG | Inkscape | Krita | Vectr (new, old)
An – Animate
Blender | Pencil2D | Spline (3D tool)
Au – Audition
Audacity | Garageband (iOS, Mac, Windows) | LMMS | Tracktion Waveform Free
Dw – Dreamweaver
Atom | Brackets | Sublime | VS Code
Id – InDesign
Canva | Krita | Scribus
Ps – Photoshop
Darktable | GIMP | Krita | Paint.NET | Photopea
Xd – Experience Design
Figma | Framer | Invision
From Julia to You
Three personal faves which I use regularly:
Projector (Canva alternative).
Lunapic (similar to GIMP but online).
FireAlpaca (painting tool).
Crello (Canva alternative).
200 notes - Posted January 1, 2022
Get your Tumblr 2022 Year in Review →
5 notes
·
View notes
Text
Music updates:
I finally googled “Volca Beats snare” to see if it was just mine that sounded weird or if it’s a thing, and, sadly, it is a thing, and the hack to fix it is more or less “GET REALLY REALLY GOOD AT SOLDERING” like much moreso than the average electronics project, and, reader, I have never soldered.
Who needs a snare drum anyway?
Meanwhile, I have started learning Ableton and it’s going really well? Like, a tutorial and a half in, and very much supplemented by all the things, vocabulary, toy sequencer apps, drum machines, etc that I have played with for the past couple years, I understand some of how this software works.
And it’s much, much, much better than GarageBand.
Also, the KeyLab is in the mail, I think, and my Sweetwater sales engineer sends me texts, which seems like a troubling business model, but if they have a thousand customers each and only 30 engage, it probably works fine.
#Volca Beats#cute little snare drum that sounds like a hamster coughing#Ableton#ok Ableton Live Lite but who’s counting
5 notes
·
View notes
Last Seen Blogs

fresh-prince-of-denmark
No They Would Describe Me as Mentally Ill

castlerockheatingandair
Castle Rock Heating & Air

bubbelteechan
BubbelTeaChan

luis22sworld
Luis Quique