#GraphAPI
Explore tagged Tumblr posts
Visit Tumblr Blog
Explore Tumblr blogs with no restrictions, modern design and the best experience.
Last Seen Tumblr Blogs


Fun Fact
Tumblr’s website traffic is steadily declining.
Text
List all the MS Teams you have joined in PowerApps
In my previous article, I have covered how you can get started with the Graph Api integration with Power Apps. If you have missed this article, you can jump back and get started. Get Started with GraphAPI in Power Apps In Today’s article, we will look at how you can list all the MS Teams Teams you have joined. We are aiming at creating a simple app, which lists all the teams, and allow the users…

View On WordPress
0 notes
Text

#NoCodeAPI platforms are a new breed of API management tools that don't require any coding. They provide a low-code or no-code interface for developers to easily create, manage, and publish APIs. The #NoCodeAPI can be used to create #RESTful or #SoapBasedAPIs.
#APIs#NoCode#API#RestAPI#GoogleMapsAPI#FastAPI#OpenAPI#Restful#LocalStorage#JavaAPI#NotionAPI#PostmanAPI#GoogleTranslateAPI#GoogleAPIs#SoapAPI#GoogleDriveAPI#GraphAPI#GmailAPI#FreeAPI#NoCodeAPIs#RESTfulAPIs
0 notes
Text
Leveraging Microsoft’s Graph API with Power Automate
Recently, Microsoft broke many of their customers’ production workflows they had built in Power Automate (formerly Flow) using mail arriving into Shared Mailboxes as the trigger.
After mail had arrived, subsequent actions from a mail action would fail with the error of “Item Id doesn't belong to the current mailbox.” Microsoft’s official workaround was to use the Graph API but a savvy user on the Power Automate message board on Microsoft.com suggested to change the password of the user of the shared mailbox (not the delegate, the actual user created alongside the mailbox); i.e. mailbox name: “Shared Mailbox” username: [email protected].
If Microsoft did not suggest that workaround, and they didn’t, it leads you to believe if this method breaks they won’t care either.
Enter: Graph API via the HTTP action.
Before we get in weeds, the HTTP action is a Premium action. So, if you do not have the Premium license for Power Automate you cannot use it.
The first step is to get a custom connector created into Azure AD to leverage the API. This allows you to build your actions once and apply them to multiple Flows.
The guide I used to get the Custom Connector created was this one from Microsoft. https://docs.microsoft.com/en-us/graph/tutorials/flow
Once that is created, you can create different actions inside the connector then access them from your Flows under Custom when adding an action. I’ll go into detail about the actions I use later in this post.
In order for the Custom Connector to have the correct token, you need to get a token from the API. Below is a screenshot of what the action looks like using the HTTP connector. The action under the HTTP connector will be the “Parse JSON” action.
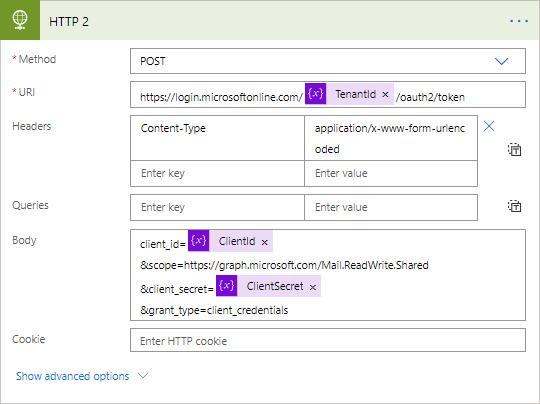
In the above screenshot, you’ll notice I stored the Tenant ID, Client ID and Client Secret from the Azure AD App Registration as variables.
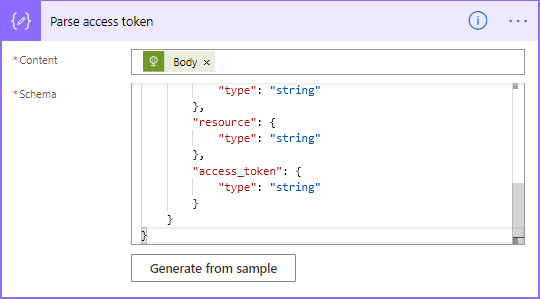
In this action, you can generate the JSON Schema using the below sample. Click “Generate from sample” and paste the below text. NOTE: after every HTTP action (including those with the Custom Connector) use the Parse JSON action in order to know the schema of the JSON.
{ "type": "object", "properties": { "token_type": { "type": "string" }, "expires_in": { "type": "string" }, "ext_expires_in": { "type": "string" }, "expires_on": { "type": "string" }, "not_before": { "type": "string" }, "resource": { "type": "string" }, "access_token": { "type": "string" } }}
Now to the Graph API Custom Connector actions.
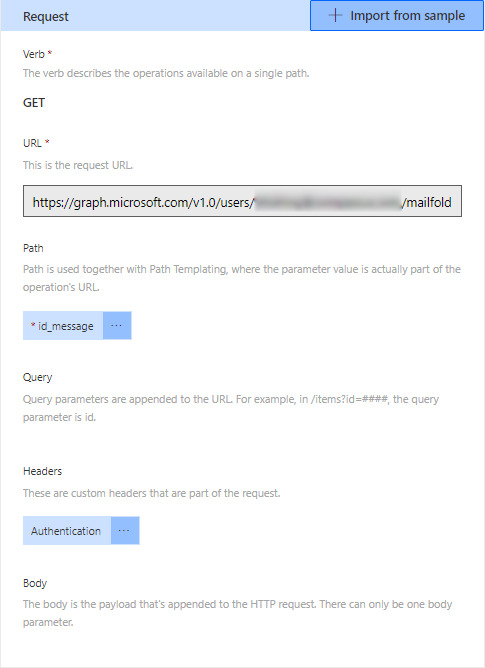
The below action gets all the attachments on a given email. Later, we’ll select the attachment we want to work with. The URL is truncated but is “https://graph.microsoft.com/v1.0/users/[email protected]/mailfolders('Inbox')/messages/{id_message}/attachments”. The text inside the brackets in the URL becomes a parameter. NOTE: actions cannot share parameters so if you have multiple actions with the same parameter they’ll need to be named uniquely. When you create the request, you will see a section for header enter the below be sure to put a space after “Bearer”, you’ll use the token from the above JSON behind Bearer after a space.
Authentication Bearer
Much like the above action, I have an action that selects an attachment. To do this, change the URL to “https://graph.microsoft.com/v1.0/users/[email protected]/mailfolders('Inbox')/messages/{id_message}/attachments/{id_attach}”; you’ll use the attachment ID found in the JSON of the above action.
I also mark the message as read. This is done with the “PATCH” verb in the Request section. I’ll discuss that in a later guide.
#powerautomate#mspowerautomate#flow#msflow#graphapi#msgraphapi#microsoft#api#microsoftapi#office365#exchangeonline#sharedmailbox
0 notes
Link
Facebook API is used to link your website, application and operating system to your Facebook account. In this article, we will learn how to configure Facebook API with clear step-by-step guide.
0 notes
Text
You Can Lastly Schedule Posts on Instagram Now (Kinda)
New Post has been published on https://takenews.net/you-can-lastly-schedule-posts-on-instagram-now-kinda/
You Can Lastly Schedule Posts on Instagram Now (Kinda)
Instagram has introduced you could now schedule posts on the social community, offered you might be signed up as a enterprise account and utilizing an accepted third-party scheduling service. This new automation will streamline the Instagram workflow for many who are utilizing the image-sharing app.
Scheduling will work by third-party apps that make use of the brand new Instagram Graph API. There’s nonetheless no solution to schedule posts instantly on Instagram, by — you will, for now at the least, have to make use of a third-party social media administration service – and they’re, as a rule, paid providers.
Instagram suggests utilizing a Hootsuite account to make this occur, though it’s going to even be potential to do through different third-party companions as they get onboard with the brand new API.
“The scheduling and publishing of Instagram content material has been the primary request for our 16 million clients,” mentioned Ryan Holmes, CEO, Hootsuite. “Hootsuite is happy to companion with Instagram to make this occur.”
The flexibility to schedule posts will little question lure extra Instagram profiles which might be getting used for enterprise functions, however that are nonetheless listed as common private accounts, to transform to the official enterprise facet to the community. Nonetheless, with Facebook’s latest bulletins that non-public content material will probably be prioritized over industrial content material, it’s possible that sooner or later these enterprise accounts will see decreased attain.
Scheduling assist for private Instagram accounts is coming too, however that will probably be in early 2019 in response to Instagram.
(through Instagram through The Verge)
#development#graphapi#Instagram#instagramapi#instagramgraphapi#posts#scheduling#sharing#Social#socialnetwork
0 notes
Text
Conditional Access Policies
Ever pop MSOL creds and but still cant access external resources due to access policies or MFA?
Try MS GraphAPI ;) (may lack the same controls as other resources.)
1 note
·
View note
Text
Global Azure AD Outage Affecting Microsoft 365 Services December 15

What Happened to Our Services?
Microsoft has had its own share of outages recently and during the evening of December 15th Azure AD was the cloud culprit. As a result, the Exoprise sensors detected this Microsoft 365 outage more than an hour before Microsoft informed customers of the issue. Here’s some of the errors that users were experiencing if they attempted to sign into Microsoft services:
Navigation HTTP failure (503 — Instance is overloaded)
Loading the starting URL resulted in an unexpected unrecognized screen on https://login.microsoftonline.com/
Error interacting with Teams (Failed to lookup the tenant id of the logged in user)
Username submission failed: There was an issue looking up your account. Tap Next to try again
Most of our worldwide customers knew well in advance of the problem before users or business suffered. Depending on their timezone and location they were able to avoid potential business disruption. Here’s a composite of dashboards and alarm messages that they received:
Proactive Notifications
Some of the errors that begin to appear for our customers included:
Navigation http failure (503 — Instance is overloaded) for https://login.microsoftonline.com/organizations/oauth2/v2.0/authorize
Username submission failed: There was an issue looking up your account. Tap Next to try again.
These were received in proactive notifications including Alarm Emails, WebHooks, Integrations with ServiceNow and more

You can read more about our Outage Notifications and Monitoring of Microsoft 365 Outages here:
Microsoft 365 Outage Notification Approximately 40 Minutes Later
FeatureDisplayName: Portal ImpactDescription: Users may experience intermittent access issues to multiple Microsoft 365 services. LastUpdatedTime: Thu, 16 Dec 2021 02:13:32 +0000 Messages:
PublishedTime:
Thu, 16 Dec 2021 02:03:37 +0000
MessageText:
Title: Users may experience intermittent access issues to multiple Microsoft 365 services User Impact: Users may experience intermittent access issues to multiple Microsoft 365 services. More info: Impacted services include but are not limited to: -Exchange Online -Microsoft 365 admin center -Partner portal Additionally, active sessions may not be affected by this problem. Current status: We’ve halted all deployments to the service as a preliminary troubleshooting step. In parallel, we’re reviewing network diagnostic data to determine the cause of the problem. Scope of impact: Based on our initial investigation, this issue appears to be impacting any user. Next update by: Thursday, December 16, 2021, at 2:30 AM UTC
Final Resolution
https://admin.microsoft.com/#/servicehealth/history/:/alerts/MO305726
MO305726, Microsoft 365 suite, Last updated: December 15, 2021 10:43 PM
Start time: December 15, 2021 7:11 PM, End time: December 15, 2021 9:25 PM
December 15, 2021 10:43 PM
Title: Users may have experienced intermittent issues accessing multiple Microsoft 365 services
User Impact: Users may have experienced intermittent issues accessing multiple Microsoft 365 services.
More info: Impacted services included but were not limited to:
- Exchange Online — Microsoft 365 admin center — Partner portal — Services leveraging GraphAPI — Power Platform
Users may have received an error when attempting to sign into the affected service.
Final status: We’ve determined that components between Microsoft account (MSA) and Azure AD sign-in services were not functioning as expected. We have rerouted traffic to alternate infrastructure to resolve the issue. We have confirmed via customer reports and extended monitoring that the issue is mitigated. Scope of impact: This issue may have impacted any user attempting to log into multiple Microsoft 365 services. Start time: Wednesday, December 15, 2021, 7:11 PM (12/16/2021, 12:11 AM UTC)
End time: Wednesday, December 15, 2021, 9:25 PM (12/16/2021, 2:25 AM UTC)
Preliminary root cause: A shared component of the Microsoft account (MSA) and Azure AD sign-in services stopped responding when a combination of a configuration error and a routine update caused multiple redundant endpoints to become unreachable. This caused sign-in failures in Microsoft services for both Microsoft personal accounts and Azure AD accounts.
Next steps: — We are reviewing diagnostic data from the impacted infrastructure to determine methods to prevent similar events in the future.
We’ll publish a post-incident report within five business days.
Originally published at https://www.exoprise.com on December 16, 2021.
0 notes
Text
Exploring and Using the Graph API for AzureAD – CloudSavvy IT
Exploring and Using the Graph API for AzureAD – CloudSavvy IT
[ad_1]
The Microsoft GraphAPI is a powerful tool to have. Not only can we use it to create tooling to automate our workloads—we can also access new functions earlier.
In this article, we’ll learn how to explore and use the Microsoft GraphAPI for Azure AD.
Prerequisites
You must meet a few prerequisites before we can begin. Before you begin with the steps outlined in this article, be sure you…
View On WordPress
0 notes
Text
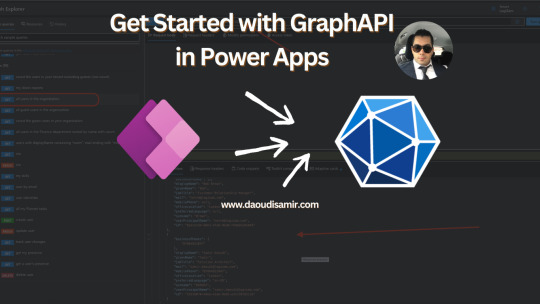
Get Started with GraphAPI in Power Apps
Integrating the Graph Api into your PowerApps opens unlimited options to your apps. With the new feature which allows PowerApps to understand and handle JSON responses from the GraphAPI 1. Connect to the Graph Explorer To start exploring what you can do with the Graph Api, no better tool to use than the Graph Explorer. Connect to Graph Explorer | Try Microsoft Graph APIs – Microsoft Graph and…
View On WordPress
0 notes
Text
How to Make Taxonomy Pages With Gatsby and Sanity.io
In this tutorial, we’ll cover how to make taxonomy pages with Gatsby with structured content from Sanity.io. You will learn how to use Gatsby’s Node creation APIs to add fields to your content types in Gatsby’s GraphQL API. Specifically, we’re going to create category pages for the Sanity’s blog starter.
That being said, there is nothing Sanity-specific about what we’re covering here. You’re able to do this regardless of which content source you may have. We’re just reaching for Sanity.io for the sake of demonstration.
Get up and running with the blog
If you want to follow this tutorial with your own Gatsby project, go ahead and skip to the section for creating a new page template in Gatsby. If not, head over to sanity.io/create and launch the Gatsby blog starter. It will put the code for Sanity Studio and the Gatsby front-end in your GitHub account and set up the deployment for both on Netlify. All the configuration, including example content, will be in place so that you can dive right into learning how to create taxonomy pages.
Once the project is iniated, make sure to clone the new repository on GitHub to local, and install the dependencies:
git clone [email protected]:username/your-repository-name.git cd your-repository-name npm i
If you want to run both Sanity Studio (the CMS) and the Gatsby front-end locally, you can do so by running the command npm run dev in a terminal from the project root. You can also cd into the web folder and just run Gatsby with the same command.
You should also install the Sanity CLI and log in to your account from the terminal: npm i -g @sanity/cli && sanity login. This will give you tooling and useful commands to interact with Sanity projects. You can add the --help flag to get more information on its functionality and commands.
We will be doing some customization to the gatsby-node.js file. To see the result of the changes, restart Gatsby’s development server. This is done in most systems by hitting CTRL + C in the terminal and running npm run dev again.
Getting familiar with the content model
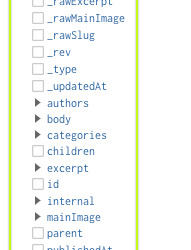
Look into the /studio/schemas/documents folder. There are schema files for our main content types: author, category, site settings, and posts. Each of the files exports a JavaScript object that defines the fields and properties of these content types. Inside of post.js is the field definition for categories:
{ name: 'categories', type: 'array', title: 'Categories', of: [ { type: 'reference', to: [{ type: 'category' }] } ] },
This will create an array field with reference objects to category documents. Inside of the blog’s studio it will look like this:
An array field with references to category documents in the blog studio
Adding slugs to the category type
Head over to /studio/schemas/documents/category.js. There is a simple content model for a category that consists of a title and a description. Now that we’re creating dedicated pages for categories, it would be handy to have a slug field as well. We can define that in the schema like this:
// studio/schemas/documents/category.js export default { name: 'category', type: 'document', title: 'Category', fields: [ { name: 'title', type: 'string', title: 'Title' }, { name: 'slug', type: 'slug', title: 'Slug', options: { // add a button to generate slug from the title field source: 'title' } }, { name: 'description', type: 'text', title: 'Description' } ] }
Now that we have changed the content model, we need to update the GraphQL schema definition as well. Do this by executing npm run graphql-deploy (alternatively: sanity graphql deploy) in the studio folder. You will get warnings about breaking changes, but since we are only adding a field, you can proceed without worry. If you want the field to accessible in your studio on Netlify, check the changes into git (with git add . && git commit -m"add slug field") and push it to your GitHub repository (git push origin master).
Now we should go through the categories and generate slugs for them. Remember to hit the publish button to make the changes accessible for Gatsby! And if you were running Gatsby’s development server, you’ll need to restart that too.
Quick sidenote on how the Sanity source plugin works
When starting Gatsby in development or building a website, the source plugin will first fetch the GraphQL Schema Definitions from Sanity deployed GraphQL API. The source plugin uses this to tell Gatsby which fields should be available to prevent it from breaking if the content for certain fields happens to disappear. Then it will hit the project’s export endpoint, which streams all the accessible documents to Gatsby’s in-memory datastore.
In order words, the whole site is built with two requests. Running the development server, will also set up a listener that pushes whatever changes come from Sanity to Gatsby in real-time, without doing additional API queries. If we give the source plugin a token with permission to read drafts, we’ll see the changes instantly. This can also be experienced with Gatsby Preview.
Adding a category page template in Gatsby
Now that we have the GraphQL schema definition and some content ready, we can dive into creating category page templates in Gatsby. We need to do two things:
Tell Gatsby to create pages for the category nodes (that is Gatsby’s term for “documents”).
Give Gatsby a template file to generate the HTML with the page data.
Begin by opening the /web/gatsby-node.js file. Code will already be here that can be used to create the blog post pages. We’ll largely leverage this exact code, but for categories. Let’s take it step-by-step:
Between the createBlogPostPages function and the line that starts with exports.createPages, we can add the following code. I’ve put in comments here to explain what’s going on:
// web/gatsby-node.js // ... async function createCategoryPages (graphql, actions) { // Get Gatsby‘s method for creating new pages const {createPage} = actions // Query Gatsby‘s GraphAPI for all the categories that come from Sanity // You can query this API on http://localhost:8000/___graphql const result = await graphql(`{ allSanityCategory { nodes { slug { current } id } } } `) // If there are any errors in the query, cancel the build and tell us if (result.errors) throw result.errors // Let‘s gracefully handle if allSanityCatgogy is null const categoryNodes = (result.data.allSanityCategory || {}).nodes || [] categoryNodes // Loop through the category nodes, but don't return anything .forEach((node) => { // Desctructure the id and slug fields for each category const {id, slug = {}} = node // If there isn't a slug, we want to do nothing if (!slug) return // Make the URL with the current slug const path = `/categories/${slug.current}` // Create the page using the URL path and the template file, and pass down the id // that we can use to query for the right category in the template file createPage({ path, component: require.resolve('./src/templates/category.js'), context: {id} }) }) }
Last, this function is needed at the bottom of the file:
// /web/gatsby-node.js // ... exports.createPages = async ({graphql, actions}) => { await createBlogPostPages(graphql, actions) await createCategoryPages(graphql, actions) // <= add the function here }
Now that we have the machinery to create the category page node in place, we need to add a template for how it actually should look in the browser. We’ll base it on the existing blog post template to get some consistent styling, but keep it fairly simple in the process.
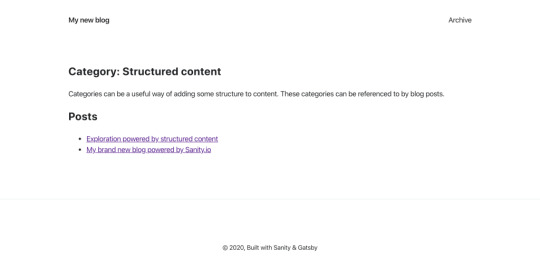
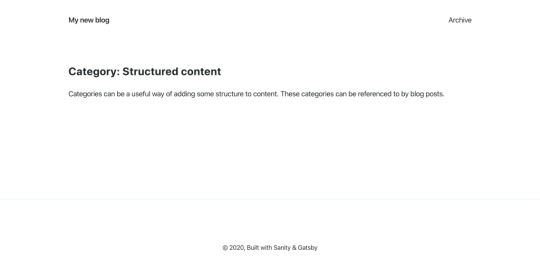
// /web/src/templates/category.js import React from 'react' import {graphql} from 'gatsby' import Container from '../components/container' import GraphQLErrorList from '../components/graphql-error-list' import SEO from '../components/seo' import Layout from '../containers/layout' export const query = graphql` query CategoryTemplateQuery($id: String!) { category: sanityCategory(id: {eq: $id}) { title description } } ` const CategoryPostTemplate = props => { const {data = {}, errors} = props const {title, description} = data.category || {} return ( <Layout> <Container> {errors && <GraphQLErrorList errors={errors} />} {!data.category && <p>No category data</p>} <SEO title={title} description={description} /> <article> <h1>Category: {title}</h1> <p>{description}</p> </article> </Container> </Layout> ) } export default CategoryPostTemplate
We are using the ID that was passed into the context in gatsby-node.js to query the category content. Then we use it to query the title and description fields that are on the category type. Make sure to restart with npm run dev after saving these changes, and head over to localhost:8000/categories/structured-content in the browser. The page should look something like this:

A barebones category page
Cool stuff! But it would be even cooler if we actually could see what posts that belong to this category, because, well, that’s kinda the point of having categories in the first place, right? Ideally, we should be able to query for a “pages” field on the category object.
Before we learn how to that, we need to take a step back to understand how Sanity’s references work.
Querying Sanity’s references
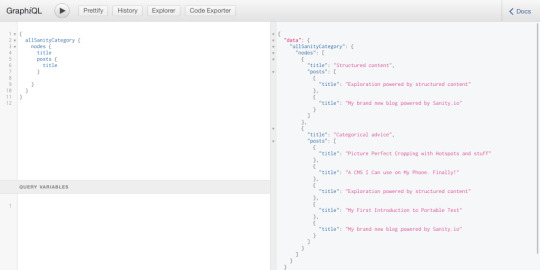
Even though we’re only defining the references in one type, Sanity’s datastore will index them “bi-directionally.” That means creating a reference to the “Structured content” category document from a post lets Sanity know that the category has these incoming references and will keep you from deleting it as long as the reference exists (references can be set as “weak” to override this behavior). If we use GROQ, we can query categories and join posts that have them like this (see the query and result in action on groq.dev):
*[_type == "category"]{ _id, _type, title, "posts": *[_type == "post" && references(^._id)]{ title, slug } } // alternative: *[_type == "post" && ^._id in categories[]._ref]{
This ouputs a data structure that lets us make a simple category post template:
[ { "_id": "39d2ca7f-4862-4ab2-b902-0bf10f1d4c34", "_type": "category", "title": "Structured content", "posts": [ { "title": "Exploration powered by structured content", "slug": { "_type": "slug", "current": "exploration-powered-by-structured-content" } }, { "title": "My brand new blog powered by Sanity.io", "slug": { "_type": "slug", "current": "my-brand-new-blog-powered-by-sanity-io" } } ] }, // ... more entries ]
That’s fine for GROQ, what about GraphQL?
Here‘s the kicker: As of yet, this kind of query isn’t possible with Gatsby’s GraphQL API out of the box. But fear not! Gatsby has a powerful API for changing its GraphQL schema that lets us add fields.
Using createResolvers to edit Gatsby’s GraphQL API
Gatsby holds all the content in memory when it builds your site and exposes some APIs that let us tap into how it processes this information. Among these are the Node APIs. It’s probably good to clarify that when we are talking about “node” in Gatsby — not to be confused with Node.js. The creators of Gatsby have borrowed “edges and nodes” from Graph theory where “edges” are the connections between the “nodes” which are the “points” where the actual content is located. Since an edge is a connection between nodes, it can have a “next” and “previous” property.

The edges with next and previous, and the node with fields in GraphQL’s API explorer
The Node APIs are used by plugins first and foremost, but they can be used to customize how our GraphQL API should work as well. One of these APIs is called createResolvers. It’s fairly new and it lets us tap into how a type’s nodes are created so we can make queries that add data to them.
Let’s use it to add the following logic:
Check for ones with the SanityCategory type when creating the nodes.
If a node matches this type, create a new field called posts and set it to the SanityPost type.
Then run a query that filters all posts that has lists a category that matches the current category’s ID.
If there are matching IDs, add the content of the post nodes to this field.
Add the following code to the /web/gatsby-node.js file, either below or above the code that’s already in there:
// /web/gatsby-node.js // Notice the capitalized type names exports.createResolvers = ({createResolvers}) => { const resolvers = { SanityCategory: { posts: { type: ['SanityPost'], resolve (source, args, context, info) { return context.nodeModel.runQuery({ type: 'SanityPost', query: { filter: { categories: { elemMatch: { _id: { eq: source._id } } } } } }) } } } } createResolvers(resolvers) }
Now, let’s restart Gatsby’s development server. We should be able to find a new field for posts inside of the sanityCategory and allSanityCategory types.

Adding the list of posts to the category template
Now that we have the data we need, we can return to our category page template (/web/src/templates/category.js) and add a list with links to the posts belonging to the category.
// /web/src/templates/category.js import React from 'react' import {graphql, Link} from 'gatsby' import Container from '../components/container' import GraphQLErrorList from '../components/graphql-error-list' import SEO from '../components/seo' import Layout from '../containers/layout' // Import a function to build the blog URL import {getBlogUrl} from '../lib/helpers' // Add “posts” to the GraphQL query export const query = graphql` query CategoryTemplateQuery($id: String!) { category: sanityCategory(id: {eq: $id}) { title description posts { _id title publishedAt slug { current } } } } ` const CategoryPostTemplate = props => { const {data = {}, errors} = props // Destructure the new posts property from props const {title, description, posts} = data.category || {} return ( <Layout> <Container> {errors && <GraphQLErrorList errors={errors} />} {!data.category && <p>No category data</p>} <SEO title={title} description={description} /> <article> <h1>Category: {title}</h1> <p>{description}</p> {/* If there are any posts, add the heading, with the list of links to the posts */} {posts && ( <React.Fragment> <h2>Posts</h2> <ul> { posts.map(post => ( <li key={post._id}> <Link to={getBlogUrl(post.publishedAt, post.slug)}>{post.title}</Link> </li>)) } </ul> </React.Fragment>) } </article> </Container> </Layout> ) } export default CategoryPostTemplate
This code will produce this simple category page with a list of linked posts – just liked we wanted!
Go make taxonomy pages!
We just completed the process of creating new page types with custom page templates in Gatsby. We covered one of Gatsby’s Node APIs called createResolver and used it to add a new posts field to the category nodes.
This should give you what you need to make other types of taxonomy pages! Do you have multiple authors on your blog? Well, you can use the same logic to create author pages. The interesting thing with the GraphQL filter is that you can use it to go beyond the explicit relationship made with references. It can also be used to match other fields using regular expressions or string comparisons. It’s fairly flexible!
The post How to Make Taxonomy Pages With Gatsby and Sanity.io appeared first on CSS-Tricks.
How to Make Taxonomy Pages With Gatsby and Sanity.io published first on https://deskbysnafu.tumblr.com/
0 notes
Text
How to Make Taxonomy Pages With Gatsby and Sanity.io
In this tutorial, we’ll cover how to make taxonomy pages with Gatsby with structured content from Sanity.io. You will learn how to use Gatsby’s Node creation APIs to add fields to your content types in Gatsby’s GraphQL API. Specifically, we’re going to create category pages for the Sanity’s blog starter.
That being said, there is nothing Sanity-specific about what we’re covering here. You’re able to do this regardless of which content source you may have. We’re just reaching for Sanity.io for the sake of demonstration.
Get up and running with the blog
If you want to follow this tutorial with your own Gatsby project, go ahead and skip to the section for creating a new page template in Gatsby. If not, head over to sanity.io/create and launch the Gatsby blog starter. It will put the code for Sanity Studio and the Gatsby front-end in your GitHub account and set up the deployment for both on Netlify. All the configuration, including example content, will be in place so that you can dive right into learning how to create taxonomy pages.
Once the project is iniated, make sure to clone the new repository on GitHub to local, and install the dependencies:
git clone [email protected]:username/your-repository-name.git cd your-repository-name npm i
If you want to run both Sanity Studio (the CMS) and the Gatsby front-end locally, you can do so by running the command npm run dev in a terminal from the project root. You can also cd into the web folder and just run Gatsby with the same command.
You should also install the Sanity CLI and log in to your account from the terminal: npm i -g @sanity/cli && sanity login. This will give you tooling and useful commands to interact with Sanity projects. You can add the --help flag to get more information on its functionality and commands.
We will be doing some customization to the gatsby-node.js file. To see the result of the changes, restart Gatsby’s development server. This is done in most systems by hitting CTRL + C in the terminal and running npm run dev again.
Getting familiar with the content model
Look into the /studio/schemas/documents folder. There are schema files for our main content types: author, category, site settings, and posts. Each of the files exports a JavaScript object that defines the fields and properties of these content types. Inside of post.js is the field definition for categories:
{ name: 'categories', type: 'array', title: 'Categories', of: [ { type: 'reference', to: { type: 'category' } } ] },
This will create an array field with reference objects to category documents. Inside of the blog’s studio it will look like this:
An array field with references to category documents in the blog studio
Adding slugs to the category type
Head over to /studio/schemas/documents/category.js. There is a simple content model for a category that consists of a title and a description. Now that we’re creating dedicated pages for categories, it would be handy to have a slug field as well. We can define that in the schema like this:
// studio/schemas/documents/category.js export default { name: 'category', type: 'document', title: 'Category', fields: [ { name: 'title', type: 'string', title: 'Title' }, { name: 'slug', type: 'slug', title: 'Slug', options: { // add a button to generate slug from the title field source: 'title' } }, { name: 'description', type: 'text', title: 'Description' } ] }
Now that we have changed the content model, we need to update the GraphQL schema definition as well. Do this by executing npm run graphql-deploy (alternatively: sanity graphql deploy) in the studio folder. You will get warnings about breaking changes, but since we are only adding a field, you can proceed without worry. If you want the field to accessible in your studio on Netlify, check the changes into git (with git add . && git commit -m"add slug field") and push it to your GitHub repository (git push origin master).
Now we should go through the categories and generate slugs for them. Remember to hit the publish button to make the changes accessible for Gatsby! And if you were running Gatsby’s development server, you’ll need to restart that too.
Quick sidenote on how the Sanity source plugin works
When starting Gatsby in development or building a website, the source plugin will first fetch the GraphQL Schema Definitions from Sanity deployed GraphQL API. The source plugin uses this to tell Gatsby which fields should be available to prevent it from breaking if the content for certain fields happens to disappear. Then it will hit the project’s export endpoint, which streams all the accessible documents to Gatsby’s in-memory datastore.
In order words, the whole site is built with two requests. Running the development server, will also set up a listener that pushes whatever changes come from Sanity to Gatsby in real-time, without doing additional API queries. If we give the source plugin a token with permission to read drafts, we’ll see the changes instantly. This can also be experienced with Gatsby Preview.
Adding a category page template in Gatsby
Now that we have the GraphQL schema definition and some content ready, we can dive into creating category page templates in Gatsby. We need to do two things:
Tell Gatsby to create pages for the category nodes (that is Gatsby’s term for “documents”).
Give Gatsby a template file to generate the HTML with the page data.
Begin by opening the /web/gatsby-node.js file. Code will already be here that can be used to create the blog post pages. We’ll largely leverage this exact code, but for categories. Let’s take it step-by-step:
Between the createBlogPostPages function and the line that starts with exports.createPages, we can add the following code. I’ve put in comments here to explain what’s going on:
// web/gatsby-node.js // ... async function createCategoryPages (graphql, actions) { // Get Gatsby‘s method for creating new pages const {createPage} = actions // Query Gatsby‘s GraphAPI for all the categories that come from Sanity // You can query this API on http://localhost:8000/___graphql const result = await graphql(`{ allSanityCategory { nodes { slug { current } id } } } `) // If there are any errors in the query, cancel the build and tell us if (result.errors) throw result.errors // Let‘s gracefully handle if allSanityCatgogy is null const categoryNodes = (result.data.allSanityCategory || {}).nodes || [] categoryNodes // Loop through the category nodes, but don't return anything .forEach((node) => { // Desctructure the id and slug fields for each category const {id, slug = {}} = node // If there isn't a slug, we want to do nothing if (!slug) return // Make the URL with the current slug const path = `/categories/${slug.current}` // Create the page using the URL path and the template file, and pass down the id // that we can use to query for the right category in the template file createPage({ path, component: require.resolve('./src/templates/category.js'), context: {id} }) }) }
Last, this function is needed at the bottom of the file:
// /web/gatsby-node.js // ... exports.createPages = async ({graphql, actions}) => { await createBlogPostPages(graphql, actions) await createCategoryPages(graphql, actions) // <= add the function here }
Now that we have the machinery to create the category page node in place, we need to add a template for how it actually should look in the browser. We’ll base it on the existing blog post template to get some consistent styling, but keep it fairly simple in the process.
// /web/src/templates/category.js import React from 'react' import {graphql} from 'gatsby' import Container from '../components/container' import GraphQLErrorList from '../components/graphql-error-list' import SEO from '../components/seo' import Layout from '../containers/layout' export const query = graphql` query CategoryTemplateQuery($id: String!) { category: sanityCategory(id: {eq: $id}) { title description } } ` const CategoryPostTemplate = props => { const {data = {}, errors} = props const {title, description} = data.category || {} return ( <Layout> <Container> {errors && <GraphQLErrorList errors={errors} />} {!data.category && <p>No category data</p>} <SEO title={title} description={description} /> <article> <h1>Category: {title}</h1> <p>{description}</p> </article> </Container> </Layout> ) } export default CategoryPostTemplate
We are using the ID that was passed into the context in gatsby-node.js to query the category content. Then we use it to query the title and description fields that are on the category type. Make sure to restart with npm run dev after saving these changes, and head over to localhost:8000/categories/structured-content in the browser. The page should look something like this:
A barebones category page
Cool stuff! But it would be even cooler if we actually could see what posts that belong to this category, because, well, that’s kinda the point of having categories in the first place, right? Ideally, we should be able to query for a “pages” field on the category object.
Before we learn how to that, we need to take a step back to understand how Sanity’s references work.
Querying Sanity’s references
Even though we’re only defining the references in one type, Sanity’s datastore will index them “bi-directionally.” That means creating a reference to the “Structured content” category document from a post lets Sanity know that the category has these incoming references and will keep you from deleting it as long as the reference exists (references can be set as “weak” to override this behavior). If we use GROQ, we can query categories and join posts that have them like this (see the query and result in action on groq.dev):
*[_type == "category"]{ _id, _type, title, "posts": *[_type == "post" && references(^._id)]{ title, slug } } // alternative: *[_type == "post" && ^._id in categories[]._ref]{
This ouputs a data structure that lets us make a simple category post template:
[ { "_id": "39d2ca7f-4862-4ab2-b902-0bf10f1d4c34", "_type": "category", "title": "Structured content", "posts": [ { "title": "Exploration powered by structured content", "slug": { "_type": "slug", "current": "exploration-powered-by-structured-content" } }, { "title": "My brand new blog powered by Sanity.io", "slug": { "_type": "slug", "current": "my-brand-new-blog-powered-by-sanity-io" } } ] }, // ... more entries ]
That’s fine for GROQ, what about GraphQL?
Here‘s the kicker: As of yet, this kind of query isn’t possible with Gatsby’s GraphQL API out of the box. But fear not! Gatsby has a powerful API for changing its GraphQL schema that lets us add fields.
Using createResolvers to edit Gatsby’s GraphQL API
Gatsby holds all the content in memory when it builds your site and exposes some APIs that let us tap into how it processes this information. Among these are the Node APIs. It’s probably good to clarify that when we are talking about “node” in Gatsby — not to be confused with Node.js. The creators of Gatsby have borrowed “edges and nodes” from Graph theory where “edges” are the connections between the “nodes” which are the “points” where the actual content is located. Since an edge is a connection between nodes, it can have a “next” and “previous” property.
The edges with next and previous, and the node with fields in GraphQL’s API explorer
The Node APIs are used by plugins first and foremost, but they can be used to customize how our GraphQL API should work as well. One of these APIs is called createResolvers. It’s fairly new and it lets us tap into how a type’s nodes are created so we can make queries that add data to them.
Let’s use it to add the following logic:
Check for ones with the SanityCategory type when creating the nodes.
If a node matches this type, create a new field called posts and set it to the SanityPost type.
Then run a query that filters all posts that has lists a category that matches the current category’s ID.
If there are matching IDs, add the content of the post nodes to this field.
Add the following code to the /web/gatsby-node.js file, either below or above the code that’s already in there:
// /web/gatsby-node.js // Notice the capitalized type names exports.createResolvers = ({createResolvers}) => { const resolvers = { SanityCategory: { posts: { type: ['SanityPost'], resolve (source, args, context, info) { return context.nodeModel.runQuery({ type: 'SanityPost', query: { filter: { categories: { elemMatch: { _id: { eq: source._id } } } } } }) } } } } createResolvers(resolvers) }
Now, let’s restart Gatsby’s development server. We should be able to find a new field for posts inside of the sanityCategory and allSanityCategory types.
Adding the list of posts to the category template
Now that we have the data we need, we can return to our category page template (/web/src/templates/category.js) and add a list with links to the posts belonging to the category.
// /web/src/templates/category.js import React from 'react' import {graphql, Link} from 'gatsby' import Container from '../components/container' import GraphQLErrorList from '../components/graphql-error-list' import SEO from '../components/seo' import Layout from '../containers/layout' // Import a function to build the blog URL import {getBlogUrl} from '../lib/helpers' // Add “posts” to the GraphQL query export const query = graphql` query CategoryTemplateQuery($id: String!) { category: sanityCategory(id: {eq: $id}) { title description posts { _id title publishedAt slug { current } } } } ` const CategoryPostTemplate = props => { const {data = {}, errors} = props // Destructure the new posts property from props const {title, description, posts} = data.category || {} return ( <Layout> <Container> {errors && <GraphQLErrorList errors={errors} />} {!data.category && <p>No category data</p>} <SEO title={title} description={description} /> <article> <h1>Category: {title}</h1> <p>{description}</p> {/* If there are any posts, add the heading, with the list of links to the posts */} {posts && ( <React.Fragment> <h2>Posts</h2> <ul> { posts.map(post => ( <li key={post._id}> <Link to={getBlogUrl(post.publishedAt, post.slug)}>{post.title}</Link> </li>)) } </ul> </React.Fragment>) } </article> </Container> </Layout> ) } export default CategoryPostTemplate
This code will produce this simple category page with a list of linked posts – just liked we wanted!

Go make taxonomy pages!
We just completed the process of creating new page types with custom page templates in Gatsby. We covered one of Gatsby’s Node APIs called createResolver and used it to add a new posts field to the category nodes.
This should give you what you need to make other types of taxonomy pages! Do you have multiple authors on your blog? Well, you can use the same logic to create author pages. The interesting thing with the GraphQL filter is that you can use it to go beyond the explicit relationship made with references. It can also be used to match other fields using regular expressions or string comparisons. It’s fairly flexible!
The post How to Make Taxonomy Pages With Gatsby and Sanity.io appeared first on CSS-Tricks.
source https://css-tricks.com/how-to-make-taxonomy-pages-with-gatsby-and-sanity-io/
from WordPress https://ift.tt/3bQyM7S via IFTTT
0 notes
Text
人気SNSを活用できるAPI7選
from https://ferret-plus.com/9008?utm_campaign=https%3A%2F%2Fferret-plus.com%2F9008&utm_medium=RSS&utm_source=top_rss
ユーザー は、読んでみて「面白い」、「参考になった」、「何か意見したい」と思う コンテンツ をSNSでシェアすることがあります。 コンテンツ は何万人もの ユーザー にシェアされ、多くの反響を生み出すことがあります。
自社の オウンドメディア でも、 コンテンツ を多くの人にシェアして欲しいと思う担当者も少なくないでしょう。そのためには、 ユーザー にシェアしてもらいやすい 導線 をつくる必要があります。ほかにも、SNS アカウント を利用した会員登録など、近年利用率が高まっているSNSと連携することで、自社メディアを充実させる機能がたくさんあります。そこで活用できるのが、SNSのAPIです。
SNSのAPIを導入すると、 ユーザー が日常的に利用しているSNSとの親和性を高められます。
今回は、7つの主要SNSが提供しているAPIをご紹介します。
APIとは
APIとは、「Application Programming Interface( アプリ ケーションプログラミングインターフェース)」の略で、ソフトウェア機能を自社サービスと共有して、手軽に利用できるようにするための仕組みのことを指します。
本来であれば難解な プログラム が必要な機能も、APIを利用することで簡単に搭載できます。
SNSのAPI7選
今回は、SNSの機能を利用できるAPIを7つご紹介します。
1. Facebook 2. Twitter 3. Instagram(インスタグラム) 4. Pinterest 5. Google + 6. LinkedIn 7. はてなハイク
Facebook
世界中で利用されているSNS「 Facebook 」のAPIです。 ユーザー が自社のWeb ページ の コンテンツ を Facebook でシェアしたり、会員登録時に Facebook の アカウント で登録したりできるようになります。
「GraphAPI」という、 Facebook のデータを取得するためのAPIを利用します。 ユーザー の名前などの基本情報だけではなく、友達の情報やメッセージ履歴まで取得可能です。ただし、 ユーザー に対して事前承認が必要です。
Twitter
短文の投稿を共有するSNS「 Twitter 」のAPIです。特定の アカウント や タグ についての投稿のみを取得して自社のWeb ページ に表示させたり、自社の アカウント をフォローするボタンを設置できたりします。
自社の商品やイベントのタグ付きの投稿が多いようなら、Web ページ に表示して反響の大きさをアピールしてみましょう。
3. インスタグラム
Instagram
撮影・加工した写真を共有するスマートフォン向け アプリ 「インスタグラム」のAPIです。 Twitter と同じく、特定のタグについての投稿のみを取得してWeb ページ に表示させることができます。緯度・軽度とその場所からの半径距離を指定すれば、その範囲内で投稿された写真の表示も可能なため、イベント中の広報などに利用可能です。
また、自社 アカウント をフォローできる機能も利用できます。
4. Pinterest
Pinterest
趣味や興味ごとに写真を共有できるWebサービス「Pinterest」のAPIです。Pinterestの中で気に入った写真を保存することを「ピン」といいます。特定のドメインの中で最もピンされた画像を自社Web ページ に表示することができます。
ピンした画像が保存される「ボード」の写真を最新順に表示したり、Web ページ 上でフォローできる機能もあります。
Google+
Google アカウント を利用したSNS「 Google +」のAPIです。 ユーザー やアクティビティ、コメントの検索と読み込みが可能です。また、特定のアクティビティに対するコメントやユーザーも取得できます。
LinkedIn
世界最大級のビジネス特化型SNSである「 LinkedIn 」のAPIです。 LinkedIn の アカウント でログインしたり、 コンテンツ を共有したりできます。
LinkedIn 以外から記事を投稿することも可能です。企業 ページ も管理できるため、仕事上でも役に立つAPIです。
7.はてなハイク
はてなハイク
ブログ やニュースなど様々な コンテンツ をもつ ポータルサイト 「はてな」のミニ ブログ サービスである「はてなハイク」のAPIです。
はてなハイクに投稿された キーワード や「お気に入り」の情報の取得や、新しい記事の作成・投稿もできます。
まとめ
SNSのAPIの中には、シェアやフォローの機能と一緒に コンテンツ のシェア数やブックマーク数が表示されるものもあります。数多くの反響を得ていることがわかれば、さらに ユーザー の関心を集めやすくなるでしょう。また、SNS上以外からでも新しく投稿できるため、運用面でも利便性が高まります。
コンテンツ の性質に合わせ、積極的に活用してみてはいかがでしょうか。
https://ferret.akamaized.net/images/5a0c0f4e7f58a84ef2000163/large.jpg?1510739789
0 notes
Link
NoCategory1Category2ServiceNameURLJapanese Service Trial or FreeAPIAPI Reference ArchitectureAuthentication MemoTried1CollaborationグループウェアOffice365https://www.microsoft.com/ja-jp/microsoft-365/explore-microsoft-365-for-home FALSETRUETRUEhttps://docs.microsoft.com/ja-jp/graph/use-the-api REST/ODataOAuth 2.0名称はOffice365→Microsoft 365。各種APIがあるが、GraphAPIを対象とした。ある程度製品ごとでバラつきはある。 TRUE2Collaborationグループウェアdesknet's NEOhttps://www.desknets.com/TRUETRUEFALSEAppSuiteでは提供されているFALSE3CollaborationグループウェアG Suitehttps://gsuite.google.co.jp/intl/ja/features/ FALSETRUETRUEhttps://developers.google.com/gsuite/aspects/apis/overview?hl=ja RESTOAuth 2.0ある程度製品ごとでバラつきはある。TRUE4CollaborationグループウェアZoho Connecthttps://www.zoho.com/jp/connect/ FALSETRUETRUEhttps://www.zoho.com/connect/api/intro.html RPC LikeOAuthOAuthはサードパーティ系を考慮しない。インターナル専用 FALSE5CollaborationグループウェアサイボウズOfficehttps://office.cybozu.co.jp/TRUETRUEFALSE過去提供していたらしいが、正式なサポートが終了。https://developer.cybozu.io/hc/ja/articles/360015228332--%E3%82%B5%E3%82%A4%E3%83%9C%E3%82%A6%E3%82%BA-Office-%E9%80%A3%E6%90%BAAPI%E3%83%89%E3%82%AD%E3%83%A5%E3%83%A1%E3%83%B3%E3%83%88%E9%85%8D%E5%B8%83%E7%B5%82%E4%BA%86%E3%81%AE%E3%81%8A%E7%9F%A5%E3%82%89%E3%81%9B-2018-09-19- FALSE6CollaborationグループウェアJ-MOTTOhttps://www.j-motto.co.jp/TRUETRUEFALSEGoogle カレンダー連携は提供しているが、APIは無い模様 FALSE7Collaborationグループウェアaipohttps://aipo.com/TRUETRUEFALSEインターナルなアプリを開発するためのAPIは提供されているが、外部連携用ではないため、今回は除外https://developer.aipo.com/platform/ FALSE8CollaborationグループウェアiQubehttp://www.iqube.net/TRUETRUETRUE不明不明不明OEM向けの外部連携APIは提供されているらしいが、公式サイトにはReferenceなどの記載なし。http://www.iqube.net/pr/archives/27 FALSE9Collaborationグループウェアビジネスgooサービス終了サービス終了FALSE10CollaborationグループウェアGRIDYhttps://ksj.co.jp/knowledgesuite/free/index.html TRUETRUEFALSE現在はKnoledgeSuite がメイン? https://ksj.co.jp/knowledgesuite/free/index.html FALSE11CollaborationグループウェアNI Collabo 360http://ni-ware.com/TRUETRUEFALSESmartから名称変更? 同社が提供するサービスとの連携はあるが、APIインターフェースは無し http://ni-ware.com/feature/feature-3.html FALSE12CollaborationグループウェアGaroonhttps://garoon.cybozu.co.jp/TRUETRUETRUEhttps://developer.cybozu.io/hc/ja/articles/360000577946-Garoon-REST-API-%E4%B8%80%E8%A6%A7 RESTBasic, CookieTRUE13Collaborationグループウェアkintonehttps://kintone.cybozu.co.jp/TRUETRUETRUEhttps://developer.cybozu.io/hc/ja/categories/200147600-kintone-API RESTAPI Token, Basic TRUE14Collaborationグループウェアmitocohttps://www.mitoco.net/index.php TRUETRUETRUESalesforce API ベース Salesforce プラットフォームベースで構築されたサービスのため、SalesforceのAPIが使える FALSE15CollaborationグループウェアWaWaOfficehttps://www.wawaoffice.jp/TRUETRUETRUE不明不明不明API連携が可能との記述があるが、仕様書は見当たらない。https://www.wawaoffice.jp/info/ FALSE16Collaborationグループウェアrakumohttps://rakumo.com/TRUETRUETRUESalesforce, G Suite API ベース Salesforce, G Suite プラットフォームのAPIベースで作られているため、データ・APIも各プラットフォームに準拠する FALSE17CollaborationグループウェアGROUP SESSIONhttps://groupsession.jp/TRUETRUEFALSEオンプレミスの場合、RDBアクセスが可能。APIは無し FALSE18Collaborationグループウェアオルカhttps://www.and.ne.jp/TRUETRUEFALSE機能一覧で存在を確認できず。 https://www.and.ne.jp/?page_id=2368 FALSE19CollaborationグループウェアINSUITEhttps://www.insuite.jp/TRUEFALSETRUEhttps://insuite.support-dreamarts.com/hc/ja/articles/235504868-%E3%83%89%E3%82%AD%E3%83%A5%E3%83%A1%E3%83%B3%E3%83%88%E4%B8%80%E8%A6%A7-Ver-3-5%E7%B3%BB JSON-RPCCookie仕様書はPDFで公開FALSE20CollaborationグループウェアR-GROUPhttps://jp.r-group.com/TRUETRUEFALSE完全無料FALSE21Collaborationグループウェアe-Broadhttps://gw.e-broad.jp/TRUETRUEFALSE光サービスと一緒に契約することで無料で利用できるFALSE22CollaborationグループウェアHotBiz8https://www.hotbiz.jp/TRUETRUEFALSEAPIの記述は見当たらずFALSE23Collaborationビジネスチャット/社内SNSslackhttps://slack.com/intl/ja-jp/FALSETRUETRUEhttps://api.slack.com/web RPC LikeOAuth 2.0OpenAPI 2.0 の仕様も公開中 https://api.slack.com/specs/openapi/v2/slack_web.json WebHook, Event は今回対象外 TRUE24Collaborationビジネスチャット/社内SNSChatworkhttps://go.chatwork.com/ja/TRUETRUETRUEhttps://developer.chatwork.com/ja/ RESTOAuth 2.0RAML ベースの定義をGithub で公開中 https://github.com/chatwork/api/blob/master/RAML/api-ja.raml TRUE25Collaborationビジネスチャット/社内SNSSalesforce chatterhttps://www.salesforce.com/jp/products/chatter/overview/ FALSETRUETRUEhttps://developer.salesforce.com/docs/atlas.ja-jp.chatterapi.meta/chatterapi/intro_what_is_chatter_connect.htm RESTOAuth 2.0FALSE26Collaborationビジネスチャット/社内SNSLINE WORKShttps://line.worksmobile.com/jp/ TRUETRUETRUEhttps://developers.worksmobile.com/jp/document/300130001?lang=ja RESTOAuth 2.0, API Token, JWT 各種サービス、組織APIなどで、デザインが異なるTRUE27Collaborationビジネスチャット/社内SNSworkplacehttps://www.workplace.com/FALSETRUETRUEhttps://developers.facebook.com/docs/workplace/reference/graph-api RESTOAuth 2.0Facebook GraphAPI の一部として提供FALSE28Collaborationビジネスチャット/社内SNSMicrosoft Teamshttps://www.microsoft.com/ja-jp/microsoft-365/microsoft-teams/group-chat-software FALSETRUETRUEhttps://docs.microsoft.com/ja-jp/graph/teams-concept-overview REST/ODataOAuth 2.0Microsoft GraphAPI の一部として提供TRUE29Collaborationビジネスチャット/社内SNSTEAMWORK CLOUDhttps://www.motivation-cloud.com/teamwork-cloud/ TRUEFALSEFALSEAPI に関する機能などの情報は見当たらずFALSE30Collaborationビジネスチャット/社内SNStypetalkhttps://www.typetalk.com/ja/TRUETRUETRUEhttps://developer.nulab.com/ja/docs/typetalk/ RESTOAuth 2.0, API Token FALSE31Collaborationビジネスチャット/社内SNSQuiphttps://quip.com/FALSETRUETRUEhttps://quip.com/dev RESTOAuth 2.0Automation API と Admin APIが外部連携用のAPI FALSE32Collaborationビジネスチャット/社内SNSWowTalkhttps://www.wowtalk.jp/TRUETRUETRUE不明不明不明以下のプレスリリースで存在を確認。リファレンスは確認できず。 https://www.wowtalk.jp/info/171005wowtalkwebapi.html FALSE33Collaborationビジネスチャット/社内SNSTalknotehttps://talknote.com/TRUETRUETRUEhttps://developer.talknote.com/doc/ RESTAPI TokenTRUE34Collaborationビジネスチャット/社内SNSChiwawaサービス終了サービス終了 https://www.chiwawa.one/ FALSE35Collaborationビジネスチャット/社内SNSIn Circlehttps://www.incircle.jp/TRUETRUETRUE不明不明不明以下のページにて、APIの提供は確認。リファレンスは不明。https://www.incircle.jp/features/ FALSE36Collaborationビジネスチャット/社内SNSdirecthttps://direct4b.com/ja/TRUETRUEFALSE機能一覧で存在を確認できず https://direct4b.com/ja/feature/ FALSE37Collaborationビジネスチャット/社内SNSTocarohttps://tocaro.im/?locale=jaTRUETRUEFALSE機能一覧で存在を確認できず https://tocaro.im/features FALSE38Collaborationビジネスチャット/社内SNSChatLuckhttps://www.chatluck.com/TRUETRUEFALSEREST的APIは存在せず。Chatbot API, Notification APIを提供。https://www.chatluck.com/help/ja_JP/api/index.html FALSE39Collaborationビジネスチャット/社内SNSSKIPhttps://www.skip-sns.jp/TRUETRUEFALSE機能一覧で存在を確認できず。https://www.skip-sns.jp/function FALSE40Collaborationビジネスチャット/社内SNSWANTEDLY CHATサービス終了サービス終了 https://sync.wantedly.com/ FALSE41Collaborationビジネスチャット/社内SNSTopicRoomhttps://www.topicroom.jp/TRUETRUEFALSEチャットボット用APIと想定される。https://www.topicroom.jp/column/chatbot/chatbotmakingflow/ FALSE42Collaborationビジネスチャット/社内SNSTENWAhttps://www.tento.camp/tenwa/TRUETRUEFALSE機能一覧で存在を確認できず。https://www.tento.camp/tenwa/function/ FALSE43Collaborationビジネスチャット/社内SNSTAGShttps://www.shinwart.co.jp/special/tags/ TRUETRUEFALSEチャットボット用のAPIと想定される。https://suzu1.shinwart.com/tags/ FALSE44Collaborationビジネスチャット/社内SNSSMAR Messagehttps://lp.smartmessage.jp/TRUEFALSEFALSE機能一覧で存在を確認できず。https://lp.smartmessage.jp/ FALSE45Collaborationビジネスチャット/社内SNSYammerhttps://www.microsoft.com/ja-jp/microsoft-365/yammer/yammer-overview FALSETRUETRUEhttps://developer.yammer.com/docs/rest-api-rate-limits RESTOAuth 2.0TRUE46Collaborationビジネスチャット/社内SNSgamba!https://www.getgamba.com/TRUETRUEFALSE機能一覧で存在を確認できず。https://www.getgamba.com/service/ FALSE47Collaborationビジネスチャット/社内SNSCISCO Webexhttps://www.webex.com/ja/video-conferencing.html FALSETRUETRUEhttps://developer.webex.com/docs/api/getting-started RESTOAuthFALSE48CollaborationWeb会議Zoomhttps://zoom.us/jp-jp/meetings.html FALSETRUETRUEhttps://marketplace.zoom.us/docs/api-reference/zoom-api RESTOAuth 2.0, JWTチャットボット用APIもありFALSE49CollaborationWeb会議Skypehttps://www.skype.com/ja/FALSETRUETRUEhttps://docs.microsoft.com/en-us/skype-sdk/ucwa/unifiedcommunicationswebapi2_0 RESTOAuthUCWA 2.0 が対象FALSE50CollaborationWeb会議CISCO WebExhttps://www.webex.com/ja/video-conferencing.html FALSETRUETRUEhttps://developer.webex.com/docs/api/getting-started RESTOAuthFALSE51CollaborationWeb会議FRESH VOICEhttps://www.freshvoice.net/products/ TRUETRUEFALSE機能一覧で存在を確認できず。FALSE52CollaborationWeb会議Google Meetshttps://gsuite.google.co.jp/intl/ja/products/meet/ FALSETRUEFALSEチャットAPIのみの提供の模様。そのため、今回は対象外とした。https://developers.google.com/hangouts/chat/how-tos/rest-api FALSE53CollaborationWeb会議Callinghttps://www.calling.fun/TRUEFALSEFALSE機能一覧で存在を確認できず。https://www.calling.fun/meeting/?click=footer-navi FALSE54CollaborationWeb会議BellFacehttps://bell-face.com/TRUETRUEFALSE機能一覧で存在を確認できず。https://bell-face.com/function/ FALSE55CollaborationWeb会議Polycomhttps://www.poly.com/jp/ja/products/video-conferencing FALSEFALSETRUEhttps://support.polycom.com/content/dam/polycom-support/products/voice/polycom-uc/other-documents/en/2018/ucsoftware-restapi.pdf REST環境依存ハードウェア製品のAPIのようにも見える? ちょっと自信が無い FALSE56CollaborationWeb会議Mee2Boxhttps://mee2box.com/TRUETRUEFALSE機能一覧で存在を確認できず。FALSE57CollaborationWeb会議IC3(アイシーキューブ)サービス終了サービス終了 https://www.canon-its.co.jp/news/detail/?id=7938 FALSE58CollaborationWeb会議Wherebyhttps://whereby.com/FALSETRUETRUEhttps://whereby.dev/ RESTAPI KeyFALSE59CollaborationWeb会議Live Onhttps://www.liveon.ne.jp/TRUETRUEFALSE機能一覧で存在を確認できず。https://www.liveon.ne.jp/product/function/ FALSE60CollaborationWeb会議SOBA ミエルカ・クラウドhttps://cloud.soba-project.com/ TRUETRUEFALSE機能一覧で存在を確認できず。https://cloud.soba-project.com/function2.html FALSE61CollaborationWeb会議Adobe Connecthttps://www.adobe.com/jp/products/adobeconnect.html FALSETRUETRUEhttps://help.adobe.com/en_US/connect/8.0/webservices/index.html XML Web Service Cookie セッションFALSE62CollaborationWeb会議sMeetinghttps://ddreams.docomo-sys.co.jp/smeeting/ TRUETRUEFALSE機能一覧で存在を確認できず。https://ddreams.docomo-sys.co.jp/smeeting/service/function.html FALSE63CollaborationWeb会議MORE CONNECTINGhttps://www.web-kaigi.com/TRUETRUEFALSE機能一覧で存在を確認できず。https://www.web-kaigi.com/function/ FALSE64CollaborationWeb会議connect livehttps://comm.rakuten.co.jp/houjin/connectlive/ TRUEFALSEFALSE機能一覧で存在を確認できず。https://comm.rakuten.co.jp/houjin/connectlive/ FALSE65CollaborationWeb会議PrimeMeetinghttps://www.softbank.jp/biz/cloud/saas/primemeeting/ TRUEFALSEFALSE機能一覧で存在を確認できず。https://www.softbank.jp/biz/cloud/saas/primemeeting/ FALSE66CollaborationWeb会議OmniJoinサービス終了予定サービス終了予定 http://download.brother.com/pub/jp/wcs/omnijoin/OmniJoin_close_guide_20190701.pdf FALSE67CollaborationWeb会議V-CUBEhttps://jp.vcube.com/service/meeting TRUETRUETRUE不明不明不明以下のページにて存在を確認。仕様書は非公開。 https://jp.vcube.com/service/meeting/overview/howto/api.html FALSE68CollaborationWeb会議BIZMEEhttps://bizmee.net/TRUETRUEFALSE機能一覧で存在を確認できず。 https://bizmee.net/ FALSE69CollaborationWeb会議FacePeerhttps://www.face-peer.com/TRUEFALSEFALSE機能��覧で存在を確認できず。 https://www.face-peer.com/solution/index.html FALSE70CollaborationWeb会議CanSeehttps://cansee.ubiteq.net/TRUETRUEFALSE機能一覧で存在を確認できず。https://cansee.ubiteq.net/features/ FALSE71CollaborationWeb会議GoToMeetinghttps://www.gotomeeting.com/FALSETRUETRUEhttps://goto-developer.logmeininc.com/gotomeeting-api-overview RESTOAuthPostmanコレクションも公開中FALSE72CollaborationWeb会議Meetingplazaサービス終了サービス終了 https://www.meetingplaza.com/ FALSE73CollaborationWeb会議TeleOfficehttps://www.ideep.com/TRUETRUEFALSE機能一覧で存在を確認できず。https://www.ideep.com/about/detailfeatures/ FALSE74CollaborationWeb会議StarLeafhttps://www.starleaf.jp/FALSETRUETRUEhttps://support.starleaf.com/integrating/cloud-api/ RESTAPI TokenFALSE75Collaborationタスク管理/プロジェクト管理Trellohttps://trello.com/jaFALSETRUETRUEhttps://developer.atlassian.com/cloud/trello/rest/ RESTOAuth 1.0FALSE76Collaborationタスク管理/プロジェクト管理asanahttps://asana.com/jaFALSETRUETRUEhttps://asana.com/ja/guide/help/api/api RESTOAuth 2.0, Personal Access Token TRUE77Collaborationタスク管理/プロジェクト管理Wrikehttps://www.wrike.com/ja/FALSETRUETRUEhttps://developers.wrike.com/ RESTOAuth 2.0FALSE78Collaborationタスク管理/プロジェクト管理backloghttps://backlog.com/ja/TRUETRUETRUEhttps://developer.nulab.com/ja/docs/backlog/ RESTOAuth 2.0, API Key TRUE79Collaborationタスク管理/プロジェクト管理jootohttps://www.jooto.com/TRUETRUEFALSE機能一覧で存在を確認できず。 Google カレンダー連携やChatwork連携は提供されている。https://www.jooto.com/jooto-features/collaboration/ FALSE80Collaborationタスク管理/プロジェクト管理Jira Software https://www.atlassian.com/ja/software/jira FALSETRUETRUEhttps://developer.atlassian.com/server/jira/platform/rest-apis/ RESTOAuth 1.0, Basic TRUE81Collaborationタスク管理/プロジェクト管理Taskworldhttps://taskworld.com/ja/FALSETRUETRUEhttps://api-docs.taskworld.com/#introduction RPC LikeOAuth likeFALSE82Collaborationタスク管理/プロジェクト管理smartsheethttps://jp.smartsheet.com/FALSETRUETRUEhttps://smartsheet-platform.github.io/api-docs/ RESTOAuth 2.0FALSE83Collaborationタスク管理/プロジェクト管理Zoho Projectshttps://www.zoho.com/jp/projects/ FALSETRUETRUEhttps://www.zoho.com/projects/help/rest-api/zohoprojectsapi.html RESTOAuth 2.0FALSE84Collaborationタスク管理/プロジェクト管理todoisthttps://todoist.com/ja/FALSETRUETRUEhttps://developer.todoist.com/sync/v8/ RPC LikeOAuth 2.0FALSE85Collaborationタスク管理/プロジェクト管理Toriohttps://www.torio.io/TRUETRUEFALSE機能一覧で存在を確認できず。 https://www.torio.io/info_collabo FALSE86Collaborationタスク管理/プロジェクト管理REDMINEhttp://redmine.jp/overview/FALSETRUETRUEhttps://www.redmine.org/projects/redmine/wiki/Rest_api RESTBasic, API KeyFALSE87Collaborationタスク管理/プロジェクト管理TeamHackhttps://teamhack.io/TRUETRUEFALSE機能一覧で存在を確認できず。 https://teamhack.io/guide/ FALSE88Collaborationタスク管理/プロジェクト管理Nozbehttps://nozbe.com/ja/FALSETRUETRUEhttps://files.nozbe.com/rest_api/nozbe_restapi01.pdf RESTOAuthFALSE89Collaborationタスク管理/プロジェクト管理Redboothhttps://redbooth.com/FALSETRUETRUEhttps://redbooth.com/api/ RESTOAuth 2.0FALSE90Collaborationタスク管理/プロジェクト管理HiTaskhttps://hitask.com/ja/FALSETRUETRUEhttp://hitask.info/ RESTAPI Key, CookieFALSE91Collaborationタスク管理/プロジェクト管理Evernotehttps://evernote.com/intl/jpFALSETRUETRUEhttps://dev.evernote.com/doc/#start RPC LikeOAuthURL構造が公開されておらず、RESTかどうか断定できず TRUE92Collaborationタスク管理/プロジェクト管理Flowhttps://www.getflow.com/FALSETRUETRUEhttps://developer.getflow.com/ RESTPersonal Access Token Postman, Insomnia のライブラリも公開中 FALSE93Collaborationタスク管理/プロジェクト管理TimeCrowdhttps://timecrowd.net/TRUETRUETRUEhttps://timecrowd.net/apidoc RESTOAuth 2.0現在BetaFALSE94Collaborationタスク管理/プロジェクト管理Brushuphttps://www.brushup.net/TRUETRUEFALSE機能一覧で存在を確認できず。 https://www.brushup.net/features/ Chatworkなどとの連携は存在 FALSE95Collaborationタスク管理/プロジェクト管理TimeKreihttps://timekrei.tenda.co.jp/TRUETRUEFALSE機能一覧で存在を確認できず。 https://timekrei.tenda.co.jp/user_manual/ FALSE96Collaborationタスク管理/プロジェクト管理Brabio!https://brabio.jp/TRUETRUEFALSE機能一覧で存在を確認できず。https://brabio.jp/function.html FALSE97Collaborationタスク管理/プロジェクト管理InnoPMhttps://www.innopm.com/TRUETRUEFALSE機能一覧で存在を確認できず。 https://www.innopm.com/system-link/ FALSE98Collaborationタスク管理/プロジェクト管理TIMETRACKERhttps://www.timetracker.jp/TRUETRUETRUE不明不明不明API Reference が404 Not found https://www.timetracker.jp/feature/web-api.html FALSE99Collaborationタスク管理/プロジェクト管理ToDoUshttp://todous.jp/TRUETRUEFALSE機能一覧で存在を確認できず。 http://todous.jp/faq.html FALSE
0 notes
Text
Intune Policy Assignment Classification Easy Secrets of using Graph API with PowerShell
[New Post by Joymalya] Intune Policy Assignment Classification Easy Secrets of using #GraphAPI with #PowerShell - #MSIntune #Intune
This article will be completely different from my other articles where I mostly explain about behind the scene logics. But in this article, I will take you through the logics and steps that we go through to create a script for accomplishment of an objective –
“Getting Intune Policy Assignment Classification to find out the deployement type – User or Device?”
The idea for this came when one…
View On WordPress
#featured#How to learn Intune Graph API#PowerShell and Graph API#Working with Intune - PowerShell and Graph API
0 notes
Text
Integrating Graph API With Node.js App On Azure
This article describes the steps for integrating SharePoint, Microsoft Graph API, and Node.js apps on Azure. source https://www.c-sharpcorner.com/article/integrating-graphapi-with-node-js-app-on-azure/ from C Sharp Corner http://bit.ly/2Do4jQO
0 notes