#HTML tutorial
Explore tagged Tumblr posts
Visit Tumblr Blog
Explore Tumblr blogs with no restrictions, modern design and the best experience.
Last Seen Tumblr Blogs


Fun Fact
Tumblr Inc. is using 66 technologies for its website.
Text
custom font colors tutorial
note: this is for my bb @tobaccosunbxrst but also just wanted to post it to public for anyone curious on how to do custom fonts w html on tumblr. i originally made this tutorial privately for my mutual @certainlysyko so apologies for the silly choice of example text that i used lol. anyways.
so as we know, tumblr only has the following default color options for text:
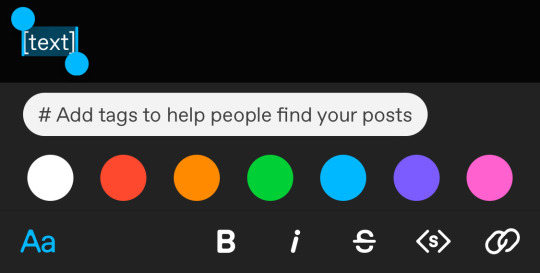
but what if we want some other cool colors like coral pink or cerulean blue or barf green?
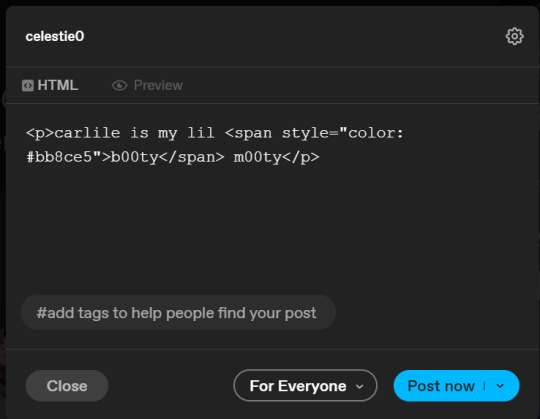
to do custom fonts, it’s very simple, but it needs to be done on pc/laptop (cannot be done on app). we are going to start with a post:
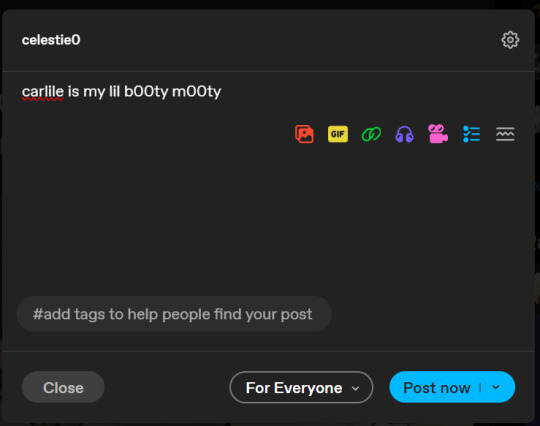
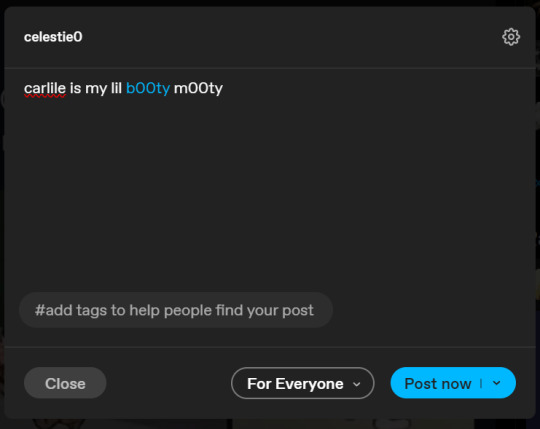
then, you’re just gonna change whatever word that you want the custom color for into one of the tumblr defaults. you do this by just selecting the text with your cursor and then tumblr’s default colors pop up. you can change into any of them, this just establishes the code in the html and makes it easy to spot
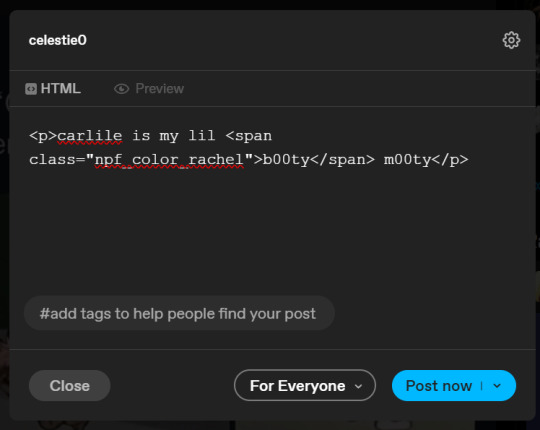
then you're going to go to the little settings thingy at the top right of the post (the settings wheel) and click on this drop down, then click on "html" which will switch it to html

now it's in html. this looks very simple bc there is only one statement here. i’ll touch on how to deal with more lengthier blocks of html code later. but for now, note this section only:
<span class="npf_color_rachel">
this is ALL we need to work with in the code
we're going to change it from
<span class="npf_color_rachel">
to
<span style="color: #[hex code]">
so, for example, something like
<span style="color: #81b7ce">
note. you can also just copy paste the lines above so you don’t have to type it out
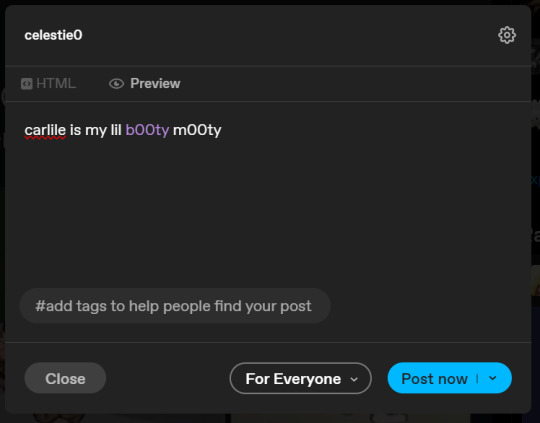
soooo all we did was delete the class=npf_color_rachel part and just replaced it with style=“color: #[hex code]
and here's the preview! all done :)
this is the website i use to find the hex codes. a hex code is basically those codes after the hashtag so like #81AACE (don't forget to input the hashtag)
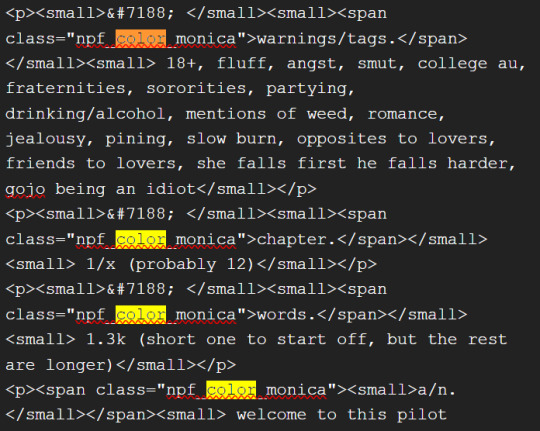
now, for those lengthier posts i mentioned, you can use ctrl+f and search the word "color". it will show up any place on the post where you have a colored font (so do this after you’ve already changed all the places you want custom colors into default tumblr colors, like in the 1st step)
this way, you can easily find the places with <span blah blah> that you need to edit
here is an example of that in one of my posts:
and yeah! that’s basically it. disclaimer, i’m not a software engineer nor so i know much about tech haha, this is just for tumblr aesthetics
alright peace out! 🧚♀️✨ hope this is helpful
#tumblr#tumblr tips#tumblr html#tumblr hacks#tumblr colors#html#tumblr custom colors#tumblr girls#custom colors#tumblr tutorial#custom colors tutorial#html tutorial#hacks
233 notes
·
View notes
Text
Convert HTML to Image: A Step-by-Step Guide ✨

Do you want to turn some HTML code you've made that's on your website and have a way to convert it into an image for you to save?
Well, look no further! I too wanted to do the same thing but funny enough, there weren't any straightforward tutorials out there that could show you how! After hours of searching, I finally discovered the solution~!
This is an old tutorial I made 🐼

💛 Set your environment
Before we dive into the conversion process, I'll assume you already have your HTML code ready. What you want to learn is how to turn it into an image file. You should have a good grasp of HTML and JavaScript. For this tutorial, we'll use the following HTML code example:

We won't include the CSS code, as it doesn't affect this tutorial. The JavaScript file (script.js) at the bottom of the body element is where we'll add the functionality for the conversion.
Your page should resemble the following:

As you can see, the "Click me" button will handle the conversion. We aim to convert everything within the div.info-div into an image.
💛 Using the html2canvas JavaScript Library
The html2canvas library allows you to take screenshots of webpages and target specific elements on a screen. Here are the steps to include the library in your project:
The steps to put the library in your project:
Visit the html2canvas website for more information.
Copy the CDN link from here

and include it in a script tag in your project's head tag in the HTML file:

That's it for including the library on the HTML side. Now, let's move on to the JavaScript code.
💛 JavaScript Functionality
Here's the JavaScript code to handle the conversion:

In this code, I want to turn the whole div.info-div into an image, I put it into a variable in const div = document.querySelector(".info-div");.
I also put the button into a variable in const button = document.querySelector("button");
I added a click event listener to the button so when the user clicks the button, it will follow the code inside of the event listener!
You can find similar code like this in the documentation of the html2canvas library:

What is happening here is:
We add the div (or what the element we want to take an image of) into the html2canvas([element]).then((canvas)
Added the image file type url to a variable = const imageDataURL = canvas.toDataURL("image/png"); - You can replace the png to other image file types such as jpg, jpeg etc
Created an anchor/link tag, added the href attribute to imageDataURL
The download attribute is where we will give the default name to the image file, I added "dog.png"
Perform the click() function to the anchor tag so it starts to download the image we created
And that's it!
💛 The End
And that's it! You've successfully learned how to turn your HTML into an image. It's a great way to save and share your web content in a unique format.

If you have any questions or need further clarification, please comfortable to ask. Enjoy converting your HTML into images! 💖🐼
#my resources#coding#codeblr#programming#progblr#studying#studyblr#programmer#html#html css#javascript#neocities#coding tips#html5 tutorial#html tutorial
155 notes
·
View notes
Text
Fake Ao3 App
Originally posted under my main blog: FlowGeeksOut in the community 'Crying ao3 down'
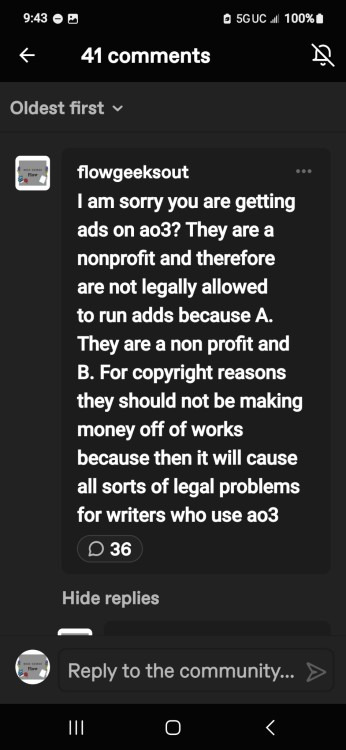
Greetings everyone reading this it has recently come to my attention that there is an app claiming to be affiliated with ao3 along with OTW that is not ans has privacy safety concerns.
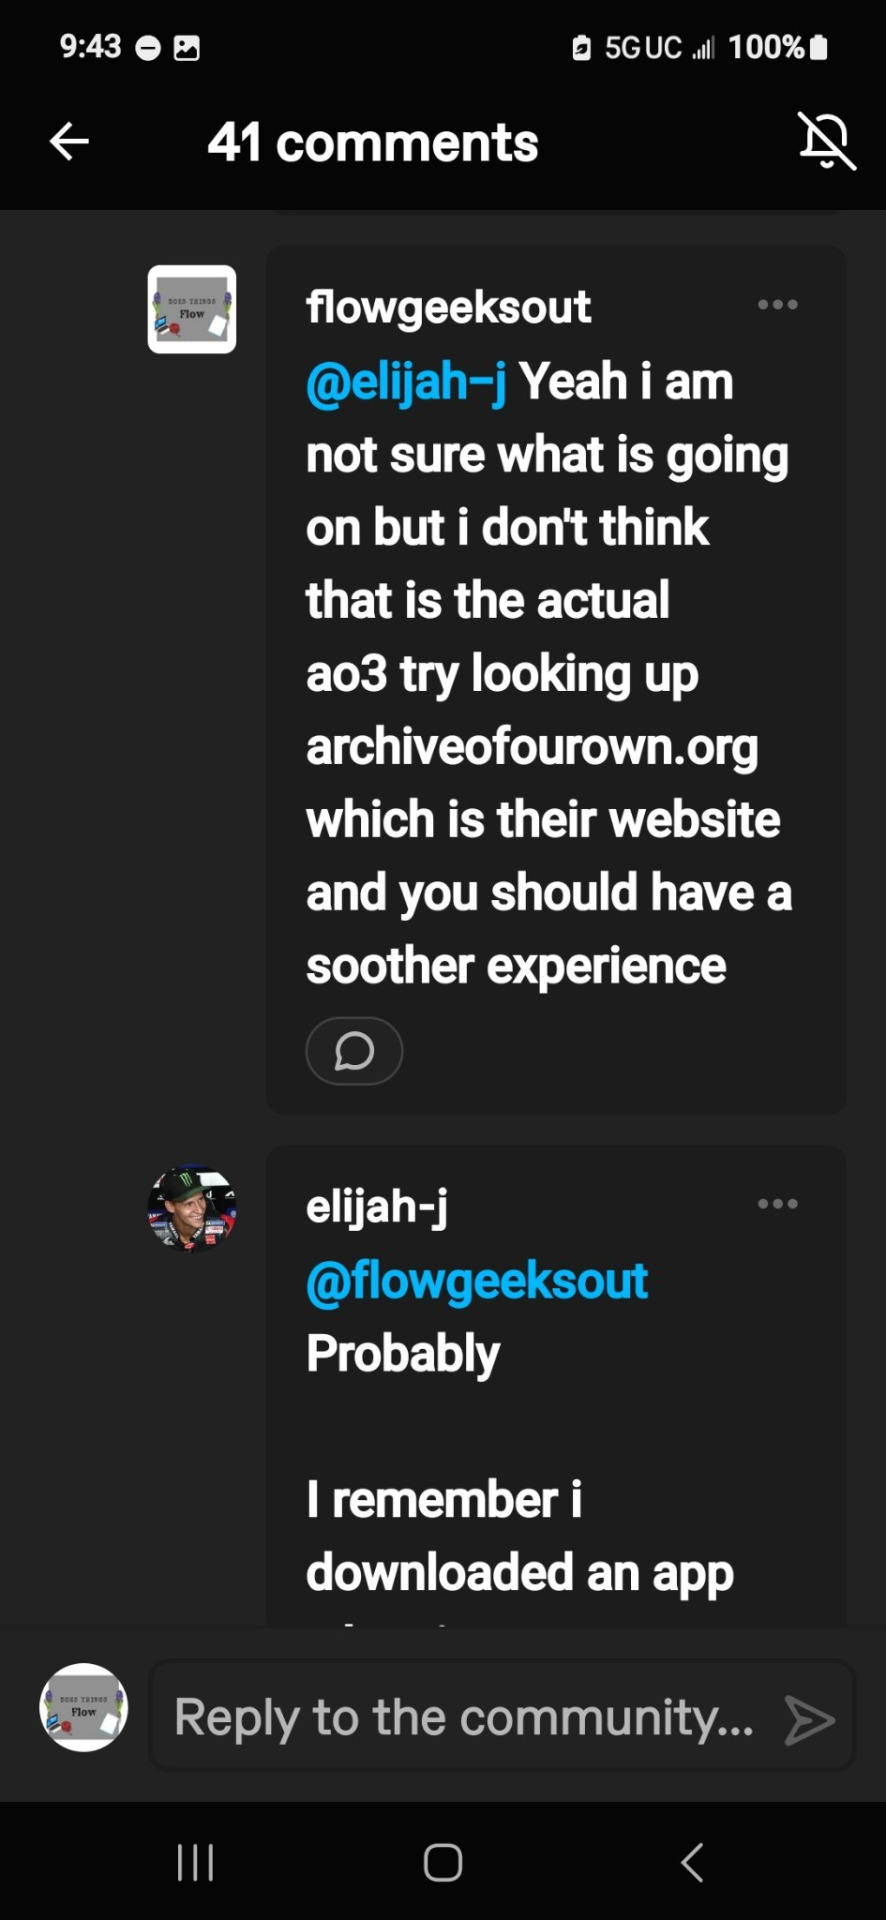
For context earlier today ao3 was having issues and the Ao3 News Tumblr blog made a post about it. I being in the Cyring Ao3 Down community went to reblog it there and link people who were having issues to the post in hopes for them to understand what was happening if they were not already aware. That was when I came across the following post from @elijah-j
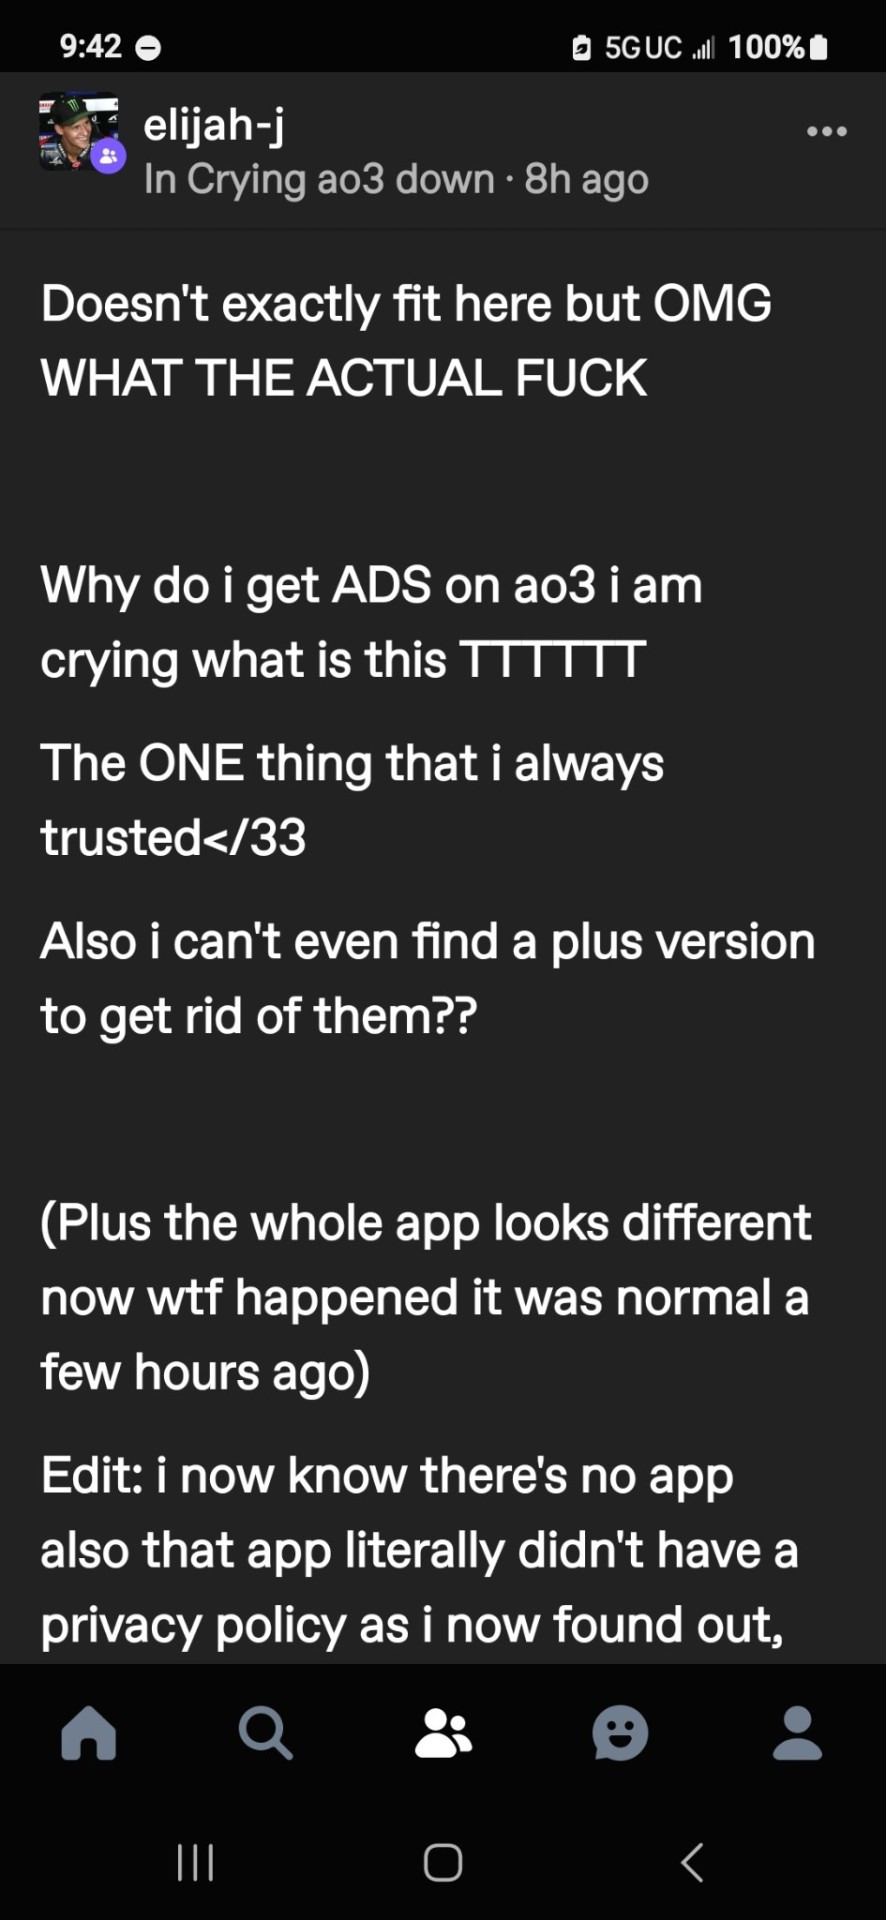
Obviously the edit was not there before. Anyways I saw this post and became confused and concerned.
In case you were not aware ao3 is part of the nonprofit organization OTW. This is very important for serval reasons. One of most being legal protection for both ao3 and the fan content creators that host their content on ao3. Since ao3 does not run ads and are part of a non profit organization they therefore do not make any money off of the fan works hosted there. This therefore gives a lot of protection to ao3 and the fan creators against civil litigation from the copy right holders of the Fandom you wrote for. Since the biggest argument in those cases is about profits and if ao3 was running ads and gaining profit from fan creators hosting the fan content there and or paying the fan creators to do so it is harder for a court case to be nessary and or winnable.
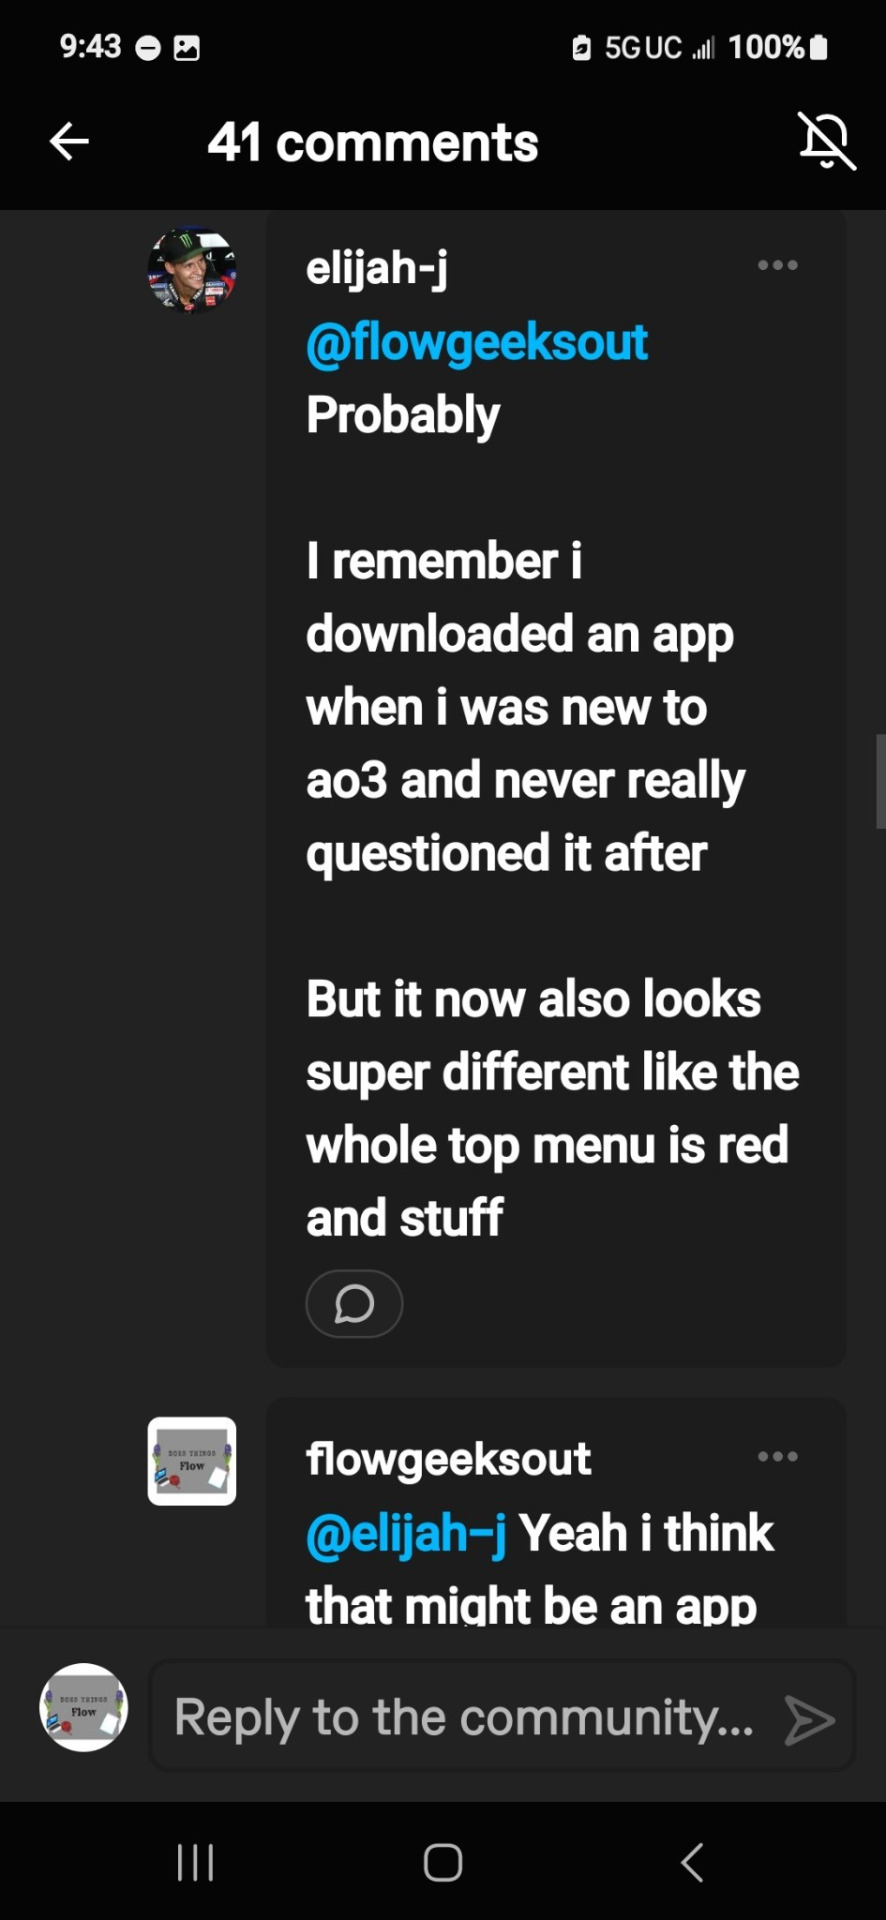
As a fan creators for has over 100 works hosted on ao3 I feel very safe being able to express my fanworks with all this protection. So imagine my concern when I saw the post shown above. I then asked the poster @elijah-j for clarification see the comments below
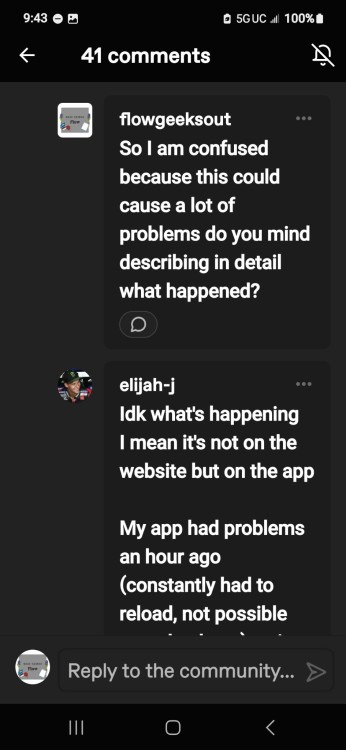

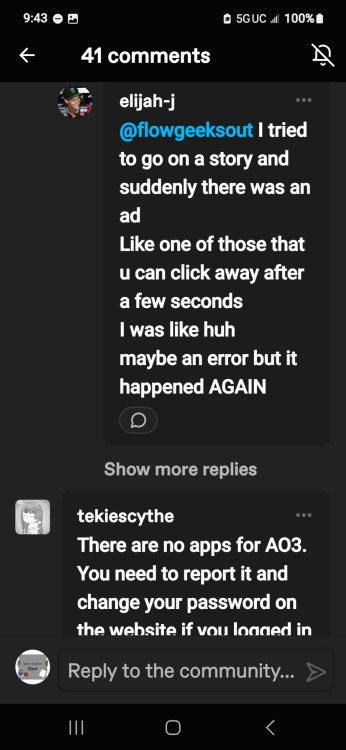
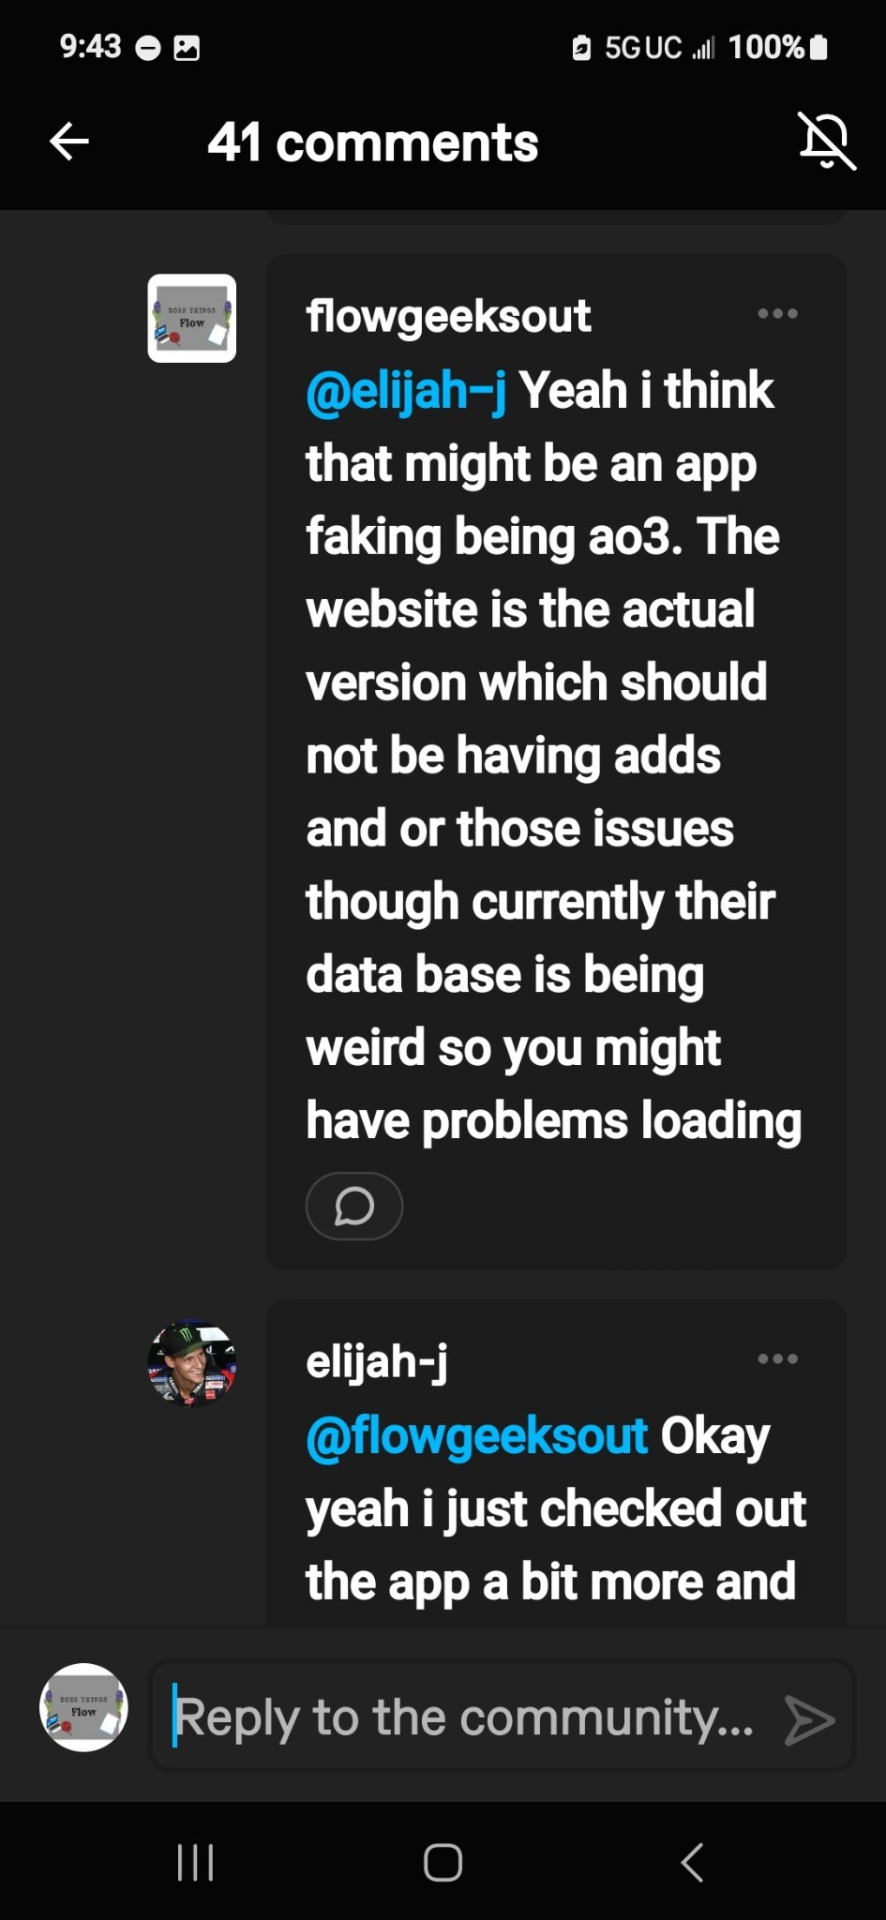
As seen in the last screenshot as soon as I was made aware that it was "in the app only" my brain immediately jumped to this being a scam since and let me say this load and clear THERE IS AND HAS NEVER BEEN AN APP FOR A03
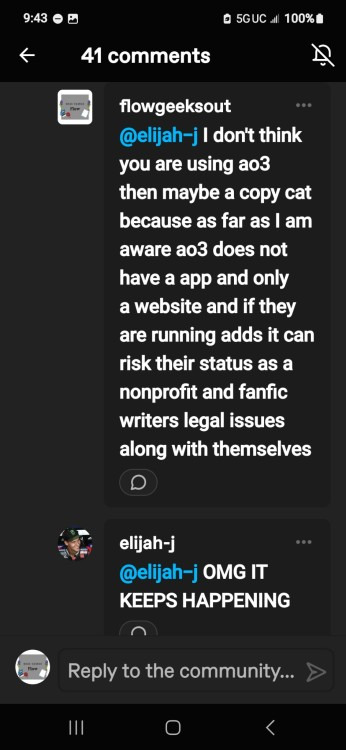
I then explained this to @elijah-j as seen in the screenshot below
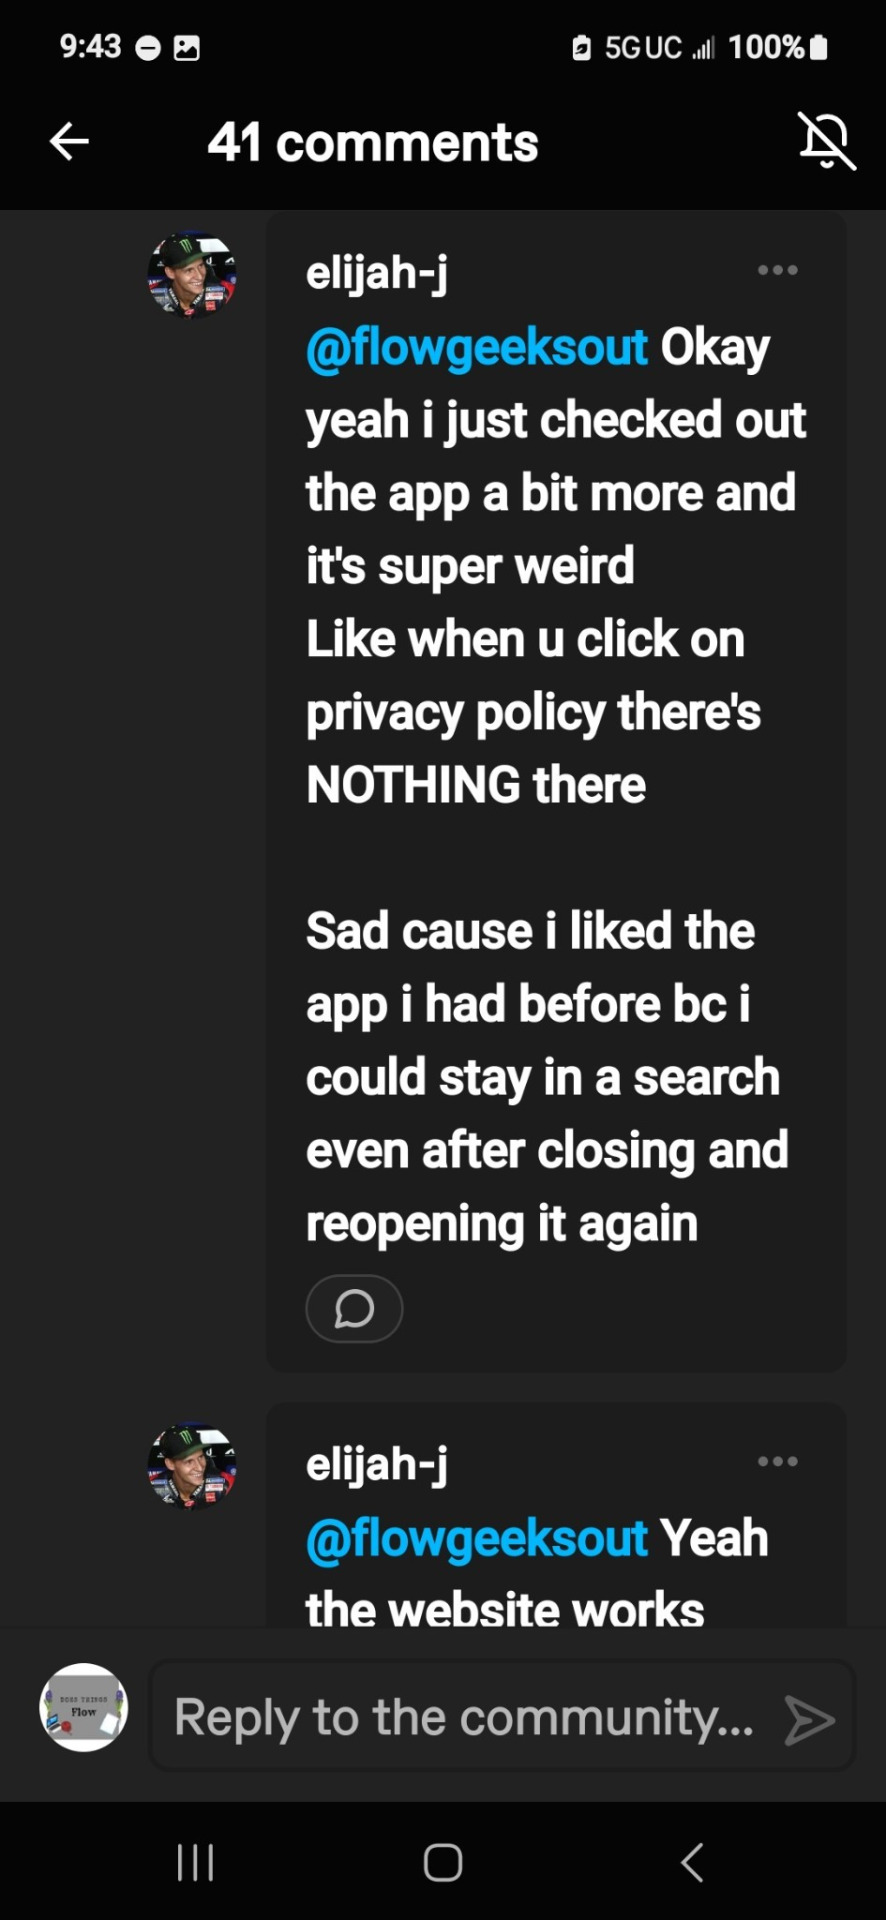
Yep that last screenshot says there was NOTHING IN THE PRIVACY POLICY
This horrible because in a way they have the right to do whatever the hell they want with any personal data they have collected on you.
I proceed to let @elijah-j that i think they should report said app to the play store and ao3 because this could cause many problems for a lot of people. @elijah-j agreed with me and did so.
So if you are using an app that is using ao3 name you should report it to the app store and ao3 along with deleting your account on the app if possible then the app.
If you used a similar password to any other website you should change the password.
I will find the link again of where to report it to ao3 along with more information about ao3 and the law if you are interested about the importance of ao3 not having ads.
If you have any questions or concerns please feel free to comment them and I will try my best to help you find an answer and or solution or way forward.
And thank you for @elijah-j for letting me post this!
Stay safe
Links
youtube
#html tutorial#ao3#ao3 coding#ao3 html#ao3 stuff#archive of our own#ao3 fanfic#ao3 author#coding#code#ao3 users#ao3 writer#ao3feed#ao3 link#fanfic#fan fiction#Youtube
10 notes
·
View notes
Text
PODFICCER (and fic author) RESOURCE: things i learned about HTML today
-> from this reference work on ao3: A Complete Guide to 'Limited HTML' on AO3 by CodenameCarrot (please go leave a comment if you find anything here useful !!!)
EDIT: OMG Y'ALL I HAVE BEEN HAVING SO MUCH NERDY GEEKY FUN TWEAKING MY PODFIC HOW-TO GUIDE WITH THIS STUFF
headings, blockquote, div

----

-----
html currently allowed by ao3 html sanitizer

a. abbr. acronym. address. b. big. blockquote. br. caption. center. cite. code. col. colgroup. details. dd. del. dfn. div. dl. dt. em. figcaption. figure. h1. h2. h3. h4. h5. h6. hr. i. img. ins. kbd. li. ol. p. pre. q. rp. rt. ruby. s. samp. small. span. strike. strong. sub. summary. sup. table. tbody. td. tfoot. th. thead. tr. tt. u. ul. var.
-----
in-line (text) formatting tags supported by ao3


-----
OMG LOOK AT THIS !!! IDK WHEN I WOULD EVER USE THIS BUT LOOK HOW COOL !!!

-----
paragraphs & p formats: archiveofourown.org/works/5191202/chapters/161901154#AddParagraphs

-----
omg I'VE ALWAYS WONDERED HOW TO GET THAT LINE BREAK THINGY IN THE MIDDLE OF THE PAGE !!!

-----
end post
#podfic resource#podficcer resource#fic author resource#ao3 writer resource#ao3 fanfic#ao3#html resource#html reference#html#reference#resource#html tutorial#basic html guide#CodenameCarrot
6 notes
·
View notes
Text
Hiii made a small accessibility tutorial for custom html webpages, feel free to look at it/use it for your websites byee

76 notes
·
View notes
Text

HTML Made Easy: The Ultimate Beginner’s Guide
Discover the best way to learn HTML for beginners with this easy-to-follow tutorial. Start from the basics, explore real-world examples, and build a strong foundation in web development. Whether you're new to coding or looking to refresh your skills, this guide makes learning HTML simple, practical, and fun.
2 notes
·
View notes
Text
HTML for Beginners: Easy-to-Follow Tutorial to Kickstart Your Web Development Journey

If you are interested in building websites, learning HTML (HyperText Markup Language) is the perfect place to begin. This HTML tutorial for beginners will help you understand the basics of web design in simple terms.
What is HTML? HTML is the foundation of all web pages. It’s a language that uses "tags" to organize and display content like text, images, links, and more. When you visit any website, what you see on the screen is made possible through HTML.
Why Learn HTML? HTML is easy to learn and essential for anyone who wants to design or edit websites. Even if you're planning to become a front-end or back-end developer, understanding HTML is crucial. It helps you control how web pages are structured and displayed.
Basic Structure of a Web Page An HTML page typically includes the following:
Headings – To define titles and subheadings on your web page.
Paragraphs – To add blocks of text content.
Links – To connect your web page to other pages or websites.
Images – To make your page more engaging.
How to Get Started with HTML You don’t need any special software to learn HTML. You can start with a simple text editor (like Notepad) and a web browser (like Chrome). Write your content, save it, and open it in the browser to see your web page come to life.
For a detailed step-by-step guide, visit HTML Tutorial for Beginners. Happy learning!
2 notes
·
View notes
Text

Learn the basics of web development with this HTML tutorial for beginners. Easy-to-follow guide to creating web pages with headings, links, and images. Perfect for new developers starting out!
2 notes
·
View notes
Text
How to create a Live Tile on Windows 11 (Tutorials) (Codes)
Learn how to create custom live tiles for your blogs and websites for use on Windows 8, Windows 10 and Windows 11.
#warrenwoodhouse#bookmark#bookmarks#link#links#.lnk#.url#tutorials#tutorial#html tutorial#html tutorials#html#2024#codes#how tos#how to#howtos#howto
3 notes
·
View notes
Text
Understanding HTML: The Building Blocks of the Web
In the vast landscape of the internet, HTML stands as the foundation upon which the digital world is built. From simple static web pages to dynamic interactive experiences, HTML (Hypertext Markup Language) plays a pivotal role in shaping the online landscape. Let's embark on a journey to demystify HTML and understand its significance in the realm of web development.
What is HTML?
HTML is a markup language used to create the structure and content of web pages. It consists of a series of elements, or tags, that define the various components of a web page, such as headings, paragraphs, images, links, and more. These elements are enclosed within angled brackets (< >) and typically come in pairs, with an opening tag and a closing tag, sandwiching the content they define.
The Anatomy of HTML:
Tags: Tags are the building blocks of HTML and serve as the basic units of structure. They encapsulate content and provide semantic meaning to different parts of a web page. Common tags include <html>, <head>, <title>, <body>, <h1> (heading), <p> (paragraph), <img> (image), <a> (anchor/link), and many more.
Attributes: Tags can also contain attributes, which provide additional information about the element. Attributes are specified within the opening tag and consist of a name and a value. For example, the <img> tag may include attributes such as src (source) to specify the image file and alt (alternative text) for accessibility purposes.
Nesting: HTML elements can be nested within one another to create hierarchical structures. This nesting allows for the organization and hierarchy of content, such as placing lists within paragraphs or dividers within sections.
Document Structure: Every HTML document begins with a <!DOCTYPE> declaration, followed by an <html> element containing <head> and <body> sections. The <head> section typically contains metadata and links to external resources, while the <body> section contains the visible content of the web page.
The Role of HTML in Web Development:
HTML serves as the backbone of web development, providing the structure and semantics necessary for browsers to interpret and render web pages correctly. Combined with CSS (Cascading Style Sheets) for styling and JavaScript for interactivity, HTML forms the core technology stack of the World Wide Web.
Conclusion:
In essence, HTML is the language of the web, enabling the creation of rich and immersive digital experiences. Whether you're a seasoned web developer or a newcomer to the world of coding, understanding HTML is essential for navigating the intricacies of web development. Embrace the power of HTML, and embark on a journey to craft compelling narratives and experiences in the ever-evolving digital realm.
5 notes
·
View notes
Text
youtube
2 notes
·
View notes
Text
Anyone who says this took a lot of time is probably taking a screenshot and photoshopping it, which is way more effort than you need to spend on making Musk look stupid.
So I'm going to show you very basic HTML editing. This is probably doable on mobile, but I don't know it off the top of my head, so you'll need a computer for this.
Find the tweet you want to edit. Right-click on it and choose "Inspect"
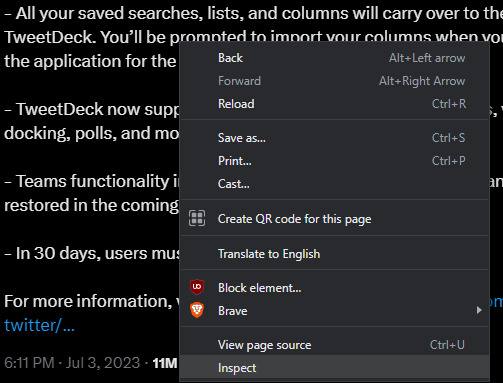
2. A panel will open. In most browsers, this will be to the right, but some might have it at the bottom of the screen. You can hover a line to highlight the element it represents.
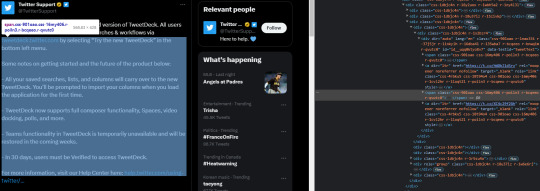
3. Tweets contain some amount of <span>, which is basically a bunch of text. Click on the arrow to the left of the line to see the contents of the span. Any links in the tweet get a separate span nested in <a>.
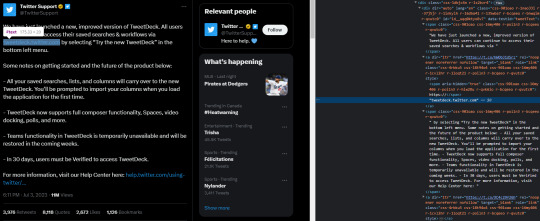
4. Double-click on the white text and edit to your heart's content. If you want to completely get rid of a span, just delete the contents and leave it blank. Push enter to apply the changes. You will see the changes immediately after. Do not refresh the page or all your changes will be lost.

5. If you can't find an element in the code panel, click the button on the top left of the panel.
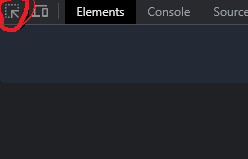
Now click on the element in the website view. It should now be highlighted in the code panel as well, and you can make any edits you want.
6. Take a screenshot. Boom. You're done. You now have a fake tweet with identical formatting to an actual tweet, no dealing with alignment issues or mismatched fonts.
You can change EVERYTHING on the webpage using this panel. Some things are just more complicated than text. Have fun poking around, but do remember that refreshing the page fetches all the data of the original page, and that sending the link to someone sends it unedited.

71K notes
·
View notes
Text

Learn HTML For Beginners
Start your web development journey with this beginner-friendly HTML guide. Learn how to create web pages using simple tags, structure content, and build the foundation for modern websites. No coding experience is needed. Just dive in and start creating!
Visit our website: https://www.tpointtech.com/html-tutorial
0 notes
Text
I posted this originally on the comminuted crying ao3 is down under flowgeeksout and it thought it would be a good idea to post here.
Just thought I would make this post since people like the person below me have trouble with ao3 loading but it is not down. Here are some ways to try to fix the problem.
1. Delete your search history on the browser. Sometimes it is just being dramatic.
2. If that does not work check to see if you have any other apps open in the background and close them
3. If this also does not work then try shutting all the tabs on the browser that you are using
4. Check on different tab and see if your browser is working on the other website if not then it could be an internet/wifi/data problem.
5. If it is a internet/wifi/data problem first if you have your wifi on try turning it off to be sure your phone is not being dramatic. Try the verse if you are using data.
6. If all of the above fails try using a different browser.
7 A. If that fails. Try by A. Making sure everything is off meaning apps and websites and powering off the device then power it back on
7 B. Make sure your device is on the latest update version
8. If all fails then sorry it might be time to look for a new device to read your fic on whether switching to another device you own and check if it works there if it does then it is the original devices issue and you may in fact need a new one.
I hope this is helpful!
6 notes
·
View notes
Text
This beginner-friendly blog post introduces you to HTML, the fundamental building block of the web.
0 notes
Text
HTML Tutorial: Learn HyperText Markup Language with Examples
Learn HTML with clear examples – build the foundation of every web page easily.
Visit the blog: https://dev.to/tpointtechblog/html-tutorial-learn-hypertext-markup-language-with-examples-1l1a
0 notes