#How to Delete cache in cpanel
Explore tagged Tumblr posts
Visit Tumblr Blog
Explore Tumblr blogs with no restrictions, modern design and the best experience.
Last Seen Tumblr Blogs


Fun Fact
Tumblr has a low social media market share in South America.
Text
Fixing WordPress Update Issues Made Easy: A Beginner’s Guide to Smooth Website Maintenance

Keeping your WordPress website updated is one of the smartest things you can do for better security, performance, and features. But what happens when those updates don’t go as planned?
If you’ve ever seen your website freeze, crash, or show strange errors after clicking "Update," don’t worry—you’re not alone, and you don’t need to be a developer to fix it.
In this guide, we’ll explain why WordPress updates fail and share simple, beginner-friendly solutions to get your website back on track—quickly and safely.
⚠️ Common Reasons Why WordPress Updates Fail
WordPress is built on multiple moving parts—your core WordPress files, themes, and plugins. An update may fail if just one part doesn’t play nicely with the others.
Here are the top reasons why updates might not go through:
🌐 Weak or unstable internet connection
🔌 Plugin conflicts that interfere with the update
🎨 Themes that aren’t compatible with the latest WordPress version
🧠 Low server memory or execution time limits
🔒 Incorrect folder or file permissions
📁 Corrupted or incomplete update downloads
🛠️ Simple Fixes for WordPress Update Problems
✅ Step 1: Always Back Up Your Website
Before making any changes, install a backup plugin like UpdraftPlus or BackupBuddy and save a complete version of your site. This ensures that if something goes wrong, you can restore your site in minutes.
✅ Step 2: Clear Your Cache
Sometimes, the issue isn’t with the update—it’s with what your browser is showing.
Clear your browser cache (Ctrl+Shift+R or Command+Shift+R)
If you use a caching plugin (like WP Super Cache or W3 Total Cache), clear your site’s cache from the plugin dashboard
Then, try the update again.
✅ Step 3: Troubleshoot Plugin Conflicts
If an update causes your site to break, the issue might be a plugin.
Here’s how to find out:
Install the Health Check & Troubleshooting plugin.
Enable “Troubleshooting Mode”—this temporarily disables all plugins for you only.
Try running the update again.
If the update works now, reactivate your plugins one at a time. The one that breaks the update is your troublemaker.
✅ Step 4: Check Hosting Limits
Your hosting environment might be too limited for updates to complete properly.
Ask your hosting provider these questions:
Is my PHP memory limit at least 256MB?
Is my maximum execution time at least 300 seconds?
Can these settings be increased if needed?
If not, consider upgrading to a better hosting plan for smoother WordPress performance.
✅ Step 5: Perform a Manual WordPress Update
When automatic updates fail, a manual update is a reliable workaround:
Download the latest WordPress version from WordPress.org
Unzip the files on your computer
Use FTP software (like FileZilla) to access your site files
Replace the wp-admin and wp-includes folders with the new versions
Leave the wp-content folder as-is (it holds your themes and plugins)
Open your site and follow any update prompts for the database
This process ensures a clean, fresh installation—without losing content or settings.
✅ Step 6: Fix File Permissions
Improper file permissions can block updates.
Use a plugin like WP File Manager or ask your host to set:
All folders to 755
All files to 644
These settings help WordPress update safely without risking your site’s security.
✅ Step 7: Remove Stuck Maintenance Mode
If you see the message:
“Briefly unavailable for scheduled maintenance. Check back in a minute.” …your site update was interrupted and left in maintenance mode.
Here’s how to fix it:
Access your site files through FTP or your hosting file manager (like cPanel)
Go to your website’s root folder
Delete the file called .maintenance
Refresh your site—it should be back to normal
This takes less than a minute and often solves the issue instantly.
💡 When to Call in the Pros
If these solutions don’t work—or if you feel unsure about any step—don’t hesitate to get help from professionals.
Here are your options:
Contact your web hosting support
Hire a trusted WordPress expert
Reach out to a reputable company like Websenor for quick, affordable help
🎯 Final Word: Let Websenor Handle Your WordPress Maintenance
WordPress update problems are common—but they don’t have to be stressful. With some basic know-how and a methodical approach, you can often fix these issues yourself.
But if you'd rather skip the hassle, Websenor is here to help. Our team specializes in:
WordPress core and plugin updates
Website backups and security
Speed optimization and error fixes
We'll keep your website running smoothly, so you can focus on your business, not your backend.
👉 Ready to stop worrying about WordPress updates? Contact Websenor today and let us take care of everything behind the scenes.
0 notes
Text
With 224,000 files, you're likely hitting the inode limit for your account
With 224,000 files, you’re likely hitting the inode limit for your account, which is causing the “disk quota full” error. To manage this: Log into cPanel. Use the File Manager to identify and delete old or unnecessary files. Look for backups, cache files, or old logs. Consider archiving older content off the server. Would you like more details on how to find and delete these files, or…
0 notes
Text
youtube
How to fix Briefly unavailable for scheduled maintenance, please check back in a minute error in wordpress 20025 ?
The "Briefly unavailable for scheduled maintenance. Please check back in a minute." error in WordPress usually occurs when an update is interrupted or incomplete. Here's how to fix it:
1. Delete the .maintenance File
WordPress creates a temporary .maintenance file in the root directory during updates. If the update fails or gets stuck, this file isn't removed, causing the error.
Steps to Fix:
Access Your Website via FTP or File Manager
Use an FTP client like FileZilla or log in to your cPanel and open the File Manager.
Locate the Root Directory
Navigate to the public_html or the folder where your WordPress site is installed.
Find and Delete the .maintenance File
If you don’t see the file, enable "Show Hidden Files" in your file manager settings.
Reload Your Website
Your site should be back online.
2. Manually Complete or Restart the Update
If the issue persists, your update may not have finished properly.
Steps to Fix:
Go to the wp-content/upgrade Folder
Delete any files inside this folder.
Manually Update WordPress, Themes, or Plugins
If a plugin or theme update was interrupted, go to your WordPress Dashboard > Plugins or Appearance > Themes and retry the update.
3. Disable Plugins (If the Error Persists)
If your site still shows the error:
Rename the plugins Folder via FTP
Go to wp-content/ and rename the plugins folder to plugins-old.
Check if your site loads. If it does, a plugin caused the issue.
Rename the folder back and activate plugins one by one to find the culprit.
4. Check File Permissions
Incorrect file permissions can cause WordPress to fail during updates.
Correct Permissions:
Files: 644
Folders: 755
You can adjust these via your File Manager or an FTP client.
5. Increase PHP Memory Limit (If Updates Are Failing)
If the update was interrupted due to low memory:
Edit wp-config.php
Add the following line:phpCopyEditdefine('WP_MEMORY_LIMIT', '256M');
Save the file and try reloading the website.
Final Step: Clear Cache
If your website is still showing the maintenance message after following the above steps:
Clear your browser cache and WordPress cache (if using a caching plugin like WP Rocket or W3 Total Cache).
0 notes
Video
youtube
Full tutorial - How to reduce the number of Inodes in your hosting account - eComHardyThis is the full tutorial video step by step showing how to reduce unnecessary Inodes from your hosting account. I recommend Siteground Hosting services - check out the link given below for discounted price hosting plans; https://www.siteground.com/index.htm?afcode=cd5fdfefc6c42dced3f39f15a45ce66d To learn to make a website - check out; http://ecomhardy.com/make-a-website Watch my video on how to use caching plugins and make a website faster; https://youtu.be/dmf7lYEFzOk Here are the steps Siteground hosting service provider suggests. Watch the full video to know free tools and plugins to help you improve Inodes numbers. How to reduce the number of inodes my account uses? The number of inodes equals the total number of files and folders on your web hosting account. Therefore, to reduce your inode count, you would have to reduce the number of files and folders. Most commonly this is done by: Removing all files and folders you don 19t need You can use the File Manager in Site Tools or FTP to access your account and delete files and folders that you don 19t need. Here are some of the most common causes that may give you an idea about how to reduce the number of inodes you have. 1. Remove old Backups It is common for backups that are created on a schedule by plugins or 3rd party services to fill all the available disk space if left unmonitored. Download unused backups and delete them from your hosting account to save disk space and inodes. 2. Delete Inactive Plugins If you 19re using WordPress and have plugins that are not active on your site 13 please delete them. Deactivating the plugins leaves the codebase on your account adding up to your inodes quota. 3. Remove Unused Image Sizes If you 19re using WordPress your theme may be generating multiple copies of each uploaded image, some of which are unused. Check your theme settings and leave only the ones that you are actually using on your site. Then, regenerate thumbnails deleting unused sizes using a plugin like Regenerate Thumbnails. 4. Check the number of cache files you have Modern web applications by default usually use file caching, which means that they might be generating a high amount of cache files inside your account, thus adding to its total inode. Check your website 19s 18cache 19 folder and reduce the number of cached files you keep regularly. Most web applications which store cache include an option to purge the cache from within their administrative area. For WordPress, check the wp-content folder for similarly named folders and clear them. We recommend using the SiteGround Optimizer plugin for caching and performance which does not rely on file-based caching and won 19t add to your inodes quota. 5. Delete the .opcache folder in your account You can use SSH to delete the .opcache system folder in your account. In case you 19re using PHP 7. x this is where it stores opcaches. Don 19t worry, it will be regenerated but will lack obsolete cache from older PHP versions or code that is no longer active on your account. 6. Clean up your Email Accounts Mail adds to the total inodes quota since emails are files stored on your account. We recommend that you regularly delete your Junk/Spam folders that tend to accumulate a large number of emails. Regularly clean your Trash/Bin folders which collect deleted emails but keep them on the server. Last but not least, you can remove emails coming from newsletters and automatically generate ones that you don 19t need. If you 19ve followed all of the above and you still need additional disk space or inodes, you may consider upgrading your account to a higher hosting plan with a higher inodes quota. ------------------------------------------------------------------------------------------------------------------------- Part 1- How to make a website - Buy right Domain and Hosting https://youtu.be/y-JoRxhwhE8 Go to, https://ecomhardy.com/make-a-website
#wordpress#woocommerce#elementor#dropshipping#ecommerce#ecomhardy#disk usage warning#get more space#how to control inodes#how to delete cache#how to delete junk or spam emails#how to delete the unnecessary files and folders#how to increase disk space#how to reduce file usage in siteground#how to reduce indoes#how to remove disk usage warning#how to solve cpanel - disk usage warning#increase disk space#increase inode limit siteground#inode quota exceeded cpanel
0 notes
Text
GreenGeeks Best WebHosting Service
Fun fact: do you know why Facebook moved its massive data center to Northern Sweden?
That’s because servers run hot, and cooling them down is expensive. Might as well keep them in a cold part of the world.
But more to the point in this GreenGeeks review: maintaining servers uses a ton of energy.
In fact, the Internet is one of the largest polluters in the world. Data centers account for 2% of the world’s CO2 emissions, about the same as the airline industry.
Well, if that’s a concern for you, I’ve got good news because the ‘green’ in GreenGeeks refers to their commitment to providing eco-friendly web hosting.
This is how it works, according to their website:
The platform is designed with a maximum use, no waste mindset.
For every amperage the company pulls from the grid, it matches it x3 in the form of renewable energy via the Bonneville Environmental Foundation
So they claim your website could be operating on a 300% green hosting platform!
While a growing number of hosting providers take the problem of energy seriously, (here’s an example from DreamHost), GreenGeeks really puts their ethos front and forward.
But what about other pros and cons, features and alternatives? Let’s put GreenGeeks through the wringer to see how it fares.
Table of Contents
GreenGeeks Prices
GreenGeeks Pros & Cons
What is GreenGeeks used for?
When not to use GreenGeeks hosting?
GreenGeeks Backups
GreenGeeks and WordPress
Final GreenGeeks Review Comments
Frequently Asked Quesitons
GreenGeeks Prices
Let’s first look at how much it costs per month to host your website on GreenGeeks. The first option is for shared hosting (the one most website owners need). You’ll also find that they offer WordPress web hosting. As far as I could tell, there is absolutely no difference between the WordPress and the shared hosting option.
As always, we’ll only be mentioning the regular price, which is what you pay after a first year at a discounted price. The first 12 months can be 50 – 70% cheaper.
Ecosite LiteEcosite ProEcosite Premium
Price (after renewal)$10.95 / month$15.95 / month$25.95 / month
You can purchase the plans for 12, 24 or 36 months. There is a significant discount for the longer terms, as you can see below:
GreenGeeks also offers VPS hosting, which comes with better performance, but a lot of limits depending on the plan you choose.
Price$39.95 / month$59.95 / month$109.95 / month
Finally, I should also mention that GreenGeeks has a few add-ons you can purchase to expand your hosting capabilities. These include:
Dedicated IP address: $48 per year
Premium AlphaSSL Wildcard: to secure SSL on multiple subdomains all at once.
WHMCS license: useful for resellers who want to bill hosting to their clients (note that GreenGeeks does offer a reselling option).
Last but not least, you’ll have to pay $25 for every backup restore, if you do it more than once per month (the first one is free).
What can you expect from each GreenGeeks plan?
As you can see in the above table, there’s a lot of unlimited stuff with their shared hosting and WordPress plans. That includes:
Unlimited bandwidth (or data transfer, which means the same thing)
Unlimited disk storage
Unlimited databases
Unlimited email accounts
Free SSL
The key limits to keep an eye on are maybe the number of ionodes, which is another way of saying the number of files on your site. It’s a very large number, mostly there to ensure you don’t abuse GreenGeeks’ generosity by hosting a file sharing website.
GreenGeeks Pros & Cons
Pros:
Green-minded: GreenGeeks is attempting to offset their server’s electricity consumption by using as much renewable energy as possible.
Unlimited data bandwidth: you can host one or multiple sites with complete peace of mind when it comes to visitor numbers and bandwidth.
Unlimited data storage: your site can be as large as you like, so good for video, high-res photos and ecommerce with loads of products. Just keep an eye on the number of files. Hosting more than 150,000 could void your plan’s contract.
Server locations: three continents to choose from, the US, Canada and Europe.
Heavily reduced long term plans: it’s not unusual to pay less for 24 or 36 month plans, but GreenGeeks is slashing their monthly prices by up to 70% for long term users.
Cons:
Missing advanced features: serious website owners and developers will need to look elsewhere for staging or premium DNSs.
No team management: it’s not possible to add multiple account users and to give permissions.
Lack of free backups: you get one automatic backup every 24 hours. One free restore per month, but the rest are paid. Not good enough.
Outdated design: Not a deal-breaker, but the whole system could do with a new coat of paint, which could also help with the user experience.
What is GreenGeeks used for?
I’d say GreenGeeks is best for website owners with green goals in mind. You can even show one of their green badges, to highlight on your site.
The generous bandwidth and storage is advantageous for those who own multiple sites. As far as the performance to price ratio goes, it’s good, and becomes more acceptable when you buy a long term contract of 24 or 36 months.
When not to use GreenGeeks hosting?
Anyone managing a team should consider that inviting others to join the account isn’t possible, and the lack of developer-friendly features could be a big no-no for certain businesses.
Developers with complicated workflows that need staging areas probably won’t be big fans of GreenGeeks’s platform either.
GreenGeeks Backups
Backups and restore are one of the areas I start considering a lot more these days when it comes to choosing a web host. A Sod’s law states: if something wrong can happen, it probably will, and at the worst possible times. This happened to us, and please learn from our mistakes when I say you should backup as often as possible.
GreenGeeks cPanel Backup Feature
Anyways, this is how it works with GreenGeeks. Option 1 is to use the cPanel backup tool. I’s a bit clunky and manual but by no means too difficult to do:
Login and click on the appropriate site’s cPanel button
Click Backup in the Files section
Click Home Directory under Download a Home Director
You can also download a database instead, or a full Zipped account backup, which is what you’ll need to keep on your local drives.
A couple of important things to note:
If your account is larger than 10GB in size, the whole cPanel backup option will be disabled. You’ll have to pay $5 per backup.
cPanel backups saved to your home directory will be deleted automatically after 48 hours, so it’s better to download the ZIP file locally.
The first monthly restore is free. After that, each restore costs $25. Note that it’s not unusual to restore at least a couple of times if there’s an issue (e.g. you chose the wrong backup to restore).
Option number two is to download files manually using an FTP program. If you use a CMS like WordPress or Drupal that also means you’ll need to backup databases. I always find that a big pain to do, and also slow. Which is why a better backup tool would have been useful.
GreenGeeks and WordPress
Although GreenGeeks has a special section on their website for WordPress hosting, I couldn’t find a difference between these plans and the share hosting ones.
In any case, here’s what you get for both if you want to install the world’s most popular CMS.
Easy installation: it’s not 1-click, but they use an install app called Softaculous, which simplifies the process for you. Maybe 4 or 5 steps, which you can read about here.
LiteSpeed Cache plugin: it’s a caching plugin that will make WordPress run faster on your site when properly configured. Be aware this is not GreenGeek’s own solution, but just a generic plugin they recommend.
LiteSpeed Cache Settings
To be honest, I feel like all the WordPress-optimized stuff is mostly there for marketing purposes. If you are really serious about WordPress experts (and you have the budget for it), I’d consider other options like Kinsta or WP Engine. SiteGround is also a great option if you need something a bit more affordable.
Final GreenGeeks Review Comments
GreenGeeks is certainly the provider we’ve tested that’s the most committed to protecting the environment. It’s an admirable choice, and businesses with a green goal will certainly be pleased to hear that they can host a website with a reliable performance, price, and low carbon footprint.
But there are nevertheless a few downsides to consider. The lack of advanced options like staging and team management features can be a dealbreaker for professional business owners. The limited backup features may be not enough for most.
And if you need a top-performing host, other (and more expensive) solutions like SiteGround, Kinsta or WP Engine could be considered.
It’s also not the cheapest provider out there. For example, at renewal DreamHost is more affordable and offers similar performance levels.
> Try GreenGeeks risk-free for 30 days
Frequently Asked Quesitons
How Do I Pay for GreenGeeks?
You can pay via all major credit cards and PayPal. No checks, money orders, wire transfers or Western Union payments.
Is Everything Really Unlimited?
Yes. Just keep in mind that there is a limit on the amount of files you can keep on your sites, though. It’s a really high number, so mostly a precaution against file-sharing websites.
Can I Get My Money Back?
There is an unconditional 30-day money back guarantee offer.
Is There an Uptime Service Guarantee?
Yes, if your website hosting drops below a 99.9% rate, GreenGeeks will refund some of your hosting fees.
Is GreenGeeks Really Environmentally-Friendly?
They’re certainly advertising as such. In practice this is how it works: GreenGeeks tells the Bonneville Environmental Foundation (BEF) how much electricity they use. The foundation calculates how much green energy they’ll need to use to make up for it. GreenGeeks purchases that amount in renewable energy.
So it’s not like their servers use less energy than standard hosting. However, they are certainly committed to making up for what they consume, and using as much green energy as possible.
Get GreenGeeks Now
#Best Web Hosting Services#Best Web Hosting Providers#best web hosts#web hosting#web host#web hosting provider#web hosting services#wordpress hosting#hosting
1 note
·
View note
Text
Here is How to Solve Cpanel - Disk Usage Warning & Inodes Problem
Here is How to Solve Cpanel – Disk Usage Warning & Inodes Problem
If you have a hosted site on WordPress then you’ll definitely face the Disk Usage and Files Limit (Inodes) Warning.
What is an Inode?
An Inode is a data structure used to store the metadata of a file. The number of inodes indicates the number of files and folders you have under your hosting account.
All the shared hosting service providers maintain these limits in order to…
View On WordPress
#Cpanel Tips & Tricks#disk usage warning cpanel solutio#get more cpanel space#Hindi#how to#how to control inodes#How to Delete cache in cpanel#how to Delete junk or spam emails in cpanel#how to Delete the unnecessary files and folders in cpanel#how to increase disk space in cpanel#how to reduce file usage in cpanel#how to reduce indoes#how to remove disk usage warning in cpanel#How to Solve Cpanel - Disk Usage Warning#How to Solve Increased Inodes#increase disk space in cpanel#increase inode limit + cpanel#inode quota exceeded cpanel#Tech Urdu#Techurdu#Urdu
0 notes
Text
How to Delete a WordPress Website
How to Delete a WordPress Website If you're wondering how to delete a WordPress website, you're not alone. This process is not as easy as it looks. For starters, you must make sure that you keep a backup of your files before making the delete request. Then, you should use an FTP client to remove your website files. You can then delete the site's database. Creating a backup of a wordpress website Creating a backup of a WordPress website before deleting it is important for several reasons. First, it protects your site from any security vulnerabilities. Once hackers or other users get access to your website, they can damage it, so proactive security measures can help you prevent this from happening. Second, you must make sure that your backup contains all of your site's content and core functionality. Creating a backup should not leave any content gaps; otherwise, you may have to recreate everything from scratch or resort to the Google Cache method to retrieve the lost content. Third, creating a backup of your WordPress website can save you a lot of trouble. A backup is a copy of your website's files, including the database and plugins. This backup can be restored if something goes wrong. You can also use it to duplicate your website or move it to another host. Keeping a backup of your files before deleting a wordpress website Before deleting your WordPress website, you should back up your site files. The files in the WordPress directory include themes, plugins, cache, images, and WP Admin details. You can backup the files manually or use a free FTP client. WordPress recommends that you make three backup copies. These copies can be stored on your hosting server, an external hard drive, or even a cloud-based service. Keeping backups in different locations is a good idea to ensure redundancy should anything happen to your website. A backup of your files is essential in the event of a website accident. Even the smallest mistake can bring your site offline. For example, accidentally altering one line of code may cause your site to become unavailable. To avoid such disasters, make a backup before deleting your website. The process of backing up files is very simple. Just make sure that you set up the backup in a safe place, and check it periodically. It is not recommended to back up files to a single location, because it puts all your eggs in one basket. In addition, a single backup site can be vulnerable to disasters. Therefore, you should create a separate backup site for your WordPress site. One way to back up your files is by using a service like BackupBuddy. It offers free offsite storage with Stash and also lets you restore single files. Account reversals are only possible within 30 days If you've accidentally deleted your WordPress website, you can try to revert the decision, but only within the first 30 days. This is because data from deleted WordPress accounts will remain on WordPress servers for 30 days. During this time, you can contact WordPress support to revert the decision. Before you delete your WordPress website, you'll want to make sure all of the files on your website are deleted. This includes your user account. If you're unsure how to delete your WordPress account, you can go to MySQL Databases > Users > Delete Accounts. You'll need to enter your website's URL for final confirmation. Otherwise, you'll lose access to the website's content. Using an FTP client to delete a wordpress site If you need to delete a WordPress website, you have several options. Some hosts offer cPanel, which makes it easy to delete files. But if you don't want to spend time in cPanel, you can also use an FTP client to delete your website. One of the best FTP clients is FileZilla, which is free and reliable. To get started, log into your hosting account and open the File Manager. In the File Manager window, find the folder containing the theme that you wish to remove. You must also make sure that the theme you want to delete is no longer active. Before you delete a WordPress site, you must first review the content. If you do not like any part of the website, you may want to delete it. But make sure to save the backup first. Though this might seem redundant, you may find that you need to restore the site someday. It's much easier to restore a backup than to start building it from scratch. Read the full article
0 notes
Text
Move WordPress Site to New Host | Step-by-Step Guide

Steps To Do Before Moving WordPress Site to New Host
There are some preparation steps that you should go through before you move your WordPress website to the new host. The size of your database will determine the time taken for migration. You will also be able to clear cache directories, remove backups, and remove unused videos, themes, and plugins to reduce space. By doing this, you can speed up the migration process.
1. Back Up Your Website Files
Now you know how to prepare before you move WordPress site to new host. Then you should proceed with backing up the critical files on your website. Unexpected things can happen as you migrate files. If you don’t want to encounter any problems with missing or corrupted files, you should take backups. You don’t have to worry about losing your data in such situations, as you can quickly restore them from the backups. You will be able to take the backups using an FTP tool to your local location on the computer.
2. Export the Database
The next step you should follow to move WordPress site to new host is to export the database. The database is one of the most critical aspects of the WordPress website. That’s because it contains the data of all your posts and pages. You will access your database via phpMyAdmin, available through the hosting control panel.You will need to select the exact database of your WordPress website from the left-hand panel and then click on the Export button that you can see on the menu bar. Ensure that the export format is in SQL before proceeding with the export. Once you click on the “Go” button, you can get the database export downloaded in the form of a .sql file. You will need to keep it in the same website folder to proceed with the migration.
3. Creating MySQL Database on New Host and Import Your WordPress Database
You should log into the new host and use cPanel to access “MySQL Databases.” This is where you will create a new database while using the same name as the old database. Depending on the host you select, you will come across the need to add a mandatory prefix to the database. Make sure that you carefully change the name of the database under such a situation.Next, you can get to phpMyAdmin. Then you can click on import and proceed with importing the SQL file. You should then open up the wp-config.php file, which you downloaded. You can search for the name of the database again and change the value of the database name with a new one.As the next step, you should create a new database user. You may click on “Add New User” and do it. You can open up the wp-config.php file and change the user and password as preferred. Finally, you will need to add the user to the created database.
4. Import Your WordPress Site to the New Host
Now you are done with database configuration, and you may proceed to migrate WordPress site to new host. This is where you can start uploading the files of the website. It would help if you connected to the new web host via an FTP tool and then located the folder where you will upload the WordPress file. You will usually need to upload files into the “public_html” folder. Make sure that you are also uploading the updated wp-config.php file.This file upload process might take some time, and it varies based on the total amount of files you have. Ensure that you don’t delete the files from the local computer until you finish the file upload process.
https://n6host.com/blog/migrate-wordpress-site/
0 notes
Text
How To Completely Delete WordPress Site?
How To Completely Delete WordPress Site? There are many reasons to delete your WordPress site such as your business has been closed. Although relatively easy to achieve, immediate and permanent removal of the Internet requires some additional steps. you can easily delete WordPress files from your server and it will no longer be available. But, your site may still appear in search results, cached snapshots, and the Wayback Machine. It is quite difficult to remove all traces of an Internet site. There are thousands of websites that summarize content from other sites, publish screenshots, provide statistics and comparisons. In this article, we will discuss how to permanently remove a WordPress site from the Internet. Let’s start !
Permanently remove an wordpress site from the internet

https://www.wpbeginner.com/
Backing up the site Before you do something as drastic as deleting the site, it’s always a good idea to create a backup. No matter how safe you are right now, you may need to access it in the future, even if it only serves as a reference source. Although there are many backup plugins, our recommendation is UpDraftPlus.
Delete files from your site using an FTP client
client
While some self-hosted WordPress users can delete their files through the cPanel of their host, others do not have this option.
The simple solution method is to delete the site via a File Transfer Protocol (FTP) client.
The one we recommend is FileZilla.
If you are not already using FTP with FTP, you should keep up with a good tutorial before proceeding.
Once you are logged in with the credentials found in your hosting account, locate the domain you want to delete and simply select all the folders and files associated with it:
then right-click, select Delete and confirm:
Although this step is very simple, make sure your site is completely off the Internet is somewhat more complex.
Delete your WordPress database via
Although deleting files from your website will effectively close the site, your database will still exist, and this could leave you with security vulnerabilities.
The easiest way to drop your database is through cPanel, and each host varies in its deployment, although the basic functionality is the same.
First, log in to your host and navigate to your cPanel:
Scroll to the Database Tools section there and click the MySQL Databases button:
here is a list of your databases – just select Delete for the right database:
Finally, check the correct database and confirm your selection by clicking Delete Database
Remove content from search engines

Even if you deleted your site, search engines can still display your web pages in search results. Search engine crawlers (also known as spiders, robots or bots) like Google and Bing regularly access websites and index their content. Once the site is deleted, crawlers will take some time to communicate with the search engine that no longer exists.
How to delete Snapshots of the Wayback Machine Website
Archive.org’s Wayback machine is the largest archive of websites in the world. Drag and store cached versions of billions of web pages. Anyone can visit Wayback Machine and search for cached snapshots from any website.
The best way to permanently delete your Wayback Machine site is to contact Archive.org and ask them to delete snapshots of your content. Removing your Wayback Machine website by email from Archive.org ensures that your previous snapshots are never taken again. Even if your domain registration has expired and transferred to a new owner, Archive.org will never enable archiving for that domain again.
That’s why we discussed how to permanently delete your WordPress site, whether you have created your site through WordPress.com or WordPress.org. And if you get involved and created several WordPress.com sites, I will also show you how to delete all these sites at once by canceling your WordPress account. We hope that this article has helped you permanently remove a WordPress site from the Internet.
https://wpqanda.com/?p=1933
0 notes
Text
WordPress Update Problems? Here’s How to Fix Them (No Tech Skills Needed)

Keeping your WordPress website up to date is critical for security, speed, and access to new features. But let’s face it—when an update fails, it can feel like the whole site is crashing down, especially if you don’t have a technical background.
Don’t panic.
Most WordPress update errors are easy to fix with a bit of guidance. In this beginner-friendly guide, we’ll break down why updates fail and what you can do to resolve them—no developer required.
🛑 Why Do WordPress Updates Fail?
WordPress runs on a system of interconnected parts: the core platform, themes, and plugins. If one of these components doesn’t align properly during an update, things can break.
Here are some of the most common causes:
📡 Poor internet connection that interrupts the update
🔌 Conflicts between plugins
🎨 Theme incompatibility
💾 Insufficient server memory or time limits
🔐 Incorrect file and folder permissions
🧩 Corrupted or incomplete update files
The first step toward fixing any problem is understanding where it’s coming from.
🛠️ How to Fix WordPress Update Errors (Step by Step)
✅ 1. Back Up Your Site First
Before trying anything, create a full backup of your website using a plugin like UpdraftPlus or BackupBuddy. This gives you a safety net in case something goes wrong during the troubleshooting process.
✅ 2. Clear Your Cache (It Might Be That Simple)
Sometimes, your browser or caching plugin is the culprit—not the update itself.
Clear your browser cache (Ctrl+Shift+R or Command+Shift+R on most browsers)
If you use a caching plugin (like WP Super Cache or W3 Total Cache), clear your site cache too
Now try updating WordPress again.
✅ 3. Use Troubleshooting Mode to Find Plugin Conflicts
Conflicting plugins are a frequent reason for failed updates.
You can use the Health Check & Troubleshooting plugin to safely test your site:
Install and activate the plugin
Enable troubleshooting mode—this disables all plugins temporarily (just for you)
Try updating again
If it works, re-enable plugins one by one until the error returns
That last plugin activated is your likely culprit.
✅ 4. Check Your Hosting Settings
Shared hosting plans often limit memory and execution time, which can stop updates mid-process.
Ask your host:
What’s the PHP memory limit? (It should be at least 256MB)
What’s the maximum execution time? (Aim for 300 seconds)
Can they increase these limits for better stability?
Sometimes, simply switching to a better hosting plan solves everything.
✅ 5. Try a Manual WordPress Update
If automatic updates aren’t working, a manual update might do the trick.
Here’s a simple guide:
Download the latest WordPress version from WordPress.org
Unzip the files on your computer
Use FTP software like FileZilla to connect to your website
Replace the wp-admin and wp-includes folders with the new ones
Do not touch the wp-content folder (it holds your themes and plugins)
Open your site—if needed, it will ask to update the database. Just click the button
Done right, this is a safe and effective fix.
✅ 6. Adjust File Permissions (If You’re Getting Permission Errors)
WordPress needs the correct file permissions to update itself.
Use a plugin like WP File Manager or ask your hosting provider to set:
Folders to 755
Files to 644
These permissions allow WordPress to work smoothly without opening security risks.
✅ 7. Stuck in Maintenance Mode? Here’s How to Exit
Sometimes an update gets interrupted, leaving your site stuck in maintenance mode with this message:
“Briefly unavailable for scheduled maintenance. Check back in a minute.”
To fix this:
Log into your hosting account (e.g., cPanel or via FTP)
Go to the root folder of your WordPress site
Delete the file named .maintenance
Refresh your site—it should return to normal
This is one of the easiest fixes on the list.
💬 When You Should Call in the Experts
If you’ve tried everything and the update still won’t work—or if you're unsure about any step—it’s perfectly okay to ask for help.
Here’s who you can turn to:
Your web hosting support team
A WordPress specialist
Or a reliable web development company like Websenor
✅ Final Thoughts: Keep WordPress Simple with Websenor
WordPress update errors can seem intimidating, but most are fixable with a calm, step-by-step approach—even if you're not a tech expert. The key is to:
Back up first
Rule out the simple causes
Test safely before changing live settings
Know when to ask for help
If managing updates or troubleshooting problems ever feels like too much, Websenor is here to take the weight off your shoulders. Our team specializes in WordPress maintenance, bug fixing, and website performance tuning—so you can focus on growing your brand while we handle the backend.
Let Websenor be your WordPress safety net. With us, your website stays secure, updated, and stress-free.
0 notes
Text
youtube
How to Remove Unused Pluggins in Wordpress 2025 ?
Removing unused plugins in WordPress is essential for improving security, performance, and site speed. Here's how you can do it in 2025:
Step-by-Step Guide to Remove Unused Plugins in WordPress
1. Access the WordPress Dashboard
Log in to your WordPress admin panel (yourwebsite.com/wp-admin).
Navigate to Plugins > Installed Plugins.
2. Identify Unused Plugins
Look for inactive plugins (these are not in use).
Deactivate any active plugin you want to remove (Click "Deactivate").
3. Delete Unused Plugins
After deactivation, click Delete below the plugin name.
Confirm the deletion when prompted.
4. Remove Leftover Files (Optional)
Some plugins leave behind data. Use a plugin like WP-Optimize or Advanced Database Cleaner to clean unused files and database entries.
5. Check for Performance Improvements
Clear cache (if using caching plugins).
Test website speed using Google PageSpeed Insights or GTmetrix.
Bonus: Remove Unused Plugins via FTP or cPanel
If the WordPress dashboard doesn’t allow deletion:
Use FTP (FileZilla) or cPanel File Manager.
Navigate to wp-content/plugins/.
Delete the folder of the unused plugin manually.
0 notes
Text
At Last, the Secret to WORDPRESS HOSTING Is Revealed
New Post has been published on https://martechguide.com/wpengine-wordpress-hosting-benefits/
At Last, the Secret to WORDPRESS HOSTING Is Revealed
Table of Content
What Is CMS?
What CMS’s are available?
WordPress is World’s Most popular CMS
TOP 3 CMS’s to look at
What is WPEngine?
Why WPengine is best wordpress hosting site?
Incomparable features in wpengine
Website Performance Optimization features in WPengine
WPengine WordPress Hosting Speed Test report
Get your FREE 3 months Trial Offer Use code JULY3FREE to get 3 months free on annual shared plans. Valid through July 31, 2020.
Create WordPress sites and content quickly with prebuilt content blocks, sections and full page layouts using Genesis Pro!
I have 9 websites are running on different shared hosting servers. Some are blog sites, educational websites and some e-commerce website. Most of the websites are having heavy content and some only moderate content. So when I look at hosting provider, I give emphasis on overall performance of website.
I have tried many shared servers including net4india, Hostgator, Godaddy and inmotion hosting. I personally found inmotion hosting giving fantastic performance. In this post “Migrating hosting server from HostGator to inmotion hosting” I have given detailed analysis why inmotion is the best.
But still for me to make my WordPress website faster, I had to spend a lot of money in getting many plugins and website booster application. So if you have decided to make your website only in wordpress CMS then this piece of information is very much important, which I learnt after experimenting for years.
What Is CMS?
CMS stands for content management system; a content management system is software that helps users create, manage, and modify content on a website without the need for specialized technical knowledge. So if you do not have knowledge of coding or HTML or PHP, you don’t need to worry you. Using CMS like WordPress you can easily make a good looking and fully functional website easily.
What CMS’s are available?
There are many CMS’s available for people to use and make website of their choice. Some of the popular CMS’s are WordPress, Drupal, Magento, WPEngine, Prestashop, Moodle, Wix, and so On… you can find huge list of CMS’s in your Hosting Cpanel
WordPress is World’s Most popular CMS
Market Share of WordPress globally
TOP 3 CMS’s to look at
Let’s understand the Top3 CMS and how they are going to be useful for you to start making your website.
WordPress.org is an open source CMS available. There are plenty of wordpress developers who developed millions of themes, plugins, widgets which can be used to make a website. The biggest drawback is, that all the plugins ,themes and widgets are developed by many different independent developers and when you use them on your website it leads to conflict in the scripts and worst part is that the codes are not optimized for superior performance and its performance is impacted. This leads to slow loading of your website and search engines DO NOT like slow websites, which impacts your websites ranking in search engines.
Point to note: more plugins will certainly slows down your wordpress website and you might need to get it optimized by a php developer, which might cost you a lot. That’s the reason most of the website are hard coded by the php developers in wordpress.
Drupal: this is one of the most powerful CMS for making a enterprise level of a website, but certainly it’s not easy for a non-technical person to work and edit the website content. It requires understanding of web development and coding skills.
Wpengine: one of the most advanced managed hosting service provider for the wordpress websites and it’s only top of the list in the paid wordpress hosting as per the builtwith.com website result.
What is WPEngine?
WP Engine is the leading WordPress hosting platform. Wpengine platform give more agility in building the website, provides cloud hosting & higher security ( Cloud hosting performance is highest compared to shared hosting). They also have integrated wordpress website optimization tools and other partner integration tools included.
Why WPengine is best wordpress hosting site?
Wpengine integrate with best-in-class technology partners. They are partnered with Google, hubspot, cloudflare, AWS, and New Relic, and optimize their technology specifically for WordPress.
Incomparable features in wpengine
StudioPress Themes
Build amazing, mobile-responsive WordPress digital experiences with 36 easy-to-use, premium themes powered by our Genesis Framework, featuring built-in SEO and security, and all included in your WP Engine plan. Explore Studio Press Themes
Auto Migration
Your move to WP Engine is as simple as a couple of clicks using our auto migration plugin. Explore auto site migration
Deploy Site
Easily move data between your cloud development environments on WP Engine.
Git and SFTP Connections
Let your development team keep using their favorite development tools to increase productivity and collaboration.
One-Click Staging
Use tools to simplify and shorten development cycles through rapid testing of changes so you’re never surprised. Creating a testing environment of a website is easy just by doing a click. Explore One Click Staging
Dev, Stage, Prod Environments
Every WP Engine site comes with three environments to help you quickly set up an efficient development workflow. Explore Environments
Automated Backups
WPengine perform daily backups on your digital experience to give you peace of mind in case you run into any site issues.
WordPress Core Updates
WPengine handle all major updates automatically to ensure sites stay up-to-date, and test the minor updates before recommending them.
Free CDN and SSL Certificates
WP Engine makes it easy to scale your site up with CDN and keep your transactions safe with SSL—just add them with a single click.
Multi-Site Conversion
WP Engine lets you set up and turn off multisite with just a few clicks in our User Portal.
User Permissions
Our interface makes it easy for you to ensure all users have the proper roles and access, making it easy for you to add or delete users and change permissions.
SSH Gateway
Save time by efficiently managing any number of WordPress sites through the command line.
Ownership Transfer
Provides an easy way for agencies or freelancers to transition site ownership and billing to clients post launch.
Activity Log
Gain visibility on your account, including updates and published content, and use the activity log to help provide governance.
GeoTarget
Provides location specific content for your audiences increasing engagement and transactions.
WordPress Plugins
WPEngine helps you by powering a wide variety of personalized experiences through plugins and custom functionality.Check Migration Plugin
WordPress Content Creation Tool
Publish quality content at scale with WordPress, a world-class CMS that increases creative agility through collaboration and ease of use.Check Genesis Pro- Content Creation Plugin
Website Performance Optimization features in WPengine
Amazon Web Services
As an AWS Advanced Technology Partner, WPengine offer a range of solutions that meet the needs of customers seeking high-performance optimized for WordPress.
Global Data Centers
They have servers across the United States, Europe, the Middle East, Africa, and in the Asia-Pacific region.
Data Center Redundancy
Keep your data safe and sound with Amazon Web Services.
Uptime Protection
Stay up and running with clustered configurations in dedicated environments, fully-managed content delivery network, and proactive, multi-layered security measures.
PHP 7.4 and HTTP/2 Enabled
Get better SEO, visitor retention, and conversions with the latest updates, which can serve up to 3x more requests per second.
Proprietary EverCache®
Reduce strain on your site’s resources with our caching solution, which is capable of moving hundreds of millions of hits per day through our system.
Fully Managed Global CDN
Load content faster with our global content delivery network (CDN), which routes local requests to the nearest server.
Increased Speed
As per the results the websites on WPengine are having 38% faster load time.
Multi-Factor Authentication
Complex passwords enforced on WordPress sites and the WP Engine User Portal by default. Add a layer of security to the user portal with multi-factor authentication (MFA) technology.
Traffic Encryption with SSL
Use free SSL certificates on every page thanks to Let’s Encrypt.
Threat Detection & Blocking
Dynamically detect and block malicious behavior with their proprietary system, making sure your site doesn’t suffer embarrassing hacks.
Disaster Recovery
In the unlikely event site is compromised, bounce back quickly with their expert recovery help.
WPengine WordPress Hosting Speed Test report
Pingdom Speed Test Report: This is regarded as as the fastest wordpress hosting & Theme;
Gtmetrix performance report
I strongly recommend to use WPengine managed hosting. if you are looking for a professional solution to your wordpress website with great performance and top ranking in search engines.
Get your FREE 3 months Trial Offer Use code JULY3FREE to get 3 months free on annual shared plans. Valid through July 31, 2020.
0 notes
Text
How to fix password reset error in wordpress

Did you encounter the error “Failed to save the password change in the database”? This error usually occurs when you unsuccessfully try to access your site. In this article I will tell you how to fix a password reset error in WordPress.
Click here : Website Designing Services UAE
How to fix WordPress password reset error through database
The Cause of the Error
The first sign of an error is that you cannot log into your WordPress site. The login page is just constantly being updated.
If you try to reset the password, you will see the error message "Failed to save the password change in the database."
Failed to save password change in database
If you do not see this message, but are also unsuccessfully trying to log in, then perhaps the reason lies elsewhere.
So, this error message indicates that WordPress cannot post new information to its database. This is caused by the fact that you filled all the hosting disk space that was allocated for your account.
The size of the WordPress database is also part of the disk space allocated for the user account. Since you have already used all the space, it is no longer possible to add any new information.
Bug Fix
To fix the password reset error, connect to the site through the FTP client or through the file manager in cPanel.
Go to the / wp-content / uploads / folder and delete some large image files in order to free up space. Before deleting, download these pictures to your computer as a backup.
Delete images taking up space
After logging in, view all the files, maybe some files are no longer needed and take up too much space. Usually these files are stored in / wp-content / or in / wp-content / uploads / folder.
Many users have caching plugins installed , and very often they are not configured to automatically clear. A lot of files are accumulating, which take up a lot of disk space.
Almost all site owners also have backup plugins installed , which, of course, is very good. But if you keep backup copies of files on the server, then it is not surprising that you do not have enough space. Keep a backup of your site’s documents on third-party cloud storage, such as on Google Drive or Dropbox .
However, if you can’t free up more space in any way, then maybe it's time to think about using a VPS hosting or even a managed hosting account.
I hope this article helped you understand the reasons and fix the password reset error in WordPress. You may also find it interesting and useful to read about the most common WordPress errors and how to fix them.
If you liked the article, do not forget to like it
For more information visit our website Digital Marketing Services in UAE
0 notes
Photo

How to Add Plugins to WordPress
So, you’ve just created your first WordPress website—now what?
One of the best things about the WordPress platform are the thousands of free and premium plugins you'll have access to.
Plugins allow you to enhance any out-of-the-box WordPress website with a wide range of advanced, powerful and even niche features. With the right plugin, you can do everything from integrate your website with popular social media platforms such as Facebook and Twitter; create a Google-style live search bar; add user registration and login functionality; or even start selling Amazon products via WordPress.
WordPress
Add a Live Ajax Search Bar to Your WordPress Website
Jessica Thornsby
WordPress
Create an Online Community for Your WordPress Site With UserPro
Jessica Thornsby
If you’re going to take your website to the next level, then you need to master the world of WordPress plugins, and in this tutorial I’ll show you how!
By the end of this article, you’ll know how to install tens of thousands of free plugins using WordPress’ built-in plugin directory, how to upload premium plugins to your account, and even how to manually install plugins to wp-content using an FTP client—just in case your WordPress hosting provider’s file restrictions make it impossible to install plugins any other way.
What Are WordPress Plugins, Anyway?
A WordPress plugin is a ready-made collection of code that you add to your website, in order to perform a task, add a feature or improve your site’s overall performance. For example, the popular Yoast plugin is designed to boost Search Engine Optimization (SEO), Akismet Anti-Spam protects against spammers, and W3 Total Cache can improve WordPress’ performance by adding browser, page, object and database caching.
While lots of WordPress plugins are safe, reliable and can add real value to your site, they’re still third party software, so you should always download your plugins from a reputable source.
For free plugins, the official WordPress plugin directory should be your go-to source, and can even be accessed directly from the WordPress user interface.
If you’re purchasing a premium plugin from a marketplace or directly from the developer's website, then you should always check whether users have experienced any problems with this plugin. This research might involve reading user reviews, comments, searching for mentions of the plugin on social media, or even performing a quick Google search to see whether the plug is mentioned on any blogs or third party websites.
Are You Using WordPress.com?
Before we start, it’s important to note that if you’re using WordPress.com then you cannot install WordPress plugins unless you upgrade to a business plan.
If you downloaded the WordPress software from WordPress.org and installed it on your own server, then you can install plugins without purchasing any additional plans.
Install a Plugin Using WordPress Plugin Search
The easiest way to install a free WordPress plugin is via the WordPress plugin directory, which at the time of writing provided easy access to almost 55,000 plugins. The downside is that this directory doesn’t contain any premium content, so if you’re interested in premium plugins then you’ll need to look elsewhere.
To install a plugin via this directory, you’ll need to search for the name of the plugin in question. If you don’t already have a specific plugin in mind, then you may find it easier to explore the WordPress plugin directory in your web browser, until you find the plugin that’s right for you.
To install your chosen plugin via the WordPress plugin directory:
Log into your WordPress account.
In WordPress’ left-hand menu, select Plugins > Add New.
Search for the name of the plugin that you want to install. When your chosen plugin appears, click the Install Now button.
• When prompted, select Activate.
Depending on your chosen plugin, you may need to configure some settings before you can start using it. The location of a plugin’s settings may vary, but you can often locate them by selecting the plugin’s name from WordPress’ left-hand menu.
You may also be able to edit your plugin's settings by selecting Plugins > Installed Plugins from WordPress' left-hand menu.
Uploading a Plugin to Your WordPress Website
The WordPress plugin directory is restricted to free plugins, but you can find plenty of premium plugins in dedicated WordPress marketplaces such as CodeCanyon, premium plugin repositories, or by purchasing a plugin directly from the developer’s website.
Once you’ve chosen and purchased your premium plugin, it’s time to upload it to your WordPress account:
Download your chosen plugin from its source, which could be a marketplace, plugin repository or a third party website. This plugin should download to your computer as a ZIP file.
Head over to your WordPress account and select Plugins > Add New from the left-hand menu.
Select the Upload Plugin button.
Scroll to the If you have a plugin in a .zip format section, and select Choose file.
Select the ZIP file that you just downloaded.
Click Install Now and the plugin will be uploaded to your WordPress account.
After a few moments, you should see a Plugin installed successfully message; select its accompanying Activate Plugin button.
Once again, you may need to configure this plugin before you can use it. You’ll typically find a plugin’s settings by selecting its name in WordPress’ left-hand menu, and then looking for a dedicated Settings menu.
When you pay for a WordPress plugin, you’ll often get access to online documentation, FAQs, knowledge bases and sometimes even live tech support, so if you’re struggling to configure your plugin then it’s always worth checking the developer’s website to see what resources are available.
How to Install a Plugin to wp-content Using FTP
It’s possible that your WordPress hosting provider may have implemented file restrictions that prevent you from installing premium plugins via the Plugins > Add New menu.
If this is the case with your website, then you can install plugins manually using an FTP (File Transfer Protocol) client, which is a desktop application that connects your computer to your WordPress hosting account.
This method requires your FTP username and password, which you should have received in an email when you signed up for your web hosting account. If you’re using cPanel, then this information is also available via the cPanel dashboard. If you cannot locate your FTP username and password, then you should contact your WordPress hosting provider, as they should be able to help.
To upload a plugin using FTP, first download the plugin’s source file, which will be in ZIP format.
Unzip the file on your computer, which should create a new folder with the same name as the original ZIP; this is the file you’ll need to manually upload to your WordPress account.
Now launch your FTP client and enter your username, password and host—which is typically your website’s URL—and click the Connect button.
Navigate to the wp-content folder within your WordPress installation. This directory typically contains several items, including a plugin directory. The location of this folder tends to vary between hosting providers, so you may need to refer to your hosting provider’s documentation, or contact your provider directly for more information.
Open the /wp-content/plugins/ directory and upload your unzipped plugin to that directory.
To verify that your plugin had been uploaded successfully, switch back to your WordPress account and navigate to Plugins > Installed Plugins. Your new plugin should now be listed in this section.
Give the plugin’s Activate link a click.
As with all the previous methods, you may need to configure your plugin before you can use it, so spend some time exploring the plugin’s various settings; you can typically find a plugin’s settings by selecting its name in WordPress’ left-hand menu.
If your new plugin isn’t appearing in WordPress' Plugins > Installed Plugins section, then:
Switch back to your FTP client.
Navigate to the /wp-content/plugins/ directory.
Delete all the files you just uploaded, and then try re-uploading the plugin again.
How to Remove a Plugin From Your WordPress Website
At some point you may decide that you no longer want to use a particular plugin.
Plugins are third party software, so there’s always a chance that one plugin may clash with another, or an outdated plugin may even become incompatible with a newer version of WordPress. Or perhaps you got carried away installing plugins and desperately need to de-clutter your WordPress account.
If there’s a chance you may need a plugin again, then you can simply deactivate it, but if you want to permanently remove a plugin then you should deactivate and then delete it.
To deactivate a plugin:
Select Plugins > Installed Plugins from WordPress’ left-hand menu.
Find the plugin in question, and select its accompanying Deactivate link.
This plugin will now be deactivated. To reinstate the plugin, simply repeat the above steps but this time select the Activate link.
If you want to permanently delete a plugin, then deactivate it using the above steps. At this point you’ll gain access to a new Delete link; give it a click and the plugin in question will be gone forever.
Conclusion
By following the instructions in this article, you can add any plugin to your WordPress website. With almost 55,000 free plugins available via the official WordPress plugin directory and 7,100 premium WordPress plugins available via CodeCanyon, you’ll be spoilt for choice!
Do you have any favourite WordPress plugins? Be sure to let us know in the comments below!
Here are some of the best plugins we've found in the most-used categories:
WordPress
20 Best WPBakery Page Builder (Visual Composer) Addons & Plugins of 2019
Nona Blackman
WordPress
12 Best WordPress Slider & Carousel Plugins of 2020
Nona Blackman
WordPress
20 Best WordPress Calendar Plugins and Widgets
Esther Vaati
WordPress Plugins
20+ Best Popup & Opt-In WordPress Plugins
Nona Blackman
by Jessica Thornsby via Envato Tuts+ Code https://ift.tt/2LRa8d3
0 notes
Text
6 Best Practices to Optimize Your WordPress Database
Your WordPress site can be slow for many different reasons; a bloated database running in the background is one of them. A professional WordPress maintenance workflow includes a regular database optimization practice during which you get rid of unnecessary data and locate and fix errors and inconsistencies in your database.
WordPress database optimization doesn’t require any specific programming knowledge, although you occasionally need to edit the wp-config file. In this article, we will show you a couple of best practices about how to optimize your WordPress database.
Start with a Backup
Before getting started with optimization, create a backup of your database. In this way, if anything goes wrong, you won’t lose any data and can return to a previous version of your site. There are different solutions to back up a WordPress site, here are the most important ones:
you can create a full site backup from the cPanel of your hosting account,
you can export all your content including your posts, pages, comments, and other post types from the Tools > Export menu in your WordPress admin area,
you can use a backup plugin such as BackupBuddy or VaultPress that allows you to create different kinds of custom backups.
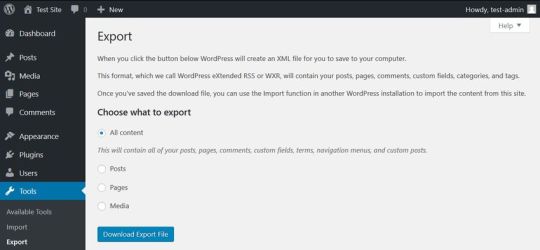
Delete the Content You Don’t Need
One of the most important things of database optimization is to get rid of all the overhead content you don’t need. As each post, page, comment, and post revision is an entry in your database, you can free up a lot of space by deleting unused, obsolete, or duplicate content right from your WordPress admin area.
If you have a WordPress site for a while, you can find such content in many different places. First and foremost, it’s worth deleting the Trash folder of your Posts and Pages menus (even if WordPress automatically deletes posts from the trash after 30 days). You can also go through your Drafts and Pending posts to see if you really need all of them.
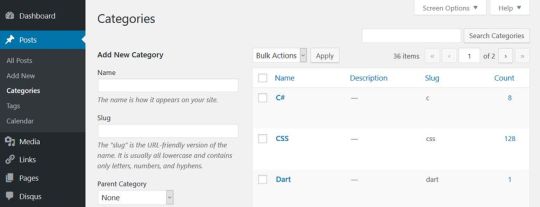
You can also check if you have any taxonomies you don’t use. WordPress has two kinds of taxonomies by default: posts and categories. You can find both of them in the Posts menu. Database optimization is also a good opportunity to think through your taxonomy structure, get rid of duplicate tags and categories, and improve the findability of your posts.

Besides default posts and pages, you can also have custom post types such as calendars, recipes, or affiliate links that include content you don’t need anymore.
Remove Themes and Plugins You Don’t Use
Although WordPress saves themes and plugins into the wp-content folder instead of the database, it’s still a good idea to delete the ones you don’t use. Many plugins and some of the more complicated themes create extra tables inside your database. Besides, all plugins and themes store their options in the wp-options table as well.
Plugins and themes developed following WordPress’ coding standards clean up after themselves when you remove them from your site. In this case, you only need to delete them from the WordPress admin area using the Appearance and Plugins menu. Note that it’s not enough to only deactivate them, you also need to hit the Delete button. If your plugin doesn’t clean up after itself, you can still get rid of the related database overhead using one of the methods below.
Optimize Your Tables in phpMyAdmin
You can run a database optimization query right from your phpMyAdmin interface. PhpMyAdmin is the application that allows you to access your raw database. You can reach phpMyAdmin from the cPanel of your hosting account, from the Databases menu.
In phpMyAdmin, open the database belonging to your WordPress site and check the tables you want to optimize. You can also choose the Check All option, as you can see on the image below:

Here, scroll down the dropdown list (with the “With selected: “ label) you can find below the tables. From the Table maintenance group, select the Optimize table option and run the query.
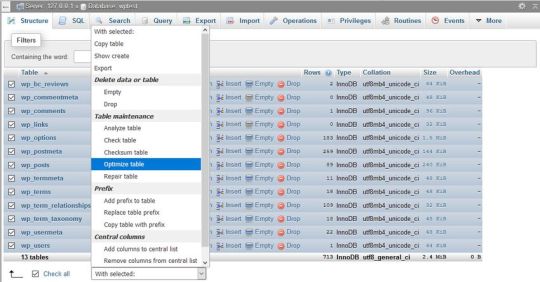
The Optimize table option runs the OPTIMIZE TABLE command on your data, which, according to the MySQL documentation:
“reorganizes the physical storage of table data and associated index data, to reduce storage space and improve I/O efficiency when accessing the table.”
Besides OPTIMIZE TABLE, you can also run the REPAIR TABLE query from the same phpMyAdmin menu, which “repairs a possibly corrupted table”.
Run WordPress’ Database Optimization Tool
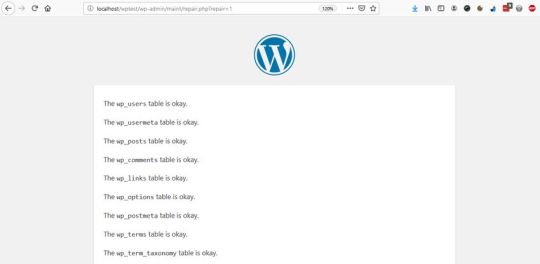
The WordPress Core also has a built-in database optimization tool. It’s turned off by default, however, you can activate it by editing your wp-config.php file. You can find wp-config in the root directory of your WordPress install on your server. Open it in your code editor and add the following option to the top of the file:
define( 'WP_ALLOW_REPAIR', true );
You can find the optimization script under the https://ift.tt/2DdDCih URL, where you need to replace your-site.com with your own domain.

Here, you can choose from two options:
Repair Database – it looks for and repairs common database problems,
Repair and Optimize Database – besides all the tasks performed by Repair Database, it also tries to optimize your database to improve performance.
In most cases, the first option is enough, but if you want an in-depth cleanup, choose the second one. Wait until the tool repairs and/or optimizes your database, then remove the option you have added to your wp-config file (otherwise, anyone on the web can see data related to your database).
Use a Database Cleanup Plugin
If you don’t want (or can’t) access your raw database and your wp-config file, or you want to run advanced database optimization tasks, you can also put a plugin into use. Below, we have collected the three best database cleanup plugins for you.
Note that you shouldn’t use more than one database optimization plugins at the same time, as these plugins have similar functionalities that can interact with each other in unexpected ways.
1. WP-Optimize
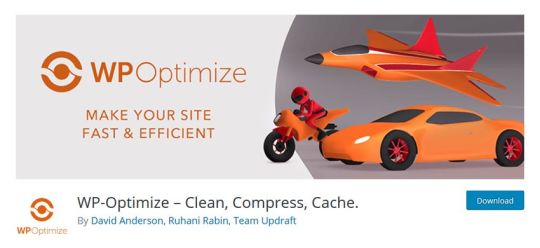
WP-Optimize is a free plugin that takes care of all kinds of optimizations on your WordPress site. Besides cleaning your database, it also compresses your images and caches the content on your site. Its database cleanup feature:
removes all unnecessary data, even expired transients hidden in the wp-options table,
optimizes all your MySQL tables,
lets you run regular automatic cleanups,
shows database statistics,
and more.
The plugin is frequently updated and the support team is responsive, so it’s a good and safe solution if you want to run automated cleanups on a regular basis.
2. Advanced Database Cleaner
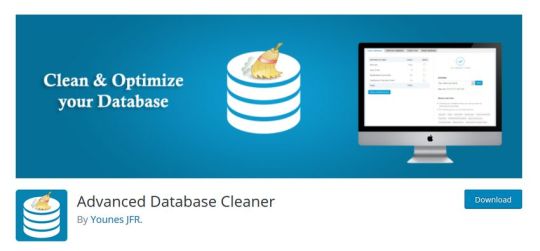
Advanced Database Cleaner is another free database optimization plugin that comes with many advanced options. It allows you to remove all kinds of unused, obsolete, and duplicate content types, such as:
old revisions, drafts, and auto-drafts of posts, pages, and custom post types,
pending, spam, and trash comments,
orphan metadata and relationships,
expired transients,
and more.
You can also schedule and run automatic cleanups, view and clean tables, and display and view items before removing them. Besides, Advanced Database Cleaner supports multisite installs, too.
3. Optimize Database after Deleting Revisions
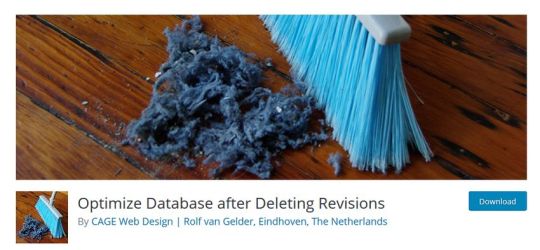
Optimize Database after Deleting Revisions is a database optimization plugin that lets you clean up your database with one single click. If you need a simple solution that doesn’t need much configuration, Optimize Database after Deleting Revisions can be the best choice for you. With this plugin, you can remove:
revisions of posts, pages, and custom post types,
trashed posts, pages, and comments (also spam comments),
orphan postmeta items,
unused tags,
expired or all transients,
pingback and trackbacks,
and more.
It also supports WordPress Multisite and adds an “Optimize DB” link to your admin bar with which you can run a one-click database optimization any time you want.
Conclusion
Database optimization is an essential task you need to perform regularly if you want to maintain good data health on your site. You can either do the optimization manually or make use of a data cleanup plugin that lets you configure and automate the entire process.
Besides, database optimization is also a typical maintenance service you can offer to your clients if you have a WordPress business. If you want to know more about what else to pay attention to when working with clients, have a look at our guide about what your clients need to know about their WordPress site, too.
6 Best Practices to Optimize Your WordPress Database published first on http://7elementswd.tumblr.com/
0 notes
Text
6 Best Practices to Optimize Your WordPress Database
Your WordPress site can be slow for many different reasons; a bloated database running in the background is one of them. A professional WordPress maintenance workflow includes a regular database optimization practice during which you get rid of unnecessary data and locate and fix errors and inconsistencies in your database.
WordPress database optimization doesn’t require any specific programming knowledge, although you occasionally need to edit the wp-config file. In this article, we will show you a couple of best practices about how to optimize your WordPress database.
Start with a Backup
Before getting started with optimization, create a backup of your database. In this way, if anything goes wrong, you won’t lose any data and can return to a previous version of your site. There are different solutions to back up a WordPress site, here are the most important ones:
you can create a full site backup from the cPanel of your hosting account,
you can export all your content including your posts, pages, comments, and other post types from the Tools > Export menu in your WordPress admin area,
you can use a backup plugin such as BackupBuddy or VaultPress that allows you to create different kinds of custom backups.

Delete the Content You Don’t Need
One of the most important things of database optimization is to get rid of all the overhead content you don’t need. As each post, page, comment, and post revision is an entry in your database, you can free up a lot of space by deleting unused, obsolete, or duplicate content right from your WordPress admin area.
If you have a WordPress site for a while, you can find such content in many different places. First and foremost, it’s worth deleting the Trash folder of your Posts and Pages menus (even if WordPress automatically deletes posts from the trash after 30 days). You can also go through your Drafts and Pending posts to see if you really need all of them.
You can also check if you have any taxonomies you don’t use. WordPress has two kinds of taxonomies by default: posts and categories. You can find both of them in the Posts menu. Database optimization is also a good opportunity to think through your taxonomy structure, get rid of duplicate tags and categories, and improve the findability of your posts.
Besides default posts and pages, you can also have custom post types such as calendars, recipes, or affiliate links that include content you don’t need anymore.
Remove Themes and Plugins You Don’t Use
Although WordPress saves themes and plugins into the wp-content folder instead of the database, it’s still a good idea to delete the ones you don’t use. Many plugins and some of the more complicated themes create extra tables inside your database. Besides, all plugins and themes store their options in the wp-options table as well.
Plugins and themes developed following WordPress’ coding standards clean up after themselves when you remove them from your site. In this case, you only need to delete them from the WordPress admin area using the Appearance and Plugins menu. Note that it’s not enough to only deactivate them, you also need to hit the Delete button. If your plugin doesn’t clean up after itself, you can still get rid of the related database overhead using one of the methods below.
Optimize Your Tables in phpMyAdmin
You can run a database optimization query right from your phpMyAdmin interface. PhpMyAdmin is the application that allows you to access your raw database. You can reach phpMyAdmin from the cPanel of your hosting account, from the Databases menu.
In phpMyAdmin, open the database belonging to your WordPress site and check the tables you want to optimize. You can also choose the Check All option, as you can see on the image below:
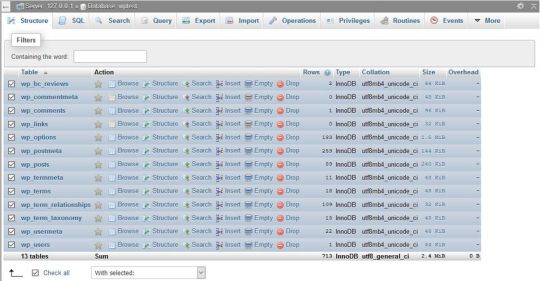
Here, scroll down the dropdown list (with the “With selected: “ label) you can find below the tables. From the Table maintenance group, select the Optimize table option and run the query.

The Optimize table option runs the OPTIMIZE TABLE command on your data, which, according to the MySQL documentation:
“reorganizes the physical storage of table data and associated index data, to reduce storage space and improve I/O efficiency when accessing the table.”
Besides OPTIMIZE TABLE, you can also run the REPAIR TABLE query from the same phpMyAdmin menu, which “repairs a possibly corrupted table”.
Run WordPress’ Database Optimization Tool
The WordPress Core also has a built-in database optimization tool. It’s turned off by default, however, you can activate it by editing your wp-config.php file. You can find wp-config in the root directory of your WordPress install on your server. Open it in your code editor and add the following option to the top of the file:
define( 'WP_ALLOW_REPAIR', true );
You can find the optimization script under the https://ift.tt/2DdDCih URL, where you need to replace your-site.com with your own domain.
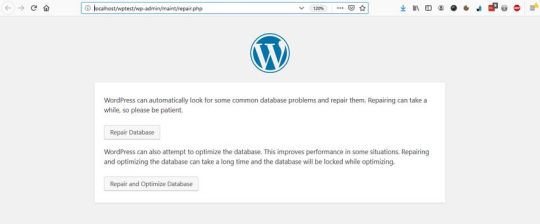
Here, you can choose from two options:
Repair Database – it looks for and repairs common database problems,
Repair and Optimize Database – besides all the tasks performed by Repair Database, it also tries to optimize your database to improve performance.
In most cases, the first option is enough, but if you want an in-depth cleanup, choose the second one. Wait until the tool repairs and/or optimizes your database, then remove the option you have added to your wp-config file (otherwise, anyone on the web can see data related to your database).

Use a Database Cleanup Plugin
If you don’t want (or can’t) access your raw database and your wp-config file, or you want to run advanced database optimization tasks, you can also put a plugin into use. Below, we have collected the three best database cleanup plugins for you.
Note that you shouldn’t use more than one database optimization plugins at the same time, as these plugins have similar functionalities that can interact with each other in unexpected ways.
1. WP-Optimize

WP-Optimize is a free plugin that takes care of all kinds of optimizations on your WordPress site. Besides cleaning your database, it also compresses your images and caches the content on your site. Its database cleanup feature:
removes all unnecessary data, even expired transients hidden in the wp-options table,
optimizes all your MySQL tables,
lets you run regular automatic cleanups,
shows database statistics,
and more.
The plugin is frequently updated and the support team is responsive, so it’s a good and safe solution if you want to run automated cleanups on a regular basis.
2. Advanced Database Cleaner

Advanced Database Cleaner is another free database optimization plugin that comes with many advanced options. It allows you to remove all kinds of unused, obsolete, and duplicate content types, such as:
old revisions, drafts, and auto-drafts of posts, pages, and custom post types,
pending, spam, and trash comments,
orphan metadata and relationships,
expired transients,
and more.
You can also schedule and run automatic cleanups, view and clean tables, and display and view items before removing them. Besides, Advanced Database Cleaner supports multisite installs, too.
3. Optimize Database after Deleting Revisions

Optimize Database after Deleting Revisions is a database optimization plugin that lets you clean up your database with one single click. If you need a simple solution that doesn’t need much configuration, Optimize Database after Deleting Revisions can be the best choice for you. With this plugin, you can remove:
revisions of posts, pages, and custom post types,
trashed posts, pages, and comments (also spam comments),
orphan postmeta items,
unused tags,
expired or all transients,
pingback and trackbacks,
and more.
It also supports WordPress Multisite and adds an “Optimize DB” link to your admin bar with which you can run a one-click database optimization any time you want.
Conclusion
Database optimization is an essential task you need to perform regularly if you want to maintain good data health on your site. You can either do the optimization manually or make use of a data cleanup plugin that lets you configure and automate the entire process.
Besides, database optimization is also a typical maintenance service you can offer to your clients if you have a WordPress business. If you want to know more about what else to pay attention to when working with clients, have a look at our guide about what your clients need to know about their WordPress site, too.
6 Best Practices to Optimize Your WordPress Database published first on https://deskbysnafu.tumblr.com/
0 notes