#How to tutorials
Explore tagged Tumblr posts
Visit Tumblr Blog
Explore Tumblr blogs with no restrictions, modern design and the best experience.
Last Seen Tumblr Blogs


Fun Fact
Tumblr Inc. is using 66 technologies for its website.
Text
I want to tell a story to the artists and would-be artists out there.
When I was 19, I made a large oil painting of the nerd I would eventually marry. I poured all my attention and care into this painting. It's the only art I have from back then that still holds up as a work I'm proud of today.
I entered it into a judged show at the local art center. It got an honorable mention. I went to see the show with my beloved model. One of the judges came up to talk to me, and highlighted that all the judges really liked the painting. It would have placed, except, you see, the feet were incorrect. They were too wide and short, and if I just studied a bit more anatomy-
I called over my future wife, and asked her to take off her shoe. Being already very used to humoring me, she did. The judge looked at her very short, very wide little foot. Exactly as I'd lovingly rendered it. I would never edit her appearance in any way.
The judge looked me in the eye, and to his credit, he really looked like he meant it when he said "Oh I'm so sorry."
Anyways the moral of the story is that all of those anatomy books that teach you proportions are either showing you averages, or a very specific idea of an idealized body. Actual bodies are much more varied than that.
So don't forget to draw from observation, and remember that humans aren't mass produced mannequins. Delight in our variation. Because it's supposed to be there.
125K notes
·
View notes
Text

It's in the eye of the beholder
#comic#birds#my art#I've had this idea for a while#after a lecture that talked about how traits we consider cute are traits found in babies#I feel like birds would have a very different definition of cute from us#anyway after making the bird tutorial I feel the pressure to draw perfect bird anatomy#but tbh I still just wing it a lot of the time!!#hehe “wing it”
64K notes
·
View notes
Text
What is the Best Affiliate Program for Beginners
Affiliate Program What to Consider Starting affiliate marketing can be exciting, and choosing the right programs is crucial for success. Here’s a breakdown of key considerations for beginners: 1. Niche Selection: Passion and Knowledge: Choose a niche you’re genuinely interested in. This will make creating content more enjoyable and authentic. Your knowledge will also help you recommend…
0 notes
Text
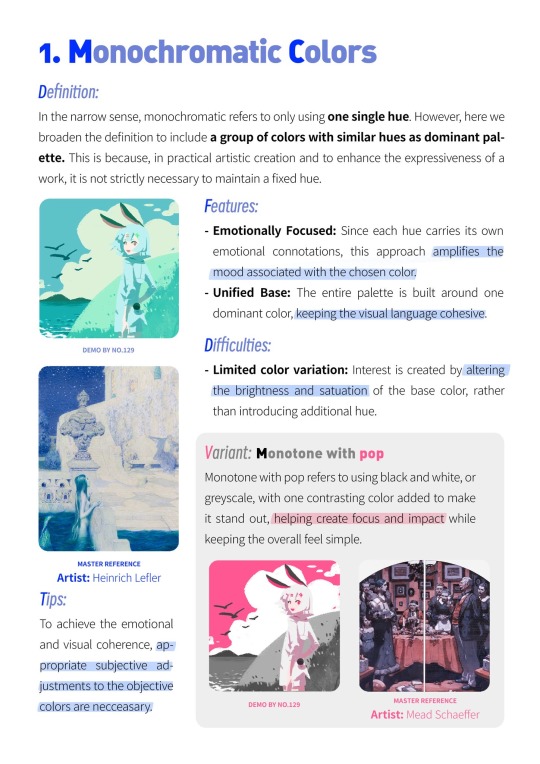
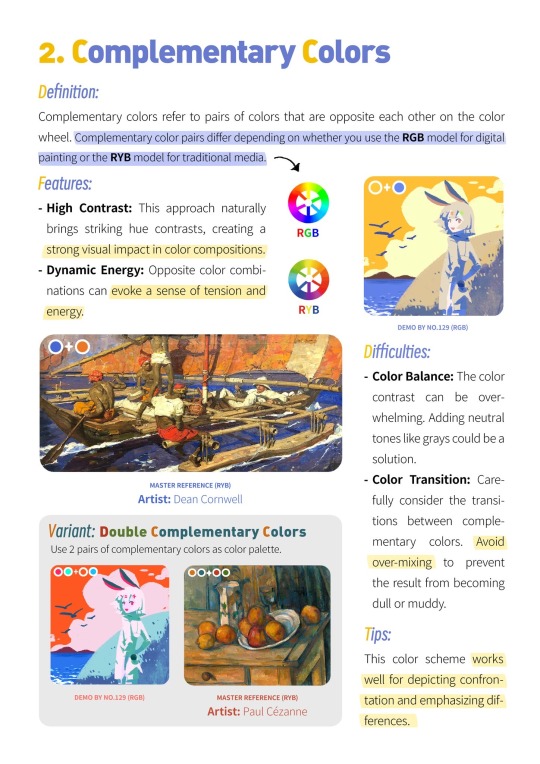
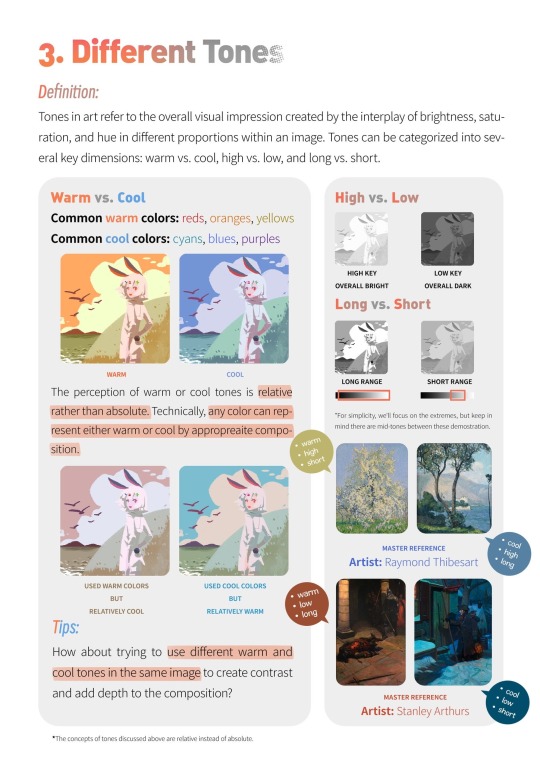
🎨color study note
18K notes
·
View notes
Text
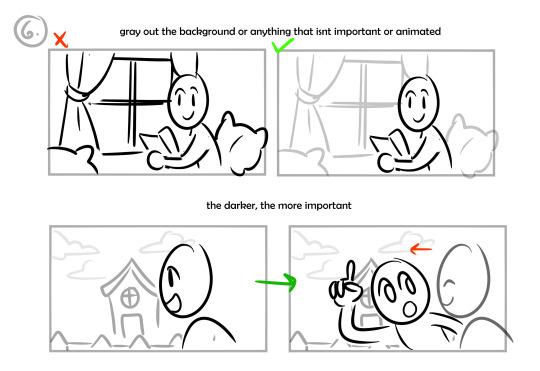
STORYBOARD/ANIMATIC TIPS
ko-fi✏️
I made these for my friends, but I thought that might be helpful for yall as well! hehe! Now whenever someone asks for storyboard tips I can throw this at them!
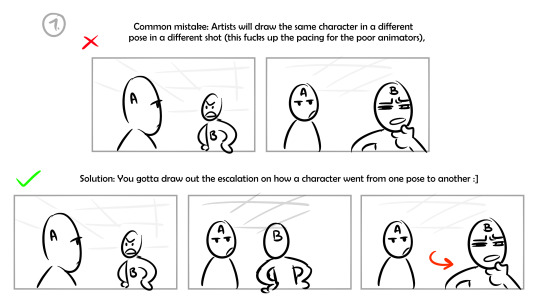


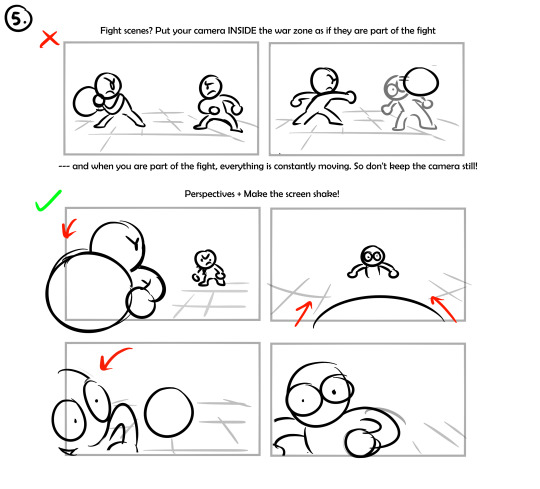
Examples of storyboards I made for fun:
#art#art tips#storyboard#animatic#art tutorial#storyboarding#storyboard tips#animatic tips#how to storyboard#gifs#animatics
24K notes
·
View notes
Text
How to Configure HSRP in Cisco Router: Step-by-Step Guide 2024
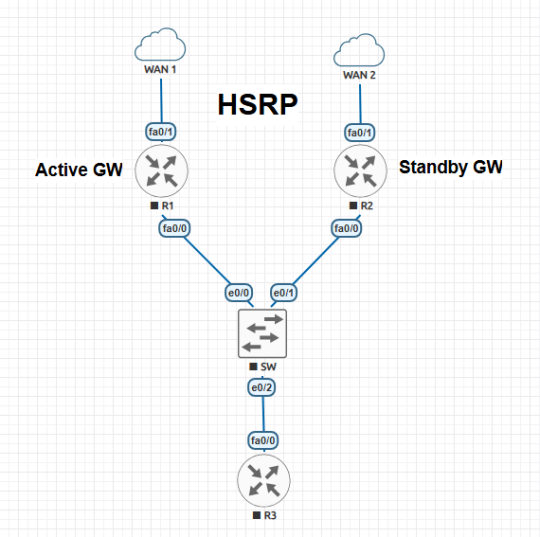
Are you looking to improve network reliability and minimize downtime? Hot Standby Router Protocol (HSRP) is a fantastic solution to ensure redundancy and seamless traffic flow in your Cisco networks. With HSRP, you can configure standby routers that automatically take over if the active router goes down, keeping your network stable and accessible.
I've put together a comprehensive, step-by-step guide on configuring HSRP on Cisco routers. Whether you're a beginner or have some experience, my guide covers everything you need to know—from initial setup to advanced configurations.
📖 Read the full guide here
Check it out to ensure your network's reliability and give your setup the failover advantage it needs for 2024!
#technology#virtualization#eve-ng#How to tutorials#tech blog#network engineer#system administrator#CCNA#CCNP#vmware#vmware workstation pro
0 notes
Text

wire tutorial for a friend
#shoutout to data and ava for thinking this was a poem. my tendencies#machinery#art tutorial#idk how else to tag this
19K notes
·
View notes
Text

As an artist with a focus on fat and trans bodies, my understanding of the human form comes from seeing variety.
I admire bodies that don't fit into the ideal form, because they are all the more common and all the more ignored.
You can find a million drawings featuring fat bodies that are drawn with the sole purpose of being appealing due to following the ideal form. Whether it be because our eyes have gotten the idea, through repetitive influence, that that form is *ideal*. Or for audiences to lust after.
Finding art depicting variety in body types, in fat distribution and structure, is very.. very hard. Sometimes, if you want to see more of something, YOU ought to be the thing you want to see more of.
If you truly want to be a body positive artist, learning to draw a generally appealing fat body is less than half the battle. Thin bodies have variety in fat distribution and in structure. Fat bodies just accentuate these forms.
Practice the ways fat falls around the body, see how it feels when you let yourself play around with the human form. Have FUN with it.
Learning to stop caring about making bodies look the most appealing to wider audiences has been the most freeing thing for me. Practicing various body types has been very fun, and has improved my understanding of the human form more than anything else possibly could.
#body postivity#fat art#art tutorial#curvy body#fat acceptance#body acceptance#fat positive#fat positvity#anatomy#anatomy tutorial#how to draw
5K notes
·
View notes
Note
How do you make your stamps? :0
Disclaimer: this is an obscenely long explanation, with pictures. Efficiency is stupid
So, for the static ones, I make a 99x56 px file on ibis paint x. Other programs are probably available online but I don't use them.
After that, I either upload an image I want to make into a stamp, or I draw one.
Then, I find a frame I want to use. Ill upload them here but let it be known I stole all of these right from deviantart


Most of them are from Lil-Devil-Melii on deviantart. The rest i have no idea. They're not all 99x56px but you can crop the canvas it's fine
Make sure to erase the edges of the picture , so they're transparent. It's not as cute otherwise
Upload those frames over your image in whatever art program you're using and viola, stamp.
For moving ones, it's a lot harder. Mostly because I refuse to download Photoshop.
There are a couple ways to do this. Some are simple animations, like with flashing text and whatnot. For these, you download the individual animation frames from your art program. Make sure it's transparent.
Then, upload each frame to ezgif.com under the option "GIF maker." You can play around with how fast each frame goes and whatnot but in the end, it'll be a stamp with some rad text that moves. This is easy, and doesn't make me want to shit my pants and cry. If you're new, do this. This is fun. This is good. This does not kill me inside
I made that↓ stamp with this method :)

this next one is how we turn gifs into stamps. This one makes me sad. It involves math and sucks. But we gotta do it. For the vibe
First, grab your gif. I'm using this cow gif because it's awesome

Then, I resize it using ezgif. Literally everything for this will be using ezgif. I am a simple man
At this point you should decide what frame to use. I'm using this one because its the first one I clicked
Figured out what size the inside of the frame is. That's what I resize the gif to, so the edges can be transparent. The inside of this one is 93x50 px, so those are the dimensions I'm making the gif.
Figure it out by putting the frame into ibis paint and realizing the canvas to fit just the inside of the frame, then seeing what the dimensions are. But there could be easier ways

Woah it's so small now
Then, still on ezgif, I go to the "crop" option.
Make sureeee to upload the smaller gif
press the button that says "extend canvas size", and then put the "width" and "height" as the dimensions for your FRAME. This'll put a bit of a transparent border around the gif. For this frame, I did 99px and 56px.
The "left" and "top" boxes show how many pixels the cropping happens from the edges of the canvas. The formula for finding that is
(width of gif / 2) - (difference between gif width and frame width / 2) = left box
For me it's (93 / 2) - (6 / 2) = 43.5
Then you do the same.for the height, which for me ends up being 22 from the top
This is reallyyy touchy and annoying though
Here's my result , with no visible difference

Okay so THEN you go to the "overlay" option, under "effects." And upload your frame. If the cropping was done right, you shouldn't have to move the frame at all and can just download it
Here's my result:

if you don't care about transparency, you can resize your gif to be the same size as the frame, and then put the frame over it. But I'm a slut for transparency
Anyways. I'm sorry if anything was unclear, it's two am. And I hope this was helpful :) these really are fun to make once you get it down
also if anyone has an easier way to make stamps from gifs, please god tell me
#web graphics#old web#neocities#custom#custom blinkies#stamps#page decor#web resources#da stamps#deviantart stamps#blinking gif#How to#tutorial#How to make stamps#Spacehey#deviantart#rentry graphics#old internet#early internet#stamp collecting#ezgif#stamp making#stamp template#Stamp frames#blinkies
7K notes
·
View notes
Note
tutorial idea: how to draw teeth / toothy smiles!! i think teeth are difficult for a lot of artists, esp me. im terrible with drawing smiles with teeth. So I would really appreciate if you made a tutorial for teeth! /gen /nf. Thank you.


Your wish is my command, dear anon!
[Transcript]
->Gums show a little
→ Smiling pushes cheeks out
Mouth corners look like triangles with lil' hooks
A closed-mouth natural smile will show the top teeth only
There are four incisors (the flat ones) followed by a canine & five molars on either side
I usually group the incisons together fon a more stylised look
While smiling, the lips stretch and look thinner
Start with simple shapes and work your way up to detail!
5K notes
·
View notes
Text
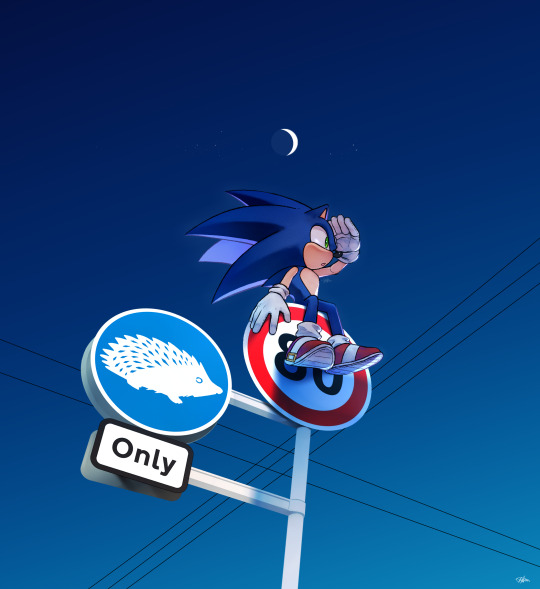
#sonic the hedgehog#girl i have no idea how to pose him i kms#i saw a fun tutorial on rendering signs and then half followed it half gave up LMAO#me when all i do is draw stick him on top of signs or lamposts im sorry for drawing nothing new
2K notes
·
View notes
Text
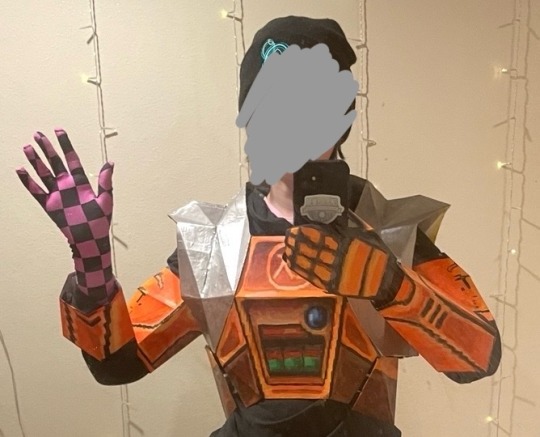
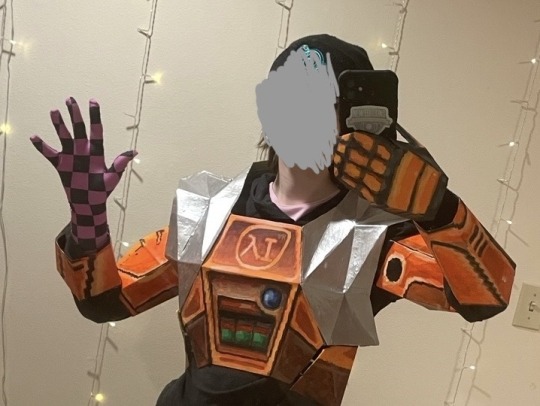
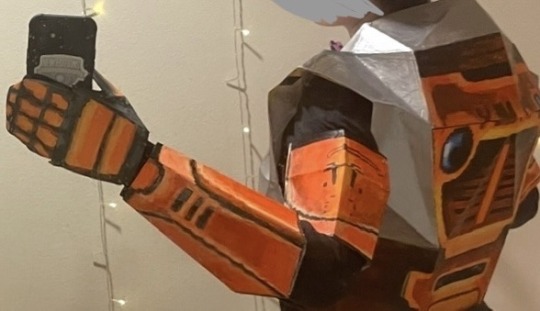
reveal of my gordon hlvrai costume project, now that about half of it is done! this is cardstock and glue and tape and more glue and paint and velcro. and 2 gloves (one hand-sewn)
i got started sometime in early-mid fall, but i committed to making it work with cardstock in january- it was originally meant to be a sizing test before construction with eva foam over the summer. then i realized how expensive thatd be, too much pressure for a form of craft ive never practiced. im pretty amazed with how its come together, even with the large seams! during that whole time when it was unpainted (started painting two weeks ago) there was no way to tell
#thank you sketchfab thank you blender thank you pepakura#school library printer… you were necessary but i dont appreciate that i had to pay per page despite my tuition#i started this because theres a tradition of wearing whatever you want to graduation at my college. ive thought abt how cool itd be to wear#an hev suit like gordon hlvrai.. hlvrai has been important throughout my whole time at college. that plus the stem degree im going for makes#hlvrai the most fitting thing to homage with my outfit#*so important to me#the support of my friends was the last push i needed before research#i havent seen anyone else go for the in-game low poly look for the hev suit! multiple tutorials out there (as expected)#but all i saw involve eva foam and molding. most of them were based on the half life 2 suit which. yeah. that one seems more desirable for#cosplay#lucky that this way was much more simple because its also the most in-theme!#hlvrai#half life vr but the ai is self aware
2K notes
·
View notes
Text
How to Spend Your Time During Winter
Winter certainly has its challenges. The days are shorter, the weather colder, and it’s easy to feel cooped up and bored. But instead of dreading the season, let’s embrace it! Winter offers a unique opportunity to enjoy activities and experiences we can’t have at other times of the year. From cozy indoor pursuits to exhilarating outdoor adventures, there’s something for everyone to make the most…
#book lovers#book worms#books#how to tutorials#parenting#reading community#reading tips#self help guides
1 note
·
View note
Text
Needle Felt Siffrin Build Log: (oct 6 - nov 20, 2024)


Credits goes wholely to @insertdisc5 for creating ISAT and siffrin's design! I am just here to attempt to make cool fanart (and get more people to play isat.. my devious plans are going great so far :3) As always, this isn't a tutorial- it is just a log about how i go about approaching a sculpture and I hope this collection of resources can help others make their own sifs!!
PSA: this has some spoilers for endgame CGs/sprites on my references image board ( also might see it in the backgrounds of my process pics). And bc this is needle felting, you will see some sharp needles! beware!
my inspiration was the intro cutscene where Sif eats the star, so my main goal was to adhere to the style of ISAT as closely as possible while transfering it to 3D space. And I knew i also wanted to try making the cloak for stopmotion purposes, so my process was tailored towards having control over the fabric with wire inlaid within the cloak (more on that later).
I ended up not sticking eyebrows on top of siffrin's bangs lol but anyways, first order of business is Gather Reference! v important. pureref is free and an awesome program. I also do some sketches to visualize the pose and important details i wanted to include in the sculpt.
behold the isat wiki gallery page! tawnysoup wrote an awesome ISAT style guide that absolutely rings true in 3d space too!! adrienne made a sif hair guide here!! (sorry i couldnt find the original link, but it's on the wiki). It says ref komaeda hair so that's what i looked at, along with other adjacent hairstyles! I also like doing drawovers on in progress photos to previs shapes n stuff to get a better idea of the end result.
Also if you're like me and struggle with translating stuff into 3D space, take a look at how people make 3d models and figurines! sketchfab is also a great resource! I looked at the link botw model by Christoph Schoch here for hair ref. (I used Maya, but there's a blender version too ! you can pose characters too if your model has been rigged!)


Face:
Started off blocking out the main shapes of eyelids and iris, and then filling in the colour details in the iris and the star highlights before moving onto adding thin black outlines and eyelashes. I didn't take many in-progress photos cause i kept ripping stuff out to redo them many many times, sorry!! This eye took about 3 hrs bc i just wasn't happy with it!! Sometimes it do be the vibe to give up, go to bed and see how it looks in the morning (more often than naught, it looks fine and it was the "dont trust yourself after 9pm" speaking)

The Mouth:
Couldn't decide if i even wanted to add a mouth as per usual with all my humanoid sculptures.. but i did some drawover tests first to see what expression i liked and to try to visualize it from multiple angles. (I was also testing the placement of stars on the hat brim here)

And then I redid the mouth like 3 times cause the angle just wasn't right (this went on for about the course of a week yay!)
Hair: woe baldfrin be upon ye


I made the hair strands individually first, and then since Sif has some of the hair at the back dyed black, i covered some of the tips with black wool (manually) (I think it would go much faster if i just took a marker to it, but hahaha i love pain and detailing!! )
And then the rest of it was positioning strands with sewing pins layer by layer, always looking at it from different multiple angles- sometimes tailoring the angle or swoop of individual hair flippies. At one point I thought the back looked too cluttered, but the hat covers a lot of it anyways!! yay for hiding mistakes! (imo this is a similar process to how cosplayers style wigs, but on a smaller scale and the same level of time consuming)
As always, look to your reference for guides, and I always do a whole bunch of drawovers over in progress photos to ascertain what was working and what wasn't.
Hat:
A trick to get a super pointy tip, make another tip seperately while keeping the connection point unfelted, and then combine the two to make super pointy hat!! (this also helps if you made the hat too short and need it to be taller. ask me how i know)

The embroidery on the hat brim was done in a hoop and then invisible stitched to the felted top portion. Technically you don't need a hoop but it helps keep the fabric tension, so you avoid puckers in your embroidery. You can also use iron-on stabilizer if your fabric is loose weave or particularly thin. this is the tutorial i used for the stars embroidery! particularly the fly stitch one, french knots, and the criss-cross stitches. highly recommend needlenthread for embroidery stitches and techniques! i learned all my embroidery from this single site alone.

For fabric, I think I used a polycotton i had in my stash,, unsure of the actual fiber content bc i bought it a long time ago. I used DMC Satin floss which was nice and subtle shiny but frayed a lot so it was kind of a pain to stitch with... but keep a short thread length and perservere through it!! After the embroidery was done, I folded up the raw edges and invisible sewed it to the top portion of the hat.
General shape:
Ok general structure of the body is this: wire armature body covered with black wool -> cloak lining & wire cage -> edge of lining is invisibly sewn to the main cloak at the hem -> head

Don't be afraid to mess around with the pattern, it's essentially a pizza with a slice taken out of it to form a steep cone shape!! Use draft paper before cutting into felt to save material! (i think i made like 3 cloaks before i was happy with the shape lol).
You can also hide the seam of the cloak and collars by gently messing up the fibers of the felt with your fingers or a felting needle btw! you can also sandpaper the seams according to Sarah Spaceman in this vid (highly recommend them for their in depth cosplay/crafting builds holy smokes), though since sif cloak is at such a smol scale, I just blended the seam with my felting needle.
For the lining wire cage section, I sewed in wire around the cloak, so the main rotation point is at the top neck area under the collar. These paddles are used to keep whatever pose I need the cloak to be in for stopmotion purposes. Then after the wire is done, I invisibly sewed the lining to the cloak at the hem (same technique as the hat brim to the lining there).
In hindsight, I should've used a thinner fabric for the lining, but i only had sheer white in my stash so had to go with double felt, thus resulting in a really bulky lining but oh well!

Heels:
started with the general boot shape, then tacking on the diamond shape heel stack and also diamond shape sole bc we're committed to the bit here. I skewer the boot onto the armature which also conveniently hides the connection point into the base to keep the whole thing upright and also I can rotate the boot to tweak the angle if needed.

Pins:
I kinda just trial and error'd jewellery wire with pliers into the pin shapes. They're itty bitty!! had a whole bunch of fails before i got two nice ones. A hot tip is to use needle nose pliers and wrap the wire around the tip to get a smooth circle shape!

Base:
I smoothed out the edge of a circular wood base with a dremel, and then used wood stainer to get the black colour. It ended up kinda looking like I took a sharpie to it, but whatever.... now i have a whole ass can of black wood stainer........ I then made a rough mountain of black wool and stuck the feet armature in. And now he's standing!!

Normally at this point when I'm done felting everything, to get a smooth finish, I'd take a small pair of scissors and carefully snip away any flyaway fibers, but this time, I just left them fluffy cause i think that's what sif would do :3c
Photoshoot:
Normally I do shoots using daylight but it was winter so the sun was nonexistent. So I broke out the home lighting setup aka dollarstore posterboard for a nice smooth background, and then hit it with the overhead Fill, side Fill 2, and Rim light, and use white paper/posterboard for bounce light if one side feels too dark. But if things are overexposed, you can move the light sources away until the harshness dims down. I'm using a Olympus mirrorless camera (handed down to me by my sibling so i dont remember the model exactly), which can connect to my phone as a remote so I can avoid shaking the camera when i take photos. Pretty nifty for stopmotion purposes! (yes my camera stand is a stack of notebooks, a tissuebox and some eva foam under the lens, don't judge me)


Stopmotion animation:
I'm still figuring stopmo out on my part, but my process was straight ahead animation ... move the cloak a cm, take a pic.... move another cm, click.... and repeat until i get a version I was happy with. My ref was the cloak animation from Gris (beautiful game btw). The 2d star animation was also done straight ahead using procreate, exported in png with a transparent background, and finally stitched together with the stopmotion footage in photoshop.

My turnarounds are also stopmotion! also secret hack, the turntable is a fidget spinner sticky tacked to a cake platter.
And i think that's all! i mainly wanted to share how I go about thinking about taking a 2d concept and moving it to 3D. I also didn't go in depth into how to actually do the needle felting bc I don't think I''d be very helpful I'm a very good teacher by telling yall to just keep stabbing until it looks right (i'm self taught for this hobby),,, if anyone wants it though, i can share a bunch of tutorials and other felters' process that helped me learn more needle felting!
Hopefully this was helpful to someone! Feel free to send asks if ya got any questions or if anything needs clarification! Or show me your works! I love seeing other people's crafts :3
here have a cookie for making it this far 🥐
#in stars and time#siffrin#isat#isat siffrin#isat fanart#needle felt#soft sculpture#know that i am devouring all the nice words yall leave in the tags/comments of my posts :holding back tears:#I hesitate to call this a tutorial bc this is just how i fumble my way through crafting anything lmao#the only reason I know how long I worked on a project are timestamps on wip photos and however long the day's video essay or letsplay is#sorry time is immaterial when i get into crafting mode#reason why this log is so late is bc after i finish a project i'm perpetually hit with the ray of 'i dont ever want to look at this again'#hence why photos never get edited#AND THIS POST SAT IN MY DRAFTS FOR 2 MONTHS DUE TO BLOODBORNE BRAINROT SORRY#done is better than perfect!!!#sorry i dont control the braincell#sorry for using a million exclaimation points! i am not good at this.. conveying my anxiety in written form!!! my toxic trait
1K notes
·
View notes
Text

"karasu search how 2 cheer human up"
"karasu search difference between sad human and zoning out human"
"karasu search how long is it safe for humans to zone out for?"
(+ a longer look at each scene:)

#art#gif#obey me#this was meant to be a quick test. it was not quick. i think this is was the longest i've spent on drawing something since rolling ik#for some reason procreate keeps fucking up the colours on export and i'm too tired to figure out how to make it stop#can you tell that satan and lucifer were animated first?#funnily enough satan showing ik his book was pretty simple but lucifer walking was like. impossible. he kept turning out fucked up#i was so worn out by the end of it that everyone else's animations are way simpler#(the walk still doesn't look right but i've made peace with that.... i should've done some tutorials or smth first)#(such is my hubris: when i try to do new art things it's mainly by brute-forcing my way through it and hoping it works)#jtta ik#obey me lucifer#obey me mammon#obey me leviathan#obey me satan#obey me asmodeus#obey me beelzebub#obey me belphegor#anyway i'd like to experiment more with trying to animate things in future so!! look forward to that?
6K notes
·
View notes
Text
hey so i've been working on a lot of things (and also second guessing myself a lot because perfectionism) but here's some very random sneak peeks if y'all are interested!!

#and happy black history month!!#how are we already entering into the final week :((#also#i've been inspired to write some 'creating deco cc' tutorials#i saw someone ask where they could find some easy-to-follow ones on x and i thought why not???#i'm far from the best but i can do lil sumn sumn i suppose
1K notes
·
View notes