#How to use CapCut filter
Explore tagged Tumblr posts
Visit Tumblr Blog
Explore Tumblr blogs with no restrictions, modern design and the best experience.
Last Seen Tumblr Blogs


Fun Fact
Women make up for the other 50% of Tumblr’s audience.
Text
How to do the Dog to Human trend on TikTok [CapCut]
How to do the Dog to Human trend on TikTok [CapCut] @jypsyvloggin AI is crazy! I asked it to transform my dog into Human. And see how it looks. #capcut #dogtrend #aimagic ♬ original sound – ⛤⃝DeathWitch333 ⛤⃝ TikTok filters are an easy and quick way to enhance your TikTok videos before posting. Whether it’s for fun or an occasion, you choose a filter to apply to your video based on whatever…
#action figure#action figure trend tiktok#barbie aesthetic trend tutorial#barbie box trend tiktok#barbie filter trend tiktok#barbie starter pack trend using capcut template#barbie trend capcut#barbie trend capcut edit step by step#barbie trend tiktok tutorial#barbie trend video edit#Best anime filters for TikTok videos#capcut barbie trend tutorial#CapCut Ghibli template#capcut template barbie trend#capcut tiktok starter pack edit#easy barbie trend tutorial for beginners#edit like barbie with capcut#Ghibli filter CapCut#Ghibli-style filter#how to do barbie trend on tiktok#How to do Studio Ghibli filter#how to get the barbie action figure look on tiktok#How to get the Ghibli effect on CapCut#how to make your own barbie box on tiktok#How to use CapCut filter#how to use capcut for tiktok barbie trend#How to use the Studio Ghibli filter on TikTok#starter pack trend tiktok#Step-by-step guide to Ghibli filter on CapCut#Studio Ghibli aesthetic effect
0 notes
Note
how does one make graphics (i need to . improve)

Well, the Princess' methods are very simple! She would be glad to teach you.
A bit long graphic tutorial under cut ^_^ (all art by Iinquint on twitter)

First, we import the frame or mask you will use. You can find these by searching "rentry frame".

Then, we will import our picture and erase any excess outside of the frame.

Then we usually add a chibi, You can do this by finding chibi art and erasing the background.

And now we will add any PNGs to the graphic. We chose circle laces for this.

Now we will duplicate the layer of our chibi.

We then use the Stroke Outer filter to find dots that weren't erased, we will go to the top original later and erase where all the exposed dots are.

After that, we delete the layer & reduplicate it. Then we use stroke outer for a white outline, and then a black one. If the chibi or whatever you are using is white or very light already, feel free to reverse the white & black.

Then we add glow outer (usually around 1-2px)

Continue this process for everything

Save it

And then we will import it into a new canvas through 'import picture' & then use the grayscale.

Now, We do not always use a gradient map. But feel free to try out gradients to see if it looks nice on the graphic. Either of the 2 top sites work.

Find a gradient that looks nice. If none fit your vision, feel free to skip it.


Now, import the new image and then add textures. Play around with blending modes & opacity until it looks right.

Boom! You've made your very own graphic.
Now for animated graphics...
(No visuals) If you'd like one where the small chibi moves, move it to be angle -5, save it, and then angle 5 and save it. (Also adjust angles if the 5 looks weird.)
Import the images into ezgif gif maker and turn on "Don't stack frames" and adjust delay time. (I usually use 80ish)
--
Animated graphics 2

Import your graphic into capcut. Add a green background or whatever color is not present on your graphic at all. Add the gif you want on the graphic. Adjust for all the images to go on for equal times so it works.


Ezgif > Mp4 to gif > Remove Background > Select hex code of background > "Replace hex with transparency" > Adjust Fuzz > Optimize

And voila, your graphic is completed! Feel free to adjust in ezgif effects if needed.

#ᛝ a chat with the lady spawn .ᐟ#rentry decor#rentry inspo#rentry resources#rentry#rentry stuff#rentry graphics#rentry banner#rentry coloring#ibis paint colorings#graphic tutorial#rentry tutorial#editblr#pr3typriincess#pr3ttypriincess forsaken#pretty princess forsaken#forsaken roblox#roblox forsaken#roblox#forsaken rentry
411 notes
·
View notes
Text
it's infuriating how women belittle the impact femininity has on girls. like it was horrible in the 2000s when girls and women were being made fun of for being bulimic, fat or anorexic on tv. when their illness was a fetish. but now the insane consumerism of apps like tiktok and instagram have really just BALLOONED the standards to a completely unachievable degree. like y'all think 12 year olds and 16 year olds are just watching women doing their cute lip-looks but it is 100% increasing their self-monitoring. they are checking filters, mirrors, constantly contorting their faces and then editing them to an unnatural degree on capcut before uploading. they then watch the playback and its featuring a total stranger who's a slightly hotter version of them. divorcing them further from themselves.
their cortisol levels are insane. they are the demographic suffering the MOST mentally from social media. the constant self-policing they have to do (even in their own minds when the camera is off bc they can't shake the feeling of being watched) has definitely inflated their anxiety levels. coupled with the misogynistic abuse and predatory stalking? more body dysmorphia, gender dysphoria, etc. add diet misinformation, and you've got a recipe for another dead girl in the next five years.
just for some women to say how happy they are they grew out of their tomboy phase and matured into a "real woman" AKA an insanely expensive misogynistic and pornographic caricature of womanhood.
these girls immune systems are being ROYALLY damaged not just by constant stress but by chemicals they shouldn't even be using. women are literally KILLING these girls. and we need to take fucking responsibility.
#i just wonder how many auto-immunde diseases these girls will have by 30#it's so fucking bleak#radblr#femininity#anti femininity#anti gender#gender#feminism
799 notes
·
View notes
Text
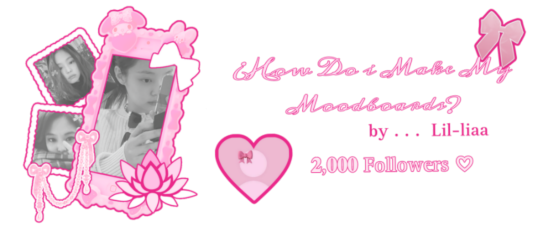
𝓛𝓮𝓪𝓻𝓷 with 𝐋𝐢𝐚!! ♡
2,000 𝒔𝒑𝒆𝒄𝒊𝒂𝒍 followers ♡⋆౨ৎ˚⟡˖ ࣪


Hi!! It's Liaa and if you don't know me i'm a kpop mbd creator i'm not sooo old or recent, but I do have some notable tips that I can give you if you need a push to improve (or start creating) your moodboards based on my criteria and experience ♡ bonus at the end!
Before you r e a d this : This guide is not a rule! You don't have to apply all the tips, feel free to apply them depending on your own style and taste.

In choosing the image on which the mb is based I want to separate them into 3 levels
Easy: An image that has common and striking colors that you can find popular aesthetics - easy to combine, harmony in colors etc!
Not so difficult: an image that has one or more not so popular colors,a background or image a little more complete, with aesthetics not so seen or visual
Difficult: The image has a color filter (dying) It has extra decoration or accessories, it has a specific bright (or duller) color (it means in any case that any image to combine will have to be edited to get the exact color)
Not everything is as difficult as I describe it! Getting started tips to make it much easierrr
# 𝐓𝐈𝐏 𝟏 : ¿Where to find?
Ways to find the aesthetic you are looking for!
Searches on Pinterest
Color + color aesthetic
Color- X Soft X Bright X Palid X Dark
Object - Subject-Color-Animal-Place-Serie/movie-country- Aesthetic
𝓐𝓮𝓼𝓽𝓱𝓮𝓽𝓲𝓬𝓼 that you may be 𝐥👀𝐤𝐢𝐧𝐠 for
I recommend this website that, apart from showing you many aesthetics, tells you the story of how it came about and more info!
Click to "Find aesthetic"

# 𝐓𝐈𝐏 𝟐 : ¿How to decorate it?
1. Collages on PICSART cute and easy♡ Make sure that the images complement each other from one side to the other so that there is balance and very importantly give it a center image!
2. Dividers You can make them yourself (On PICSART again) or find them here on tumblr!
I also have my own dividers if you want to check them out ദ്ദി ˉ͈̀꒳ˉ͈́ )✧
3. Gifs I always move the images a little to make it more striking! (you can do it in capcut and create the gif here on tumblr♡) another tutorial of example gif here
4. Texts! separate the angles you can always put a poem or some lyric music! (To add color to the text I have a tutorial here) You can always add "bios", symbols or kaoemojis since they are closely linked to the aesthetics in the texts
5.Pngs: It's very cutee and also gives an extra resource ((I don't use it as much as before but it can work well on quite a few mbds) I would recommend putting it in the middle
# 𝐓𝐈𝐏 𝟑 : ¿How to combine images? (My way to do it!)


Taking into account the general color palette, look at the image and check if the most prominent colors are warm or cold (including the background will be very useful) this way it will be easier for you to combine the tones without really having to find the exact color of the image! It will make it look much better.
# 𝐓𝐈𝐏 𝟒 : Center and sides
Keep in mind the center of your moodboard! As it is still a square (think like it's a painting) you can have more balance if you put certain colors or certain photos on one side or the other and put the main photo (or a collage) in the middle! So that it harmonizes and draws more attention.
# 𝐓𝐈𝐏 𝟓 : Tonal degrees
Always keep in mind what tonal degree the color of the photo has. Depending on that, you can look for images with the same tonality! As I already mentioned, if it is more opaque or stronger or brighter, it makes it much easier to identify a better combination.
# 𝐓𝐈𝐏 𝟔 : Combination
At first glance, you might be able to identify the most prominent colors in a photo, but taking into account color theory, the color of that photo only exists when it is contrasted by another, that is, based on the combination of colors with each other.
So when choosing photos to match, look for the two colors together in the photo to give a more similar impression even if the colors are not exact (In any case, you can also edit the color of images that have the same tone as your photo by changing the image and the difference would not be noticeable)
# 𝐓𝐈𝐏 𝟕 : More ways to apply aesthetics . . .
Related objects: depending on the image, there are also usually certain objects that can be related to the aesthetics of the photo. You can always add details with reference to the aesthetics that, without necessarily matching the photo, can look good.
Angles and sizes: Looking at the reference photo we can find photos that have the same dimensions as this one will make it look pretty good and make sense to put together
Requirements for adding a photo: to make it easier to combine you can write down things to keep in mind so that they combine, for example:
1.Color and Color palette
2.Size, shapes and angles
3.Common objects
4.Balancing abundance (for example if a photo has a lot of details, you have to find similar ones and at the same time find photos that have less details to give it a better impression.)
# 𝐓𝐈𝐏 𝟖 : Your own Style and have fun!
Don't rush into having your own style, eventually your mbds will be guided by your tastes and then you will have your own stamp unconsciously so don't rush!
Have fun and take your time making mbds, that's the secret formula to making a good moodboard♡
𝓑𝓸𝓷𝓾𝓼 𝐁𝐎𝐍𝐔𝐒𝓑𝓸𝓷𝓾𝓼
Match Technique 💋🎀: My painful technique for making everything match so well comes from my perfectionism and I'll tell you what I do,sometimes the photos match each other perfectly (which is perfectly fine lol if you want you can leave it like that) but to make sure.. what I do is separate each of the images and compare them to each other to see the contrast and thus realize if they really match.
Searching: ¿How did we get to the final result? There will always be many times in sex where you simply won't like the result, I always recommend having at least two stages when looking for a good result.
This requires quite a bit of experimentation.
Stage 1 "Draft" : Where you look for the basis of what you want
Stage 2 "Improvements" : You look for the parts that don't fit and why.
Stage 3 "Details": The finishing touches!
𝐓𝐲𝐬𝐦 𝐟𝐨𝐫 𝐑𝐞𝐚𝐝𝐢𝐧𝐠! These are my own techniques and I know that probably not everyone puts so much science into this but I hope I have helped you improve certain things 💕 xoxo
(English is not my first language, I would really appreciate it if you could tell me to correct any mistakes!)
#𓇻゜𐬹#🗣𝓣𝗎𝗍𝗈𝗋𝗂𝖺𝗅 ; 𝓑𝔂 𝗟𝗶𝗮#(๑>◡<๑) © 𝐅 𝐑 𝐀 𝐌 𝐄 𝐒 @his-tomorrows⭒ 𝇈 𝅄#and @mochilly#moodboard#messy moodboard#kpop gg#coquette moodboard#kpop moodboard#soft moodboard#pink moodboard#aesthetic#aesthetic moodboard
89 notes
·
View notes
Note
Heyyy. . :3
Idk if you are fine with questions but I'd like to ask where you get these gifs from.. And how u color them..

Your post with these banners
haiii!!!!!!!! these r the overlays below :3 i get most of these from pinterest,, i recommend searching up keywords like "gif overlays for editing" but im pretty sure u can find these also on tenor
and the coloring tutorial is under the cut !!!!!!!! (it is again, long)
how do i color my overlays?
... is what ill be teaching u today! follow my steps
step zero : make the color first !!!
this will be used to color the overlays, your free to make it look like anything, throw in some gradients or some dots!!!

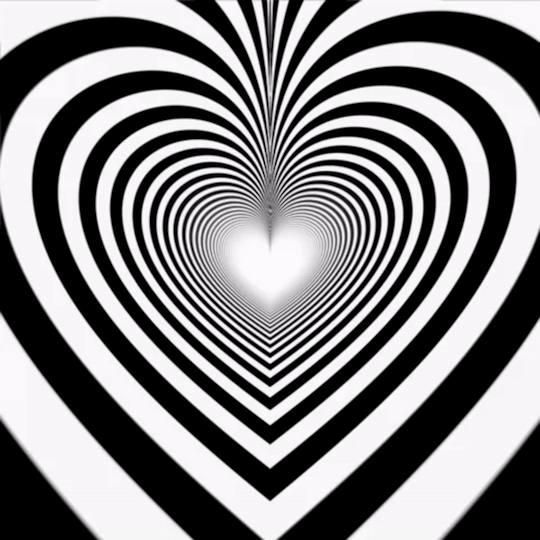
first, ill show you how to color the heart tunnel! ill be doing this on capcut, but this can probably work on most programs! follow my steps!
step one : add the images
make sure to first add the background and then add the overlay!!!


step two : color it
to do this first click on the overlay, scroll till you find "blend" and then click "dodge"

then save! this will be the end result, tada!

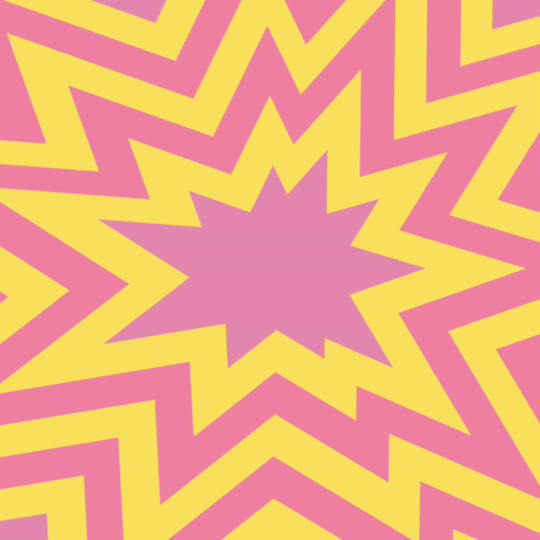
wasnt that hard, was it? now lets do the other overlay! ill be doing this again on capcut but this can work on most programs!
lets keep going!
step one : add the images
this time, add the overlay first and then the color! scroll til you find "overlay" -> "add overlay"
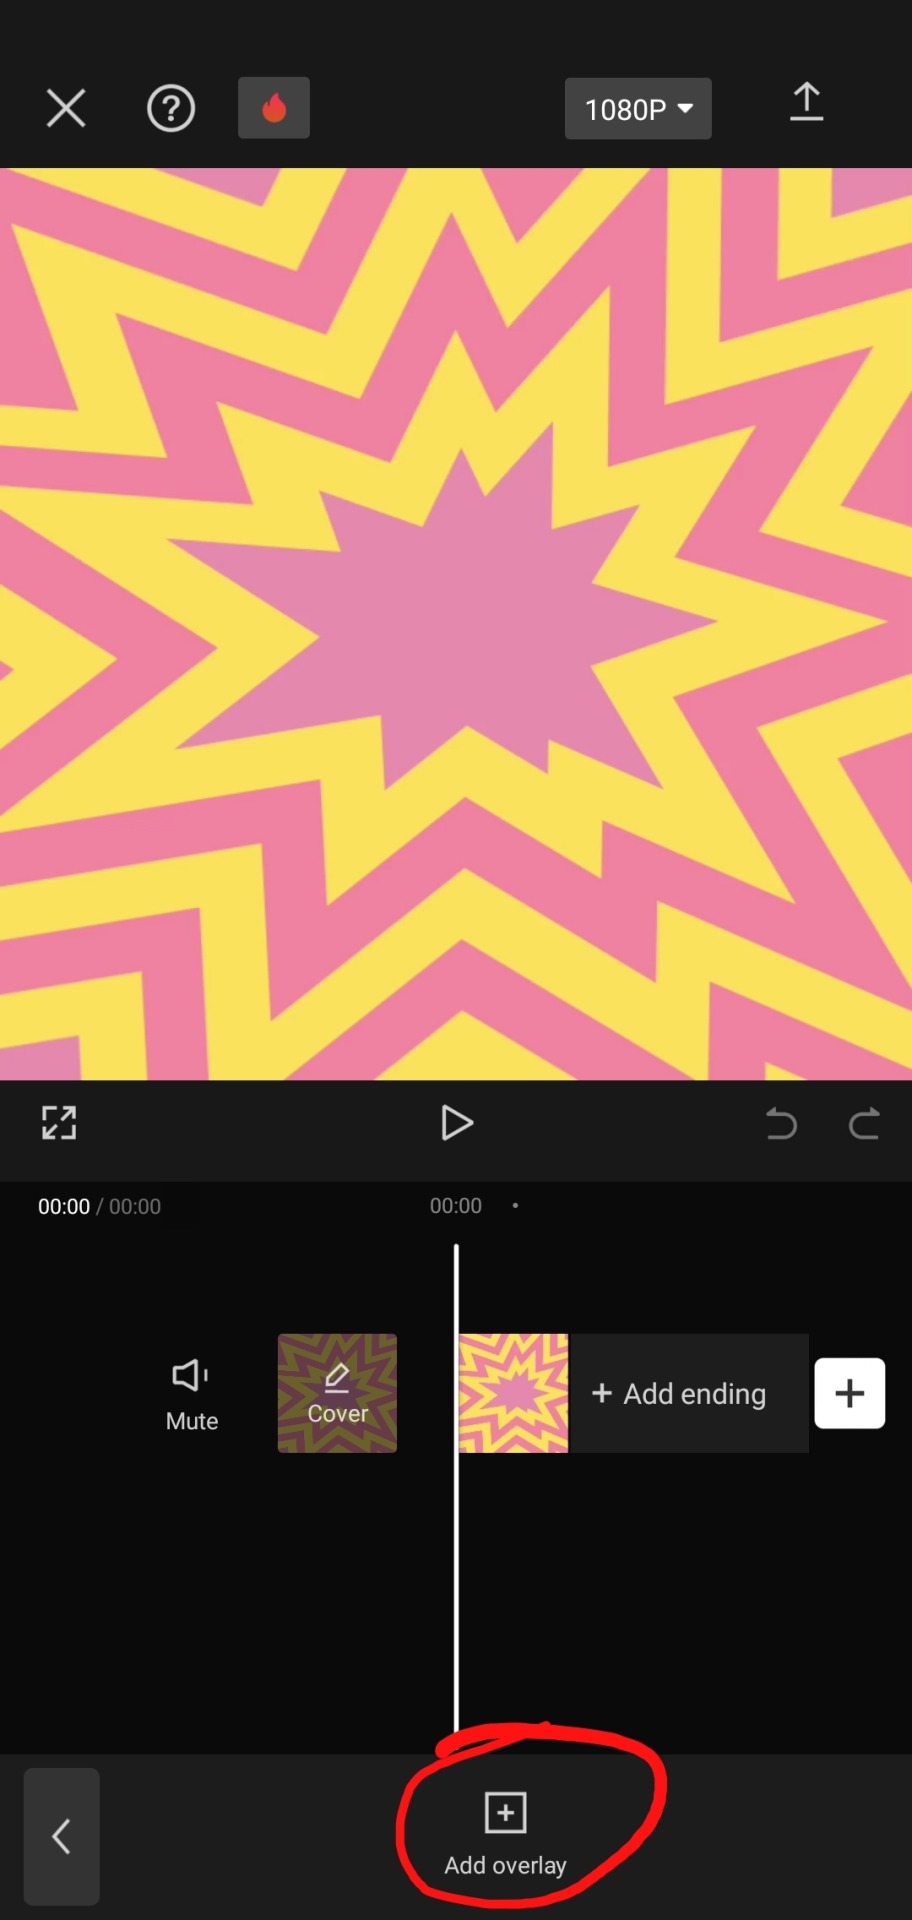
step two : color it
scroll til you find "blend" -> "filter"


and now save! and you are finished!

tada! now this is the end result!
additional steps: if u need to make it a gif, convert it on ezgif
hope this tutorial is easy to understand and helpful!
178 notes
·
View notes
Note
can you do a tutorial on how to to do your themes?
i have got this ask i think .. an hundred times and i think i never answered properly to it. so, let’s go ! today, i am giving you the complete and detailed guide how to do a theme like mine ^_^


HOW TO MAKE A THEME, OKWONYO STYLE, 101
first step. choose an icon ! before even choosing the pictures for the theme, i choose the pictures for the blog’s icon and the header. usually, i find them on the idol’s instagram, twitter and pinterest.
second step. look for pictures ! to be honest, i rarely search for “[color] aesthetic” on pinterst. i usually just look into my “themes&aesthetic” board on my own page.
what i recommend is to take time to scroll on pinterest and always save pretty images that you know will be great on a theme. it can also really helps for work’s layout.
when you want to make a new theme, you just have to tap on the images you want and pinterst will show you pictures that have the same vibe / color scheme.


when i make a theme, i try to put pictures that go well together. i don’t look for pictures with all the same color, but i look for colors that go well with each other. as colors have different shades, i think it is harder to make a theme with only the one color.
after finding what i want, i put theme next to each other— in a way that sits right with me.
third step. add your own touch ! what i like to do is to modify my pictures (add my name, add cursive letters, put a black and withe filters). the applications i use for this are phonto, picsart, capcut and ibispaint.

i find the fonts on pinterst. as for the pictures, i have a board just for the fonts as well. if you need a tutorial for how i do my header here. however, this is an hold one, i don’t really do headers like this anymore ^^
for the gifs, i use pngs from pintersts that i keep in a board and use ezgif.com to go from video to gif !

forth step. put texts ! to link my navigation, moots and carrd, i need to add texts. i mostly take bios from song lyrics or create my own like i did for the texts on my pinned currently.
to modify the fonts, i use yaytext.com ! and to find the symbols i go on accounts like @/espuor or @/oatelier.
fifth step. to finish, i incorporate colors in my theme.
sometimes, color the texts on pinned with studdbydavid.com. here is a quick little tutorial on how to use.
these days, i also like to change the background and accent colors. for this, i use ibis paint to take colors from my theme directly.


to add a lick on my account, i use this : <a href="insert link">insert word</a> and put in on my blog’s settings on tumblr. com !
i also add the links for my navigation on places that look good. i don’t put two different links and words that are next to each other ^^
and that is all ! that’s how i make a theme step by step >< don’t forget to give credits from the person you take inspiration from 💋✨
36 notes
·
View notes
Text
Art by @jaradraws
Had to switch to InShot because of how dog shit CapCut has become. The creator's are so fucking money hungry, almost every option or filter ain't free anymore.
"It's a free editing app" LMAOOO, not anymore. 💀
I do like how this came out, though. It's not much, but I'm proud of it.
This song fits their situation perfectly, and it hurts my heart. 😭💔
Thank you for allowing me to use this. Your art is amazing ong 💯
#transformers one#transformers#orion pax#d 16#d 16 x orion pax#optimus prime#orion pax x d 16#tf one#dpax#tf one megop#megop#megatron#transformers edit#tf one edit
48 notes
·
View notes
Note
hello! i've been watching sfth edits all day (including yours! big fan!), and i just wanted to ask what your editing process is like? what program do you use, how long do they usually take, how do you get all the footage, etc? i really want to try making edits, but it's all new to me and i don't really know where to start
Hello!! That’s definitely a great way to spend the day :D (and thank you <3)
I’ve only been editing for a year so I’m honestly still learning, too :)
I don’t really know how I do it, I generally only edit when ideas actually come to me otherwise I won’t be motivated enough to finish it. Most of the time it’s just hearing a song and going “that’s exactly like this character/ship/moment” and then I put them together. Making them can take anywhere from an hour or two to a week, depends on how motivated I am. (A week from beginning to end- not of actually doing it)
I’m making an edit now so I’m gonna basically just say what I’m doing :) this will be long and I’m sorry if I’m bad at explaining things 😅
Find song and get the audio


I save tiktoks with potentially good audios into a folder and used one of those today. I also just use songs I know or hear. I generally go to youtube and screen record it, then I can “upload audio from video” when editing.
2. Screen record clips and then upload them to the editing software of your choice.
I use inshot but have also used capcut, recommend inshot more. (Only used the free versions, which is the reason I don’t use capcut- the free version is very limited in my opinion and I’ve found inshot to be better in this aspect)
(I edit on my phone, this “tutorial” is in the context of using inshot on a phone :))


I choose moments that I find fit with the lyrics. Usually I kinda see the moments in my mind?? when I listen to the song and am thinking of how the edit will go, so I then find those moments in the video.
3. Add the audio and mute the clips
(I generally mute the actual clips, sometimes I play with having lines of the dialogue in the edit, but for starting to edit I’d say it’s simpler to mute the clip audio and focus on the music)


The “extract audio from video” will allow you to import to screen recording of the song.
you’ll probably want to also cut the audio, you do this with the “split” tool when you have the audio open (so click on the lil “audio” button) you can also fade in or out the audio with the “edit” tool (the pencil)

Dragging whatever you have open (like the image or the audio or the captions) will let you put that little white line on wherever you want to make a cut.
4. Cut the clips to fit the audio and adjust them where needed. You can also change the aspect ratio of the edit to be whatever, I like to make it 1:1 (square)

You can see here that I split the clip using the “split” tool, then deleted the part I didn’t want (marked with the star) by clicking on it and then pressing the “delete” button.


Above is how to make it cropped 1:1 or cropped to be whatever aspect ratio you want. You can also do this manually (which I did for AGES before realising this was possible and way easier.)
5. Add text, filters, overlays, text ect.


Have a play around and try to make it look good, is my honest advice. I don’t really have my rhyme or reason for what I do with filters/adjustments, just try and make it look harmonious.
You can use the “duplicate” tool for text to keep any changes you make to it (like colour and size) consistent.
6. Adding transitions
I don’t actually do this all the time because I kinda like how it looks without any transitions. I’m not going to do it for this edit, but if I were to do it, I’d probably use the “animation” tool. You can also click on the white square with the “\”symbol to add a transition, but that can mess up with the timing of your clips because it merges them.


7. Make it all clean and smooth
You’ll probably have to do this a lot, at least I do. Just pretty much watching it over and over looking out for any jumps or bits that don’t look right and then lining them up.
In inshot, you can drag the thing you’re working on to line up with another aspect and it should “snap” into place which is a very handy feature.
8. Export
I usually end up exporting an edit at least four times because I’ll watch the final product and go “oh that looks bad” so I just kinda keep going until I’m happy with it. Inshot allows you to remove the watermark by watching ads, which I do. I then export it in 4K (because who needs storage right?) and voilà :)
Hopefully this is a helpful guide for you, anon!
#I’m not the best at explaining things but hopefully this is good#Editing#editing tutorial#inshot#sfth edits#emu edits#thank you for the ask!#I tried to format the images to be neater but tumblr wasn’t having it
15 notes
·
View notes
Note
hey i was just wondering how you make your art have that kinda film grain/old vhs type quality? its just so monch-able and i wanna do that with my art :3
I actually just made a video for TikTok about it tee hee
But too long didn’t watch: I use the app prequel and CapCut to add the filters
( prequel says ai in the description but I think it’s more bcus it’s a trendy word and they might have one weird Cartoon Me filter )
But yeah yummy prequel filters n effects: lomiograph, Oklahoma, brownie, vhs, and Miami
And then capcut has an effect in the tv section called betamax and she’s scrummy yum yum
And also lowering the contrast adding fade lowering highlights adding noise adding dust stuff like that :3
187 notes
·
View notes
Text
How to do the Barbie Doll trend on TikTok [CapCut]
How to do the Barbie Doll trend on TikTok [CapCut] @jypsyvloggin #filtrobarbie #miversionia #barbiefilter #barbieai ♬ sonido original – chio mora TikTok filters are an easy and quick way to enhance your TikTok videos before posting. Whether it’s for fun or an occasion, you choose a filter to apply to your video based on whatever look you’re hoping to achieve. Each filter is a combination of…
#action figure#Best anime filters for TikTok videos#CapCut Ghibli template#Ghibli filter CapCut#Ghibli-style filter#How to do Studio Ghibli filter#How to get the Ghibli effect on CapCut#How to use CapCut filter#How to use the Studio Ghibli filter on TikTok#Step-by-step guide to Ghibli filter on CapCut#Studio Ghibli aesthetic effect#Studio Ghibli effect TikTok#Studio Ghibli filter TikTok#Studio Ghibli-style animation filter tutorial#TikTok anime filter#TikTok anime trend#TikTok trending filters
0 notes
Text


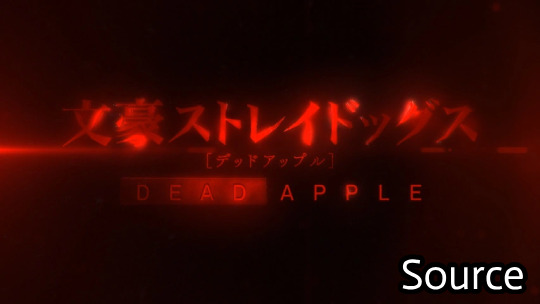
how i feel after making my own soukoku wallpaper cus i couldn’t find one i liked😘😘 feel free to use it i made this using filters in CapCut lmao it took like- 2 minutes 💀 i love it sm it reminds me of the tortured poets department by Taylor swift😍
ALSO PLS DONT REUPLOAD THIS TO OTHER SITES PLS<3 & DONT SAY THIS IS URS, THATS STINKY😖 TNX🫶😋😋
#bsd#bungou stray dogs#dazai osamu#nakahara chuuya#soukoku#skk#skk wallpaper#My edit#my wallpaper#wallpaper#feel free to use:3#silly#silly posting:33#:33333#capcut#Taylor swift#the tourtured poets department#Dazai x chuuya#Chuuya x dazai
34 notes
·
View notes
Text
How to make GIF's from videos

I consider myself relatively knowledgeable on GIF making, but I am not an expert. This tutorial mainly focuses on making GIF's and sharpening, for a PSD tutorial see here.
A few things to note before starting:
I struggle with sharpening GIF's- Especially real-life GIF's. For some reason I can't quite wrap my head around when/if the GIF's look too sharpened, so the tutorial part on this may seem lackluster.
I only use photopea and ezgif for GIF editing and capcut for cutting videos. I won't be able to answer questions about other software's (ie photoshop).
Tumblr has a GIF size limit of 10MB. It's the bane of my life. Always check how big your GIF is.
And with no other questions let's begin.
How to make a GIF from a video
Find the video and download it (real life)
This is a very obvious step but one that is important. I would always recommend finding videos in good quality. I often use tiktok, free videos from sites (like pixabay) and Instagram.
As for downloading them, I would recommend avoiding '[website] downloader' sites for a few reasons. A) they get shut down and replaced with spam sites frequently, thus making them unsafe to use, and B) they often times make you watch an add or remove ad blocker before giving you the highest quality download option.
I would always use cobalt.tools for video downloading.
Find the video and download it (anime)
This is more complex and I won't detail my download methods publicly. All I can say is not to use the anime watch sites to download your videos from, they're often low quality and have watermarks- Plus a lot of the sites have pop-ups ect which make them unsafe.
If you want a video tutorial I can't link you one from YouTube. This is not a YouTube tutorial. Nope.
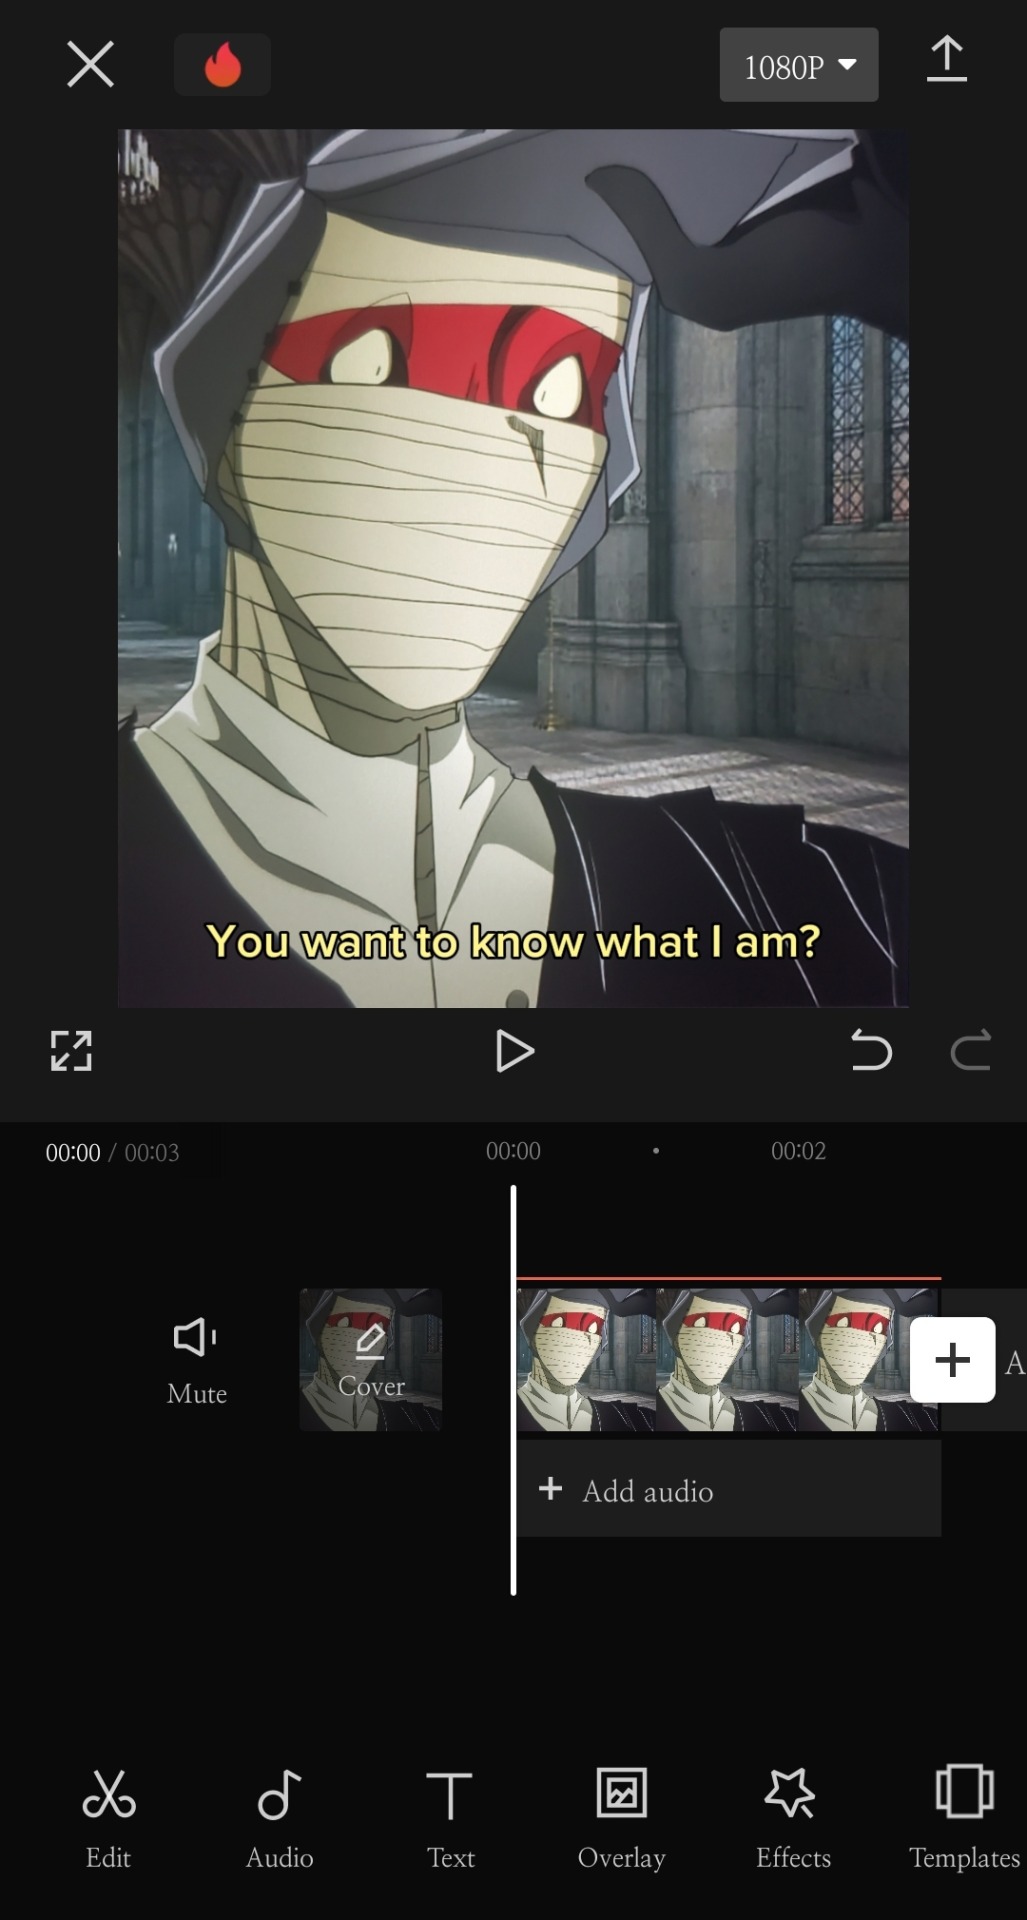
Anyway, once you have it you will need to use capcut to shorten the video length (and potentially change the file) however you will need to make an account. Annoying I am aware, but it's the best video cutting software I know of and has caused 0 issues for me.
Not that when I first used captut the video save settings had the video at 720 pixels, however you want 1080 pixels because it makes everything smoother and higher quality. Once you change this setting you don't have to change it again.
Make the GIF
I always use Ezgif for this part. You need to use the video to GIF option and upload your video. Then choose the length of the video you want to turn into a GIF.
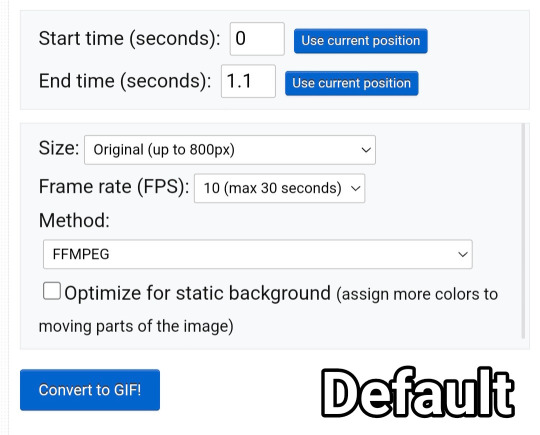
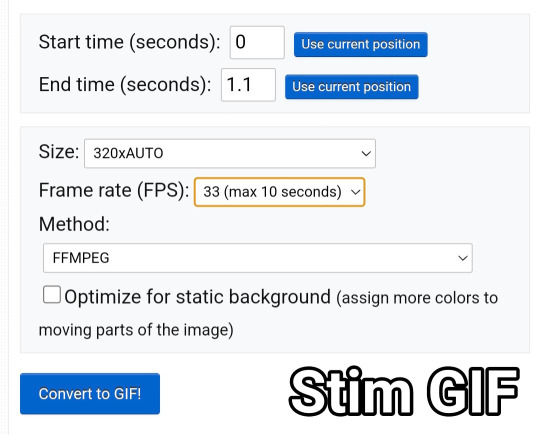
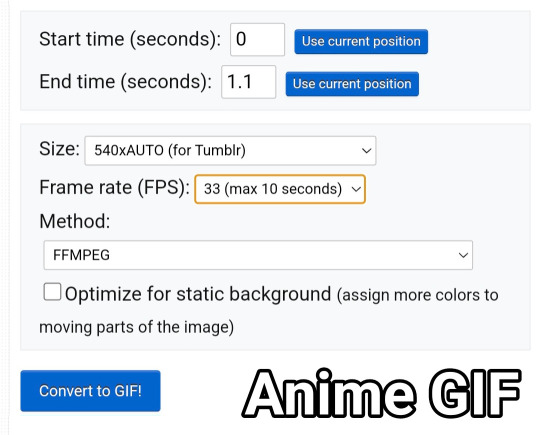
You will be met with a screen like this under the video.
Frankly I do not know what all of this means so that's why I only edit the size and frame rate.
With the size, you don't want it too big, smaller gives you more wiggle room for size with tumblrs size limit. However, with anime videos there's often less colors/detail, so they can be bigger and still look good.
The frame rate is important, the higher the frame rate the better quality it is, so regardless of GIF always have it this size
Then you hit convert to GIF and there you go.
If you need to crop the GIF use the crop tool and if there's any points of the video you don't want (ie frames of the next scene) you can use the frames tool (note that imo it's easier to use the photopea timeline for this)
Editing the GIF
You can just leave the GIF as it is, or you can make it sharper and/or add a PSD in photopea.
For stim gifs I will simply direct you to this tutorial because I can't understand the irl GIF sharpening process without photoshop's tools.
However, for anime ones you can use the smart sharpen tool, I either leave it on the default setting, or turn down the radius to 0.1-0.5
You can find the sharpening tool in filters > sharpen > smart sharpen
And here are some comparisons.


I spoke about PSD's here, but here's an example of the GIF with one and sharpened.

9 notes
·
View notes
Note
is there a filter you use on your art to get that distinctive tv vibe? I love it so much and wanna learn how to do it

i get asked this alot! i'll show what i use :) its easy🍓
the apps i use to edit my drawings are capcut (free) ibispaint X (free) and rarevision vhs (which i only payed $1 for)

for me, rarevision only takes videos and not photos, so i use capcut to make my drawing into a video first and then i put it into rarevision. (you press the 'play' button to import a video). rarevision has many types of different filters you can put on your videos, and if you click on the menu button you can adjust the color/blurriness/contrast to however you want.

and when thats done, i put it back into capcut to edit the colors/contrast

i also use ibispaint X to fix the cropping and adding a bit more filters like sharpening and stuff so it wouldnt be too blury.

hoped this helped ^_^
95 notes
·
View notes
Note
I love that ENA animation you did! I'm curious, how did you alter the audio to make it sound like that l? (In that old school computer game voice idk how else to describe it lol)
thank u sm !! i isolated the audio clip and used the audio filter “lofi” in capcut on it to give it that effect
4 notes
·
View notes
Text
Retrospective on things I made in 2024! Edits and then fics. Here's the 2023 version. Putting this under a cut for length. All DS9 with the exception of one IWTV edit.
Edits:
Most of these are a minute or less because I was putting a lot of them on tiktok (still avoiding putting anything not-unlisted on YouTube until I finish the brightness good omens edits), but hey, shorter edits take less time (though I'm still a very slow editor) so I probably made more things as a result! January: Julian edit to an instrumental of "Sweater Weather" by the Neighborhood - still really happy with this one, I feel like I'm going to say that about a lot of this year's edits. Is this a sign of developing craft? Who knows! Maybe!! simple Julian edit (to a cut up and extended end part of "My Time Part 2" by Alex Jones which is a sample of "I'm God" by Clams Casino and Imogen Heap) Weyoun edit to "Came Back Haunted" by Nine Inch Nails - we have fun February: short garashir edit to "Help I'm Alive" by Metric March: Quark/Brunt edit to "Iris" by Pastel Ghost - one of my favorite edits I made this year, we have fun garashir edit to "Summer Skin" by Death Cab for Cutie - love to occasionally really lean into causing people (fun, artistic) pain and suffering and to make an edit aiming for the pain. Also whenever I chop up songs to match the pacing of a vid that I want (did this on the Metric vid and the My Time vid as well) I get to feel capable as an audio editor, which I sure usually do not because balancing dialogue against music is pretty tricky April: fancam? transition-heavy? styled Kira edit to "Crystals" by isolate.exe - I am not experienced with this style of edit and still have a lot to learn so it doesn't work for me as well as I would like but there are still a lot of aspects of it I do like and we have fun. This was one of the edits I used tracking with on the captions (because that is a popular thing to do in that style) and I'm not sure it fully worked for me but hey, trying things! I am really pleased with how the one small section of Kira fighting turned out. Jadzia and Julian edit to "The Persistence of Loss" by Nine Inch Nails - pain
May: simple + very short Ezri and Jadzia edit to part of "Dissolved Girl" by Massive Attack - this was very simple to make and I don't have much to say about it but I think it does what I wanted it to! June: Damar/Weyoun edit to "Shadow" by Sidewalks and Skeletons + Goo Monday - this is another one of my fav edits I made this year (liking darkwave may be a factor, or maybe I just vibe extra strongly with the music and make better edits as a result), also the other instance of using tracking on the captions which I don't think fully works but. I love using the "cyberpunk" capcut filter on Weyoun stuff—I did on the January NIN one too. Purple! July: Weyoun 6 edit to "Apple" by Charli xcx - I don't think I was using the cyberpunk filter here. My fav default filter in capcut (as someone who does not always use filters depending on the show etc, especially historically) for DS9 footage is "Snack," nice contrast and vibrancy boost, so it might've been that. Happy with it! Armand edit to an edited version of "wutiwant" by sauraunh0ly done by trendformusic - not much to say about this but I'm pretty happy with it! I did some extra-fast cuts playing with doubletime and the music's syncopation at one point in the vid that I personally like! December: Gul Dukat edit to "Sympathy is a knife" by Charli xcx - I suppose my only full song-length edit for the year. Pretty pleased with it and amused myself while making it which is fun! Maaaybe my fav edit I made? But that's probably helped by the space using a full song gives as far as the story or whatevs I want to tell with an edit, shot timing, etc. This one might be the one I'm the most proud of and the qunt edit might be my fav.
Fic
January: Couple of chapter updates (I think I did 4 and 5 pretty much together) to with hope in your hands [WIP], I still think about this fic often and do intend to finish it eventually!
March:
Julian and Quark, one of Quark's holosuites - in response to a selection by the_last_dillpickle as part of the rare pair ficlet game created by stuffedtiger (not @ing folks given that this is reflectiontime4me). E for oo-mox babey. I don't think I have thoughts really, I'm pretty fine with how it turned out! Writing is hard and writing smut is especially a challenge but we have fun.
December: agent handling [WIP] - E rated Sloan/Garak fic for the 2024 Sloan Fuh-Q Fest. I posted the first (short!) chapter of a 2 chapter fic because I didn't want to miss the deadline. I was hoping to get the full thing up before the end of the year. That didn't happen but I am hoping to finish it soon!
I have many vid and fic WIPs so will post some of them in 2025 at least!
3 notes
·
View notes
Note
how/when did you learn to edit?
Hi thanks for the question
I started out using a really bad method - using the editing software for instagram reels, so I would add different clips to a reel and use that instead of an actual editing app, and then I used InShot and now I’ve moved onto CapCut which is my favourite
If you want to get into editing definitely start with CapCut it’s really easy and there’s so many different options for transition stuff, filters, effects etc
2 notes
·
View notes