#I colored the text in HTML stuff
Explore tagged Tumblr posts
Visit Tumblr Blog
Explore Tumblr blogs with no restrictions, modern design and the best experience.
Last Seen Tumblr Blogs


Fun Fact
130K people were victims of a chain letter scam that affected Tumblr in May 2011.
Text

Absence
#I colored the text in HTML stuff#proud of myself#my art#pigeon's art stuff#utmv oc#Enoch!Sans#utmv#undertale au#sans au#pigeon's utmv art
100 notes
·
View notes
Note
Hey how do you do the color gradient thing for your dialog tags?
Assuming you mean these things, I've actually been meaning to make a guide of my own for a while lol.
For one, you can only do this on computer/the website of Tumblr! There's no option to select this stuff on the app.

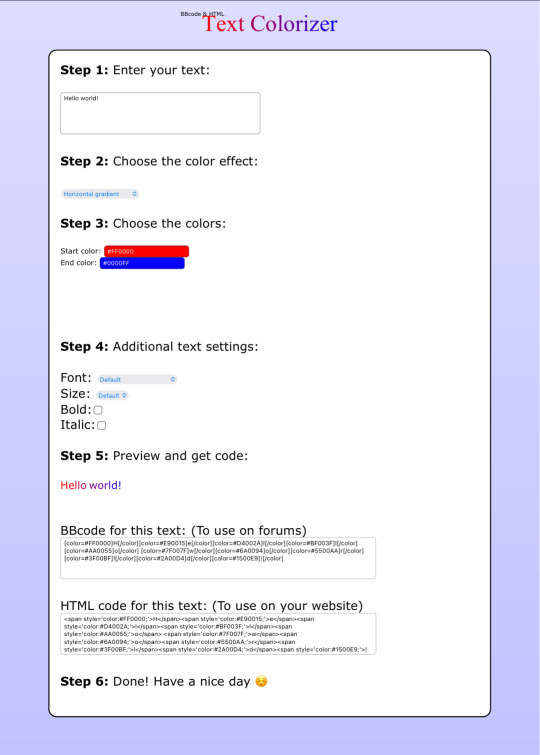
STEP 1: CREATE A NEW DOC / GO TO SETTINGS

It opens a dropdown menu/whole screen full of options!
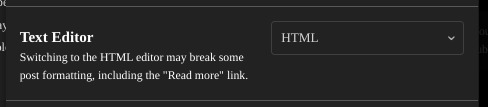
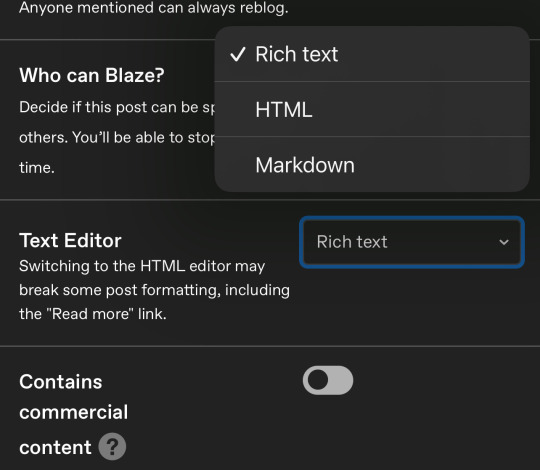
From there, select the "text editor" dropdown, which starts as displaying "rich text".

Select "HTML"

And it should change how the entire post looks!

STEP TWO: CHEAT
Yeeeeeaaaaah, so I use a website for this lol

I inserted my colors for faeries (#30853C) and Cloud (#6DC1B4) for my example of "these things" earlier. To make this easier, I most often have two windows open at a time while working on uploading my scripts to Tumblr.

To get colours to insert into the Text Colorizer website, you can use any kind of hex color picker or even this one website I've used to yoink "thematic" colors from photos!


Personally, I've developed a massive library of colors over time for this exact purpose lol. Using my old colors as a "base", I can change it accordingly to the kind of "new color" that I want for a specific character or thing!


(I'll use the website to also make gradients for "in-between" colors lol)
STEP 3: INSERT TEXT / DESIRED COLORS
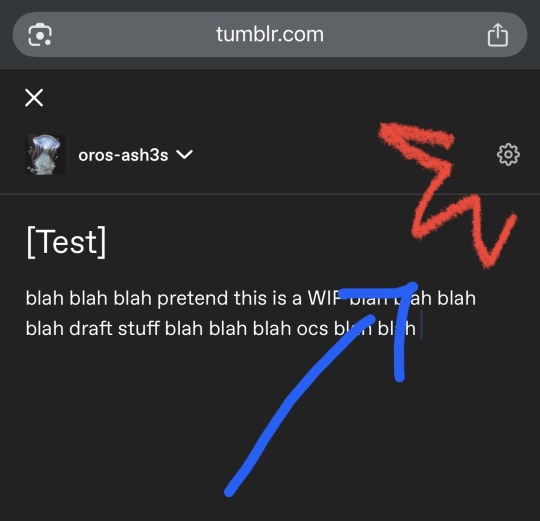
To make Nova's gradient, I start with #A600D9, my color for Magic, and end with #F56745—their individual color. However, being as it's short, I'll use a quote from them instead lol.

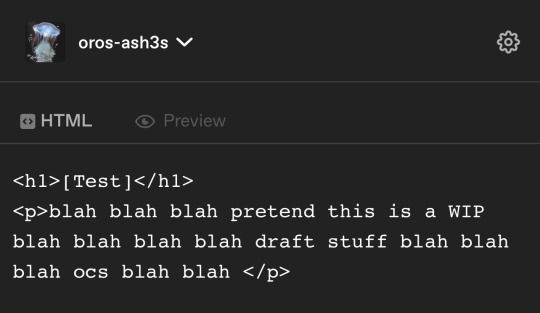
Once you've inserted your text and colors, you will click in the text box I highlighted in red, ctrl+a and ctrl+c to copy it all, and go back over to your new tumblr post tab!
From there, you'll ctrl+v to paste the entirety into the HTML area, which pastes the code into your post!

AND VOILA!

You have gorgeous gradient text!
However, I want to give a fair warning and a bit of advice! If you didn't notice wayyyyyyy back when...

Tumblr warns that this all can break your formatting!
It doesn't do it too often, but take it from someone who does an obscene amount of formatting... it's 100% true.
STEP 4: CHEAT SOME MORE!
For this reason, I personally have a whole separate draft post full of my characters' colors (and names lol) that I use to copy-paste them in from rather than using the "html" text editor on every post!
I mentioned earlier I often have multiple windows open while editing? Here's what that looks like!

Additionally, I'll use a separate tab off on the left (my "current wip post" side) with the "html editor" enabled for me to copy-paste stuff!
(Also here's yet another example of how many colors I have)

Once again, you can ctrl+c these things to paste them into another tumblr post with the correct colors!
And it's ONLY possible to do on the website!!!
EXTRA INFO!
WARNING:
Tumblr will only allow each "paragraph's html to be so many characters long, so you can't have too big of anything in a gradient!

And by "anything"... I mean you really can't have that big of a gradient in general. RIP lol.
It straight-up won't save the post so long as you have that "overflow" in the character block! MAKE SURE YOU'VE FIXED IT, OR YOU CAN AND WILL LOSE ALL PROGRESS ON YOUR POST!
SINGLE-COLOR TIP:
You don't need the website for a single color! If you'd like, you can just change the "color code" within the html editor to change specific colors!

MAKE SURE COLORS CAN WORK ON DIFFERENT BACKGROUNDS!
On desktop, you can use shift+p while not on any sort of textbox to change the color pallet! I always do tests to see which colors work best before settling on any!

(Tho, the blue background SPECIFICALLY is nightmarish to work around. So if that's the ONLY thing I can't make work, I often ignore it and let you guys who use it suffer lmao)
(Hopefully this'll give you guys some respect for me and how much I do to make my posts aesthetic af lol)
Also hopefully this all helps???
divider by @cafekitsune
73 notes
·
View notes
Note
your oc website is SO SO SO SO INCREDIBLY COOL how the hell do you even start learning how to do this ?? if you learned how to do this by yourself online, are there any tutorials or resources you can share with us? was making this website free??
omg THANK YOU SO SOOOOOO MUCH!!! It makes me so happy to hear that folks like my little site. I code my site with Phoenix Code (for the live viewer and number dials) and I host my site on Neocities - it is all free. Phoenix can be used in browser or on desktop, but I like having it on desktop more for big projects in case my files get deleted. I use the browser version when I just want to test something quickly.
The 2 videos I use and can not recommend enough to anyone who asks me are this HTML tutorial and this CSS tutorial. They are simple and easy to understand, but I recommend watching it the first go, and then following along the next few watches until you get the flow of basic parts to a website, how they're organized, and what order they go in. At this point, I've memorized exactly where everything goes, and it is all thanks to these 2 videos.
If I am being honest, I learned how to code by myself, not quite even with online tutorials but just from being stupid and messing around myself (1, because I was a kid, and 2, because I didn't understand English very well to know what tutorials are saying.) I used to do html coding for Neopet pages when I was a kid with too much online time, first by just editing the default petpages and adding info and images, and then just doing trial and error with the html. I'll just try something and then if it doesn't turn out the way I want it, I try to find out why it didn't work and also get inspiration from other similar sites to figure out where things go or how they coded (with this nifty thing called right click > inspect page or right click > view page source). And BOOM, working webpage.
It was rudimentary, white blank background without any boxes or anything, you just scrolled down the page and sections were separated by a horizontal bar. OH and every text was centered! I had no idea how to make scrolling boxes or fancy assets, but damn I still had so much fun working on it every weekend. When you find authentic selfmade sites from the 90s and 2000s, most of them aren't super fancy either unlike what modern nostalgia makes you think. So I hope you don't feel discouraged if you begin making a website and feel it isn't "fancy", you're already doing a first big step which is making a webpage and learned your first set of html code!
It was over a decade later before I coded webpages with html again. I've gotten lazy and started relying on site builders, but nothing was quite as versatile as html. I wanted to try coding my own OC site again, so that was when I started working on OutKrop (the site I posted). Until I started coding again, I had literally no idea what CSS even is (and let me tell you, it's a game changer!)
Personally, I work best when I can do things hands on. I don't read through tutorials, I code first then go back and read through coding help sites like w3schools when I find myself stuck and unable to figure something out. Sometimes I grab existing codes and play around with them to see what changes and what I can do with it, cuz having visual context is what helps me a lot.
I can also share my process:
Once I gather up some ideas, I make a sketch, including what boxes (divs in css) should approximately go. It is very rough, but shows me exactly what I need to know.
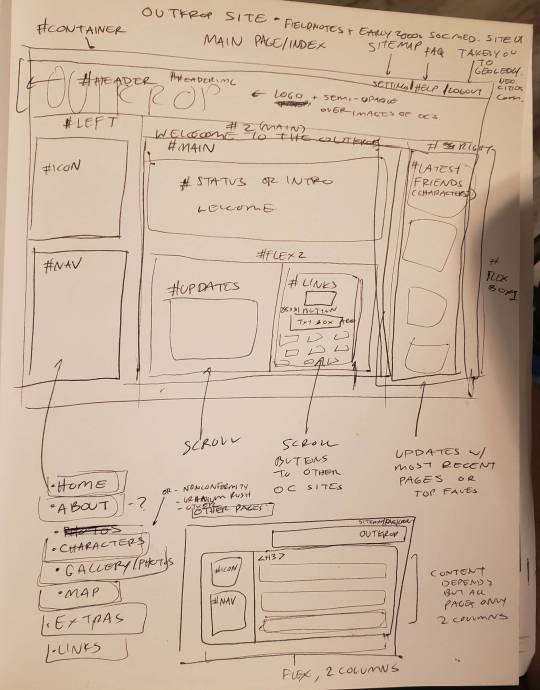
Next I load up my coding app (Phoenix Code in my case) and "sketch" the layout. Nothing fancy going on here, just putting things where they need to be, and fixing size of boxes and margins if needed. I give my boxes all a background color so I can easily see how big they are and where they are located.

After some adjustments like moving stuff around and adding assets like backgrounds and images, and changing colors of the boxes, rounding off corners, etc., we get this!
so recap + additional useful sites I use:
Coding app: Phoenix Code
Site hosted on: Neocities
Video tutorials: HTML and CSS
Sites for learning code: w3schools, also lissa explains is a great site that is written for kids to learn html so it's easy to understand. Finally, sadgrl has a lot of great resources for coding as well!
I recommend looking through these sites AFTER you tried taking a spin at coding - it doesn't have to be anything fancy just follow the HTML video tutorial I linked!
Thanks for the ask, and I hope this helps you and many others out there who are interested in building a site with html/css! Don't be afraid to get things "wrong" or have an "un-fancy" site. This is how you learn to code, and it'll become so easy once you get the hang of it.
Anyone is always more than welcome to reach out for coding help and advice :-]
58 notes
·
View notes
Note
Hiii. How do I get more colour options/colour fades when writing. Cause I don’t know what I’m doing😭😭
Like how do you get this⬇️

Cause all I get is these options ⬇️

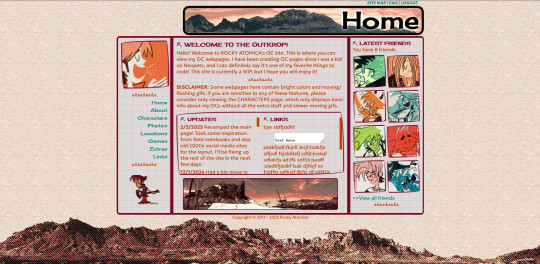
finally posting a real fading text tutorial ;) haii!! it’s actually super easy!! you have to use a computer to this btw
1. go to this website: https://patorjk.com/text-color-fader/
2. put in your message

3. choose your number of colors, i usually do 2 or 7, depending on how much of a fading look i want, like the picture below! (i usually do 7 if i want a look like the second and third picture)


4. tap the big blue button “generate color faded text (i typically ignore all the other stuff, but you can fiddle with that)

5. tap on the “select all” button and control+c to copy paste the HTML text.
6. go to tumblr, create a new post, and tap the settings icon in the corner. scroll down until you find “text editor”. change it from "rich text" to "HTML".


7. go back to the new post you’ve created, and paste the HTML you’ve copy pasted. it should look really confusing lol, but then change the text type back to normal (sometimes you have to wait until it’s loaded, usually the “post now” button turns blue, or else it won’t show up)
8. it should be done!! you can copy paste the text you already have, but if you wanna add something new, you can to repeat these steps. you can also freely change the size, make it bold, make it italic, however you'd like! i hope this made sense ;3

25 notes
·
View notes
Text
SysNotes devlog 1
Hiya! We're a web developer by trade and we wanted to build ourselves a web-app to manage our system and to get to know each other better. We thought it would be fun to make a sort of a devlog on this blog to show off the development! The working title of this project is SysNotes (but better ideas are welcome!)

What SysNotes is✅:
A place to store profiles of all of our parts
A tool to figure out who is in front
A way to explore our inner world
A private chat similar to PluralKit
A way to combine info about our system with info about our OCs etc as an all-encompassing "brain-world" management system
A personal and tailor-made tool made for our needs
What SysNotes is not❌:
A fronting tracker (we see no need for it in our system)
A social media where users can interact (but we're open to make it so if people are interested)
A public platform that can be used by others (we don't have much experience actually hosting web-apps, but will consider it if there is enough interest!)
An offline app
So if this sounds interesting to you, you can find the first devlog below the cut (it's a long one!):
(I have used word highlighting and emojis as it helps me read large chunks of text, I hope it's alright with y'all!)
Tech stack & setup (feel free to skip if you don't care!)
The project is set up using:
Database: MySQL 8.4.3
Language: PHP 8.3
Framework: Laravel 10 with Breeze (authentication and user accounts) and Livewire 3 (front end integration)
Styling: Tailwind v4
I tried to set up Laragon to easily run the backend, but I ran into issues so I'm just running "php artisan serve" for now and using Laragon to run the DB. Also I'm compiling styles in real time with "npm run dev". Speaking of the DB, I just migrated the default auth tables for now. I will be making app-related DB tables in the next devlog. The awesome thing about Laravel is its Breeze starter kit, which gives you fully functioning authentication and basic account management out of the box, as well as optional Livewire to integrate server-side processing into HTML in the sexiest way. This means that I could get all the boring stuff out of the way with one terminal command. Win!
Styling and layout (for the UI nerds - you can skip this too!)
I changed the default accent color from purple to orange (personal preference) and used an emoji as a placeholder for the logo. I actually kinda like the emoji AS a logo so I might keep it.
Laravel Breeze came with a basic dashboard page, which I expanded with a few containers for the different sections of the page. I made use of the components that come with Breeze to reuse code for buttons etc throughout the code, and made new components as the need arose. Man, I love clean code 😌
I liked the dotted default Laravel page background, so I added it to the dashboard to create the look of a bullet journal. I like the journal-type visuals for this project as it goes with the theme of a notebook/file. I found the code for it here.
I also added some placeholder menu items for the pages that I would like to have in the app - Profile, (Inner) World, Front Decider, and Chat.

i ran into an issue dynamically building Tailwind classes such as class="bg-{{$activeStatus['color']}}-400" - turns out dynamically-created classes aren't supported, even if they're constructed in the component rather than the blade file. You learn something new every day huh…

Also, coming from Tailwind v3, "ps-*" and "pe-*" were confusing to get used to since my muscle memory is "pl-*" and "pr-*" 😂
Feature 1: Profiles page - proof of concept
This is a page where each alter's profiles will be displayed. You can switch between the profiles by clicking on each person's name. The current profile is highlighted in the list using a pale orange colour.

The logic for the profiles functionality uses a Livewire component called Profiles, which loads profile data and passes it into the blade view to be displayed. It also handles logic such as switching between the profiles and formatting data. Currently, the data is hardcoded into the component using an associative array, but I will be converting it to use the database in the next devlog.

New profile (TBC)
You will be able to create new profiles on the same page (this is yet to be implemented). My vision is that the New Alter form will unfold under the button, and fold back up again once the form has been submitted.
Alter name, pronouns, status
The most interesting component here is the status, which is currently set to a hardcoded list of "active", "dormant", and "unknown". However, I envision this to be a customisable list where I can add new statuses to the list from a settings menu (yet to be implemented).


Alter image
I wanted the folder that contained alter images and other assets to be outside of my Laravel project, in the Pictures folder of my operating system. I wanted to do this so that I can back up the assets folder whenever I back up my Pictures folder lol (not for adding/deleting the files - this all happens through the app to maintain data integrity!). However, I learned that Laravel does not support that and it will not be able to see my files because they are external. I found a workaround by using symbolic links (symlinks) 🔗. Basically, they allow to have one folder of identical contents in more than one place. I ran "mklink /D [external path] [internal path]" to create the symlink between my Pictures folder and Laravel's internal assets folder, so that any files that I add to my Pictures folder automatically copy over to Laravel's folder. I changed a couple lines in filesystems.php to point to the symlinked folder:

And I was also getting a "404 file not found" error - I think the issue was because the port wasn't originally specified. I changed the base app URL to the localhost IP address in .env:

…And after all this messing around, it works!
(My Pictures folder)

(My Laravel storage)

(And here is Alice's photo displayed - dw I DO know Ibuki's actual name)

Alter description and history
The description and history fields support HTML, so I can format these fields however I like, and add custom features like tables and bullet point lists.

This is done by using blade's HTML preservation tags "{!! !!}" as opposed to the plain text tags "{{ }}".
(Here I define Alice's description contents)


(And here I insert them into the template)

Traits, likes, dislikes, front triggers
These are saved as separate lists and rendered as fun badges. These will be used in the Front Decider (anyone has a better name for it?? 🤔) tool to help me identify which alter "I" am as it's a big struggle for us. Front Decider will work similar to FlowCharty.

What next?
There's lots more things I want to do with SysNotes! But I will take it one step at a time - here is the plan for the next devlog:
Setting up database tables for the profile data
Adding the "New Profile" form so I can create alters from within the app
Adding ability to edit each field on the profile
I tried my best to explain my work process in a way that wold somewhat make sense to non-coders - if you have any feedback for the future format of these devlogs, let me know!
~~~~~~~~~~~~~~~~~~
Disclaimers:
I have not used AI in the making of this app and I do NOT support the Vibe Coding mind virus that is currently on the loose. Programming is a form of art, and I will defend manual coding until the day I die.
Any alter data found in the screenshots is dummy data that does not represent our actual system.
I will not be making the code publicly available until it is a bit more fleshed out, this so far is just a trial for a concept I had bouncing around my head over the weekend.
We are SYSCOURSE NEUTRAL! Please don't start fights under this post
#sysnotes devlog#plurality#plural system#did#osdd#programming#whoever is fronting is typing like a millenial i am so sorry#also when i say “i” its because i'm not sure who fronted this entire time!#our syskid came up with the idea but i can't feel them so who knows who actually coded it#this is why we need the front decider tool lol
25 notes
·
View notes
Note
sorry if you’ve answered something similar before but how do you format things for your website? in the collections you have for poems
i love how it looks. the book kind of format it has
and i want to do similar/the same formatting for my own works but im really struggling…
i've been asked stuff like this a lot and i don't mind explaining it often because i want people to make websites more. i made a tutorial video at some point but it's kind of hard to make a curriculum or tutorial or whatever around this kind of thing because it's really just a self expression thing. i'll try to break down as much of my thought process as makes sense.
i design my pages in photoshop with either double/single page display in mind and then i use html to set them next to each other. most of the choice here comes down to how overwhelming i want my designs to feel. in the case of the lonely leaver page, the entire book was designed to be something that could be a physical book, and so from the getgo i made the pages in that kind of format. i previewed things in acrobat which has a booklet view mode (which singles out the front and back cover around the contents of the file) & allows you to process double page view as well. as for the actual process in photoshop before that point, i typically will open a canvas that is the size of the full 2 page spread (i.e. 8 inches wide for 2 pages which are both 4 inches wide) and i set grid lines for bleed margins and to mark the center of the page so that i can make the composition something that im comfortable with having a gap in the middle from the book folding. with lonely leaver i had to reformat about half the book at some point because i wanted to make it a larger resolution which was annoying but i just keep my guidelines for a print size in mind while im working. often if im a certain amount of time into a project that i feel like i will be spending a lot more time with i'll create a dummy psd file at this point which is devoid of content but which has all of the margins/resolution stuff set up already so i can just open that up and save a different version of it when i'm done.
my actual writing process and my design process is generally extremely intertwined, that's why things tend to be varying degrees stream of conscious in my work i think. i'll for instance, have a thought im stuck on for several days, and then open photoshop without having a poem or comic in mind, but i'll fill the canvas with some kind of color like red or yellow or a photo or whatever, and then open a text box or start drawing. telling a story through composition (i.e. page layout itself) is generally my favorite aspect of art and design because i enjoy how violent and dramatic framing angles can make the content of a piece feel so i'll try to move stuff around as much as possible in order to get my desired effect, often times using place holder shapes in lieu of finished design elements in order to get a rough blocking. as i do this i tend to react to what i'm writing/making as i'm doing it, and i do a lot of selective self editing during this part. for instance, i'll start manipulating rasterized text or cutting around images or whatever. i'll reread and look at whatever im doing for a couple of hours and then when i'm done with a spread or whatever i will save the document as a psd with a combined full spread and then each page separately as pngs or whatever (split at the middle grid line, back to the example, i'll save 2 different 4 inch wide images by changing the canvas size).
when it's time for me to put stuff on my website i then batch convert whatever pngs i exported into webp's because they load faster and take up less space on the server/my computer. you can look at my direct html/css files in your internet browser's explorer mode to see exactly what i do but essentially i just have either 1 or 2 images in a block and then a series of repeating vertical blocks containing images. i don't have an extremely efficient way of uploading pages and i'll typically just copy the same
"<p><img src="01.png"> <p><img src="02.png">"
like, 30 or 40 times or whatever into a html document. i use visual studio code for this stuff because it lets me do a bunch of stuff like having several files open at once & the navigation pane is nice & there's a live server extension that automatically refereshes the html file in my web browser on file save which is really awesome. i have a css page that i made like, 5 years ago, and i usually just link new projects to that because it has a bunch of different settings in it which i'll toggle on or off depending on the needs of whatever page or i'll add new div id's to it. it's kind of messy at this point, but it gets the job done. i use filezilla and something like bluehost or something for webhosting/file management.
i arrange and organize all of my art extremely methodically so usually in my like "<root catch all poetry folder>" inside of my "<root catch all art folder>" there will be a "<name of specific poem book>" folder which just contains the poems named by their actual name e.g. "dedication to saint eulalia 4.png" and then another folder inside of that is called "paginated" where i, using the acrobat document i arrange stuff in as reference, rename copies of my pages which i have placed in that folder to be named things like "01.png" so that i can then manually flip through it sequentially in the windows photo viewer and also just so that i don't have to go through the arduous process of renaming and tracking stuff inside of the root folder i'm containing that project's files in.
i'm 26 now and i made my first website when i was like 18, and my first zine project and i'm tired of feeling feeling around that same time, so i've got like, coming up on a decade of trial and error behind this and this is generally what has worked for me. my website isn't super complicated and mostly just gets the job done but because i try to think about style and presentation up front with whatever projects i'm doing i tend to just make plans based around that as early as it makes sense. to me having a website for art presentation has always been the Primary Method and intended landing zone for my art so it's genuinely always been a consideration in my process to try to plan around how i will put it on my website. i do this because i believe having my own curated space for containing my art allows it to exist in a context which best heightens whatever message i'm trying to convey. if there's an issues with my website right now they are that i'm very bad at mobile browser formatting & i havent updated the main look of the website in something like 4 years barely at all.
anyway, at the end of the day i think really as long as you can identify whatever your intentions are and do some planning/problem solving around that you should probably be able to find your own method which works for you better than mine might but if you do just want to copy my website the tools to do so are within your brain and internet searches and i believe in you. i think the biggest strength of my website is that it shows how easy it is to just put art big as fuck on a webpage and how effective that kind of minimalism can be. i just want my website to be like a museum's walls. and it's not super complicated to get to that level of html knowledge.
11 notes
·
View notes
Note
how do you make the text in your posts gradient??🤍🩶🤍🩶🤍
tried to upload a vid i screen-recorded for a proper tutorial but tumblr was acting up so here's a step-by-step!
GRADIENT TEXT TUTORIAL!
step 1!
go to https://patorjk.com/text-color-fader/
step 2!
type in your desired text, choose your desired number of colours nd all that stuff. you can also play around with different settings (colour presets, fade type, output code, etc). click "Generate Colour Faded Text" once your done
step 3!
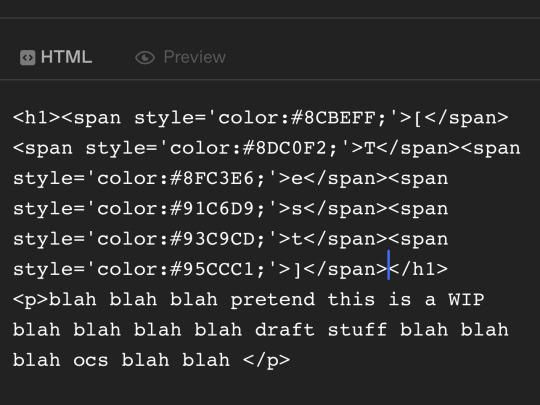
once you're satisfied with the text, click select all and copy (ctrl+c) all of the HTML code text.
step 4! ( important )
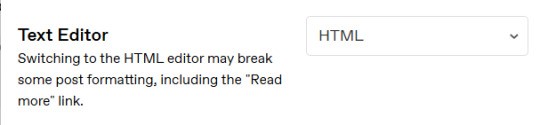
go to your tumblr and have your post ready to modify. first, make sure you have the "HTML" setting selected in the Text Editor (if it's not showing up, you can toggle some stuff in your page's settings to fix it. see photo below.)
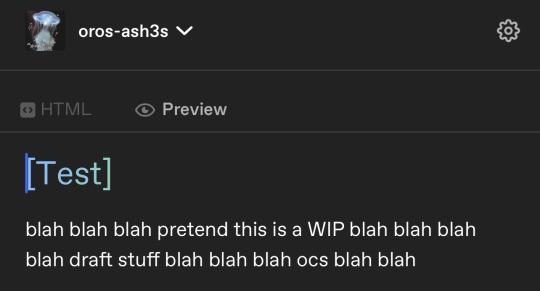
once in the HTML page, you should see a bunch of code. ONLY highlight the text that include your title. then paste your HTML code from Fader Colour into it to replace it. press "preview" at the type to view it.
i hope this was somewhat helpful and straightforward. the process is pretty simple and you should get the hang of it rather quickly. if you have any questions, feel free to send another ask or dm me!
xoxo, olivia.
10 notes
·
View notes
Note
Ahser, how do you make those nice colors on your text? They look so cool
hii! sorry it took me a while to get to this, it’s just a bit of a long process to explain. I’ll hopefully do my best at making it make sense, but if it doesn’t, there’s also a very good tutorial by @pixxiesdust:

|I How to make cool coloured text .ᐟ .ᐟ
⟢⠀ So, to do this you need to be off of mobile and on the actual Tumblr website, or else it won’t work. You’ll open up your draft or your post or whatever on the website, and in the top right corner you’ll find a settings button.
Like this.
⟢⠀ You want to click on it. Near the bottom it will open up a menu for the text editor. You want to change it to HTML, which will allow you to put in the hex codes for the colours you want your text to be!!
•─────⋅☾ ☽⋅────────•
⟢⠀ Now, your text should look something like this:
•─────⋅☾ ☽⋅────────•
Next, the website I use is called Stuff by David. Here’s a link to it just in case: https://www.stuffbydavid.com/textcolorizer
⟢⠀ This is the best website I’ve seen, so I definitely recommend it over others!! Fortunately, the rest of the tutorial is in the very front page, as it gives you clear instructions on how to do everything.
•─────⋅☾ ☽⋅────────•
⟢⠀ Once you have your text all sorted out, you simply go and paste the HTML code into where your text would’ve went:
•─────⋅☾ ☽⋅────────•
⟢⠀ And you’re done!! Hopefully this was at least a little bit helpful to you. I wish you luck with all your new gradients and colourful titles :]
15 notes
·
View notes
Note
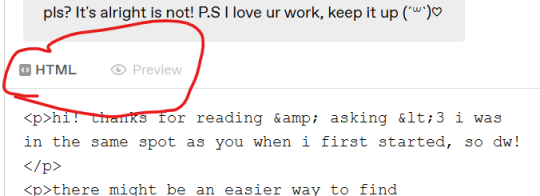
Hey Iris! I'm somewhat new to tumblr and joined to try and post some of my work here, however, I've wanted to add some pizazz to my posts like all the other writers on here! The only issue is: idk how to make or use banners as well as some of the gradients people here use; I was wondering if you could give me a small run down pls? It's alright is not! P.S I love ur work, keep it up (´꒳`)♡
hi! thanks for reading & asking <3 i was in the same spot as you when i first started, so dw!
there might be an easier way to find banners/dividers idk but i basically just do different tumblr searches until i find one i want to use lmao. so i might search "orange dividers," "cat dividers," "line dividers," etc. and just parse through the results. when you find one you like, just make sure you follow the creator's rules for using/crediting (usually at the top of their blog somewhere). one creator i like is @diviniyae
for gradient text idk anything about html so i use this text color fader. i always have the plain text for the fic i'm about to post drafted in tumblr beforehand, and i mark the words i know i want to stylize in bold so i know where they are. then i open the color fader, pick my colors and input the text i want, click generate, and copy the color code it gives me

once that's done, i come back to tumblr, open my draft, click the settings wheel in the top right (i do all the formatting stuff on my laptop), and switch the text editor setting from "rich text" to "html"
this will open up two tabs at the top of your draft: one to see the html codes of your text and another to preview how it will actually look when posted.
this is where you'll use the color code from earlier. in the html tab, find the word(s) you created the color code for, highlight it, and paste the code over the plain text. this should make the text all rainbow and colorful now, but switch over to the preview tab to make sure it worked correctly and clear up any spacing errors. i'm not sure if this made sense but it's a simple yet tedious process once you get used to it.
here are some other guides for reference!
https://www.tumblr.com/gradient-text
https://pixxiesdust.tumblr.com/post/626456563152977920/how-to-make-text-in-captions-gradient-or
15 notes
·
View notes
Note
https://www.tumblr.com/deerdoegone/783158683631796224/sheriff-announces-end-to-search-for-missing?source=share
Firstly, this reality is absolutely amazing. Secondly, the post is beautiful. I'm new to tumblr so if it's not too much of a bother I'd appreciate it if you could help me out a bit thank you so much in advance. The color of the pink text is not the one that tumblr offers right? So you made it with html correct? But then how did you add the "keep reading" thing because I think it's unavailable in the html mode? I'm confused and lost and scared man
hi! thank you so much, first of all, you are so sweet and this is not a bother at all!
for starters, yes! this pink is not the same as this. neither is this one nor this one. so, you are right that i use the html editor, but i use this handy little website to achieve all sorts of results in html! it basically does everything for me.
there are tons of other sites you can use, but i’ve been using this one for years, plus you can do a lot with it, really fun stuff like this middle gradient! it's a bit different from a regular horizontal gradient
now, i have no clue how html works. i only use it to color words, but i have such limited knowledge that once i’m done with what i needed, i open up the same text editor list i first opened to get to html, and then i switch back to rich text editor. this allows me to add the keep reading cutoff! super simple, but if you're still confused, let me know!
(edit: i have a new method. instead of constantly switching between html and standard text, i have two tabs open, one with html and the other with my post itself on text mode. i put my code into the tab with the html editor, hit preview, copy and paste on my standard text post. this saves me time and the endless scrolling when i want to change a section)
9 notes
·
View notes
Text
Favorite Firefox Extensions
Firefox is a very extensible browser - through a combinations of addons and userscripts you can make it behave just about any way you want. The best part is, they're all free. Here are some of my favorites.
Note: if you have an Android device, check out my post about Firefox for Android's new extended support for addons!
Note: if you have an Apple device, check out my favorite Safari extensions here!
Last updated Feb 2025 (updated list of languages supported for native, local translation by Firefox).
Index:
uBlock Origin
Tab Session Manager
Sauron
Bypass Paywalls Clean
Auto Tab Discard
Video DownloadHelper
Highlight or Hide Search Engine Results
TWP - Translate Web Pages
UnTrap - YouTube Customizer
Indie Wiki Buddy
Cookie Auto Delete
ShopSuey - Get Rid of Ads on Amazon and Ebay
LibraryExtension
Absolute Enable Right Click & Copy
uBlock Origin
(compatible with Firefox for Android)
This is the first addon I install on any new Firefox browser. It's an adblocker, but at its core it can remove pretty much any HTML element from a website, and it comes with pre-configured lists for removing everything from ads to cookie banners to those annoying popups that ask you to sign up for email newsletters.
Tab Session Manager
Have you ever accidentally lost all your open browser tabs due to a computer update, or even just accidentally closing Firefox? With this addon you no longer have to worry about that - it automatically saves your open tabs and windows every time the browser closes, and autosaves a restore point of tabs every few minutes in case the browser crashes unexpectedly. Opening all your previous tabs and windows is a one-click deal.
Sauron
Ever wished your favorite website had a dark mode? With Sauron, now it can! Sauron attempts to intelligently figure out how to edit the color scheme of the web page (including text) to make it dark-mode friendly. It preserves the original color of images, but dims them so that they don't blind you. You can disable image dimming or dark mode on a site by site basis too. It's not perfect since it is making guesses about which colors to change, but it goes a long way toward making the internet an enjoyable place for me.
Bypass Paywalls Clean
This addon removes paywalls from hundreds of news websites around the world or adds links to open the article in a wrapper that provides the article text (like the Internet Archive etc.)
Auto Tab Discard
Ever wanted to keep a tab open for later use, but you notice the browser getting slower and slower the more tabs you have open? Auto Tab Discard will automatically "hibernate" tabs that you haven't used in a while so that they use less resources on your computer. It's smart enough not to hibernate pages that are playing media (like YouTube) or that have forms you haven't submitted yet (like job applications). You can customize how fast it puts tabs to sleep too and exclude certain websites from hibernating at all.
Video DownloadHelper
This addon can download streaming videos from most modern (HTML5) websites, and even finds soft subtitles that accompany the stream and downloads those too. Just browse to the webpage that has the video on it, click the icon in the Firefox toolbar, and select the video you want to download and click "Quick Download". For YouTube I would recommend using a YT downloader website (like KeepVid) to download the video directly, but Video DownloadHelper really shines for websites that aren't popular enough to have dedicated downloader websites like that. I've used it download videos from a Japanese film festival streaming portal, news websites, etc.
Highlight or Hide Search Engine Results
This addon allows you to blacklist websites and completely remove them from Google, Bing, or DuckDuckGo search results. Don't want to see image search results from AI websites? Blacklist them. Searching for tech support advice and getting frustrated by all the auto-generated junk websites that stuff themselves full of SEO terms to jump to the top of the search results without actually providing any information at all? Blacklist them so they don't come up in your next search. Conversely, you can also whitelist websites that you know and trust so that if they ever come up in future search results, they'll be highlighted with a color of your choosing for visibility.
TWP - Translate Web Pages
(compatible with Firefox for Android)
Does what it says on the tin: auto-detects a website's language and provides a button that can translate it to a language of your choosing. You can also just select individual text on the page and translate just that. Note that this sends whatever text you translate to the servers of your selected translation service (Google, Bing, Yandex, or DeepL), so keep in mind the privacy implications if you don't want your IP address associated with having read that text.
Edit: As of version 118, Firefox now has the ability to translate text locally on your computer, without needing to send it to a cloud service. You can enable this in Settings -> Translation -> Install languages for offline translation. Note that at this time (Feb 2025), 31 languages are supported - Russian, Korean, Chinese (simplified), and Japanese were recently added. More info here.
UnTrap for YouTube
(compatible with Firefox for Android and they have a Safari for iOS extension too)
This addon lets you tweak the YouTube interface and hide anything you don't want to see. For instance, I hide all the "recommended" videos that come up when you search YT now. They have nothing to do with your search, so they're essentially just ads YT puts in your search results. I also hide Explore, Trending, More from YouTube, and Shorts sections, but you can customize it to fit your preferences.
Note: depending on the particular set of tweaks you want to make to YouTube, you may prefer to use YouTube Search Fixer instead. User preference.
Indie Wiki Buddy
I loathe Fandom.com wiki sites - they are cluttered and filled with ads and autoplaying videos that follow you down the page as you scroll. The organization is also hostile - if a community tries to leave their platform and bring their content to a new wiki hoster, Fandom bans them from the platform and reverts all their deletions/changes. Indie Wiki Buddy attempts to find an independent alternative for the wiki you're trying to browse and automatically redirects you to it, and if one doesn't exist, it will redirect you to a proxy site like antifandom or breezewiki that shows the Fandom content but removes all ads/videos/background images so you can actually, you know. READ it.
Cookie Auto Delete
(compatible with Firefox for Android)
Websites store "cookies" - little text files with info about you - on your computer as you browse so they can track you as you browse the internet. This addon automatically deletes cookies from a website a short while after you close the last tab you had open for that site. You can customize how long it waits before clearing cookies too. Note that this can sign you out of many websites, so you can whitelist any site you don't want cookies cleared for.
ShopSuey - Get Rid of Ads on Amazon and Ebay
Removes the ads/recommended products that clutter up Amazon and Ebay search results and product pages.
LibraryExtension
This fantastic addon recognizes when you are viewing a book on many popular websites and can automatically check whether that book is available in any of the library systems or subscription services you have access to, including how many copies your library(ies) have and how many are currently checked out. The best part is it shows the availability for physical books, ebooks, AND audiobooks at supported libraries. The extension currently supports libraries in Australia, Canada, Germany, New Zealand, the United Kingdom and the United States, but it also supports some global repositories like the Internet Archive and subscription services like NLS Bard for the blind and print disabled, Kobo Plus, Libro.fm, Anyplay.fm, Bookmate, and Everand. Great extension for people trying to support their local library and also save money.
Filtering+ for Tumblr
This addon lets you add tags or phrases to your tumblr tag filters with two clicks, without leaving the dashboard. I've been asking Tumblr for this tag filtering behavior on their mobile apps (i.e. press and hold a tag to get a filter option) for at least a year now in asks and surveys, without ever stopping to see if someone had already implemented this on desktop. More fool me. This addon is from the author of XKit Rewritten. Note that the right-click tag filtering only works on the dashboard; it will not appear if you are on someone's blog. Right-clicking selected text to filter the phrase works everywhere based on my testing.
Absolute Enable Right Click & Copy
This addon does its best to re-enable the normal right-click context menu and copy/paste actions on pages that try to disable them. If you run into a site that messes with either of those, select this addon and check "Enable Copy," then try again. If that doesn't work, check "Absolute mode." It doesn't work everywhere, but I find it very helpful.
126 notes
·
View notes
Note
Hello! :D
So I got a couple questions
First: How do you get text to be a different color? (besides the colors provided by tumblr) I think it looks super cool :3
Second: Are you okay with people drawing their ocs to fit the Sunshine Suburbia au? Not to force you to insert them or anything, but just for funsies? If not that's okay /gen
I also want to say that I love your art, I wish I could transfer it into physical food and eat it /vpos
Anyways that's all, have a nice day :D
Howdy!
1: (ALOT OF JARGON WARNING!)
So I mainly edit my Sunshine Suburbia posts using Tumblr on the computer (Aka On my browser, This stuff is impossible on mobile as far as I know…) which allows you to swap from rich text editor (The default, and only option on the mobile app) to HTML (Alot more flexible on what you can do- BUT a headache to look at because it’ll be a GIANT wall of format along with your post’s text)
So once you’ve managed to get the HTML editor up you’ll need a hex code which represents the color you want your text to be- (ex: the code I use for Jevin is #0a01fe). The easiest way to get these is using your art program of choice (In my case, Procreate fw!) and color picking said color and checking the Hexidecimal section on where you pick colors!
You could manually input the HTML coding for colors but I really don’t like looking at HTML code for very long (Augh headache) so I use this text editor https://spacegen.carrd.co/ by another user called luna ! I copy paste the generated code to the Tumblr HTML editor (Usually replacing the text I had put in there, You can also italicize, bolden, etc using the spacegen editor ) and go to preview at the top of the editor and wow volia! More specifically colored text!!
Notes:
- Line breaks / Read mores break when you swap over from Rich Text to HTML but colored text does not break when you switch from HTML to Rich Text.
- Please be aware of what background your text will be seen on… It’s kind of why Wenda’s text isn’t colored on the Sunshine suburbia blog… Can’t guarantee people can read it as not everyone uses a dark bg- Same goes for Black / Tenebrae and some characters having texts slightly off from their actual colors. (Too light on white bgs, Too dark on black bgs…)
2: I’m absolutely fine with people drawing and writing their ocs to fit the Sunshine Suburbia au! Excited even! It’s even how I’d likely handle people interacting with the askblog (NOT THIS BLOG, DO NOT RP WITH THIS BLOG, THIS IS MY PERSONAL ART BLOG!!!! MY THERAPIST WILL HEAR ABOUT YOU IF YOU DO THAT!) as I sort of want to avoid crossovers mostly to keep the setting from getting messy! (I’ll likely detail this in the Visitor guide post on the Sunshine suburbia blog itself)
I’m just not cool with like— Trying to squirm in relationships (Mostly romantic and familial… But knowing someone before/ being friends with them is fine- It doesn’t have as many implications as the latter…) on the characters as they have their own things going on unless they’ve extensively discussed it with me WHICH I highly doubt would happen and alot of the times it doesn’t fit with the AU… But art and writing to fit them into the AU without those previous elements is COOL AND I’D LOVE TO SEE EM- PLEASE TAG ME IF YOU DO THAT!
I’d also try to provide more info about the world in there as the blog goes on to help with that- (Don’t be scared to prod for world building questions in this case… Most are not spoilery but most of the asks on this personal blog are bound to be a bit looser than what I’d give on the actual blog itself)
And also thank you! I’ve been told by a friend my art tastes like tv static (in a cool way!) Thanks for the ask! ^^
13 notes
·
View notes
Note
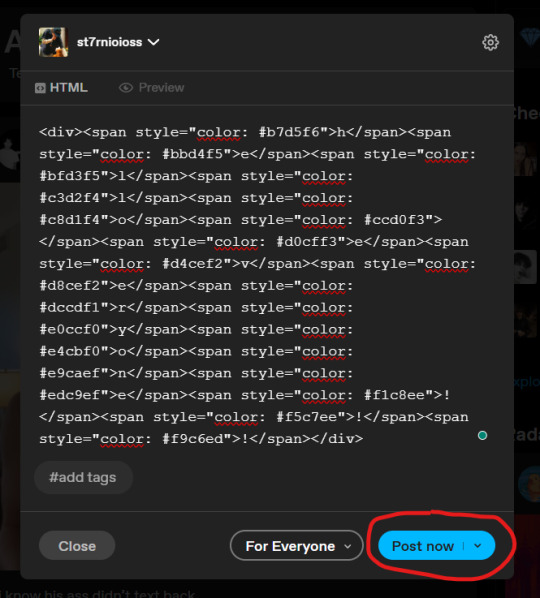
OOC ASK HOW DID YOU COLOR THE TEXT ABSOLUTELY PERFECTLY ?????
------------------------------------------------------------------------------
its just html stuff
you need to set the text editor to html, type normally using preview mode and then now if you want to set a color,,,
then go to html and now yoou can edit em speficially like this

here <result!
anyway yeah thats allWAIT THAT RREMINDS ME FUCK I NEED TO GET BACK TO THIS ASKBLOG AAAAAHHHHH
7 notes
·
View notes
Text
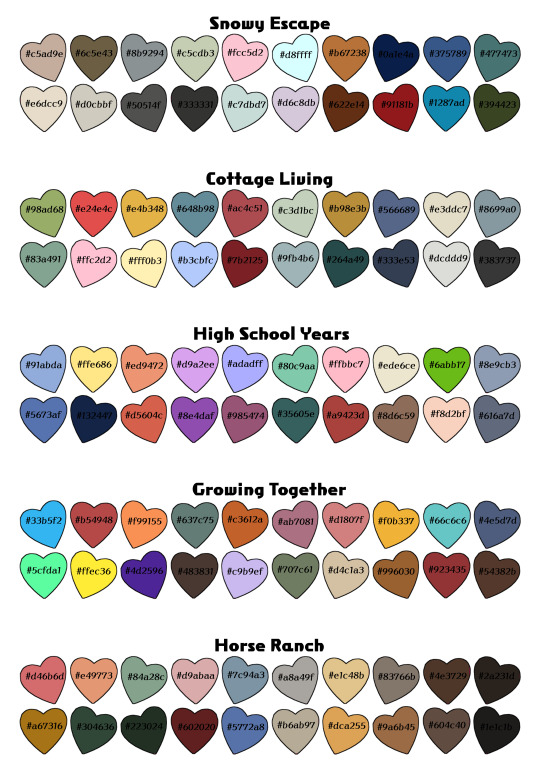
Sims 4 Palette Master Post


Choosing colors is overwhelming. Choosing colors is tiring.
You spend hours cultivating the perfect custom swatches for your perfect custom content and then you bring it into the game and something just feels... off. Ugh.
NO. MORE. I have had ENOUGH.
Have a cheat sheet. (have thirty two)
Each palette above is based on the most prominent colors from each sims pack. This means anything made with these colors will easily fit in with the pack it is based on. It's that simple.
Want the new pack to fit with your old favorites? Recolor in an old palette and watch blendy magic happen.
Tired of finding swatches for a new custom mesh? Source a palette that speaks to you.
Want new colors but a maxis match feel? Swatch some base hues, and mess around with light + dark.
There's so many ways to use these. I can't wait to see what they inspire. <3
Here's a zip of the pngs if you want them in that format
If you want the HTMLs in text format for an easy copy-paste, you can find them below ⬇
Expansion Packs
Get To Work
Get Together
City Living
Cats and Dogs
Seasons
Seasons (Holiday Mix)
Get Famous
Island Living
Discover University
Eco Lifestyle
Snowy Escape
Cottage Living
High School Years
Growing Together
Horse Ranch
For Rent
Game Packs
Outdoor Retreat
Spa Day
Dine Out
Vampires
Parenthood
Jungle Adventure
StrangerVille
Realm of Magic
Journey to Batuu
Dream Home Decorator
My Wedding Stories
Werewolves
Stuff Packs
Luxury Party
Paranormal
Nifty Knitting
Movie Hangout
(updated all game and expansions as of 6/11/24... If there is a specific stuff pack or kit you would like the palette for, send me an ask)
Scroll My Palettes
Check out my cc
#GumdropPalette#custom palette#cc palette#sims 4 palette#palette#color palette#masterlist#ts4 cc#ts4 resources#ts4 recolor#recolor#custom content#custom content resource#ts4#for creators#for modders#cc creator#the sims 4
84 notes
·
View notes
Note
hi i'm sorry to bother u but how did u change ur font color to that pink? it's rlly cute. thank u sm.
YOU'RE NOT BOTHERING ME AT ALL ANGEL!!!!!!!!!!!! okok so i use this page. you just need to type in the word you want to be changed and then pick the color/colors of it. i personally skip the fourth step and just change the text into bold if it's needed when i'm back on the actual tumblr post.
and then you copy ALL of the text from the lower box of text (the html one) and you can go back to making your tumblr post. when you have that open, click on the little settings button on the top right of the box and find the text editor. from there click on html.
it might look like a lot at first, trust me i was a little confused too but now you just have to either: if you have no other text there, just paste what you copied from the other page and it should be good OR if you have already written something, you have to find the word/the part you wanted to change the color of and then delete that. just the word or the phrase, aaand then you want to paste the copied stuff right where the word was.
after that, you can just click on the setting button again, and the text editor and then rich text aaaaaand you should be good!!
#IF IT STILL DOESN'T WORK OUT LET ME KNOW#god i really am bad at explaining things lmao#but i hope this is enough..#changing the font colors is soo so cute i love when ppl do that#and i'm so obsessed with my own pink too!!!!!!!!!!#IT'S THE PRETTIEST EVERRR!!!!!!!!!!!!#anyway ilyy nonniee!!!!!!!#mwah mwah!!!#friends!!
14 notes
·
View notes
Note
GIRL how do you to your text? Where it is two colors or a different color that’s not on here?
Okay so! i use a gradient text website and there’s options to do 2 colors or more and such. and you have to use the web or a computer and not the app on your phone. I’m not the best at explaining things so i hope this makes sense 😭
[you’ll go to the settings button in the top corner]

[and then scroll down to Text Editor and click the ‘Rich Text’]

[and change it to ‘HTML’]

[It should look like this once you’ve changed it]

[In the website, once you’ve chosen your colors and typed the text you want]

[You’ll hit the big blue button that says ‘Generate Color Faded Text’ which will take you here]

[If everything looks right, press ‘Select All’ and copy the highlighted stuff in the box]

[Take the stuff you copied and go back to tumblr and paste it in the ‘HTML’ section]

[And when you go to ‘Preview’ it should show up how you want!!]

it may take a little to get used to and work with, because i’m still trying to figure it out and such. but it should work out! (again i’m very bad at explaining things so if this makes no sense i am so sorry)
17 notes
·
View notes