#I will edit later if I can find the facebook link again x
Text
Are We Dating the Same Guy?
Ethan Edition

There are Facebook groups called "Are We Dating the Same Guy?". They exist to "expose" cheaters and guys who are just creeps in general. Women will post a photo/profile and ask if anyone has any tea or red flag alerts. The other day I was scrolling through a local one and saw a friend of mine. Talk about a WHOA moment. A few days later, the "AWDSG? Boston" group was recommended to me, and my mind automatically went to... what if Tobias and/or Ethan were on this? I ran the idea past @lucy-268 and @genevievemd and asked if I should do it for Ethan or Tobias. Their answer was, "Both is good." So, in honor of them, I'm doing both. I posted the Tobias version here, and now, I present Ethan's.
Book: Open Heart (Post Series)
Pairing: Ethan Ramsey x F!MC (Kaycee MacClennan)
Rating: Teen
Words: 1,723 plus edit
Summary: Sienna's dating luck hasn't been as good as she had hoped, so on the advice of her best friend, Kaycee, she is looking to see if her matches appear in the "Are we dating the same guy? Boston/Cambridge", group on Facebook. But instead of finding her most recent match, she finds... Ethan. Here are Kaycee's (and Ethan's) reactions... as well as the post itself.
A/N: The story precedes the FB post of Ethan on the "AWDSG?" page. *** Participating in @choicesjunechallenge Cocktails (they needed one or two... lol)
“Oh my, God,” Kaycee cringed, her forehead falling into the hand that wasn’t gripping her phone.
“I hope you’re not upset. I…”
“No! No, Sienna… I appreciate you letting me know. Can you forward the link to me? I’d like to see it before I break the news to him.”
“Damage control?” Sienna giggled.
“Yeah, well, I’d like to see how much damage there is.”
“Sure. I’m heading back to the hospital, but text me if you need me, OK?”
“Of course. And Si, thanks again; I appreciate the heads up.”
“Hey, what are best friends for if not for letting each other know when their fiance is on some weird stalker page on Facebook.”
Kaycee was relieved Ethan was still out for his daily run. It would allow her some time to research. The irony was delicious. She was the one that recommended Sienna start checking out the “Are we dating the same guy?” group to weed out potential creeps. After Wayne and a couple of terrible online dates, it sure wouldn’t hurt. The last thing she expected to happen was for her best friend to find her fiancé.
“May as well bite the bullet,” she sighed, about to click the link. But then she thought it would be best to have some support on hand… in this case, a mimosa and Jackie. Once the drink was made, she dialed her friend.
“OK, I just sent you the link,” Kaycee stated. “We’ll open it together on the count of three.”
“I don’t understand,” Jackie whined. “If Sienna found this, why isn’t she stuck dealing with it now? Why drag me in?”
“Because she’s working, and if you think I have the self-control to wait ten hours before she’s off shift to open this, you’re high. Now… open!”
“Damn, you’re bossy. I don’t know why Ethan puts up with you. But then again… once we check this out, maybe you won’t want to put up with him….”
“Jackie, please…,” Kaycee interrupted. “I’m sure he’s not doing anything wrong. I’m just curious to see what people had to say about him. Now ready… one… two… three!”
“Hmm… decent enough picture…” Jackie started.
“Yeah, it’s not his best, but… oh my God!” Kaycee exclaimed. “This sociopath took his picture without him knowing! Carmen is right! That is creepy! What kind of a woman does that?”
“Who is Carmen?”
“I don’t know… but she commented. The point is, she is right. Ethan was clearly dating a crazy woman.”
“Hmm. That checks,” Jackie deadpanned. “Crazy women are apparently his type because I remember someone taking many pictures without his knowledge… across a crowded nurse’s station, in Donahue’s, when she saw him strolling down the street…. What kind of serial killer does shit like that?”
“That was different!” Kaycee defended. “ I knew him. He was my attending.”
“Yeah! That makes it so much better.”
“You’re not focusing!” Kaycee admonished. “Holy shit, Erin sure had a lot to say!”
“Erin? The nurse on four? Is that the one he used to date?”
“One and the same… you know, maybe I shouldn’t read this. Maybe I should just tell him about….”
“Oh, hell no!” Jackie interrupted, her interest suddenly piqued. “Now I want the juice!”
“Don’t you mean the tea?”
“Juice, tea? I don’t care; it’s all served at brunch. Now what do we have here…. Erin seems cool … girlfriend clearly had some feelings about being dumped, but she still gave him the thumbs up. Wait, who is Marissa?”
“Marissa?”
“Yeah, apparently she banged your man when they were both residents….”
“RAMOS!” Kaycee screeched. “He banged Marissa Ramos?”
“Did you not know this? Shouldn’t you have known this?”
“It’s not like I asked him for a dossier of everyone he ever slept with… or vice versa! But he could have told me about her,” Kaycee sighed. “Then again, maybe it would have been better not to know. Fortunately, we rarely hang around with her and her husband. It will be awkward looking at her over the dinner table now.”
“Will it? Is it difficult for you to look at Harper?” Jackie asked. “Does he have trouble looking at Bryce? Face it, a slight tweak here or there, and your story would have been a hit on any Mexican telenovela.”
“Jackie!”
“OK. Maybe it would be better geared toward an Indian soap opera. Hey, wait! That’s it. I’m taking your story, embellishing a little… I think it can sell! This may be how I pay off my student debt!”
“Jackie!”
“What? Do you or Ethan watch Indian teledramas?”
“No.”
“Then what’s the harm? I’ll give you a cut of the profits.”
“You’re not really helping,” Kaycee groaned, rubbing her temples.
“I know. That’s the plan. This way, you'll wait for Sienna when something like this happens again. She’s the supportive friend; you should know better than to involve me. Although… now that you’re part of my new get-rich-quick scheme, I suppose I’ll have to put up with you.” She cleared her throat. “So, Kaycee… what do you need from me? How can I support you?”
“By hanging up,” Kaycee spat.
“That’s not the answer I was hoping for… how can I get more material if….”
“Jackie! Ethan just got home. I want to go fill him in.”
“Of course! Any chance you could record his reaction to this? I’d love to use it when I….”
The line went dead as Kaycee ended the call and threw her phone in her pocket as Ethan approached.
“Oh, hey, baby,” she smiled nervously. “How was your run?”
Ethan came up behind her, wrapping his arms around her waist and leaving a soft kiss on the side of her neck.
“Exhilarating,” he half smiled. “Or as exhilarating as a run can be on an eighty-nine-degree Boston day. What about you?” he asked, thumbing through some mail on the corner of the kitchen table. “Did you have fun while I was gone?”
“I don’t know if fun is the word I’d use to describe it,” Kaycee winced. “It was… interesting? Maybe informative?”
Ethan looked over quizzically, both brows raised. “What, were you watching a documentary?”
Kaycee spat out her tea, wiping her mouth with a laugh. “Not… exactly.” She extended her hand. “Come… join me in the living room.”
“All right… what did I do?” he asked with a grave tone as they sat on the leather sofa. “You know, I’m already a decade older than you, Kaycee, and when you do things like this, I swear, you take years off my life.”
“Me?” she bleated. “I didn’t do anything! But… I can’t guarantee this won’t take years off of your life.”
She reached into her pocket to retrieve her phone and handed it to Ethan.
“There’s a page on Facebook,” she started. “Where women post photos of men they’re talking to, or just started dating, and….”
“IS THIS ME?” Ethan yelled.
“It is,” Kaycee said, rubbing his knee. “It’s not recent… it’s from 2019, so….”
“So this has been viewable for the past four years!!”
“Uh.. apparently, it has. But it’s not as bad as it seems….”
Ethan began to read through the comments rapidly, his face becoming paler by the second until it turned crimson red.
“This… this is … this is an atrocity! Is this even legal?”
“I assure you it’s perfectly legal. I mean, I assume someone could have a defamation suit depending on what is said. But your former chicks seemed to speak pretty highly of you, so….”
Ethan jumped from the sofa and began to frantically pace the floor. His attempts to speak were thwarted when words failed to come… Kaycee wasn’t sure she had ever seen him this flustered.
“Ethan, you’re going to hyperventilate. Breathe….”
“How… how did you even find this?”
Her explanation failed to offer any relief. “Great! So Trinh knows. Do you know how many others could have seen this in the four years it was up?”
“Well, it was liked by seventeen thousand people, so….”
“SEVENTEEN THOUSAND!!!”
“What do you expect, babe… you’re hot.”
“I can’t believe this is happening,” he whimpered, pinching the bridge of his nose. “I’m feeling lightheaded.”
Kaycee jumped up and ushered him back to the couch.
“Here, baby,” she comforted, trying to conceal her amusement at his overreaction. “Do you need me to get you a glass of water?”
“No. I need a Scotch. This occasion requires Scotch.”
“Very well…” she said, pouring his drink. “Ethan, I think you’re making too much of this.”
“I’m not making too much of it. I like my private life to be, well, private. And this is not….”
“Private,” she finished.
“This is the opposite of private!” Ethan downed his drink, then held Kaycee closely in his arms. “I hate the modern world,” he groaned.
“It’s not all bad,” she smiled. “Why don’t you must message the group’s admin and ask her to take it down. NICELY!”
He shot Kaycee a look that made it clear that her statement changed his message's tone.
“Fine! Hey, out of curiosity, is anyone else we know on this thing?”
“Tobias is,” she smirked.
“Jesus, I can only imagine what people had to say about him. How many likes did he have?”
“19,500,” Kaycee winced.
“Wait! He has 2,500 more likes than me?”
“That’s unimportant, baby,” she redirected. “What’s important is we get your post taken down.”
“Well, maybe not,” he concluded. “Maybe I should leave it up a little longer. Maybe things will even out – considering our engagement may have this trending.”
“Trending?” she laughed. “Do you seriously want to leave your private life viewable for anyone to see… just so you can attempt to get more likes than Tobias?”
“Well, when you put it that way,” he smiled. “By the way, what would you have said about me… you know… if you had chimed in on this.”
“Me?” She grinned. “There is none better, but he’s taken… and you don’t want to mess with a girl from South Philly.”
“You know,” he chuckled. “That’s kind of a turn-on.”
“Is it,” she cooed. “Why don’t you head into the shower, Dr. Ramsey… I’ll meet you there in a few?”
“That sounds like a plan, Dr. MacClennan… you know… maybe this wasn’t such a big deal after all.”
“Yeah,” Kaycee laughed. “Funny how that worked out.”

Perma: @a-crepusculo @animesuck3r @annoyingmillenialnewbie @crazy-loca-blog @doriopenheart @differenttyphoonwerewolf @fayeswiftie @gryffindordaughterofathena @genevievemd @jamespotterthefirst @jennieausten @kingliam2019 @liaromancewriter @onikalover @openheartforeverinmyheart @potionsprefect @quixoticdreamer16 @rookiemartin @secretaryunpaid @socalwriterbee @sophxwithers @tessa-liam @trappedinfanfiction @jerzwriter-reblogs-asks @choicesficwriterscreations @openheartfanfics
More tags in reblog.
#choices fanfic#open heart#open heart choices#ethan ramsey#ethan ramsey x mc#choices open heart#open heart fanfic#playchoices fanfic#choices fic writers creations#cfwc fics of the week#choices monthly challenge
69 notes
·
View notes
Text
Why I want to learn saxophone in 2024🎷
The saxophone 🎷 in Detective Conan's soundtrack captivated me as a child. And when I found Sidney Bechet's 'Si tu vois ma mère', as a teenager, I just wanted a saxophone. And with finding Sade, I knew without a doubt that it was the next instrument for me, no matter when.
Years later, I found a pocket saxophone in an Instagram ad and it was mesmerising
Spontaneously, I decided to buy this instead of music business resources . It was so cool and I want to play like Coltrane and Masego. I want to do all the things I really love. Being on the phone is a sign of boredom and if wasting my time on earth. Even though I learn a lot and gets a few laughs out of the videos and memes, but I want to experience life. The old fashioned way with instruments, writing manuscripts for books and letters to faraway friends in longhand, cooking more and not ordering food to your doorstep, and time offline to read all my novels and contemplate about life and pray and be present with my wife and kids. I call myself a writer, musician and philosopher and I want to do just that, not approximated hesitant approaches to writing by outlining, fantasising and researching without ever writing down chapters that can be read, reviewed, edited and shared. All these unused notebooks, Collegeblocks and calendars. All this motivation and no tangible goals,results or organisation for my creative and intellectual life. I don't wanna be a wannabe.
What's stopping me?
The second reason was that I wanna build new enjoyable habits, not just detect and stop my harmful ones. For example my habit of pornography needed to stop but my sexual energy should be transferred or transmuted to other physical and mental activities. It's easier to stay physical for my inferior Se (exterior sensing) to be stabilised and challenged just enough. So making sports, playing instruments over reading or producing music on my laptop. I need a physical, haptic kinetic component in my activities. Walking outdoors does wonders for me even if I'm pushing the stroller and watching my babies play.
The third reason is that being a stay at home dad, I need a mental challenge. Being with toddlers all day, not being in deep conversation with adults or engaged in critical thinking, I fear that I can't get to play off my greatest strengths. And while I enjoy the time with my boys -which will end soon enough and I will miss this slow pace- I could need a challenge to grow my faculties.
Financially I want to retire my wife and secondly my mother, so I gotta make money. But since I can't get a babysitter for my babies, I gotta treat the post-pandemic world as if I'm in a pandemic in a music business sense. So how can I make money without performing, without being outside and over the long term?
My answer is: 1. build a catalogue that can be sold and streamed online (I stay away from DSP like Spotify and will use YouTube, SoundCloud and Bandcamp)
2. Get sync licenses for your music to be used in
4. Use your music and books in your own productions of artworks and media (own soundtrack,own script written, own director work)
Multi-hyphenate work like Lin-Manuel Miranda's Hamilton
5. Use Collabs to reach new fanbases
6. Write Longform content on the email newsletter and website and introverted spaces (Wordpress and Tumblr)
Medium sized articles with links to my other pages on reddit
Write short form on Thread and X, and with images on Insta, Tiktok and Facebook
7. Get meetings online and on phone call (interviews for publicity ,group chats for community )
8. Promote yourself online aggressively and consistently (you have to be seen for your tribe to find you)
So the saxophone that I am awaiting will teach me to start learning correctly from the start and will serve as a symbolic transition from hobbyist to self-employed blogger and offline artist that shares his mind, connects for a brief time and then dips out again to resume his preferred life off the grid.
I want to make money with digital real estate like Monopoly. It means that my revenue from my creations will add up cumulatively but it doesn't need my constant supervision every second of the day. I will be making money in my sleep and will promote, create more and start speaking and teaching to pass it forward and to be a teacher and guide for other Christians, creatives and growth-oriented people.
Thank you for reading.
I want to write more and it feels good to express my thoughts and verbalise my ideas. 💡
I will try to do it more often.
Below you find the ad that made me order the pocket saxophone:
#musician#producer#independent artist#christian blog#writer#saxophone#detective conan#blogger#digital real estate
1 note
·
View note
Text


Luca Marinelli - Rome, Trastevere - 16th June 2022
#look at these beautiful pictures 🥰#love how happy he looks! 💕#it’s yearning hours#luca marinelli#il cinema in piazza#I saw and saved these earlier while I was out but now I can’t find the link 😩#I will edit later if I can find the facebook link again x#credit to the owner#fabrizio de andré: principe libero#lu speaks 💅🏻#queued post
124 notes
·
View notes
Text
How To Collect and Organize Beta Reader Feedback
As some of you might know, I previously wrote a full draft of my currently untitled m/m romance novel and got through an almost full round of beta readers before I decided to scrap it and start again, nearly from scratch and with a different premise (It went from two timelines - first love/second chance to a single timeline - enemies to lovers).
Out of nowhere, I decided to start rereading and reorganizing my feedback in hopes to find something that would be useful to me in my current draft. Originally, I just planned to delete everything that wasn’t relevant, but a lot of it was really cute and funny, and I mean, I did write a full book - even if it wasn’t all that good - I at least deserve to keep my feedback from it.
Before I went on this endeavor, I foolishly believed that there’s no wrong way to collect beta feedback and boy, oh boy was I wrong! So I’m here to tell you the wrong ways and the right way. But first, let’s revise our terms:
What is a Beta Reader?
Beta readers are readers, who would be interested in picking your book off the shelf if it were already published. That means you should already have a pretty good idea of what is your genre and age category is. There’s no such thing as a ‘fiction book for everyone’. While certain books might have broader appeal, all books have a target audience. So figure out yours.
The reason to know this from the start is two-fold. First, obviously to know how and where to market your book. Second, different genres come with different expectations and you really don’t want to piss off your core readership. You’re not going to be able to please everyone, and if you try, you’re likely to end up pleasing no one. So while it’s definitely a good idea to look for diversity in your beta readers, you should probably not be looking for genre diversity.
I’m gonna let you in a little secret: for the longest time, I had no idea I was writing a romance novel. Part of it was that I really just hadn’t read a contemporary queer romance, so subconsciously thought that (contemporary) romance was for the straights only. But the bigger part was that my story just wasn’t well structured so I had no idea what the main conflict was supposed to be. And let’s just say... that didn’t exactly do me any favors when I was trying to get people interested in reading it. You can’t really amp others up about a project if you don’t know what the project is about.
Not only that, but I had a cp/beta reader who while wonderful, wasn’t a romance fan, so there were several points where I felt frustrated with their critique because I felt they simply didn’t like certain conventions of the genre. And that’s not their fault - we were just not a great match. Still appreciate working with them, but I know better now.
Where to find Beta readers?
You can find them anywhere. Tumblr, Twitter, Facebook groups, Discord servers and so on. Just look around. I assume you’re writing your story because you want to read something like it, and if you want to read it, someone else probably wants to read it too.
How to collect Beta feedback?
I normally use Google Docs or sometimes Word. Chapter by chapter is definitely best. It’s much less overwhelming to try to read 10 pages than 210. Copy/Paste the chapter in a new document and send it to the beta, after warning them for any triggers or squicks that might apply.
If you’re using Word, send the document over email. If you’re using Google Docs, share it with their email. Make sure to share it through email and not create links (like me), because it’s much safer that way. If you share it, only the person with the access to the email can see it, if you make a link, anyone with the link can see it. Again chances of plagiarism are minuscule, but still.
On Google Docs you want to give them Comment permission. That way they can make comments in the margins and any edits they make will show up like Track Changes on Word. If they are using Word and making edits, simply encourage them to turn on Track Changes.
Encourage betas to make comments while reading, on everything that they liked, disliked, found confusing, or anything that made any impression at all. Even if’s just ‘lol’ or a keyboard smash. Sometimes those are the best comments to read!
But also keep in mind that not everyone will do that. That’s why I always have a questionnaire or do an interview with the beta. Questions tend to prompt people into organizing their thoughts a bit. Because I’m nice, I’ll share my questionnaire with you, (it is actually an adjusted version of @jennamoreci‘s questionnaire from her beta readers video here:
1. What is your overall opinion of the chapter?
2. What do you think of x character ?
3. What is your favorite scene/part/line and why? (You can pick more than one.)
4. What is your least favorite scene/part/line and why? (You can pick more than one.)
5. Are any parts confusing or unclear?
6. Do you think there’s anything specific I need to improve or fix in the chapter, whether it’s the writing, the charters, plot, setting, etc.?
7. On a scale of 1 to 10, how much did you enjoy the chapter?
8. On a scale of 1 to 10, how eager are you to read the next chapter?
9. On a scale of 1 to 10, how much are you enjoying the book so far (not applicable to chapter 1)?
10. Do you have any predictions?
12. Do you have any other comments, thoughts, suggestions, or advice?
You can also add questions specific to the chapter, especially if you are already worried about a particular aspect of it. You should also ask their opinion on every character who shows up in the chapter.
I prefer to put this questionnaire at the end of the document I send to my beta reader, that way I’m sure they won’t be accidentally spoiling something with my questions and they can go over it right after reading instead of waiting for our schedules to match so we can have an interview. It’s a bit of a copy-pasting game, sure, but ultimately it takes no more than a couple of minutes. I would discourage you from having the questionnaire in the same document you are writing because it might end up messing with your word count, and lie to you that you’ve written more words than you actually have.
Afterward, if you need any clarifications on their answers, message the beta on their preferred platform - for me, that’s usually Discord, sometimes Twitter or Tumblr - to ask for clarifications. Sometimes you can also explain what you were going for, especially if the beta had a question, but don’t overdo it. You don’t want to seem argumentative.
Oh, and be sure to thank your beta readers. Don’t forget they are giving up their time to help you for free. Nothing annoys me more from a beta reader perspective, then to not receive even a form thank you.
How to Organize Beta Feedback?
So this is the big one. After you receive your beta feedback, address all the small things you can like typos and grammar right away (unless you’re already pretty sure you’ll be deleting/rewriting the scene) and mark stuff, that they’ve pointed out is badly phrased, etc. for later. Then delete irrelevant feedback, like one-word answers or ‘no opinion’. The feedback you disagree with might be unpleasant to read, but that doesn’t make it irrelevant. And if something makes you really mad, chances are it’s something you probably need to work on.
Then copy all the feedback - every comment and every answer, even if you disagree with them - into a separate document organized BY CHAPTER, not by beta name. This was the mistake I made. You’ll need this feedback when you move on to revision and you really don’t want to have a million tabs or documents open. Аlso it’s much easier to spot patterns if everything is in the same place. And if several people are saying the same thing, that’s probably something to pay attention to.
Oh, don’t play around with fonts too much. I make everything the same font, but at first, I tried to make it really distinguished between what quote from the manuscript the beta was responding to and the beta’s own words, and honestly, you wrote your book, you know it pretty well. 99.9% of the time you can easily tell what they were responding to and what’s a quote from the book and what is the beta’s own words.
Good luck on your beta journey!
#beta reader#beta readers#beta feedback#feedback#writer#wrting#writeblr#writing tips#writer life#writer advice#writing advice#mine
10 notes
·
View notes
Text
Summertime Melodies
Pairing: Peter Parker x college!fem!reader
Word Count: 1,478
Summary: Peter and the reader were friends their last year of high school but were split apart when you traveled to California for college. However, since it is summer, you’ve decided to head back home to Queens to surprise her friend in all of the things she’s learned.
Genre: Fluff, fluff, all the fluff.
Warnings: Barely edited so there’s probably a few mistakes, to dang much fluff, musical references ‘cuz I’m a major musical nerd so honestly? I’m sorry but also not so lol
Prompt: “I didn’t know you could sing like that”
A/N: This is for @madmadmilk and her 5k summer celebration writing event! Any criticism is appreciated but only constructive stuff, got it? Got it. Okay, moving on!
Song Links:
All That Matters
Sylvia’s Lullaby
Key:
Y/N - Your Name
L/N - Last Name
Y/N/N - Your Nickname
After leaving for college, you had to admit, you missed your friends like crazy. Peter and Ned and MJ, even Liz (although you two did have a small quarrel sophomore year over the notorious Peter Parker). However, you were exhilarated to finally get to come home for summer and leave your performing arts college.
Considering how you wanted to keep this trip a surprise, you only told your mother and May Parker. You wanted to make sure that Peter, seeing as how he became your best friend in your senior year of high school, would be completely unaware of the fact that you were coming home. So, to do this, you had to tell Aunt May so that she could make sure to keep him busy throughout the day.
And thus, you were now sitting on a crowded airplane at LAX, ready to take off and head to Queens, armed only with two suitcases and a carry-on bag. Most of your possessions would be staying in Los Angeles, but you made sure you had enough to get you through these next four weeks.
While up in the air, you messaged Peter over Facebook.
Y/N L/N: Peterrrrrrr :(
Peter Parker: Hey Y/N/N, what’s up?
Y/N L/N: Are you sure you can’t come visit me in LA? Your promised :(
Peter Parker: I’m sorry... May and I don’t have the money and I don’t want to ask Mr. Stark to send me all the way to Cali
Y/N L/N: Ughhhhh but you didn’t even show up for my performance! You missed seeing me as Sylvia in Finding Neverland!
Peter Parker: I’m sorry! I tried to make it Y/N/N! I swear!
Peter Parker: But in all fairness, you never sent me that video recording that you promised
Y/N L/N: The files too big! You’ll need to watch it in person, like on my laptop or sth
Y/N L/N: Well, I guess there’s always next performance... so much for a best friend :(
Peter Parker: I’m sorry...
Y/N L/N: Whatever, I gtg so I’ll message you later, ok Spider-Boy?
Peter Parker: Okay, see you later!
Peter Parker: Also stop calling me Spider-Boy! The spider stuff is supposed to be a secret!
You laughed at his last minute remark before you put your phone away and took out your iPod, choosing to listen to music to pass the time until you landed in New York.
Once you were off the plane, your quickly found your mom waiting for you by the luggage claim area. The two of you ran over and hugged each other tightly.
“I’ve missed you my darling angel!” your mother shouted, drawing attention to the two of you. “Look at my little muffin! You’ve grown so much since I’ve seen you!”
“Mom!” you shouted, cheeks burning bright red. You quickly pushed her away before going to collect your luggage. You glanced down at your phone to see that you missed several text messages from Peter’s aunt.
May: I’ve got Peter running errands!
May: When do you land?
May: Where are we meeting again?
May: Are you on the plane? Is that why you’re not answering?
May: Hmm... maybe I should text your mother...
May: Why am I still texting you?
May: So any way, Peter and I are heading out to a restaurant in the Bronx, I’ll text your mom the info!
You rolled your eyes, smiling at how excited May was to have you back home, so much so that she still continued to spam your phone despite the fact that you were clearly on a plane. Deciding it was best to answer her, you did so.
Y/N: Hey! I’m on my way there now! Just gotta grab my luggage and head out!
Before you could even turn the screen off, you got a response from May.
May: Hurry! Peter’s starting to get suspicious of why we’re just sitting at a restaurant, waiting to order
Y/N: OMW!
You turned to your mother, who happened to grab your suitcases for you. “Hey, May’s freaking out, we gotta head to that restaurant.”
“Sounds about right. Let’s get going.”
The two of you pulled up to the restaurant. The moment your mother parked, you practically jumped out of the car, barging straight into the restaurant. Your eyes landed on Aunt May who was motioning with her eyes for you to come over. Peter, meanwhile, had his back to you.
You silently walked over to the table, trying your hardest to not make a sound. However, you didn’t pause to think about the fact that Peter had his spidey-senses (as you affectionately referred to them as), which caused him to literally jump out of the booth and turn to look at you.
“Y/N?” His voice was filled with shock as he took you in. Suddenly, you were pulled into his arms in a very tight hug. “You’re here! You’re here! I can’t believe you’re actually- wait!” He pushed you away, suddenly glaring. “You were making me feel bad for not visiting knowing that you would see me! You’re mean!”
You giggled softly, reaching out to ruffle his curly brown curls. However, he leaned away, pouting at you. “Peter, I had to! I couldn’t let you know I was visiting!”
He huffed before sitting down. He motioned for you to join him. “Fine, but I won’t forgive you until I get to see that recording of you performing.”
“Deal.” You smiled brightly at him before joining him in the booth to order food.
“I didn’t know you could sing like that,” Peter said in amazement, watching your performance on his laptop. You giggled, causing him to look up from the screen. “No, I mean it. You sound amazing! Why weren’t you in any of the school plays at Midtown? You would have surely been the lead with those vocals!”
You simply shrugged, pausing the performance so the two of you could talk. “I was shy. It took getting accepted into this crazy school in LA to actually open up about singing in public. And then I was cast as the lead in Finding Neverland and I just... That’s why I wanted you to come visit me, you big ol’ nerd.”
Peter smiled up at you. “You should sing right now.”
His request gave you pause. You never really performed one-on-one unless it was an audition, and even then, auditions usually had a few other people involved. “I’m sorry?”
“Please?” he begged, his brown eyes getting big and his mouth forming a small little pout. “I want to hear you perform in person.”
“What would I even sing?” you asked, watching as his face contorted into his silly little thinking face.
A light bulb must have gone off in his head as he turned his attention back to the computer that had the professional recording of your musical on it. “The song you were just singing. What was it called?”
“Sylvia’s Lullaby? All That Matters? Which one? They do happen back to back, ya know.” Once again, he started thinking, hard. You laughed, causing him to lose concentration. He gave you a questioning stare, causing your cheeks to burn up. “Your face gets all cute when you’re thinking.”
It was now Peter’s turn to turn bright red, his eyes turning away from your face. “Y-You should... u-um... All That Matters. Yep, that sounds... um, pretty good.”
You subconsciously leaned closer to Peter, brushing a curly strand from his face. “Yeah... okay...” you mumbled, watching as he turned to look at you.
Before you knew it, he had a hand cupping your face, rubbing his thumb along your cheekbone. “Hey Y/N?” he asked softly, staring into your eyes.
“Hmm?” you hummed, your eyes never leaving his.
“C-Can I, um... ya know... I just think that maybe, um... maybe we could... kiss?”
You laughed as he stuttered over his words before nodding. “Yeah, I think that would be nice.”
A huge smile broke out over his features before he captured your lips with his own in a sweet and indulgent kiss. However, it was over much to soon for the both of you.
Before he could pull away entirely, you pecked him on the cheek before pulling back completely to start the video again. You cuddled up into his side, smiling up at him. “You know, I’m starting to think coming back for the summer was a smart idea.”
He laughed at you and kissed the top of your head. “You should sing for me.”
“I’ll sing for you every day if that’s what you want.”
He hummed in response before once again focusing his attention on your show that was playing on the laptop. You sighed happily to yourself, imagining all the summertime melodies you would perform for him.
Tags:
@starksparker @madmadmilk @thedaydreamingwriter
#madmadsummer#peter parker x reader#peter parker imagine#peter parker headcanon#peter parker#tom holland x reader#tom holland imagine#tom holland headcanon#tom holland#spider-man x reader#spider-man imagine#spider-man headcanon#spider-man#marvel#spider-man homecoming#userkavvy
50 notes
·
View notes
Text
VSCO and Gen Z: There’s More to the Story by Hannah Fay
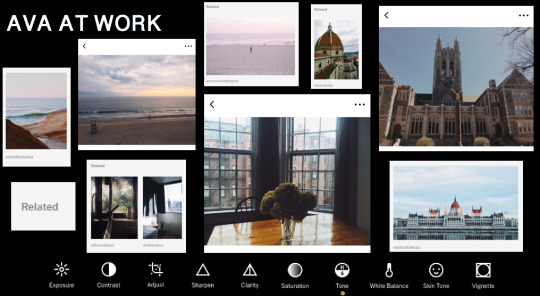
Last week I presented on VSCO as a platform for brands to reach Generation Z in a way that feels more organic than traditional social media channels. It gets much of its appeal from a lack of ads, a sense of authenticity, and a reputation as a place of refuge from the pressures of more evaluative platforms like Instagram and Facebook. I was surprised to find that most of the class was generally unfamiliar with the app (other than name recognition)! Below I’ll talk about some of the points that I didn’t get to during my presentation and address some of the questions the class asked a little bit more in-depth.
USING VSCO
During the questions portion, I got asked a lot about the mechanics of the app. Here’s an example of the steps a user might take to edit and post a picture (see replies as well). You’ll notice that not even close to all of the options available are used -- this is where VSCO’s appeal for photo-editing comes in. A seemingly endless array of tools like “white balance,” “shadows tint,” “grain,” and “vignette” enable users to create an infinite amount of filter combinations even before taking the presets (or VSCO-developed filters) into account. A certain amount of the presets come free to use upon downloading the app, and some can be purchased in-app (more on that later). They’re designed, according to CEO & Co-Founder Joe Flory, to recreate the look and feel of real film, lending a sense of authenticity that Generation Z can appreciate.

This is where VSCO can differentiate itself from Instagram, and why the two are able to coexist. Instagram simply does not offer the scope of editing tools that VSCO does -- users will often edit a photo on VSCO and later export it to post on Instagram. For users like this, VSCO is the artistic medium, and Instagram is the means for social connection. This is something that the company’s creators would be OK with, seeing themselves as running a creative company -- not a social company. I’ve also included some screenshots below to illustrate what the user sees in-feed in lieu of a display of likes/reposts. While the user could admittedly count the number of likes and republishes their image receives by hand, this is not the primary focus of the app.
HOW THEY MONETIZE
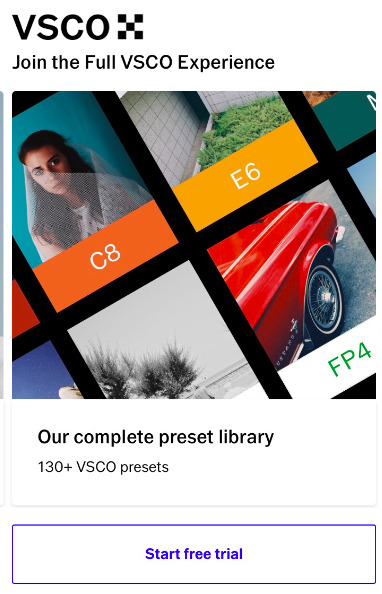
The app is free to download and free to use for all. Most editing tools are available for free, along with a healthy amount of presets (aka filters). The branded filters I’ll discuss more below are also available for free. And, again, VSCO does not allow ads on their platform. So how in the world do they make money? In the past, essentially the only way was to sell filters. A “shop” icon leads the user to a store offering packs of filters in sets of 4, 6, 8, 10, and 12 for prices ranging from $0.99 to $3.99. But this was difficult in that the purchases were one-time and therefore a somewhat limited source of revenue.
Enter VSCO X, the company’s subscription service rolled out as an invite-only exclusive in late 2016. It’s since then expanded to be available to all users, and is mainly responsible for the company’s 91% growth in revenue in 2017. For $20 a year, the 1 million plus members of VSCO X get unlimited access to all filters and presets, including some created to emulate the look of Fuji and Kodak film, and including some that cannot be purchased separately in-app. Users can access additional editing tools for color balance, and can utilize VSCO’s Sens technology to edit videos with all available filters and tools. Check the video here (or the replies) for an idea of just how extensive the filter library really is.
Why does VSCO X appeal specifically to Gen Z? For this generation more than any other, their online presence is as much an expression of self as their physical presence. The ability to get their photos to appear exactly as they’d like with relative ease matters. Also important is the fact that the influencers Gen Z knows and loves use VSCO for their own editing. They’re already well accustomed to paying for services like Netflix, Spotify, Hulu, and more on a monthly basis. Although $20 sounds like a lot, it translates to roughly $1.60 per month. That’s much less than other common subscription services seen now as a necessity -- so what’s the harm in one more?
BRANDS THAT USE VSCO
I mentioned in my presentation that brands could work with VSCO in two main ways: one, they could collaborate on branded filters and collections, or two, they could use the VSCO Connect Beta to be matched with content creators.
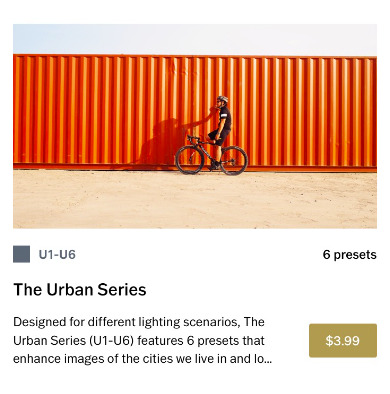
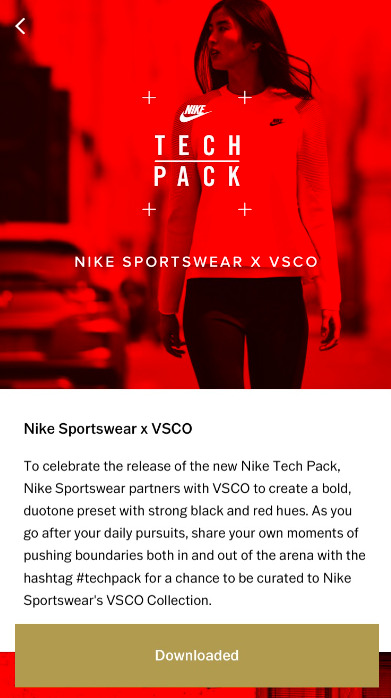
Nike, Levi’s, and Oakley are some of the best-known brands that debuted their own VSCO filters. When said presets are released, users receive an in-app popup inviting them to download for free and giving a little background information on why the brand has chosen to work with VSCO and what the filter represents. For example, Nike’s TECH preset was released “to celebrate the release of the new Nike Tech Pack,” and invites the user to share their own photos using the TECH preset and #techpack hashtag. As for all branded presets, photos tagged in this way are added to a grid or collection of other user generated images. VSCO further aids the brand by inviting the user to view said collection via a linked post in their normal feed. Generation Z would, in general, form an affinity for brands that interact with them in this way: “How cool is it that Levi’s (or Oakley, or Krochet Kids, or Nike…) provided me with a brand new filter, for free, that fits my aesthetic perfectly?”
Chobani, Strava, Nike (again), and Timberland, on the other hand, are some of the better-known brands that worked with the VSCO Connect Beta. As discussed in class, any company that wanted to take part in the service was asked to submit a brief creative summary stating the goals of the campaign and/or brand and the vision to be realized. VSCO would then have their AI technology (called AVA) step in to scan millions of profiles and match companies with five or so content creators that align with company vision. At this point, companies can select one of the five to produce content in about four weeks’ time. The finished product resembles user-generated content more heavily, lending brands a sense of authenticity that Gen Z appreciates. Gen Z will also be happy to know that the brand is giving lesser-known content creators not signed with agencies a chance to further their careers -- marketing with a cause.
MORE ABOUT AVA
The biggest rising star of VSCO is their AI technology, AVA. AVA does more than simply recognize that an image is of a dog or a tree or a slice of cake. According to VSCO co-founders, AVA can assess the mood of the photo, and what feelings it might evoke. How does it manage to do this? Its technology rests upon four years of human “tagging” data, during which time human VSCO employees rated photos on how it made them feel, what it reminded them of, and what they thought about it. Still, AVA is not left to her own devices, so to speak, now that the main tagging project is over. Employees at VSCO continue to screen her results and in case she gets something “wrong.” This data further hones AVA’s ability to view art and photography in a way somewhat more abstract than the average AI technology.
This explains why the technology had become the backbone of the VSCO Connect process. Chances are, a company does not care about finding a content creator that only photographs shoes or flowers or pine trees. It’s far more likely that a company might say they want their upcoming ad campaign to be bright, clean, and upbeat -- AVA can discern which creators are best at capturing those feelings much more quickly and efficiently than the human eye.

CITATIONS
5 notes
·
View notes
Text
Lifehacker Lastpass

You’ve got to appreciate some of the irony in that title. Lifehacker is part of the Gawker group of websites. Some hackers got into their system and downloaded their database and source code. They also ran some scripts agains the database and were able to find nearly 200,000 people who were using passwords that weren’t very strong.
Lifehacker Lastpass Login
Lifehacker Lastpass Update
Lifehacker Lastpass Free
Is Last Password Safe
Lifehacker Lastpass
LastPass hacked: Time to change the last password you'll ever need to remember LastPass data has been compromised. Although there's no need to panic. LastPass Universal Linux Installer. The Universal Linux installer installs browser extensions for Firefox, Chrome, and Opera. LastPass for Firefox (i386 and x64) LastPass browser extension for Mozilla Firefox. This will also work on other Mozilla based browsers such as SeaMonkey, Mozilla, etc.
I had an account on Lifehacker from years ago. Since I didn’t consider it a huge security issue I used a simple five letter, single word password. Since it was easy to break this password, my username, password and email address was part of the roughly 200,000 released in decrypted form on the web.
I panicked just a bit when I saw my password on the list. Fortunately I’ve been using 1Password so I was quickly able to search through all of my logins and identify where I had previously used that password. It turns out it wasn’t used in many other places–mainly on things where I needed a quick account and wanted a password that I’d be likely to guess again.
So I was able to quickly change anything where I might have been at risk. Still it shook me up a bit and made me take a closer look at my password strategy. Ten years ago I used 3 different passwords. I had one for banking and websites where the risk of losing my data was high. I had another for things like email accounts where the risk was moderate and a third for sites like LifeHacker where the damage of someone logging in as me was minimal.
However, the real risk wasn’t that someone would login as me to make comments. The real risk was precisely what happened with LifeHacker–someone got into the website, discover a bunch of users passwords and then use those passwords to get access to their other accounts on the internet.
In the past five years I’ve taken a bit of a different approach to creating passwords. Whenever possible, I try to create a unique random password for each website I need a login for. That way if something happens like what happened with LifeHacker, the hackers will only have access to the site they hacked–something they probably have already in order to get the passwords in the first place.
How passwords are stored
If you want to understand how to create a secure password, it is worth taking some time to understand how passwords are stored on modern web applications.
Had I used a longer password that wasn’t a word in some language, the hackers probably wouldn’t have been able to get my password. LifeHacker stored their passwords as a hash (basically a type of one way encryption). When you login, LifeHacker’s servers took your password, ran it through the hash function and then compared it to what they had previously stored. If the values match, then you can login. If not, then you don’t have the right password. As you can see this meant that LifeHacker didn’t have to keep a copy of each users password on their server. However, you can get dictionaries of common words mapped to their hash value. This is how the hackers were able to get my password–they simply looked for a hash.
Here is an example. First lets create a hash of a common password “qwerty”. We do this using the following command at the OS X command line:
The hash is that long string of numbers and letters. This is what gets stored instead of your password on the server.
Lifehacker Lastpass Login

How to break hashes
The hash process isn’t reversible. There isn’t an easy way to take a86850deb2742ec3cb41518e26aa2d89 and “decode” it. However, “qwerty” if a fairly common password. If one were to take a dictionary of common words and run them through the hash process they could create a database of all the hash values for common passwords. “qwerty” is a common password–common enough that someone probably has it listed with its hash value on the internet. So if we do a google search for:
We are going to find a number of results–most are showing that a86850deb2742ec3cb41518e26aa2d89 is the md5 hash for the word “qwerty”. This is how the hackers were able to break my password–even though all they had was the hashed value.
Safe passwords
Hopefully that explains why using a password that can be found in a dictionary is a bad idea. So how do you create passwords that can’t be broken in this way? You need to use a password that the hackers aren’t going to be able to find in a list of common words. Also the longer the password, the safer you are.
So a password like:
gorilla
is bad, but a password like:
dkfje&KPiOudkfje(*(3!
is good. While that last password is secure, there is one little problem. Can you spot it? Right. It is nearly impossible to remember. A simple solution is to use a password that combines a number of words. Here are some good passwords:
TheGorillaAteSoup.OhMy!
mydoghas1flea!
bob.can’t.run.8.miles.
Picking a pattern is another good method. These passwords look random until you try to type them. You basically remember the pattern on your keyboard.
a’s;dlfkgjh
%TGBnhy6
zxcvxcvbcvbnvbnmbnm,nm,.m,./
Use different passwords
Even if you use a secure password, you don’t want to use the same one on every site. Tthere are other ways for hackers to get your password. Some times hackers will install keystroke loggers on public computers in order to capture passwords people are using. If you have a secure password, but use the same one on all of your logins, you might login to check your facebook messages at a library and later find that someone has been assessing your banking. I have logins for over 400 websites. There are some techniques I can use to remember a different password for each site, but it simply doesn’t scale to 400 logins.
Thats where software like 1Password, LastPass, or RoboForm comes in handy.
1Password
I have been using 1Password for several years. 1Password lets you create a random password whenever you need it and it keeps track of your username and login for each website. When you return to a site, 1Password logs back in for you. You have a password on 1Password that gives you access to all of your other passwords.
Lifehacker Lastpass Update
The passwords generated by 1Password are long and random. You can edit the settings to try to make the passwords easier to pronounce if you are trying to remember them or let it make them completely random and very long.
1Password is very nice, but it works as an application with a handful of plugins for different browsers. This works pretty well, but you really need an ubiquitous tool if you want to be able to keep all of your passwords secure. Otherwise you end up using simpler passwords on things you need to access often and from different locations. Often these are the very things you want most to protect.
What frustrated me with 1Password is that I couldn’t use it on my Blackberry or my Linux computer. As long as I stayed on my mac it was fine, but if I tried to use another machine things got a bit more tricky.
LastPass
This week I’ve started looking at LastPass. While 1Password is an application with some plugins, LastPass seems to be entirely plugin based and they have a great deal of cross platform compatibility. The interface doesn’t seem quit as polished as 1Password, but this is probably because they are making it run on a bunch of different platforms. Also LastPass offers synching between different devices so everything stays up to date. Any decryption is done on your local machine so your passwords are only stored encrypted in the cloud.
One interesting feature of LastPass is their security audit that will show you how secure your passwords are overall. You can even have it show you all logins that share a password so you can easily identify the places where you need to bolster your security. Another feature that looks useful is the ability to share your password with others.
LastPass is free for its basic version which will do all that most people need. You can pay $1 per month for extra features like Blackberry support.
Conclusion
Take the time to think about your password strategy. Mistakes are going to happen and you want to make sure you are in the safest position possible if your password for a site somehow gets discovered like mine did.

8,086 Reviews Scanned by Raise5 AI
No products found.
◊
Lifehacker Lastpass Free
Apart Best Lastpass Lifehacker To Buy, Readers Also Shopped for
◊
Is Last Password Safe
Our Promise to Readers
https://loadingseeker540.tumblr.com/post/652975265423687680/giuseppe-verdi-rigoletto. We keep receiving tons of questions of readers who are going to buy Lastpass Lifehacker, eg:
Sketch for designers. Apr 6 I, Robot: How Mark Jardine of Tapbots designs award-winning apps with Sketch; Mar 25 Still connected: How the Sketch Community hosted 100 events in 12 months — during a pandemic; Mar 23 New in Sketch: Linked Data and Starred updates. A teams subscription costs $99 (billed annually) or $9 (billed monthly) per Contributor seat. Contributors are members of your team who need access to use the Mac app to create and edit Sketch documents. These prices don’t include sales tax, which may still apply. Create, prototype, collaborate, and bring your ideas to life with the design platform used by over one million people — from freelancers, to the world’s largest teams. Try for Free See pricing. Fully featured 30-day free trial. Sketch requires macOS Mojave (10.14.4) or newer. Cx='221' cy='138' r='138'.
What is the best Lastpass Lifehacker for 2019, for 2018 or even 2017 (old models)?
What is the best Lastpass Lifehacker to buy?
What is the best Lastpass Lifehacker to buy for a Beginner?
or even What is the best affordable (best budget, best cheap or even best expensive!!!) Lastpass Lifehacker?…
All of these above questions make you crazy whenever coming up with them. We know your feelings because we used to be in this weird situation when searching for Lastpass Lifehacker.
Before deciding to buy any Lastpass Lifehacker, make sure you research and read carefully the buying guide somewhere else from trusted sources. We will not repeat it here to save your time. Songbook list.
Lifehacker Lastpass
You will know how you should choose Lastpass Lifehacker and What you should consider when buying the Lastpass Lifehacker and Where to Buy or Purchase the Lastpass Lifehacker. Just consider our rankings above as a suggestion. The final choice is yours.
That’s why we use Big Data and AI to solve the issue. We use our own invented, special algorithms to generate lists of the best brands and give them our own Scores to rank them from 1st to 10th.
You could see the top 10 Lastpass Lifehacker for March 2019 above. The lists of best products are updated regularly, so you can be sure that the information provided is up-to-date.
You may read more about us to know what we have achieved so far. Don’t hesitate to contact us if something’s wrong or mislead information about Lastpass Lifehacker.
Raise5.com is reader-supported. When you buy through links on our site, we may earn an affiliate commission.
Last updated on 2020-05-16 / Affiliate links / Images from Amazon Product Advertising API
0 notes
Text
Vmware Tools For Mac Os Lion

Windows 10 is a great operating system. It has its quirks and annoyances, but which operating system doesn’t? Even if you’re beholden to Microsoft and Windows 10, you can still shop around.
I'm trying to install Mac OSX Lion on Windows 7 by VMWare 8, everything is alright except the fact that I can't install VMWare tools for MacOSX Lion. I tried installing it using VMWare's toolbar. In the image below you can see that VM Tools is not installed. You can set the screen resolution of.
What better way to do that than from the safe confines of your existing operating system with a virtual machine? This way, you can run macOS on Windows, which is perfect when you want to use Mac-only apps on Windows.
So, here’s how you install macOS in a virtual machine on Windows, making a virtual Hackintosh that lets you run Apple apps from your Windows machine.
Vmware Mac Os Tools
What Files Do You Need to Create a macOS Virtual Machine on Windows 10?
Before delving into the “how-to,” you need to download and install the essential tools. The tutorial details how to create macOS virtual machines using both Oracle VirtualBox Manager (VirtualBox) and VMware Workstation Player (VMware Player).
Not sure which to use? Learn more about the differences between VirtualBox and VMware.
Download the latest version of VirtualBox. The tutorial uses VirtualBox 6.1.4
Download the latest version of VMware Player. The tutorial uses VMware Player 15.0.4
You need a copy of macOS, too. Catalina is the latest macOS version. You can find the download links for macOS Catalina in the next section.
This tutorial will focus on installing macOS Catalina in a virtual machine running on Intel hardware, using either VirtualBox or VMware Player.
Unfortunately, I do not have access to any AMD hardware, so I cannot provide a tutorial.
There is, however, the code snippet that anyone using an AMD system requires to boot a macOS Catalina using VMware on AMD hardware. Hotspot shield for mac download.
The process to launch the macOS Catalina virtual machine is the same as the Intel version but uses a slightly different code snippet. You can find the tutorial and the code snippet in the section below.
Furthermore, you will find links to several AMD macOS Catalina, Mojave, and High Sierra virtual machine tutorials, at the end of the article.
Download macOS Catalina Virtual Image
Use the following links to download macOS Catalina for both VirtualBox and VMware.
If the Google Drive reaches its download limit, right-click the file and select Copy to create a copy in your own Google Drive. You can then download the macOS Catalina virtual image from there.
Please note that these links may stop working from time to time. If that is the case, please leave a comment, and I’ll fix them as soon as possible.
After the virtual image finishes downloading, right-click, and extract the file using your favorite archive tool. For instance, right-click, then select 7-Zip > Extract to “macOS Catalina.”
How to Create a macOS Catalina Virtual Machine with VirtualBox
Before creating the macOS virtual machine, you need to install the VirtualBox Extension Pack. It includes fixes for USB 3.0 support, mouse and keyboard support, and other useful VirtualBox patches.
Download: VirtualBox Extension Pack for Windows (Free)
Scroll down, select All supported platforms to download, then double-click to install.

Create the macOS Catalina Virtual Machine
Open VirtualBox. Select New. Type macOS.
VirtualBox will detect the OS as you type and will default to Mac OS X. You can leave this as is.
Regarding the virtual machine name, make it something memorable yet easy to type. You’ll need to input this name in a series of commands, and it is frustrating to type a complicated name multiple times!
Next, set the amount of RAM the macOS virtual machine can use. I would suggest a minimum of 4GB, but the more you can give from the host system, the better your experience will be.
Remember, you cannot assign more RAM than your system has available, and you need to leave some memory available for the host operating system. Learn more about how much RAM does a system need?
Now, you need to assign a hard disk, which is the virtual image downloaded previously. Select Use an existing virtual hard disk file, then select the folder icon. Browse to the VMDK file, then select Create.
Edit the macOS Catalina Virtual Machine Settings
Don’t try and start your macOS Catalina virtual machine yet. Before firing the virtual machine up, you need to make a few tweaks to the settings. Right-click your macOS virtual machine and select Settings.
Under System, remove Floppy from the boot order. Ensure the Chipset is set to ICH9.
Vmware Tools For Mac Os Lion Download
Select the Processor tab. Assign two processors. If you have a CPU with power to spare (such as an Intel Core i7 or i9 with multiple extra cores), consider assigning more. However, this isn’t vital.
Make sure the Enable PAE/NX box is checked.
Under Display, set Video Memory to 128MB.
Now, under Storage, check the box alongside Use Host I/O Cache.
Finally, head to the USB tab and select USB 3.0, then press OK.
Use Command Prompt to Add Custom Code to VirtualBox
It still isn’t quite time to fire up your macOS Catalina virtual machine. In its current configuration, VirtualBox doesn’t work with your macOS VMDK.
To get it up and running, you have to essentially patch VirtualBox before the macOS virtual machine will function. To do this, you need to enter some code using the Command Prompt. All the details are below.
Start by closing VirtualBox. The commands will not execute properly if VirtualBox or any of its associated processes are running.
Once closed, press Windows Key + X, then select Command Prompt (Admin) from the menu.
If your menu only shows the PowerShell option, type command into your Start menu search bar. Then right-click the Best Match, and select Run as Administrator.
The following code works for VirtualBox 5.x and 6.x.
Use the following command to locate the Oracle VirtualBox directory:
Now, enter the following commands, one by one. Adjust the command to match the name of your virtual machine. For instance, my virtual machine name is “macoscat.” Here are the commands:
After the completion of the commands, and presuming you encountered no errors, close the Command Prompt.
Boot Your macOS Mojave Virtual Machine
Vmware For Mac Download
Reopen VirtualBox. Double-click your macOS virtual machine to start it. You will see a long stream of text, followed by a gray screen.
The gray screen can take a moment or two to clear, but don’t panic. Once the screen clears, macOS Catalina will begin installing. When it resolves, you will arrive at the macOS “Welcome” screen.
From here, you can set your macOS Mojave virtual machine up as you see fit.
Pro Tip: Take a snapshot of your virtual machine once it passes the gray screen. If anything goes wrong down the line, you can return to the Welcome screen setup and start the process again.
Once you complete the macOS setup, take another one so you can jump straight into your macOS installation. Head to Machine > Take Snapshot, give your snapshot a name, and wait for it to process.
How to Create a macOS Catalina Virtual Machine Using VMware Workstation Player
Prefer VMware over VirtualBox? You can create a macOS Catalina virtual machine using VMware that works exactly the same as VirtualBox. And, just as with VirtualBox, VMware also requires patching before the macOS Catalina virtual machine will work.
This part of the tutorial works for Intel and AMD systems. AMD users must use the second code snippet when editing the virtual machine VMX file. Read through the tutorial to see what this means exactly.
Patch VMware Workstation Player
In the “macOS Catalina Virtual Image” section is the VMware Player Patch Tool. Before commencing any further, download the patch tool.
Then, browse to the location you downloaded the patch tool to. Extract the contents of the archive. This process works best when the folders are on the same drive (e.g., the VMware root folder and extracted archive are both found on the C: drive).
Make sure VMware is completely closed. Now, in the patcher folder, right-click the win-install command script and select Run as Administrator. The script will open a Command Prompt window, and the patch-script will run.
Do pay attention. The script whizzes by, and you need to keep watch for any “File not Found” messages.
The most common reason for a “file not found” or a “system cannot find the file specified” message is installing VMware Workstation Player in a different location to the default folder, and executing the patch from a different directory.
Once the patch completes, you can open VMware.
Create the macOS Catalina Virtual Machine with VMware
Select https://crispypuppydreamer.tumblr.com/post/642697144796610560/facebook-for-mac-os-x. Create a New Virtual Machine. Choose I will install the operating system later.
Now, select Apple Mac OS X, and change the Version to macOS 10.14. If you don’t see the macOS options, it is because the patch didn’t install correctly.
Next, you need to choose a name for your macOS Catalina virtual machine. Choose something easy to remember, then copy the file path to somewhere handy—you’re going to need it to make some edits in a moment.
On the next screen, stick with the suggested maximum hard disk size, then select Store virtual disk as a single file. Complete the virtual disk creation wizard, but do not start the virtual machine just yet.
Edit the macOS Mojave Virtual Machine Settings
Before you can boot the virtual machine, you must edit the hardware specifications. Worm for mac. Plus, you need to tell VMware where to find the macOS VMDK.
From the main VMware screen, select your macOS Catalina virtual machine, then right-click, and select Settings.
Like VirtualBox, bump the virtual machine memory up to at least 4GB. You can allocate more if you have RAM to spare.
Under Processors, edit the number of available cores to 2.
Now, under Hard Disk (SATA), you need to remove the hard disk created earlier. Select Remove and VMware will remove the disk automatically.
Now, select Add > Hard Disk > SATA (Recommended)> Use an existing disk. Browse to the location of the macOS VMDK and select it.
Edit the macOS Catalina VMX File for Intel Hardware
This section is for Intel users and it involves the final set of edits you need to make before switching your VMware macOS Catalina virtual machine on!
Close VMware. Head to the location you stored the macOS virtual machine. The default location is:
Browse to macOS.vmx, right-click, and select Open with…, select Notepad (or your preferred text editor). Scroll to the bottom of the configuration file and add the following line:
Save, then Exit.
You can now open VMware, select your macOS Mojave virtual machine, and fire it up!
Edit the macOS Catalina VMX File for AMD Hardware
This section is for AMD users. Like the above section, AMD users must also edit the VMX file before proceeding. The AMD edit involves a few more lines than the Intel version, but you can copy and paste the data into the file.
Close VMware. Head to the location you stored the macOS virtual machine. The default location is:

Browse to macOS.vmx, right-click, and select Open with…, select Notepad (or your preferred text editor). Scroll to the bottom of the configuration file and add the following lines:
Save, then Exit.
You can now open VMware, select your macOS Mojave virtual machine, and fire it up!
Install VMware Tools to Your macOS Catalina Virtual Machine
You now need to install VMware Tools, which is a set of utilities and extensions that improve mouse handling, video performance, and other useful things.
With the macOS virtual machine running, head to Player > Manage > Install VMware Tools.
The installation digavsc will appear on the macOS desktop. When the option appears, select Install VMware Tools, then allow it access to the removable volume. Follow the guided installer, which will require a restart on completion.
Troubleshooting
There are a couple of things that can go wrong during the macOS virtual machine installation in VMware Player Workstation.
If you cannot see “Apple Mac OS X” during the virtual machine creation wizard, then you need to revisit the patch process. Ensure every process associated with VMware Player is off.
If you receive the message “Mac OS X is not supported with binary translation” when starting the virtual machine, there is a strong chance you need to activate virtualization in your BIOS/UEFI configuration.
If you receive the message “VMware Player unrecoverable error: (vcpu-0)” when starting the virtual machine, you need to head back to the macOS.vmx configuration file to ensure you added the extra line and saved the edit.
If you’re running AMD hardware and get stuck at the Apple logo, first power off the virtual machine. Now, head to Settings > Options > General. Change the Guest operating system to Microsoft Windows, and the Version to Windows 10 x64. Press OK, then attempt to power up the virtual machine again. Once the Apple logo passes, power down the virtual machine, then set the Guest operating system option back to Apple Mac OS X, selecting the correct version.
macOS Virtual Machines for AMD Hardware
Apple uses Intel hardware to power desktops and laptops. Configuring a macOS virtual machine using Intel hardware is easier because the hardware specifications are very similar.
With AMD, the opposite is true. Because Apple does not develop macOS on AMD hardware, creating a macOS virtual machine on an AMD system is trickier.
Adding to this, I don’t have an AMD system to test macOS virtual machines on, so I cannot give you a detailed tutorial. I can, however, point you in the direction of several macOS AMD virtual machine tutorials that do work, so long as you are patient and follow each step accordingly.
Mojave AMD Vanilla Guide From Windows via AMD OS X
High Sierra 10.13.1 VM for VMware Player for Ryzen/FX/APU via AMD OS X
Mojave AMD VirtualBox via AMD OS X
The AMD OS X forum is a great resource for macOS virtual machines. You can find many more forum threads regarding AMD macOS virtual machines, too.
macOS Catalina Virtual Machine Installation Complete
You have two options to choose from for your macOS Catalina virtual machine. Both options are great if you want to give macOS a try before making the switch from Windows and enjoy some of the best Apple apps on offer.
You can use a virtual machine to test other operating systems too. For instance, here’s how to install a Linux distro in a virtual machine.
Are you looking to learn more about virtual machines?
Check out our VirtualBox User’s Guide, which teaches everything you need to know, or our guide to creating a virtual machine using Windows 10 Hyper-V.
Read the full article: How to Run macOS on Windows 10 in a Virtual Machine
This simple guide is for those who want to try out Apple’s Macintosh OS X on VMware Workstation in Windows platform. The basic requirements are:
A PC running Windows x86 or x64
VMware Workstation 8
Download the following files:
Mac OS X Lion VMware Files.exe (Size: 2.42MB)
Mac OS X Lion Retail Bootable .vmdk (For VMware) (A bit torrent of size 4.12GB)
Before running Mac OS X on VMware workstation, a patch should apply to some binary files of VMware workstation.
Vmware Mac Os Windows
For illustration purpose, the following example will attempt to patch VMware Workstation 8 binary files:
First, extract the download file Mac OS X Lion VMware files.exe.using any file archive utility like 7-Zip or double click the .exe to extract the files.
Open command prompt (cmd) in Administrator Account.
Navigate to extracted folder “VMware Workstation Unlocker - Windows' and run install.cmd:
The VMware workstation 8 is now patched. You may continue the next step to configure and run Mac OS X Lion on VMware workstation 8.
Prepare a Mac OS X machine

Extract pre-configure Mac OS X Lion VMware workstation files from Mac OS X Lion VMware Files.exe in a new folder:
Start the virtual machine
Install Mac Os On Vmware
Mac OS X Lion.vmx. A dialog prompt for the virtual machine instance state:
Press “I copied it
Vmware Tools For Mac Os Lion 10.8
” button to state the virtual machine is a cloned instance.
Prepare Mac OS X Installation
The machine setting may change to suit the environment. e.g.: Memory size.
Next, add Mac OS X Lion Installer disk (Mac OS X Lion Installer.vmdk
Vmware Tools Mac Os X Mountain Lion
) by creating a new VMware hard disk.
Start Mac OS X Machine
Power on the virtual machine. A Mac OS X installation screen should appear as follow:
Prepare a disk for Mac OS X installation
Next, start Disk Utility to prepare a disk for Mac OS X installation:
Create a new Mac OS X partition by using the Erase option. A label for the new disk may specify in the option:
Confirm the Erase operation:
Start Mac OS X Installation
Follow the screen instruction to continue Mac OS X installation:
Confirm the installation on the new disk created:
The installation may take a while to finish:
Finish Mac OS X Installation
Finally, the Mac OS X installed and the first screen appear as follow:
VMware tools provide few GUI enhancement experience for Mac OS X guest. Download VMware tools ISO for OS X here. Follow the following steps to install VMware tools in OS X:
Extract a ISO file (darwin.iso) from the zip archive file
Mount the ISO file to Mac OS X Guest operating system
Start Mac OS X guest system.
Open Finder from OS X desktop and select CD/DVD ROM device.
Double click Install VMware Tools icon to start VMware tools installation
Follow the screen instruction to complete installation.

How To Install Fully Functional Mac OS X Lion Virtual Machine inside Windows 7 [UPDATE: 10.7.3]. URL: http://www.windows7hacker.com/index.php/2011/09/how-to-install-fully-functional-mac-os-x-lion-virtual-machine-inside-windows-7/
0 notes
Text
Download Application For Mac

Mac Free
Download Application For Facebook
Apr 06, 2020.
iTunes is going places.
Download macOS Catalina for an all‑new entertainment experience. Your music, TV shows, movies, podcasts, and audiobooks will transfer automatically to the Apple Music, Apple TV, Apple Podcasts, and Apple Books apps where you’ll still have access to your favorite iTunes features, including purchases, rentals, and imports.
You can always download iTunes 12.8 for previous versions of macOS,
as well as the iTunes application for Windows.

Hardware:
Audiobook Binder. While you can listen to books in MP3 format, I like the M4B format more as it. Apps and downloads Vonage Business Communications easily integrates with your mobile devices, web browsers, and business applications to help you be more efficient. Download and start using these apps and plugins today. Desktop app download for Mac. Desktop app download for PC. Aug 27, 2020. Mac App Store is the simplest way to find and download apps for your Mac. To download apps from the Mac App Store, you need a Mac with OS X 10.6.6 or later.
Mac computer with an Intel processor
To play 720p HD video, an iTunes LP, or iTunes Extras, a 2.0GHz Intel Core 2 Duo or faster processor is required
To play 1080p HD video, a 2.4GHz Intel Core 2 Duo or faster processor and 2GB of RAM is required
Screen resolution of 1024x768 or greater; 1280x800 or greater is required to play an iTunes LP or iTunes Extras
Internet connection to use Apple Music, the iTunes Store, and iTunes Extras
Apple combo drive or SuperDrive to create audio, MP3, or backup CDs; some non-Apple CD-RW recorders may also work. Songs from the Apple Music catalog cannot be burned to a CD.
Software:
OS X version 10.10.5 or later
400MB of available disk space
Apple Music, iTunes Store, and iTunes Match availability may vary by country
Apple Music trial requires sign-up and is available for new subscribers only. Plan automatically renews after trial.
iTunes
Download the latest version for Windows.
The latest entertainment apps now come installed with macOS Catalina. Upgrade today to get your favorite music, movies, TV shows, and podcasts. You can join Apple Music and stream — or download and play offline — over 70 million songs, ad‑free.
iTunes
Download the latest version from the Microsoft Store.
The latest entertainment apps now come installed with macOS Catalina. Upgrade today to get your favorite music, movies, TV shows, and podcasts. You can join Apple Music and stream — or download and play offline — over 70 million songs, ad‑free.
Hardware:
PC with a 1GHz Intel or AMD processor with support for SSE2 and 512MB of RAM
To play standard-definition video from the iTunes Store, an Intel Pentium D or faster processor, 512MB of RAM, and a DirectX 9.0–compatible video card is required
To play 720p HD video, an iTunes LP, or iTunes Extras, a 2.0GHz Intel Core 2 Duo or faster processor, 1GB of RAM, and an Intel GMA X3000, ATI Radeon X1300, or NVIDIA GeForce 6150 or better is required
To play 1080p HD video, a 2.4GHz Intel Core 2 Duo or faster processor, 2GB of RAM, and an Intel GMA X4500HD, ATI Radeon HD 2400, or NVIDIA GeForce 8300 GS or better is required
Screen resolution of 1024x768 or greater; 1280x800 or greater is required to play an iTunes LP or iTunes Extras
16-bit sound card and speakers
Internet connection to use Apple Music, the iTunes Store, and iTunes Extras
iTunes-compatible CD or DVD recorder to create audio CDs, MP3 CDs, or backup CDs or DVDs. Songs from the Apple Music catalog cannot be burned to a CD.
Software:
Windows 7 or later
64-bit editions of Windows require the iTunes 64-bit installer
400MB of available disk space
Some third-party visualizers may no longer be compatible with this version of iTunes. Please contact the developer for an updated visualizer that is compatible with iTunes 12.1 or later.
Apple Music, iTunes Store, and iTunes Match availability may vary by country
Apple Music trial requires sign-up and is available for new subscribers only. Plan automatically renews after trial.
iTunes is going places.
Visit the iTunes Store on iOS to buy and download your favorite songs, TV shows, movies, and podcasts. You can also download macOS Catalina for an all-new entertainment experience on desktop. Your library will transfer automatically to the new Apple Music app, Apple TV, and Apple Podcasts. And you’ll still have access to your favorite iTunes features, including your previous iTunes Store purchases, rentals, and imports and the ability to easily manage your library.
Music, TV, and podcasts
take center stage.
iTunes forever changed the way people experienced music, movies, TV shows, and podcasts. It all changes again with three all-new, dedicated apps — Apple Music, Apple TV, and Apple Podcasts — each designed from the ground up to be the best way to enjoy entertainment on your Mac. And rest assured; everything you had in your iTunes library is still accessible in each app. iCloud seamlessly syncs everything across your devices — or you can back up, restore, and sync by connecting the device directly to your Mac.
The new Apple Music app is the ultimate music streaming experience on Mac.1 Explore a library of 70 million songs, discover new artists and tracks, find the perfect playlist, download and listen offline, or enjoy all the music you’ve collected over the years. And find it all in your music library on all your devices.
The Apple TV app for Mac is the new home for all your favorite movies, shows, premium channels, and Apple TV+. Watch everything directly in the app or enjoy it offline, and discover the best of what’s on in the Watch Now tab. You can even pick up where you left off on any screen, across all your devices. And for the first time, 4K2 and Dolby Atmos3-supported movies are available on Mac.
More than 700,000 of the best entertainment, comedy, news, and sports shows are now available on your Mac with Apple Podcasts. Search for podcasts by title, topic, guest, host, content, and more. Subscribe and be notified as soon as new episodes become available. And in the Listen Now tab, you can easily pick up where you left off across all your devices.
iTunes Support can help answer your questions
Get help with syncing, updating to a more recent version of iTunes, or with an iTunes Store purchase — and much more.
Learn more
Looking for a previous version of iTunes?
Download earlier versions of iTunes to work with compatible operating systems and hardware.
Find previous versions of iTunes
Pages is a powerful word processor that lets you create stunning documents, and comes included with most Apple devices. And with real-time collaboration, your team can work together from anywhere, whether they’re on Mac, iPad, iPhone, or using a PC.
From the start, Pages places you in the perfect creative environment. It puts all the right tools in all the right places, so it’s easy to choose a look, customize fonts, personalize text styles, and add beautiful graphics. And everyone collaborating on a document has access to the same powerful features.
Start with something beautiful.
Choose from over 70 beautiful Apple‑designed templates, and customize your reports, letters, and other documents any way you like. And, if you’ve ever dreamed of writing a book or fairy tale, it’s easy to create interactive stories right inside Pages.
Make progress you can see.
Track changes, add highlights, and have threaded conversations with your team. Your edits are saved automatically.
Stunning results. Effortlessly.
Liven up your text by filling it with color gradients or images. And, take the entire page to the next level by adding photos, galleries, audio clips, video, math equations, charts, or more than 700 customizable shapes.
What’s new in Pages.
New
Turn handwriting into text. Magically.
With Scribble and Apple Pencil, your handwritten words will automatically be converted to typed text. Take notes, write a book, or annotate a paper fast and easy.
New
Write reports easier.
With new report templates, there’s no staring at a blank page. Jump start an essay, research paper, or school report by choosing from one of the 3 new templates.
Skim through in style.
Now, on your iPhone and iPad, you can read through your document, zoom in and out, and interact with it — without accidentally changing anything.
Play videos right in your documents.
Play YouTube and Vimeo videos right in Pages, without the need to open a web browser. Simply add a link, and play your web video inside your document or book.
You don’t work in one place on just one device. The same goes for Pages. Work seamlessly across all your Apple devices. The documents you create using a Mac or iPad will look the same on an iPhone or web browser — and vice versa.
You can also work on documents stored on iCloud or Box using a PC.
Work together in the same document, from across town or across the world. You can see your team’s edits as they make them — and they can watch as you make yours, too. Just click the Collaborate button and invite people to join.
Use Apple Pencil on your iPad to sketch, illustrate, and create documents. Draw and fine-tune your idea, then press play to watch each stroke animate onto the page. Plus, with Smart Annotation, your edits stay with the marked-up text, making it easy for you and your team to incorporate changes.
Mac Free
Teaming up with someone who uses Microsoft Word? Pages makes it simple. You can save Pages documents as Word files. Or import and edit Word documents right in Pages.
Numbers

Create great-looking
spreadsheets. Together.
Download Application For Facebook
Learn more about Numbers
Keynote
Build stunning, memorable
presentations. Easily.
Learn more about Keynote
0 notes
Text
Arplis - News: 2020-04-26
As we all watch this incredible scenario play out, it’s safe to say that no one can really believe the far-reaching effects of this pandemic. Loss of life and livelihood are everywhere.
It’s up to all of us to help stop the spread of Covid-19.
People like those in the healthcare industry are doing an incredible job, putting themselves in harm’s way to help others.
My sister is one of those.
She is an endoscopy specialist in London usually away from the main part of the hospital. But she is now working as a general nurse with people suffering with Covid-19.
Her courage – and the courage of others like her – deserves all of our respect… and whatever we can all do to help control the spread of this disease honours their bravery.
For us, Christina and I have decided to self-isolate. We have elderly and at-risk friends and family, and the thought of passing this terrible illness on to them horrifies us.
Remaining isolated and continuing to tell stories and (hopefully) entertain is what we can do to help the situation.
So here’s what we’ve been up to in our isolation. And if you’re also on lock-down, we’ve got some tips on how to make the most of your isolation.
Stay safe, keep dreaming of distant lands… and keep washing your hands!
Cheers – Jim & Christina x
The hardest thing about isolating is staying indoors a lot, especially when the day’s as pretty as this. But isolation doesn’t mean you have to live like a hermit.
As long as you’re careful, avoid any close contact and choose places that aren’t busy when you go out, you should be ok.
The worst part of this virus isn’t that you might catch it; it’s that you might pass it on without knowing. That’s the part that scares us.
Christina and I are lucky that we have this beautiful garden at our disposal. After a long day of being cooped up inside, we’re enjoying a delicious glass of vino and a few games of backgammon.
If you have a favourite board game (not Monopoly), now’s the chance to bring it out.
It looks like Christina and I won’t be travelling again any time soon, so we’re doing some of the things that we’ve wanted to do but haven’t been home long enough to finish.
My chilli plants have started pumping out crops and crops of fruit, so I’m drying them to make chilli oil. It’s very easy – find a sunny window and just hang the chillies up by their stems. I’ve used a length of picture wire.
They take between three days to a week to dry completely. Then you chop them up and put them in a jar of oil. After a week or so, you should have a tasty spicy dressing.
Tonight, I’ve cooked up an Indian curry for dinner. Just melting a blob of butter into the saag tarka dhal with my blowtorch. Nothing like a bit of food theatre!
One thing we’ve changed that’s made a big difference to our days in isolation is we’re eating up to the dinner table more. Rather than eating on the sofa in front of the TV, this change of scenery helps with the tedium of being stuck at home.
We’ve also started a new thing where we put on music that represents the food of the country. Spotify has playlists specifically for international food! Tonight is obviously Indian music, but other nights we’ve played Italian classics (That’s Amore!) for our risotto and French cafe style tunes to go with our cheese plates.
It’s fun and a way to travel without leaving the house.
I love getting into the kitchen and this isolation is creating the perfect opportunity.
Christina’s about to tuck into one of my signature sausage rolls for lunch. These are super easy by the way. Frozen pre-rolled puff pastry sheets and sausages with the skins removed.
Lay the sausage meat on the pastry, roll it up and seal it and whack it in the oven (180ºC for about 15 minutes).
Before you cook them, these freeze really well too by the way. Cook them from frozen at 160°C for about 25 minutes or until the pastry is golden brown.
It’s important to keep doing the things you normally do – especially those that make you happy. Thankfully we have plenty of gin, dry vermouth and olives in the house at the moment for martini o’ clock!
Back in the kitchen, I’m baking my weekly loaf of bread. You can use regular flour but strong bread flour is better. Then you can add all the seeds and things in as you go.
If you’re interested, I’ll be sharing my recipe and method for baking bread later this week – though if you’re thinking of baking your own, best start hunting for baker’s yeast now – there seems to be a shortage for some weird reason.
If there’s one thing I am genuinely happy about it’s my wine club subscription to Cupitt Estate. These guys – with their beautiful cellar door in Ulladulla, NSW – make superb wine and are still sending out their top picks.
This is a great way to keep your wine stash topped up and also to help local producers. If you have a favourite winery, why not look into whether they have a club you can join or if they’re still delivering?
Tonight, we’re enjoying a bit of cheese with one of our new wines from Cupitt’s – the Slaughterhouse Red – a Shiraz Cabernet blend – while we finish this surreal miniseries on Netflix.
If you’re looking for a really weird show to watch, check out the Tiger King.
Travel tips for self-isolation
So much of travel and our motivation to see the world is based on creating memories, so why not tap into those memories you’ve already made and revisit some of the incredible places you’ve been to?
Whether that’s just looking through old travel photos – or even making them into an album you can have pop up on your TV when it goes on standby, or making a dish that you ate while you we were away (like the taralli from Puglia we made at home) or music that reminds of that time you were away.
Here are some other clever ways we’ve found to travel without leaving your house.
Visit virtual Chicago
Our friends from Choose Chicago tourism board sent an amazing list of things you can see and do just with the aid of wifi.
Click here to download the pdf and sit back to explore the Windy City!
You can take an architectural tour of Frank Lloyd Wright’s home, visit the beautiful Art Institute of Chicago, go into the Adler Planetarium, peer into the wildlife of the city’s zoos and aquariums, learn recipes from Chicago’s finest chefs, and even hook into the world-renown music scene here all through the click of a hyperlink.
Cook along with Thai chefs and eat like you’re back in Chiang Mai
The Thai tourism board – Hug Thailand – is working with Chat Thai, an excellent Thai restaurant in Sydney running live-stream cooking classes on Facebook!
Every Friday at 4pm, check out what the kitchen is cooking.
This really reminds me of when we had a cooking lesson in Bangkok recently – the most fun we’ve had on the road!
You also get the recipe and can watch the lesson in your own time!
Get help with that novel you’ve been thinking about
They say there’s a book in everyone, the only problem is never having the time to get it started.
Well, you’re at home now, so why not try your hand?
If you’re not sure about where to start, how to get the middle going or what you do to finish, you should check out the online lessons from the Australian Writers’ Centre.
I did a course for feature writers years ago with these guys and it was brilliant. I’m sure their fiction-writing course is just as good.
If you can’t go to the places of your dreams, perhaps you can create them.
The AWC also does a course on content creation, which is just about the smoothest segway to my last idea…
Start your own blog!
One of the main reasons we started Mr & Mrs was so that we could google our own lives! Having a searchable resource online of what you’ve done stops the frustration of trying to remember what you did at Christmas last year.
It also started out as a creative outlet for me and a place for Christina to put her beautiful photos.
From that, I’ve turned this into my full-time job and Christina – as well as Hair Romance now runs Photography Romance with her sister Mary.
There are so many more reasons to start your own blog too, and if that’s something that interests you, check out our post on how to start your own blog here.
It explains the basics of starting up and has advice about hosting (use our special link to BlueHost here), platforms and domains and platforms.
We hope you’ve enjoyed this Weekly Edition and that you’re safe and well.
Keep your chin up and let’s hope we’ll all be free again soon!
Cheers – Jim & Christina xx
The post Travel without moving – an isolated lifestyle appeared first on Mr and Mrs Romance.
#WeeklyEdition #Isolation #Lifestyle #Travel #InstagramDiary

Arplis - News
source https://arplis.com/blogs/news/2020-04-26
0 notes
Text
What’s the Best Instagram Image Size 2020? Complete Guide
What’s the best Instagram image size?
Find all the Instagram dimensions:
Photo, graphic, and video Instagram post size, and infographic.
Instagram Stories size for image and video.
Instagram Story highlights cover size.
Instagram ad sizes, and infographic.
IGTV video specs and sizes, plus IGTV cover images.
“https://growinsta.xyz/wp-content/uploads/2020/04/the20savvy20marketere28099s20guide20to20igtv.html” infographic.
Combat misinformation online! Share this article with friends and followers.
What Are the Instagram Image Sizes for 2020?
Instagram grew to 1 billion monthly users in 2019, and 63% of them log in every day.
200 million Instagram users visit at least one business profile daily.
That’s a lot of eyeballs on your posts, so let’s get those sizes right!
Instagram upgraded the paltry 640 pixel square to a more robust 1080 on July 6, 2015. They also added support for non-square images on August 26, 2015.
The optimal sizes are 1080 pixels wide by 566 pixels to 1350 pixels high.
The maximum Instagram resolution is 1080 pixels wide.
Un-square shapes were added for Instagram ads.
You can post a landscape image in a 1.91 to 1 aspect ratio, which is exactly the same as a Facebook link preview image. So there’s cross-platform compatibility with IG and Facebook ads.
But I don’t recommend the landscape for marketers, as it takes up less than half the space you could snag with a portrait image!
If you have a landscape photo or graphic that you don’t want to crop to a square, consider using one of the many apps that add a border top and bottom to take up more space in the feed.
If you do post a wide (or tall) image, be aware that it will be cropped to a square on your image gallery (profile page).
The portrait image gives you the most bang for your buck in the Instagram stream.
Stick with the 1080 pixel width, and go up to 1350 pixels tall. If your photo is larger, no worries – Instagram will reduce it when you post.
Try not to post smaller, though, as your image will lose quality when viewed on most devices, especially retina screens.
The Instagram portrait aspect ratio (or proportion) is the same as an 8 x 10 portrait photo!
You’ll find the aspect ratio 4:5 or 8:10 offered as a cropping option in your photo editing app – or you can crop right in the IG app.
Which do YOU think has more impact on Instagram – landscape or portrait shape photo?
Why Is My Instagram Photo Post NOT 1080 Pixels Wide?
When you share a photo on Instagram, whether you’re using Instagram for iOS or Android, it posts at the best quality resolution possible (up to 1080 pixels wide).
There are a few reasons you may be seeing lower resolution photos on Instagram:
Photos between 320 x 320 and 1080 x 1080 pixels will post at their original resolution.
You may need to update to the most recent version of the Instagram mobile app.
The desktop version of Instagram only displays up to 640 px images.
Your phone might not take and/or support high resolution photos.
NOTE: If you share a photo at a lower resolution than 320 pixels wide, it’ll be enlarged to 320. Please don’t even think of posting such a low rez photo!
If you share a photo at a higher resolution, it’ll be sized down to 1080.
Sizing down is always better than sizing up!
Why You Might Want an Even Larger Instagram Photo Size
I love the Instagram editing tools. Even when I do photo edits in Photoshop, I might add Lux or Saturation in Instagram. Awesome tools!
If you have Save Original Photos set to ON in your Instagram settings, your edited photo is saved at its full resolution to your device’s photo library.
If you want to use the photo to make prints, a picture book, or something else where you need a high resolution… post your Instagram images as large as needed for the later use.
Social media photos are constantly enlarging. Post 1080px square if possible – even larger if you want to ensure you can reuse the image at top quality next year! Who knows, the size may increase again by then.
How Do I Choose a Portrait or Landscape Photo on Instagram?
In early June 2019, Instagram started messing with where you change your photo shape. For about a week, you chose portrait or landscape on the screen after you selected your photo.
I was not a fan, because you could no longer determine which frame you shot would work best when cropped. You had to decide from the squares.
If you didn’t like the way it cropped, you had to return and choose another.
I’m guessing they got a lot of flak on this and did an about-face.
Directly below are the current instructions as of August 15. I’m leaving the previous instructions in case they switch again, or you have a different version of the app.
Select a photo or video from your phone or tablet’s photo library. Stay on this screen. To share it as a portrait or landscape instead of a square:
Tap the crop icon at the left to switch from a square to a portrait or landscape.
You can pinch the screen to adjust the exact shape. Cropping in the same shape must be done on the Edit screen.
Tap Next to filter or edit.
Tap Next to post.
If you do NOT see the crop icon when choosing your photo:
After selecting a photo or video from your phone or tablet’s photo library, you will be immediately sent to the Filter screen.
To post as a portrait or landscape instead of a square:
Tap the crop icon at the top to switch from a square to a portrait or landscape.
You can touch the screen to move the photo and adjust how it fits within the frame.
Choose to apply a filter or edit.
Tap Next to post.
In version 1, to change the proportion you must do so before tapping Next. In version 2, you change the overall shape (or aspect ratio) of the photo on the Filter or Edit panel.
Also note that the white bars you see down the sides of a portrait photo while you’re editing it will NOT remain after it’s posted. This is just to fit the image into the editing area. It will actually post even larger – to the full width of the feed.
Unsquare images appear as center-cropped squares on your profile gallery. These photos were all posted as portrait shape.
NOTE: You must have Instagram app version 7.5 or later to post unsquare photos as well as see them. Users with older versions of the app will see your image cropped to a square.
Additionally, unsquare images will appear as a center-cropped square in your profile grid (see image at left).
Many people are sticking with the square, and it’s still a powerful shape.
The taller image gives you a better Pinterest presence (where tall mages rule) without having to create a separate graphic. In fact, Pinterest has experimented with showing ALL Pins at the same 8×10 aspect ratio in the home feed!
Pinterest now seems to be more accepting of less-tall images that make cross-posting content from IG to Pinterest easier.
What size are Instagram Stories?
Good news for marketers: 1/3 of the most-viewed Stories are from businesses! And 62% of people say they have become more interested in a brand or product after seeing it in Stories.
Instagram has the second-highest social referral rate for ecommerce sites, at 10.7%.
How do IGers get to your site? Links in your Stories! Note, this feature is limited to business accounts with over 10K followers.
Whether you’re posting a photo, graphic, or video to your Story, it’ll take up the full mobile screen.
The recommended size is 1080 x 1920 pixels, or any 9:16 proportion.
Instagram Story highlight size: If you’re making graphics, the 1080 x 1920 pixel size is ideal. When you go to customize your cover you’ll be able to zoom in on the area of your photo that you want highlighted in the circle.
If you’re uploading a photo, almost any size or shape will work BUT it’s going to be cropped in the Instagram app to a long skinny rectangle smack dab in the middle.
If that chops off half your face or some other important feature, simply use the 9:16 crop template in any photo editing app (even iPhone Photos) before adding it to your Story. The exact pixel size isn’t critical, but the shape or aspect ratio is.
If you’re planning to add a video to your Instagram Story, you’ll make your life a lot easier if you shoot it in a vertical format, holding your phone upright. Then it should look just right when you add it to your Story.
Note that videos added to Stories are limited to 15 second clips! As of 2019, Instagram will cut longer videos into 15 second bits.
You’ll want to keep Story videos relatively short though. Post longer videos to IGTV – details after the section on ad sizes.
Instagram Ad Sizes 2020
If you have an Instagram business account, you can advertise on Instagram, and even easily promote a post right within the Instagram app.
According to the Instagram official website, 60% of people discover new products on this platform, and there are around 25 million business profiles with 2 million active advertisers on Instagram.
About 200 million Instagram users visit business profiles per day. Isn’t it impressive that studies on Instagram marketing found that 72% of users purchased items they discovered via Instagram content!
That’s 130 million Instagram users tapping on shopping posts every month. Are they shopping your business?
Reach more of your audience with Instagram ads! Instagram’s potential advertising reach is 849.3 million users. Reach them well with the appropriate ads.
Below are sizes and specs for the 5 types of Instagram ads.
1 | Instagram image ad size and specs
The Image Ad is the most widely used advertising type for both Instagram and Facebook.
As Instagram is a photo-sharing social media platform, it’s essential to share visually pleasing content.
Instagram crops your image to a square when it is displayed on the feed, but you can also add it as a landscape or portrait image.
Here are some specifications of Instagram image ads:
Caption: up to 2,200 characters
Image format: .jpg or .png
Max. file size: 30 MB
Square (1:1 aspect ratio):
600×600 pixels (minimum)
1936×1936 pixels (maximum)
Landscape (1.91:1 aspect ratio):
600×315 pixels (minimum)
1936×1936 pixels (maximum)
Portrait (4:5 aspect ratio):
600×750 pixels (minimum)
1936×1936 pixels (maximum)
2 | Instagram video ad size and specs
Video Ads let you introduce your brand or offers with a video or GIF.
Instagram videos start to play when the application opens. The moving nature of video ads helps to catch user attention as they scroll their Instagram feeds.
Time spent watching videos on Instagram was up more than 75% year-over-year in 2019.
Here are the basic specifications:
File Size – up to 4GB
Length – 120 seconds
Caption Length – 2200 characters
Aspect Ratio:
Square – 1:1
Landscape – 1.91:1
Portrait – 4:5
3 | Instagram Stories ad size and specs
Stories are one of the popular features on Instagram.
Instagram Stories are similar to Snapchat in that they allows users, and brands, to share self-destructing photos and videos. They draw attention to your brand with Stories Highlights, which will stay on your profile until you remove them.
On Instagram Stories, you can post recorded videos, photos, live videos, boomerangs, text and music. You can also add stickers such as your location, user tags, the temperature and hashtags.
Here are the Stories specs:
Format: Full-screen vertical ad (9:16)
File types: .jpg or .png
Photo content: visible for 5 seconds
Aspect Ratio: from 1:91 to 4:5
File type
.mp4 or .mov (Video)
.jpg or .png (Photo)
Maximum File Size:
4GB (Video)
30MB (Photo)
Length
Maximum: 15 seconds
Images show for 5 seconds by default
Dimensions
Resolution: 1080 x 1920 (portrait)
Minimum: 600 x 1067
4 | Instagram Collection ad size and specs
Collection ads worki like this: When users see an advertisement or offer from your brand, they’ll have the option to purchase products directly from the ad.
Using Collections, you can showcase your products and discounts to increase sales. The result proved that it increased conversions by 6.3%.
Aspect ratio: 1:1 to 16.9
Character length: 90
Formats and dimensions are the same as those of a standard image or video ad.
5 | Instagram Carousel ad size and specs
Carousel ads allow you to show a series of scrollable images or videos rather than just one single image.
This ad feature can link to your Facebook Page or website directly using a “Learn More” button.
Here are some specifications of Carousel ads:
Minimum number of carousel cards: 2
Maximum number of carousel cards: 10 successive carousel cards
Aspect ratio: 1:1 (recommended)
Resolution: 1080 x 1080 pixels (recommended)
Image file format: .jpg and .png
Image maximum file size: 30MB
Video length: up to 240 minutes (15 seconds recommended)
Video file format: .mp4
Video maximum file size: 4GB
to see and repin the entire Instagram ad sizes infographic on Pinterest. Our thanks to by TechWyse for the graphic and complete guide to .
How to use IGTV for Marketing
Instagram TV, or IGTV, is the place for users to post longer-form videos.
Any IGer can post videos up to 10 minutes, and verified users can post videos up to 60 minutes in length. Users who follow your account on regular Instagram will see a preview in the regular feed, suggesting they click to watch more on IGTV.
This IGTV infographic, “https://growinsta.xyz/wp-content/uploads/2020/04/the20savvy20marketere28099s20guide20to20igtv.html,” was created by .
Launched in June 2018, IGTV is the latest offering from Instagram. This infographic shows you everything you need to know in order to get the most out of this brand-new feature for your brand’s content marketing strategy.
Five years after the launch of video on Instagram, we are excited to introduce IGTV which brings audiences closer to the creators they love.
We are re-envisioning mobile video with a new standalone surface that features longer videos and easy discoverability through channels, all in a vertical format that sits upright, in the palm of your hand.
We’re evolving with the times; these days, people are watching less TV and more digital video. By 2021, mobile video will account for 78% of total mobile data traffic. And we’ve learned that younger audiences are spending more time with amateur content creators and less time with professionals.
IGTV is:
Mobile first: IGTV is built for how you actually use your phone: vertical and full screen.
Simple and intuitive: It starts playing as soon as you open the app. You don’t have to search or browse to get started, and it’s easy to multitask.
Curated: IGTV is focused on the creators you love most and already follow on Instagram.
Anyone can be a creator on IGTV and upload videos in the app or on the web.
What IGTV means for businesses
Longer vertical video on Instagram makes it even easier to get closer to your audience and be discovered by new people.
Be first: Be among the first to lead the future of video.
Get closer: Use longer, permanent video for deeper storytelling. Build stronger connections with potential customers as you showcase other dimensions of your business without being limited to one type of content, length or format.
Leverage your community: As with Instagram stories, IGTV is built on Instagram leveraging a global community of more than 800M people. When your followers open IGTV, they will instantly see original content from you, and new people can also discover your brand.
In conclusion, Instagram says: We believe this is the future of video. People continue to spend more time with entertainment on their mobile devices, and we’re making it easier for them to get closer to the creators and original content they love.
Your next step with IGTV? Learn how to maximize your marketing on the infographic at the end of this article!
What are the video requirements for IGTV?
Videos must be between 15 seconds and 10 minutes long.
Note: Larger accounts and verified accounts can upload videos up to 60 minutes long, but they must be uploaded from a computer.
Videos must be in MP4 file format.
Videos should be vertical (not landscape) with an aspect ratio of 9:16.
Videos should have a minimum frame rate of 30 FPS (frames per second) and minimum resolution of 720 pixels.
The maximum file size for videos that are 10 minutes or less is 650MB. The maximum file size for videos up to 60 minutes is 3.6GB.
IGTV Cover Photo Size
The recommended size for cover photos is 420px by 654px (or 1:1.55 ratio). Right now, you can’t edit your cover photo after you’ve uploaded it.
I have no clue how they came up with this size, but it says so .
Which Instagram image size will you use?
We covered all this:
Photo, graphic, and video Instagram post size.
Instagram Stories size for image, video, and highlights cover.
Instagram ad sizes, all 5 types.
IGTV video specs and sizes, plus IGTV cover images.
Miss something? Scroll back to review. Scroll down to see the infographics!
This post was originally published September 2015 and last updated December 2019.
Please share!Help the word get out. Pin the graphics below.
Help others learn what’s the best Instagram image size!
Super-de-duper Insta-info Louise! Pinned, shared and tweeted the goodness x
Thanks a million, Emily!
thank you for this useful information 🙂
You’re welcome!
so nice
Glad it was helpful.
hello,
i understand that currently, instagram only allows 1080×1080 for ads, do you happen to know if it’s true?
You can also do a horizontal in the same proportions as Facebook: 1.91 to 1. Minimum size 600×315 pixels.
Hello and thank you for this post 🙂
One thing I don’t understand:
I have a portrait image, and I resized it to be 1080 tall. I tried to post it but Instagram is cropping it. I than found your post and resized it to 1035 tall. It still cropping it. why?
Thanks a lot,
Shlomit
You have to tap the little button that converts it from square to the shape of the photo (whether horizontal or vertical). The precise pixel dimensions don’t affect whether it can be posted as non-square (but at last 1080 wide is optimal).
what little button ?
In iOS it’s in the lower left corner and looks like 2 brackets
Wondering why when I hit the option to switch to portrait I get the white bars in the sides instead of filling the frame like your example. Any thoughts?
It only has bars on the sides in edit mode, so you can see the full image. It won’t have bars once it’s posted.
Hey Louise,
Thanks for the updated information.
I prefer to use 1080X1350 as you can express more. Ditching the standard square format.
Thanks for the article!
Regards,
Bloggerpunit
I prefer tall, too. Enjoy!
One thing I’m having a hard time finding out is the best DPi for Instagram. I’m saving photos in Photoshop at 1080X1350 at 300dpi, but should it be 72dpi for the web? Are images still getting compress at 300dpi?
Thanks!
Pixels per inch doesn’t matter for the web. Images will be shown per the user’s device resolution.
But…. if I upload an image at 72dpi and the user’s device is 96dpi am I going to be uprezed and thus lose out to someone posting at 300 which could always down rez?
Images on the web don’t maintain any number of pixels per inch. Overall pixel size is all that matters. But if you want to save at 300 ppi, be my guest.
Ppi is a printer measurement. Get the Pixel dimensions correct. Ignore ppi. Louise is right!
Thanks Rich!
Hey Louise I just discovered your blog and want to send a big thanks for creating really practical, no fluff articles. I’m book marking you now to share with my followers who I know will appreciate your style.
Fantastic! Glad to hear it, Janet.
Fantastic. Love your stuff. Shared this post.
Thanks for sharing!
I always crop my photos to 1080×1080 at 100% quality and 72dpi… but, on the iPad the photo still looks a bit fuzzy. Any way to improve the quality for iPad viewing?
I’ve noticed this too. I don’t think you can because the iPad screen size is bigger than 1080 pixels. I’ll let you know if I discover any tricks.
What are the specs of the header “circle” image?
Use any size you like as long as it’s no smaller than 110 pixels either way.
Louise,
I did see that the portrait photos are cropped on the bottom and top to show the square shape in the integral feed, do you know how much from each? or it would be same from both ends?
Yep, tall or wide images will crop to a centered square.
Thanks for sharing all Instagram sizes.
I use big one works better
I use tablet for posting pictures on Insta.. the posted pics look a bit compressed and very fuzzy. I upload pictures from DSLR with full resolution without changing anything. Earlier I used 7 inch tablet and posted the same way but the picture quality was better..now I have 8 inch tablet and the pictures are fuzzy. I am thinking about buying a small screen phone..I don’t know if the big screen size is causing the problem or the high resolution size of image.
It may be just how it appears on your screen. Have you tried viewing a posted image from another device?
Hello Lousie,
Thanks for such a great informational article.
I prefer long image since it offers us to display more content to our audience.
Regards,
Sky Ab
Agreed!
what is the size of Instagram post?
This is covered thoroughly in the article. Is there something you don’t understand about it?
Hi, very nice and helpful post.
I prefer using square images of size 500px by 500px.
I strongly recommend you upsize as that will reflect poor quality. Instagram is all about great images!
Hi Louise,
Your post is really helpful for me because this post told me the best size image of Instagram post.
I am first time visit here and now I am big fan of your website so keep posting such a great article with us.
Regards,
Basit
Will do!
Hi Louise,
I’m curious about posting a 2048 pixel vertical to IG. If I share it to FB thru the IG upload will it retain the pixels, or will it resize it down to 1350 when it posts to FB?
Thanks and HNY!
I just checked the one I shared to FB this morning. It was 1080 x 1350, but saved to my camera roll at full size (I do some edits in IG and save the pics).
This was exactly what we were looking for! It’s crazy how all the platforms have their different preferred sizes. Took tons of notes on this Insta Sizes for 2019. Appreciate you sharing this info Louise 🙂
Yeah it can get confusing! 🙂
Hey Louise,
Thanks for the updated information.
I prefer to use 1080X1350 as you can express more. Ditching the standard square format.
Thanks for the article!
Great post. Thanks!
What I just don’t get is why nobody talks about KB and MB for Instagram images. This gets completely ignored in every post I see on the subject.
Isn’t KB/MB relevant for Instagram images? What are the KB or MB limits I should use for best Instagram image quality?
Thanks!
I have not found it to be relevant. After all, IG’s intention is that you post photos on the fly, not that you edit and save them to a required size.
I do have a complete article on Instagram resolution here.
Louise, MB has EVERYTHING to do with instagram and image quality. If you have a MB that has to be downscaled, your photo will Always look better, swear on my life. In the future, quality will increase and photographers cannot turn back time or replace an image, however they can put a greater image that is prepared to scale when the puny phone app catches up to the display of the intended upload.
Great points Kevin.
Recently tried out the 1080 by 1350 size for a standard IG post, it turned out cropped. Any reasons why this should happen?
Had to revert to 1080 by 1080 as a result.
Only reason I know of is if you didn’t tap the bracket icon at lower left to show the correct shape.
Such detailed information about the image size for Instagram posts is really good. Thanks for helping me out. I am going to try this from now on.
Great! Best of luck.
You seem to not understand the difference between resolution (LPI-Lines per inch, DPI-dots per inch) and page or document or picture size. Resolution is the amount of colored dots placed in each inch, centimeter, of monitor, paper, magazine, app space. The higher the resolution, the better that image is seen, up to a point. Magazines are printed at 600-1200 DPI, screen resolutions vary from 72 DPI (for internet low quality images) to up to 600 DPI for higher resolution images.
I don’t? I did print design for 25 years. I completely understand DPI. Is there something here that I need to clarify for the general public? I’m open to your suggestions, as long as it’s geared to non- print designers, as print people is not my audience.
Honestly , I don’t like square size resolution. I will upload photos in full size portrait mode. Thanks for image resolution info !
My pleasure.
I always apply landscape mode for all my IG posts, but in a square frame, using Instasize. So my post looks like a photo embedded in a canvas. I think it’s more interesting than a full-size post without spacing.
That’s another great option.
Thanks Louise. You are soooo smart!!
I’m trying to use Hootsuite for IG scheduling. I don’t think it has the little brackets. Am i right? Also what is the best app for resizing? I need something that works on desktop/laptop so I can use it with hootsuite.
Thanks so much. BTW how much do you charge for individual coaching?
Lora
I haven’t used Hootsuite in ages and don’t know what you mean by brackets.
As far as resizing on computer, I suppose you could use Canva which is free. Snappa, Stencil, any would work.
I no longer offer any services, I just blog! 🙂
What an informative post that mostly went way over my head lol. I’ll understand it all one day. In the mean time, I am trying to find out what settings to use in photoshop to make an instagram post. My photos I take on my phone show as 960×960 pixels in photoshop and are over 13″ width/height. When I create a new document with those specs in photoshop, the graphic is just over 3″. My end goal is to be able to create my own graphics to post in Instagram but I want to be able to print them all the same size for a collage. I really appreciate your suggestions?
I would suggest you check your phone settings and choose a higher resolution for your photos. While those would be adequate for Instagram, they’re not so good for printing unless you’re OK with 3″ squares.
If you are, no problem. Just post the images at 960×960 on Instagram – no need to resize anything in Photoshop for that use.
Great job on the article and graphics, assuming they are your creation. Thanks for the inspiration!
My pleasure.
Hey Louise
I’ve been having trouble posting a portrait sized pic on IG I have made it the exact specs as you’ve described 1350px max H but the picture is still to big, but only just and crops the image. Any ideas why?
1080 x 1350 should work perfectly as long as you tap the crop tool at bottom left when you’re selecting the photo. Otherwise you’re stuck in square mode.
Awesome content, Louise! I too find portraits much more engaging on Instagram. That almost full screen real estate is not only bigger, but lets you show more detail. Landscapes are a real bummer. If you want to properly display a landscape, I typically crop at 2:1, and then make two separate images at 1:1 (one for the left side of the image, and one for the right side) and upload as an album. Its seamless and allows for that detail a proper camera is good for.
Super idea, Colin!
So, the standard size of 1080 pixels wide by 566 is an aspect ratio of roughly 1.78 to 1?
That’s the one thing I needed to clarify precisely. The rest I pretty much knew already or had zero interest in.
I shouldn’t have to get my calculator out to figure that sum. Ideally it should be the very first thing I read in your article.
Why must people in general waffle so much in their copywriting? I just get to the actual point then shut up.
(Not to mention, attention spans are at an all-time low. No-one reads every word of an article. Do you? People skim read for the actual info they want.
“Ideally it should be the very first thing I read in your article.”
Of course, if I wrote this article specifically for the information you wanted at that precise moment.
Other readers are actually looking for more and/or other information. Not to mention no one would find the article in the first place, since Google likes to see comprehensive content on a topic, with readers spending a long “time on page.”
That’s why people “waffle so much in their copywriting.” We’re trying to answer more than one question, and help readers find our articles via search.
Just found your additional comment in spam. How delightful of you to insult my intelligence as well.
I really appreciate the information you shared on this blog. Thanks
Any recommendation for a IOS app where i can change image size by pixels, and add a border. I have photoshop in my laptop but i take many pictures with my phone and will like to resize and get them ready for IG from my phone
I don’t know of any iOS apps that let you set a specific pixel size, however most have these recommended IG sizes built in.
As far as border, I don’t know of any that let you set a border in a click, but you can reduce the image on a colored background in something like Over app, to get a border effect.
https://growinsta.xyz/whats-the-best-instagram-image-size-2020-complete-guide/
#free instagram followers#free followers#free instagram followers instantly#get free instagram followers#free instagram followers trial#1000 free instagram followers trial#free instagram likes trial#100 free instagram followers#famoid free likes#followers gratis#famoid free followers#instagram followers generator#100 free instagram followers trial#free ig followers#free ig likes#instagram auto liker free#20 free instagram followers trial#free instagram followers no#verification#20 free instagram likes trial#1000 free instagram likes trial#followers instagram gratis#50 free instagram followers instantly#free instagram followers app#followers generator#free instagram followers instantly trial#free instagram followers no survey#insta 4liker#free followers me#free instagram followers bot
0 notes
Text
Interview with Dolly Daggerz of Tokyo Taboo!

Tokyo Taboo are a loud, ferocious band fronted by the inimitable Dolly Daggerz – who pole dances whilst singing at their shows! (As a pole dancer, I am incredibly impressed) I caught up with Dolly to get the low down on what it’s like in the industry, as well as what she thinks of #DLGRL (We now have an Instagram as well as a Facebook page, follow us @dlgrl2021)
Firstly, thank you so much for being an unapologetic, loud woman we can all look up to! How and when did you first begin to connect to your energy and power?
I think just slogging away in the music industry for a decade makes you really resilient and slowly not care what anyone thinks of you. It’s this fearlessness that has helped me when performing. Having idols that have a stage presence and something to say also helps! Pole has helped me enormously too as I’ve built my physical (and mental) strength and sometimes I’ll watch videos back and don’t recognise myself! I’m always surrounded by amazing women in pole class too so I’m sure this gives me strength and makes me feel supported. Never underestimate the power of women coming together and supporting each other. All the mainstream media and press want is for us to be against each other but when we join forces I honestly think women can conquer anything.
When did you make the decision to pole dance during your live shows? As a fellow musician and pole dancer, I’m hella impressed!
I’ve been performing for a long while and I get bored easily, so performing in the band was getting a bit stale. I always used to drink large amounts and climb on speakers and bend myself backwards off things as a thrill when performing. I took away the drink so replaced it with pole. We tried it for one gig and slowly I tested my comfort zone and every show I pushed myself a bit more. Now I have shows where I’m on my X Stage platform about 90% of the show! (If it’s super sweaty and hot in the venue I struggle but otherwise I am flying!) It really has changed our whole live show!
Cris Watkins photographing the fabulous Dolly Daggerz!
What makes you the most proud about being a woman working in the music industry?
I think it’s important that I write the songs (alongside Mickey). Every lyric is written by me. I get so bored of reading / hearing the male point of view. I love female songwriters who are honest and outspoken. I particularly love Lily Allen’s lyrics for these reasons. I’m proud that I’m still standing and that I haven’t given up. I’m proud I’m still writing music I love, and putting on a stage show that is different to most, and for that reason, special.
What does your songwriting process look like? Such a fan of all your tunes!
We’ve just started writing again, focusing in on the final five songs of our second album. I usually play chords on the piano then words will flow out if I’m feeling particularly inspired, or emotional. At the piano I write really fucking sad songs and cry a bit. Other times I’ll be out running (another addiction) and I’ll have a song title idea or I’ll be sat on the tube and use my notes app on my phone to write a whole bunch of bollocks that’s running through my head, like a stream of consciousness. Then, I run through it all and edit it. I bin a lot of it and Mickey and I will work on a very small amount of my lyrics. It’s just important to let everything out, then edit later, whether it’s amazing genius or utter shite.

Cris Watkins photographing the fabulous Dolly Daggerz!
What is one show you’ve done that you would like to live through forever? (think Groundhog Day!) And what is one show you would most like to avoid?!
I loved playing at Byline Festival last year. We were in the middle of a forest so I felt like a little pole fairy in the woods! We gathered quite a big crowd! We definitely had a captive audience and got a lot of people messaging us after, saying that they were completely blown away. The nice messages always make you realise you should keep going even though the music industry can feel a bit much a times!
The worst gig for me was when I was sexually assaulted last year. A random drunk guy grabbed my ass when I was coming back through the crowd after singing sat on the bar. I was honestly so shocked that it ended up being Mickey who called him out. I’ve had a lot of problems with men touching me inappropriately and it makes me not want to perform when that happens. It feels like all the hard work I put into creating a great live show gets flushed down the toilet and I’m left feeling powerless and small. That feeling is so depressing. I make a point to speak up about being touched when I’m just doing my job selling merch or chatting to fans. We might eventually hire security at shows if it gets really bad, but I like chatting to people after the show. It’s a shame some people spoil everything and make me feel uncomfortable and unsafe.
What would seeing a woman in the headline slot at Download Festival mean to you? Do you have a pick of who you’d most like to see in the slot? (other than yourselves, of course!)
I actually had no idea that a woman had never headlined before until you contacted us! I was shocked and saddened but also not surprised. You look at a lot of festival lineups and it’s all the same ‘safe’ acts. Mainly male. It’s boring. We need festivals to take more risks I think! I LOVE Halestorm so please get Lzzy headlining PLEASE! Pretty please?
Massive thank you to Tokyo Taboo for supporting us with this campaign and answering all our questions! Make sure to follow this badass band on all the socials, which you can find below. And if you haven’t signed our petition yet, WHAT ARE YOU DOING WITH YOUR LIFE? Linked below as well.
#DLGRL petition: https://www.change.org/p/get-a-woman-to-headline-download-festival
TOKYO TABOO SOCIALS:
Live Video: https://youtu.be/OycnPvWDzw8
Official Website: www.tokyotabooband.com
Facebook: www.facebook.com/tokyotaboo
Patreon: https://www.patreon.com/TokyoTaboo
from Interview with Dolly Daggerz of Tokyo Taboo!
0 notes
Photo
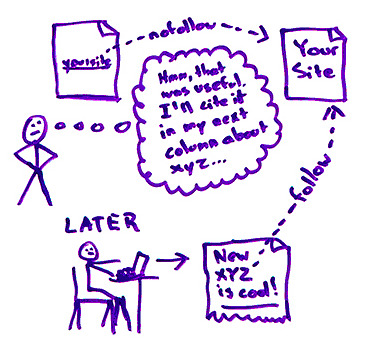
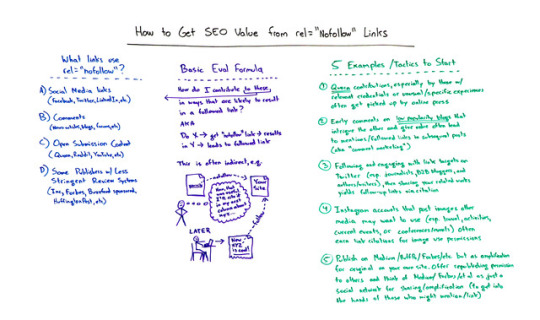
Getting SEO Value from rel=“nofollow” Links - Whiteboard Friday
Posted by randfish Plenty of websites that make it easy for you to contribute don’t make it easy to earn a followed link from those contributions. While rel=nofollow links reign in the land of social media profiles, comments, and publishers, there’s a few ways around it. In today’s Whiteboard Friday, Rand shares five tactics to help you earn equity-passing followed links using traditionally nofollow-only platforms.
Click on the whiteboard image above to open a high-resolution version in a new tab!
Video Transcription Howdy, Moz fans, and welcome to another edition of Whiteboard Friday. This week we’re going to chat about how you can get SEO value from nofollowed links. So in the SEO world, there are followed links. These are the normal ones that you find on almost every website. But then you can have nofollowed links, which you’ll see in the HTML code of a website. You will see the normal thing is a href=somewebsite in here. If you see this rel=nofollow, that means that the search engines — Google, Bing, Yahoo, etc. — will not count this link as passing link equity, at least certainly not in the same way that a followed link would.
So when you see these, you can see them by looking in the source code yourself. You could turn on the MozBar and use the “Show nofollow links” on the Page button and see these.
What sort of links use rel=nofollow? But the basic story is that you’re not getting the same SEO value from them. But there are ways to get it. Recently you might have seen in the SEO news world that Inc. and Forbes and a few other sites like them, last year it was Huffington Post, started applying nofollow tags to all the links that belong to articles from contributors. So if I go and write an article for Inc. today, the links that I point out from my bio and my snippet on there, they’re not going to pass any value, because they have this nofollow applied.
A) Social media links (Facebook, Twitter, LinkedIn, etc.) There are a bunch of types of links use this. Social media, so Facebook, Twitter, and LinkedIn, which is one of the reasons why you can’t just boost your linked profile by going to these places and leaving a bunch of links around.
B) Comments (news articles, blogs, forums, etc.) Comments, so from news articles or blogs or forums where there’s discussion, Q&A sites, those comments, all the links in them that you leave again nofollowed.
C) Open submission content (Quora, Reddit, YouTube, etc.) Open submission content, so places like Quora where you could write a post, or Reddit, where you could write a post, or YouTube where you could upload a video and have a post and have a link, most of those, in fact almost all of them now have nofollows as do the profile links that are associated. Your Instagram account, for example, that would be a social media one. But it’s not just the pictures you post on Instagram. Your profile link is one of the only places in the Instagram platform where you actually get a real URL that you can send people to, but that is nofollowed on the web.
D) Some publishers with less stringent review systems (Forbes, Buzzfeed, LinkedIn Pulse, etc.) Some publishers now with these less stringent publishing review systems, so places like Inc., Forbes, BuzzFeed in some cases with their sponsored posts, Huffington Post, LinkedIn’s Pulse platform, and a bunch of others all use this rel=nofollow.
Basic evaluation formula for earning followed links from the above sources
The basic formula that we need to go to here is: How do you contribute to all of these places in ways that will ultimately result in followed links and that will provide you with SEO value? So we’re essentially saying I’m going to do X. I know that’s going to bring a nofollowed link, but that nofollowed link will result in this other thing happening that will then lead to a followed link.
Do X → Get rel=nofollow link → Results in Y → Leads to followed link
5 examples/tactics to start This other thing happening can be a bunch of different things. It could be something indirect. You post something with your site on one of these places. It includes a nofollow link. Someone finds it. We’ll just call this guy over here, this is our friendly editor who works for a publication and finds it and says, “Hmm, that link was actually quite useful,” or the information it pointed to was useful, the article was useful, your new company seems useful, whatever it is. Later, as that editor is writing, they will link over to your site, and this will be a followed link. Thus, you’re getting the SEO value. You’ve indirectly gained SEO value essentially through amplification of what you were sharing through your link.
Google likes this. They want you to use all of these places to show stuff, and then they’re hoping that if people find it truly valuable, they’ll pick it up, they’ll link to it, and then Google can reward that.
So some examples of places where you might attempt this in the early stages. These are a very small subset of what you could do, and it’s going to be different for every industry and every endeavor.
1. Quora contributions But Quora contributions, especially those if you have relevant or high value credentials or very unique, specific experiences, that will often get picked up by the online press. There are lots of editors and journalists and publications of all kinds that rely on interesting answers to Quora questions to use in their journalism, and then they’ll cite you as a source, or they’ll ask you to contribute, they’ll ask you for a quote, they’ll point to your website, all that kind of stuff.
2. Early comments on low-popularity blogs Early comments especially in, I know this is going to sound odd, but low-popularity blogs, rather than high-popularity ones. Why low popularity? Because you will stand out. You’re less likely to be seen as a spammer, especially if you’re an authentic contributor. You don’t get lost in the noise. You can create intrigue, give value, and that will often lead to that writer or that blogger picking you up with followed links in subsequent posts. If you want more on this tactic, by the way, check out our Whiteboard Friday on comment marketing from last year. That was a deep dive into this topic.
3. Following and engaging with link targets on Twitter Number three, following and engaging with your link targets on Twitter, especially if your link targets are heavily invested in Twitter, like journalists, B2B bloggers and contributors, and authors or people who write for lots of different publications. It doesn’t have to be a published author. It can just be a writer who writes for lots of online pieces. Then sharing your related content with them or just via your Twitter account, if you’re engaging with them a lot, chances are good you can get a follow back, and that will lead to a lot of followed up links with a citation.
4. Link citations from Instagram images Instagram accounts. When you post images on Instagram, if you use the hashtags — hashtag marketing is kind of one of the only ways to get exposure on Instagram — but if you use hashtags that you know journalists, writers, editors, and publications of any kind in your field are picking up and need, especially travel, activities, current events, stuff that’s in the news, or conferences and events, many times folks will pick up those images and ask you for permission to use them. If you’re willing to give it, you can earn link citations. Another important reason to associate that URL with your site so that people can get in touch with you.
5. Amplify content published on your site by republishing on other platforms If you’re using some of these platforms that are completely nofollow or platforms that are open contribution and have follow links, but where we suspect Google probably doesn’t count them, Medium being one of the biggest places, you can use republishing tactics. So essentially you’re writing on your own website first. Writing on your own website first, but then you are republishing on some of these other places.
I’m going to go Forbes. I’m going to publish my column on Forbes. I’m going to go to Medium. I’m going to publish in my Medium account. I’m going to contribute Huffington Post with the same piece. I’m republishing across these multiple platforms, and essentially you can think of this as it’s not duplicate content. You’re not hurting yourself, because these places are all pointing back to your original. It’s technically duplicate content, but not the kind that’s going to be bothersome for search engines.
You’re essentially using these the same way you would use your Twitter or Facebook or LinkedIn, where you are pushing it out as a way to say, “Here, check this out if you’re on these platforms, and here’s the original back here.” You can do that with the full article, just like you would do full content in RSS or full content for email subscribers. Then use those platforms for sharing and amplification to get into the hands of people who might link later.
So nofollowed links, not a direct impact, but potentially a very powerful, indirect way to get lots of good links and lots of good SEO value.
All right, everyone, hope you’ve enjoyed this edition of Whiteboard Friday, and we’ll see you again next week. Take care.
Video transcription by Speechpad.com
Sign up for The Moz Top 10 , a semimonthly mailer updating you on the top ten hottest pieces of SEO news, tips, and rad links uncovered by the Moz team. Think of it as your exclusive digest of stuff you don’t have time to hunt down but want to read!
http://bit.ly/2y18Owe
#lagunabeachseo #socialmediamarketing #huntingtonbeachseo #articlewriting #blogpower #digitalmarketing #internetmarketing #newportbeachseo #bestlocalseo #contentwriting
#lagunabeachseo#socialmediamarketing#huntingtonbeachseo#articlewriting#blogpower#digitalmarketing#internetmarketing#newportbeachseo#bestlocalseo#contentwriting
1 note
·
View note
Text
StabMovies.com's Most Frequently Asked Questions (with answers)...
Where can I buy your Ghostface costume/robe?
You can't. Joshua Dudley sewed our GhostFace costume used in Stab 4, 5 and 6 with fabric donated to us by ManhattanFabrics.com. Many fan asks if we can sell them robes, however, we simply don't have time to make and sell more! Plus, Joshua's sewing skills leave something to be desired... lol. We used to have a link to the fabric but it is sadly no longer for sale. Joshua also just made us a new costume, out of new fabric, for Stab 7! We will continue to film with that costume for now.
What type of fabric do you use for your costume?
Truth is... we don't remember. We hunted the internet for fabric and bought the first thing we could find. A little advice though, if you want this fabric, search for black fabric with silver "lurex." That should help a little.
What kind of knife do you film with?
Where can I buy a replica Buck 120?Stab 4 and Stab 5 were filmed using a *real* Buck Knife 119. WE DO NOT RECOMMEND FILMING WITH A REAL KNIFE EVER! Stab 6 and the rest our Stab films feature replica Buck Knife 120's donated to us by Pop's Props, who no longer creates these replicas. Stab 7 features the same replica knives and a dulled down, real Buck 120. If you're trying to find a replica Buck 120... use google!
What type of camera do you film with?
Stab 4 was filmed on a FLIP Mino and Stab 5 was filmed on a Sony Bloggie and the last version of the FLIP camera. Stab 6 and the Trifecta of Terror were filmed on a Veho Kuzo. Stab 7, the more recent short films and future films are currently being filmed on a Sony NEX-F3.
What editing program do you use?
Stab 4 and Stab 5 were edited with Sony Vegas 9. Stab 6 and the Trifecta of Terror were edited with Final Cut Pro X! Stab 7 is being edited in Sony Vegas 12 and 13.
Where can I watch your movies?
You can watch all of our movies right here, on our website, on their respective pages and on our YouTube Channel www.youtube.com/stabmovies
Why can't we watch the first 3 Stab movies?
When we decided to start making our Stab movies, Scream 4 had not yet been released. Only rumors that in Scream 4's script we would learn that they are now up to Stab 7. Joshua Patrick Dudley decided to start making the Stab movies with Stab 4 because we had already seen the first Stab in SCREAM 2 and though we never saw the second or third Stab film, it was established in Scream 3 that Stab 3's production had been shut down. We skipped making the new Stab 3 "Hollywood Horror" simply because we didn't want to re-make Scream 3. So production began on Stab 4: Fresh Blood and continued.
Why are there Scream movies inside your Stab movies?
We're trying to create original, Stab/Scream-themed fan films that everyone can enjoy. One of our favorite aspects of these movies is that they play on the levels of reality. In Stab 4, the Stab movies were real movies, but in Stab 5, the Stab movies weren't real, the Scream movies were.... doesn't make much sense for a Stab movie... but we like to think we've created a whole new Stab universe where the Scream movies are like the Stab movies... based on "real" events.... does that make sense? Also, I often wonder if the Stab movies are called "Stab" inside the Stab movies, or if they are called something else. So us calling it "Scream" could also be the title of the Stab movie in the Stab movie. Confusing, huh?
Why doesn't your Stab 5 have time travel?
When we decided to start making our Stab movies, Scream 4 had not yet been released. It wasn't revealed until Scream 4 that Stab 5 contained time travel. And again we like to think we've created a whole new Stab universe in tribute to the one that's already out there! If you read the individual Stab pages on our website, you'll notice that I tried to invent a new mythology for the Stab movies and even cite a different reason as to why there's no time travel. Check it out!
Can I buy your movies on DVD?
You can not buy our Stab movies on DVD but you will however be able to buy all of our new original content on DVD!
Can I be in your movies?
Maybe! We only cast actors over the age of 18 who can afford their travel expenses. Auditions are held about a year before production begins on each film and we normally churn out one film a year! Audition info can be found on the main page of this site when available.
Can I write your next movie?
Nope. Joshua and Rachel will continue writing our films.
Who makes these movies?
Our films are made by two friends named Joshua Patrick Dudley and Rachel Alexandria Arnold. Joshua writes and creates everything and Rachel is right by his side to help make it all go smoothly. They both work for Joshua's production company, JDuDs Productions. Joshua and Rachel work closely together on almost every aspect of making the films... and they do it all for your enjoyment!
Where do you film your movies?
We film mostly in Manchester, NH and Bedford, NH, U.S.A. But we have also shot in Hollywood, CA, Philadelphia, PA, Hooksett, NH and Newmarket, NH. But, now we will be filming in YouTube Studios in New York City and Los Angeles!
Who makes your promotional poster art and website?
Joshua Patrick Dudley.
Can you give me advice about filming my own Fan-Film?
Be prepared for the worst! Filming is a crazy process, nothing ever goes right the first time and if it does, something else will go wrong later! Make sure you have a solid script and actors who are committed to the project, who will actually show up when it's time to film! Plan out your shots and lighting before you get to the set! And take your time with the death scenes, they can be tricky... but a lot of fun to film! Good luck with your own films!
Will you read the script I wrote?
As much as we would love to hear all of your ideas, we simply don't have time to read other's scripts! We have movies to make! However, we do encourage you all to write! Writing is a great, fun experience!
How can I contact a Stab cast member?
Many of our stars have Twitter accounts or Facebook pages that we encourage you to "follow" and "like" to interact with our actors and actresses!
I heard you are rude to people that critique your films...
Not true! Well... half true! lol There is a difference between giving a honest review of a movie and simply talking shit. We always tell shit-talkers to go fuck themselves, and so should you! However, we do understand the importance of our fans' feedback and with each new film we try to give the fans what they want by listening to their comments and reading their reviews!
2 notes
·
View notes
Text
Best Email App For Mac Computer

Best photo app for iPhone PicsArt is an easy-to-use and attractively-designed app that helps you edit photos with mashups, filters, shape overlays, collages, frames and more. Separating amazing apps from must-have apps is the hard part, and we don’t want you to spend hours analyzing the Mac App Store (or scouring the web) to find the very best and most useful apps. A recent surge of worthy new email clients offers Mac users some of the best choices they’ve ever had for managing their mail. With a panoply of clever features and new ideas, these contenders. Apple Mail is one of the best email apps for Mac users. This Mac Email client is well designed for Apple ecosystem and works well with OS X and iOS devices. This built-in Mac email client works well with most of the email providers like Gmail, iCloud, Outlook, Yahoo, etc.
Today's Best Tech Deals
Picked by Macworld's Editors
Top Deals On Great Products
Picked by Techconnect's Editors
Arcode Inky
Read Macworld's review
eightloops Unibox 1.0
Read Macworld's review
Mindsense Mail Pilot for Mac
Read Macworld's review
Freron MailMate 1.5
Read Macworld's review
Generic Company Place Holder Airmail
Read Macworld's review
Postbox 3.0.5
Read Macworld's review
A recent surge of worthy new email clients offers Mac users some of the best choices they’ve ever had for managing their mail. With a panoply of clever features and new ideas, these contenders have also mounted a serious challenge to the relatively stagnant Apple Mail and Microsoft Outlook. But with so may options to choose from, it’s now even harder to pick out the best email client for your particular needs. We’ve found one strong program that offers a great mix of features, usability, and value for a broad swath of users, plus several more that will cater well to more specialized preferences.
Top choice: Postbox 3
Postbox 3 () isn’t the newest or sleekest candidate in this roundup. Its design hews more closely to the traditional Mac look and feel, rather than adopting a slick iOS-like appearance. But for $10, it combines reliable performance, smart design, and a wide array of impressive features that make the program feel like what Apple Mail ought to be.
Even though it’s built on Mozilla’s aging Thunderbird underpinnings, Postbox handled my email quickly and confidently. Setting up new POP and IMAP accounts went smoothly; in one case, when I tried to set up a work Outlook account, Postbox patiently guessed at several different IMAP configurations until it found the right one. It then filled up my new mailbox relatively quickly, despite the pile of messages involved, and let me track its progress with a clear but unobtrusive progress icon.
Everywhere you turn in Postbox, you’ll find well-thought-out features that enhance your email experience. Message threads are easy to follow, with each message’s beginning and end clearly marked, and a quick reply box waiting at the end of the most recent message.
An inspector pane next to each message shows you not only who sent it —and, with a click, their entire contact card from your address book—but breaks out any links, images, maps, or package delivery info it finds in the message. You can also easily search for any messages, images, or attachments from a particular sender just by clicking links within their address book info.
And if work requires you to send a lot of form responses, Postbox builds in that ability. Just compose your response in preferences, then choose it from a pulldown menu when you’re writing a new email.
Postbox plays nicely with many popular social and productivity tools. If you have Evernote installed, Postbox can send emails to that service to help you keep track of them. Once you set up your account information, dragging and dropping files from your Dropbox will create links that let recipients download those files straight from your Dropbox account. And you can tie in your Facebook, Twitter, and LinkedIn accounts to not only get links to your contacts on those services, but post to all three directly from Postbox. The program will even use the Gravatar service to pull in images for your friends and acquaintances from one or more of those services.
A helpful To-Do mode lets you create new tasks, or turn existing messages into tasks, then check them off as you finish. Postbox also integrates an RSS reader to keep track of your favorite feeds, an increasingly rare feature among modern email clients. And Postbox provides great support for Gmail, including the ability to use Gmail’s keyboard shortcuts. None of these features gets in the way of simply sending or receiving email, but they’re all readily available when you need them.
Finding and using all these features can get a bit intimidating when you first start using it, but Postbox’s clear, straightforward, and easily searchable online help files make the learning curve much gentler.
Postbox 3 has begun to show its age; OS X updates since its initial release have actually broken a few features, such as integration with the Mac’s Calendar. But overall, Postbox seems like the best mix of price, capabilities, and quality for the majority of Mac users.
Best Email App For Ios
Top contenders
Inky
If you use email more for pleasure than business, you’ll likely enjoy Inky’s earnest efforts to present your inbox in ways that matter to you.
Built for portability, Inky () stores information for your POP and IMAP accounts—but not your mail itself—securely on its remote servers. Once you’ve set up that info, a single Inky login will bring all your email to any computer you’re using Inky with.
In a clean, colorful interface, Inky lets you view mail as a unified inbox, by individual accounts, or by several different clever Smart Views. The program’s smart enough to automatically recognize and sort messages containing maps, package info, daily deals, subscription mailings, and other common categories.
By clicking icons on each message, you can also teach Inky how to rank your email by relevance, so that it’ll display messages that matter to you more prominently.
I occasionally had trouble logging in to Inky, and had to quit and restart the program a few times to get to my mail. And Inky doesn’t offer business-friendly features like to-do lists, or any bells and whistles beyond sorting and handling email. But it’s free, it’s fun to use, and it’s full of well-executed and practical new ideas.
Mail Pilot
The same can be said for Mail Pilot (; Mac App Store link), a $20 email client built loosely around the Getting Things Done approach to productivity. It looks terrific, but for all its good qualities, it’s still missing a few crucial features.
Mail Pilot treats your inbox as a to-do list. Each message is a task that you can check off right away, set aside until you’ve got the time for it, or ask to be reminded about on a certain date. Clearly labeled keyboard shortcuts at the bottom of the screen make these tasks easy to accomplish.
Best Email App For Mac Desktop
It’s IMAP-only, and setting up your account ranges from simple (Gmail) to tricky (Outlook, although the program’s great help files spelled out exactly what I needed.) Once your mail’s in place, Mail Pilot offers lots of different options to navigate message threads. The variety puzzled me at first, but I came to appreciate the different ways it sorted and stacked my messages.
As a fairly new program, Mail Pilot’s still somewhat under construction. The ability to save new messages as drafts or search by message text won’t arrive until a later version. But if you’re in synch with Mail Pilot’s productivity-first approach, you’ll nonetheless find the program helpful and worthwhile.
Unibox
Give it a few more versions, and Unibox (; Mac App Store link) could become quite the contender. Right now, it’s a very well-designed and usable $10 app with a few pesky hiccups.
Setting up IMAP accounts is fast and easy, and once your mailboxes are populated, Unibox displays them not by message title, but by who sent you mail on a given day. From the top of the screen, you can switch between viewing each sender’s message thread, or seeing all the attachments or images in that thread by list or by icon.
I really enjoyed Unibox’s sleek and efficient one-window interface, which makes maximum use of space while still displaying your mail clearly. The new message window slides down from the top of each message thread. Buttons to sort, junk, or delete a message materialize when your mouse hovers to the left of it; replying and forwarding options appear when you hover to the right.
I wasn’t as fond of the blank screen Unibox displayed upon loading until I manually refreshed my mail. And it has a bad habit of truncating longer messages by default, forcing you to click again to read the whole thing. Still, it’s a smart program full of good ideas; it just needs a bit more polish.
The rest of the pack
AirMail
AirMail () offers an attractive, inexpensive front end for your IMAP-based webmail of choice. But while the program’s interface is nice to look at, it’s not always easy to use, with tiny, hard-to-see buttons and space-hogging new message windows. Gmail messages also take an unusually long time to load; promised Dropbox support proved impossible to set up; and AirMail offers few help features.
Mail.app
I used to love Apple Mail () but it’s begun to stagnate with the last few versions of OS X (Mail is free with OS X Mavericks). The latest incarnation trickles in a few new features, including the welcome ability to search by attachments and attachment types. And, as befits an Apple program, it’s well-integrated with the rest of OS X. It’s also the only client in this review to natively support Microsoft Exchange accounts, although Outlook’s increasing support for IMAP renders that a bit moot.
Alas, the latest version was plagued by troubles with Gmail, and Apple has released updates that address many of the problems. But wouldn't it be nice if it simply just worked?
MailMate
Like a mighty rhinoceros, the $30 MailMate () won’t win any beauty contests; it’s not what you’d call “approachable”; and it’s astonishingly powerful. Its gray, austere, text-only interface conceals jaw-dropping abilities to search, sort, and sift massive piles of mail. Its support for SpamSieve and PGP, and its unbelievably granular search categories—like “level of server domain”—make MailMate the undisputed best email pick for power users, but probably a needlessly intimidating choice for everyday users.
See a list of email clients available for the Mac
Bottom line

Even if you only want a simple, no-frills email experience, you don’t have to stick with Apple Mail. Inky’s a great free alternative for folks who just want a streamlined inbox presented in a friendly way. On the other end of the spectrum, MailMate is ideal for tech-savvy experienced users who want to rule their inbox like a cruel, all-powerful god. And right at the happy medium between those extremes, Postbox offers plenty of easy-to-use enhancements for a fair price.
Note: When you purchase something after clicking links in our articles, we may earn a small commission. Read our affiliate link policy for more details.
Arcode Inky
Read Macworld's review
eightloops Unibox 1.0
Read Macworld's review
Mindsense Mail Pilot for Mac
Read Macworld's review
Freron MailMate 1.5
Read Macworld's review
Generic Company Place Holder Airmail
Read Macworld's review
Postbox 3.0.5
Read Macworld's review
0 notes
Text
Getting SEO Value from rel="nofollow" Links - Whiteboard Friday
Posted by randfish
Plenty of websites that make it easy for you to contribute don't make it easy to earn a followed link from those contributions. While rel=nofollow links reign in the land of social media profiles, comments, and publishers, there's a few ways around it. In today's Whiteboard Friday, Rand shares five tactics to help you earn equity-passing followed links using traditionally nofollow-only platforms.
Click on the whiteboard image above to open a high-resolution version in a new tab!
Video Transcription
Howdy, Moz fans, and welcome to another edition of Whiteboard Friday. This week we're going to chat about how you can get SEO value from nofollowed links. So in the SEO world, there are followed links. These are the normal ones that you find on almost every website. But then you can have nofollowed links, which you’ll see in the HTML code of a website. You will see the normal thing is a href=somewebsite in here. If you see this rel=nofollow, that means that the search engines — Google, Bing, Yahoo, etc. — will not count this link as passing link equity, at least certainly not in the same way that a followed link would.
So when you see these, you can see them by looking in the source code yourself. You could turn on the MozBar and use the "Show nofollow links" on the Page button and see these.
What sort of links use rel=nofollow?
But the basic story is that you're not getting the same SEO value from them. But there are ways to get it. Recently you might have seen in the SEO news world that Inc. and Forbes and a few other sites like them, last year it was Huffington Post, started applying nofollow tags to all the links that belong to articles from contributors. So if I go and write an article for Inc. today, the links that I point out from my bio and my snippet on there, they're not going to pass any value, because they have this nofollow applied.
A) Social media links (Facebook, Twitter, LinkedIn, etc.)
There are a bunch of types of links use this. Social media, so Facebook, Twitter, and LinkedIn, which is one of the reasons why you can't just boost your linked profile by going to these places and leaving a bunch of links around.
Comments, so from news articles or blogs or forums where there's discussion, Q&A sites, those comments, all the links in them that you leave again nofollowed.
C) Open submission content (Quora, Reddit, YouTube, etc.)
Open submission content, so places like Quora where you could write a post, or Reddit, where you could write a post, or YouTube where you could upload a video and have a post and have a link, most of those, in fact almost all of them now have nofollows as do the profile links that are associated. Your Instagram account, for example, that would be a social media one. But it's not just the pictures you post on Instagram. Your profile link is one of the only places in the Instagram platform where you actually get a real URL that you can send people to, but that is nofollowed on the web.
D) Some publishers with less stringent review systems (Forbes, Buzzfeed, LinkedIn Pulse, etc.)
Some publishers now with these less stringent publishing review systems, so places like Inc., Forbes, BuzzFeed in some cases with their sponsored posts, Huffington Post, LinkedIn's Pulse platform, and a bunch of others all use this rel=nofollow.
Basic evaluation formula for earning followed links from the above sources
The basic formula that we need to go to here is: How do you contribute to all of these places in ways that will ultimately result in followed links and that will provide you with SEO value? So we're essentially saying I'm going to do X. I know that's going to bring a nofollowed link, but that nofollowed link will result in this other thing happening that will then lead to a followed link.
Do X → Get rel=nofollow link → Results in Y → Leads to followed link
5 examples/tactics to start
This other thing happening can be a bunch of different things. It could be something indirect. You post something with your site on one of these places. It includes a nofollow link. Someone finds it. We'll just call this guy over here, this is our friendly editor who works for a publication and finds it and says, "Hmm, that link was actually quite useful," or the information it pointed to was useful, the article was useful, your new company seems useful, whatever it is. Later, as that editor is writing, they will link over to your site, and this will be a followed link. Thus, you're getting the SEO value. You've indirectly gained SEO value essentially through amplification of what you were sharing through your link.
Google likes this. They want you to use all of these places to show stuff, and then they're hoping that if people find it truly valuable, they'll pick it up, they'll link to it, and then Google can reward that.
So some examples of places where you might attempt this in the early stages. These are a very small subset of what you could do, and it's going to be different for every industry and every endeavor.
1. Quora contributions
But Quora contributions, especially those if you have relevant or high value credentials or very unique, specific experiences, that will often get picked up by the online press. There are lots of editors and journalists and publications of all kinds that rely on interesting answers to Quora questions to use in their journalism, and then they'll cite you as a source, or they'll ask you to contribute, they'll ask you for a quote, they'll point to your website, all that kind of stuff.
2. Early comments on low-popularity blogs
Early comments especially in, I know this is going to sound odd, but low-popularity blogs, rather than high-popularity ones. Why low popularity? Because you will stand out. You're less likely to be seen as a spammer, especially if you're an authentic contributor. You don't get lost in the noise. You can create intrigue, give value, and that will often lead to that writer or that blogger picking you up with followed links in subsequent posts. If you want more on this tactic, by the way, check out our Whiteboard Friday on comment marketing from last year. That was a deep dive into this topic.
3. Following and engaging with link targets on Twitter
Number three, following and engaging with your link targets on Twitter, especially if your link targets are heavily invested in Twitter, like journalists, B2B bloggers and contributors, and authors or people who write for lots of different publications. It doesn't have to be a published author. It can just be a writer who writes for lots of online pieces. Then sharing your related content with them or just via your Twitter account, if you're engaging with them a lot, chances are good you can get a follow back, and that will lead to a lot of followed up links with a citation.
4. Link citations from Instagram images
Instagram accounts. When you post images on Instagram, if you use the hashtags — hashtag marketing is kind of one of the only ways to get exposure on Instagram — but if you use hashtags that you know journalists, writers, editors, and publications of any kind in your field are picking up and need, especially travel, activities, current events, stuff that's in the news, or conferences and events, many times folks will pick up those images and ask you for permission to use them. If you're willing to give it, you can earn link citations. Another important reason to associate that URL with your site so that people can get in touch with you.
5. Amplify content published on your site by republishing on other platforms
If you're using some of these platforms that are completely nofollow or platforms that are open contribution and have follow links, but where we suspect Google probably doesn't count them, Medium being one of the biggest places, you can use republishing tactics. So essentially you're writing on your own website first. Writing on your own website first, but then you are republishing on some of these other places.
I'm going to go Forbes. I'm going to publish my column on Forbes. I'm going to go to Medium. I'm going to publish in my Medium account. I'm going to contribute Huffington Post with the same piece. I'm republishing across these multiple platforms, and essentially you can think of this as it's not duplicate content. You're not hurting yourself, because these places are all pointing back to your original. It's technically duplicate content, but not the kind that's going to be bothersome for search engines.
You're essentially using these the same way you would use your Twitter or Facebook or LinkedIn, where you are pushing it out as a way to say, "Here, check this out if you're on these platforms, and here's the original back here." You can do that with the full article, just like you would do full content in RSS or full content for email subscribers. Then use those platforms for sharing and amplification to get into the hands of people who might link later.
So nofollowed links, not a direct impact, but potentially a very powerful, indirect way to get lots of good links and lots of good SEO value.
All right, everyone, hope you've enjoyed this edition of Whiteboard Friday, and we'll see you again next week. Take care.
Video transcription by Speechpad.com
Sign up for The Moz Top 10, a semimonthly mailer updating you on the top ten hottest pieces of SEO news, tips, and rad links uncovered by the Moz team. Think of it as your exclusive digest of stuff you don't have time to hunt down but want to read!
This content was originally published here.
0 notes
Last Seen Blogs

whinymochii
Anxiety is my middle name

scampsie-blog
scampsie's informative blog

contservice
Управляющая Компания Cont Service

artclass210720
Untitled

joyofmotiondancecenter
Joy of Motion Dance Center