#JSONData
Explore tagged Tumblr posts
Visit Tumblr Blog
Explore Tumblr blogs with no restrictions, modern design and the best experience.
Last Seen Tumblr Blogs


Fun Fact
The Tumblr office adopted Tommy, an 11-year-old Pomeranian.
Text
Improper Alignment due to default package setting

In a report generation software, with the option available “Export as PDF” the reports are exported in PDF formats that can be downloaded. Not quite, whenever the reports were exported to PDF formats, the PDF files lacked readability as there was an improper alignment issue.
When we looked into the improper alignment, we found the issues were due to the default settings of the PDFMake package content. The application collects contents from data centers and generates the PDF report.
We use an API call to invoke the data centres that responds with a . JSON format(encrypted) with a 64 — bit base. Only after the code’s been decoded, it employs the PDFMake Package 0.1.54 to generate the PDF report.
Still, we did not get an expected outcome. Moreover, the report could not be manually aligned. By default, the contents in the report were left aligned. While re checking it was found that the package did not employ the properties “preserveLeadingSpaces and preserveTrailingSpaces”.

After restarting the execution, the contents still lacked alignment. We identified this was because of the default font style “ROBOTO” that comes with the PDFMake Package. To overcome this, download and include the “LUCIDA CONSOLE” font style. Now we got a perfectly aligned readable PDF report.
#PDFAlignment#PDFGeneration#PDFMake#JSONData#APIIntegration#DataCenter#RobotoFont#LucidaConsole#TechSolutions#ReportGeneration#BugFix#FontStyle#CodingIssues#PDFExport#ApplicationDevelopment#SoftwareFix
0 notes
Link
0 notes
Text
What is JSON? Know how it Works with Examples

An easy and orderly way to save information is through JavaScript Object Notation (JSON). When information is transferred between a browser and a server, it must be in the form of text. Any JavaScript object can be converted to JSON and sent to the server in this manner. Any JSON that you get from the server can also be converted into JavaScript objects. It makes working with the data as JavaScript objects easier because there is no need for laborious parsing and translations. Now that you are aware of what JSON is, let's move on to why we must use it and what JSON's various benefits are.
JSON Syntax
// JSON syntax { "name": "Shailesh", "age": 22, "gender": "male", } The data in JSON is organized into key/value pairs and separated by commas,. JSON is a descendant of JavaScript. Consequently, the JSON syntax is similar to the JavaScript object literal syntax. However, other computer languages can also access and create the JSON format.
Data in JSON
Key/value pairs in JSON data resemble the object attributes in JavaScript. A colon separates the key and values, which are written in double quotes:. For instance, // JSON data "name": "John" Object in JSON A JSON object is enclosed with curly brackets. JSON objects are capable of holding several key/value pairs. For instance, // Object in JSON { "name": "Shailesh", "age": 22 }
Array JSON
Square brackets are used to denote JSON arrays. For instance, // Array JSON // JSON array containing objects
What makes us use JSON?
The most popular format for data transmission (data interchange) between a server and client is JSON. JSON data are relatively simple to use and understand. JSON data are simple to retrieve and modify because they just include text. JSON is not language specific. Other programming languages also support the creation and use of JSON. When compared to other open data interchange solutions, JSON is compact and simple to use. You should use it for your API integration for a number of other reasons as well, though. It is chosen over alternative choices due to the following benefits: Less Syntax - Compared to XML, it has a more condensed style. This makes it easier to read. Working with complex systems can be significantly improved by JSON's lightweight approach. Faster - JSON is parsed by software more quickly than XML. This is due to the fact that large XML files require more RAM to be handled by the DOM manipulation modules. On the other hand, JSON requires less data, which lowers the cost and speeds up parsing. Readable - JSON has a clear, simple structure that is simple to read. Whatever programming language you're using, you have an easier time mapping to domain objects. Structured Data – JSON uses a map data structure for its structured data, whereas XML uses a tree data structure. Your task may be constrained by the key or value pairs, but you get a predictable and simple data model in return. I hope you will like the content and it will help you to learn What is JSON? Know how it Works with Examples If you like this content, do share. Read the full article
0 notes
Text
Post request send with complex raw data in express
how to send simple json raw and complex, nested row data in post request then how to received json data in express
1. select post request in postman.
2. click to body tab and select Json in the dropdown box.
3. Create raw data like as first_name, last_name, mobile_no, email, password
http://deesoftservice.co.in/article/post-request-send-with-complex-raw-data-in-express&48

1 note
·
View note
Link
JSON is one of the best ways to store data but JSON is more likely to get messed up which can be difficult to parse. Here we have given examples of parsing nested data processing using Apache Spark in JSON.
0 notes
Text
Working with European Central Bank data in python (revisited)
Description of the problem
I have looked at pulling European Central Bank data using lisp, clojure, scala, and python. Today, I am going to revisit my python code and clean it up, and maybe, improve some.
Implementation
Let us start with the imports:
import json import pandas as pd from matplotlib import pyplot as plt from urllib.request import urlopen
Next, our work-horse that will query ECB data warehouse:
def ecbProbe(dataset,name,m): mid = ':'.join(['0' for i in range(m)]) base = 'https://sdw-wsrest.ecb.europa.eu/service/data/' with urlopen(f'{base}{dataset}?format=jsondata') as url: raw = json.load(url) dates = [x['name'] for x in raw['structure']['dimensions']['observation'][0]['values']] values = [x[0] for x in raw['dataSets'][0]['series'][mid]['observations'].values()] return pd.DataFrame({name: values}, index=dates)
There is a specific parameter that I couldn’t figure out. Each dataset has a specific key with specific number of ’0’s. So, I passed the number of these zeros as a parameter m.
Let us look at EU area trade deficit with China (imports divided by exports). For this dataset the parameter m is 8.
df1 = ecbProbe(f'ECB,TRD/M.I8.Y.M.TTT.CN.4.VAL','Imports',8) df2 = ecbProbe(f'ECB,TRD/M.I8.Y.X.TTT.CN.4.VAL','Exports',8) pd.DataFrame(df1['Imports']/df2['Exports']).plot(figsize=(12,6)) plt.savefig('ecb-with-python-trade-deficit.png')
Next, we’ll get the consumer price index for the Euro area:
df = ecbProbe('ICP/M.U2.N.000000.4.ANR','CPI Euro Area',6) df.plot(figsize=(12,6)) plt.savefig('ecb-with-python-cpi.png')

Finally, let us do the labor productivity for the Euro area:
dataset = 'MNA/Q.Y.I8.W0.S1.S1._Z.LPR_PS._Z._T._Z.EUR.LR.GY' df = ecbProbe(dataset,'Labor Productivity',14) df.plot(figsize=(12,6)) plt.savefig('ecb-with-python-labor-productivity.png')

2 notes
·
View notes
Photo

PythonのFlaskでMySQLを利用したRESTfulなAPIをDocker環境で実装する https://ift.tt/2ABlvR8
概要
Flaskを利用してRESTfulなAPIを実装する場合、いくつかのモジュールを導入するといい感じに実装できるのですが、モジュールそれぞれのドキュメントはあるものの、じゃあ合わせて利用するには?って記事が少なかったのでまとめてみました。
今��利用したソースはGitHubにアップしています。
kai-kou/flask-mysql-restful-api-on-docker https://github.com/kai-kou/flask-mysql-restful-api-on-docker
環境
MacでDockerコンテナ上で動作する環境をつくりました。 MySQLもDockerコンテナで動作させます。
> docker --version Docker version 18.06.1-ce, build e68fc7a > docker-compose --version docker-compose version 1.22.0, build f46880f
利用したモジュール
気がついたらこんなに利用していました。 各モジュールを利用するにあたり公式や参考にさせてもらった記事をざっくりとまとめておきます。 ひととおり動作するところまで進んで、Django使ったほうが早かったかもと後悔したのは、また別のお話。
Flask
Flask-RESTful
SQLAlchemy
Flask-SQLAlchemy
Flask-Migrate
Flask-Marshmallow
PyMySQL
Gunicorn
Flask
軽量Webフレームワークですね。簡単なWebアプリケーションであれば、これだけですぐに実装ができるのですが、その反面実現したいことによっては利用するモジュールが増えます。増えました。
Flask http://flask.pocoo.org/
[Python] 軽量WebフレームワークのFlaskに入門(準備、起動、HTML、静的ファイル、GET、POSTなど) https://www.yoheim.net/blog.php?q=20160505
Flask-RESTful
Flask単体でもRESTfulなAPIは実装できるのですが、実装をすっきりさせたかったので、導入しています。
Flask-RESTful https://flask-restful.readthedocs.io/en/latest/
こちらの記事が詳しかったです。感謝!
Flask-RESTful – KZKY memo http://kzky.hatenablog.com/entry/2015/11/02/Flask-Restful
SQLAlchemy
Pythonで定番のORM(オブジェクト・リレーショナル・マッパー)モジュールです。SQLを書かなくても良いのです。
SQLAlchemy – The Database Toolkit for Python https://www.sqlalchemy.org/
Python3 の 定番ORM 「 SQLAlchemy 」で MySQL ・ SQLite 等を操作 – 導入からサンプルコード https://it-engineer-lab.com/archives/1183
Flask-SQLAlchemy
FlaskでSQLAlchemyを簡単に利用するためのモジュールです。
Flask-SQLAlchemy http://flask-sqlalchemy.pocoo.org/2.1/
Flask-SQLAlchemyの使い方 https://qiita.com/msrks/items/673c083ca91f000d3ed1
Flask-Migrate
DBスキーマをマイグレーション管理するのに利用します。
Alembicを使用したFlask+SQLAlchemyでマイグレーションするための拡張だそう��す。(公式より) 自分でマイグレーションファイルを作成しなくても良いのがとても魅力的です。
Flask-Migrate documentation https://flask-migrate.readthedocs.io/en/latest/
Flask + SQLAlchemyプロジェクトを始める手順 https://qiita.com/shirakiya/items/0114d51e9c189658002e
Flask-Marshmallow
Flask-SQLAlchemyで取り扱うモデルをJSONに変換してくれるモジュールです。 マシュマロって名前が良いですね。
Flask-Marshmallow https://flask-marshmallow.readthedocs.io/en/latest/
SQLAlchemy x marshmallowでModelからJSONへの変換を楽に行う https://techblog.recochoku.jp/3107
marshmallow-sqlalchemy
Flask-Marshmallowを利用するのに必要となります。
marshmallow-sqlalchemy https://marshmallow-sqlalchemy.readthedocs.io/en/latest/
PyMySQL
PythonのMySQLクライアントモジュールです。
PyMySQL https://github.com/PyMySQL/PyMySQL
Gunicorn
DockerでFlaskアプリを動作させるのに利用しています。
Gunicorn – Python WSGI HTTP Server for UNIX https://gunicorn.org/
ファイル構成
今回のファイル構成です。 それぞれのファイルについて説明をしていきます。 __init__.py は今回空ですが、作成していないと、import でハマるので、侮ってはいけません(1敗
> tree . ├── Dockerfile ├── docker-compose.yml ├── mysql │ ├── Dockerfile │ ├── my.cnf │ └── sqls │ └── initialize.sql └── src ├── __init__.py ├── apis │ └── hoge.py ├── app.py ├── config.py ├── database.py ├── models │ ├── __init__.py │ └── hoge.py ├── requirements.txt └── run.py
Dockerの環境設定
MySQLの設定
MySQLの設定に関しては下記を参考にさせていただきました。
docker-composeとMySQL公式イメージで簡単に開発環境用DBを作る https://qiita.com/K_ichi/items/e8826c300e797b90e40f
docker-compose.yaml(一部抜粋)
version: '3' services: (略) db: build: ./mysql/ volumes: - ./mysql/mysql_data:/var/lib/mysql # データの永続化 - ./mysql/sqls:/docker-entrypoint-initdb.d # 初期化時に実行するSQL environment: - MYSQL_ROOT_PASSWORD=hoge # パスワードはお好みで
mysql/Dockerfile
FROM mysql EXPOSE 3306 ADD ./my.cnf /etc/mysql/conf.d/my.cnf # 設定ファイルの読み込み CMD ["mysqld"]
文字コードの設定
mysql/my.cnf
[mysqld] character-set-server=utf8 [mysql] default-character-set=utf8 [client] default-character-set=utf8
今回利用するデータベースが初期化時に作成されるようにします。
mysql/sqls/initialize.sql
CREATE DATABASE hoge; use hoge;
動作確認
MySQLのDockerコンテナが立ち上がるか確認するには以下のようにします。
> docker-compose build db > docker-compose up -d db > docker-compose exec db mysql -u root -p Enter password: (略) Type 'help;' or '\h' for help. Type '\c' to clear the current input statement. mysql>
はい。
つながったらデータベースが作成されているか確認しておきます。
mysql> show databases; +--------------------+ | Database | +--------------------+ | hoge | | information_schema | | mysql | | performance_schema | | sys | +--------------------+ 5 rows in set (0.01 sec)
Flaskの設定
Flaskを動作させるDocker Composeの設定を確認します。
下記記事の設定をベースにしています。
Python+Flask環境をDockerで構築する https://cloudpack.media/43978
flask コマンドが実行できるように環境変数を指定しています。 services.api.command でflask run コマンドを指定して、Flaskアプリが起動するようにしています。-h 0.0.0.0 オプションの指定がないとDockerコンテナ外からアクセスできないので、ご注意ください。
docker-compose.yml(完全版)
version: '3' services: api: build: . ports: - "5000:5000" volumes: - "./src:/src" tty: true environment: TZ: Asia/Tokyo FLASK_APP: run.py FLASK_ENV: development command: flask run -h 0.0.0.0 db: build: ./mysql/ volumes: - ./mysql/mysql_data:/var/lib/mysql - ./mysql/sqls:/docker-entrypoint-initdb.d environment: - MYSQL_ROOT_PASSWORD=hoge
Dockerfileでpip install するようにしています。
Dockerfile
FROM python:3.6 ARG project_dir=/src/ ADD src/requirements.txt $project_dir WORKDIR $project_dir RUN pip install -r requirements.txt
最初に紹介したモジュールを指定しています。
requirements.txt
flask sqlalchemy flask-restful flask-sqlalchemy sqlalchemy_utils flask-migrate pymysql gunicorn flask_marshmallow marshmallow-sqlalchemy
動作確認
こちらもDockerコンテナが起動するか確認するには以下のようにします。
> docker-compose build api > docker-compose up -d api > docker-compose logs api (略) api_1 | * Serving Flask app "run.py" (lazy loading) api_1 | * Environment: development api_1 | * Debug mode: on api_1 | * Running on http://0.0.0.0:5000/ (Press CTRL+C to quit) api_1 | * Restarting with stat api_1 | * Debugger is active! api_1 | * Debugger PIN: 221-047-422
はい。
もし、記事に沿って環境構築されている場合、まだ実装がないので、http://0.0.0.0:5000 にアクセスしても、エラーになりますので、ご注意ください。
実装
前置きが長くなりましたが、これでFlaskとMySQLが利用できるようになりましたので、実装を確認していきます。
run.py はFlaskアプリ起動用となります。
src/run.py
from src.app import app if __name__ == '__main__': app.run()
app.py でデータベース設定やAPIリソースのルーティング設定をしています。
Flask-RESTfulのadd_resource を利用することで、APIリソースの実装をapis に切り離すことができるのが良いところですね。
Flask-SQLAlchemyの利用方法については下記がとても参考になりました。感謝!
Flask + SQLAlchemyプロジェクトを始める手順 https://qiita.com/shirakiya/items/0114d51e9c189658002e
src/app.py
from flask import Flask, jsonify from flask_restful import Api from src.database import init_db from src.apis.hoge import HogeListAPI, HogeAPI def create_app(): app = Flask(__name__) app.config.from_object('src.config.Config') init_db(app) api = Api(app) api.add_resource(HogeListAPI, '/hoges') api.add_resource(HogeAPI, '/hoges/<id>') return app app = create_app()
app.py で���ンポートしているconfig.py はデータベースの接続文字列など、アプリケーションの設定情報の指定に利用しています。
src/config.py
import os class DevelopmentConfig: # SQLAlchemy SQLALCHEMY_DATABASE_URI = 'mysql+pymysql://{user}:{password}@{host}/{database}?charset=utf8'.format( **{ 'user': os.getenv('DB_USER', 'root'), 'password': os.getenv('DB_PASSWORD', 'hoge'), 'host': os.getenv('DB_HOST', 'db'), 'database': os.getenv('DB_DATABASE', 'hoge'), }) SQLALCHEMY_TRACK_MODIFICATIONS = False SQLALCHEMY_ECHO = False Config = DevelopmentConfig
database.py ではデータベースを利用するための初期化処理やマイグレーション管理のために必要なメソッドを定義しています。
src/database.py
from flask_sqlalchemy import SQLAlchemy from flask_migrate import Migrate db = SQLAlchemy() def init_db(app): db.init_app(app) Migrate(app, db)
APIリソースの実装
app.py で読み込んでいるAPIリソースの実装です。
下記記事が公式ドキュメントのサンプルをベースに詳しく説明してくれています。感謝!
Flask-RESTful – KZKY memo http://kzky.hatenablog.com/entry/2015/11/02/Flask-Restful
src/apis/hoge.py
from flask_restful import Resource, reqparse, abort from flask import jsonify from src.models.hoge import HogeModel, HogeSchema from src.database import db class HogeListAPI(Resource): def __init__(self): self.reqparse = reqparse.RequestParser() self.reqparse.add_argument('name', required=True) self.reqparse.add_argument('state', required=True) super(HogeListAPI, self).__init__() def get(self): results = HogeModel.query.all() jsonData = HogeSchema(many=True).dump(results).data return jsonify({'items': jsonData}) def post(self): args = self.reqparse.parse_args() hoge = HogeModel(args.name, args.state) db.session.add(hoge) db.session.commit() res = HogeSchema().dump(hoge).data return res, 201 class HogeAPI(Resource): def __init__(self): self.reqparse = reqparse.RequestParser() self.reqparse.add_argument('name') self.reqparse.add_argument('state') super(HogeAPI, self).__init__() def get(self, id): hoge = db.session.query(HogeModel).filter_by(id=id).first() if hoge is None: abort(404) res = HogeSchema().dump(hoge).data return res def put(self, id): hoge = db.session.query(HogeModel).filter_by(id=id).first() if hoge is None: abort(404) args = self.reqparse.parse_args() for name, value in args.items(): if value is not None: setattr(hoge, name, value) db.session.add(hoge) db.session.commit() return None, 204 def delete(self, id): hoge = db.session.query(HogeModel).filter_by(id=id).first() if hoge is not None: db.session.delete(hoge) db.session.commit() return None, 204
ポイント: 1リソース1クラスにできなさそう
hoges リソースに対して以下のようにHTTPメソッドを定義するとしたらHogeListAPI とHogeAPIクラスのように分ける必要があるっぽいです。個人的にはまとめてしまいたい感じです。
実装するHTTPメソッド
GET hoges
POST hoges
GET hoges/[id]
PUT hoges/[id]
DELETE hoges/[id]
Flask-RESTfulの実装
HogeListAPI
GET hoges: def get(self)
POST hoges: def post(self)
HogeAPI
GET hoges/[id]: def get(self, id)
PUT hoges/[id]: def put(self, id)
DELETE hoges/[id]: def delete(self, id)
ポイント: モデルはjsonify で返せない
以下のように取得した情報をjsonify でJSON形式にして返せたらシンプルなのですが、駄目なので、Flask-Marshmallowを利用してJSON形式に変換しています。
src/apis/hoge.py(だめな例)
def get(self, id): hoge = db.session.query(HogeModel).filter_by(id=id).first() if hoge == None: abort(404) return jsonify(hoge) # これだとだめ(´・ω・`)
Flask-Marshmallowについては下記の記事を参考にさせていただきました。感謝!
SQLAlchemy x marshmallowでModelからJSONへの変換を楽に行う https://techblog.recochoku.jp/3107
モデルの実装
Flask-SQLAlchemyを利用したモデルの実装になります。 APIリソースで利用、Flask-Migrateでマイグレーションする��に参照されます。
以下を記事を参考にして実装しました。感謝!
Flask + SQLAlchemyプロジェクトを始める手順 https://qiita.com/shirakiya/items/0114d51e9c189658002e
Flask-SQLAlchemyの使い方 https://qiita.com/msrks/items/673c083ca91f000d3ed1
SQLAlchemy x marshmallowでModelからJSONへの変換を楽に行う https://techblog.recochoku.jp/3107
SQLAlchemyでのupdate http://motomizuki.github.io/blog/2015/05/20/sqlalchemy_update_20150520/
id をUUIDにしてたり、created_at をcreateTime にしてたりしますが、そのへんはお好みで。
src/models/hoge.py
from datetime import datetime from flask_marshmallow import Marshmallow from flask_marshmallow.fields import fields from src.database import db import uuid ma = Marshmallow() class HogeModel(db.Model): __tablename__ = 'hoges' id = db.Column(UUIDType(binary=False), primary_key=True, default=uuid.uuid4) name = db.Column(db.String(255), nullable=False) state = db.Column(db.String(255), nullable=False) createTime = db.Column(db.DateTime, nullable=False, default=datetime.now) updateTime = db.Column(db.DateTime, nullable=False, default=datetime.now, onupdate=datetime.now) def __init__(self, name, state): self.name = name self.state = state def __repr__(self): return '<HogeModel {}:{}>'.format(self.id, self.name) class HogeSchema(ma.ModelSchema): class Meta: model = HogeModel createTime = fields.DateTime('%Y-%m-%dT%H:%M:%S') updateTime = fields.DateTime('%Y-%m-%dT%H:%M:%S')
マイグレーションする
マイグレーションに必要なファイルが準備できましたので、Flask-Migrateを利用して、データベースにテーブル追加してみます。
こちらも先程からなんども参考にしている下記が参考になります。
Flask + SQLAlchemyプロジェクトを始める手順 https://qiita.com/shirakiya/items/0114d51e9c189658002e#migration%E3%82%92%E8%A1%8C%E3%81%86%E3%81%AB%E3%81%AF
apiのコンテナに入って作業します。
> docker-compose exec api bash
flask db init コマンドでマイグレーションに必要となるファイルが作成されます。
コンテナ内
> flask db init Creating directory /src/migrations ... done Creating directory /src/migrations/versions ... done Generating /src/migrations/env.py ... done Generating /src/migrations/alembic.ini ... done Generating /src/migrations/script.py.mako ... done Generating /src/migrations/README ... done Please edit configuration/connection/logging settings in '/src/migrations/alembic.ini' before proceeding.
flask db migrate で“`
コンテナ内
> flask db migrate INFO [alembic.runtime.migration] Context impl MySQLImpl. INFO [alembic.runtime.migration] Will assume non-transactional DDL. INFO [alembic.autogenerate.compare] Detected added table 'hoges' Generating /src/migrations/versions/a6e84088c8fe_.py ... done
コンテナ内
> flask db upgrade INFO [alembic.runtime.migration] Context impl MySQLImpl. INFO [alembic.runtime.migration] Will assume non-transactional DDL. INFO [alembic.runtime.migration] Running upgrade -> 244b6323079a, empty message
データベースにテーブルが追加されたか確認しています。
> docker-compose exec db mysql -u root -p
コンテナ内
mysql> use hoge; mysql> show tables; +-----------------+ | Tables_in_hoge | +-----------------+ | alembic_version | | hoges | +-----------------+ 2 rows in set (0.00 sec) mysql> desc hoges; +------------+--------------+------+-----+---------+-------+ | Field | Type | Null | Key | Default | Extra | +------------+--------------+------+-----+---------+-------+ | id | varchar(255) | NO | PRI | NULL | | | name | varchar(255) | NO | | NULL | | | state | varchar(255) | NO | | NULL | | | createTime | datetime | NO | | NULL | | | updateTime | datetime | NO | | NULL | | +------------+--------------+------+-----+---------+-------+ 5 rows in set (0.10 sec)
マイグレーション管理用のalembic_version とhoges テーブルが作成されていたらおkです。
動作確認する
APIにアクセスしてみます。
> curl -X POST http://localhost:5000/hoges \ -H "Content-Type:application/json" \ -d "{\"name\":\"hoge\",\"state\":\"hoge\"}" { "updateTime": "2018-10-13T10:16:06", "id": "3a401c04-44ff-4d0c-a46e-ee4b9454d872", "state": "hoge", "name": "hoge", "createTime": "2018-10-13T10:16:06" } > curl -X PUT http://localhost:5000/hoges/3a401c04-44ff-4d0c-a46e-ee4b9454d872 \ -H "Content-Type:application/json" \ -d "{\"name\":\"hogehoge\"}" > curl http://localhost:5000/hoges/3a401c04-44ff-4d0c-a46e-ee4b9454d872 { "id": "3a401c04-44ff-4d0c-a46e-ee4b9454d872", "createTime": "2018-10-13T10:16:06", "state": "hoge", "updateTime": "2018-10-13T10:19:23", "name": "hogehoge" } > curl http://localhost:5000/hoges { "items": [ { "createTime": "2018-10-13T10:16:06", "id": "3a401c04-44ff-4d0c-a46e-ee4b9454d872", "name": "hogehoge", "state": "hoge", "updateTime": "2018-10-13T10:19:23" } ] }
DELETE する前にテーブルの中身をみておきます。
> docker-compose exec db mysql -u root -p Enter password: mysql> use hoge; mysql> select * from hoges; +--------------------------------------+----------+-------+---------------------+---------------------+ | id | name | state | createTime | updateTime | +--------------------------------------+----------+-------+---------------------+---------------------+ | 3a401c04-44ff-4d0c-a46e-ee4b9454d872 | hogehoge | hoge | 2018-10-13 10:16:06 | 2018-10-13 10:19:23 | +--------------------------------------+----------+-------+---------------------+---------------------+ 1 row in set (0.00 sec) mysql> quit
ではDELETEしてみます。
> curl -X DELETE http://localhost:5000/hoges/3a401c04-44ff-4d0c-a46e-ee4b9454d872 > curl http://localhost:5000/hoges/3a401c04-44ff-4d0c-a46e-ee4b9454d872 { "message": "The requested URL was not found on the server. If you entered the URL manually please check your spelling and try again." }
はい。一通りのAPIがうまく機能していることが確認できました。
まとめ
FlaskでDBを利用するRESTfulなAPIを実装する場合、モジュールを利用すると、いい感じに実装できるものの、利用するモジュールが増えて、学習コストがそこそこ掛かりそうです。
次は別の記事で単体テストを追加してみます。
元記事はこちら
「PythonのFlaskでMySQLを利用したRESTfulなAPIをDocker環境で実装する」
October 31, 2018 at 12:00PM
1 note
·
View note
Text
Debouncing and Throttling in Angular with RxJS

In this article we'll talk about Debouncing and Throttling, two optimization techniques that we might want to consider whenever we're developing an Angular app that needs features such as autocomplete, real-time filtered searches, and so on: learning how to efficiently use both of them will not only improve our overall knowledge of the Angular (and RxJS) codebase, but will also ensure important performance improvements because it will greatly reduce the number of HTTP requests that our client-side code will issue to the server to retrieve data. Introduction Let's take the following Angular code snippet: As we can see, this is a typical data retrieval method that will fetch a jsonData result from the server using a standard HTTP request using a local http object (most likely an instance of HttpClient instantiated in the constructor using Dependency Injection ) and store it within a local variable; such approach is tipically used by most Angular components (and services) that perform such kind of tasks. Read the full article
#Angular#debounceTime#Debouncing#distinctUntilChanged#HTTP#Observables#RxJS#Subjects#throttleTime#Throttling
0 notes
Text
Implementing a Custom Request Using Volley Library

Why we use Volley Library?
Volley is an HTTP library that makes networking for Android apps easier and most importantly, faster. Volley is available on GitHub.
Volley offers the following benefits:
Automatic scheduling of network requests.
Multiple concurrent network connections.
Transparent disk and memory response caching with standard HTTP cache coherence.
Support for request prioritization.
Cancellation request API. You can cancel a single request, or you can set blocks or scopes of requests to cancel.
Ease of customization, for example, for retry and back off.
Strong ordering that makes it easy to correctly populate your UI with data fetched asynchronously from the network.
Debugging and tracing tools
Things You Need to Do:
Extend the Request<T>class, where <T> represents the type of parsed response the request expects. So if your parsed response is a string, for example, create your custom request by extending Request<String>.
Add Gson library compile dependency to your app-level build.gradle
Create a model class as per response.
Add custom request to request queue of volley
Create the Model Response class :
public class ServiceResponse { String data;
public String getData() { return data; }
public void setData(String data) { this.data = data; } public int getType() { return type; } public void setType(int type) { this.type = type; } int type; }
Create CustomRequest class :
public class VolleyCustomRequest extends Request<Object>{ Map<String, String> params; protected int reequesttype; String postdata; int postdatv=1; protected Response.Listener mListener; public VolleyCustomRequest(String url, Response.ErrorListener listener) { super(url, listener); } public VolleyCustomRequest(int method, String url, Response.Listener listener1, @Nullable Response.ErrorListener listener, String postdata, int reequesttype) { super(Method.POST, url, listener); this.reequesttype=reequesttype; this.mListener=listener1; this.postdata=postdata; this.postdatv=2;
} public VolleyCustomRequest(int method, String url, Response.Listener listener1, @Nullable Response.ErrorListener listener, int reequesttype) { super(Method.GET, url, listener); this.reequesttype=reequesttype; this.mListener=listener1; } public VolleyCustomRequest(int m, String url, Response.Listener listener1, Response.ErrorListener listener, Map<String, String> params, int requestType) { super(Method.POST, url,listener); this.reequesttype=requestType; this.mListener=listener1; this.params=params; }
@Override protected Response<Object> parseNetworkResponse(NetworkResponse response) { String jsonData=new String(response.data); ServiceResponce s=new ServiceResponce(); s.setData(jsonData); s.setType(reequesttype); Response<Object> resp = Response.success((Object) (s), HttpHeaderParser.parseCacheHeaders(response)); return resp; }
@Override protected VolleyError parseNetworkError(VolleyError volleyError) {
ServiceResponse s=new ServiceResponse(); s.setData(volleyError.getLocalizedMessage()); s.setType(reequesttype); return super.parseNetworkError(volleyError); }
@Override protected void deliverResponse(Object response) { mListener.onResponse(response);
}
@Override public Map<String, String> getHeaders() throws AuthFailureError { Map<String,String> params = new HashMap<>(); params.put(“Content-Type”,”application/x-www-form-urlencoded”); return params; } @Override protected Map<String, String> getParams() throws AuthFailureError { return params; } @Override
public byte[] getBody() throws AuthFailureError { return postdata.getBytes(); }
}
Let’s use volley custom request in your app :
public class YourActivity extends AppCompatActivity implements Response.Listener,Response.ErrorListener { EditText et_email; TextView back,submit; LoadingDialog loadingDialog;
@Override protected void onCreate(Bundle savedInstanceState) { super.onCreate(savedInstanceState); setContentView(R.layout.forgotpassword_layout); init(); } public void init() { HashMap<String, String> amp = new HashMap<>(); amp.put(“user_id”,et_email.getText().toString()); loadingDialog = new LoadingDialog(ForgotPasswordActivity.this); loadingDialog.showDialog(); VolleyCustomRequest request = new VolleyCustomRequest(Request.Method.POST, “your url”, this, this, amp, 3); RequestQueue queue = Volley.newRequestQueue(ForgotPasswordActivity.this); queue.add(request); }
@Override public void onErrorResponse(VolleyError error) { loadingDialog.stop(); Snackbar.with(this,null) .type(Type.ERROR) .message(“Some Problem Occure”) .duration(Duration.SHORT) .fillParent(true) .textAlign(Align.LEFT) .show(); }
@Override public void onResponse(Object response) { loadingDialog.stop(); ServiceResponce serviceResponce=(ServiceResponce)response;
if(serviceResponce.getType()==3)
{
try {
// here you get service response JSONObject jsonObject = new JSONObject(serviceResponce.getData()); String message=jsonObject.getString(“message”); Toast.makeText(getApplicationContext(),message,Toast.LENGTH_LONG).show(); Snackbar.with(this,null) .type(Type.SUCCESS) .message(message) .duration(Duration.SHORT) .fillParent(true) .textAlign(Align.LEFT) .show(); } catch (Exception e) {
}
}
}
}
#android app#top app development companies#mobile app development#android app development service#android app development service gurgaon
0 notes
Text
SwiftUI Pull to Refresh Tutorial
The Pull to Refresh functionality can be used to refresh contents of a List by pulling down. SwiftUI introduced the refreshablel() modifier. In this tutorial a JSON file will be fetched from the internet and displayed in a list when the pull to refresh is initiated..This tutorial is built for iOS15 and Xcode 13, which can be download at the Apple developer portal.
Open Xcode and either click Create a new Xcode project in Xcode’s startup window, or choose File > New > Project. In the template selector, select iOS as the platform, select App template in the Application section and then click Next.
Enter SwiftUIPullToRefreshTutorial as the Product Name, select SwiftUI as Interface, SwiftUI App as Life Cycle and Swift as Language. Deselect the Include Tests checkbox and click Next. Choose a location to save the project on your Mac.
In the canvas, click Resume to display the preview. If the canvas isn’t visible, select Editor > Editor and Canvas to show it.
In the Project navigator, click to select ContentView.swift. Above the ContentView struct add a new Contact struct to hold the items of the json file which will be loaded.
struct Contact: Decodable, Identifiable { let id: Int let name: String let email: String }
Change the ContentView struct to
struct ContentView: View { // 1. @State private var contacts = [ Contact(id: 0, name: "SwiftUI", email: "Pull to refresh!")] var body: some View { NavigationView { // 2. List(contacts) { item in VStack(alignment: .leading) { Text(item.name) .font(.title) Text(item.email) .font(.subheadline) } } // 3. .refreshable { do { // 4. let url = URL(string: "https://ioscreator.com/s/contacts.json")! let (jsonData, _) = try await URLSession.shared.data(from: url) contacts = try JSONDecoder().decode([Contact].self, from: jsonData) } catch { // error contacts = [] } } } } }
A state propery array of contacts is declared which will hold the contacts. The first item is a stub item which will display the pull to refresh text in the List.
The List is displayed and contains the name and emall of the contact
The refreshable modifier is added to the List and will display an activity indicator while running the code.
The json file is fetched asynchronously and decoded into the Contacts struct.
Go to the Preview and select Live Preview.
Pull down the Pull to refresh item to load and display the contacts.
The source code of the SwiftUIPullToRefreshTutorial can be downloaded at the ioscreator repository on Github.
0 notes
Text
Trade Deficit vs Exchange Rate Curve
Description of the problem
I once remember reading an old paper by an economist (whose name escapes me) about relationship between trade deficit and exchange rates. Today, I’ll do a numerical experiment to see if there is a demonstrable relationship.
Data
I am going to pull the data from European Central Bank. Let us start with the libraries:
import json import pandas as pd import numpy as np from matplotlib import pyplot as plt from urllib.request import urlopen
I am going to rehash a function I wrote earlier to pull the data:
def ecbProbe(dataset,name,m): mid = ':'.join(['0' for i in range(m)]) with urlopen(f'https://sdw-wsrest.ecb.europa.eu/service/data/{dataset}?format=jsondata') as url: raw = json.load(url) dates = [x['name'] for x in raw['structure']['dimensions']['observation'][0]['values']] values = [x[0] for x in raw['dataSets'][0]['series'][mid]['observations'].values()] return pd.DataFrame({name: values}, index=dates)
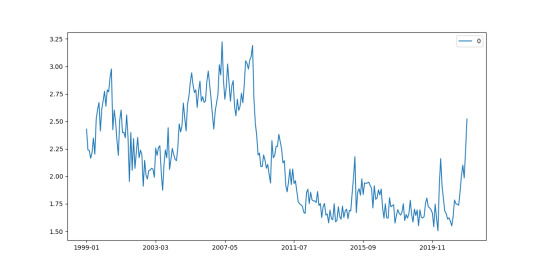
I am going to pull the full data of total imports and exports of EU Area with the US:
country = 'US' df1 = ecbProbe(f'ECB,TRD/M.I8.Y.M.TTT.{country}.4.VAL','imports US',8) df2 = ecbProbe(f'ECB,TRD/M.I8.Y.X.TTT.{country}.4.VAL','exports US',8) deficit = pd.DataFrame(df1['imports US']/df2['exports US']) deficit.plot(figsize=(12,6)) plt.savefig('us-ec-trade-deficit.png')
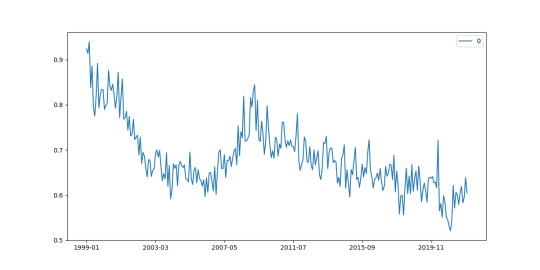
Next, the exchange rate data:
exchangeUStoEUR = ecbProbe('EXR/M.USD.EUR.SP00.A','EURXUS',5) exchangeUStoEUR.plot(figsize=(12,6)) plt.savefig('us-ec-exchange-rate.png')

Now, we plot these things against each other. I’ll do a running average of 8 months.
tmp = deficit.join(exchangeUStoEUR,how='inner').rolling(8).mean() plt.plot(tmp.iloc[:,0],tmp.iloc[:,1]) plt.savefig('us-ec-plot.png')
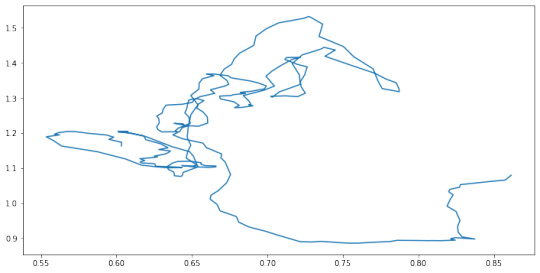
Analysis
Interesting!
0 notes
Text
How To Automate API Testing With Postman
About The Author
Kelvin Omereshone is the CTO at Quru Lab. Kelvin was formerly a Front-end engineer at myPadi.ng. He’s the creator of NUXtjs Africa community and very passionate … More about Kelvin …
In this article, we will learn how to write automated tests on web APIs with Postman. In order to follow along to this tutorial, you’ll need at least a fair amount of familiarity with Postman.
One of my favorite features in Postman is the ability to write automated tests for my APIs. So if you are like me and you use Postman and you are tired of manually testing your APIs, this article will show how to harness the test automation feature provided by Postman.
In case you don’t know what Postman is or you are entirely new to Postman, I will recommend you check out the Postman getting started documentation page and then come back to this article to learn how to automate testing your API with Postman.
APIs or Web APIs pretty much drive most of the user-facing digital products. With that said, as a backend or front-end developer being able to test these APIs with ease and more efficiently will allow you to move quickly in your development lifecycle.
Postman allows you to manually test your APIs in both its desktop and web-based applications. However, it also has the ability for you to automate these tests by writing JavaScript assertions on your API endpoints.
Why You Should Automate API Tests
Testing in software development is used to ascertain the quality of any piece of software. If you are building APIs as a backend for a single frontend application or you are building APIs to be consumed by several services and clients, it’s important that the APIs work as expected.
Setting up automated API tests to test the different endpoints in your API will help catch bugs as quickly as possible.
It will also allow you to move quickly and add new features because you can simply run the test cases to see if you break anything along the way.
Steps To Automating API Tests
When writing API tests in Postman, I normally take a four step approach:
Manually testing the API;
Understand the response returned by the API;
Write the automated test;
Repeat for each endpoint on the API.
For this article, I have a NodeJS web service powered by SailsJS that expose the following endpoints for:
/ — the home of the API.
/user/signup — Signs up a new user.
/user/signin — Signs in an exiting user.
/listing/new — Creates a new listing(a listing is details of a property owned by the user) for an existing user.
I have created and organized the endpoints for the demo service we would be using in this article in a Postman collection so you can quickly import the collection in postman by clicking the button below and follow along.
So let’s follow my four steps to automating API tests in Postman.
1. Test The API Manually
I will open Postman and switch over to a workspace I created called demo which has the postman-test-demo-service collection. You will also have access to the collection if you imported it from above. So my postman would look like this:
(Large preview)
Our first test is to test the home endpoint(/) of the API. So I would open the request on the sidebar called home you can see it’s a Get request and by simply pressing Enter, I would send a GET request to the web service to see what it responds with. The image below shows that response:
(Large preview)
2. Understand The Response Returned By The API
If you are following along and also from the screenshot above you will see the response came back with a status code of 200 OK and also a JSON body with a message property with the value of You have reached postman test demo web service
Knowing this is the expected response of the / endpoint on our service, we can proceed to step 3 — writing the actual automated test.
3. Write The Automated Test
Postman comes out of the box with a powerful runtime based on Node.js which gives it’s users the ability to write scripts in the JavaScript language.
In Postman, you add scripts to be executed during two events in the Postman workflow:
Before you make a request. These scripts are called pre-request script and you can write them under the Pre-request Script tab.
After you’ve received a response from the request you made. These scripts are called Test scripts and it is this set of scripts that are our focus in this article. You write test scripts under the Tests tab in a Postman request.
The image below shows the Tests tab opened in Postman:
(Large preview)
If you look to your right in the already opened request Tests tab, you will notice a list of snippets available to quickly get you started writing tests. Most of the time, these snippets are sufficient for quite a number of test scenarios. So I would select the snippet title Status code: Code is 200. This will generate the code below in the Tests editor:
pm.test("Status code is 200", function () { pm.response.to.have.status(200); });
Here is also how Postman would look like after clicking on that test snippet:
(Large preview)
If you’ve written any form of tests in JavaScript using some of the testing frameworks out there like Jest, then the snippet above will seem familiar. But let me explain: All postman test suits or scenario begins with test() function which is exposed in the pm(short for Postman) global object provided by Postman for you. The test method takes two arguments: the first is the test description which in our test suite above reads: Status code is 200, the second argument is a callback function. It’s in this function you make your assertions or verification of the response on the particular request being tested.
You will notice we have a single assertion right now but you can have as many as you want. However, I like keeping assertions in separate tests most of the time.
Our assertion above simply asks Postman if the response return has a status code of 200. You could see how it reads like English. This is intentional in order to allow anyone to write these tests with ease.
Running Our Test
To run our test we will send a request to the endpoint again. Only this time around, when Postman receives the response from that request, it will run your tests. Below is an image showing the passing test in Postman (You can access test result on the Test Results tab of the response section in postman):
(Large preview)
So our test passed! However, it’s crucial that we make our test scenario fail first, and then make it pass; this will help make sure that the scenario you are testing is not affected by any external factor, and that the test passes for the reason you are expecting it to pass — not something else. A good test should be predictable and the end result should be known beforehand.
To make our test pass, I will make a typo in the URL we are currently sending the GET request to. This will lead to a 404 Not Found status code which will make our test fail. Let’s do this. In the address bar currently having the variable of our baseUrl, I will add /a to it (it could be anything random actually). Making the request again and our test will fail like seen below:
(Large preview)
Removing the string /a will make the test pass again.
We have written an automated test for the home route of our demo web service. At the moment we have a test case checking the status of the response. Let’s write another test case checking if the response body contains a message property as we have seen in the response and the value is ‘You have reached postman test demo web service’. Add the below code snippet to the test editor:
pm.test("Contains a message property", function() { let jsonData = pm.response.json(); pm.expect(jsonData.message).to.eql("You have reached postman test demo web service"); })
Your Postman window should look like this:
(Large preview)
In the snippet above, we are creating a test case and getting the JavaScript object equivalent of the response body of the request which is originally in JSON by calling json() on it. Then we use the expect assertion method to check if the message property has a value of “You have reached postman test demo web service.”
4. Repeat!
I believe from the above first iteration of our 4 steps to writing API tests that you’ve seen the flow. So we would be repeating this flow to test all requests in the demo web service. Next up is the signup request. Let’s test on!
Signup Request
The signup request is a POST request expecting the fullName, emailAddress, and password of a user. In postman, you can add these parameters in many ways however we would opt into x-www-form-urlencoded method in the Body tabs of the request section. The image below gives an example of the parameters:
(Large preview)
Here is the response with the above request:
{ "message": "An account has been created for [email protected] successfully", "data": { "createdAt": 1596634791698, "updatedAt": 1596634791698, "id": "9fa2e648-1db5-4ea9-89a1-3be5bc73cb34", "emailAddress": "[email protected]", "fullName": "Kelvin Omereshone" }, "token": "eyJhbGciOiJIUzI1NiIsInR5cCI6IkpXVCJ9.eyJzdWIiOiJrZWx2aW5vbWVyZXNob25lQGdtYWlsLmNvbSIsImlzcyI6Ik15UGFkaSBCYWNrZW5kIiwiaWF0IjoxNTk2NjM0NzkxfQ.otCcXSmhP4mNWAHnrYvvzHkgU8yX8yRE5rcVtmGJ68k" }
(Large preview)
From the above response body, you will notice a token property is returned with the response body. So we would write a test case to assert if a JSON response body was returned and if it contains the property token. Also, we would check for the status code as well which returns 201 Created. So open the Tests tab and add the following snippets:
pm.test("Status code is 201", function () { pm.response.to.have.status(201); }); pm.test("Response has a JSON body", function () { pm.response.to.be.json; }); pm.test("Response has a token property", function () { var jsonData = pm.response.json(); pm.expect(jsonData.token).to.be.a('string'); });
What each test case does should be obvious enough from the test description. From top to bottom, we check if the response is a 201 Created status code, we assert also if the response body is JSON and lastly we assert if the token property has a value of type string. Let’s run our tests.
Note: Make sure you change at least the email address of the new user as the Web service won’t allow for duplicate emails.
Our tests should pass and when you check the Test Results tab of the Response section you should get 3 passing tests as shown below:
(Large preview)
Let’s move onward to testing the signin endpoint…
Signin Request
The signin request’s response body is similar to the signup request. You could verify that by hitting the endpoint with user credentials – emailAddress and Password – you signed up already. After you have done that, add the following test cases to the tests editor:
pm.test("Status code is 200", function () { pm.response.to.have.status(200); }); pm.test("Response has a JSON body", function () { pm.response.to.be.json; }); pm.test("Response has a token property", function () { var jsonData = pm.response.json(); pm.expect(jsonData.token).to.be.a('string'); }); pm.test("Response has a data property", function () { var jsonData = pm.response.json(); pm.expect(jsonData.data).to.be.a('object'); });
Make the request to signin with a valid user credential and your test should pass and Postman should look like so:
(Large preview)
Finally, we would be testing the listing/new endpoint of our demo API.
Listing/New Request
This test would be a little different. According to the requirement of our fictitious API, only logged in users can create listings. So we would need a way to authenticate the request.
Recall when signing in a JWT token was returned we can use that token as the authorization header for the create listing request.
To do this in postman, simply copy the token you got from signing in and go over to the Authorization tab of the Request section in Postman and select the type to be Bearer Token from the Type dropdown. You can then paste the token in the box to your right labeled Token. So the new request Authorization tab should look like this:
(Large preview)
You can then go on and add the parameters in the Body tab of the request. You will notice the fields name are already there with sample values which you can choose to edit or not. Let’s make a request first before writing our test. A successful response will look like so:
{ "message": "New listing created successfully", "data": { "createdAt": 1596637153470, "updatedAt": 1596637153470, "id": "41d922ce-7326-43eb-93c8-31658c59e45d", "name": "Glorious Lounge", "type": "Hotel", "address": "No 1. Something street", "rent": "$100k per year", "lister": "9fa2e648-1db5-4ea9-89a1-3be5bc73cb34" } }
We can see we get a JSON response body back. We can test for that and also make sure data is not empty. Add the following test case to the Test tab:
pm.test("Status code is 200", function () { pm.response.to.have.status(200); }); pm.test("Response has a JSON body", function () { pm.response.to.be.json; }); pm.test("Response has a message property", function () { var jsonData = pm.response.json(); pm.expect(jsonData.message).to.be.a('string'); }); pm.test("Response has a data property", function () { var jsonData = pm.response.json(); pm.expect(jsonData.data).to.be.a('object'); });
With that added, make another request and the tests should all pass as shown below:
(Large preview)
Conclusion
This article aims at showing you how to utilize Postman to write automated tests for your APIs which will allow you to bridge the gap between development and quality assurance, and also minimize the surface area of bugs in your API.
Additional Resources
(ks, ra, yk, il)
Website Design & SEO Delray Beach by DBL07.co
Delray Beach SEO
source http://www.scpie.org/how-to-automate-api-testing-with-postman/ source https://scpie1.blogspot.com/2020/09/how-to-automate-api-testing-with-postman.html
0 notes
Text
How To Automate API Testing With Postman
About The Author
Kelvin Omereshone is the CTO at Quru Lab. Kelvin was formerly a Front-end engineer at myPadi.ng. He’s the creator of NUXtjs Africa community and very passionate … More about Kelvin …
In this article, we will learn how to write automated tests on web APIs with Postman. In order to follow along to this tutorial, you’ll need at least a fair amount of familiarity with Postman.
One of my favorite features in Postman is the ability to write automated tests for my APIs. So if you are like me and you use Postman and you are tired of manually testing your APIs, this article will show how to harness the test automation feature provided by Postman.
In case you don’t know what Postman is or you are entirely new to Postman, I will recommend you check out the Postman getting started documentation page and then come back to this article to learn how to automate testing your API with Postman.
APIs or Web APIs pretty much drive most of the user-facing digital products. With that said, as a backend or front-end developer being able to test these APIs with ease and more efficiently will allow you to move quickly in your development lifecycle.
Postman allows you to manually test your APIs in both its desktop and web-based applications. However, it also has the ability for you to automate these tests by writing JavaScript assertions on your API endpoints.
Why You Should Automate API Tests
Testing in software development is used to ascertain the quality of any piece of software. If you are building APIs as a backend for a single frontend application or you are building APIs to be consumed by several services and clients, it’s important that the APIs work as expected.
Setting up automated API tests to test the different endpoints in your API will help catch bugs as quickly as possible.
It will also allow you to move quickly and add new features because you can simply run the test cases to see if you break anything along the way.
Steps To Automating API Tests
When writing API tests in Postman, I normally take a four step approach:
Manually testing the API;
Understand the response returned by the API;
Write the automated test;
Repeat for each endpoint on the API.
For this article, I have a NodeJS web service powered by SailsJS that expose the following endpoints for:
/ — the home of the API.
/user/signup — Signs up a new user.
/user/signin — Signs in an exiting user.
/listing/new — Creates a new listing(a listing is details of a property owned by the user) for an existing user.
I have created and organized the endpoints for the demo service we would be using in this article in a Postman collection so you can quickly import the collection in postman by clicking the button below and follow along.
So let’s follow my four steps to automating API tests in Postman.
1. Test The API Manually
I will open Postman and switch over to a workspace I created called demo which has the postman-test-demo-service collection. You will also have access to the collection if you imported it from above. So my postman would look like this:
(Large preview)
Our first test is to test the home endpoint(/) of the API. So I would open the request on the sidebar called home you can see it’s a Get request and by simply pressing Enter, I would send a GET request to the web service to see what it responds with. The image below shows that response:
(Large preview)
2. Understand The Response Returned By The API
If you are following along and also from the screenshot above you will see the response came back with a status code of 200 OK and also a JSON body with a message property with the value of You have reached postman test demo web service
Knowing this is the expected response of the / endpoint on our service, we can proceed to step 3 — writing the actual automated test.
3. Write The Automated Test
Postman comes out of the box with a powerful runtime based on Node.js which gives it’s users the ability to write scripts in the JavaScript language.
In Postman, you add scripts to be executed during two events in the Postman workflow:
Before you make a request. These scripts are called pre-request script and you can write them under the Pre-request Script tab.
After you’ve received a response from the request you made. These scripts are called Test scripts and it is this set of scripts that are our focus in this article. You write test scripts under the Tests tab in a Postman request.
The image below shows the Tests tab opened in Postman:
(Large preview)
If you look to your right in the already opened request Tests tab, you will notice a list of snippets available to quickly get you started writing tests. Most of the time, these snippets are sufficient for quite a number of test scenarios. So I would select the snippet title Status code: Code is 200. This will generate the code below in the Tests editor:
pm.test("Status code is 200", function () { pm.response.to.have.status(200); });
Here is also how Postman would look like after clicking on that test snippet:
(Large preview)
If you’ve written any form of tests in JavaScript using some of the testing frameworks out there like Jest, then the snippet above will seem familiar. But let me explain: All postman test suits or scenario begins with test() function which is exposed in the pm(short for Postman) global object provided by Postman for you. The test method takes two arguments: the first is the test description which in our test suite above reads: Status code is 200, the second argument is a callback function. It’s in this function you make your assertions or verification of the response on the particular request being tested.
You will notice we have a single assertion right now but you can have as many as you want. However, I like keeping assertions in separate tests most of the time.
Our assertion above simply asks Postman if the response return has a status code of 200. You could see how it reads like English. This is intentional in order to allow anyone to write these tests with ease.
Running Our Test
To run our test we will send a request to the endpoint again. Only this time around, when Postman receives the response from that request, it will run your tests. Below is an image showing the passing test in Postman (You can access test result on the Test Results tab of the response section in postman):
(Large preview)
So our test passed! However, it’s crucial that we make our test scenario fail first, and then make it pass; this will help make sure that the scenario you are testing is not affected by any external factor, and that the test passes for the reason you are expecting it to pass — not something else. A good test should be predictable and the end result should be known beforehand.
To make our test pass, I will make a typo in the URL we are currently sending the GET request to. This will lead to a 404 Not Found status code which will make our test fail. Let’s do this. In the address bar currently having the variable of our baseUrl, I will add /a to it (it could be anything random actually). Making the request again and our test will fail like seen below:
(Large preview)
Removing the string /a will make the test pass again.
We have written an automated test for the home route of our demo web service. At the moment we have a test case checking the status of the response. Let’s write another test case checking if the response body contains a message property as we have seen in the response and the value is ‘You have reached postman test demo web service’. Add the below code snippet to the test editor:
pm.test("Contains a message property", function() { let jsonData = pm.response.json(); pm.expect(jsonData.message).to.eql("You have reached postman test demo web service"); })
Your Postman window should look like this:
(Large preview)
In the snippet above, we are creating a test case and getting the JavaScript object equivalent of the response body of the request which is originally in JSON by calling json() on it. Then we use the expect assertion method to check if the message property has a value of “You have reached postman test demo web service.”
4. Repeat!
I believe from the above first iteration of our 4 steps to writing API tests that you’ve seen the flow. So we would be repeating this flow to test all requests in the demo web service. Next up is the signup request. Let’s test on!
Signup Request
The signup request is a POST request expecting the fullName, emailAddress, and password of a user. In postman, you can add these parameters in many ways however we would opt into x-www-form-urlencoded method in the Body tabs of the request section. The image below gives an example of the parameters:
(Large preview)
Here is the response with the above request:
{ "message": "An account has been created for [email protected] successfully", "data": { "createdAt": 1596634791698, "updatedAt": 1596634791698, "id": "9fa2e648-1db5-4ea9-89a1-3be5bc73cb34", "emailAddress": "[email protected]", "fullName": "Kelvin Omereshone" }, "token": "eyJhbGciOiJIUzI1NiIsInR5cCI6IkpXVCJ9.eyJzdWIiOiJrZWx2aW5vbWVyZXNob25lQGdtYWlsLmNvbSIsImlzcyI6Ik15UGFkaSBCYWNrZW5kIiwiaWF0IjoxNTk2NjM0NzkxfQ.otCcXSmhP4mNWAHnrYvvzHkgU8yX8yRE5rcVtmGJ68k" }
(Large preview)
From the above response body, you will notice a token property is returned with the response body. So we would write a test case to assert if a JSON response body was returned and if it contains the property token. Also, we would check for the status code as well which returns 201 Created. So open the Tests tab and add the following snippets:
pm.test("Status code is 201", function () { pm.response.to.have.status(201); }); pm.test("Response has a JSON body", function () { pm.response.to.be.json; }); pm.test("Response has a token property", function () { var jsonData = pm.response.json(); pm.expect(jsonData.token).to.be.a('string'); });
What each test case does should be obvious enough from the test description. From top to bottom, we check if the response is a 201 Created status code, we assert also if the response body is JSON and lastly we assert if the token property has a value of type string. Let’s run our tests.
Note: Make sure you change at least the email address of the new user as the Web service won’t allow for duplicate emails.
Our tests should pass and when you check the Test Results tab of the Response section you should get 3 passing tests as shown below:
(Large preview)
Let’s move onward to testing the signin endpoint…
Signin Request
The signin request’s response body is similar to the signup request. You could verify that by hitting the endpoint with user credentials – emailAddress and Password – you signed up already. After you have done that, add the following test cases to the tests editor:
pm.test("Status code is 200", function () { pm.response.to.have.status(200); }); pm.test("Response has a JSON body", function () { pm.response.to.be.json; }); pm.test("Response has a token property", function () { var jsonData = pm.response.json(); pm.expect(jsonData.token).to.be.a('string'); }); pm.test("Response has a data property", function () { var jsonData = pm.response.json(); pm.expect(jsonData.data).to.be.a('object'); });
Make the request to signin with a valid user credential and your test should pass and Postman should look like so:
(Large preview)
Finally, we would be testing the listing/new endpoint of our demo API.
Listing/New Request
This test would be a little different. According to the requirement of our fictitious API, only logged in users can create listings. So we would need a way to authenticate the request.
Recall when signing in a JWT token was returned we can use that token as the authorization header for the create listing request.
To do this in postman, simply copy the token you got from signing in and go over to the Authorization tab of the Request section in Postman and select the type to be Bearer Token from the Type dropdown. You can then paste the token in the box to your right labeled Token. So the new request Authorization tab should look like this:
(Large preview)
You can then go on and add the parameters in the Body tab of the request. You will notice the fields name are already there with sample values which you can choose to edit or not. Let’s make a request first before writing our test. A successful response will look like so:
{ "message": "New listing created successfully", "data": { "createdAt": 1596637153470, "updatedAt": 1596637153470, "id": "41d922ce-7326-43eb-93c8-31658c59e45d", "name": "Glorious Lounge", "type": "Hotel", "address": "No 1. Something street", "rent": "$100k per year", "lister": "9fa2e648-1db5-4ea9-89a1-3be5bc73cb34" } }
We can see we get a JSON response body back. We can test for that and also make sure data is not empty. Add the following test case to the Test tab:
pm.test("Status code is 200", function () { pm.response.to.have.status(200); }); pm.test("Response has a JSON body", function () { pm.response.to.be.json; }); pm.test("Response has a message property", function () { var jsonData = pm.response.json(); pm.expect(jsonData.message).to.be.a('string'); }); pm.test("Response has a data property", function () { var jsonData = pm.response.json(); pm.expect(jsonData.data).to.be.a('object'); });
With that added, make another request and the tests should all pass as shown below:
(Large preview)
Conclusion
This article aims at showing you how to utilize Postman to write automated tests for your APIs which will allow you to bridge the gap between development and quality assurance, and also minimize the surface area of bugs in your API.
Additional Resources
(ks, ra, yk, il)
Website Design & SEO Delray Beach by DBL07.co
Delray Beach SEO
source http://www.scpie.org/how-to-automate-api-testing-with-postman/ source https://scpie.tumblr.com/post/628688256176963584
0 notes
Text
How To Automate API Testing With Postman
About The Author
Kelvin Omereshone is the CTO at Quru Lab. Kelvin was formerly a Front-end engineer at myPadi.ng. He’s the creator of NUXtjs Africa community and very passionate … More about Kelvin …
In this article, we will learn how to write automated tests on web APIs with Postman. In order to follow along to this tutorial, you’ll need at least a fair amount of familiarity with Postman.
One of my favorite features in Postman is the ability to write automated tests for my APIs. So if you are like me and you use Postman and you are tired of manually testing your APIs, this article will show how to harness the test automation feature provided by Postman.
In case you don’t know what Postman is or you are entirely new to Postman, I will recommend you check out the Postman getting started documentation page and then come back to this article to learn how to automate testing your API with Postman.
APIs or Web APIs pretty much drive most of the user-facing digital products. With that said, as a backend or front-end developer being able to test these APIs with ease and more efficiently will allow you to move quickly in your development lifecycle.
Postman allows you to manually test your APIs in both its desktop and web-based applications. However, it also has the ability for you to automate these tests by writing JavaScript assertions on your API endpoints.
Why You Should Automate API Tests
Testing in software development is used to ascertain the quality of any piece of software. If you are building APIs as a backend for a single frontend application or you are building APIs to be consumed by several services and clients, it’s important that the APIs work as expected.
Setting up automated API tests to test the different endpoints in your API will help catch bugs as quickly as possible.
It will also allow you to move quickly and add new features because you can simply run the test cases to see if you break anything along the way.
Steps To Automating API Tests
When writing API tests in Postman, I normally take a four step approach:
Manually testing the API;
Understand the response returned by the API;
Write the automated test;
Repeat for each endpoint on the API.
For this article, I have a NodeJS web service powered by SailsJS that expose the following endpoints for:
/ — the home of the API.
/user/signup — Signs up a new user.
/user/signin — Signs in an exiting user.
/listing/new — Creates a new listing(a listing is details of a property owned by the user) for an existing user.
I have created and organized the endpoints for the demo service we would be using in this article in a Postman collection so you can quickly import the collection in postman by clicking the button below and follow along.
So let’s follow my four steps to automating API tests in Postman.
1. Test The API Manually
I will open Postman and switch over to a workspace I created called demo which has the postman-test-demo-service collection. You will also have access to the collection if you imported it from above. So my postman would look like this:
(Large preview)
Our first test is to test the home endpoint(/) of the API. So I would open the request on the sidebar called home you can see it’s a Get request and by simply pressing Enter, I would send a GET request to the web service to see what it responds with. The image below shows that response:
(Large preview)
2. Understand The Response Returned By The API
If you are following along and also from the screenshot above you will see the response came back with a status code of 200 OK and also a JSON body with a message property with the value of You have reached postman test demo web service
Knowing this is the expected response of the / endpoint on our service, we can proceed to step 3 — writing the actual automated test.
3. Write The Automated Test
Postman comes out of the box with a powerful runtime based on Node.js which gives it’s users the ability to write scripts in the JavaScript language.
In Postman, you add scripts to be executed during two events in the Postman workflow:
Before you make a request. These scripts are called pre-request script and you can write them under the Pre-request Script tab.
After you’ve received a response from the request you made. These scripts are called Test scripts and it is this set of scripts that are our focus in this article. You write test scripts under the Tests tab in a Postman request.
The image below shows the Tests tab opened in Postman:
(Large preview)
If you look to your right in the already opened request Tests tab, you will notice a list of snippets available to quickly get you started writing tests. Most of the time, these snippets are sufficient for quite a number of test scenarios. So I would select the snippet title Status code: Code is 200. This will generate the code below in the Tests editor:
pm.test("Status code is 200", function () { pm.response.to.have.status(200); });
Here is also how Postman would look like after clicking on that test snippet:
(Large preview)
If you’ve written any form of tests in JavaScript using some of the testing frameworks out there like Jest, then the snippet above will seem familiar. But let me explain: All postman test suits or scenario begins with test() function which is exposed in the pm(short for Postman) global object provided by Postman for you. The test method takes two arguments: the first is the test description which in our test suite above reads: Status code is 200, the second argument is a callback function. It’s in this function you make your assertions or verification of the response on the particular request being tested.
You will notice we have a single assertion right now but you can have as many as you want. However, I like keeping assertions in separate tests most of the time.
Our assertion above simply asks Postman if the response return has a status code of 200. You could see how it reads like English. This is intentional in order to allow anyone to write these tests with ease.
Running Our Test
To run our test we will send a request to the endpoint again. Only this time around, when Postman receives the response from that request, it will run your tests. Below is an image showing the passing test in Postman (You can access test result on the Test Results tab of the response section in postman):
(Large preview)
So our test passed! However, it’s crucial that we make our test scenario fail first, and then make it pass; this will help make sure that the scenario you are testing is not affected by any external factor, and that the test passes for the reason you are expecting it to pass — not something else. A good test should be predictable and the end result should be known beforehand.
To make our test pass, I will make a typo in the URL we are currently sending the GET request to. This will lead to a 404 Not Found status code which will make our test fail. Let’s do this. In the address bar currently having the variable of our baseUrl, I will add /a to it (it could be anything random actually). Making the request again and our test will fail like seen below:
(Large preview)
Removing the string /a will make the test pass again.
We have written an automated test for the home route of our demo web service. At the moment we have a test case checking the status of the response. Let’s write another test case checking if the response body contains a message property as we have seen in the response and the value is ‘You have reached postman test demo web service’. Add the below code snippet to the test editor:
pm.test("Contains a message property", function() { let jsonData = pm.response.json(); pm.expect(jsonData.message).to.eql("You have reached postman test demo web service"); })
Your Postman window should look like this:
(Large preview)
In the snippet above, we are creating a test case and getting the JavaScript object equivalent of the response body of the request which is originally in JSON by calling json() on it. Then we use the expect assertion method to check if the message property has a value of “You have reached postman test demo web service.”
4. Repeat!
I believe from the above first iteration of our 4 steps to writing API tests that you’ve seen the flow. So we would be repeating this flow to test all requests in the demo web service. Next up is the signup request. Let’s test on!
Signup Request
The signup request is a POST request expecting the fullName, emailAddress, and password of a user. In postman, you can add these parameters in many ways however we would opt into x-www-form-urlencoded method in the Body tabs of the request section. The image below gives an example of the parameters:
(Large preview)
Here is the response with the above request:
{ "message": "An account has been created for [email protected] successfully", "data": { "createdAt": 1596634791698, "updatedAt": 1596634791698, "id": "9fa2e648-1db5-4ea9-89a1-3be5bc73cb34", "emailAddress": "[email protected]", "fullName": "Kelvin Omereshone" }, "token": "eyJhbGciOiJIUzI1NiIsInR5cCI6IkpXVCJ9.eyJzdWIiOiJrZWx2aW5vbWVyZXNob25lQGdtYWlsLmNvbSIsImlzcyI6Ik15UGFkaSBCYWNrZW5kIiwiaWF0IjoxNTk2NjM0NzkxfQ.otCcXSmhP4mNWAHnrYvvzHkgU8yX8yRE5rcVtmGJ68k" }
(Large preview)
From the above response body, you will notice a token property is returned with the response body. So we would write a test case to assert if a JSON response body was returned and if it contains the property token. Also, we would check for the status code as well which returns 201 Created. So open the Tests tab and add the following snippets:
pm.test("Status code is 201", function () { pm.response.to.have.status(201); }); pm.test("Response has a JSON body", function () { pm.response.to.be.json; }); pm.test("Response has a token property", function () { var jsonData = pm.response.json(); pm.expect(jsonData.token).to.be.a('string'); });
What each test case does should be obvious enough from the test description. From top to bottom, we check if the response is a 201 Created status code, we assert also if the response body is JSON and lastly we assert if the token property has a value of type string. Let’s run our tests.
Note: Make sure you change at least the email address of the new user as the Web service won’t allow for duplicate emails.
Our tests should pass and when you check the Test Results tab of the Response section you should get 3 passing tests as shown below:
(Large preview)
Let’s move onward to testing the signin endpoint…
Signin Request
The signin request’s response body is similar to the signup request. You could verify that by hitting the endpoint with user credentials – emailAddress and Password – you signed up already. After you have done that, add the following test cases to the tests editor:
pm.test("Status code is 200", function () { pm.response.to.have.status(200); }); pm.test("Response has a JSON body", function () { pm.response.to.be.json; }); pm.test("Response has a token property", function () { var jsonData = pm.response.json(); pm.expect(jsonData.token).to.be.a('string'); }); pm.test("Response has a data property", function () { var jsonData = pm.response.json(); pm.expect(jsonData.data).to.be.a('object'); });
Make the request to signin with a valid user credential and your test should pass and Postman should look like so:
(Large preview)
Finally, we would be testing the listing/new endpoint of our demo API.
Listing/New Request
This test would be a little different. According to the requirement of our fictitious API, only logged in users can create listings. So we would need a way to authenticate the request.
Recall when signing in a JWT token was returned we can use that token as the authorization header for the create listing request.
To do this in postman, simply copy the token you got from signing in and go over to the Authorization tab of the Request section in Postman and select the type to be Bearer Token from the Type dropdown. You can then paste the token in the box to your right labeled Token. So the new request Authorization tab should look like this:
(Large preview)
You can then go on and add the parameters in the Body tab of the request. You will notice the fields name are already there with sample values which you can choose to edit or not. Let’s make a request first before writing our test. A successful response will look like so:
{ "message": "New listing created successfully", "data": { "createdAt": 1596637153470, "updatedAt": 1596637153470, "id": "41d922ce-7326-43eb-93c8-31658c59e45d", "name": "Glorious Lounge", "type": "Hotel", "address": "No 1. Something street", "rent": "$100k per year", "lister": "9fa2e648-1db5-4ea9-89a1-3be5bc73cb34" } }
We can see we get a JSON response body back. We can test for that and also make sure data is not empty. Add the following test case to the Test tab:
pm.test("Status code is 200", function () { pm.response.to.have.status(200); }); pm.test("Response has a JSON body", function () { pm.response.to.be.json; }); pm.test("Response has a message property", function () { var jsonData = pm.response.json(); pm.expect(jsonData.message).to.be.a('string'); }); pm.test("Response has a data property", function () { var jsonData = pm.response.json(); pm.expect(jsonData.data).to.be.a('object'); });
With that added, make another request and the tests should all pass as shown below:
(Large preview)
Conclusion
This article aims at showing you how to utilize Postman to write automated tests for your APIs which will allow you to bridge the gap between development and quality assurance, and also minimize the surface area of bugs in your API.
Additional Resources
(ks, ra, yk, il)
Website Design & SEO Delray Beach by DBL07.co
Delray Beach SEO
source http://www.scpie.org/how-to-automate-api-testing-with-postman/
0 notes
Text
How to Migrate #JSONData from #MongoDB to MaxCompute https://t.co/xyKyBVL25O https://t.co/VsOKwqgAWP
How to Migrate #JSONData from #MongoDB to MaxCompute https://t.co/xyKyBVL25O pic.twitter.com/VsOKwqgAWP
— Macronimous.com (@macronimous) December 23, 2019
from Twitter https://twitter.com/macronimous December 23, 2019 at 06:33PM via IFTTT
0 notes