#Link Building Software
Explore tagged Tumblr posts
Visit Tumblr Blog
Explore Tumblr blogs with no restrictions, modern design and the best experience.
Last Seen Tumblr Blogs


Fun Fact
The total number of visits Tumblr.com received during January 2021 is 327 million.
Text
LinkDR
LinkDR, an AI-powered link building tool, is designed to generate more leads and sales on a hundred percent autopilot. Getting users 10X more backlinks than competitors, LinkDR is setting a foundation for unparalleled customer service and quality link building software for ranking higher and building outreach. We are dedicated to helping you scale with 90 per cent less effort. That means we use AI to make outreach easy for you and send thousands of backlink outreach emails within minutes. We can do 20+ hours of work in 20 minutes. Regardless of your competition, your satisfaction means the most to us. And as the ultimate link building software, you can trust us to effortlessly boost your authority, trust, and organic traffic.
Website: https://linkdr.com/
Address: 2261 Market Street, San Francisco, CA, 94114
Phone Number: +1 209-865-0321
Business Contact Email ID: [email protected]
Business Hours: Mon - Sun:09:00am - 05:00pm
1 note
·
View note
Text
Visibility is crucial in a sea of competitors.
➡️Visibility is crucial in a sea of competitors.💪🐘
🤔Imagine a Picture like this: a new customer is searching online for your services.
📌They’re more likely to choose one of the top results they see. Because those businesses use SEO to make their online profiles more visible. Being one of these top choices gives you a significant advantage, essentially putting you in front of clients actively searching for your services.
👉When your online profile or website is easy to find, it means more eyes on your business, more growth in your business, and at least more revenue.🤩🥳
🧲A higher online presence increases the likelihood of attracting new clients who may not have heard of you otherwise. Enhancing your digital footprint lets clients come to you effortlessly, boosting your reach without relying solely on word of mouth.✨ . 👉Am I right? What is your opinion? let me know in the comment.🔥👇
WhatsApp: Share on WhatsApp
Visit: https://www.fiverr.com/s/6D9RwL

#on page optimization#seo#seo services#on page seo#online business#business growth#digital marketing#monthly seo service#off page seo#link building services#digital marketing services#customer service#courier service management software bd#repair#legal services#retail#tax#property#customer#so hot and sexy
0 notes
Text
Link Building Strategies for 2024
We know that SEO is always changing. Search engines often update their algorithms to provide a better user experience. In this changing SEO algorithm, one thing stays important: link building. As we move into 2024, Quality backlinks are undergoing significant transformation. We need to shift from old methods to more focused, quality-driven strategies.
Before getting into how to acquire quality backlinks, we’ll go through some basics for beginners. Let’s dig now…
Link Building: Navigating New Turns in 2024
Link outreach has always been about earning a vote of confidence from other websites. Each backlink you acquire is proof ......read more here.

#Quality Backlinks Guide#smmsoftwareltd#SMM Software LTD#SEO Trends 2024#Modern Link Building Techniques#AI in Link Building#Content-Driven Backlinks#Authority Links Strategy#Ethical SEO Practices#Sustainable SEO Practices
0 notes
Text
#UnlockTheSecret! 15 Million Digital Products in a Crazy Bundle #Free #Downloads #Design #EarnOnline
#Free #Downloads #Design #EarnOnline #SpecialOffers #Freelance #workonlinefromhome Unlock Unlimited Potential with Our 15+ Million Resell Digital Products Bundle! Art u0026 Collectibles,Drawing u0026 Illustration,Digital,digital products,ebooks,plr,template,digital assets,passive income,entrepreneur,online business,plr templates,adobe photoshop,plr planner,work from home,sell on…

View On WordPress
#affiliate marketing#Amazon marketing#backlinks#content marketing#digital advertising#digital branding#digital marketing#digital products#eBay marketing#email marketing#Facebook Ads#Google Ads#Google Analytics#link building#marketing automation#online business#online marketing#online store#pay-per-click#PPC#SaaS#search engine optimization#SEO#SEO tools#Shopify#social media marketing#software as a service#Twitter marketing#user#website traffic
1 note
·
View note
Text
Tf141 x reader idea nsfw mdni
This is what I was thinking about WHILE TAKING MY FINAL TODAY. The brain rot is actually rotting.

So I keep having this idea about being the tf141’s technical analyst (think Garcia from criminal minds kinda beat)
And part of your job is reviewing websites and links visited by any government equipment. Including the tablets/ work phones/ laptops the boys use on base / in the field , just to make sure nothing is a security threat. Keep things secure and tight.
You’re mature enough not to blink twice at the porn websites, and how the visits to them spike while they’re in the field . They’re hotblooded men, it makes sense.
You do blink.. at least once.. seeing how their searches seem to mirror their teammates. Soap’s masked men searches, Gaz’s bearded daddy type thing, Ghost’s affliction for Scottish gym rats, and Price’s varied tastes.
*ok so this squad was a little messy*
But ok, the websites are secure enough. You make a mental note to look into some additional antivirus software for them but move on. Except… now it’s hard not to read into Price’s lingering shoulder pats on his team. It’s harder not to notice how Gaz brings Coffee and Tea to his teammates with a soft smile. Ghost’s intense watchful eyes softening ever so slightly when someone made a joke said something kind. And wait… did Johnny just smack someone’s ass??? And hey, you could swear Gaz and Johnny *weren’t* wearing those shirts before they mysteriously disappeared for half an hour.
Whatever, it’s a hard job. They deserve a little stress relief. you’re happy for them. Maybe a little jealous because that’s a big ole sandwich (LOTS of meat) anyone would want to be in. Maybe you blush when Johnny and Kyle sit on either side of you in the mess hall… maybe you get a little sidetracked when going over hacked intel with Ghost and Price, how they both lean over your shoulder as they look at your screen…
Focus. FOCUS.
So, imagine your surprise when one day as your clearing some of the links that Soap’s tablet had visited that weekend. And his searches sound familiar- your build, your hair color, your features….
Soon you find something similar going through Price’s, and then Gaz’s… (the only reason you don’t see it on Ghost’s is because he watches over Soap’s shoulder). All of them searching for porn where the actress looks like you…
You should feel violated. Uncomfortable. Disrespected… but you don’t. If anything, you feel a little hot under the collar. Maybe a little embarrassed.
Maybe it was time to remind the boys that you can in fact see their internet searches. If you can manage to look them in the eyes.
Anyways do I have something here or…???
Turns out I had something. Part 2
#call of duty modern warfare x reader#codmw x reader#ghost x reader#simon ghost riley x reader#simon riley x reader#john price x reader#captain price x reader#cod mwii x reader#tf 141 x reader#141 x reader#poly 141
4K notes
·
View notes
Text
#search engine optimization#seo software#link building#webtraffic#artificial intelligence#technology
0 notes
Text


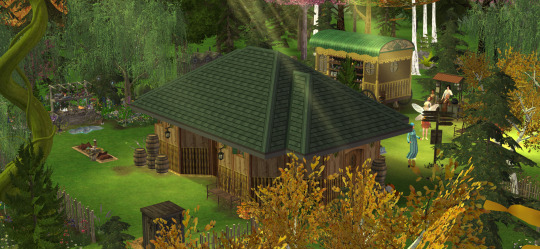
Grachtstraat | Small business and apartment
MOO and debug used NO CC
Here on Grachstraat you'll find Belladonna Ink - a 3 floor tattoo studio able to work full colour all the way to line art and hand poke, stay after your session for a play on the arcade games! Next door is a large townhouse for the owner of Belladonna Ink, that is just as sleek and modern as their business. Unfortunately, no youtube speed build for this as I accidentally recorded everything in 240fps and my editing software couldnt handle it :'(
Name: Grachstraat World: Nordhaven Type: Residential (small business) Origin ID is TheSeptemberSim
If you would like to download this build please use the links below, or via my origin ID above. Although all my builds are no CC, I use a custom thumbnail so make sure 'modded' is checked to see this in your game.
Download (sfs)
If you would like to support me, use creator code:
THESEPTEMBERSIM
when purchasing on the EA app or thesims.com. Please note, this is not a discount code
#ts4#the sims 4#sims 4#ts4 nocc#sims 4 no cc#sims 4 buy mode#the sims community#sims 4 build#ts4 build#ts4 edit#nordhaven#residential#small business
776 notes
·
View notes
Text
USEFUL SOFTWARE FOR THE SIMS 2

This is a list of programs that will make your life easier if you're an avid Sims 2 player. Click on program titles to get download links.
SimPE The most known software for The Sims 2 that lets you edit package files. You can do basic stuff like rename a Sim, change family name, edit Sims' genetics as well as edit/create mods. Don't use if you have no idea what you're doing, watch a tutorial first or back up your neighborhood beforehand in case you mess something up! The newest version also has a terrain editor.
Sims2Pack Clean Installer The best program for installing downloaded lots and Sims. Those don't just go into Downloads, you need to install them!
Hood Checker This program checks neighborhood references and can clean out ones that are broken. Also useful for bringing back lost graves (it's still good to have NoUnlinkOnDelete).
HCDU Plus The Hack Conflict Detector Utility lets you scan your Downloads folder to check if you have any mods that edit the same aspect of the game, so can potentially be in conflict. Also useful to navigate which mods load first (load order is important for some mods to work).
What Caused This When you have 'testingcheats' on, the game gives you error messages if there's something going on. Not all of them mean there's a serious problem, but What Caused This can help you navigate what the source is. Upload the log file (Documents/EA/TS2/Logs) in the program, give it your Downloads folder and it will scan it to look for the culprit. Might give you straighforward information on which mod conflict caused the issue or that you lack Smarter EP Check for a mod that requires it.
The Compressorizer You can compress your Downloads to take up less space.
Delphy's Download Organiser You can filter your files to a certain category, scan for orphans (files that don't fully work if other files are missing, such as meshes), duplicates, and clean up your Downloads folder in an easier way than trying to track it inside the folder manually.
Outfit Organiser You downloaded CC clothes that the creator marked as outerwear but you think they don't fit in that category? With this program you can quickly change that! It's also doable in SimPE, but Outfit Organiser is a lot easier to use.
CPack Editor If you want to make plastic surgery genetic, there's no need to do it manually in SimPE, especially if it's more than one Sim. In CPack Editor, you just choose your neighborhood's folder, run the program, and it changes ALL surgery faces in that neighborhood to genetic!
Lot Adjuster This program lets you edit already existing lots. If you want a smaller or bigger lot than possible in-game, you can do it here! Also great for creating pavilions or row houses that are all separate lots, as you can get rid of the 2-tile border separating buildings by making the lots smaller and copying them.
793 notes
·
View notes
Text
How I ditched streaming services and learned to love Linux: A step-by-step guide to building your very own personal media streaming server (V2.0: REVISED AND EXPANDED EDITION)
This is a revised, corrected and expanded version of my tutorial on setting up a personal media server that previously appeared on my old blog (donjuan-auxenfers). I expect that that post is still making the rounds (hopefully with my addendum on modifying group share permissions in Ubuntu to circumvent 0x8007003B "Unexpected Network Error" messages in Windows 10/11 when transferring files) but I have no way of checking. Anyway this new revised version of the tutorial corrects one or two small errors I discovered when rereading what I wrote, adds links to all products mentioned and is just more polished generally. I also expanded it a bit, pointing more adventurous users toward programs such as Sonarr/Radarr/Lidarr and Overseerr which can be used for automating user requests and media collection.
So then, what is this tutorial? This is a tutorial on how to build and set up your own personal media server using Ubuntu as an operating system and Plex (or Jellyfin) to not only manage your media, but to also stream that media to your devices both at home and abroad anywhere in the world where you have an internet connection. Its intent is to show you how building a personal media server and stuffing it full of films, TV, and music that you acquired through indiscriminate and voracious media piracy various legal methods will free you to completely ditch paid streaming services. No more will you have to pay for Disney+, Netflix, HBOMAX, Hulu, Amazon Prime, Peacock, CBS All Access, Paramount+, Crave or any other streaming service that is not named Criterion Channel. Instead whenever you want to watch your favourite films and television shows, you’ll have your own personal service that only features things that you want to see, with files that you have control over. And for music fans out there, both Jellyfin and Plex support music streaming, meaning you can even ditch music streaming services. Goodbye Spotify, Youtube Music, Tidal and Apple Music, welcome back unreasonably large MP3 (or FLAC) collections.
On the hardware front, I’m going to offer a few options catered towards different budgets and media library sizes. The cost of getting a media server up and running using this guide will cost you anywhere from $450 CAD/$325 USD at the low end to $1500 CAD/$1100 USD at the high end (it could go higher). My server was priced closer to the higher figure, but I went and got a lot more storage than most people need. If that seems like a little much, consider for a moment, do you have a roommate, a close friend, or a family member who would be willing to chip in a few bucks towards your little project provided they get access? Well that's how I funded my server. It might also be worth thinking about the cost over time, i.e. how much you spend yearly on subscriptions vs. a one time cost of setting up a server. Additionally there's just the joy of being able to scream "fuck you" at all those show cancelling, library deleting, hedge fund vampire CEOs who run the studios through denying them your money. Drive a stake through David Zaslav's heart.
On the software side I will walk you step-by-step through installing Ubuntu as your server's operating system, configuring your storage as a RAIDz array with ZFS, sharing your zpool to Windows with Samba, running a remote connection between your server and your Windows PC, and then a little about started with Plex/Jellyfin. Every terminal command you will need to input will be provided, and I even share a custom #bash script that will make used vs. available drive space on your server display correctly in Windows.
If you have a different preferred flavour of Linux (Arch, Manjaro, Redhat, Fedora, Mint, OpenSUSE, CentOS, Slackware etc. et. al.) and are aching to tell me off for being basic and using Ubuntu, this tutorial is not for you. The sort of person with a preferred Linux distro is the sort of person who can do this sort of thing in their sleep. Also I don't care. This tutorial is intended for the average home computer user. This is also why we’re not using a more exotic home server solution like running everything through Docker Containers and managing it through a dashboard like Homarr or Heimdall. While such solutions are fantastic and can be very easy to maintain once you have it all set up, wrapping your brain around Docker is a whole thing in and of itself. If you do follow this tutorial and had fun putting everything together, then I would encourage you to return in a year’s time, do your research and set up everything with Docker Containers.
Lastly, this is a tutorial aimed at Windows users. Although I was a daily user of OS X for many years (roughly 2008-2023) and I've dabbled quite a bit with various Linux distributions (mostly Ubuntu and Manjaro), my primary OS these days is Windows 11. Many things in this tutorial will still be applicable to Mac users, but others (e.g. setting up shares) you will have to look up for yourself. I doubt it would be difficult to do so.
Nothing in this tutorial will require feats of computing expertise. All you will need is a basic computer literacy (i.e. an understanding of what a filesystem and directory are, and a degree of comfort in the settings menu) and a willingness to learn a thing or two. While this guide may look overwhelming at first glance, it is only because I want to be as thorough as possible. I want you to understand exactly what it is you're doing, I don't want you to just blindly follow steps. If you half-way know what you’re doing, you will be much better prepared if you ever need to troubleshoot.
Honestly, once you have all the hardware ready it shouldn't take more than an afternoon or two to get everything up and running.
(This tutorial is just shy of seven thousand words long so the rest is under the cut.)
Step One: Choosing Your Hardware
Linux is a light weight operating system, depending on the distribution there's close to no bloat. There are recent distributions available at this very moment that will run perfectly fine on a fourteen year old i3 with 4GB of RAM. Moreover, running Plex or Jellyfin isn’t resource intensive in 90% of use cases. All this is to say, we don’t require an expensive or powerful computer. This means that there are several options available: 1) use an old computer you already have sitting around but aren't using 2) buy a used workstation from eBay, or what I believe to be the best option, 3) order an N100 Mini-PC from AliExpress or Amazon.
Note: If you already have an old PC sitting around that you’ve decided to use, fantastic, move on to the next step.
When weighing your options, keep a few things in mind: the number of people you expect to be streaming simultaneously at any one time, the resolution and bitrate of your media library (4k video takes a lot more processing power than 1080p) and most importantly, how many of those clients are going to be transcoding at any one time. Transcoding is what happens when the playback device does not natively support direct playback of the source file. This can happen for a number of reasons, such as the playback device's native resolution being lower than the file's internal resolution, or because the source file was encoded in a video codec unsupported by the playback device.
Ideally we want any transcoding to be performed by hardware. This means we should be looking for a computer with an Intel processor with Quick Sync. Quick Sync is a dedicated core on the CPU die designed specifically for video encoding and decoding. This specialized hardware makes for highly efficient transcoding both in terms of processing overhead and power draw. Without these Quick Sync cores, transcoding must be brute forced through software. This takes up much more of a CPU’s processing power and requires much more energy. But not all Quick Sync cores are created equal and you need to keep this in mind if you've decided either to use an old computer or to shop for a used workstation on eBay
Any Intel processor from second generation Core (Sandy Bridge circa 2011) onward has Quick Sync cores. It's not until 6th gen (Skylake), however, that the cores support the H.265 HEVC codec. Intel’s 10th gen (Comet Lake) processors introduce support for 10bit HEVC and HDR tone mapping. And the recent 12th gen (Alder Lake) processors brought with them hardware AV1 decoding. As an example, while an 8th gen (Kaby Lake) i5-8500 will be able to hardware transcode a H.265 encoded file, it will fall back to software transcoding if given a 10bit H.265 file. If you’ve decided to use that old PC or to look on eBay for an old Dell Optiplex keep this in mind.
Note 1: The price of old workstations varies wildly and fluctuates frequently. If you get lucky and go shopping shortly after a workplace has liquidated a large number of their workstations you can find deals for as low as $100 on a barebones system, but generally an i5-8500 workstation with 16gb RAM will cost you somewhere in the area of $260 CAD/$200 USD.
Note 2: The AMD equivalent to Quick Sync is called Video Core Next, and while it's fine, it's not as efficient and not as mature a technology. It was only introduced with the first generation Ryzen CPUs and it only got decent with their newest CPUs, we want something cheap.
Alternatively you could forgo having to keep track of what generation of CPU is equipped with Quick Sync cores that feature support for which codecs, and just buy an N100 mini-PC. For around the same price or less of a used workstation you can pick up a mini-PC with an Intel N100 processor. The N100 is a four-core processor based on the 12th gen Alder Lake architecture and comes equipped with the latest revision of the Quick Sync cores. These little processors offer astounding hardware transcoding capabilities for their size and power draw. Otherwise they perform equivalent to an i5-6500, which isn't a terrible CPU. A friend of mine uses an N100 machine as a dedicated retro emulation gaming system and it does everything up to 6th generation consoles just fine. The N100 is also a remarkably efficient chip, it sips power. In fact, the difference between running one of these and an old workstation could work out to hundreds of dollars a year in energy bills depending on where you live.
You can find these Mini-PCs all over Amazon or for a little cheaper on AliExpress. They range in price from $170 CAD/$125 USD for a no name N100 with 8GB RAM to $280 CAD/$200 USD for a Beelink S12 Pro with 16GB RAM. The brand doesn't really matter, they're all coming from the same three factories in Shenzen, go for whichever one fits your budget or has features you want. 8GB RAM should be enough, Linux is lightweight and Plex only calls for 2GB RAM. 16GB RAM might result in a slightly snappier experience, especially with ZFS. A 256GB SSD is more than enough for what we need as a boot drive, but going for a bigger drive might allow you to get away with things like creating preview thumbnails for Plex, but it’s up to you and your budget.
The Mini-PC I wound up buying was a Firebat AK2 Plus with 8GB RAM and a 256GB SSD. It looks like this:

Note: Be forewarned that if you decide to order a Mini-PC from AliExpress, note the type of power adapter it ships with. The mini-PC I bought came with an EU power adapter and I had to supply my own North American power supply. Thankfully this is a minor issue as barrel plug 30W/12V/2.5A power adapters are easy to find and can be had for $10.
Step Two: Choosing Your Storage
Storage is the most important part of our build. It is also the most expensive. Thankfully it’s also the most easily upgrade-able down the line.
For people with a smaller media collection (4TB to 8TB), a more limited budget, or who will only ever have two simultaneous streams running, I would say that the most economical course of action would be to buy a USB 3.0 8TB external HDD. Something like this one from Western Digital or this one from Seagate. One of these external drives will cost you in the area of $200 CAD/$140 USD. Down the line you could add a second external drive or replace it with a multi-drive RAIDz set up such as detailed below.
If a single external drive the path for you, move on to step three.
For people with larger media libraries (12TB+), who prefer media in 4k, or care who about data redundancy, the answer is a RAID array featuring multiple HDDs in an enclosure.
Note: If you are using an old PC or used workstatiom as your server and have the room for at least three 3.5" drives, and as many open SATA ports on your mother board you won't need an enclosure, just install the drives into the case. If your old computer is a laptop or doesn’t have room for more internal drives, then I would suggest an enclosure.
The minimum number of drives needed to run a RAIDz array is three, and seeing as RAIDz is what we will be using, you should be looking for an enclosure with three to five bays. I think that four disks makes for a good compromise for a home server. Regardless of whether you go for a three, four, or five bay enclosure, do be aware that in a RAIDz array the space equivalent of one of the drives will be dedicated to parity at a ratio expressed by the equation 1 − 1/n i.e. in a four bay enclosure equipped with four 12TB drives, if we configured our drives in a RAIDz1 array we would be left with a total of 36TB of usable space (48TB raw size). The reason for why we might sacrifice storage space in such a manner will be explained in the next section.
A four bay enclosure will cost somewhere in the area of $200 CDN/$140 USD. You don't need anything fancy, we don't need anything with hardware RAID controls (RAIDz is done entirely in software) or even USB-C. An enclosure with USB 3.0 will perform perfectly fine. Don’t worry too much about USB speed bottlenecks. A mechanical HDD will be limited by the speed of its mechanism long before before it will be limited by the speed of a USB connection. I've seen decent looking enclosures from TerraMaster, Yottamaster, Mediasonic and Sabrent.
When it comes to selecting the drives, as of this writing, the best value (dollar per gigabyte) are those in the range of 12TB to 20TB. I settled on 12TB drives myself. If 12TB to 20TB drives are out of your budget, go with what you can afford, or look into refurbished drives. I'm not sold on the idea of refurbished drives but many people swear by them.
When shopping for harddrives, search for drives designed specifically for NAS use. Drives designed for NAS use typically have better vibration dampening and are designed to be active 24/7. They will also often make use of CMR (conventional magnetic recording) as opposed to SMR (shingled magnetic recording). This nets them a sizable read/write performance bump over typical desktop drives. Seagate Ironwolf and Toshiba NAS are both well regarded brands when it comes to NAS drives. I would avoid Western Digital Red drives at this time. WD Reds were a go to recommendation up until earlier this year when it was revealed that they feature firmware that will throw up false SMART warnings telling you to replace the drive at the three year mark quite often when there is nothing at all wrong with that drive. It will likely even be good for another six, seven, or more years.

Step Three: Installing Linux
For this step you will need a USB thumbdrive of at least 6GB in capacity, an .ISO of Ubuntu, and a way to make that thumbdrive bootable media.
First download a copy of Ubuntu desktop (for best performance we could download the Server release, but for new Linux users I would recommend against the server release. The server release is strictly command line interface only, and having a GUI is very helpful for most people. Not many people are wholly comfortable doing everything through the command line, I'm certainly not one of them, and I grew up with DOS 6.0. 22.04.3 Jammy Jellyfish is the current Long Term Service release, this is the one to get.
Download the .ISO and then download and install balenaEtcher on your Windows PC. BalenaEtcher is an easy to use program for creating bootable media, you simply insert your thumbdrive, select the .ISO you just downloaded, and it will create a bootable installation media for you.
Once you've made a bootable media and you've got your Mini-PC (or you old PC/used workstation) in front of you, hook it directly into your router with an ethernet cable, and then plug in the HDD enclosure, a monitor, a mouse and a keyboard. Now turn that sucker on and hit whatever key gets you into the BIOS (typically ESC, DEL or F2). If you’re using a Mini-PC check to make sure that the P1 and P2 power limits are set correctly, my N100's P1 limit was set at 10W, a full 20W under the chip's power limit. Also make sure that the RAM is running at the advertised speed. My Mini-PC’s RAM was set at 2333Mhz out of the box when it should have been 3200Mhz. Once you’ve done that, key over to the boot order and place the USB drive first in the boot order. Then save the BIOS settings and restart.
After you restart you’ll be greeted by Ubuntu's installation screen. Installing Ubuntu is really straight forward, select the "minimal" installation option, as we won't need anything on this computer except for a browser (Ubuntu comes preinstalled with Firefox) and Plex Media Server/Jellyfin Media Server. Also remember to delete and reformat that Windows partition! We don't need it.
Step Four: Installing ZFS and Setting Up the RAIDz Array
Note: If you opted for just a single external HDD skip this step and move onto setting up a Samba share.
Once Ubuntu is installed it's time to configure our storage by installing ZFS to build our RAIDz array. ZFS is a "next-gen" file system that is both massively flexible and massively complex. It's capable of snapshot backup, self healing error correction, ZFS pools can be configured with drives operating in a supplemental manner alongside the storage vdev (e.g. fast cache, dedicated secondary intent log, hot swap spares etc.). It's also a file system very amenable to fine tuning. Block and sector size are adjustable to use case and you're afforded the option of different methods of inline compression. If you'd like a very detailed overview and explanation of its various features and tips on tuning a ZFS array check out these articles from Ars Technica. For now we're going to ignore all these features and keep it simple, we're going to pull our drives together into a single vdev running in RAIDz which will be the entirety of our zpool, no fancy cache drive or SLOG.
Open up the terminal and type the following commands:
sudo apt update
then
sudo apt install zfsutils-linux
This will install the ZFS utility. Verify that it's installed with the following command:
zfs --version
Now, it's time to check that the HDDs we have in the enclosure are healthy, running, and recognized. We also want to find out their device IDs and take note of them:
sudo fdisk -1
Note: You might be wondering why some of these commands require "sudo" in front of them while others don't. "Sudo" is short for "super user do”. When and where "sudo" is used has to do with the way permissions are set up in Linux. Only the "root" user has the access level to perform certain tasks in Linux. As a matter of security and safety regular user accounts are kept separate from the "root" user. It's not advised (or even possible) to boot into Linux as "root" with most modern distributions. Instead by using "sudo" our regular user account is temporarily given the power to do otherwise forbidden things. Don't worry about it too much at this stage, but if you want to know more check out this introduction.
If everything is working you should get a list of the various drives detected along with their device IDs which will look like this: /dev/sdc. You can also check the device IDs of the drives by opening the disk utility app. Jot these IDs down as we'll need them for our next step, creating our RAIDz array.
RAIDz is similar to RAID-5 in that instead of striping your data over multiple disks, exchanging redundancy for speed and available space (RAID-0), or mirroring your data writing by two copies of every piece (RAID-1), it instead writes parity blocks across the disks in addition to striping, this provides a balance of speed, redundancy and available space. If a single drive fails, the parity blocks on the working drives can be used to reconstruct the entire array as soon as a replacement drive is added.
Additionally, RAIDz improves over some of the common RAID-5 flaws. It's more resilient and capable of self healing, as it is capable of automatically checking for errors against a checksum. It's more forgiving in this way, and it's likely that you'll be able to detect when a drive is dying well before it fails. A RAIDz array can survive the loss of any one drive.
Note: While RAIDz is indeed resilient, if a second drive fails during the rebuild, you're fucked. Always keep backups of things you can't afford to lose. This tutorial, however, is not about proper data safety.
To create the pool, use the following command:
sudo zpool create "zpoolnamehere" raidz "device IDs of drives we're putting in the pool"
For example, let's creatively name our zpool "mypool". This poil will consist of four drives which have the device IDs: sdb, sdc, sdd, and sde. The resulting command will look like this:
sudo zpool create mypool raidz /dev/sdb /dev/sdc /dev/sdd /dev/sde
If as an example you bought five HDDs and decided you wanted more redundancy dedicating two drive to this purpose, we would modify the command to "raidz2" and the command would look something like the following:
sudo zpool create mypool raidz2 /dev/sdb /dev/sdc /dev/sdd /dev/sde /dev/sdf
An array configured like this is known as RAIDz2 and is able to survive two disk failures.
Once the zpool has been created, we can check its status with the command:
zpool status
Or more concisely with:
zpool list
The nice thing about ZFS as a file system is that a pool is ready to go immediately after creation. If we were to set up a traditional RAID-5 array using mbam, we'd have to sit through a potentially hours long process of reformatting and partitioning the drives. Instead we're ready to go right out the gates.
The zpool should be automatically mounted to the filesystem after creation, check on that with the following:
df -hT | grep zfs
Note: If your computer ever loses power suddenly, say in event of a power outage, you may have to re-import your pool. In most cases, ZFS will automatically import and mount your pool, but if it doesn’t and you can't see your array, simply open the terminal and type sudo zpool import -a.
By default a zpool is mounted at /"zpoolname". The pool should be under our ownership but let's make sure with the following command:
sudo chown -R "yourlinuxusername" /"zpoolname"
Note: Changing file and folder ownership with "chown" and file and folder permissions with "chmod" are essential commands for much of the admin work in Linux, but we won't be dealing with them extensively in this guide. If you'd like a deeper tutorial and explanation you can check out these two guides: chown and chmod.

You can access the zpool file system through the GUI by opening the file manager (the Ubuntu default file manager is called Nautilus) and clicking on "Other Locations" on the sidebar, then entering the Ubuntu file system and looking for a folder with your pool's name. Bookmark the folder on the sidebar for easy access.

Your storage pool is now ready to go. Assuming that we already have some files on our Windows PC we want to copy to over, we're going to need to install and configure Samba to make the pool accessible in Windows.
Step Five: Setting Up Samba/Sharing
Samba is what's going to let us share the zpool with Windows and allow us to write to it from our Windows machine. First let's install Samba with the following commands:
sudo apt-get update
then
sudo apt-get install samba
Next create a password for Samba.
sudo smbpswd -a "yourlinuxusername"
It will then prompt you to create a password. Just reuse your Ubuntu user password for simplicity's sake.
Note: if you're using just a single external drive replace the zpool location in the following commands with wherever it is your external drive is mounted, for more information see this guide on mounting an external drive in Ubuntu.
After you've created a password we're going to create a shareable folder in our pool with this command
mkdir /"zpoolname"/"foldername"
Now we're going to open the smb.conf file and make that folder shareable. Enter the following command.
sudo nano /etc/samba/smb.conf
This will open the .conf file in nano, the terminal text editor program. Now at the end of smb.conf add the following entry:
["foldername"]
path = /"zpoolname"/"foldername"
available = yes
valid users = "yourlinuxusername"
read only = no
writable = yes
browseable = yes
guest ok = no
Ensure that there are no line breaks between the lines and that there's a space on both sides of the equals sign. Our next step is to allow Samba traffic through the firewall:
sudo ufw allow samba
Finally restart the Samba service:
sudo systemctl restart smbd
At this point we'll be able to access to the pool, browse its contents, and read and write to it from Windows. But there's one more thing left to do, Windows doesn't natively support the ZFS file systems and will read the used/available/total space in the pool incorrectly. Windows will read available space as total drive space, and all used space as null. This leads to Windows only displaying a dwindling amount of "available" space as the drives are filled. We can fix this! Functionally this doesn't actually matter, we can still write and read to and from the disk, it just makes it difficult to tell at a glance the proportion of used/available space, so this is an optional step but one I recommend (this step is also unnecessary if you're just using a single external drive). What we're going to do is write a little shell script in #bash. Open nano with the terminal with the command:
nano
Now insert the following code:
#!/bin/bash CUR_PATH=`pwd` ZFS_CHECK_OUTPUT=$(zfs get type $CUR_PATH 2>&1 > /dev/null) > /dev/null if [[ $ZFS_CHECK_OUTPUT == *not\ a\ ZFS* ]] then IS_ZFS=false else IS_ZFS=true fi if [[ $IS_ZFS = false ]] then df $CUR_PATH | tail -1 | awk '{print $2" "$4}' else USED=$((`zfs get -o value -Hp used $CUR_PATH` / 1024)) > /dev/null AVAIL=$((`zfs get -o value -Hp available $CUR_PATH` / 1024)) > /dev/null TOTAL=$(($USED+$AVAIL)) > /dev/null echo $TOTAL $AVAIL fi
Save the script as "dfree.sh" to /home/"yourlinuxusername" then change the ownership of the file to make it executable with this command:
sudo chmod 774 dfree.sh
Now open smb.conf with sudo again:
sudo nano /etc/samba/smb.conf
Now add this entry to the top of the configuration file to direct Samba to use the results of our script when Windows asks for a reading on the pool's used/available/total drive space:
[global]
dfree command = /home/"yourlinuxusername"/dfree.sh
Save the changes to smb.conf and then restart Samba again with the terminal:
sudo systemctl restart smbd
Now there’s one more thing we need to do to fully set up the Samba share, and that’s to modify a hidden group permission. In the terminal window type the following command:
usermod -a -G sambashare “yourlinuxusername”
Then restart samba again:
sudo systemctl restart smbd
If we don’t do this last step, everything will appear to work fine, and you will even be able to see and map the drive from Windows and even begin transferring files, but you'd soon run into a lot of frustration. As every ten minutes or so a file would fail to transfer and you would get a window announcing “0x8007003B Unexpected Network Error”. This window would require your manual input to continue the transfer with the file next in the queue. And at the end it would reattempt to transfer whichever files failed the first time around. 99% of the time they’ll go through that second try, but this is still all a major pain in the ass. Especially if you’ve got a lot of data to transfer or you want to step away from the computer for a while.
It turns out samba can act a little weirdly with the higher read/write speeds of RAIDz arrays and transfers from Windows, and will intermittently crash and restart itself if this group option isn’t changed. Inputting the above command will prevent you from ever seeing that window.
The last thing we're going to do before switching over to our Windows PC is grab the IP address of our Linux machine. Enter the following command:
hostname -I
This will spit out this computer's IP address on the local network (it will look something like 192.168.0.x), write it down. It might be a good idea once you're done here to go into your router settings and reserving that IP for your Linux system in the DHCP settings. Check the manual for your specific model router on how to access its settings, typically it can be accessed by opening a browser and typing http:\\192.168.0.1 in the address bar, but your router may be different.
Okay we’re done with our Linux computer for now. Get on over to your Windows PC, open File Explorer, right click on Network and click "Map network drive". Select Z: as the drive letter (you don't want to map the network drive to a letter you could conceivably be using for other purposes) and enter the IP of your Linux machine and location of the share like so: \\"LINUXCOMPUTERLOCALIPADDRESSGOESHERE"\"zpoolnamegoeshere"\. Windows will then ask you for your username and password, enter the ones you set earlier in Samba and you're good. If you've done everything right it should look something like this:

You can now start moving media over from Windows to the share folder. It's a good idea to have a hard line running to all machines. Moving files over Wi-Fi is going to be tortuously slow, the only thing that’s going to make the transfer time tolerable (hours instead of days) is a solid wired connection between both machines and your router.
Step Six: Setting Up Remote Desktop Access to Your Server
After the server is up and going, you’ll want to be able to access it remotely from Windows. Barring serious maintenance/updates, this is how you'll access it most of the time. On your Linux system open the terminal and enter:
sudo apt install xrdp
Then:
sudo systemctl enable xrdp
Once it's finished installing, open “Settings” on the sidebar and turn off "automatic login" in the User category. Then log out of your account. Attempting to remotely connect to your Linux computer while you’re logged in will result in a black screen!
Now get back on your Windows PC, open search and look for "RDP". A program called "Remote Desktop Connection" should pop up, open this program as an administrator by right-clicking and selecting “run as an administrator”. You’ll be greeted with a window. In the field marked “Computer” type in the IP address of your Linux computer. Press connect and you'll be greeted with a new window and prompt asking for your username and password. Enter your Ubuntu username and password here.

If everything went right, you’ll be logged into your Linux computer. If the performance is sluggish, adjust the display options. Lowering the resolution and colour depth do a lot to make the interface feel snappier.

Remote access is how we're going to be using our Linux system from now, barring edge cases like needing to get into the BIOS or upgrading to a new version of Ubuntu. Everything else from performing maintenance like a monthly zpool scrub to checking zpool status and updating software can all be done remotely.

This is how my server lives its life now, happily humming and chirping away on the floor next to the couch in a corner of the living room.
Step Seven: Plex Media Server/Jellyfin
Okay we’ve got all the ground work finished and our server is almost up and running. We’ve got Ubuntu up and running, our storage array is primed, we’ve set up remote connections and sharing, and maybe we’ve moved over some of favourite movies and TV shows.
Now we need to decide on the media server software to use which will stream our media to us and organize our library. For most people I’d recommend Plex. It just works 99% of the time. That said, Jellyfin has a lot to recommend it by too, even if it is rougher around the edges. Some people run both simultaneously, it’s not that big of an extra strain. I do recommend doing a little bit of your own research into the features each platform offers, but as a quick run down, consider some of the following points:
Plex is closed source and is funded through PlexPass purchases while Jellyfin is open source and entirely user driven. This means a number of things: for one, Plex requires you to purchase a “PlexPass” (purchased as a one time lifetime fee $159.99 CDN/$120 USD or paid for on a monthly or yearly subscription basis) in order to access to certain features, like hardware transcoding (and we want hardware transcoding) or automated intro/credits detection and skipping, Jellyfin offers some of these features for free through plugins. Plex supports a lot more devices than Jellyfin and updates more frequently. That said, Jellyfin's Android and iOS apps are completely free, while the Plex Android and iOS apps must be activated for a one time cost of $6 CDN/$5 USD. But that $6 fee gets you a mobile app that is much more functional and features a unified UI across platforms, the Plex mobile apps are simply a more polished experience. The Jellyfin apps are a bit of a mess and the iOS and Android versions are very different from each other.
Jellyfin’s actual media player is more fully featured than Plex's, but on the other hand Jellyfin's UI, library customization and automatic media tagging really pale in comparison to Plex. Streaming your music library is free through both Jellyfin and Plex, but Plex offers the PlexAmp app for dedicated music streaming which boasts a number of fantastic features, unfortunately some of those fantastic features require a PlexPass. If your internet is down, Jellyfin can still do local streaming, while Plex can fail to play files unless you've got it set up a certain way. Jellyfin has a slew of neat niche features like support for Comic Book libraries with the .cbz/.cbt file types, but then Plex offers some free ad-supported TV and films, they even have a free channel that plays nothing but Classic Doctor Who.
Ultimately it's up to you, I settled on Plex because although some features are pay-walled, it just works. It's more reliable and easier to use, and a one-time fee is much easier to swallow than a subscription. I had a pretty easy time getting my boomer parents and tech illiterate brother introduced to and using Plex and I don't know if I would've had as easy a time doing that with Jellyfin. I do also need to mention that Jellyfin does take a little extra bit of tinkering to get going in Ubuntu, you’ll have to set up process permissions, so if you're more tolerant to tinkering, Jellyfin might be up your alley and I’ll trust that you can follow their installation and configuration guide. For everyone else, I recommend Plex.
So pick your poison: Plex or Jellyfin.
Note: The easiest way to download and install either of these packages in Ubuntu is through Snap Store.
After you've installed one (or both), opening either app will launch a browser window into the browser version of the app allowing you to set all the options server side.
The process of adding creating media libraries is essentially the same in both Plex and Jellyfin. You create a separate libraries for Television, Movies, and Music and add the folders which contain the respective types of media to their respective libraries. The only difficult or time consuming aspect is ensuring that your files and folders follow the appropriate naming conventions:
Plex naming guide for Movies
Plex naming guide for Television
Jellyfin follows the same naming rules but I find their media scanner to be a lot less accurate and forgiving than Plex. Once you've selected the folders to be scanned the service will scan your files, tagging everything and adding metadata. Although I find do find Plex more accurate, it can still erroneously tag some things and you might have to manually clean up some tags in a large library. (When I initially created my library it tagged the 1963-1989 Doctor Who as some Korean soap opera and I needed to manually select the correct match after which everything was tagged normally.) It can also be a bit testy with anime (especially OVAs) be sure to check TVDB to ensure that you have your files and folders structured and named correctly. If something is not showing up at all, double check the name.
Once that's done, organizing and customizing your library is easy. You can set up collections, grouping items together to fit a theme or collect together all the entries in a franchise. You can make playlists, and add custom artwork to entries. It's fun setting up collections with posters to match, there are even several websites dedicated to help you do this like PosterDB. As an example, below are two collections in my library, one collecting all the entries in a franchise, the other follows a theme.

My Star Trek collection, featuring all eleven television series, and thirteen films.

My Best of the Worst collection, featuring sixty-nine films previously showcased on RedLetterMedia’s Best of the Worst. They’re all absolutely terrible and I love them.
As for settings, ensure you've got Remote Access going, it should work automatically and be sure to set your upload speed after running a speed test. In the library settings set the database cache to 2000MB to ensure a snappier and more responsive browsing experience, and then check that playback quality is set to original/maximum. If you’re severely bandwidth limited on your upload and have remote users, you might want to limit the remote stream bitrate to something more reasonable, just as a note of comparison Netflix’s 1080p bitrate is approximately 5Mbps, although almost anyone watching through a chromium based browser is streaming at 720p and 3mbps. Other than that you should be good to go. For actually playing your files, there's a Plex app for just about every platform imaginable. I mostly watch television and films on my laptop using the Windows Plex app, but I also use the Android app which can broadcast to the chromecast connected to the TV in the office and the Android TV app for our smart TV. Both are fully functional and easy to navigate, and I can also attest to the OS X version being equally functional.
Part Eight: Finding Media
Now, this is not really a piracy tutorial, there are plenty of those out there. But if you’re unaware, BitTorrent is free and pretty easy to use, just pick a client (qBittorrent is the best) and go find some public trackers to peruse. Just know now that all the best trackers are private and invite only, and that they can be exceptionally difficult to get into. I’m already on a few, and even then, some of the best ones are wholly out of my reach.
If you decide to take the left hand path and turn to Usenet you’ll have to pay. First you’ll need to sign up with a provider like Newshosting or EasyNews for access to Usenet itself, and then to actually find anything you’re going to need to sign up with an indexer like NZBGeek or NZBFinder. There are dozens of indexers, and many people cross post between them, but for more obscure media it’s worth checking multiple. You’ll also need a binary downloader like SABnzbd. That caveat aside, Usenet is faster, bigger, older, less traceable than BitTorrent, and altogether slicker. I honestly prefer it, and I'm kicking myself for taking this long to start using it because I was scared off by the price. I’ve found so many things on Usenet that I had sought in vain elsewhere for years, like a 2010 Italian film about a massacre perpetrated by the SS that played the festival circuit but never received a home media release; some absolute hero uploaded a rip of a festival screener DVD to Usenet. Anyway, figure out the rest of this shit on your own and remember to use protection, get yourself behind a VPN, use a SOCKS5 proxy with your BitTorrent client, etc.
On the legal side of things, if you’re around my age, you (or your family) probably have a big pile of DVDs and Blu-Rays sitting around unwatched and half forgotten. Why not do a bit of amateur media preservation, rip them and upload them to your server for easier access? (Your tools for this are going to be Handbrake to do the ripping and AnyDVD to break any encryption.) I went to the trouble of ripping all my SCTV DVDs (five box sets worth) because none of it is on streaming nor could it be found on any pirate source I tried. I’m glad I did, forty years on it’s still one of the funniest shows to ever be on TV.
Part Nine/Epilogue: Sonarr/Radarr/Lidarr and Overseerr
There are a lot of ways to automate your server for better functionality or to add features you and other users might find useful. Sonarr, Radarr, and Lidarr are a part of a suite of “Servarr” services (there’s also Readarr for books and Whisparr for adult content) that allow you to automate the collection of new episodes of TV shows (Sonarr), new movie releases (Radarr) and music releases (Lidarr). They hook in to your BitTorrent client or Usenet binary newsgroup downloader and crawl your preferred Torrent trackers and Usenet indexers, alerting you to new releases and automatically grabbing them. You can also use these services to manually search for new media, and even replace/upgrade your existing media with better quality uploads. They’re really a little tricky to set up on a bare metal Ubuntu install (ideally you should be running them in Docker Containers), and I won’t be providing a step by step on installing and running them, I’m simply making you aware of their existence.
The other bit of kit I want to make you aware of is Overseerr which is a program that scans your Plex media library and will serve recommendations based on what you like. It also allows you and your users to request specific media. It can even be integrated with Sonarr/Radarr/Lidarr so that fulfilling those requests is fully automated.
And you're done. It really wasn't all that hard. Enjoy your media. Enjoy the control you have over that media. And be safe in the knowledge that no hedgefund CEO motherfucker who hates the movies but who is somehow in control of a major studio will be able to disappear anything in your library as a tax write-off.
1K notes
·
View notes
Text
Canada sues Google

If you'd like an essay-formatted version of this post to read or share, here's a link to it on pluralistic.net, my surveillance-free, ad-free, tracker-free blog:
https://pluralistic.net/2024/12/03/clementsy/#can-tech

For a country obsessed with defining itself as "not America," Canada sure likes to copy US policies, especially the really, really terrible policies – especially the really, really, really terrible digital policies.
In Canada's defense: these terrible US policies are high priority for the US Trade Representative, who leans on Canadian lawmakers to ensure that any time America decides to collectively jump off the Empire State Building, Canadian politicians throw us all off the CN Tower. And to Canada's enduring shame, the USTR never has to look very hard to find a lickspittle who's happy to sell Canadians out.
Take anti-circumvention. In 1998, Bill Clinton signed the Digital Millennium Copyright Act, a gnarly hairball of copyright law whose Section 1201 bans reverse-engineering for any purpose. Under DMCA 1201, "access controls" for copyrighted works are elevated to sacred status, and it's a felony (punishable by a five-year prison sentence and a $500k fine) to help someone bypass these access controls.
That's pretty esoteric, even today, and in 1998, it was nearly incomprehensible, except to a small group of extremely alarmed experts who ran around trying to explain to lawmakers why they should not vote for this thing. But by the time Tony Clement and James Moore (Conservative ministers in the Harper regime) introduced a law to import America's stupidest tech idea and paste it into Canada's lawbooks in 2012, the evidence against anti-circumvention was plain for anyone to see.
Under America's anti-circumvention law, any company that added an "access control" to its products instantly felonised any modification to that product. For example, it's not illegal to refill an ink cartridge, but it is illegal to bypass the access control that gets the cartridge to recognise that it's full and start working again. It's not illegal for a Canadian software developer to sell a Canadian Iphone owner an app without cutting Apple in for a 30% of the sale, but it is illegal to mod that Iphone so that it can run apps without downloading them from the App Store first. It's not illegal for a Canadian mechanic to fix a Canadian's car, but it is illegal for that mechanic to bypass the access controls that prevent third-party mechanics from decrypting the error codes the car generates.
We told Clement and Moore about this, and they ignored us. Literally: when they consulted on their proposal in 2010, we filed 6,138 comments explaining why this was a bad idea, while only 53 parties wrote in to support it. Moore publicly announced that he was discarding the objections, on the grounds that they had come from "babyish" "radical extremists":
https://www.cbc.ca/news/science/copyright-debate-turns-ugly-1.898216
For more than a decade, we've had Clement and Moore's Made-in-America law tied to our ankles. Even when Canada copies some good ideas from the US (by passing a Right to Repair law), or even some very good ideas of its own (passing an interoperability law), Canadians can't use those new rights without risking prosecution under Clement and Moore's poisoned gift to the nation:
https://pluralistic.net/2024/11/15/radical-extremists/#sex-pest
"Not America" is a pretty thin basis for a political identity anyway. There's nothing wrong with copying America's good ideas (like Right to Repair). Indeed, when it comes to tech regulation, the US has had some bangers lately, like prosecuting US tech giants for violating competition law. Given that Canada overhauled its competition law this year, the country's well-poised to tackle America's tech giants.
Which is exactly what's happening! Canada's Competition Bureau just filed a lawsuit against Google over its ad-tech monopoly, which isn't merely a big old Privacy Chernobyl, but is also a massively fraudulent enterprise that rips off both advertisers and publishers:
https://www.reuters.com/technology/canadas-antitrust-watchdog-sues-google-alleging-anti-competitive-conduct-2024-11-28/
The ad-tech industry scoops up about 51 cents out of every dollar (in the pre-digital advertising world the net take by ad agencies was more like 15%). Fucking up Google's ad-tech rip off is a much better way to Canada's press paid than the link tax the country instituted in 2023:
https://www.eff.org/deeplinks/2023/05/save-news-we-must-ban-surveillance-advertising
After all, what tech steals from the news isn't content (helping people find the news and giving them a forum to discuss it is good) – tech steals news's money. Ad-tech is a giant ripoff. So is the app tax – the 30% Canadian newspapers have to kick up to the Google and Apple crime families every time a subscriber renews their subscriptions in an app. Using Canadian law to force tech to stop stealing the press's money is a way better policy than forcing tech to profit-share with the news. For tech to profit-share with the news, it has to be profitable, meaning that a profit-sharing press benefits from tech's most rapacious and extractive conduct, and rather than serving as watchdogs, they're at risk of being cheerleaders.
Smashing tech power is a better policy than forcing tech to share its stolen loot with newspapers. For one thing, it gets government out of the business of deciding what is and isn't a legit news entity. Maybe you're OK with Trudeau making that call (though I'm not), but how will you feel when PM Polievre decides that Great Replacement-pushing, conspiracy-addled far right rags should receive a subsidy?
Taking on Google is a slam-dunk, not least because the US DoJ just got through prosecuting the exact same case, meaning that Canadian competition enforcers can do some good copying of their American counterparts – like, copying the exhibits, confidential memos, and successful arguments the DoJ brought before the court:
https://www.justice.gov/opa/pr/justice-department-sues-google-monopolizing-digital-advertising-technologies
Indeed, this already a winning formula! Because Big Tech commits the same crimes in every jurisdiction, trustbusters are doing a brisk business by copying each others' cases. The UK Digital Markets Unit released a big, deep market study into Apple's app market monopoly, which the EU Commission used as a roadmap to bring a successful case. Then, competition enforcers in Japan and South Korea recycled the exhibits and arguments from the EU's case to bring their own successful prosecutions:
https://pluralistic.net/2024/04/10/an-injury-to-one/#is-an-injury-to-all
Canada copying the DoJ's ad-tech case is a genius move – it's the kind of south-of-the-border import that Canadians need. Though, of course, it's a long shot that the Trump regime will produce much more worth copying. Instead, Trump has vowed to slap a 25% tariff on Canadian goods as of January 20.
Which is bad news for Canada's export sector, but it definitely means that Canada no longer has to worry about keeping the US Trade Rep happy. Repealing Clement and Moore's Bill C-11 should be Parliament's first order of business. Tariff or no tariff, Canadian tech entrepreneurs could easily export software-based repair diagnostic tools, Iphone jailbreaking tooks, alternative firmware for tractors and medical implants, and alternative app stores for games consoles, phones and tablets. So long as they can accept a US payment, they can sell to US customers. This is a much bigger opportunity than, say, selling cheap medicine to Americans trying to escape Big Pharma's predation.
What's more, there's no reason this couldn't be policy under Polievre and the Tories. After all, they're supposed to be the party of "respect for private property." What could be more respectful of private property than letting the owners of computers, phones, cars, tractors, printers, medical implants, smart speakers and anything else with a microchip decide for themselves how they want to it work? What could be more respectful of copyright than arranging things so that Canadian copyright holders – like a games studio or an app company – can sell their copyrighted works to Canadian buyers, without forcing the data and the payment to make a round trip through Silicon Valley and come back 30% lighter?
Canadian politicians have bound the Canadian public and Canadian industry to onerous and expensive obligations under treaties like the USMCA (AKA NAFTA2), on promise of tariff-free access to American markets. With that access gone, why on Earth would we continue to voluntarily hobble ourselves?
#pluralistic#link tax#big tech#corruption#canpoli#cdnpoli#monopolies#ad-tech#publishing#canada#competition bureau#usmca#nafta#anticircumvention#r2r#right to repair#interoperability
273 notes
·
View notes
Text
Understanding Javascript and Search Engine Optimization
This report provides a comprehensive overview of Javascript, a fundamental programming language for web development, and Search Engine Optimization (SEO), a critical practice for enhancing online visibility. The analysis delves into the core concepts of Javascript, its applications in both front-end and back-end development, and explores popular frameworks and libraries. Furthermore, it examines…
#Angular#Back-End Development#Front-End Development#Javascript#Keyword Research#Link Building#Node.js#Off-Page SEO#On-Page SEO#programming#React#seo#software-development#Technical SEO#technology#Web Development#Website Speed
0 notes
Text
Hey everyone,
I’ve been building a small Irish language learning app called Píosa Beag over the last few weeks. It gives you one new word or proverb each day, with pronunciation and a streak system to help you stick with it.
I’m a first-year software dev student and this is my first ever app. Not finished yet, but I’d love to share the journey and get any thoughts or ideas. Check it out here: https://piosabeag.ie
Slán!
This person has shared their in-progress app for learning Irish - I’ve included the link to both their site and their post on Reddit. Thought some of ye might be interested!
96 notes
·
View notes
Text
📥 How to install everything ?! 🗂️
It's a very big project ! Between the lots and the sims, you have to be very sure of what you are doing. However, this post is there to guide you through the steps of installing everything.


🟪 Phase one - The "Lot Master Meshes Post" 🏗️ (for the unpopulated neighborhood) : This post contains links for custom content (Building and Buying Mode) needed that does not install itself with the packaged files and needs to be installed for lots to display properly. Not downloading those things can cause bug, especially food/shop displays. 🟥 Phase two - The "Chapters" posts : install the lots 🏡 These posts contain links to big downloads or entire download sub-folders containing the lots.packages (Neighborhood, Downtown, MagicTown etc.). Each lot.package file must be installed for every lot to display properly in the neighborhood with The Sims 2 Clean Pack Installer by Mootilda. For the lots, every CC is needed. The CC presentation in the lots posts (between pictures) serves to illustrate (or to show you an alternative or to thank a creator) and is included in the packaged file or the lot master-meshes post. The lots post where only to show what you are downloading, and for the ones who just want to pick and choose a particular lot for their own game. 🟧 Phase three - The Neighborhood 🏘️ The "Chapter 5" post includes every neighborhood decoration CC you need for the neighborhoods, after you installed every lot packaged file. When, you passed the check-list, you can choose what to download between all the options presented to you. 🟨 Phase four - The CAS Master Meshes Posts 1 and 2 A lot of CC presented in those posts are not strictly necessary. If you don't install a default replacement, you will end up with the maxis content. If you don't load a custom hairstyle or clothing, you can have a display bug, but that is quickly corrected with the "change appearance" option. Big bugs can occur when an eye or skin color is missing, so I deliberately build my sims with the Maxis eye/skin options. These posts are for the ones who want to install my populated neighborhood. For those who only want to choose a few sims from the families, each sim in each family post has their own content listed. 🟩 Phase five - Download & install the TS1 families Subhood 🧑🤝🧑 I'm working on making one big neighborhood, but the issue with main hoods is unwanted sims spawning, especially custom PT and NPCs. And then potential corruption when you try to clean that freaking mess. The Main (completely unpopulated) hood with the populated subhood is the best option to have a "Fresh Start" clean neighborhood. After deleting the subhood, you have to move the family in houses. The Sims 1 has a big family bin. Choosing who is going where is part of the game, it doesn't seem right to choose for you. 🟦 Phase six - Passed the check list 🎮 You chose, you installed, you PLAY ! (veni, vedi, vici...)


⚠️ I'm not going to lie to you. It's a big project. I tried by the past to handle that kind of installation and here is my advice, good or bad, I don't know :
1 - Install every master-meshes, well organized in your files. 2 - Install every CC included in lot packages in the same folder, to make the duplicate replacing themselves (there are a lot since I use a lot of time the same items... logic). 3 - Install the neighborhood deco nicely organized in your folders. 4 - Test the lots/neighborhoods, see if everything works. 5 - Exit your game and Run a program to search for duplicates (like this one for exemple), and suppress all duplicates files from the "lots packaged file CC folder" (suppress where it's still messy) 6 - If you want to organize the "messy" folder, you can run a program like the great Delphy Download Organizer to efficiently re-dispatch files according to your own classification. However, I strongly advise against using this software to locate duplicates. It has the option, but it doesn't work well.
💡To go faster ? - The "Navigation" page on my Simblr !


#sims 2#sims 2 download#ts2 simblr#ts2#1t2#the sims 1#sims nostalgia#sims 1#the sims 2#ts1#ts1t2 families#ts1t2 neighborhood download#ts1t2 neighborhood project#ts1 to ts2#FAQ
57 notes
·
View notes
Photo

(via AI haters build tarpits to trap and trick AI scrapers that ignore robots.txt - Ars Technica)
Building on an anti-spam cybersecurity tactic known as tarpitting, he created Nepenthes, malicious software named after a carnivorous plant that will "eat just about anything that finds its way inside."
Aaron clearly warns users that Nepenthes is aggressive malware. It's not to be deployed by site owners uncomfortable with trapping AI crawlers and sending them down an "infinite maze" of static files with no exit links, where they "get stuck" and "thrash around" for months, he tells users. Once trapped, the crawlers can be fed gibberish data, aka Markov babble, which is designed to poison AI models. That's likely an appealing bonus feature for any site owners who, like Aaron, are fed up with paying for AI scraping and just want to watch AI burn.
Tarpits were originally designed to waste spammers' time and resources, but creators like Aaron have now evolved the tactic into an anti-AI weapon. As of this writing, Aaron confirmed that Nepenthes can effectively trap all the major web crawlers. So far, only OpenAI's crawler has managed to escape.
105 notes
·
View notes
Note
idk how much engagement you get but if you're interested in an extra income, I have a free credit repair software and I can make you a referral link so you get a referral fee for everyone that signs up with your link.
Attention, baby bitchlings! This is clearly spam, but we're using it as a teaching moment.
I would never say yes to something like this for 2 reasons:
Part of our revenue model is endorsing companies for a cut of referrals (the other part being our Patreon, which you should absolutely join). Companies reach out to partner with us BECAUSE we have a big audience and BECAUSE we've built up a significant amount of trust with our audience. Y'all know we don't endorse stuff we haven't personally tested and researched. There's no way in HELL your humble Bitches would signal boost a completely random, unnamed "free credit repair software."
Most credit repair services are a scam or a waste of money. They recommend tactics you can do on your own for free (I'll link our guides for this below) without sharing your sensitive personal data with an outside company. The fact that anon is recommending a "free" credit repair software tells me that once you're in the software, their business model is to upsell you on other shit you don't need. Along with life insurance, credit repair services are one business model we'll never partner with for endorsements.
Now, if someone asks YOU to signal boost a referral link, think long and hard about it. Is it legit? Is it a scam? Is it something you're ok putting your name on if it means other people could be taken advantage of?
Now, if your credit needs repairing, here's what we recommend:
How to Build Good Credit Without Going Into Debt
Credit Scoring Is a Racist, Classist System that Has Us All Trapped
How To Fix an Error on Your Credit Report Without Losing Your Damn Mind
How to Instantly Increase Your Credit Score… for FREE
{ MASTERPOST } Everything You Need to Know about Credit and Credit Cards
Did we just help you out? Say thanks on Patreon!
98 notes
·
View notes
Text
My Open-Source Tolkien Studies Data Sets
One of the best parts of being an independent scholar is that I get to be generous with my research. I am not counting on it for a job, and frankly, between teaching at a small rural school and running the Silmarillion Writers' Guild, I will likely never be able to do all that I want to do with the data that I collect and so love the idea that someone might do something with it.
Because I do love making sets of data. Everything from the mind-numbing copy/paste data entry to learning new spreadsheet formulas is enjoyable to me. I'm an introvert in a very extraverted profession, and after a day of being all on for my students, turning everything into numbers is like a cup of tea under a warm blanket with a Golden Retriever at my feet.
So please use these data sets if they interest you. Play with them. Write about and share what you notice. Expand and build on them. Publish using them. If you use my data or work, credit Dawn Walls-Thumma and link to my website, dawnfelagund.com, if possible. I'd also love if you'd let me know if you share anything using them.
Consolidated Timelines. I made this back in 2013. I was trying to arrange all of Tolkien's timelines side by side. I did some weird things with numbers that I'm not sure I fully understand now, but maybe you can make sense of this or maybe you just want everything Tolkien said about timelines in one handy document. (Make a copy of the Consolidated Timelines.)
Fanfiction Archive Timeline. Made for the 2023 Fan Studies Network North America conference, this timeline-on-a-spreadsheet shows archives in the Tolkien and Harry Potter fandoms, multifandom archives, and social networks and when they came online, were active, became inactive, and went offline, along with data about affiliated communities, software, and rescue efforts. I update this timeline annually with that year's data and will continue to add new archives when I have enough data to do so. (Make a copy of the Fanfiction Archive Timeline spreadsheet.)
References to Sources in the Works of J.R.R. Tolkien. In this document, I record each time a narrator's source is mentioned or alluded to. Ideally, this will one day include The Hobbit and The Lord of the Rings as well! For now, it is just The Silmarillion for the selfish reason that I'm predominantly a Silmarillion researcher. (Make a copy of the References to Sources.)
Silmarillion Characters. A list of all of the characters in The Silmarillion, demographic data about them, the number of times they are mentioned, various aliases, and which "books" of The Silmarillion they appear in. The latter part is a work-in-progress. (Make a copy of Silmarillion Characters.)
Silmarillion Death Scenes (spreadsheet | document). For last year's Tolkien at UVM and Oxonmoot conferences, I collected every death scene in the Quenta Silmarillion and recorded various details about character demographics, cause of death, and grief and mourning rituals. (Make a copy of the spreadsheet. Make a copy of the document.)
The Silmarillion: Who Speaks? This is my newest project, which I hope to complete by the end of the year, documenting which characters get to speak actual words, the number of words they speak, and demographics about the speaking characters. Eventually, I would like to include as well characters who are mentioned as having spoken without being given actual dialogue, but one step at a time. Again, this is a work-in-progress. I have just started working on it. Come back in 2025 and, hopefully, there will be interesting stuff to see.
117 notes
·
View notes