#MXLinux
Explore tagged Tumblr posts
Visit Tumblr Blog
Explore Tumblr blogs with no restrictions, modern design and the best experience.
Last Seen Tumblr Blogs


Fun Fact
The KCSC sent more than 20K requests to delete posts related to prostitution and porn to Tumblr from January to June 2017.
Text
MX Linux 23 Xfce Edition Customization
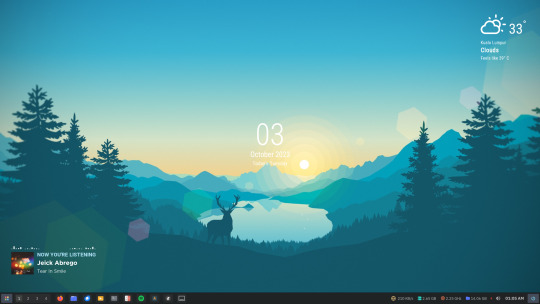
Hey there, fellow Linux enthusiasts! Are you ready to take your MX Linux 23 Xfce Edition experience to the next level? 🚀
In this journey, we're diving deep into the world of customization, leveraging the fantastic features of MX Linux 23 Xfce, including the Xfce desktop 4.18 series. It's time to make your Linux environment uniquely yours. 🖥️
But here's the real kicker: this isn't just for MX Linux 23 Xfce users. We've got you covered, no matter if you're using Debian-based distributions, Fedora-based distributions, or Arch-based distributions. You can get our comprehensive documentation here: Download Documentation. 🔗
Here's what we have in store for you:
🎥 Video Final Result: Witness the stunning transformation in our final result video: Video Final Result.
📹 Video Tutorial Step-by-step: Follow along step by step and master the art of MX Linux 23 Xfce Edition customization: Video Tutorial Step-by-step.
🛠️ Video Additional Setups: Take your customization to the next level with additional setup tips and tricks: Video Additional Setups.
💾 Download Resource Files: Grab essential resource files to enhance your MX Linux 23 Xfce experience: Download Resource Files.
🖼️ Download Default Wallpaper: Add a touch of personalization with our default wallpaper: Download Default Wallpaper.
Get ready to make your MX Linux 23 Xfce Edition desktop truly your own. Let's unleash the full potential of your Linux journey together! 🔓
42 notes
·
View notes
Text
This is kinda funny. I decided to go ahead and log into Firefox for bookmark sync purposes, since I thought I would just settle down and try and live in Garuda for a while to see if the current setup continues to work well.
So yeah, apparently Firefox decided to automatically send over that silly bookmark bar MX adds to its Firefox package, which I hadn't bothered to turn off in the new install yet. Oops. But if I should need the antiX wiki, I guess I would be all set.
2 notes
·
View notes
Video
youtube
How To Change The Primary Mouse Button In MX Linux : Quick & Easy Tutorial
In this step-by-step tutorial, you'll learn how to change the primary mouse button in MX Linux, whether you're left-handed or simply prefer using the right mouse button as primary. This quick guide walks you through the settings needed to switch your mouse from left-click to right-click (or vice versa) with ease.
🖱️ Ideal for left-handed users ⚙️ Easy-to-follow steps for MX Linux 💻 Works on desktops and laptops
Perfect for customizing your Linux desktop experience to match your workflow!
Simple Steps 1. In the lower left corner and click on the "Application Menu" button and choose the "Green Gear Wheel" icon to open settings. 2. In the dialog box that opens, in the "Hardware" section, click on "Mouse & Touchpad". 3. In the dialog box that opens, click on the "Devices" tab. 4. Under "Buttons", toggle on either "Left-Handed or Right-Handed".
0 notes
Link
#Linux#LinuxForBeginners#Top5LinuxDistros#LinuxMint#Ubuntu#PopOS#MXLinux#ZorinOS#BeginnerFriendlyLinux#LinuxTutorial#LinuxCommunity#LinuxSoftware#LinuxHardware#OpenSource#LinuxJourney#TechForBeginners#SwitchToLinux#5#4#3#2#1
0 notes
Text
1 note
·
View note
Note
do you use linux. how & why
I do! While I do use Windows 10 for my desktop since I game a lot and play with a lot of old software so its bit of a requirement, I use linux on pretty much everything else I can. I even run it in VMs on my desktop on a fairly frequent basis to do things windows simply cant. As for the how using linux is pretty easy once you manage to learn how to use a CLI since even if you have a GUI you'll still be interfacing with it a lot. I prefer debain based distros since thats what I learned linux with and my current distro of choice is MXLinux, though I havent had a chance to use it much since I switched to it so I might change back to stock Debain. As for the why of it I simply love Open Source software as well as loving the amount of freedom it gives you, also its better for things like running servers and honestly once you get used to using a CLI you can get a lot faster with doing things in your OS. Its very fun to tinker and to do things on it as well so its a great hobby thing, its also a great way to breath some new live into an old laptop so I definitely recommend doing that at some point. I plan to run a homelab on some old hardware I have to do things like have a FTP server, host my own website and Gmod server, and do a veriety of other fun things on it which will all be accomplished with linux and a bunch of VMs. Thank you for the ask!
2 notes
·
View notes
Text
RaspberryPi’s as a brand are ridiculously overpriced right now due to supply constraints, but there are a wide variety of alternatives. If you’re planning to use a wired connection and only use it for PiHole purposes, the Libre Le Potato is still nicely inexpensive. FriendlyElec has a ton of options, with the NanoPi M4 being the most Pi-standard, and some of these, like the FriendlyElec R5S (multi 2.5g ethernet!), are much more capable than the RaspberryPi standard-bearers. OrangePi and BananaPi’s are more direct knockoffs, though I’ve mixed feelings about them.
That said, non-RaspberryPi install processes may be a little more annoying if you’ve never used Ubuntu before. (Uh, or even if you had; for a while, FriendlyElec had their Officially Supported Distro on a google drive.)
The big advantage to the Pi-like form factor is simply that it takes a tiny amount of power, and takes a tiny amount of space, and in some jurisdictions this adds up. A 5w computer costs a thirtieth of a 150w computer in terms of electricity, and while that while that’s maybe fifty or a hundred bucks bucks on the east coast, there’s parts of the west coast where that will be closer to three hundred.
That said, you can buy used mid-form factor machines pretty cheap these days. A used Dell Optiplex 9020 will probably set you back 100-150 USD, plus the cost of a disk drive, and generally runs 10-20 watts. If you’ve got the space, it’s a nice compromise -- and far easier to update down the road to act as a local game server, or to operate a file share and backup system.
((Seriously, consider a local Nextcloud config, if your selection has a full disk drive rather than a microSD. Having differential backups on a local computer is a nice option!))
Because Raspbian cannot be upgraded across version WHY U DO THIS
Raspbian doesn’t let you do distro upgrades for the same reason groups like MXLinux are sporadic about it; they break pretty often -- I’ve destroyed handfuls of Ubuntu installs through ‘supported’ distro-upgrades -- and your machine won’t last that long, anyway.
((MicroSD cards have notorious reliability problems after about 10k-100k writes, so you usually get about two to three years of ‘normal’ use.))
Which is a horrible reason, except for all the others.
If you didn’t plug it in, and need to setup the wifi, there’s magic incantations to attach it to the wifi and to be quite blunt, I forget what they are.
Officially, for Raspbian, set wpa_supplicant.conf on the MicroSD card to contain:
country=“Your Two-Letter-Country-Code”
ctrl_interface=DIR=/var/run/wpa_supplicant GROUP=netdev network={
ssid="YOUR_NETWORK_NAME"
psk="YOUR_PASSWORD"
key_mgmt=WPA-PSK
}
In practice, I’ve managed to get it to work literally once across several dozen attempts. And the Ubuntu-specific version is even worse. The correct answer is to borrow an HDMI monitor and a keyboard for a few minutes to get initial setup completed.
((And you'll want your Pi-hole connected via wires to your router anyway. Will make things a lot less obnoxious.))
Apropos of nothing
If you are the techiest person in the house (and for many of you, this is not techy at all), today is a good day to build a pihole thanks to Google's new TLDs.
For the record, this straight up stopped Dad from getting computer viruses when coupled with the Ublock browser extension, so I will volunteer my time to get you set up. We will find an evening and do a Zoom call. I am serious.
Prerequisities:
Before you start, this will be way way easier if your router has a magic way to:
Set static IP addresses
Set a custom DNS server
If you can't do this, I'm not saying you're stuck, but there's some non-obvious failure modes and maybe it's time to buy a better router.

Parts:
Raspberry Pi 4B. 2GB if you just want to set and forget, 8GB if you want to do more things on this than just your pihole (Coughs in a MarioKart box) -> https://www.raspberrypi.com/products/raspberry-pi-4-model-b/
Spare USB-C charger if you don't have one already. I'm a fan of https://www.amazon.com/Argon-USB-C-Power-Supply-Switch/dp/B0919CQKQ8/ myself
A microSD card at least UHS class 3 or better. 32 is fine for just a pihole, I have a 512 in some of mine that I use for more stuff. https://www.tomshardware.com/best-picks/raspberry-pi-microsd-cards
Some method of flashing the card if you don't have one (Some come with SD to micro-SD adapters, if not a USB to SD/micro-SD adapter is about $10 off Amazon)
If you really feel like going nuts, go buy yourself an Argon case and then very very carefully never ever install the software for the fan that does nothing. The value is entirely in having a big giant brick that is self-cooling. If you want to play MarioKart, I would consider this a requirement. https://www.amazon.com/Argon-Raspberry-Aluminum-Heatsink-Supports/dp/B07WP8WC3V
Setup:
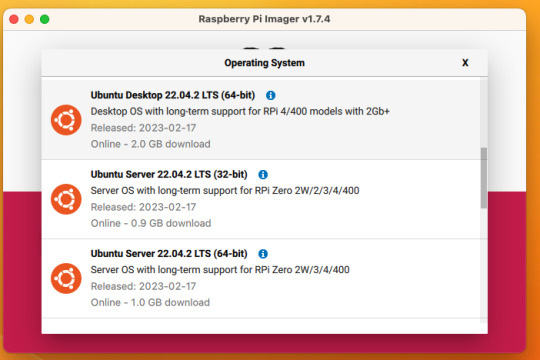
Do yourself a favor and ignore all the signs telling you to go get Raspbian and instead go grab an ISO of Ubuntu 64-bit using RPi Imager. Because Raspbian cannot be upgraded across version WHY U DO THIS
Download Rpi Imager, plug the microSD card into your computer,
Other General Purpose OS -> Ubuntu -> Ubuntu 22.04 LTS
So now you have an operating system on an SD card.
Assemble the case if you bought one, plug in the SD card, power supply, ethernet cable if you have one or mouse and (mini) HDMI cable if you don't. If you bought that Argon case, you can just plug a keyboard (server OS means no mouse gang; In this house, we use the Command Line) and HDMI cable into the Pi. Turn it on.
Gaining access
The end state of this is that your pi is:
Connected to the internet by cable or wifi
You can SSH to it (Also not scary)
If you plugged in an ethernet cable, once it's done booting (1-2 minutes?), you should be able to ssh to "ubuntu@<the IP of the system>". Look it up in your router. It may make sense to give the static IP NOW to keep it stable.
If you've never used SSH before, I think the standard is Putty on Window or you can just open a terminal in Mac. (And if you know enough Linux to have a Linux computer, why are you reading this?)
If you didn't plug it in, and need to setup the wifi, there's magic incantations to attach it to the wifi and to be quite blunt, I forget what they are.
Your username is ubuntu, your password is ubuntu and then it will ask you to make a new password. If you know the meaning of the phrase "keypair-based access", it may make sense to run `ssh-copy-id` at this point in time.
Router settings (part 1)
Give your new Pi a static IP address, and reboot your pi (as simple as typing in `sudo reboot`).
Open a new SSH session to the pihole on the new address.
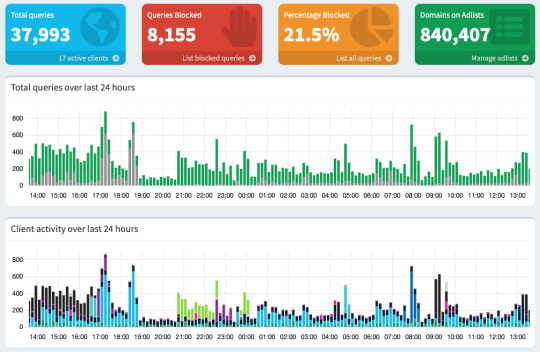
Installing pihole
Open up an SSH session and
curl -sSL https://install.pi-hole.net | bash
This is interactive. Answer the questions
When it's done, on your other computer, navigate to <the ip>/admin
Login with the password you just set. Router settings part 2
Give your new Pi a static IP address then point your router at that address
Set the DNS servers to the static IP
Then ensure you're blocking something. Anything.
Then do what you want to do. You'll probably need to whitelist some sites, blacklist some more, but the main thing is going to be "Adding more list of bad sites". Reddit has some lists.
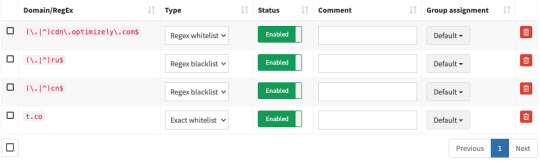
And... enjoy.
/But seriously, there's some stuff to do for maintenance and things. I wasn't joking about the pair setup.
2K notes
·
View notes
Text
Nyoba mx-linux yang 32-bit, dan beneran enteng meski berjalan di memori 1024MB
---
OS Type: Linux
Based on: Debian (Stable), antiX
Origin: Greece, USA
Architecture: armhf, i686, x86_64
Desktop: Fluxbox, KDE Plasma, Xfce
Category: Desktop, From RAM, Live Medium, Raspberry Pi
Status: Active
MX Linux, a desktop-oriented Linux distribution based on Debian's "Stable" branch, is a cooperative venture between the antiX and former MEPIS Linux communities. Using Xfce as the default desktop (with separate KDE Plasma and Fluxbox editions also available), it is a mid-weight operating system designed to combine an elegant and efficient desktop with simple configuration, high stability, solid performance and medium-sized footprint. (DistroWatch.com)
2 notes
·
View notes
Photo
--------------------------------------
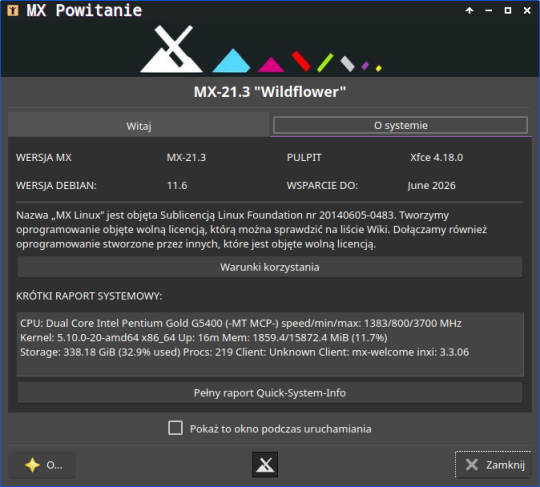
Operating System: MX-21.3 “Wildflower”.
--------------------------------------
Based On: Debian version 11.6
Desktop: Xfce 4.18.0
Support for this version ends: June 2026
--------------------------------------
Changed System Panel and Colours
--------------------------------------
GNU/Linux Distribution Page: https://mxlinux.org/
3 notes
·
View notes
Text
I like MXLinux - it's very beginner friendly and debian based, hard recommend it
Chat, I may have to change to Linux soon-ish. Does someone has some advices?
I mostly use my personal cimputer for games and things like discord and libreoffice.
29 notes
·
View notes
Video
youtube
How To Update All Apps At Once Using The Terminal In MX Linux | Step-By-...
In this quick and easy tutorial, I’ll show you how to update all your apps at once using the terminal in MX Linux. Keeping your system up to date is essential for security, stability, and performance. Whether you're new to MX Linux or just want a faster way to manage updates, this guide walks you through the exact terminal commands step-by-step.
Simple Steps 1. Press Ctrl + Alt + T or open the terminal from your applications menu. 2. Run the following command to update the package list, ensuring you have the latest information on available updates: sudo apt update 3. Enter your password if prompted, and press Enter. 4. Run the following command to upgrade all installed packages to the latest versions: sudo apt upgrade 5. You may be asked to confirm the upgrade process by typing Y and pressing Enter.
1 note
·
View note
Text
youtube
#linux#foss#open source#ubuntu#LinuxForBeginners#Top5LinuxDistros#LinuxMint#Ubuntu#PopOS#MXLinux#ZorinOS#BeginnerFriendlyLinux#LinuxTutorial#LinuxCommunity#LinuxSoftware#LinuxHardware#OpenSource#LinuxJourney#TechForBeginners#SwitchToLinux#Youtube
1 note
·
View note
Text
0 notes
Text
It's a very serious rule. If you don't hit your flirting quota then the terrible tux will come to you at night and install MXLinux on your puter as punishment.
But if you kiss many, then the wonderful Xenia will bestow you with protection from bugs and crashes
how does one even run a linux blog,,
467 notes
·
View notes
Text
xfce
3 notes
·
View notes