#Mac desktop icons keep moving
Text
Mac desktop icons keep moving

MAC DESKTOP ICONS KEEP MOVING FULL
MAC DESKTOP ICONS KEEP MOVING WINDOWS
I don't know if this would be an easy thing to help anyone with, but maybe something similar has happened to someone before. I could just not use spaces, but what would the point be? My finger came off the track pad and the icon snapped over to the far upper left corner of the desktop. I opened the applications folder from the dock and I attempted to drag the icon to the dock to create a shortcut there. The menu bar remains the same for the app I was using, and only becomes finder when I click on the desktop. Icon stuck on desktop, will not move or delete. I also don't think this is finder calling for anything. I have also tried creating a new desktop space and deleting the old one. I tried rearranging spaces, I moved the Desktop to the third space (this must be a Mavericks feature, I don't think I have ever been able to do that before), and it keeps jumping to that Desktop (third space).
MAC DESKTOP ICONS KEEP MOVING WINDOWS
What I have tried, besides restarting Finder, and restarting the Mac, in Mission Control settings I disabled Automatically rearrange, and Group windows by applications (to be honest I don't know what Group windows by application means, I assume it has to do with what screens a new window of an already running app will open on), and When switching to an app, switch space. So far typing this I have counted it happening seven times. It is getting to the point where it is too annoying to ignore. The screen just keeps taking me back to the first one. This is also a good time to check that the. Ive also tried the 'rebuild icon file' suggestion shown in several places. Granted, Ive only tried Desktop OK on one device. On a third, no Settings icons so its just the Norton icon that moves.
MAC DESKTOP ICONS KEEP MOVING FULL
(I run a few apps full screen, and usually keep the first desktop open for any quick work or apps I will use, if I will have an app open for a while that doesn't have full screen, I create a desktop/space for it and run it off on the side somewhere). If your desktop files show up then you're in the right place. On two computers, I happen to have a 'Settings' icon and that one and the Norton one both move every time the computer locks or is rebooted. When it continued to happen I quit all open apps and restarted the computer. After the first few times this happened I pressed ⌘ Cmd- ⌥ Opt- ⎋ Esc and restarted finder. Icons on the desktop keep rearranging every time monitor goes to. I changed each 1920 value to 3840, 1080 to 2160, and the problem was solved. There are no running apps on that desktop (except finder). These keys above were set to values either 1920 or 1080, so it seemed that Windows was setting the resolution to 1920x180 while the monitor powers off (don't know why). My screen (desktop/spaces) keeps jumping to the first "desktop".
0 notes
Text
Cricut Explore Air 2 Setup: Easy Tutorial for Beginners
I can feel your excitement if it is your first time using the Cricut machine for crafting. The process of the Cricut Explore Air 2 setup is straightforward, but it is wise to have the proper knowledge first. Plus, as a new crafter, you can face some problems during the procedure, and that is given. But don’t worry, as I am going to cover all the vital steps to complete the machine setup. With the help of this guide, you will be able to setup your Cricut machine on a Mac and iOS device. Without causing any further delay, let’s jump right into the process!
Cricut Explore Air 2 Setup on Your Mac Computer
Here are the comprehensive steps that will allow you to setup your Explore machine on a Mac operating system.
Step 1: Establishing the Bluetooth Connection
First and foremost, keep your machine within the 15 feet range of your Mac device.
After that, turn on the printer if it is not on.
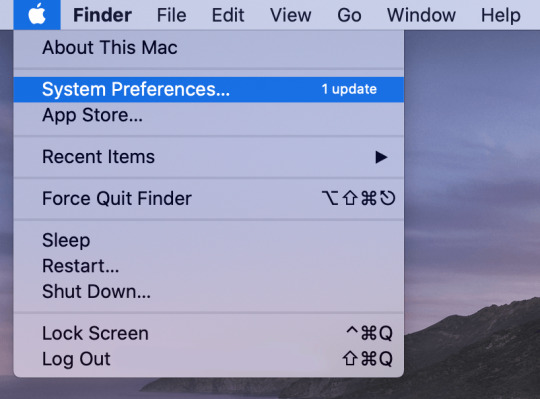
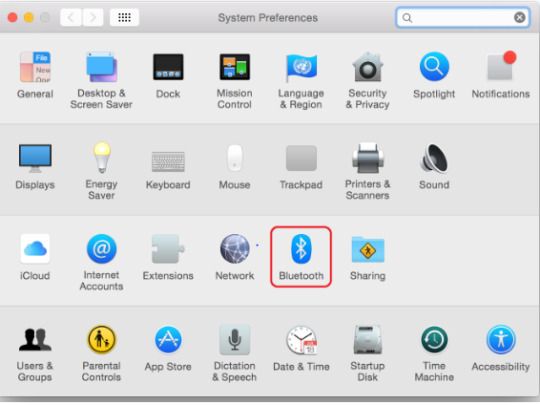
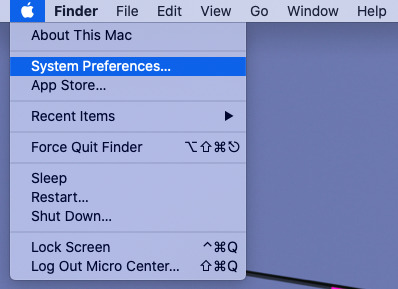
Now, move to your Mac desktop and click on the Apple icon to select the System Preferences option.
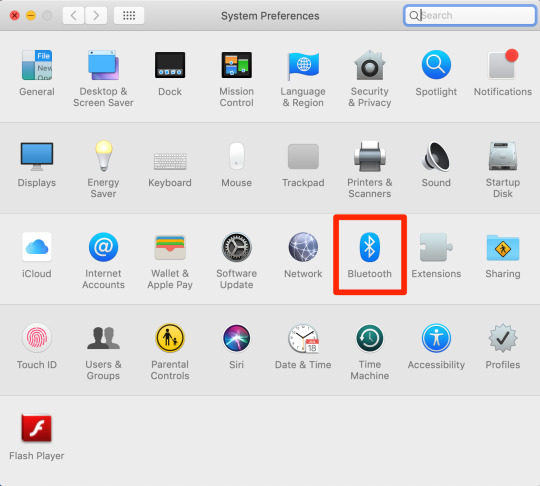
In the System Preferences window, choose the Bluetooth icon.
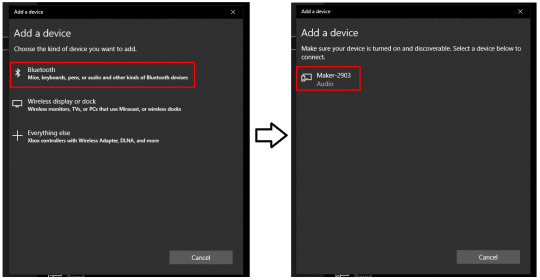
After that, click on the Bluetooth toggle to turn it on; it will start searching for all the available Bluetooth devices under its range.
Look for your machine model number in the list and click on the Pair option in front of it.
When you see a prompt to enter the password, click on the 0000, then click on Pair.
Then, the Bluetooth connection process will be complete.
Moreover, you can use the provided USB cable for the connection if you want to establish a wired connection.
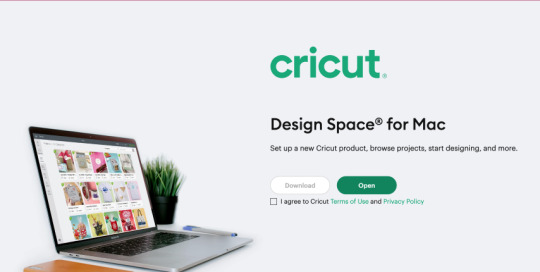
Step 2: Downloading Cricut Design Space on Mac
Initially, browse the official Cricut web page on your macOS device.
Move to the Apps page and click on the Download option under Design Space for Mac option. (If the Download option is not enabled, then click on the checkbox for the Cricut Terms of Use and Privacy Policy first.)
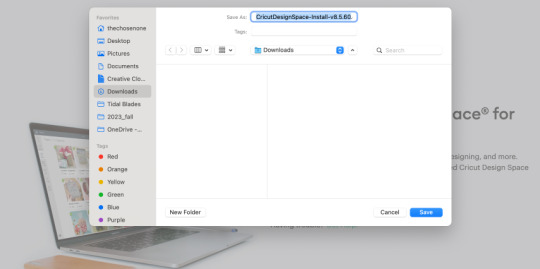
After that, a new screen will appear on the screen, where you can specify how to save the Cricut file after the download.
Once you have selected a folder path, click on the Save option; afterward, the download process will begin.
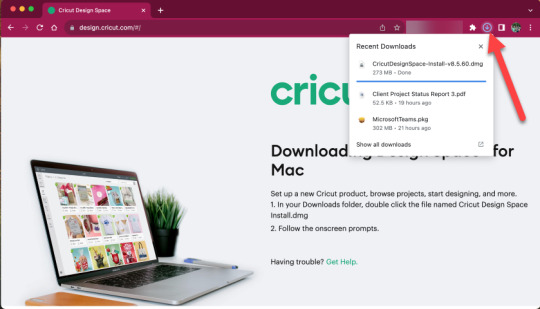
Wait for the download to complete, and then open the software file from the browser.
In addition, you can also access the selected folder to open the Cricut .dmg file.
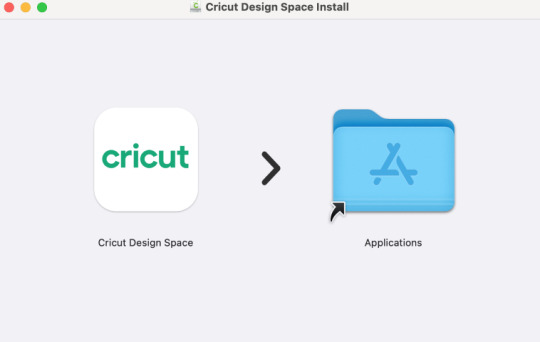
Then, drag your Cricut icon to the Applications folder in order to initiate the installation folder
Now, you can launch the app by double-clicking on the “cricut design space” option in the Applications folder.
While opening the app, a Mac notice may show up on the screen asking if you want to open this app; click on the Open button to move forward.
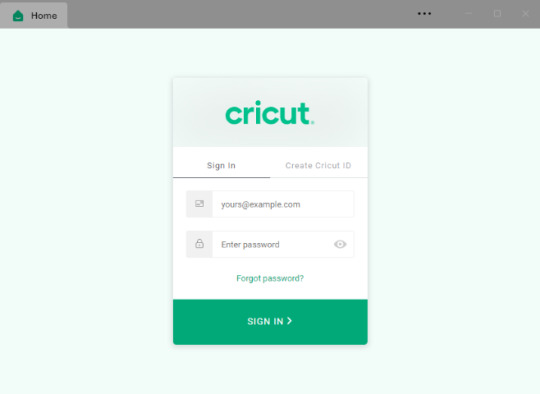
On the app home page, complete the account login process or create a new account if you are a new user.
Next, select the right option to complete the Explore machine setup.
From the list of options, choose your machine model number.
Here you go! Your machine setup process is complete.
Cricut Explore Air 2 Setup on Your iOS Device
The following procedures will guide you through the complete process of Explore machine setup on iPhones and iPads.
Step 1: Connecting a Cricut Machine via Bluetooth
Before you move to the connection process, ensure the printer is switched on.
If you want to connect the machine to an iPhone/iPad using Bluetooth connectivity, bring both devices within the 10–15 feet range.
Next, tap on the Settings tab from the home screen of your iPhone/iPad.
On the next page, tap on the Bluetooth option and then tap on the toggle to turn on the Bluetooth connection.
Now, the device will start scanning for the Bluetooth devices within its connection range.
Henceforth, look for your machine name from the devices list and then tap on it.
If you see a prompt to enter the password to establish the Bluetooth connection, enter 0000 and then tap on Pair.
The device Bluetooth pairing will now be complete.
Once the Bluetooth connection process is done, you can move to the next setup of the Cricut Explore Air 2 setup.
Step 2: Installing Cricut Design Space App
Then, go to your iOS device and open the App Store from your home screen.
After that, tap on the search section and type “cricut design space.”
From the results, tap on the correct app and then tap on Get to download it. (you might need to enter your iTunes password to verify the download.)
Next, the download process will begin.
After downloading, the app will automatically be added to your home screen.
You can open the app from the App Store or from the home screen.
On the app, access your Cricut account by entering your registered ID and password. (You need to create a new ID if you are a new user.)
To setup your machine, tap on the Machine Setup option.
Follow the instructions, and the Cricut Explore Air 2 setup process will be complete.
Final Words
I have covered all the information you should know to setup your Cricut Explore Air 2 machine. With the help of this complete guide, you can easily setup the device on a Mac or iOS device without anyone’s help. However, to avoid any problems during the setup, make sure to check the device compatibility first. Besides that, feel free to ask for additional help if you want more help, or if any problem appears in the setup.
Frequently Asked Questions
Can I Connect My Cricut Explore Air 2 to My Phone?
Yes, you can connect your Explore Air 2 machine to a phone. The machine works with both Android and iOS smartphones and tablets. You can download the Cricut app on your device and then start using it after connecting both devices through the app. However, before downloading the app to your device, make sure to check if the phone model you have is compatible with the machine.
Why Is My Cricut Explore Air 2 Not Connecting?
If your Cricut machine is not connecting to a device then it could be the result of some technical glitches. You need to check the system compatibility criteria and check the network connection. Also, ensure that your device OS is updated and both devices are within the connection range. If the problem seems complex, then connect to the brand customer support team to get the solution of this problem.
Do I Need to Download Software to Setup Cricut Explore Air 2?
Design Space is essential software to setup and use, no matter which cutting machine you are using. Also, without the Cricut app, it is impossible to setup the machine, let alone use it. Therefore, as a Cricut crafter, you need to download the app on a computer or smartphone device.
Source: cricut explore air 2 setup
Visit here to know more: Cricut.com/setup
Pinterest
0 notes
Text
How to Connect to Cricut: Easy Steps for Phone and Computer
Do you want to learn how to connect to Cricut on your device? If that is the case, then you have reached the right place. As a long-time Cricut user, I am familiar with all the techniques to connect a Cricut machine to your compatible device. I am going to write down the methods you can use to connect your machine to your smartphone and computer.
Cricut offers two methods for connecting your machine: a wireless Bluetooth and a wired USB connection. Both methods are available for nearly all Cricut machines. To learn more about these connection options for your device, let’s get started!
How to Connect to Cricut via Bluetooth on Windows?
Windows computers are a great device to use with a crafting machine. So, if you are using a Windows PC to connect it to your machine, you have both options for the connection. For the compatibility of your computer, you just have to make sure that you are using a Windows 10 or a newer version of a computer. The process for the connection is as follows:
In the beginning, you must turn on the machine after connecting it to a power source.
The other thing you have to remember is that you should keep the machine within 10-15 feet of the computer.
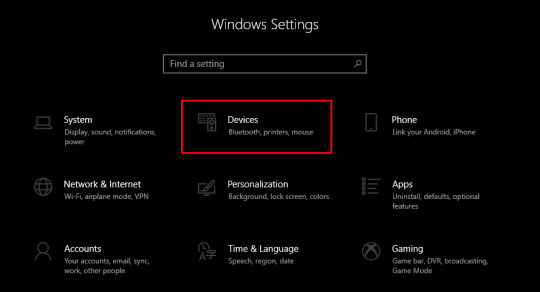
Go to the computer, open the Start menu, and open Settings.
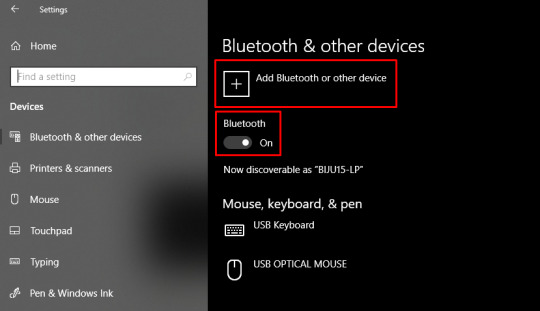
In the following screen, move to the Devices option. There, you will see Bluetooth; you have to turn it on.
After turning on the Bluetooth, click on the option Add Bluetooth or another device.

Now, the computer will start searching for the available Bluetooth devices.
When you see your machine along with other available devices, you have to tap to select it, and it will be connected to your computer.
You can ensure the connection by going to the Design Space app and checking in the New Product Setup. The machine appears to be connected to your PC.
How to Connect to Cricut via Bluetooth on Mac?
A Mac computer is equally good for connecting to a Cricut machine. You can again use both methods to connect your computer to a machine. The computer is compatible with the Design Space app, but for that, you will have to use macOS 11 or newer versions. Here is how you can connect a MacBook to your machine with Bluetooth:
Similarly, plug the machine into an electric source and press the power button.
It will be available for the connection, but you have to keep it in the range. The range for the wireless connection is 10-15 ft.
Then, click on the Apple icon and go to the System Preferences on your computer.
After that, go to the Bluetooth section and turn it on.
When you turn on your computer’s Bluetooth, it will start searching for available devices.
When you see your machine on the available devices, you have to tap on it.
Next, the machine is connected to your computer.
To ensure the connection between the machine and your Mac, go back to Design Space and then to the New Product Setup.
You can see that the machine appears to be connected to the computer there.
How to Connect to Cricut via USB on Android/iOS Devices?
Apart from Bluetooth, you can also use a USB cable for the connection between the machine and your computer. Since it is a wired connection, you do not have the luxury of roaming around while working on projects as you can do with Bluetooth. USB can be used to connect your machine to any of the devices. Here, you will see the process of connecting your Android or iOS phone to your machine via Bluetooth. To add your machine to your desktop with USB, you will have to follow the same procedure:
You have to add a machine to a power source and then press the power button to turn it on. When the machine is on, a light will light up.
Then, you have to use a USB cable to connect it to your phone and the machine. The cable has to be connected to both devices at both ends.
You must use a healthy cable so that you do not lose the connection while working with it.
You can go back to the Cricut app again to ensure connectivity.
Conclusion
To sum up, you learned how to connect to Cricut with Bluetooth or a USB cable. With both methods, you can connect any computer or mobile device that is compatible with Cricut. You learned how to connect Windows and Mac computers to Cricut with the help of Bluetooth. You also saw how you could connect a phone to your machine with the help of a USB cable. Now, you can use this guide to connect your Cricut to your device, and then you will be able to work on your DIY projects.
FAQs
Can I Connect My Cricut via Bluetooth to My iPhone?
Yes, you can! Cricut gives you two options to connect it to your device. You can use not only an iPhone but any device, and you can use either of the options to make your projects. So, you can definitely use Bluetooth to connect your machine to your iPhone. To connect Cricut to your iPhone via Bluetooth, you have to turn the machine and search for it on the device. When you see it, select it, and it will connect.
How Can I Reset Bluetooth on My Computer?
Resetting a Bluetooth connection on your Cricut machine is easy. You need to open the Bluetooth settings and click on the pairing. You will have the option to unpair it; click on it. Then, you must turn the Bluetooth off and wait for some time. Now, turn on the Bluetooth again on your computer and start searching for your machine. Upon seeing the machine, click on it, and it will be connected.
Why My Cricut Is Not Showing on My Computer?
If your machine is not being shown on your computer, then you should check a couple of things. The first thing you have to do is check and make sure that you have turned on the machine. Only after that will it be available to be connected to any device. Next, you need to ensure that you have turned on the Bluetooth on your device. The final thing you must check is that you have kept the device and your machine within the range of 10-15 feet.
0 notes
Text
Cricut Download Software: Easy Guide for Desktop and Mobile
Want to learn how to get the Cricut download software on your device? This blog consists of each step you need to follow. If you’re a beginner with Cricut, you’ll learn something meaningful here. Lots of people don’t know how to download the Cricut software, but you can learn it from here. Let’s check out the steps involved in downloading the Cricut Design Space.
Basically, the Cricut app is an easy-to-use tool that allows you to cut different materials with Cricut. This application is rich with many creative features that allow you to create the best personalized design. In order to get that software on your device, you must follow this guide.
Cricut Download Software on Your Desktop
If you have a desktop computer like Windows or Mac, below are the steps you should follow to download the software easily. Let’s check the steps here.
For Windows
If you have a Windows computer, you must follow these steps:
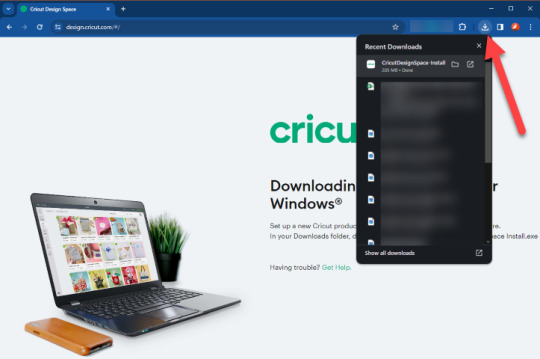
On your internet browser, navigate to the design.cricut.com website.
Then, tick the checkbox on Cricut’s official page to accept the Cricut Terms of Use and hit the Download button.
Once the download is complete, move on to the Downloads folder and double-click on your software file.
After that, the setup window will show the installation progress; let it run.
In the next step, you need to sign in to your Cricut ID with the correct credentials.
Next, log in to the Cricut account using the username and password.
Now, the Design Space software icon will be added to your desktop screen.
In order to keep the icon added to your desktop, select the Pin to Taskbar option.
Finally, you’re ready to enjoy your software. That’s how you can get the software on a Windows computer.
For Mac
If you are a Mac user, you should follow the steps below for the Cricut download software.
To start, open an internet browser and visit design.cricut.com.
Then, tick the box to agree to the Cricut Terms of Use and then hit the Download button.
After that, select a location where you can save your software file.
Let the software download and reach the Downloads folder.
Next, double-click on your file and open the software.
When you get the app, drag it to the Applications folder to start the installation.
Now, the application will be added to the Mac.
In the next step, your Mac will ask you to open the Cricut application.
Then, hit the Open button to begin.
Lastly, log in to the Cricut ID with the help of the email address and password.
Hence, all the steps for downloading the Cricut app on a Mac computer are covered.
Cricut Download Software on Mobile Devices
To download and install the Cricut software, follow the steps below. All you need to do is to install the app on your Android or iOS devices.
For Android
If you’re an Android user, below are the complete steps to install the Cricut app on your Android.
On your Android phone, visit the Google Play Store and search for the Cricut Design Space in the search bar.
Then, click on the Install button to install the software.
After that, allow the installation to complete, and your app will appear with the other applications.
Now, click on the Cricut icon to launch it and start creating designs.
This is how you can download and install the Cricut software on your Android mobile device.
For iOS
Being an iOS user, you must follow the steps below to learn the Cricut download software:
To start, head to the App Store on your iOS device on the App Store tab.
Then, navigate to the Cricut Design Space, which appears as a white square icon.
After that, hit the Get button and download the app.
Next, when the download is complete, launch the app and choose the Machine Setup or just hit the Sign In button.
If you’re a beginner, you can create a new Cricut ID.
Finally, you’ve learned everything about the Cricut software. If you want more features, you can get the Cricut Access subscription.
Conclusion
You know how to get the Cricut download software on your device, whether desktop or mobile device. All you need to do is to visit the Cricut’s official website at design.cricut.com. Also, you need to download the application on your desktop. If you have a desktop, you need to visit Cricut’s official website, and for mobile devices, you should install the application from the Play Store or App Store. To sign in to your Cricut ID, you must have the Cricut login credentials. If you don’t have one, you should create a new Cricut ID.
FAQs
Is Cricut Design Space Software Free?
Yes, the Cricut Design Space software is completely free. It includes all the features you need and is integrated with the Cricut machine. However, Cricut Access is a paid subscription that provides you with a range of more interesting features than Design Space. You can get a 30-day trial if you want.
How to Get Cricut Download Software for Windows 10?
To get the Cricut app on your Windows 10 computer, follow these steps:
On your Windows 10 computer, browse design.cricut.com.
Then, tick the checkbox to accept the Cricut Terms and Conditions.
Now, hit the Download button.
Once the app is downloaded, head to the Downloads folder.
After that, allow the installation to run on your computer.
Next, sign in to your Cricut account using the right credentials.
As a new user, you should create a new Cricut ID.
Is It Possible to Use Cricut Design Space Without Cricut?
Yes, you can use the Design Space without a Cricut machine. You only need to visit Cricut’s official website on your computer and download the software. And if you’re a mobile user, you must install the application on your phone.
Source :- https://cricuthelpcenter.wordpress.com/2024/07/31/cricut-download-software-easy-guide-for-desktop-and-mobile/
cricut sign in
cricut explore air 2 login
cricut design space login
www.cricut.com/setup login
0 notes
Text
How to Connect & Pair Cricut Maker: (Easy Steps)
Isn’t it true that the Cricut Maker is an ultimate cutting machine that cuts 300+ materials and works with 13 different tools? This versatile tool has been a part of my crafting journey for a while now, and now I’m exploring how to pair Cricut Maker with computers and smartphones. Cricut Maker has cutting-edge technology and also comes with Bluetooth, allowing seamless wireless pairing with devices.
As a crafter, I look forward to saving time and then creating DIY projects, which is why I prefer to pair my devices wirelessly. It is one of the easiest methods because the entire process is wireless. If you’ve got a Cricut cutting machine but don’t know about its pairing process, check out this manual. Here, you will learn everything in depth and easily.
Pair Cricut Maker With Your Computer via Bluetooth
After wirelessly pairing the Cricut machine to a desktop, you can easily cut the material into any shape or size. This machine supports Windows and Mac systems and pairs very quickly. This section explains the steps to pair this machine to a desktop.
Windows
With the help of these instructions, you can execute the wireless pairing process between the Windows and Cricut machine:
In the opening stage of the process, check that the machine is on and place it on a flat surface.
After checking that, keep the Cricut product under your computer’s 10-15 ft range.
Now, go to Device Manager, and if Bluetooth is inside it, then your Windows computer’s Bluetooth is on.
Also, close the Device Manager and navigate to the Start menu.
Next, open the Settings tab and open the Devices tab.
After the tab opens, select Add Bluetooth or other devices.

Then, tap the Bluetooth option and then click the Cricut Maker button.

Following this, enter the PIN code (0000) inside the blank.
Afterward, press the Connect box and hold on till the pairing process is on the way.

Bravo! You have successfully paired your Cricut cutting machine to your Windows computer.
Mac
You can also pair Cricut Maker with a Mac computer. To do that, you need to go through the steps written below:
Start the method by repeating steps 1 & 2, which you discussed in the above section.
Now, open the Apple menu > click System Preferences, and then tick the Bluetooth icon.

If your device’s Bluetooth is off, tap Turn Bluetooth On and wait for a while.
After waiting a few minutes, click on your Cricut model name from the Devices list.
To continue the process, click Pair > type 0000 and then click the Pair option.

Finally, the Cricut product pairing process with Mac ended successfully.
Let’s discuss the method for pairing this Cricut model to smartphones without wasting any more time.
Pair Cricut Maker to a Smartphone via Bluetooth
It doesn’t matter whether you use an iOS or Android device; check out the information below, which will guide you through the pairing process.
iOS
By following these steps, you can pair this Cricut product to iOS without making any mistakes.
First, check that your machine is on and within 10-15 ft from your iOS device.
Second, open the Settings tab and then click the Bluetooth option.

Move the toggle to the right side if your device’s Bluetooth isn’t enabled.
Now, click on your Cricut model from the names appearing under the Devices list.

Furthermore, type 0000 and click the Pair option.

If you want to learn how to pair Cricut Maker to Android, check out the section below.
Android
The following are the steps you need to take when connecting your Android device to this machine.
Repeat step number 1 > Look for the Settings tab and select the Bluetooth option.

Now, enable your Bluetooth and choose the model from the Available Devices section.
After that, enter the PIN number (0000) and click the OK button.

You have successfully paired up your Cricut to an Android device through these steps.
By reading this blog, you will become an expert in pairing up your Cricut cutting machine with devices.
Frequently Asked Questions
Question: On Which Devices Can I Connect My Cricut Maker?
Answer: Cricut Maker is a cutting machine that cuts hundreds of materials and connects with multiple devices. With its built-in Bluetooth connectivity, you can easily set the machine up for PCs and smartphones. You can also easily connect your Maker machine to Windows, Mac, iOS, and Android systems.
Question: Can I Connect My Cricut to My Computer?
Answer: Yes, you can easily connect your Cricut machine to your desktop computer. In order to make your favorite designs and projects, you need to download and install the Cricut Design Space software and then connect both devices using a USB cable or wireless Bluetooth connection.
Question: How Can I Pair Cricut Maker With Android?
Answer: if you want to connect your Android device to Cricut product, then follow these steps:
Check that your Cricut machine is on and within 10-15 ft from each other.
Next, turn on Bluetooth and choose your model name from the list.
Now, enter the PIN code and click the OK button.
Read more: install cricut design space app
cricut.com/setup mac
Cricut Design Space
Cricut.com setup windows
Source: pair cricut maker
0 notes
Text
How Do I Connect Cricut to Computer: A Step-by-Step Guide
How do I connect Cricut to computer? This was a question I got on one of my blogs a week ago. Not only this, but I also received similar questions regarding connection from many readers. Since none of my posts has a complete guide to Cricut connection in one single guide, I tried to write this.
Without thinking twice, dive into this blog and explore the steps one by one. In this blog, I have answered how do I connect my Cricut to my computer via Bluetooth. Let’s start now!
What Do I Need to Connect My Cricut to a Computer?
In order to learn how do I connect Cricut to computer, you have to first understand what you need before connecting to your Cricut. As we know, the connection is a part of the Cricut setup, meaning we are actually setting up our machines. So, there are things that are required before setup. Let’s get a look into it:
Cricut machine
Power cable to connect your Cricut to a wall outlet
A flat surface like a table for keeping the machine on
A Windows/Mac computer with the following system requirements:
For Windows
Operating System – Windows 10 or later (64-bit)
RAM – Minimum 4GB
Disk – 2 GB free
CPU – Intel Dual Core or equivalent to AMD processor
Display – 1024px x 768px screen resolution
Connectivity – A USB port/Bluetooth connection
For Mac
Operating System – macOS 11 or later
CPU – 1.83 GHz
RAM – Minimum 4GB
Display – Minimum 1024px x 768px screen resolution
A USB port or Bluetooth is required
Disk – 2GB
How Do I Connect Cricut to Computer (Windows)?
You will need to set up your Cricut on a Windows PC, which requires a connection. Since the connection is part of the Cricut setup, you must use a compatible Windows PC, such as Windows 10 or a later version. I have explained the easy steps I followed to connect my Cricut to a Windows computer.
Here are the easy steps to connect your Cricut to a computer on a PC:
First, you need to look for a flat surface to place your Cricut.
Here, ensure the distance is no more than 15 feet from the PC.
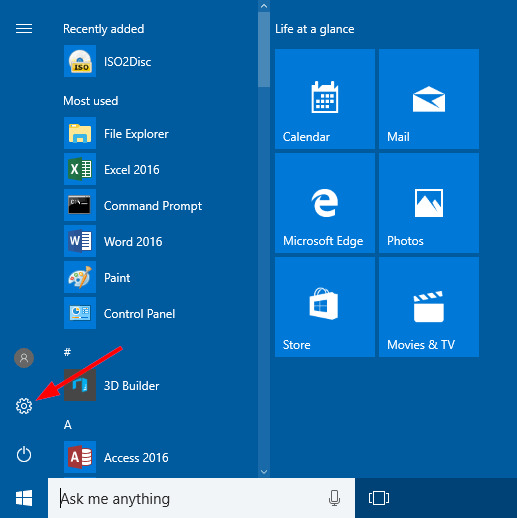
Afterward, go to the Start menu and select a gear icon to open Settings.
As you click on Settings, you will move to another screen, where you need to click on Devices.

Verify if your Bluetooth is ON, then go to Add Bluetooth or other device.

Next, select the Bluetooth option and wait for your PC to detect your Cricut machine.
Select it as it is visible in the open list, and your pairing will be done.
How Do I Connect Cricut to Computer (Mac)?
Mac users need to follow the following steps. However, the placements of Cricut and your computer are almost the same as for Windows. Here are the easy steps to connect your Cricut to a computer on a Mac:
Review if your computer is powered on or off.
After that, move to the Apple menu and choose the System Preferences option.
Now, go to the Bluetooth app on your Mac computer.
Afterward, turn on the Bluetooth.
Next, select the detected Cricut model from the available list.
Last but not least, you have connected your Mac computer to your Cricut.
FAQs
Question 1: What is the “Connect to Computer via Bluetooth” screen on Cricut?
Answer: The “Connect to Computer via Bluetooth” usually appears during the setup of Cricut Maker 3 or Cricut Explore 3. It happens because the Cricut Design Space app has detected an AMD Ryzen chip on your desktop. Actually, there is a problem with some Windows AMD Ryzen chips that may cause problems when you try to connect your Cricut via a USB cable. Therefore, Cricut recommends you use a Bluetooth connection for these computers.
Question 2: What should I do if my Cricut won’t connect?
Answer: If your Cricut is not connecting to your device, then you need to try the following useful tips:
You need to clear the cache and history of the web browser.
Run a scan on your computer for potential malware.
Defragment the hard disk.
Ensure your firewall or antivirus is blocking Cricut connections.
Question 3: Are all Bluetooth dongles compatible with Cricut machine?
Answer: According to Cricut’s official website, CSR (Cambridge Silicon Radio) Bluetooth dongles are incompatible with the Cricut machine. However, if you want to use a Bluetooth dongle, you need to use one that supports audio devices. Cricut doesn’t guarantee that all dongles will connect to your machine, but those that support audio devices are more likely to be able to connect.
Conclusion
To learn how do I connect Cricut to computer, I have explained all the steps carefully. Before that, I also mentioned things that were required before the Cricut setup. In it, I have especially discussed the system requirements. Make sure your Cricut meets the requirements so that you can do the setup in no time. To have an error-free, smooth connection with the Cricut software, go to this write-up and follow the steps mentioned above.
Read more: install cricut design space app
cricut.com/setup mac
Cricut Design Space
Cricut New Machine Setup
Source: How Do I Connect Cricut to Computer
#How Do I Connect Cricut to Computer#Cricut New Machine Setup#install cricut explore air 2#cricut design space#cricut explore 3#cricut.com/setup#design space signin#cricut.com/setup mac#cricut.com/setup windows
0 notes
Text
Introduction to Computers: Everything You Need to Know

Introduction
Welcome to the world of computers! Whether you're a complete beginner or someone looking to brush up on the basics, understanding essential computing concepts and beginner computer skills is key to navigating the digital landscape with confidence. In this blog, we'll cover everything you need to know to kickstart your journey into the realm of computing.
Understanding Essential Computing Concepts
Before diving into the specifics of operating systems, hardware, and software, it's important to grasp some fundamental computing concepts. Let's break them down:
1. What is a Computer?
A computer is an electronic device that processes data to perform various tasks. It consists of hardware components such as the central processing unit (CPU), memory, storage, input devices (e.g., keyboard, mouse), and output devices (e.g., monitor, printer).
2. Operating System (OS)
An operating system is software that manages computer hardware and provides a user interface for interacting with the system. Common operating systems include Windows, Mac OS, and Linux.
3. Hardware vs. Software
Hardware refers to the physical components of a computer, while software comprises programs and data that instruct the hardware to perform specific tasks.
4. Data Storage
Data storage involves saving and retrieving information on a computer. This can be done using various storage devices such as hard disk drives (HDDs), solid-state drives (SSDs), and external storage devices.
5. Internet and Networking
The internet allows computers to communicate and share information globally. Networking involves connecting computers and other devices to share resources and access the internet.
Beginner Computer Skills
Now that we have a basic understanding of essential computing concepts, let's explore some beginner computer skills that will help you navigate your way around a computer:
1. Basic Navigation
Familiarize yourself with the desktop environment, including icons, taskbar, and Start menu (or equivalent). Learn how to open and close programs, switch between windows, and navigate file directories.
2. Typing Skills
Improving your typing speed and accuracy is essential for efficient computer use. Practice typing exercises and learn keyboard shortcuts to streamline your workflow.
3. Internet Browsing
Learn how to use a web browser to search the internet, navigate websites, bookmark pages, and manage browser tabs. Understand basic internet safety practices such as identifying secure websites and avoiding phishing scams.
4. File Management
Master the basics of file management, including creating, renaming, moving, and deleting files and folders. Organize your files into logical directory structures to keep your computer organized.
5. Basic Troubleshooting
Develop problem-solving skills for common computer issues such as software errors, frozen applications, and connectivity problems. Learn how to restart your computer, perform basic troubleshooting steps, and seek help when needed.
Conclusion
Congratulations! You've now been introduced to essential computing concepts and beginner computer skills. Remember, mastering these fundamentals is the first step towards becoming proficient in using computers effectively. Practice regularly, explore new features and applications, and don't hesitate to seek help or further guidance whenever you encounter challenges. With dedication and perseverance, you'll soon become a confident computer user ready to tackle any digital task that comes your way. Happy computing!
0 notes
Text
How to Download Cricut Design Space Desktop: Stepwise Guide
If you are searching for a complete guide to downloading and installing the Cricut Design Space desktop, this blog will be beneficial for you. I have been working as a professional crafter and training people to start their crafting journey. In this blog, I will share a complete step-by-step guide to downloading the Cricut Design Space app on a Windows and Mac computer.
In addition, you get to learn about the system requirements to download the Cricut app. So, keep reading this blog till the end to acquire a full understanding of the procedure.
System Requirements to Download Cricut Design Space on Windows/Mac
Before you start downloading the Cricut Design Space desktop, it is vital to learn the system requirements.
Your Windows system must be running on the Windows® 10 or later version.
Also, the device must have a CPU: Intel™ Dual-Core or equivalent AMD® processor.
For Mac computers or laptops, at least macOS 11 or later is necessary.
Plus, the macOS device should have a processor minimum of 1.83 GHz.
For storage, 2 GB free space and 4 GB RAM is essential.
The desktop system must have a USB port or Bluetooth connectivity.
The screen resolution should be a minimum of 1024px x 768px.
Download Cricut Design Space Desktop (Windows)
You can perform this guide in order to download the Cricut Design Space for the desktop on your Windows device.
For the first step, access the design.cricut.com website on your Windows browser.

Then, right-tick on the license agreement checkbox and select the Download button.
When the download is complete, go to the Downloads section in the browser and open the download file.
Also, you can access the Downloads folder on your PC to open it.
When the setup screen appears on the screen, it will ask if you trust the app and choose the right option to start the installation.
A pop-up window will show the installation progress on the screen.
Once the app installation process is complete, sign in to your account using the Cricut account login credentials.
Afterward, a Design Space for Desktop icon will automatically be added to your Windows desktop. (You can pin it to the taskbar if you want)
Now, you can start using the Cricut app to create beautiful designs or set up your Cricut machine to make beautiful crafts.
Download Cricut Design Space Desktop (Mac)
If you want to download the Cricut app to your macOS computer, then these are the steps you can follow.
Firstly, visit the Cricut support website on your Mac system.
After that, click on the Download button under the Design Space For Mac option. (If the Download option is grayed out, click on the page’s terms and conditions checkbox.)
Also, you can go to the selected folder that you chose and open the Cricut app setup file
Now, you can launch the Cricut Design Space desktop by double-clicking on the file name in the Applications folder.
A Mac pop-up will come up on the screen to ask if you want to open this file; choose the Open button to move forward.
Frequently Asked Questions
How to Do Cricut Design Space Download for Desktop?
If you want to download the Cricut app to your computer device, then follow the steps below.
Firstly, browse the Cricut support website on an internet browser.
After that, access the Cricut Design Space file according to your operating system.
Next, click on the Download option to initiate the process.
Once the download is complete, double-click on the setup file.
Now, follow the on-screen guide to complete the installation guide.
Finally, they started using the app to create beautiful designs.
Why Can’t I Download Cricut Design Space for Desktop?
Here are some reasons that can cause the issue behind not being able to download the app.
The app is not compatible with your computer device.
The device is facing a network issue.
Your device space is running out of space.
You are downloading and installing the Cricut Design app from a third-party website.
Any file on your PC is blocking it from downloading.
The browser you are using is facing many issues.
Can I Download Cricut Design Space on a Chromebook?
The Cricut app works on both computer and smartphone devices. You can download and use the compatible Windows and Mac computers. However, it does not work with the Chromebook because it is the Google Chrome operating system. You can visit Cricut’s official website to download and install the Cricut Design app on Windows/Mac systems. Also, before downloading the app, you must check the system criteria of the app.
Source Url:- cricut design space desktop
Visit for more Information :- cricut design space for desktop
cricut design space download for desktop
0 notes
Text
7 Essential Computer Tips and Tricks You Can’t-Miss
In the vast world of technology, hidden features often can transform how we work. Let’s delve into the details of seven lesser-known tips and tricks, providing step-by-step guidance on mastering each.

1. Mastering Keyboard Shortcuts: A Game-Changer
Efficiency meets simplicity with keyboard shortcuts. These time-saving combinations vary across applications, but here are some universal ones to get you started:
Ctrl+C and Ctrl+V: Copy and paste selected text or files.
Win+D: Minimize or maximize all windows, revealing the desktop.
Ctrl+Z: Undo the last action.
Alt+Tab: Quickly switch between open applications.
To master keyboard shortcuts, practice incorporating them into your daily tasks. Soon, you’ll find yourself navigating your computer with unparalleled speed and ease.
2. Customizing System Preferences for Personalization
Tailor your system to suit your preferences by customizing various settings:
Desktop Background: Choose an image that inspires or relaxes you.
Taskbar Settings: Adjust its position and decide which icons to display.
System Sounds: Personalize notification sounds for a unique auditory experience.
Explore these settings to make your tech environment uniquely yours, creating a more enjoyable and personalized computing experience.
3. Time-Saving File Organization Techniques
Efficient file management is crucial for productivity. Here’s how to organize your files effectively:
Use Folders and Subfolders: Categorize files based on projects or types.
Utilize Tags and Labels: Add descriptive tags for quick identification.
Create Shortcuts: Place shortcuts to frequently accessed folders on your desktop.
Implementing these techniques will save you time and ensure you can locate essential files swiftly.
4. Unearthing Hidden Browser Features
Your browser holds powerful features beyond primary navigation. Explore these hidden gems:
Pinned Tabs: Keep essential tabs readily accessible by pinning them.
Gestures: Enable mouse gestures for quicker navigation.
Hidden Extensions: Discover extensions that enhance your browsing experience.
Uncovering these features will revolutionize your internet browsing, making it faster and more efficient.
5. Mastering the Art of Autofill
Streamline online activities with autofill:
Form Autofill: Save time filling out online forms with autofill.
Password Autofill: Store and manage passwords securely.
Payment Autofill: Safely save and autofill payment information.
Configure autofill settings in your browser to enjoy a hassle-free online experience.
6. The Power of Virtual Desktops
Enhance multitasking with virtual desktops:
Create Virtual Desktops: Use Task View on Windows or Mission Control on Mac.
Switch Between Desktops: Seamlessly move between virtual desktops.
Customize Virtual Desktops: Assign specific tasks or projects to each desktop.
This feature is especially beneficial for those juggling multiple projects simultaneously.
Conclusion
Unleash the full potential of your tech experience with these 7 hidden tips and tricks. Incorporating these into your daily routine will streamline tasks, save time, and allow you to enjoy a more efficient and personalized digital environment. Explore this blog for in-depth insights into Must-Know Essential Computer Tips and Tricks.
While mastering these hidden tips and tricks can significantly enhance your computer experience, addressing potential hardware or software issues promptly is essential. Consider seeking professional computer repair services if you encounter persistent slowdowns, system crashes, or other issues.
Expert technicians can diagnose and resolve various issues, ensuring your computer operates at its best. Whether it’s a hardware upgrade, software optimization, or virus removal, investing in computer repair can extend your device’s lifespan and maintain its optimal performance.
FAQs
Q: Can I customize keyboard shortcuts on my computer?
Yes, many applications allow customization of keyboard shortcuts. Check the settings of the specific program you’re using.
Q: How do I set up virtual desktops?
On Windows, use the Task View button or press Win+Tab to manage virtual desktops. On Mac, use Mission Control to add and switch between desktops.
Q: Is dark mode suitable for everyone?
While some find dark mode more comfortable, it’s subjective. Consider personal preference and any potential impact on eye strain.
Q: Can I turn off autofill if I don’t want my information saved?
Yes, most browsers allow you to manage autofill settings. You can disable or customize autofill based on your preferences.
Q: Are keyboard shortcuts the same for all applications?
No, keyboard shortcuts vary across applications. Familiarize yourself with the shortcuts specific to each program you use.
Q: Can I use virtual desktops on a single monitor setup?
Absolutely! Virtual desktops are beneficial even with a single monitor, allowing you to organize tasks and reduce clutter.
1 note
·
View note
Text
How to Convert Any Image from jpg to png converter online for free ?
To alleviate this problem for you, we’re pleased to turn our guns on the problem of file conversion. The jpg to png converter has been created to ease the turns of aiding procedures for the targeted audience.
An interactive dashboard displaying the batch of converted files is available for your perusal while the process progresses. You have complete control over when and how many free vector icons files you download anytime—called to your device in one bundle to make things easier for you.
To make things easier for you, you may batch-convert many files to JPG in this manner. An image converter is also available from us, with the same set of useful functions.

Images may be readily converted
Are you trying to figure out how to save time and money on everyday operations like picture conversion? You may ask: An easy-to-use tool is what you need to counteract this propensity.
Even during the research, one doesn’t have to keep their work on standby or be anxious about using the converter in the best possible way. You don’t have to leave your house for picture conversions.
Why should you transform your images?
To guarantee that the file size of your digital assets is small enough to avoid slowing down your website, you must convert your photographs to a smaller format. Some file types will be more suitable for digital purposes since they are lighter and quicker to transfer than others.
It also makes them more suitable for resizing on mobile devices. In the opposite situation, you must have a format for the printed documents that provides the greatest amount of image converter information.
Priority is given to ensuring well-being.
You must trust us when you submit your files to our service. Your files are converted safely and securely when you send them to us through our website. The program will notify you when the transition is complete and save your file in the new format.
When you’re on the go, convert.
It works well on both Windows and Mac, on the desktop, in the app, and on the move, on both mobile and desktop platforms. The tool is user-friendly. Choose the picture you want to convert, choose the format, and save and share it with others.
Read rest of the article here
0 notes
Text
Cricut Design Space Update: See What’s New in the Software
Cricut Design Space is creative and needs constant updates to keep people engaged. Using the same features over and over again feels monotonous, and Cricut understands it. That’s why Cricut updates its software every so often to break the monotony. And we will discuss what changes Cricut has made so far. Get ready to learn about the Cricut Design Space update.
After knowing about them, you will make the most of your Cricut machine. You just have to choose an option to update your software to the latest version.
How to Update Cricut Design Space on a Desktop?
You can update your Cricut Design Space on your desktop, like on Windows and Mac, by following a few steps. Let’s go for that.
For Mac
With the Design Space open, move to the menu at the top and choose the Design Space dropdown. Then, click About Cricut Design Space to check the current version.
For Windows
Take the cursor over Cricut Design Space, and it’ll show the current version of the software.
But you need to understand that the Cricut update doesn’t happen for every user at the same time.
So, to check for updates at that time, you need to stop the software and restart it again to update it automatically to the current version. You can contact Cricut support. Now, you know what to do to update it. And you must be curious about what changes you will see in the software. So we brought a quick guide on this.
What are the New Features in the Cricut Design Space Update?
There are some new features included in Design Space that are unique and may bring some joy to your work. Here are a few of them, which Cricut has updated recently.
Update 1: Phrase Navigation
A new feature has been added to the Design Space canvas that provides users with easy access to the huge library of pre-designed phrases. This feature is similar to image search, but here you can navigate the most common phrases to make your projects.
Update 2: New Text Editing

Moreover, you will see a bounding box around your text that will allow you to resize your text without altering your font size. And your text will wrap automatically while resizing the box.
Update 3: Notifications
Now the Design Space offers in-app notifications, which means you can start connecting with other people in your community. The app will notify you about new followers and whenever someone likes your work. It can be your profile, where you can showcase your best work and get admirers.
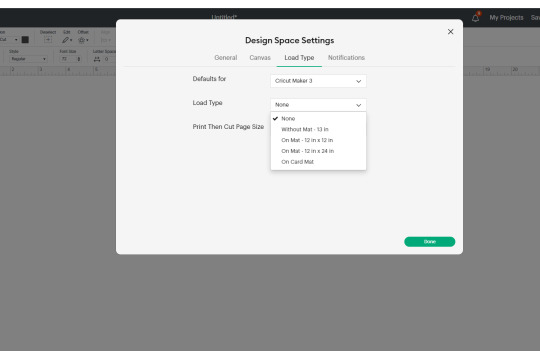
Update 4: Default Mat Settings
Update 5: Guides
Well, this is a unique improvement in the Design Space. Now you can turn your shapes, images, and texts within the guides to make your projects. So, you’ll be able to change the line type and modify your project on the canvas.
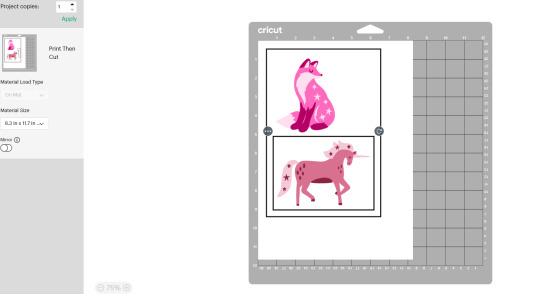
Update 6: Improved Preview Function of Print Then Cut
There are some updates in the pattern of Print Then Cut that match the type of operation where you can follow the given functions.
You can rotate the images.
You can move your objects to the other Print Then Cut mats. For this, you only have to select the object and click on the More icon.
The Hide Images option is also present. For this, just choose your object and click on the More icon represented by three dots.
The marking of the Print Then Cut sensor expands or resizes automatically when the objects are hidden or moved.
If any image falls out of Print then Cut sensor marking like while rotating an image; it’ll be repositioned again in the marking when you release the image.
The ability to rotate, move or hide the Print Then Cut objects on the Preview screen allows you to expand the space to use on one page and also minimize mats.
These were some latest Cricut Design Space updates. With these updates, you are allowed to make your project better than before. Cricut understands your needs, and keeping that in view, it offers many great updates often. With the updates, you can upgrade your work as well as connect with other people with similar interests. Also, the in-app notification feature allows you to follow or unfollow people.
Visit – Cricut.com/setup
design.cricut.com
www.cricut.com/setup
Cricut Design Space
#Cricut Design Space Update#Cricut Design Space Guide#Beginner's Guide#Cricut Cut Your Designs#Cricut Design Space Download#Cricut Design Space login#Download Cricut Design Space Guide#Cricut.com/setup
0 notes
Text
How to Connect Cricut Machine to a Computer and Mobile?
Hey, are you looking for a simple guide that can teach you how to connect Cricut machine? If yes, then you are in the right place! In this post, I will talk about the steps to pair the Cricut machine on a desktop and mobile.
Do you know why we need to connect a Cricut machine to a compatible device? Look, this is no different than the setup because the connection is part of the Cricut machine setup. A Cricut setup is required to get started with this machine. To design or modify the design, you will need the Cricut Design Space app. But here, I will not talk about software; I will teach you the steps to connect.
One by one, I will start with a Windows computer and then end with an iOS device. So, are you ready to get the answer to your question: How do I connect my Cricut machine to my computer? If so, then let’s get into it without further ado!
Connect Cricut Machine to Your Computer
When I use my Cricut on my computer, it offers me more features than the mobile version. But it still depends on what crafters like you want to use. What is most suitable? I don’t know whether you want to use Cricut on a Windows or Mac computer, so I will explain the steps to connect below for both desktops.
For Windows
Find a flat surface to place your Cricut Explore Air 2.
Be careful about a distance of 10 - 15 between the PC and your machine.
After that, you should move to the Windows taskbar.
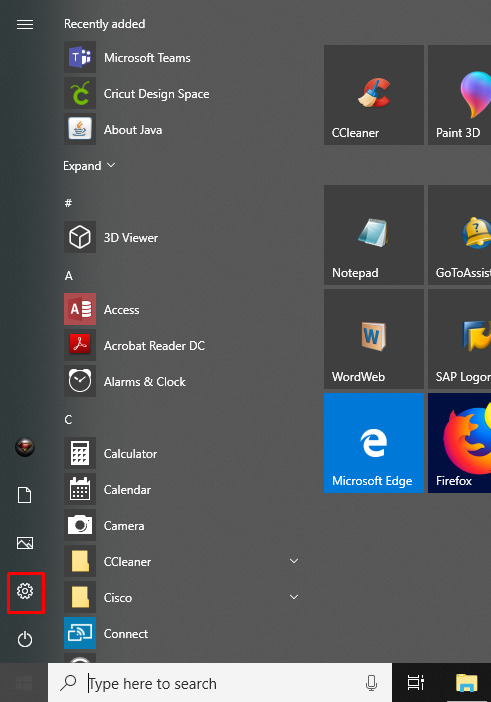
There, you need to click the Windows icon. Then, hit the gear icon to launch Settings.

In the following step, click on Devices.
Here, you should confirm whether your Bluetooth is ON.
After your Bluetooth is turned on, tap Add Bluetooth or other device.
Afterward, click the Bluetooth option.
Let your Windows computer find your machine’s model name.
As you see it on your screen, select the Cricut model.
After selecting it, you can easily pair it with your computer.
Finally, you have learned how to connect Cricut machine to your PC.
For Mac OS
Once the Mac is turned on, place the computer and machine together to connect it via Bluetooth.
To connect, go to the Apple menu.
Afterward, choose the System Preferences.
Here, look for a Bluetooth option on your Mac computer.

Once you have found it, turn on the Bluetooth.
Following this, select your Cricut model from the available list.
Now, you have connected your Cricut to Mac computers.
Connect Cricut Machine to a Mobile Device
Depending on the type of project, I change my devices. When I have bigger projects, I prefer a desktop, which is perfect for creating a design or editing. Also, controlling Cricut via a computer is more convenient than using a mobile device. But you can’t neglect the benefits of using a phone, too. It is easy to connect, and the phone we always keep with us makes it easier to use Cricut.
For Android
Go to your Android phone and then navigate to the toggle bar by swiping it below from the top screen. (See the screenshot below).
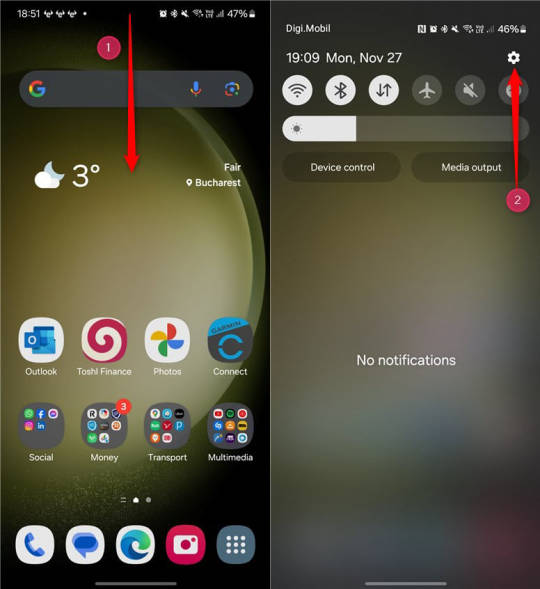
After that, you will need to click the gear icon to open your Settings.
Once you are in phone Settings, move to the Bluetooth option.
In the following step, turn on Bluetooth.
https://www.digitalcitizen.life/wp-content/uploads/2018/05/android_Bluetooth-10.png
You need to wait and hold for a while to see whether your device finds your nearby Cricut.
Once it detects the Cricut, click on it to pair.
Now, it is done. It might be clear to you how to connect Cricut machine.
For iOS
On your iOS (iPhone or iPad) device, go to the Settings app.
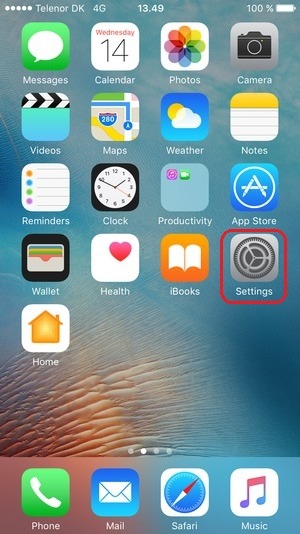
Then, turn on the Bluetooth by selecting the toggle button.
https://cdsassets.apple.com/live/7WUAS350/images/iOS/iOS-17-iphone-14-pro-settings-Bluetooth-pair-third-party-device.png
Now, wait and check your iPhone.
See if your device detects your Cricut machine.
Once detected, click on it to pair.

Finally, your device is connected to Cricut. Enjoy!
FAQs
Question 1: Why do I need to connect my Cricut to my device?
Answer: The Cricut machine should only be connected to compatible devices. It is necessary as it helps the crafters to set their machines up. By setting up the machine, you can easily create, edit, and modify your design on Cricut Design Space. During setup, Cricut will also update its firmware.
Question 2: Which device is compatible to connect Cricut?
Answer: According to Cricut, you can connect your Cricut to a computer and mobile device. In other words, if you are connected to your desktop, you can easily connect it to a Mac or Windows computer. Other than that, it doesn’t support Chromebooks or Unix/Linux. Speaking of mobile devices, Android and iOS devices are compatible with Cricut.
Question 3: Do I need a computer to connect Cricut machine?
Answer: Yes, but it is not compulsory to have a computer only. You can connect your Cricut to a mobile device, whether Android or iOS. Cricut connects easily with every device except for Chromebook and Unix/Linux. Besides, you will need to ensure that your computer or smartphone is compatible with the hardware and software. To learn about the system requirements, you will need to visit Cricut’s official website.
0 notes
Text
Appcleaner smart delete

#APPCLEANER SMART DELETE FOR MAC#
#APPCLEANER SMART DELETE PRO#
#APPCLEANER SMART DELETE SOFTWARE#
#APPCLEANER SMART DELETE PRO#
In the Startup Programs section, you can disable and enable launch agents and login items and remove user login items.Īpp Cleaner & Uninstaller Pro provides a free trial with unlimited features. You can preview and remove leftovers of old apps in the Remaining Files section, which you have previously removed, by just moving them into the Trash without using uninstalling tools. You will find web browser extensions, installations, plugins, widgets, screensavers, preference panes, and widgets in the Extensions tab. This uninstaller also provides more important features which allow you to keep your Mac clean from all remaining files and other debris. It is also possible to clear only the app’s service files by selecting all the files except Executables. If you want to uninstall an app completely, just select all its items and click the Remove button. If you switch to the Expert mode, you can preview all the related files of each application in the right section. Once you launch the program, you see the window with all installed applications on your Mac. With App Cleaner & Uninstaller from Nektony, you can also change startup programs, remove extensions and change default applications for different types of files.Īpp Cleaner & Uninstaller has an entirely different interface. Below we will review AppCleaner and App Cleaner & Uninstaller, which help you remove your Mac applications.Īpp Cleaner & Uninstaller is a more professional tool that, besides uninstalling Mac applications, provides a wide range of other features. That’s why we recommend that you use special tools designed to uninstall applications easily and safely. Also note, if you remove important system files, this might damage your system. However, this is inconvenient, and it takes much time. You can completely uninstall applications by searching and removing their service files manually.
#APPCLEANER SMART DELETE SOFTWARE#
That’s why it is important to uninstall software completely or to periodically clear service items. If you removed them the regular way, all their support files are still stored on your disk and might occupy gigabytes of hard drive space. Now try to recall how many apps you’ve downloaded and deleted, due to their unsuitability, for the entire session on your computer. Then you use only one of these applications. You usually download several or dozens of programs from the App Store and try each one to find the most convenient one for you. Imagine that you are looking for a suitable desktop application to make notes. When you drag and drop a program into the Trash bin, its service files will remain on your Mac. Almost every experienced Mac user realizes that the removal of an app by just moving its icon into the Trash is not enough for a complete uninstallation. Also, we will provide a comparison table of the features of both applications.Ī little background story: Why use special tools to remove applications from Mac?įor those who may not know the applications mentioned above, we will clarify. That has spurred us to write this article comparing AppCleaner from FreeMacSoft and App Cleaner & Uninstaller from Nektony. On some well-known download archives, we found users’ comments about not comprehending the difference between the two. Although they have completely different interfaces, developers, and functionality, most users tend to mix them up.
#APPCLEANER SMART DELETE FOR MAC#
There are two popular removal tools for Mac with almost similar names – AppCleaner and App Cleaner & Uninstaller Pro.
0 notes
Text
Mac os macos sierra

Mac os macos sierra how to#
Mac os macos sierra for mac os#
Mac os macos sierra update#
Mac os macos sierra pro#
Mac os macos sierra free#
When you’re done, hover over the video and click the icon at the bottom left to pop the video back to its source.
Mac os macos sierra free#
You can drag the video’s borders to make it bigger or smaller, and move it to one of the other corners (you can’t free place PIP video). In both iTunes and Safari, the video will pop out into a floating menu that appears at the top-right of the screen. Right-click the video once and you’ll see the YouTube menu right-click again to bring up the Safari menu and select Enter Picture-in-Picture. Go to YouTube and find a video (the TrustedReviews channel has a rather good selection).
Mac os macos sierra how to#
I’ll show you how to turn on PIP on YouTube, although the process is similar for other video content on different sites. This includes YouTube and Vimeo, but not Netflix at the moment. With Safari, you can only use PIP mode with supported websites. Hover over the video window and you can click the pop-out icon. With iTunes, just fire up the app and start playing a video. Now macOS Sierra has the same feature, available for individual videos in iTunes and Safari. The iPad got a picture-in-picture (PIP) mode back with iOS 9, letting you keep videos on the desktop while you got on with other work. Use picture-in-picture mode for iTunes and Safari A word of warning though – as with all betas, there’s no guarantee you’ll be getting a stable build, so it’s probably a good idea to backup all your files before you go trying out the latest beta.Ģ.
Mac os macos sierra update#
You’ll also be able to set the colour temperature of the display.Īs mentioned, Night Shift for macOS is currently only available in the Sierra 10.12.4 beta, which can be downloaded through Apple’s Developer Centre or the software update function in the Mac App Store. To experiment with different Night Shift settings, head into System Preferences where you’ll be able to schedule Night Shift to activate at Sunset and deactivate at Sunrise, or set your own schedule. Once opened, you should see a new Night Shift switch in the Today section of the panel. The Night Shift feature can be turned on by going to the Notification Centre, which can be opened by either swiping onto the trackpad with two fingers from the right-hand side, or clicking the Notification Centre icon in the menu bar (see below). Now the feature has made its way to Apple’s Desktop OS, you can spend your evenings and nights imbibing all manner of insightful article (read: checking facebook) without fear of your night being disrupted by the laptop’s blue light-filled display. Why? Well blue light has been linked to upsetting the body’s circadian rhythm and causing insomnia. The feature is designed to gradually shift the display of your MacBook from a blue tint to the warmer end of the colour spectrum as the day turns to evening. The latest macOS beta, version 10.12.4, comes with a feature which has been available on iOS since version 9.3 – Night Shift. Switch Night Shift on for a better night’s sleep
Mac os macos sierra pro#
Whether you’re a pro user or a complete novice, here are 10 of the best OS tips and 10 secret Siri commands to try out today.
Mac os macos sierra for mac os#
The name has changed, but otherwise it's business as usual for Mac OS Mac OS X OS X macOS.Our guide to macOS Sierra tips, tricks and hidden features will turbocharge your Apple software experience. Add in the Mac’s stale, aging hardware lineup and Apple’s total lack of communication about it, and there seem to be real problems for the Mac as a platform.īut for all the Mac users already out there, Sierra happily trundles along in the operating system’s quiet and reliable groove. It has been a long time since the Mac was Apple's favorite child, and there are places in Sierra (like the Messages app) where it clearly feels like Mac users are getting a second-tier experience compared to people on iOS. El Capitan and Sierra both designate one or two big "hero" features for Apple to plan its marketing around (window management in El Capitan, Siri in Sierra), a decent range of medium-sized changes, at least one big under-the-hood addition (System Integrity Protection in 10.11, the Gatekeeper stuff in 10.12, and APFS next year if all goes well), and a smattering of minor improvements to the core apps. Since Yosemite, things have felt more tightly controlled, more planned. Further Reading OS X 10.11 El Capitan: The Ars Technica Review
1 note
·
View note
Text
Usb flash recovery mac

#Usb flash recovery mac how to#
#Usb flash recovery mac mac os x#
#Usb flash recovery mac software#
#Usb flash recovery mac Pc#
#Usb flash recovery mac zip#
If none of them work, either all the disks are bad (less likely) or the drive is faulty (more likely). It might just be the one disk that is bad.
#Usb flash recovery mac zip#
If this happens, try reading other Zip disks, ideally ones that were stored in a different condition. If you hear lots of clicking from your Zip drive while attempting to read a disk, you could have a bad Zip drive or a bad disk.
#Usb flash recovery mac how to#
RELATED: How to Copy or Move Files and Folders on Windows 10 Troubleshooting
#Usb flash recovery mac Pc#
For Mac disks, it’s best if you read them on a vintage Mac then copy the files over to your Windows PC via a USB drive or a LAN. Windows 10 or 11 can’t read Mac format Zip disks unless you use a special utility called HFSExplorer, with mixed results. Windows can read Zip disks formatted with FAT, FAT32, exFAT, or NTFS formats commonly used by MS-DOS and Windows over the decades. For example, you can drag the file icons where you want them to go, or right-click and copy, then paste to a destination. You can copy the files just as you would with any other disk or drive. Then insert a Zip disk, and the drive will appear in “This PC” in File Explorer, usually labeled as “USB Drive.”ĭouble click the Zip drive’s icon in File Explorer and you’ll see the contents of your Zip disk. First, plug your USB Zip drive into a spare USB port on your PC. If you’re on Windows 10 or 11, it’s really easy to copy data from a Zip disk. RELATED: What Is a File System, and Why Are There So Many of Them? How to Copy Data from a Zip Disk to Windows So if you have any IBM PC- or Windows-formatted ZIP disks, you can insert them into a Zip drive plugged into your Mac and copy the files over easily. Ironically, while recent versions of macOS don’t natively support legacy Mac-formatted Zip disks, they do support legacy MS-DOS and Windows disks. Once on the intermediary Mac, you can copy the files to a USB flash key or over a LAN to your modern Mac. Once you have the vintage Mac in hand, just plug your USB Zip drive into the Mac, open the drive icon that appears in Finder (or on your desktop), and drag your files over to copy them. A Core 2 Duo Mac Mini is a good low-cost machine that can serve as an intermediary between HFS-formatted Zip disks and a modern Mac. They are plentiful, so keep an eye out for a good deal on one in working condition. That’s not as bad as it sounds: as of December 2021, you can get an early Intel Mac Mini (such as a Core Solo or Core 2 Duo model) for around $50-$100 on eBay. More easily, you can buy a cheap, used Intel Mac Mini running an older version of macOS, then copy the files over to a modern machine via a USB key or LAN. But that’s a very technical and difficult solution for most people. If you don’t have one, you can attempt to run an earlier version of macOS in a virtual machine, then link it to your USB Zip drive. To read HFS or HFS+ Zip disks, you’ll need to use a Mac running macOS 10.14 Mojave (2018) or earlier. It’s likely your Mac Zip disks were written in HFS format on a PowerPC Mac. So if you formatted a Zip disk using a Mac before 2009, the odds are very high it’s in HFS or HFS+ format.
#Usb flash recovery mac mac os x#
But until Mac OS X 10.6 Snow Leopard (2009), the Mac operating system supported writing to HFS and HFS+ disks.
#Usb flash recovery mac software#
What is a file system, you ask? It’s a software method that determines how an operating system writes data to (and reads data from) a storage medium such as a disk or hard drive. That’s because most Mac-formatted Zip disks use the now-obsolete HFS or HFS+ file system format that macOS today can’t read. If you’re trying to read vintage Mac-format Zip disks with a recent Mac running an up-to-date version of macOS, you’ll run into a significant roadblock very quickly. RELATED: Even 25 Years Later, the Iomega Zip Is Unforgettable How to Copy Data From a Zip Disk to a Mac We’ll start with Mac first because that has the most caveats. We’ll cover each scenario in a different section below. Once you have a USB Zip drive in hand, how you proceed depends on if you’re working from a Windows PC or a Mac. Those non-USB models won’t work with modern PCs or Macs. Just make sure you don’t buy a Zip drive with a parallel port or SCSI connection by accident. The higher capacity drives can read the smaller capacity disks (such as 100 MB) easily. Almost any Zip drive with a USB connection will work, including the 100 MB, 250 MB, and 750 MB models. As of December 2021, you can get a USB Zip Drive on eBay for anywhere between $50 and $200 depending on condition and type.
0 notes
Last Seen Blogs

probablyimprovised
Insomniac

scenographist
Scenographist

bloomholm85
The Journaling of Behrens 139

dommetrix
X X X

faggotfreaks-blog
WAGING WAR ON FAGGOT FREAKz