#Milk Storage Solutions
Text
Nurturing Convenience: Breast Milk Storage Products Market Report
The global breast milk storage products market size is expected to reach USD 834.06 million by 2030, according to a new report by Grand View Research, Inc., expanding at a CAGR of 8.28% from 2022 to 2030. The expansion of the market for breast milk storage products can be attributed to growing public knowledge of the advantages of breast milk. Various governments around the world urge moms to breastfeed their children until they are 6 months old. A number of industry participants, including Medela LLC, Laura & Co., and Ameda, and universities, such as Washington University and Fudan University, are educating women about breastfeeding and its advantages by organizing workshops and offering educational periodicals. This is, in turn, impelling the market growth.

Gain deeper insights on the market and receive your free copy with TOC now @: Breast Milk Storage Products Market Report
Globally expanding milk banks are predicted to significantly increase the demand for breast milk storage products including bottles and bags. For instance, Germany has roughly 18 breastmilk banks that can aid premature children by giving them donor milk. In order to assist clinical institutions in Germany, Austria, and Switzerland with the establishment and management of human milk banks on a national scale, the European Foundation for Care of Newborn Infants (EFCNI) has also launched an international project. This is expected to increase the milk donation, thereby impelling the need for breast milk storage products.
Furthermore, it is anticipated that increasing awareness and a number of government measures to normalize the use of breast milk will benefit the market growth. For instance, a congresswoman introduced a bipartisan bill in August 2022 to safeguard parents who are traveling with breast milk. The Transportation Security Administration (TSA) is now required to clarify and regulate updates on handling breast milk and infant formula. This law will make it possible for parents to transport breast milk as well as other infant formula while feeling safe and at ease. This could result in driving the demand for breast milk bottles and bags.
#Breast Milk Storage#Baby Feeding Essentials#Milk Storage Solutions#Mom And Baby Products#Parenting Must Haves#Newborn Nutrition#BabyCare Products#Breast feeding Support#Infant Health#Baby Wellness#Maternal Care#Baby Nourishment#Parenting Gear#Childcare Essentials#Breast Milk Management#Baby Feeding Accessories#Postpartum Essentials#Nursing Mom#Baby Product Reviews#Healthy Baby Starts Here
0 notes
Text
having a little look at some of my treasures just cause

#thinking abt ...her 💗#she must have been very expensive#i own this and its all holics fault!!!!#ok i put her back in the box now#before i figure out better storage solutions#this box contains like 4 vintage formal kimono and also a strawberry milk themed blanket#for safekeeping
3 notes
·
View notes
Note
I had the most dumb yet sensible thought when it comes to your Pretender AU. Megatron discovering ways to deal with Optimus accidentally through human media. Particularly horror media like The Thing, Among Us, Bloodborne, Alien, SCP and such.
A thing that Soundwave would stumble upon by accident before realizing this could come in handy and share with it the other Decepticons. It's kinda ironic in a way. Organics having what could be the key to handling this entire mess through their entertainment based media.
Plus they probably look to YouTube for channels like Roanoke Gaming who discusses the various intricacies like mythology, biology and such on media creatures such as Xenomorphs.
Oh goodness this is FUNNY.
Previous part here.
This is kinda crack so honestly its up in the ether plot relevance wise.
━━━━━━ ⊙ ❖ ⊙ ━━━━━━━━━━━━ ⊙ ❖ ⊙
The Pretenders tried to flee Cybertron as soon as they deemed the planet unsuitable. Megatron wanted to scoff when he caught wind of the Pretend Prime and his entourage fleeing the sector. He had every intention of ruling Cybertron and left more than enough soldiers behind to tend to the planet in his absence, but he simply could not allow the Pretenders to go. If they got any ground anywhere, they would spread and be back.
The Pretender Prime had long since proven to be capable of holding a grudge, and Megatron was in no mood to shove the issue under the rug until it came back to bite him. As such, he collected his inner circle, Jazz included, and boarded the Nemesis. He set course for the planet the Pretenders were headed toward with grim determination, and upon landing, he almost wanted to scream due to the sheer amount of organic everything. It reminded him of the Pretenders and he despised being on the ground.
Thus, while his subordinates did everything in their power to root out the Pretenders wherever they were rooted on the planet of Earth, Megatron delved into the human datanet with Soundwave at his side. Jazz joined them on occasion, and through this shared effort, they discovered possible methods to combat their foes that they never would have expected. The ideas were... a tad outlandish. But having tried just about everything else under the sun to kill their enemies, the Decepticons were willing to make an attempt to follow the potential solutions provided.
Having watched "Earnest Scared Stupid" one time, the Vehicons attempted to deal with the Pretenders through the use of milk. It was a one time effort, and the Pretenders were more dumbfounded than actually upset at the milk that was tossed all over them. Seeing as they didn't melt into goo, the Vehicons ran screaming.
Jazz made a valiant attempt to use voodoo magic a handful of times, which ended up resulting in a small storage closet being filled to the brim with collections of dolls stuffed with needles. He also tried a few banishing rituals just for the kick of it. And surprisingly, after one of his attempts which involved an offering the some demon Jazz never bothered to remember, Arcee ended up stepping into a hole and breaking her leg. Since then Jazz has occasionally repeated the ritual just to see if anything else happens.
Starscream saw several movies and decided that water might be a possible way to combat the Pretenders. Being the most reliable flier, he took to the air and decided that Arcee would be the best target. He picked her up, and making sure to wear gloves so as to not actually touch her, he threw her into the nearest body of water and waited above. Arcee for her part flailed and got out with a hiss of indignation, her plating flaring and her extra limbs extending so that she could shake off the liquid. The most Starscream got for his efforts was a dirty look, but his work was applauded when he returned to the Nemesis. Touching a Pretender was always a dangerous risk to take.
Megatron opted for a slightly more... violent solution. He had attempted chemical warfare, bombing, outright attacks, poison, and even manufactured diseases to fight back against his foes. None of his efforts so much as gave him a reasonable weakness to use against them. While young, Pretenders were easy to kill. But after that all he really had to target was their familial connections. There were no physical defects to attack or use against them. They adapted, and as much as he was loath to admit it, they were disgustingly superior when it came to most physical activities. They were resistant to just about everything too. So really there were only two options in his mind.
The Pretenders operated similarly to organics. And according to what he saw, two things that killed organics most often were freezing cold and fire. Thus, his vehicons were given flamethrowers for a time and when the opportunity arose, Optimus was thrown into the arctic for observation. The vehicons for their part managed to make the Pretenders scatter, but fire did nothing against them that it didn't do for a normal Cybertronian. The freezing on the other hand? Freezing could kill a bot, at least in a moist environment. But against the odds, as soon as Optimus found he couldn't escape on his own, the Prime dug a hole into the ground and curled up into a ball, his frame stilling. For a moment Megatron thought he might have won, but then as soon as the other Pretenders came to get him, they dragged the Prime out and back to their base. Within a week he was up and moving again.
The monsters could hibernate it seemed. And that terrified Megatron more than he cared to admit.
The Decepticons only true success came when Soundwave decided to attempt using sound to their advantage. The Pretenders were incredibly sensitive, their optics, audials, and olfactory systems all primed for hunting. Seeing "The Quiet Place", Soundwave noted the similarities between the Pretenders and the Angels and opted to make an attempt at using the same attack against their foes. To the surprise of everyone, he...
Succeeded.
When Soundwave played music on just the right frequency on the battlefield, the Pretenders began to scream. Their frames shifted, their disguises falling away and simultaneously being forced back into place. Unable to control their frames fully, they could only thrash and fight like wild animals as their senses were assaulted from all sides. It was not enough to kill them, but the weakness was swiftly acknowledged and abused.
It wasn't much, but it was something.
Another step closer to victory.
#transformers#maccadam#transformers prime#team prime#arcee#optimus prime#megatron#alternate universe#soundwave#starscream#vehicons#pretender au
92 notes
·
View notes
Text
Fight Food Deserts with Community Gardening

“Gardening is fun!” When I talked with David Thompson, founder of Food is Free Washington, that’s why he said he started doing it. It was so much fun, in fact, that he grew too much produce in his 2,000 sf garden to use it all himself, so he started giving it away. He went on, “The thing that became more fun than growing my own food was sharing it. It’s the joy of giving stuff away.” That is the heart of the Food is Free movement: building community by sharing food independence.
Read more about the real life gardener who inspired Chapter 3 of Calico Jill and the Search for Cheese!
What Food is Free Does
Food is Free Washington is a non-profit co-run by David and Ursula Thompson in Tacoma, WA. The goal of Food is Free is to take care of our planet and take care of each other in the process by feeding people. The Thompsons seek to reduce food waste by getting food into the hands of local people who need it. They also educate people on how to grow their own food so that our community is more self reliant and less dependent on outside forces.
Food deserts stretch across many of Tacoma’s communities, but especially so in downtown Tacoma, east Tacoma and south Tacoma. A food desert is an area where local residents do not have access to fresh and healthy foods. Food is Free focuses in particular on these communities in need.
While a food bank might serve 50-100 people, Food is Free serves on average 220 people with each food giveaway. Food banks are great resources for gathering food and giving it to those in need, and they even supply Food is Free with donations through the Emergency Food Network and Feeding Feasible Feasts, but Food is Free is so much more effective in its distribution for two reasons: it goes into the heart of communities where there is food insecurity, and there is no requirement to show an ID or prove income. Anyone who shows up gets food. It’s as simple as that.
Food Is Free Sharing Tables
Ursula and David’s solution to the food deserts that stretch across Tacoma is gardening. Food is Free has planted 3,000 square feet of community garden space across the city. They started setting up tables next to these garden plots, and they would set out food for anyone to take.
They encouraged others to follow suit. At the height of the pandemic, there were 97 of these sharing tables scattered around Tacoma which became a sort of mobile food pantry. During a time of social isolation and social distancing, people formed a sense of community around sharing food surplus with each other within their local communities.
These tables were popular for a time, but there were obstacles. Even though the Thompsons would post instructions on accepted and restricted items, there wasn’t enough education about proper food storage. People started dropping off things like chicken breasts and milk, things that would spoil if left on a table.
These days, the total number of food tables is around 10-12, and they are run independently.
Food Accessibility in 2023
One thing the Thompsons are particularly excited about is the Gleaning Project, a program that is run through Harvest Pierce County in which people can sign up to have the fruit trees in their backyards harvested. Last year, 27,000 pounds of produce was harvested thanks to this program and shared with local hunger relief organizations.
Food banks are getting fewer donations than they used to. EBT benefits were cut in March. With rising food inflation, fewer people want to make donations. Add to these factors the job insecurities that we’ve all faced thanks to the pandemic, and more and more people are turning to feeding themselves with their own gardens.
Food is Free Washington is supporting these burgeoning green thumbs with seeds, plant starters and resources. Ursula explained, “You can grow an extra row. You can grow an extra plant. We just want people to do it with us. All of us gardeners together, we can help feed our community.”
Food Is Free Drop Offs
If you live in Tacoma, you can pick up food on Tuesdays in the extra parking lot across from (west of) Hope Point (formerly Calvary Baptist) Church. Address: 6511 South C Street. Follow @tacomaurbanfarmer on instagram to stay abreast what is available from week to week.
Resources:
Food is Free Washington: https://foodisfreewashington.org/
Emergency Food Network: https://www.efoodnet.org/
Feeding Feasible Feasts: https://feedingfeasiblefeastsllc.org/
Harvest Pierce County: https://piercecd.org/190/Urban-Agriculture
and the Gleaning Project (where you can register your fruit trees!): https://piercecountygleaningproject.org/
Calico Jill and the Community Garden
You can read Calico Jill's story on tumblr at the following links. (The Community Garden is Chapter 3):
Chapter 1 | Chapter 2 | Chapter 3 | Patreon
The artwork is this post is a painting of mine titled Put A Little Spring In Your Step. It is Watercolor and Ink on 8×10 inch hot press watercolor paper.
#community garden#food deserts#food scarcity#activism#calico jill and the search for cheese#calico jill#tacoma#washington state#pacific northwest
72 notes
·
View notes
Text

i am making yet another shelf.
i am a slut for storage solutions !!!
ill take a picture of it holding my milk crates when its all welded up
#kind of wish i could make this so i could disassemble it#but that would take a lot more effort than i feel its worth#welding#diy#art
9 notes
·
View notes
Text
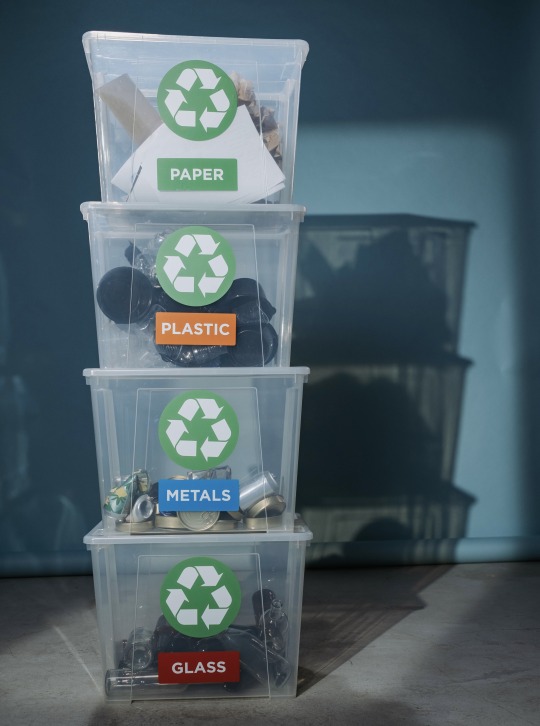
The 3 R's of Waste Management
Reduce, reuse, and recycle.

The 3 R's are the necessary foundations of conservation and waste management techniques for a more sustainable lifestyle.
Sustainability, in its environmental definition, is the ability to maintain conditions supporting biological life on Earth by preserving natural resources. The continued prevalence of diminished natural resources due to the rise in greenhouse gas emissions, such as carbon dioxide and methane, from human activity over the past decades has impacted our course of sustainability on planet Earth. However, reducing, reusing, and recycling materials will lessen energy consumption instead of mining, extracting, and producing new goods with raw materials. These forms of waste management will allow trees to be planted in areas to lessen the carbon dioxide in the atmosphere that would otherwise be used as landfills for trash.
Reduce
Overconsumption of products that yield mass amounts of trash can contribute to the problem that waste management is trying to fix. Being aware of the issue at its roots and diminishing the need to throw away items can better sustain and handle the waste output that one is producing. Reducing the amount of discarded waste can also lessen the need to reuse or recycle items constantly.
Some ways to reduce and use preventative measures are to:
use reusable forms of everyday daily items such as reusable beeswax food wraps, washable utensils, electric lighters, metal razors, and recycled grocery bags
compost compostable foods at compost centers in your state
shop at zero-waste grocery stores in your state
avoid throwaway items such as single-use cutlery and dishes
replace paper items with fabric or cloth options such as fabric napkins, dishcloths, and cotton paper towels
buy products in bulk as opposed to small, single-use containers

Reuse
Often, it can be easy to discard packaging or items that no longer work or have a use for them. Instead, one should put creativity into practice when thinking of ways to reuse an object instead of throwing it out entirely and increasing waste output.
Some ways to reuse common thrown-away items are to:
turn used milk, coffee, juice, and water cartons into birdhouses
grow seedlings in empty egg cartons
use empty plastic milk jugs for your garden in creative ways
clean out glass jars or containers and repurpose them as a storage component
sell or donate old clothes, furniture, appliances, etc., to those who can use it
reuse grocery bags to cover small trashcans or on your next trip to the store
utilize newspaper as a way to cushion fragile items for storage
use leftover wood as fuel for bonfires
donate old notebooks and books for children who are in need of them

Recycle ♻️
At times, it can be easier to throw away used goods rather than recycle them and allow them to redirect potential waste from landfills, conserve energy, and reduce the need to extract new materials for new products. According to the EPA, "recycling one ton of paper would save enough energy to power the average American home for six months, save 7,000 gallons of water, save 3.3 cubic yards of landfill space, and reduce greenhouse gas emissions by one metric ton of carbon equivalent (MTCE)."
Some ways to get started with recycling items can be to:
buy items that are made with recycled materials so that once it is used up, you can recycle them and restart the process
educate yourself on the plastic recycling symbols and learn what they mean and if they can be recycled
be aware of the fact that not all plastics can be recycled at certain facilities
clean out hazardous/unrecyclable contents before recycling items
choose to buy things that are made with water-soluble solutions instead of chemical-based solvents
look out for materials that local recycling facilities are accepting, and start collecting recyclable items
use public blue bins that indicate if they accept paper, glass, or plastic for an easy-access recycling system
Efforts to start being sustainable might seem to make a slight difference amongst the tons of trash thrown away daily, but having one person reuse, reduce, and recycle, can make a big difference in a healthier Earth.
Sources
“3rs - Reduce, Reuse & Recycle.” SustainableSA.Com, 2 Aug. 2016, www.sustainablesanantonio.com/practices-technology/reduce-reuse-recycle/.
“Basic Information Details | Paper Recycling.” United States Environmental Protection Agency, 21 Feb. 2016, archive.epa.gov/wastes/conserve/materials/paper/web/html/index-2.html.
“Climate Change Indicators.” United States Environmental Protection Agency, 1 Aug. 2022, www.epa.gov/climate-indicators/greenhouse-gases.
“Climate Change, Recycling, and Waste Prevention.” Climate Change, Recycling and Waste Prevention from King County’s Solid Waste Division - King County, kingcounty.gov/depts/dnrp/solid-waste/programs/climate/climate-change-recycling.aspx. Accessed 1 July 2023.
Fahad. “3 R’s of Environment - Reduce, Reuse, Recycle.” Earth Reminder, 4 Jan. 2020, www.earthreminder.com/3rs-of-environment-reduce-reuse-recycle/.
#environment#recycle#reduce#earth#epa#environmentalism#climate change#climate justice#recycle reuse renew rethink#reusedmaterials#reduce reuse recycle#ecofriendly#sustainability#sustainable#recycled#environmetalists
8 notes
·
View notes
Text
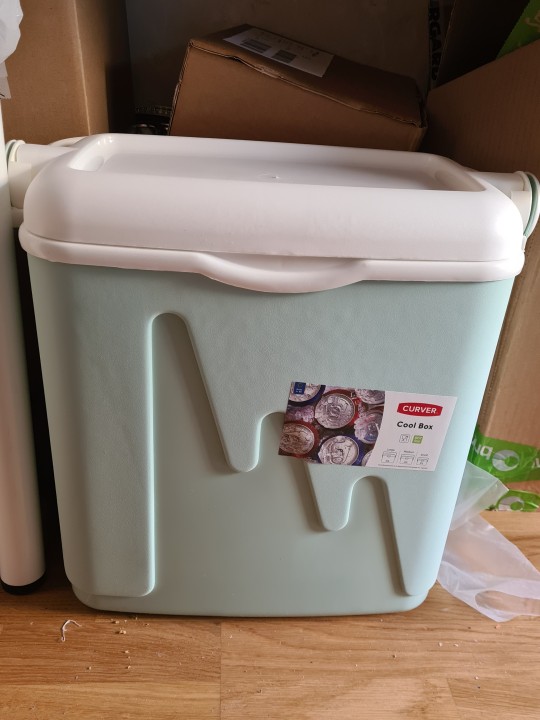
Thankfully obtained after work today: a cooler for a little temporary non-freezer storage! That's another thing we had, but it must still be sitting in our old house on Plague Island.*
(And yep, I really need to run the Roomba through here. But, I've been staying a tad distracted.)
Plus, some more chill blocks that are now in the freezer. Along with a couple of 1L drink bottles with water in them to help take up the slack as DIY reusable ice packs after he picked up half the commercial ones that I would have. We already had a few reusable ice blocks in there. I wish I had thought of the bottle solution before he even went out, so they could go into the freezer earlier. Ah well!
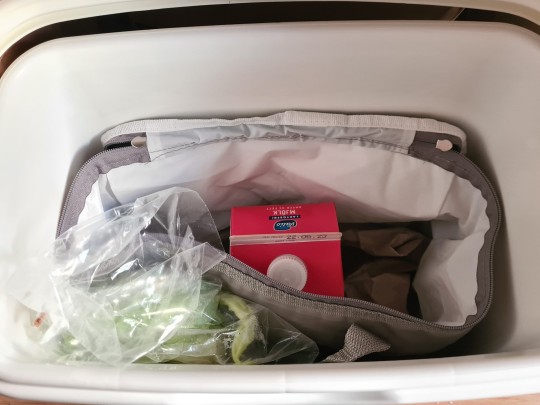
Currently inside there: that carton of milk I accidentally froze, which I was wanting to set back out to thaw and use anyway. Plus some lettuce I wanted to eat soon instead of throwing away while I was just clearing out the vegetable bin, because it won't hurt it to sit in there.
The milk situation shoud be win-win: it can continue thawing itself out, while also helping chill the cooler down before I add more ice packs to keep it that way! 😎
I decided to throw that insulated shopping bag in there too, because it shouldn't hurt and the little extra insulation might be useful. ¯\_(ツ)_/¯ Part of my galaxy brain strategic plan here is also that we should be able to grab that bag of refrigerator stuff out, to free up the cooler itself to shovel at least some of the freezer stuff into temporarily when the new fridge is on the way.
We are apparently getting this model instead of the Husqvarna, because it was actually in stock today:
That is also like $400-equivalent less expensive, and looks perfectly fine. Much better than what we've got now even before the fridge compartment broke down, so really not gonna complain.
Unfortunately, we'll most likely not get it until after the weekend. 😭 That store does indeed seem to be part of a smaller more local chain operating under some Elon franchise setup, and they handle their own deliveries/installations. But yeah, the delivery people are apparently pretty booked up through the end of the week and will get back to him tomorrow.
Was hoping for sooner, but we are in SO much better situation in the meantime since the freezer is still chugging along. *fingers crossed*
I am currently trying to get more perishables cleared out of the fridge before they can start stinking things up. Not much is going in the cooler, at this point. Stuff like pickles and vinegary sauces may be fine at room temperature if we use them up soonish, and a lot of other items are already untrustworthy. Mostly salvaging longer-life stuff like cheese and some vegetables.
* Which is indeed still in our legal possession, with a bunch of stuff in it that the moving company just did not get like they were supposed to. 😒 Unless burglars have been in after petty household shit like that, who knows. I am not too happy about Limbo House, but hey. It's complicated. That is indeed one reason why I am still surprised sometimes not to find items that we totally should have, though. I remember packing a lot of them.
6 notes
·
View notes
Text


Infused-ganache Chocolate Truffles
Made a batch of these on the weekend (and then tormented my international friends on discord with them) so in penance by popular demand, let’s talk chocolate-making.
Okay, well, making things out of chocolate. Actually making chocolate from scratch is a long and specialised process that’s well out of scope for the average casual home-cook. See these videos from H2CT and Babish if you want to learn what’s involved there.
I’ve made a few versions of these truffles with different moulds, chocolate types and infused flavours, so this isn’t going to be a prescriptive recipe as much as the key steps/principles that you can tweak to fit what you’re working with.
Working With Chocolate
A lot of what I’ve learned about working with chocolate comes from Anne Reardon’s How to Cook That channel. If you have time, this video is a great introduction to some of the food-science behind how chocolate works:
youtube
Let’s do a summary of some key principles:
WATER IS THE ENEMY
Solid chocolate does not contain water. When water (or other water-based moisture, like milk) comes into contact with chocolate, it starts to dissolve the sugar, changing the chemical structure – which can change the texture and taste.
If the surface of the chocolate gets damp/wet (e.g. because of water on your fingers or condensation in your mould/storage container) it can cause what’s called a ‘sugar bloom’, leaving white streaks or other discolouration. You can actually see a bit of this in my photos; I was making these on a humid day and I think some condensation formed on the chilled moulds as I was pouring the chocolate in. This is the best case scenario for water – it’ll damage your chocolate aesthetically but you can wipe any away remaining moisture to stop it from getting worse and keep going.
If water mixes into your melted chocolate, your chocolate will ‘seize’; the sugar-water forming a solution that the cocoa sticks to, turning it thick, dry/sludgy/lumpy and resistant to melting. At this point your chocolate is texturally ruined (unless you’re making Flake) and can’t be used for moulding or shaping. You can use it for other things, by slowly adding more hot liquid until it melts into a chocolate sauce or ganache, but seizing can’t be reversed so this will be the end of the line for using that batch in truffle shells. You’ll have to start over.
The best way to prevent this is to keep everything dry. Wipe down your bowls/ knives/ spoons/ moulds/ surfaces well with a clean cloth or paper towel to ensure there’s no water left from washing or condensation build-up from the fridge/ freezer, dry your hands thoroughly, keep exposed wet ingredients on a different part of your work surface (or use them before/ after handing your chocolate so they’re not out at the same time) and try to limit the chance of condensation (e.g. from stovetop- or kettle-steam) dripping into your melted chocolate as much as possible.
COCOA BUTTER OR COMPOUND?
There are two main types of chocolate that you’ll find in the baking aisle: ‘real’ chocolate, which uses cocoa butter as the main fat, and ‘compound’ chocolate, which uses vegetable fat instead. For this you really need to read the ingredients list on the chocolate you’re buying since different brands can use either for different products (e.g. Cadbury Baking Melts are real chocolate while Nestle Baking Melts are compound chocolate, but other Cadbury products use compound chocolate and vice versa). The only way to guarantee what you’re getting is to check whether cocoa butter or vegetable fat is listed on the packet.
This makes a difference because the fats used change the stability and texture. The vegetable fat in compound chocolate has a higher melting point and is fully solid at room temperature. This means it holds its shape more easily and doesn’t need special treatment to set firm (which can be very forgiving to beginners and good for making thin decorations) but the trade-off is that those harder fats give it a tougher texture and a waxier/ oilier mouth-feel, as well as a less glossy sheen. Meanwhile, the cocoa butter in real chocolate has a lower melting point – closer to room temperature – which means that the heat from your hands (or even just a warm day) can be enough to melt the thinner pieces. Those softer fats are what give real chocolate that nicer melt-in-your-mouth feel, and the crystalline structures that the cocoa butter arranges itself into gives real chocolate its crisp snap and glossy surface. The trade-off is that, in order to keep the fats in that crystal structure, real chocolate has to be handled more carefully, and ‘tempered’ after fully melting; otherwise the melted fat resolidifies into an unstable, unstructured form that won’t set at room temperature.
Basically compound chocolate is more forgiving to work with (especially for thin pieces) but has a worse texture and appearance, while real chocolate looks and tastes better but requires an extra step and a little more care to work with.
TEMPERING
Tempering is that extra step I mentioned, which you need to do if you want real chocolate (the cocoa butter stuff) to set back into that nice crisp, room-temperature-stable, glossy state. When you buy real chocolate it is ‘in temper’, which means that the cocoa butter fat-molecules are arranged in a crystalline configuration that shimmers when the light hits it and breaks with a nice crack.
As you heat chocolate up the fat starts to soften and then melt, until it reaches a point where that crystal arrangement of fat molecules completely liquifies into unstructured particles: called going out of temper. Once out of temper, chocolate won’t reset into temper on its own – leaving you with squidgy, dull chocolate. The maximum temperature you can take chocolate to before it goes out of temper depends on the darkness of the chocolate:
White Chocolate < 29°C / 84°F
Milk Chocolate < 30°C / 86°F
Dark Chocolate < 32°C / 86°F
You can always try to thread the needle of heating chocolate up enough to make it workable but not so far as to send it out of temper, but that can take a lot of precision and be easy to overshoot (especially if you don’t have a candy thermometer). Instead, the simpler thing to do is to completely melt your chocolate, and then work the melted chocolate as it cools down so that you bring it back into temper. You can melt your chocolate by microwaving in 15-30 second bursts (stirring well in between to ensure it heats evenly) or over a double-boiler (stirring constantly).
Tempering chocolate is a lot less hard or scary than it may seem. I think chocolate is one of those things that has suffered a sort of “reverse CSI effect” thanks to cooking shows. These shows often like to feature the most technically complex/ specialised methods/ tools for food prep’ because it looks chef-y/ impressive/ spectacular, which can create the impression that these are the only methods available when there are actually simpler, more reliable, more accessible methods out there.
The method I find most accessible is the seeding method. To do this you need to reserve a couple of handfuls of your chocolate and chop it finely, then periodically add those reserved chocolate chips into your melted chocolate (biggest bits to smallest bits) as it cools. What you’re doing here is taking chocolate which still has its fat crystals in-temper and introducing it to your out-of-temper melted chocolate; providing a ‘seed’ template that helps the melted fats fall back into that crystalised structure. It also helps cool your chocolate down as the seed chocolate melts in. When doing this you have to be careful not to add the seed chocolate while things are too hot: otherwise it’s just going to melt out of temper as well, which could leave you in a mess unless you have extra chocolate on hand to sacrifice to the process.
A lifehack for this if you don’t have a food-thermometer is that the average core temperature of the human body is around 37°C / 99°F (with your extremities being colder) and chocolate will go into/out of temper between 29°C to 32°C (84°F to 86°F), so you can test whether it’s time to start tempering by getting your (clean and thoroughly dried) fingers involved. Dip a finger in to touch-test the temperature (stir your cooling chocolate to ensure the temperature is even throughout). Once it feels lukewarmyou can start melting in your bigger chips. Slowly add more, stirring to melt each addition through completely, until your chocolate mix feels slightly cooler than your hands while still being liquid enough to spoon and pour. If you have particularly warm hands, have recently exercised or it’s a hot day then you might want to shoot for a little cooler again. Just remember: the lighter your chocolate, the cooler the temperature it needs to go down to, so pay close attention when working with white chocolates in particular. I’ve done this every time with different chocolate types and it’s consistently got me into the tempering zone (even the first time I did it, which is rare because I usually muck things up on the first pass).
As you can see, it doesn’t actually take that much more work or time to temper real chocolate for truffles. But if you’re in a hurry (or don’t feel like it) you can just go with compound chocolate to skip this step.
Infusing Ganache
Ganache is a mixture of chocolate and cream, used for sauces, frostings, fillings or (in our case) truffle centres. It’s made by melting chocolate and cream together (either by heating both at the same time or pouring hot cream over chocolate) with the thickness of the ganache depending on the ratio of chocolate to cream, the lightness/darkness of the chocolate and its current temperature. Because ganache is a chocolate-cream mix that can’t be tempered you should use real chocolate when making it since the only thing you’ll get from compound chocolate here is a flavour downgrade.
Now you can just use ganache straight for a creamy chocolate-filled truffle but one of the fun things I like to do is add extra flavours to make them more interesting.
FLAVOURING THE CREAM
This depends on your flavouring. If you’re using a smooth dissolving powder (e.g. espresso powder, freeze-dried berry) or liquid essence/extract (e.g. vanilla, almond) then you can directly stir it through the warm cream to flavour your ganache. One thing to be careful of here is that adding acidic liquids to hot cream can make it split and curdle (that’s actually how you get cottage cheese), so if you’re looking for a citrus flavour I’d suggest infusing the cream with the rind not the juice. (If you want to make something like a wine ganache, you’ll need a recipe with extra ingredients to compensate for the added liquid and acid.)
Speaking of infusion, you may want to add flavouring from things that won’t dissolve smoothly; like vanilla pods, fresh herbs (e.g. rosemary or mint), fruit peel, culinary lavender or (as pictured) chillies. In this case what you want to do is infuse the flavour into the cream. To do this, soak your flavouring of choice in the heated cream to extract the essential oils and aromatics. For some flavours you can boil the cream with the flavouring to get the most out of it, but for more delicate flavours you might want to just steep the pieces in warm cream to avoid cooking away/ burning the taste. It’s a good idea to cut/ grate your flavour source fairly finely to release as much as possible. Once the cream is infused to your liking (the longer it sits the stronger the taste will be) you can strain the mix through a tea-strainer or mesh sieve to catch the chunky bits.
A quick note on infusing chilli
The main thing that makes chillies ‘spicy’ is a chemical called capsaicin, which triggers the body’s pain and temperature receptors (making it feel like it’s burning you). Milk-based products (such as cream in our case) contain a protein called casein, which binds to and inhibits capsaicin – neutralising some of the heat. Capsaicin can also be dissolved and washed away by oils and sugars. Basically when you infuse chilli into a cream-ganache you’re surrounding it with things that either neutralise some of the heat or help it pass along faster, which means the end-product will be less spicy than the same amount of chilli used in other dishes. If you want a hot truffle you’ll need to use stronger chillies or add slightly more. (See this video to learn more about chilli and chocolate.)
Can you infuse pure chocolate?
You can, but be careful. Make sure that your flavouring ingredient is completely dry and not something that would release any juice (again, water is your enemy). I would also avoid attempting any liquid or powdered additions since that could cause seizing. The things that I find have worked best are sitting whole woody herbs or spice pods in the chocolate as it melts (I’ve done this with rosemary). I’d recommend tying your flavouring into a bundle with some kitchen twine (or making a ‘teabag’ with some mesh cloth) to make it easier to remove; pure melted chocolate is harder to strain than cream. You can also salt your melted chocolate if you like. If you’re using real chocolate, remember to temper it once you’ve removed your ‘flavour bundle’ from the melt.
Once your cream is flavoured you can pour it over the chocolate to make ganache as normal – if needed warm it over a double boiler or microwave in short bursts until the chocolate is completely melted through. You can also colour white-chocolate-based ganache with a few drops of gel food dye for visual effect.
WHIPPED GANACHE
Let’s say you don’t want a very chocolate-heavy ganache as your filling (perhaps because it would be too rich). Or maybe you added too much cream while making your ganache and now you’re worried that your filling will be too runny at serving temperature.
What you can do here is whip your ganache to thicken it in the same way that you would whip cream. Any liquid that contains at least 30% fat can be whipped – the fat globules forming a stabilised network that traps tiny air bubbles. Meanwhile when you whip egg white/ gelatine/ aquafaba what you’re doing is stretching out proteins to create the air-trapping network. Since pure cream is typically 40% fat and chocolate typically contains 20-40% fat, a cream-chocolate ganache mixture has enough fat to whip up. Ganache whipped to stiff peaks will give you a thickness and structure similar to a cooled, chocolate-heavy ganache while being substantially lighter in richness and texture.
Whether you whip your ganache just to thicken it or all the way to peaks will depend on your starting thickness and personal preference for filling texture – how runny your original mix was and whether you prefer the filling gooier or fluffier. While you can whip ganache through enthusiastic application of a balloon-whisk, I would recommend using an electric beater (or at least a hand-crank) to save yourself the exertion.
Putting it all together: Truffle time
This type of truffle is made by pouring pure melted chocolate into a mould to a create chocolate shell, which you then fill with your flavoured ganache before sealing everything shut with more chocolate and allowing to set.
MOULDS & MOULD MATERIALS
In theory you could make chocolate in any kind of mould, but the thing to keep in mind is whether you’ll be able to get it out at the end without breaking the mould or shattering the chocolate. For example, you don’t want a shape that would hook into/ fold over the chocolate, because that part would just get trapped and break off. Ideally you want a mould with a bit of flex, so that you can pop the solidified truffles from the case more easily.
My recommendation is silicon moulds. These have enough heat resistance to handle warm chocolate while keeping their shape, while also being non-stick and pliable, which makes them easier to peel off your completed truffles. You can also use plastic ice-cube trays but there is a risk, since you need to apply more force to pop the truffle out, which can transfer to the shell and crack it – especially if you’re using a gooier filling that might shift around and press against the shell from the inside.
HOW MUCH CHOCOLATE DO YOU NEED FOR SHELLS?
This will depend heavily on both the volume of filling you make, and the size of the moulds. The smaller your moulds, the more chocolate you need relative to filling. That might seem backwards, but think about it this way: the smaller your mould is, the smaller the amount of filling that can fit inside, which means you’ll need more shells to use all that filling up (it’s a surface area thing). As a general rule of thumb, you need about 300 grams of chocolate per ‘ice-cube tray’ of moulds.
You can guesstimate the number of moulds you’ll need by comparing the volume of filling you expect your chocolate + cream to make (remembering that whipped ganache will expand) to the volume you expect each mould to take. It’s a good idea to overestimate the amount of shell chocolate you think you’ll need. If you end up with too many shells you can always fill them with other things, like buttercream/cream-cheese frosting, caramel, jam/jelly, peanut butter, citrus curd, wasabi (for prank truffles) or any leftover melted chocolate (which you could also press candy pieces into).
MAKING AND FILLING SHELLS
Okay, now that we’ve covered the theory, let’s make some truffles:
Step 1:
Chill your chocolate moulds (making sure they’re clean and well-dried first). Either put them in the fridge overnight or in the freezer for a few hours. This will give your chocolate shells a head start on setting.
Step 2:
Make your flavoured ganache and set aside. This gives your filling time to cool down while you prepare and chill the shells. If you add a warm filling to your thin chocolate casings, the heat will melt them. (Note: You will need to let your ganache cool to room temperature if you want it to whip properly.).
Step 3:
Melt the chocolate, and temper it if needed. I would recommend using a heat-safe glass or pyrex bowl since those will hold heat for longer and you want to keep your chocolate warm enough to be workable throughout this process.
Step 4:
Make your shell moulds:
Pour your chocolate into your first tray of chilled moulds. Using a spatula or the back of a knife, level the tops until they are flush with the moulds, scraping the excess chocolate back into the bowl for reuse.
Return the filled moulds to the refrigerator for 2-4 minutes to allow the outer layer to cool and harden into a shell – the longer you cool it for, the thicker the truffle shell will be.
Once chilled, invert the moulds back over the bowl to pour out the remaining chocolate ( you can gently tap or shake the tray to help encourage the liquid out).
Scrape the tops flush again, returning the excess to the bowl. Place the shells back in the fridge to harden completely.
Repeat with the next mould-tray, reducing the shell-chilling time each round since your chocolate will be cooler and set faster/thicker.
If you’re starting with lots of chocolate you can do two trays at a time, but since you need to completely fill each mould while the outer layer sets, a lot of the chocolate for the later shells is going to come from the excess poured out of the first moulds. You will not have enough to fill all your moulds at once. The chocolate poured from the last 1-2 moulds will be used to seal the filling inside later.
Step 5:
Add your filling(s). If possible use a piping bag with a narrow tip to give you good control and help avoid spills or overfilling (if you don’t have a piping bag, you can improvise one by reinforcing the corner of a Ziploc bag with some tape and then snipping the tip off). You want to leave at least 3mm (1/9th inch) of headspace between the top of your filling and the top of the mould (this is to fit the chocolate cap). If needed, gently tap or jiggle your mould to even out the filling. For very thick fillings, you can use a toothpick/skewer to spread the filling into any gaps/air pockets. Return your moulds to the fridge for 5-10 minutes to help set the top of the filling.
Step 6:
Seal your truffles. Check that the remaining melted chocolate is still liquid enough to be workable - if it has become too thick, microwave for no more than 10 seconds or briefly place it over a bowl of hot water, just enough to get it loose again. Spoon the chocolate to fill each truffle until it’s flush with the top of the mould – scraping any excess back into the bowl to use again. Here you need to be careful not to agitate the fillings or let them mix with the chocolate, otherwise your caps may not set.
Step 7:
Chill your truffles for at least 2 hours (longer for larger moulds) or ideally overnight until the chocolate and filling have fully set. Once fully set, pop your truffles out of the moulds.
Step 8 (OPTIONAL):
If you like, you can accessorise your truffles by drizzling with extra chocolate (remember to temper if using the real stuff) or topping with whipped cream, extra whipped ganache or other decorations (if you wanted, you could use a small amount of chocolate to stick on sprinkles or sugar flowers) . This is an especially good idea if you’re making truffles with different fillings inside the same type of shell and want to be able to tell them apart.
The ones in the picture
For the chilli-truffles in the picture, I infused three chopped fresh red chillies (with seeds) by boiling in approximately 200mL of pure cream, then strained and combined it with 225g each of White and Milk Chocolate to make slightly more than 2 cups of runny ganache. (You can absolutely use darker chocolates to make the ganache but be aware that darker chocolates have a stronger cocoa taste that can drown out/ mask more delicate flavours. Pick the sweetness/darkness of chocolate that plays well with the profile of your chosen flavour.) Since the ganache was runny, I let it cool and whipped it to semi-stiff peaks. For these truffle shells and caps I used 900g of tempered dark chocolate, set in my supermarket’s home-brand heart moulds:

This recipe made 24 (with some of the ganache reserved for decorating the tops) plus some extra chocolate shells which I filled with peanut butter.
Have fun with it!
The reason I wrote this post the way I did is that I don’t really stick to a precise recipe when making this kind of truffle anymore. Once you have the basics down, feel free to play around. Try out other combinations of chocolates and flavours, different moulds and different fillings.
Here are some variants I’ve personally made:
Salted White Chocolate shell + Rosemary White-Chocolate Ganache Filling
Dark Chocolate shell + Orange Curd filling
Dark Chocolate shell + Peanut Butter filling
Dark Chocolate shell + Habanero White Chocolate filling
You could also look at this playlist of chocolate videos if you want some extra inspiration.
Have fun experimenting!
#chocolate#chocolate making#chocolate truffles#recipe#I want to make lavender infused ones one day (when my big spice kit is no longer sealed in storage)#chilli chocolate#chili chocolate#food science#3WD cooks
8 notes
·
View notes
Photo

Have a Long-Term Water Storage Plan for Emergencies:
Water is earth's most valuable resource. It is the essential element to survival. All living things need it to survive. But in the near future, there may not be enough to sustain life on our planet.
AMOUNT TO STORE:
Storing and knowing how to gather and decontaminate water is necessary in every emergency plan and emergency supplies kit.
It is said that the average person can survive only three (3) days without water. Following a disaster, clean drinking water may not be available. Regular water sources could be cut-off or compromised through contamination. If evacuating, water sources will take on many undesireable and contaminated forms. Building a supply of water is only the beginning of preparing for an emergency. After the initial supply is gone, knowing how to collect and decontaminate subsequent supplies is crucial. The search for potable (drinkable) water sources should always be a major priority.
Considering the amount of water a person uses in one day under normal conditions, it's no wonder that water storage should be a priority for emergency situations. Calculate minimum water storage amounts to be 1 gallon of water [drinking (32 ounces) and sanitation] per day per person for a minimum of 3 days. More is better. Children, nursing mothers and sick people may need more water. Water use may increase for a medical emergency and warm weather climates and can double in very hot temperatures. Additional water must be considered in emergency water storage plans for Pets and to re-hydrate dehydrated foods. A mimimum of 32 ounces of drinking water per day, per person, should be calculated in the water storage plan.
If the local water supply or well is contaminated, turn off the water supply to the residence/business.
COLLECTION / SOURCES:
When a working faucet is not available, consider these options. Filtering and Purification methods should always be applied.
Replenishable Water Sources should always be sought after
Residence / Office: Hot Water Heater, Toilet, Ice Trays, Bath Tub, Hot Tub, Dehumidifier, Sink, Garden Hose. At the very first alert of a serious Emergency, fill all of these water reservoirs then turn off the public water supply to prevent internal water storage contamination from the outside. Try to prevent contamination of water sources but ALWAYS treat and filter water before use.
Community: swimming pools, exterior spigots on houses and office buildings (get a Sillcock Key), water drainage systems, pot holes.
Undrinkable: While not the ideal solution for drinking water, in a crisis situation, nearly any water can be distilled and filtered to make drinkable (potable) water, even Urine and Salt Water. Read about Uses for Urine.
Nature: Ocean, lakes, ponds, streams, puddles, some plant leaves, vines, Solar Still, Plant Transpiration Bag, Rain Catching, Fog Catching, Morning Dew Collection from surfaces by soaking up with rags.
PURIFYING:
Generally, any type of water can be made drinkable (Potable) with the correct method to filter and purify it.
Read Methods to Purify Water
STORAGE METHODS:
Commercially bottled water is the safest and most reliable emergency water supply
Keep bottled water in its original container and do not open until you need to use it
Observe the expiration or "use by" date (about 18 months shelf life)
Personal water containers require special considerations
Do not use glass containers because they can break and are heavy
Use food grade water storage containers from surplus or camping supplies stores
If reusing commercial drink containers
Use 2-liter plastic soft drink bottles – not plastic jugs or cardboard containers
Do Not Use containers that have had milk or fruit juice in them
Before use, thoroughly clean containers with dishwashing soap & water & rinse completely
Sanitize: add a solution of 1 teaspoon of non-scented liquid household bleach to a quart of water
Swish sanitizing solution in the container so that it touches all surfaces
After sanitizing, thoroughly rinse out the sanitizing solution with clean water
Fill container to the top with regular tap water*
Label the container with a 6-month "use by" date and Replace the water every six (6) months
Store all water in a cool, dark place
Reusing Water: Consider water as a very valuable resource. Don't waste the drinking water, that has expired, by dumping it down the drain. Just because it should not be used for internal consumption, reuse it for washing the body, clothes or dishes, flushing the toilet, watering the garden, filling the car radiator or anything else that uses water. Always think about alternate uses for anything you are about to throw away.
[Author's Reference Link]
Related Resources:
Make Fresh Water from SeaWater
[11-Cs Basic Emergency Kit]
[14-Point Emergency Preps Checklist]
[Immediate Steps to Take When Disaster Strikes]
[Learn to be More Self-Sufficient]
[The Ultimate Preparation]
[P4T Main Menu]
This blog is partially funded by Affiliate Program Links and Private Donations. Thank you for your support.
#waterEmergencyStorage#water#prepper#survival#shtf#prepare4tomorrow#waterStorage#emergencyWater#emergency water storage#prepping#prepared#survivalist#survivalism#camping#hiking#water storage
1 note
·
View note
Text
Marketing through Packaging: The Impact of Design on Consumer Choices
1.What kind of plastic is used for packaging?
Various types of plastics are utilized in packaging, each selected for its unique properties and suitability for specific applications. Among these, Polyethylene (PE) stands out as the most used plastic, prized for its remarkable flexibility and excellent moisture resistance. This versatility makes it an ideal material for a wide range of applications, including shopping bags, food wraps, and protective films. Its ability to be produced in various densities, such as low-density polyethylene (LDPE) and high-density polyethylene (HDPE), allows manufacturers to tailor its properties for specific needs. For instance, LDPE is typically used for thinner, more flexible products, while HDPE is known for its strength and is often used in more robust packaging solutions such as milk jugs and detergent bottles.
In contrast, Polypropylene (PP) is favoured for its greater rigidity and higher heat resistance, making it particularly suitable for applications such as containers, automotive parts, and food packaging that requires sterilization. Polyethylene Terephthalate (PET) has gained immense popularity, especially in the beverage industry, due to its remarkable strength, transparency, and recyclability, allowing for a circular economy in bottle usage. Meanwhile, Polystyrene (PS) is commonly used for disposable items such as cutlery, plates, and food containers, valued for its lightweight nature and ease of production. Polyvinyl Chloride (PVC) is often found in cling films and other flexible packaging due to its excellent barrier properties. However, the choice of plastic not only influences the functionality and durability of the packaging but also raises important considerations regarding environmental sustainability. As awareness of plastic pollution grows, the industry is increasingly tasked with finding solutions that balance performance with eco-friendly practices, leading to innovations in bioplastics and enhanced recycling methods.
2. What is the purpose of packaging design?
Packaging design serves a multifaceted purpose that extends well beyond mere aesthetics. At its core, the primary function of packaging is to safeguard the product during transportation and storage, ensuring that it arrives at the consumer in optimal condition. This protective layer is essential in preventing damage from external elements, which can include anything from physical shocks to environmental factors like moisture and temperature fluctuations. However, effective packaging does not stop at protection; it also plays a crucial role in enhancing brand identity. In a competitive market laden with alternatives, well-designed packaging helps differentiate products, making them more recognizable and memorable to consumers. This differentiation fosters brand loyalty, as consumers are more likely to repurchase products that they find visually appealing and aligned with their personal values and preferences.
Moreover, effective packaging design serves as a vital communication tool that conveys essential information to the consumer. It informs users about usage instructions, nutritional content, and other pertinent details that aid in their purchasing decision. In this context, packaging can evoke emotions, tapping into consumers' values and aspirations, which can significantly influence their buying behaviour. As environmental concerns become increasingly prominent, sustainable packaging solutions have emerged as a critical component of modern design strategies. Consumers are now more aware of the ecological impact of their purchases, and they often prefer brands that prioritize sustainability in their packaging choices. Ultimately, successful packaging design seamlessly integrates functionality, branding, and sustainability, creating a compelling first impression that not only attracts consumers but also fosters long-term loyalty and satisfaction.
3. How is PVC used in packaging?
Polyvinyl chloride (PVC) has established itself as a predominant choice in the packaging industry, primarily due to its exceptional versatility and durability. This synthetic polymer is adept at serving a multitude of packaging needs, including the production of rigid containers, blister packs, and flexible film wraps. One of the key attributes of PVC is its ability to offer robust protection against various external factors, such as moisture, chemicals, and physical damage, ensuring the integrity of the products contained within. Moreover, the inherent transparency of PVC allows consumers to visually assess the product without compromising packaging quality, thereby enhancing consumer appeal. The lightweight nature of PVC not only facilitates easier handling and storage but also contributes to reduced transportation costs, ultimately leading to a lower overall environmental impact associated with logistics.
Despite the numerous advantages that PVC offers, growing sustainability concerns have prompted the packaging industry to reevaluate its reliance on traditional materials. As a response, there is a concerted effort to explore innovative recycling options and sustainable alternatives that can mitigate the environmental footprint associated with PVC usage. Efforts are underway to develop eco-friendly packaging solutions that harness the beneficial properties of PVC while addressing the material's ecological implications. This dual approach not only fosters advancements in sustainable practices but also highlights the potential for PVC to adapt and evolve in a market increasingly driven by environmental consciousness. By leveraging its inherent advantages while embracing responsible manufacturing processes, the packaging industry can continue to rely on PVC as a valuable material while contributing positively to global sustainability goals.
4. What is packaging design in business?
Packaging design in business is a multifaceted discipline that encompasses the strategic creation and development of product packaging to fulfill various essential functions. At its core, packaging serves as a protective barrier for products, ensuring they remain intact during transportation and storage. However, it extends far beyond mere protection. Effective packaging design involves a meticulous selection of materials, shapes, colors, and graphics that work together to form a cohesive visual identity. This identity must resonate with the target consumer demographic, creating an immediate connection that can influence their purchasing behavior. By carefully considering these elements, businesses can craft packaging that not only safeguards the product but also captivates the consumer's eye on store shelves or online platforms.
Moreover, effective packaging design plays a crucial role in the broader context of marketing strategy. It serves as a powerful communication tool, conveying essential information about a product’s features, benefits, and usage instructions. Thoughtful packaging can enhance shelf appeal, making products stand out in a crowded marketplace, while also fostering brand loyalty through consistent and recognizable design elements. By aligning packaging with overall marketing strategies, businesses can effectively differentiate their offerings from competitors, thereby driving sales and increasing market share. In today's consumer-driven environment, where first impressions count, a well-executed packaging design is not merely an accessory; it is a fundamental component of successful product marketing that can significantly influence a brand's trajectory in the marketplace.
5. What is a packaging business?
A packaging business is a vital player in the supply chain, specializing in the design, production, and distribution of packaging materials and solutions tailored to protect and promote a wide array of products. This industry encompasses a diverse range of materials, including cardboard, plastic, glass, and metal, each selected based on the specific needs of various sectors such as food and beverage, pharmaceuticals, and consumer goods. Companies within this sector prioritize the development of innovative, sustainable, and cost-effective packaging solutions that not only enhance product visibility but also ensure safety during transportation and storage. By adhering to regulatory standards and industry best practices, packaging businesses help minimize risks associated with product damage, spoilage, and contamination, thereby adding significant value to the overall supply chain.
Furthermore, packaging serves as a critical component of branding and marketing strategies for businesses. Packaging companies work closely with their clients to create customized packaging options that reflect the company’s identity, values, and market positioning. This bespoke approach not only contributes to aesthetic appeal but also enhances consumer experience by making products more accessible and engaging. Effective packaging design can significantly influence consumer perception and purchasing decisions, fostering brand loyalty and satisfaction. In today’s competitive marketplace, where sustainability and eco-friendliness are increasingly prioritized, packaging businesses are also committed to developing environmentally responsible solutions that reduce waste and promote recycling, ensuring that they meet the evolving expectations of consumers and regulatory bodies alike.
0 notes
Text
Saffron Machinery is a leading dairy plant and equipment manufacturer in India, specializing in milk processing plant solutions. Our extensive range includes dairy machinery, milk storage tanks, juice processing plants, and industrial chillers, all designed to meet the highest industry standards. Based in Ahmedabad, Gujarat, we are committed to delivering reliable and efficient products that enhance productivity and profitability. Our mission focuses on optimizing resources while promoting self-employment in rural India, thereby improving living standards. Additionally, we provide industrial erection services, ensuring comprehensive support for our clients in the dairy and food processing sectors.
1 note
·
View note
Text
Shilajit and Weight Loss: A Natural Solution for Shedding Pounds
Shilajit, a natural resin that oozes from the cracks of rocks in the Himalayan mountains, has been used for centuries in traditional medicine for its potent healing properties. In recent years, Shilajit and weight loss connection with it has surged in popularity in modern wellness circles, particularly in relation to weight loss. But how exactly does Shilajit contribute to shedding pounds, and why is it becoming a go-to supplement for those looking to lose weight naturally?
What is Shilajit?
Shilajit is a mineral-rich substance that forms over centuries through the decomposition of plant material. Packed with essential nutrients like fulvic acid, humic acid, and more than 80 trace minerals, Shilajit is celebrated for its ability to boost energy, enhance physical performance, and improve overall well-being. Its unique composition not only supports bodily functions but also has a profound impact on metabolism, which is key to weight loss.
How Shilajit Aids Weight Loss
When it comes to weight loss, Shilajit can be a game-changer. Here’s how it works:
Boosts Metabolism
One of the primary ways Shilajit supports weight loss is by improving metabolic function. A faster metabolism means your body can burn calories more efficiently, even at rest. The fulvic acid present in Shilajit helps transport nutrients directly into cells, optimizing energy production and increasing fat-burning potential.
Enhances Energy Levels
Fatigue and low energy are common barriers to weight loss. People often struggle to stick to workout routines or maintain a healthy lifestyle due to a lack of energy. Shilajit combats this by enhancing mitochondrial function, which is crucial for energy production. More energy means you’re more likely to stay active, burn calories, and lose weight.
Reduces Inflammation
Chronic inflammation can hinder weight loss by disrupting hormonal balance and increasing fat storage. Shilajit is known for its anti-inflammatory properties, helping the body reduce inflammation, which in turn supports better metabolic function and aids weight loss.
Regulates Appetite
Shilajit may also help regulate appetite by balancing hormones like ghrelin and leptin, which are responsible for hunger and satiety. By controlling these hormones, Shilajit can prevent overeating and help maintain a calorie deficit, which is essential for losing weight.

Other Benefits of Shilajit for Overall Health
In addition to supporting weight loss, Shilajit offers numerous other health benefits:
Improves Digestion: By enhancing nutrient absorption, Shilajit supports a healthy digestive system, which is important for weight management.
Detoxifies the Body: Shilajit helps flush out toxins from the body, aiding in better overall health and wellness.
Supports Hormonal Balance: Hormonal imbalances can lead to weight gain. Shilajit helps regulate hormones, improving both mood and physical well-being.
How to Use Shilajit for Weight Loss
Shilajit is typically available in resin or powder form. For best results, it’s recommended to take a small amount of Shilajit daily—usually a pea-sized amount of the resin or a recommended dosage of the powder, mixed with water or milk. Consistent use over time, combined with a balanced diet and regular exercise, can help optimize the benefits of Shilajit for weight loss.
However, it’s essential to consult with a healthcare professional before adding any new supplement to your routine, especially if you have underlying health conditions or are pregnant or breastfeeding.
Conclusion
Shilajit and weight loss are a natural combination that many people are turning to in their journey toward better health. Its ability to boost metabolism, enhance energy levels, reduce inflammation, and regulate appetite makes it a powerful ally in weight management. Combined with a healthy lifestyle, Shilajit can support sustainable, long-term weight loss while offering numerous additional health benefits. If you’re looking for a natural way to aid your weight loss efforts, Shilajit might be the solution you’ve been searching for.

0 notes
Text
The GBBO remark on the nanowrimo post has reminded me that I, who cannot bake, won a bake-off (against like 8 people who made their desserts from scratch) with a practically pre-made pie.
The bake-off was part of a fundraiser with a non-monetary prize (bragging rights and a piece of paper), and I was part of the organizing committee; our only rule was that you couldn't buy a finished dessert, so you couldn't go to the deli section of a grocery store, get a $17 cheese cake and call it good. We hadn't had good turn out at prior fundraisers, so we were hoping the promise of sugary delights would help. We were also worried that no one would sign up to compete and/or we just would not have enough competitors (we only had 2 sign-ups at the time and the competition was in 3 days); the solution decided on was that some members of the committee would compete, so we would have a) desserts for people to eat and b) an actual competition for people to be excited about.
Again, I can't bake; I don't have any family recipes for desserts, and, when I bake, stuff turns into inedible bricks. So, I bought a pre-made chocolate graham cracker pie crust, an instant jello chocolate pudding packet, and a box of graham crackers; none of this is against the rules, but this is the least baking, least time consuming, cheapest method of getting a dessert. I didn't have to do anything with the pie crust. I made the pudding, but that is just pour milk and powder in bowl, stir for 5 minutes, pour in crust, put in fridge and watch tv for 3 hours. I crushed graham crackers and just sprinkled them over the top. The process takes like 10 mins work and costs like $7 max.
I'm talking with @captaindibbzy like "I'm going to win :D" [Apollo will remember this]
Day of the cook-off, I set-up the room for the fundraiser, get all the other competitors into place, go fetch my pie from the fridge in the last 5 mins; I am the last one in the circuit around the room, but people aren't following the circuit anyways and are hopping from table to table. I'm competing against people that clearly like to bake, including grandmothers. There's cakes with drizzle, decorative pies, fun-shaped cookies, snicker-doodle looking things from out of a home-making magazine next to my $7 mostly pre-made pie.
We have a pretty good turn out and get a few donations; this is basically a success/win, and my pie is almost entirely gone so I don't have to worry about storage or food poisoning my co-workers.
The ballots are collected and tallied; I did not vote for myself because chocolate drizzle cake is delicious (and it's not in the spirit of competition to vote for yourself). The ballots are tallied, tallied again and then tallied again. The other organizers are looking at me from across the room.
I won by getting like 50% of the votes. No one was mean or even rude about it, but it was the greatest upset in the history of upsets. I don't know if people looked at me and were like "this is the youngest person here/the underdog/they did their best on a tight budget clearly" and voted with empathy or if the other desserts looked nice but tasted bad (I only had the cake, and I would have given it to the cake), but I won.
#Kraken's log#Story time with Kraken#thinking about it I've won like 3 competitions despite being the least skilled person entered
0 notes
Text
How To Carry Absolutely Anything On a Motorcycle
From bungees and milk crates to color-matched luggage, a world of cargo carrying capacity awaits.
When you’re driving a car, your storage capacity is probably the farthest from your mind. From a backpack to a briefcase to a couple of kids and/or the family pet, you probably just pack everything and everyone who’s coming along into your vehicle and go—zero thoughts required. That might change if you need to transport something large, like a couch or a massive flat-screen TV—but everyday cargo probably doesn’t even make you blink.
The thing about motorcycles is, you can carry a lot of the same things if you plan appropriately. It might take a little more thought and investment in storage solutions to transport all necessary items, but it can be done—well, within reason. (You’re still going to have difficulty transporting a big couch, though you might be able to strap a TV with enough bungees and ratchet straps, as well as the right attitude.)
Read More :- https://bodaboda360.com/blog/2024/02/12/how-to-carry-absolutely-anything-on-amotorcycle/
0 notes
Text
Introduction to MHW-3BOMBER: A Leader in Specialty Coffee Wares
Since its inception, MHW-3BOMBER has dedicated itself to developing high-quality specialty coffee wares that meet the growing demands of coffee enthusiasts around the world. By combining innovative design with a deep understanding of coffee culture, MHW-3BOMBER has redefined how people experience their coffee. The company’s unique approach to product design and manufacturing has helped establish its reputation as a global leader in the specialty coffee industry, with successful sales in over 60 countries.
Revolutionizing Coffee Aesthetics with Innovative Designs
MHW-3BOMBER’s focus on innovation is central to its success. The brand is known for developing products that are not only functional but also visually appealing. With a special emphasis on coffee aesthetics, MHW-3BOMBER incorporates modern design elements into traditional coffee-making tools, giving users a new perspective on brewing coffee. From the silver spot finish on the Turbo Milk Pitcher to the ergonomic handles on their tamper products, MHW-3BOMBER’s design philosophy revolves around enhancing both form and function.
Integrated Coffee Maker with Grinder: A Comprehensive Brewing Solution
Among MHW-3BOMBER's impressive product lineup, the coffee maker with grinder stands out as a comprehensive brewing solution for coffee lovers who value both convenience and quality. This all-in-one system allows users to grind fresh coffee beans and brew their coffee in one seamless process. The precision grinder ensures that the beans are ground to perfection, which significantly enhances the flavor and aroma of the final brew. This product is ideal for both novices and experts, providing a streamlined experience that preserves the richness of freshly ground coffee.
The Best Cold Brew Coffee Maker: A Staple for Coffee Enthusiasts
For cold brew lovers, MHW-3BOMBER offers a range of cold brew makers designed to extract the subtle flavors of coffee with a slow, cold steeping process. As one of the best cold brew coffee makers available, MHW-3BOMBER’s cold brew maker delivers a smooth, low-acid coffee that can be enjoyed straight or used as a base for various coffee drinks. Its design emphasizes ease of use while ensuring consistent results, making it a must-have for coffee enthusiasts looking for a refreshing cold brew experience.
The Best Drip Coffee Maker: Precision and Consistency
In the realm of drip coffee, precision and consistency are key. MHW-3BOMBER’s best drip coffee maker is engineered to deliver both. With a focus on temperature control and even water distribution, this coffee maker ensures that every cup is brewed to perfection. The innovative design features and advanced brewing technology allow users to extract the full flavor profile of their coffee, making it a top choice for those who enjoy a well-balanced cup of drip coffee.
Grinder Tool: The Backbone of Great Coffee Brewing
At the heart of every great cup of coffee is a high-quality grinder. MHW-3BOMBER’s grinder tools are crafted with precision to ensure uniform grind size, which is essential for optimal extraction. Whether you are brewing espresso or drip coffee, the consistency in grind size provided by MHW-3BOMBER’s grinders plays a pivotal role in enhancing the coffee’s taste. Designed with durability and efficiency in mind, these grinders are a testament to the brand’s commitment to quality craftsmanship.
MHW-3BOMBER’s Cold Brew Maker: A Modern Take on a Classic Process
The cold brew maker from MHW-3BOMBER exemplifies the brand’s innovative approach to coffee brewing. With a sleek design and user-friendly features, this cold brew maker allows for easy brewing and storage. Made from premium materials, it ensures durability while delivering excellent cold brew coffee. The focus on design not only ensures optimal extraction but also elevates the aesthetic appeal of the product, making it a centerpiece in any kitchen.
Conclusion: Pioneering the Future of Specialty Coffee
MHW-3BOMBER has made significant strides in the global coffee industry by continuously pushing the boundaries of what specialty coffee wares can achieve. From its innovative designs to its focus on product functionality, the company has successfully merged art and science to enhance the coffee brewing experience. With a robust presence in over 60 countries and a commitment to quality, MHW-3BOMBER is poised to continue leading the specialty coffee market for years to come. Through its dedication to craftsmanship and aesthetic innovation, MHW-3BOMBER is not just producing coffee tools—it is shaping the future of coffee culture.
0 notes
Text
Why Every Cafe Needs a Reliable Under Counter Chiller
In the competitive world of café management, where customer satisfaction and operational efficiency are paramount, investing in the right equipment can make all the difference. One such essential piece of equipment that often goes unnoticed but plays a crucial role in daily operations is the under counter chiller. In this blog, we’ll explore why every café needs a reliable under counter chiller and how it contributes to both the operational efficiency and customer satisfaction of your establishment.
1. Space Efficiency and Convenience
One of the most significant advantages of an under counter chiller is its space-saving design. Cafés often have limited space, especially in the kitchen area where every inch counts. An under counter fridge fits neatly beneath counters, allowing you to maximize the use of your kitchen space without compromising on storage. This design not only helps in keeping the kitchen organized but also provides easy access to refrigerated items, making the workflow more efficient.
2. Optimal Storage for Ingredients
In a busy café environment, fresh ingredients are key to serving high-quality food and beverages. An under counter chiller provides a dedicated and easily accessible space for storing perishable items such as milk, cream, and other essentials needed for coffee and pastries. With its adjustable shelves and temperature controls, an under counter fridge ensures that ingredients are kept at the optimal temperature, preserving their freshness and extending their shelf life. This aspect of Commercial Refrigeration is vital for maintaining the quality of your offerings and reducing waste.
3. Improved Workflow and Efficiency
Efficiency in a café kitchen is crucial for maintaining a smooth operation. The strategic placement of an under counter chiller enhances workflow by allowing staff to store and retrieve items quickly without needing to reach for items in a larger, less accessible fridge. This reduction in movement not only speeds up service but also minimizes the risk of cross-contamination by keeping frequently used items within reach. In essence, the under counter chiller contributes to a more organized and faster-paced kitchen environment.
4. Aesthetic Appeal and Professionalism
A well-maintained and aesthetically pleasing kitchen reflects professionalism and attention to detail. An under counter fridge contributes to this by blending seamlessly with the rest of the kitchen equipment. Its sleek and compact design ensures that it does not disrupt the visual harmony of the café’s kitchen while providing an efficient refrigeration solution. Investing in a high-quality Commercial Refrigeration system such as an under counter chiller enhances the overall appearance and professionalism of your establishment.
5. Energy Efficiency and Cost Savings
Modern under counter chillers are designed with energy efficiency in mind. These units typically consume less energy compared to larger refrigerators, which can lead to significant cost savings on your electricity bills. By choosing an energy-efficient model, you not only reduce your environmental footprint but also benefit from lower operational costs. This is an important consideration for any café looking to manage expenses while maintaining high standards of service.
Conclusion
In conclusion, a reliable under counter chiller is a vital component of any successful café operation. It offers space efficiency, optimal ingredient storage, improved workflow, and aesthetic appeal, all while being cost-effective and energy-efficient. Investing in this essential piece of Commercial Refrigeration equipment ensures that your café can provide high-quality service while maintaining a well-organized and efficient kitchen. As part of your overall strategy for outfitting your café, an under counter fridge should be considered a key element in your suite of commercial kitchen equipment.
0 notes
Last Seen Blogs

tindsy
Tindsy Larry

charm-u-laterarchive
#1 Raven Queen Fan

karjin01
Sin título

lepettitprince
@hateandwar

myfamily-universe-blog
Untitled