#PHP comment examples
Explore tagged Tumblr posts
Visit Tumblr Blog
Explore Tumblr blogs with no restrictions, modern design and the best experience.
Last Seen Tumblr Blogs


Fun Fact
In 2020, 44% of users from Denmark used Tumblr daily.
Text
PHP Comments : Types, Syntax, Examples & Best Practices
Learn everything about PHP comments including single-line, multi-line, and PHPDoc comments. Explore syntax, real-world examples, best practices, and FAQs to write better PHP code. Understanding PHP Comments: A Complete Guide Comments are an essential part of any programming language, and PHP is no exception. They are used to describe what a specific block of code does, which is extremely…
#comments in PHP#how to comment in PHP#PHP comment best practices#PHP comment examples#PHP comment syntax#PHP comments#PHP documentation comments#PHP multi-line comment#PHP single-line comment#PHPDoc comment
0 notes
Note
komaedas have you tried straw.page?
(i hope you don't mind if i make a big ollllle webdev post off this!)
i have never tried straw.page but it looks similar to carrd and other WYSIWYG editors (which is unappealing to me, since i know html/css/js and want full control of the code. and can't hide secrets in code comments.....)
my 2 cents as a web designer is if you're looking to learn web design or host long-term web projects, WYSIWYG editors suck doodooass. you don't learn the basics of coding, someone else does it for you! however, if you're just looking to quickly host images, links to your other social medias, write text entries/blogposts, WYSIWYG can be nice.
toyhouse, tumblr, deviantart, a lot of sites implement WYSIWYG for their post editors as well, but then you can run into issues relying on their main site features for things like the search system, user profiles, comments, etc. but it can be nice to just login to your account and host your information in one place, especially on a platform that's geared towards that specific type of information. (toyhouse is a better example of this, since you have a lot of control of how your profile/character pages look, even without a premium account) carrd can be nice if you just want to say "here's where to find me on other sites," for example. but sometimes you want a full website!
---------------------------------------
neocities hosting
currently, i host my website on neocities, but i would say the web2.0sphere has sucked some doodooass right now and i'm fiending for something better than it. it's a static web host, e.g. you can upload text, image, audio, and client-side (mostly javascript and css) files, and html pages. for the past few years, neocities' servers have gotten slower and slower and had total blackouts with no notices about why it's happening... and i'm realizing they host a lot of crypto sites that have crypto miners that eat up a ton of server resources. i don't think they're doing anything to limit bot or crypto mining activity and regular users are taking a hit.


↑ page 1 on neocitie's most viewed sites we find this site. this site has a crypto miner on it, just so i'm not making up claims without proof here. there is also a very populated #crypto tag on neocities (has porn in it tho so be warned...).
---------------------------------------
dynamic/server-side web hosting
$5/mo for neocities premium seems cheap until you realize... The Beautiful World of Server-side Web Hosting!
client-side AKA static web hosting (neocities, geocities) means you can upload images, audio, video, and other files that do not interact with the server where the website is hosted, like html, css, and javascript. the user reading your webpage does not send any information to the server like a username, password, their favourite colour, etc. - any variables handled by scripts like javascript will be forgotten when the page is reloaded, since there's no way to save it to the web server. server-side AKA dynamic web hosting can utilize any script like php, ruby, python, or perl, and has an SQL database to store variables like the aforementioned that would have previously had nowhere to be stored.
there are many places in 2024 you can host a website for free, including: infinityfree (i use this for my test websites :B has tons of subdomains to choose from) [unlimited sites, 5gb/unlimited storage], googiehost [1 site, 1gb/1mb storage], freehostia [5 sites/1 database, 250mb storage], freehosting [1 site, 10gb/unlimited storage]
if you want more features like extra websites, more storage, a dedicated e-mail, PHP configuration, etc, you can look into paying a lil shmoney for web hosting: there's hostinger (this is my promocode so i get. shmoney. if you. um. ����🗿🗿) [$2.40-3.99+/mo, 100 sites/300 databases, 100gb storage, 25k visits/mo], a2hosting [$1.75-12.99+/mo, 1 site/5 databases, 10gb/1gb storage], and cloudways [$10-11+/mo, 25gb/1gb]. i'm seeing people say to stay away from godaddy and hostgator. before you purchase a plan, look up coupons, too! (i usually renew my plan ahead of time when hostinger runs good sales/coupons LOL)
here's a big webhost comparison chart from r/HostingHostel circa jan 2024.

---------------------------------------
domain names
most of the free website hosts will give you a subdomain like yoursite.has-a-cool-website-69.org, and usually paid hosts expect you to bring your own domain name. i got my domain on namecheap (enticing registration prices, mid renewal prices), there's also porkbun, cloudflare, namesilo, and amazon route 53. don't use godaddy or squarespace. make sure you double check the promo price vs. the actual renewal price and don't get charged $120/mo when you thought it was $4/mo during a promo, certain TLDs (endings like .com, .org, .cool, etc) cost more and have a base price (.car costs $2,300?!?). look up coupons before you purchase these as well!
namecheap and porkbun offer something called "handshake domains," DO NOT BUY THESE. 🤣🤣🤣 they're usually cheaper and offer more appealing, hyper-specific endings like .iloveu, .8888, .catgirl, .dookie, .gethigh, .♥, .❣, and .✟. I WISH WE COULD HAVE THEM but they're literally unusable. in order to access a page using a handshake domain, you need to download a handshake resolver. every time the user connects to the site, they have to provide proof of work. aside from it being incredibly wasteful, you LITERALLY cannot just type in the URL and go to your own website, you need to download a handshake resolver, meaning everyday internet users cannot access your site.
---------------------------------------
hosting a static site on a dynamic webhost
you can host a static (html/css/js only) website on a dynamic web server without having to learn PHP and SQL! if you're coming from somewhere like neocities, the only thing you need to do is configure your website's properties. your hosting service will probably have tutorials to follow for this, and possibly already did some steps for you. you need to point the nameserver to your domain, install an SSL certificate, and connect to your site using FTP for future uploads. FTP is a faster, alternative way to upload files to your website instead of your webhost's file upload system; programs like WinSCP or FileZilla can upload using FTP for you.
if you wanna learn PHP and SQL and really get into webdev, i wrote a forum post at Mysidia Adoptables here, tho it's sorted geared at the mysidia script library itself (Mysidia Adoptables is a free virtual pet site script, tiny community. go check it out!)
---------------------------------------
file storage & backups
a problem i have run into a lot in my past like, 20 years of internet usage (/OLD) is that a site that is free, has a small community, and maybe sounds too good/cheap to be true, has a higher chance of going under. sometimes this happens to bigger sites like tinypic, photobucket, and imageshack, but for every site like that, there's like a million of baby sites that died with people's files. host your files/websites on a well-known site, or at least back it up and expect it to go under!
i used to host my images on something called "imgjoe" during the tinypic/imageshack era, it lasted about 3 years, and i lost everything hosted on there. more recently, komaedalovemail had its webpages hosted here on tumblr, and tumblr changed its UI so custom pages don't allow javascript, which prevented any new pages from being edited/added. another test site i made a couple years ago on hostinger's site called 000webhost went under/became a part of hostinger's paid-only plans, so i had to look very quickly for a new host or i'd lose my test site.
if you're broke like me, looking into physical file storage can be expensive. anything related to computers has gone through baaaaad inflation due to crypto, which again, I Freaquing Hate, and is killing mother nature. STOP MINING CRYPTO this is gonna be you in 1 year

...um i digress. ANYWAYS, you can archive your websites, which'll save your static assets on The Internet Archive (which could use your lovely donations right now btw), and/or archive.today (also taking donations). having a webhost service with lots of storage and automatic backups can be nice if you're worried about file loss or corruption, or just don't have enough storage on your computer at home!
if you're buying physical storage, be it hard drive, solid state drive, USB stick, whatever... get an actual brand like Western Digital or Seagate and don't fall for those cheap ones on Amazon that claim to have 8,000GB for $40 or you're going to spend 13 days in windows command prompt trying to repair the disk and thenthe power is gong to go out in your shit ass neighvborhood and you have to run it tagain and then Windows 10 tryes to update and itresets the /chkdsk agin while you're awayfrom town nad you're goig to start crytypting and kts just hnot going tot br the same aever agai nikt jus not ggiog to be the saeme
---------------------------------------
further webhosting options
there are other Advanced options when it comes to web hosting. for example, you can physically own and run your own webserver, e.g. with a computer or a raspberry pi. r/selfhosted might be a good place if you're looking into that!
if you know or are learning PHP, SQL, and other server-side languages, you can host a webserver on your computer using something like XAMPP (Apache, MariaDB, PHP, & Perl) with minimal storage space (the latest version takes up a little under 1gb on my computer rn). then, you can test your website without needing an internet connection or worrying about finding a hosting plan that can support your project until you've set everything up!
there's also many PHP frameworks which can be useful for beginners and wizards of the web alike. WordPress is one which you're no doubt familiar with for creating blog posts, and Bluehost is a decent hosting service tailored to WordPress specifically. there's full frameworks like Laravel, CakePHP, and Slim, which will usually handle security, user authentication, web routing, and database interactions that you can build off of. Laravel in particular is noob-friendly imo, and is used by a large populace, and it has many tutorials, example sites built with it, and specific app frameworks.
---------------------------------------
addendum: storing sensitive data
if you decide to host a server-side website, you'll most likely have a login/out functionality (user authentication), and have to store things like usernames, passwords, and e-mails. PLEASE don't launch your website until you're sure your site security is up to snuff!
when trying to check if your data is hackable... It's time to get into the Mind of a Hacker. OWASP has some good cheat sheets that list some of the bigger security concerns and how to mitigate them as a site owner, and you can look up filtered security issues on the Exploit Database.
this is kind of its own topic if you're coding a PHP website from scratch; most frameworks securely store sensitive data for you already. if you're writing your own PHP framework, refer to php.net's security articles and this guide on writing an .htaccess file.
---------------------------------------
but. i be on that phone... :(
ok one thing i see about straw.page that seems nice is that it advertises the ability to make webpages from your phone. WYSIWYG editors in general are more capable of this. i only started looking into this yesterday, but there ARE source code editor apps for mobile devices! if you have a webhosting plan, you can download/upload assets/code from your phone and whatnot and code on the go. i downloaded Runecode for iphone. it might suck ass to keep typing those brackets.... we'll see..... but sometimes you're stuck in the car and you're like damn i wanna code my site GRRRR I WANNA CODE MY SITE!!!
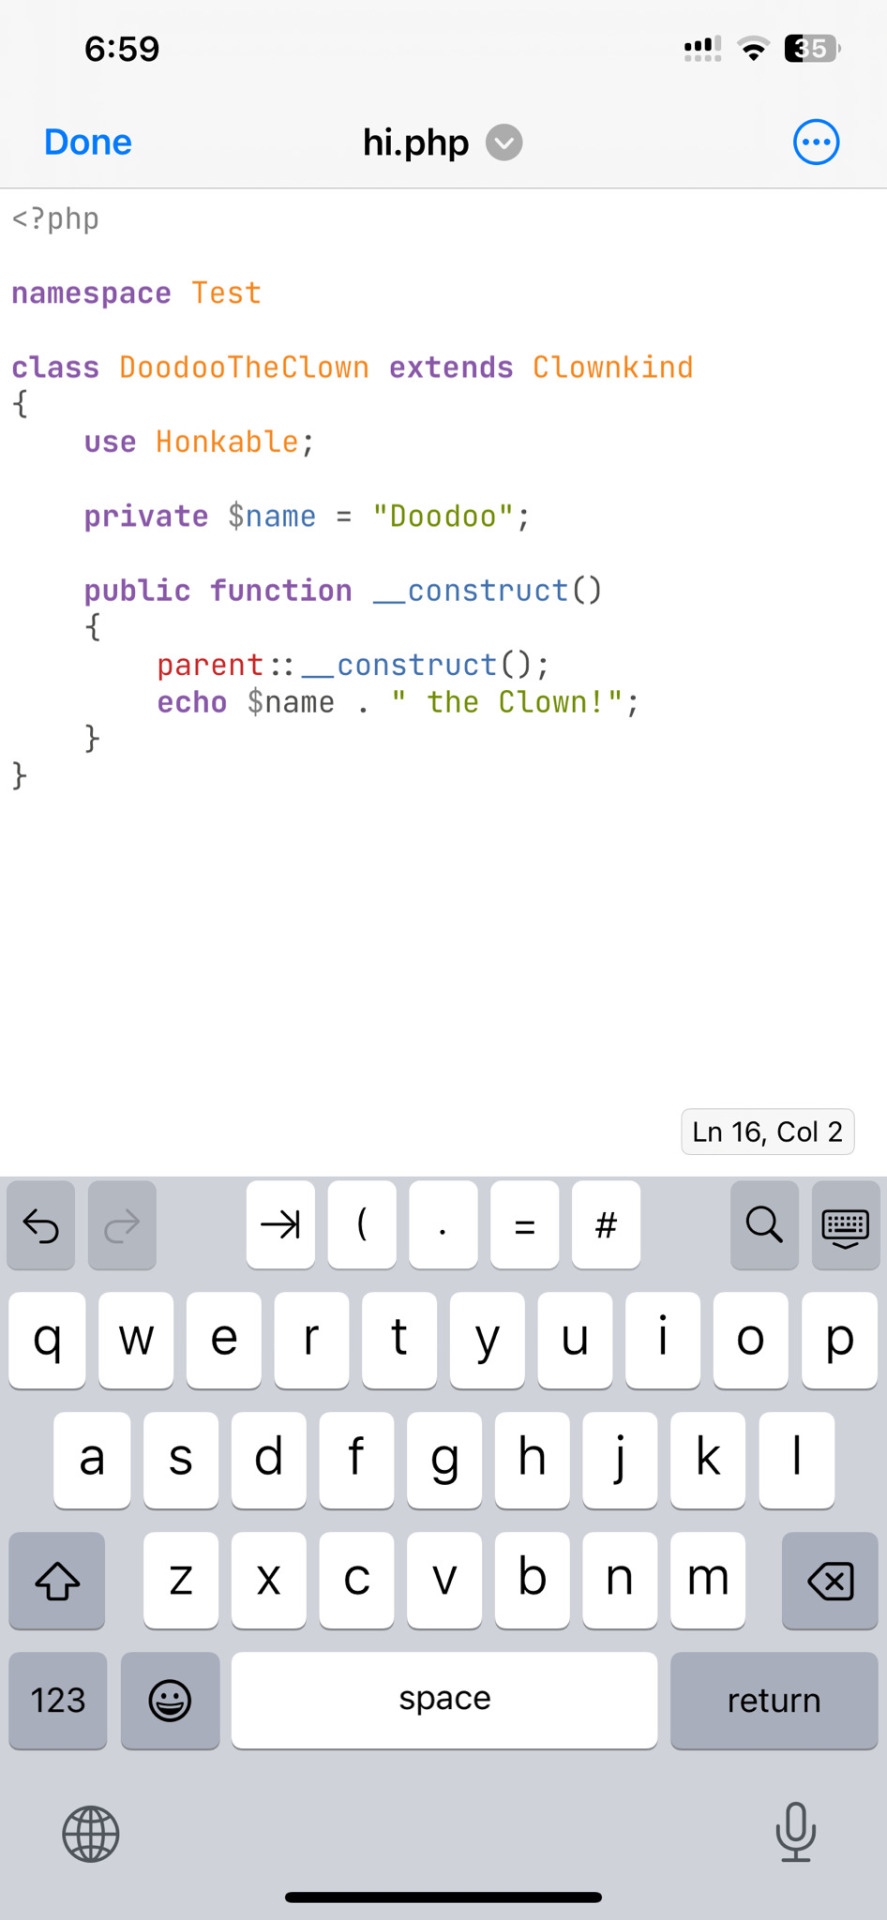
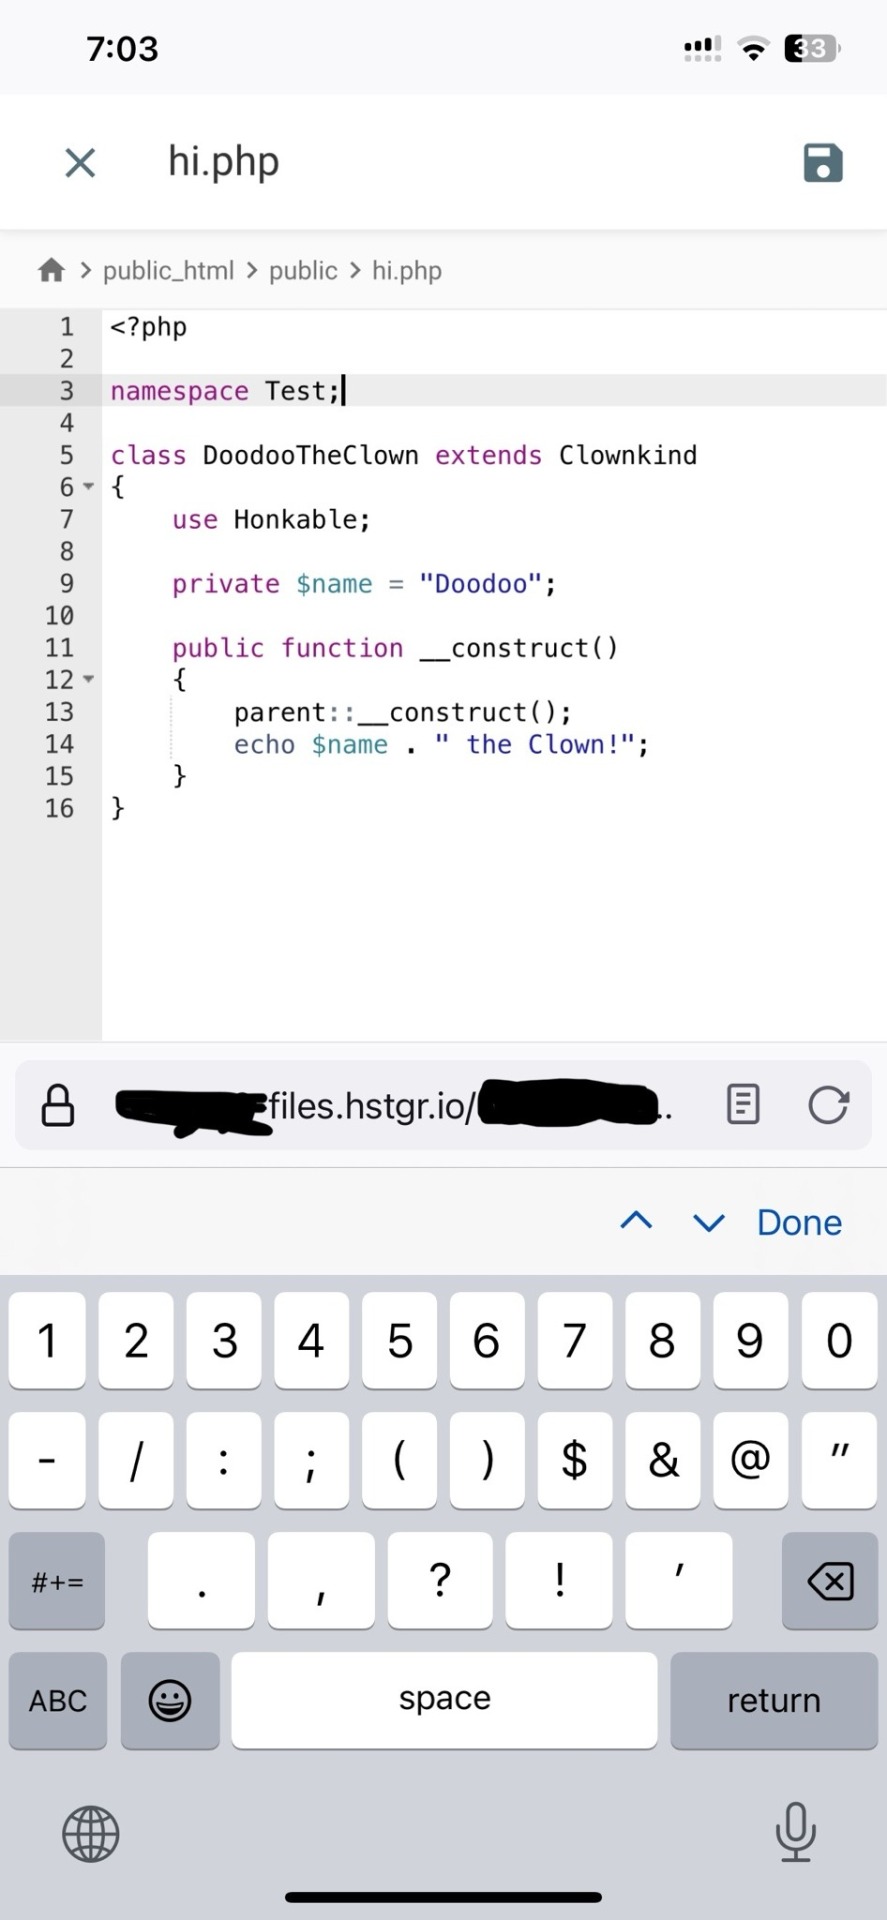
↑ code written in Runecode, then uploaded to Hostinger. Runecode didn't tell me i forgot a semicolon but Hostinger did... i guess you can code from your webhost's file uploader on mobile but i don't trust them since they tend not to autosave or prompt you before closing, and if the wifi dies idk what happens to your code.
---------------------------------------
ANYWAYS! HAPPY WEBSITE BUILDING~! HOPE THIS HELPS~!~!~!
-Mod 12 @eeyes

198 notes
·
View notes
Text

Halloween Discount!!!
To inquire, please leave a comment or send an ask to my account! I will contact you as soon as possible!
For more information, please click "keep reading" below!
Art Examples:


Headshots


Half-body

Commission rules:
I am allowed to refuse a service.
Please provide the character reference beforehand the beginning of the commission.
Payment will be paid in Full once the commission is confirmed.
Clients are allowed three minor changes, any following will be an extra 1 USD / 50 php.
I will be sending progress shots the entire duration of the commission.
No refunds once the commission is finished.
My art will not be used for AI/NFT/Harassment.
Please do not remove my Watermark.
Waiting time is 3-7 days, if surpassed, you may contact me for progress.
I will ask permission if I am able to post your commission to my socials.

#undertale#undertale au#sans#papyrus#horror sans#sans au#codey art#undertale commission#art commissions#commissions open#halloween commissions#please reblog#boost
26 notes
·
View notes
Text
ColibriSM Nulled Script 1.4.3

Unlock the Power of Social Media with ColibriSM Nulled Script Looking to build your own dynamic and fully-featured social networking platform? The ColibriSM Nulled Script is the ultimate PHP-based solution designed for developers and entrepreneurs who want to create a modern, sleek, and intuitive social media experience—all without breaking the bank. Best of all, you can download ColibriSM Nulled Script completely free from our website today. What Is ColibriSM Nulled Script? ColibriSM is a premium PHP script that replicates the core functionality of major social media platforms such as Facebook, Twitter, and Instagram. Designed with speed, security, and customization in mind, ColibriSM allows users to share posts, images, and videos, follow each other, comment, and react—all wrapped in a modern, responsive interface. This nulled version gives you full access to all premium features, letting you explore, test, and even deploy a full-scale network without the typical licensing fees. Technical Specifications Script Type: PHP, MySQL Frontend: Bootstrap 4, jQuery Backend: Secure and optimized PHP framework Database: MySQL 5.7+ Server Requirements: Apache/Nginx, PHP 7.4+, OpenSSL, cURL Why Choose ColibriSM Nulled Script? Here’s why the ColibriSM Nulled Script is the top choice for developers and startups: Full Customization: Modify layouts, modules, and features with ease. Modern UI: Clean, mobile-friendly design that provides a native app-like experience. Advanced Features: User profiles, timelines, notifications, live messaging, and more. Performance Optimized: Lightweight code ensures fast page loads and responsive performance. Multilingual Support: Ready for international deployment with RTL compatibility. Ideal Use Cases for ColibriSM Nulled Script Whether you're launching a niche social network or building a private platform for a school, company, or organization, ColibriSM adapts effortlessly. Here are just a few examples of its versatility: Student and Alumni Networks Business or Professional Communities Creative and Artistic Social Hubs Private Corporate Platforms Localized Community Networks Simple Installation Guide Getting started with ColibriSM is fast and easy: Download the ColibriSM Nulled Script package from our website. Upload files to your hosting server via FTP or file manager. Set up your MySQL database and import the included SQL file. Edit the config.php file with your site settings and database credentials. Run the installation wizard and follow the on-screen prompts. Start customizing your platform to fit your brand or community. You’ll have a fully-functional social network live within minutes. FAQs About ColibriSM Nulled Script Is the ColibriSM Nulled Script safe to use? Yes, the version provided on our site is thoroughly scanned and tested to ensure it’s free from malicious code or backdoors. However, we always recommend using it on a development or test server first. Can I monetize my platform with this script? Absolutely! ColibriSM Nulled Script includes advertising modules and third-party integration options, making it easy to implement revenue streams. Does the nulled version have all premium features? Yes, this version gives you unrestricted access to every feature, including media uploads, real-time chat, dark mode, and more. Final Thoughts For those who are ready to bring their social networking idea to life, ColibriSM delivers everything you need. With its robust feature set, user-friendly interface, and complete customizability, it’s the go-to choice for developers and digital innovators. Download it today and start building your digital community. Want to enhance your platform's SEO performance? Don’t miss out on the powerful Yoast seo nulled plugin available on our site. Also, check out the avada nulled theme for a beautiful and customizable frontend experience.
0 notes
Text
What are the different Web Design Tools?
Web Design makes your business available online by making a dedicated
website for your brand. You can present your business online through an
appealing and aesthetic website. It is not only about the creative level, it is about
using the right tools at the right times. For using multiple right tools & practising
these tools for becoming an expert in these, you need to get a good platform to
learn about these tools. Here, let us see the best institute in Delhi. If you live
around Delhi, do visit for learning web designing with practising the right tools
with experts. Sardar Patel Academy & Research Centre is the best Institute in
Delhi for Web Design Courses. Web designing becomes smooth with the help
of tools, and one becomes an expert in working with multiple tools. To know
about a few tools, let's read this article and have a glimpse of website designing.
Different Web Design Tools to Work on:
1. WordPress: It is a Content Management System(CMS) that will help you
build a website smoothly. It is easy to use programming languages like
PHP (Hypertext Preprocessor) and MySQL (Structured Query Language).
Let’s read about the features of WordPress:
● You can make a user-friendly website with WordPress, from a simpler blog
website to an e-commerce website and a complete business.
● The website is mainly famous for blogging websites, which means
● The Plugin feature can add more features and enhance the website, such
as SEO, Security, and E-Commerce.
2. Figma: Figma has collaborative skills, and it will help you in making
websites and mobile applications. It mainly works on collaborative user
experience(UX) and user interface(UI) design.
● Balancing the design system is easy with Figma; you can reuse the logo,
images, text style, icons, and buttons.
● A plugin helps in managing the functionality of a website by adding
accessible and designing tools.
3. Webflow: Webflow is another important website maker that will help you in
making, designing, and launching a creative visual website.
● It has a drag & drop feature which will help you add new features and
design a better layout.
● Webflow allows you to control the SEO page's title tags, meta description,
and alt text images.
● It also makes sure that your website’s content is indexed correctly by
search engines. Webflow gives the chance to add customisation.
4. Nova: Have you heard about PANIC? Nova is the latest version of PANIC,
and it can enhance the working power of the backend system.
● Nova provides a beautiful and elegant interface with a focus on simplicity
and usability.
5. Wix: Wix is a website-building tool, and if you haven’t worked on any
website by now. You can make a website on Wix as a fresher.
● You can easily check website performance through the in-house tools. For
example, you can work on Google Analytics, Google Ads, and Facebook
Pixels for better performance.
● You will have a social media community for interacting with each other
through likes, comments, and follows.
6. Google Web Designer: It is a free tool to create a website. It allows you to
create an engaging website that includes Google ads, interactive
elements, animation and many more features of a website.
● Using Google Drive to publish your work in Google Web Designer will be
Your help.
● The main purpose of using Google Web Designer is to create an HTML5 web
and other similar content.
7. Canva: This tool will give you multiple chances to create graphics for
websites. Canva is full of creative montages and templates to make your
website visually appealing.
● You can add multiple images and creative graphics together with the same
design & logo.
Conclusion
Mastering the skill of creating websites on different platforms with a Diploma in
Web Designing in Delhi. Creating a website will give you a chance to make your
product reach a targeted audience, as we know in today’s digital world, people
trust a product before purchasing it by checking out its website. We always go
and check if it has their own website or do they are available on an E-Commerce site
website. The necessity of having a website for a business shows that the job
requirement of web designer/developer is going to increase by 16% by 2032.
0 notes
Text
Elevating the Blog Experience with Laravel 11: A Technical Deep Dive!Scideassolutions
In today's fast-paced digital landscape, a robust and engaging blog is critical for thought leadership and community engagement. My recent project involved building a sophisticated blog and web application utilizing Laravel 11, seamlessly integrated with Moodle and featuring a custom chatbot – and I'm excited to share some insights.
Laravel 11 offers a streamlined and powerful foundation for creating modern web applications, and I've been particularly impressed with:
Simplified Structure: Laravel 11's leaner application skeleton makes it even easier to get started and maintain a clean codebase. This is particularly important for large projects with ongoing development.
Performance Enhancements: The latest version brings further performance optimizations, resulting in a snappier user experience. This translates to better engagement and lower bounce rates.

Beyond the Basics: Integrating Moodle API
One of the key challenges was integrating the blog with a Moodle platform. This involved leveraging Laravel's API capabilities to:
Synchronize User Data: Automatically create and update user accounts between the blog and Moodle.
Embed Course Content: Display relevant Moodle course content directly within blog posts, creating a unified learning experience.
Enable Single Sign-On (SSO): Allow users to seamlessly access both the blog and Moodle with a single set of credentials.
I achieved this using Laravel's robust HTTP client and carefully crafted API endpoints, ensuring secure and efficient data transfer.
Custom Laravel Commands for Streamlined Management
To further enhance the workflow, I developed custom Laravel commands for managing various blog aspects. Examples:
php artisan blog:publish {post_id}: Publishes a blog post with a specific ID.
php artisan moodle:sync: Synchronizes user data with Moodle.
php artisan chatbot:train: Retrains the chatbot with the latest data.
These commands, optimized for both Windows and Linux environments, significantly simplified administrative tasks.
AI-Powered Engagement: Laravel Chatbot Integration
To enhance user interaction and provide instant support, I integrated a Laravel-based chatbot. This chatbot can:
Answer frequently asked questions about the blog and Moodle courses.
Guide users to relevant content.
Provide personalized recommendations.
This proactive approach improves user satisfaction and reduces the burden on support staff.
Key Takeaways
Building a blog with Laravel 11 and integrating it with Moodle and a chatbot required a deep understanding of both technologies. The key takeaways from this project include:
Planning is Paramount: A well-defined architecture is crucial for seamless integration.
Security First: Prioritize security best practices when working with sensitive data.
User Experience Matters: Focus on creating a user-friendly and engaging experience.
Important Considerations and Customization Steps:
Personalize Extensively: This is a template! Replace my generic statements with your specific experiences, challenges, and solutions.
High-Quality Visuals: I cannot stress this enough. Your images are crucial. Invest time in creating visually appealing and informative screenshots and graphics.
Target Audience: Think about who you want to reach on LinkedIn. Tailor the language and content to resonate with them. Are you targeting recruiters? Other developers? Potential clients?
Call to Action: Encourage interaction. Ask a question at the end, invite comments, or suggest readers connect with you.
Keywords: Use relevant keywords in your post to improve its visibility in search results. I included a few, but research others relevant to your skill set and the project.
Proofread Carefully: Ensure your post is free of grammatical errors and typos.
Engagement: Respond to comments and engage in discussions to build your network.
Track Results: Pay attention to how your post performs to learn what resonates with your audience.
Conclusion: In conclusion, leveraging Laravel 11 for your blog's development can significantly elevate user engagement and streamline management tasks.From integrating Moodle for unified learning experiences to deploying an AI-powered chatbot for enhanced user interaction, the possibilities are vast. Remember to personalize your content, prioritize high-quality visuals, and engage your audience actively to maximize impact.
I'm excited to connect with fellow developers! How are you using Laravel 11 in your projects? Let’s discuss.
#Laravel #PHP #Moodle #WebDevelopment #AI #Chatbot #SoftwareEngineering #ScadeaSolutions
Let’s Take Your Business Online!
🌐 Website: www.scideassolutions.com
📧 Email: [email protected]
1 note
·
View note
Text
Interactive Web Application Development

Web development is no longer about just static pages. Users now expect responsive, real-time, and engaging experiences. In this post, we’ll explore how to develop interactive web applications that provide dynamic content and respond to user input instantly.
What is an Interactive Web Application?
An interactive web app is a website that responds to user actions in real time without needing to reload the entire page. Examples include:
Live chats
Form validations
Dynamic dashboards
Online games and quizzes
Social media feeds and comment systems
Key Technologies for Interactivity
HTML & CSS: Structure and style your app.
JavaScript: The core language for interactivity.
Frontend Frameworks: React, Vue.js, or Angular for building dynamic UIs.
AJAX & Fetch API: Load data without page reloads.
WebSockets: Real-time communication (e.g., chat apps, live notifications).
Backend Technologies: Node.js, Python, Ruby, or PHP for handling logic and databases.
Databases: MySQL, MongoDB, Firebase for storing and retrieving data.
1. Plan Your Application
Start by mapping out user flows and interactions. Identify:
What actions users will take (e.g., login, click, scroll)
How the app should respond (e.g., show a modal, fetch data)
What data is needed and where it comes from
2. Build a Responsive UI
Use CSS Flexbox or Grid for layout
Make it mobile-friendly with media queries
Add transitions and animations for smoother interactions
3. Add Dynamic Behavior with JavaScript
Use JavaScript or a frontend framework to:
Handle user events like clicks, inputs, and scrolls
Update content without reloading the page
Manipulate the DOM (Document Object Model)
4. Connect to a Backend
Use APIs to send and receive data from the server:
Use fetch() or axios to make HTTP requests
Implement RESTful APIs or GraphQL
Secure endpoints and handle authentication
5. Real-Time Features
For real-time functionality, use:
WebSockets: For bi-directional communication
Firebase Realtime Database or Firestore: For instant data syncing
Pusher or Socket.io: Libraries that simplify real-time integration
6. Test and Optimize
Test responsiveness on different screen sizes
Use tools like Lighthouse or WebPageTest for performance analysis
Minify and bundle JavaScript and CSS for faster loading
7. Deploy Your App
Use services like:
Vercel or Netlify for frontend hosting
Render, Heroku, or Railway for full-stack apps
GitHub Actions for CI/CD automation
Popular Use Cases of Interactive Web Apps
Interactive data dashboards
E-commerce platforms with live product updates
Educational platforms with quizzes and code editors
Project management tools like Trello or Notion
Conclusion
Interactive web applications create engaging and efficient user experiences. With a solid understanding of JavaScript, a powerful frontend framework, and modern backend tools, you can build apps that users love to interact with. Start simple, focus on clean UX, and keep improving your skills!
0 notes
Text
```markdown
SEMrush API Scripts: Unlocking Advanced SEO Capabilities
SEMrush is a powerful tool for digital marketers and SEO professionals, offering a wide range of features to help improve website visibility and performance. One of the lesser-known but highly valuable aspects of SEMrush is its API, which allows users to automate tasks and integrate SEMrush data into their workflows. In this article, we will explore how to use SEMrush API scripts to unlock advanced SEO capabilities that can significantly enhance your marketing efforts.
What are SEMrush API Scripts?
SEMrush API scripts are pieces of code that interact with the SEMrush API. These scripts can perform a variety of tasks, from keyword research and competitor analysis to tracking rankings and generating reports. By leveraging these scripts, you can streamline your SEO processes and gain deeper insights into your website's performance.
Benefits of Using SEMrush API Scripts
1. Automation: Automate repetitive tasks such as daily keyword ranking checks or monthly report generation.
2. Integration: Integrate SEMrush data with other tools and platforms, creating a more cohesive workflow.
3. Customization: Customize data extraction and processing to fit your specific needs and requirements.
4. Scalability: Scale your operations by automating large-scale data collection and analysis.
How to Get Started with SEMrush API Scripts
To start using SEMrush API scripts, you need to sign up for an SEMrush account and obtain an API key. Once you have your API key, you can begin writing scripts in languages like Python, PHP, or JavaScript. Here’s a simple example of a Python script that retrieves keyword data:
```python
import requests
api_key = 'your_api_key_here'
endpoint = 'https://api.semrush.com/keyword/get?&key={}&type=organic&database=en_us'.format(api_key)
params = {'phrase': 'digital marketing'}
response = requests.get(endpoint, params=params)
if response.status_code == 200:
data = response.json()
print(data)
else:
print('Error:', response.status_code)
```
This script retrieves organic search results for the keyword "digital marketing." You can modify the parameters to suit your needs and expand the script to include more complex functionalities.
Conclusion and Discussion Points
SEMrush API scripts offer a wealth of opportunities for enhancing your SEO strategies. By automating tasks and integrating data, you can save time and gain valuable insights that can drive better decision-making.
What are some ways you think SEMrush API scripts could be used in your own projects? Have you tried using the SEMrush API before? Share your thoughts and experiences in the comments below!
```
加飞机@yuantou2048

ETPU Machine
谷歌留痕
0 notes
Text
Prevent Open Redirects in Laravel: Secure Your Application
Open redirects are a common vulnerability that can harm your Laravel application. These occur when a malicious actor manipulates URLs to redirect users to unintended, harmful destinations. This blog dives into identifying and fixing open redirects in Laravel applications with practical coding examples.

We also introduce our Free Website Security Scanner tool to help you uncover vulnerabilities, including open redirects, with ease.
What Are Open Redirects?
Open redirects happen when a web application accepts unvalidated input and redirects users to external URLs without proper checks. Cybercriminals exploit this to redirect users to phishing or malicious websites.
Example of Open Redirect in Laravel
Imagine you have the following code snippet:
<?php namespace App\Http\Controllers; use Illuminate\Http\Request; class RedirectController extends Controller { public function redirectTo(Request $request) { $url = $request->input('redirect_to'); return redirect($url); } }
In this example, the application directly redirects to any URL passed in the redirect_to parameter, making it vulnerable to open redirects.
How to Prevent Open Redirects in Laravel
To fix this vulnerability, you must validate the URL before redirecting users. Use Laravel's helper methods to ensure safe redirection.
Secure Code Example
<?php namespace App\Http\Controllers; use Illuminate\Http\Request; class RedirectController extends Controller { public function redirectTo(Request $request) { $url = $request->input('redirect_to'); // Validate URL if ($this->isSafeUrl($url)) { return redirect($url); } // Default redirection for unsafe URLs return redirect('/default-page'); } private function isSafeUrl($url) { return filter_var($url, FILTER_VALIDATE_URL) && parse_url($url, PHP_URL_HOST) === 'yourdomain.com'; } }
This example uses URL validation to ensure only safe and predefined domains are allowed for redirection.
Visualize Security with Our Free Tool
Step 1: Scan Your Website
Here’s a screenshot of our Free Website Security Checker tool:

Screenshot of the free tools webpage where you can access security assessment tools.
Step 2: Get Detailed Reports
After scanning, you’ll receive a detailed vulnerability assessment report. Here's an example screenshot of a report generated by our tool:

An example of a vulnerability assessment report generated with our free tool provides insights into possible vulnerabilities.
Why Open Redirects Are Dangerous
Phishing Attacks: Redirecting users to malicious websites.
SEO Impact: Open redirects can harm your site’s reputation and ranking.
User Trust: Users lose trust when they are redirected to unsafe websites.
Automate Security Testing with Our Free Tool
Our Website Security Checker tool makes it easy to identify vulnerabilities, including open redirects. Just enter your URL, and our tool provides a detailed security report.
Final Thoughts
Securing your Laravel application against open redirects is crucial for safeguarding user data and maintaining trust. Use best practices, validate input, and regularly assess vulnerabilities using tools like ours to test website free.
By securing your application, you not only protect your users but also boost your brand's credibility and SEO performance.
Pro Tip: Bookmark https://free.pentesttesting.com for regular vulnerability scans to keep your website secure and efficient.
Feel free to share your thoughts and feedback in the comments section below. Let’s make the web a safer place together!
#cyber security#cybersecurity#data security#pentesting#security#the security breach show#laravel#redirect
1 note
·
View note
Text
BeMusic Php Script v3.1.3 - Music Streaming Engine
https://themesfores.com/product/bemusic-php-script-music-streaming-engine/ Would you be interested in the ultimate music streaming solution? BeMusic PHP Script v3.1.3 is your answer! This all-in-one platform lets you easily create stunning music streaming and sharing websites. Whether you’re building a site like Spotify, SoundCloud, or Mixcloud, BeMusic delivers unmatched performance and versatility. ✔️ Top Features: Create personalized music streaming platforms. Fully responsive design for all devices. Advanced audio streaming and playlist features. User-friendly interface for seamless navigation. Easily customizable to match your brand. ✔️ Why Choose BeMusic? BeMusic combines powerful functionality with ease of use, making it the ideal choice for entrepreneurs, music enthusiasts, and developers. With its SEO-friendly structure and blazing-fast performance, your site will stand out on search engines like Google. Get BeMusic today and revolutionize the way music is shared and streamed! BeMusic Php Script Features: Automation – BeMusic can be set to “automated” mode which will automatically import and update artists, albums, tracks, channels and other information from 3rd party sites as well as stream music and video using youtube API. Content Management – All automation functionality can be disabled, which allows BeMusic to be used as a content management system. Control what content appears on the site by creating and managing it from admin area. This includes artists, albums, tracks, channels, videos and more. User Artists – Allow users to set up their profile and upload and share their music with others. Waveforms – Uploaded songs will get auto-generated realtime waveform. Sharing – Users can comment, repost, like, embed and playlist their favorite tracks and albums as well as easily share them via social media. User & artist profiles – Users can personalize their profile pages with custom avatar, background image, description, social links, location and more. Follower System – Users can stay up to date with other user and artist activities by following them. Easy Installation – Install BeMusic easily with no coding or server knowledge in a few minutes with our easy to use installer and documentation. Editable Landing Page – Default landing page can be easily edited via built-in appearance editor with live preview and no coding knowledge. SaaS mode – Earn money with built in premium subscription system. Create different plans for users to subscribe to and control what functionality and limitations each plan has. High Performance – BeMusic is lightweight and has lighting fast performance and page load time out of the box. User Libraries – Users can add songs, albums and artists to their library on BeMusic in addition to playlists. Playlists – Users can create, share and follow playlists. Player – Fully-featured player including shuffle, repeat, lyrics, queue and more. Dark Mode – BeMusic comes with pre-built light and dark themes. You can fully customize them or add new themes via appearance editor. Channels – Create automated or manually managed channels to display content matching specific criteria or ordered by a particular value. For example: top 50 tracks by plays, newly released albums, popular genres, albums ordered by plays and more. Search – When “automated” mode is enabled, virtually any artist, album or track can be found via search. Custom Pages – Custom pages (for example terms of service, about us etc) can be created using built-in WISIWYG editor. Menu Editor – All the menus across the site can be easily edited and reordered via drag and drop without any coding knowledge. Appearance Editor – Easily manage your site appearance (colors, logo, landing page, menus etc) via built-in appearance editor. Ads – Paste ad codes into integrated ad slots in admin panel and BeMusic will display them automatically. Roles & Permissions – Assign roles and permissions to users to give or restrict access to specific functionality on the site. Analytics – Google analytics are integrated right into admin panel so you don’t need to open a separate page to see how your site is doing. Translatable – Site can be easily translated from admin panel, it also has multi-language suport. Responsive – BeMusic is fully responsive and will work on desktop, mobile, tablet and other devices. Documentation – BeMusic comes with in depth documentation that explains everything from installation to all the features. SEO Editor – SEO tags for all pages can be modified directly from appearance editor in admin area. Authentication – Fully featured authentication system with social login (facebook, twitter and google), normal login, registration, password recovery, account settings and more. Disable Registration – Registration can be fully disabled from admin panel so only users you create manually from admin panel will be able to login. Professional Design – Pixel-perfect professional design based on google’s material design. Settings – Admin panel has many settings that allow you to fine-tune the site to your needs. Multiple Homepages – Choose between multiple homepages including channels, landing page, login page or your own custom html page. Source Code – You will receive full, unencrypted source code upon purchase, allowing easy custom modifications. Requirements: PHP >= 8.1 PDO Extension (enabled by default) php_fileinfo Extension (enabled by default) MySQL Database Demo: Click Here https://themesfores.com/product/bemusic-php-script-music-streaming-engine/ #PHPScript
0 notes
Text
WordPress Multi-Multisite: A Case Study
New Post has been published on https://thedigitalinsider.com/wordpress-multi-multisite-a-case-study/
WordPress Multi-Multisite: A Case Study
The mission: Provide a dashboard within the WordPress admin area for browsing Google Analytics data for all your blogs.
The catch? You’ve got about 900 live blogs, spread across about 25 WordPress multisite instances. Some instances have just one blog, others have as many as 250. In other words, what you need is to compress a data set that normally takes a very long time to compile into a single user-friendly screen.
The implementation details are entirely up to you, but the final result should look like this Figma comp:
Design courtesy of the incomparable Brian Biddle.
I want to walk you through my approach and some of the interesting challenges I faced coming up with it, as well as the occasional nitty-gritty detail in between. I’ll cover topics like the WordPress REST API, choosing between a JavaScript or PHP approach, rate/time limits in production web environments, security, custom database design — and even a touch of AI. But first, a little orientation.
Let’s define some terms
We’re about to cover a lot of ground, so it’s worth spending a couple of moments reviewing some key terms we’ll be using throughout this post.
What is WordPress multisite?
WordPress Multisite is a feature of WordPress core — no plugins required — whereby you can run multiple blogs (or websites, or stores, or what have you) from a single WordPress installation. All the blogs share the same WordPress core files, wp-content folder, and MySQL database. However, each blog gets its own folder within wp-content/uploads for its uploaded media, and its own set of database tables for its posts, categories, options, etc. Users can be members of some or all blogs within the multisite installation.
What is WordPress multi-multisite?
It’s just a nickname for managing multiple instances of WordPress multisite. It can get messy to have different customers share one multisite instance, so I prefer to break it up so that each customer has their own multisite, but they can have many blogs within their multisite.
So that’s different from a “Network of Networks”?
It’s apparently possible to run multiple instances of WordPress multisite against the same WordPress core installation. I’ve never looked into this, but I recall hearing about it over the years. I’ve heard the term “Network of Networks” and I like it, but that is not the scenario I’m covering in this article.
Why do you keep saying “blogs”? Do people still blog?
You betcha! And people read them, too. You’re reading one right now. Hence, the need for a robust analytics solution. But this article could just as easily be about any sort of WordPress site. I happen to be dealing with blogs, and the word “blog” is a concise way to express “a subsite within a WordPress multisite instance”.
One more thing: In this article, I’ll use the term dashboard site to refer to the site from which I observe the compiled analytics data. I’ll use the term client sites to refer to the 25 multisites I pull data from.
My implementation
My strategy was to write one WordPress plugin that is installed on all 25 client sites, as well as on the dashboard site. The plugin serves two purposes:
Expose data at API endpoints of the client sites
Scrape the data from the client sites from the dashboard site, cache it in the database, and display it in a dashboard.
The WordPress REST API is the Backbone
The WordPress REST API is my favorite part of WordPress. Out of the box, WordPress exposes default WordPress stuff like posts, authors, comments, media files, etc., via the WordPress REST API. You can see an example of this by navigating to /wp-json from any WordPress site, including CSS-Tricks. Here’s the REST API root for the WordPress Developer Resources site:
The root URL for the WordPress REST API exposes structured JSON data, such as this example from the WordPress Developer Resources website.
What’s so great about this? WordPress ships with everything developers need to extend the WordPress REST API and publish custom endpoints. Exposing data via an API endpoint is a fantastic way to share it with other websites that need to consume it, and that’s exactly what I did:
Open the code
<?php [...] function register(WP_REST_Server $server) $endpoints = $this->get(); foreach ($endpoints as $endpoint_slug => $endpoint) register_rest_route( $endpoint['namespace'], $endpoint['route'], $endpoint['args'] ); function get() $version = 'v1'; return array( 'empty_db' => array( 'namespace' => 'LXB_DBA/' . $version, 'route' => '/empty_db', 'args' => array( 'methods' => array( 'DELETE' ), 'callback' => array($this, 'empty_db_cb'), 'permission_callback' => array( $this, 'is_admin' ), ), ), 'get_blogs' => array( 'namespace' => 'LXB_DBA/' . $version, 'route' => '/get_blogs', 'args' => array( 'methods' => array('GET', 'OPTIONS'), 'callback' => array($this, 'get_blogs_cb'), 'permission_callback' => array($this, 'is_dba'), ), ), 'insert_blogs' => array( 'namespace' => 'LXB_DBA/' . $version, 'route' => '/insert_blogs', 'args' => array( 'methods' => array( 'POST' ), 'callback' => array($this, 'insert_blogs_cb'), 'permission_callback' => array( $this, 'is_admin' ), ), ), 'get_blogs_from_db' => array( 'namespace' => 'LXB_DBA/' . $version, 'route' => '/get_blogs_from_db', 'args' => array( 'methods' => array( 'GET' ), 'callback' => array($this, 'get_blogs_from_db_cb'), 'permission_callback' => array($this, 'is_admin'), ), ), 'get_blog_details' => array( 'namespace' => 'LXB_DBA/' . $version, 'route' => '/get_blog_details', 'args' => array( 'methods' => array( 'GET' ), 'callback' => array($this, 'get_blog_details_cb'), 'permission_callback' => array($this, 'is_dba'), ), ), 'update_blogs' => array( 'namespace' => 'LXB_DBA/' . $version, 'route' => '/update_blogs', 'args' => array( 'methods' => array( 'PATCH' ), 'callback' => array($this, 'update_blogs_cb'), 'permission_callback' => array($this, 'is_admin'), ), ), );
We don’t need to get into every endpoint’s details, but I want to highlight one thing. First, I provided a function that returns all my endpoints in an array. Next, I wrote a function to loop through the array and register each array member as a WordPress REST API endpoint. Rather than doing both steps in one function, this decoupling allows me to easily retrieve the array of endpoints in other parts of my plugin to do other interesting things with them, such as exposing them to JavaScript. More on that shortly.
Once registered, the custom API endpoints are observable in an ordinary web browser like in the example above, or via purpose-built tools for API work, such as Postman:
PHP vs. JavaScript
I tend to prefer writing applications in PHP whenever possible, as opposed to JavaScript, and executing logic on the server, as nature intended, rather than in the browser. So, what would that look like on this project?
On the dashboard site, upon some event, such as the user clicking a “refresh data” button or perhaps a cron job, the server would make an HTTP request to each of the 25 multisite installs.
Each multisite install would query all of its blogs and consolidate its analytics data into one response per multisite.
Unfortunately, this strategy falls apart for a couple of reasons:
PHP operates synchronously, meaning you wait for one line of code to execute before moving to the next. This means that we’d be waiting for all 25 multisites to respond in series. That’s sub-optimal.
My production environment has a max execution limit of 60 seconds, and some of my multisites contain hundreds of blogs. Querying their analytics data takes a second or two per blog.
Damn. I had no choice but to swallow hard and commit to writing the application logic in JavaScript. Not my favorite, but an eerily elegant solution for this case:
Due to the asynchronous nature of JavaScript, it pings all 25 Multisites at once.
The endpoint on each Multisite returns a list of all the blogs on that Multisite.
The JavaScript compiles that list of blogs and (sort of) pings all 900 at once.
All 900 blogs take about one-to-two seconds to respond concurrently.
Holy cow, it just went from this:
( 1 second per Multisite * 25 installs ) + ( 1 second per blog * 900 blogs ) = roughly 925 seconds to scrape all the data.
To this:
1 second for all the Multisites at once + 1 second for all 900 blogs at once = roughly 2 seconds to scrape all the data.
That is, in theory. In practice, two factors enforce a delay:
Browsers have a limit as to how many concurrent HTTP requests they will allow, both per domain and regardless of domain. I’m having trouble finding documentation on what those limits are. Based on observing the network panel in Chrome while working on this, I’d say it’s about 50-100.
Web hosts have a limit on how many requests they can handle within a given period, both per IP address and overall. I was frequently getting a “429; Too Many Requests” response from my production environment, so I introduced a delay of 150 milliseconds between requests. They still operate concurrently, it’s just that they’re forced to wait 150ms per blog. Maybe “stagger” is a better word than “wait” in this context:
Open the code
async function getBlogsDetails(blogs) let promises = []; // Iterate and set timeouts to stagger requests by 100ms each blogs.forEach((blog, index) => if (typeof blog.url === 'undefined') return; let id = blog.id; const url = blog.url + '/' + blogDetailsEnpointPath + '?uncache=' + getRandomInt(); // Create a promise that resolves after 150ms delay per blog index const delayedPromise = new Promise(resolve => setTimeout(async () => try const blogResult = await fetchBlogDetails(url, id); if( typeof blogResult.urls == 'undefined' ) console.error( url, id, blogResult ); else if( ! blogResult.urls ) console.error( blogResult ); else if( blogResult.urls.length == 0 ) console.error( blogResult ); else console.log( blogResult ); resolve(blogResult); catch (error) console.error(`Error fetching details for blog ID $id:`, error); resolve(null); // Resolve with null to handle errors gracefully , index * 150); // Offset each request by 100ms ); promises.push(delayedPromise); ); // Wait for all requests to complete const blogsResults = await Promise.all(promises); // Filter out any null results in case of caught errors return blogsResults.filter(result => result !== null);
With these limitations factored in, I found that it takes about 170 seconds to scrape all 900 blogs. This is acceptable because I cache the results, meaning the user only has to wait once at the start of each work session.
The result of all this madness — this incredible barrage of Ajax calls, is just plain fun to watch:
PHP and JavaScript: Connecting the dots
I registered my endpoints in PHP and called them in JavaScript. Merging these two worlds is often an annoying and bug-prone part of any project. To make it as easy as possible, I use wp_localize_script():
<?php [...] class Enqueue function __construct() add_action( 'admin_enqueue_scripts', array( $this, 'lexblog_network_analytics_script' ), 10 ); add_action( 'admin_enqueue_scripts', array( $this, 'lexblog_network_analytics_localize' ), 11 ); function lexblog_network_analytics_script() wp_register_script( 'lexblog_network_analytics_script', LXB_DBA_URL . '/js/lexblog_network_analytics.js', array( 'jquery', 'jquery-ui-autocomplete' ), false, false ); function lexblog_network_analytics_localize() $a = new LexblogNetworkAnalytics; $data = $a -> get_localization_data(); $slug = $a -> get_slug(); wp_localize_script( 'lexblog_network_analytics_script', $slug, $data ); // etc.
In that script, I’m telling WordPress two things:
Load my JavaScript file.
When you do, take my endpoint URLs, bundle them up as JSON, and inject them into the HTML document as a global variable for my JavaScript to read. This is leveraging the point I noted earlier where I took care to provide a convenient function for defining the endpoint URLs, which other functions can then invoke without fear of causing any side effects.
Here’s how that ended up looking:
The JSON and its associated JavaScript file, where I pass information from PHP to JavaScript using wp_localize_script().
Auth: Fort Knox or Sandbox?
We need to talk about authentication. To what degree do these endpoints need to be protected by server-side logic? Although exposing analytics data is not nearly as sensitive as, say, user passwords, I’d prefer to keep things reasonably locked up. Also, since some of these endpoints perform a lot of database queries and Google Analytics API calls, it’d be weird to sit here and be vulnerable to weirdos who might want to overload my database or Google Analytics rate limits.
That’s why I registered an application password on each of the 25 client sites. Using an app password in php is quite simple. You can authenticate the HTTP requests just like any basic authentication scheme.
I’m using JavaScript, so I had to localize them first, as described in the previous section. With that in place, I was able to append these credentials when making an Ajax call:
async function fetchBlogsOfInstall(url, id) let install = lexblog_network_analytics.installs[id]; let pw = install.pw; let user = install.user; // Create a Basic Auth token let token = btoa(`$user:$pw`); let auth = 'Authorization': `Basic $token` ; try let data = await $.ajax( url: url, method: 'GET', dataType: 'json', headers: auth ); return data; catch (error) console.error('Request failed:', error); return [];
That file uses this cool function called btoa() for turning the raw username and password combo into basic authentication.
The part where we say, “Oh Right, CORS.”
Whenever I have a project where Ajax calls are flying around all over the place, working reasonably well in my local environment, I always have a brief moment of panic when I try it on a real website, only to get errors like this:
Oh. Right. CORS. Most reasonably secure websites do not allow other websites to make arbitrary Ajax requests. In this project, I absolutely do need the Dashboard Site to make many Ajax calls to the 25 client sites, so I have to tell the client sites to allow CORS:
<?php // ... function __construct() add_action( 'rest_api_init', array( $this, 'maybe_add_cors_headers' ), 10 ); function maybe_add_cors_headers() // Only allow CORS for the endpoints that pertain to this plugin. if( $this->is_dba() ) add_filter( 'rest_pre_serve_request', array( $this, 'send_cors_headers' ), 10, 2 ); function is_dba() $url = $this->get_current_url(); $ep_urls = $this->get_endpoint_urls(); $out = in_array( $url, $ep_urls ); return $out; function send_cors_headers( $served, $result ) // Only allow CORS from the dashboard site. $dashboard_site_url = $this->get_dashboard_site_url(); header( "Access-Control-Allow-Origin: $dashboard_site_url" ); header( 'Access-Control-Allow-Headers: Origin, X-Requested-With, Content-Type, Accept, Authorization' ); header( 'Access-Control-Allow-Methods: GET, OPTIONS' ); return $served; [...] }
You’ll note that I’m following the principle of least privilege by taking steps to only allow CORS where it’s necessary.
Auth, Part 2: I’ve been known to auth myself
I authenticated an Ajax call from the dashboard site to the client sites. I registered some logic on all the client sites to allow the request to pass CORS. But then, back on the dashboard site, I had to get that response from the browser to the server.
The answer, again, was to make an Ajax call to the WordPress REST API endpoint for storing the data. But since this was an actual database write, not merely a read, it was more important than ever to authenticate. I did this by requiring that the current user be logged into WordPress and possess sufficient privileges. But how would the browser know about this?
In PHP, when registering our endpoints, we provide a permissions callback to make sure the current user is an admin:
<?php // ... function get() $version = 'v1'; return array( 'update_blogs' => array( 'namespace' => 'LXB_DBA/' . $version, 'route' => '/update_blogs', 'args' => array( 'methods' => array( 'PATCH' ), 'callback' => array( $this, 'update_blogs_cb' ), 'permission_callback' => array( $this, 'is_admin' ), ), ), // ... ); function is_admin() $out = current_user_can( 'update_core' ); return $out;
JavaScript can use this — it’s able to identify the current user — because, once again, that data is localized. The current user is represented by their nonce:
async function insertBlog( data ) let url = lexblog_network_analytics.endpoint_urls.insert_blog; try await $.ajax( url: url, method: 'POST', dataType: 'json', data: data, headers: 'X-WP-Nonce': getNonce() ); catch (error) console.error('Failed to store blogs:', error); function getNonce() if( typeof wpApiSettings.nonce == 'undefined' ) return false; return wpApiSettings.nonce;
The wpApiSettings.nonce global variable is automatically present in all WordPress admin screens. I didn’t have to localize that. WordPress core did it for me.
Cache is King
Compressing the Google Analytics data from 900 domains into a three-minute loading .gif is decent, but it would be totally unacceptable to have to wait for that long multiple times per work session. Therefore I cache the results of all 25 client sites in the database of the dashboard site.
I’ve written before about using the WordPress Transients API for caching data, and I could have used it on this project. However, something about the tremendous volume of data and the complexity implied within the Figma design made me consider a different approach. I like the saying, “The wider the base, the higher the peak,” and it applies here. Given that the user needs to query and sort the data by date, author, and metadata, I think stashing everything into a single database cell — which is what a transient is — would feel a little claustrophobic. Instead, I dialed up E.F. Codd and used a relational database model via custom tables:
In the Dashboard Site, I created seven custom database tables, including one relational table, to cache the data from the 25 client sites, as shown in the image.
It’s been years since I’ve paged through Larry Ullman’s career-defining (as in, my career) books on database design, but I came into this project with a general idea of what a good architecture would look like. As for the specific details — things like column types — I foresaw a lot of Stack Overflow time in my future. Fortunately, LLMs love MySQL and I was able to scaffold out my requirements using DocBlocks and let Sam Altman fill in the blanks:
Open the code
<?php /** * Provides the SQL code for creating the Blogs table. It has columns for: * - ID: The ID for the blog. This should just autoincrement and is the primary key. * - name: The name of the blog. Required. * - slug: A machine-friendly version of the blog name. Required. * - url: The url of the blog. Required. * - mapped_domain: The vanity domain name of the blog. Optional. * - install: The name of the Multisite install where this blog was scraped from. Required. * - registered: The date on which this blog began publishing posts. Optional. * - firm_id: The ID of the firm that publishes this blog. This will be used as a foreign key to relate to the Firms table. Optional. * - practice_area_id: The ID of the firm that publishes this blog. This will be used as a foreign key to relate to the PracticeAreas table. Optional. * - amlaw: Either a 0 or a 1, to indicate if the blog comes from an AmLaw firm. Required. * - subscriber_count: The number of email subscribers for this blog. Optional. * - day_view_count: The number of views for this blog today. Optional. * - week_view_count: The number of views for this blog this week. Optional. * - month_view_count: The number of views for this blog this month. Optional. * - year_view_count: The number of views for this blog this year. Optional. * * @return string The SQL for generating the blogs table. */ function get_blogs_table_sql() $slug = 'blogs'; $out = "CREATE TABLE $this->get_prefix()_$slug ( id BIGINT NOT NULL AUTO_INCREMENT, slug VARCHAR(255) NOT NULL, name VARCHAR(255) NOT NULL, url VARCHAR(255) NOT NULL UNIQUE, /* adding unique constraint */ mapped_domain VARCHAR(255) UNIQUE, install VARCHAR(255) NOT NULL, registered DATE DEFAULT NULL, firm_id BIGINT, practice_area_id BIGINT, amlaw TINYINT NOT NULL, subscriber_count BIGINT, day_view_count BIGINT, week_view_count BIGINT, month_view_count BIGINT, year_view_count BIGINT, PRIMARY KEY (id), FOREIGN KEY (firm_id) REFERENCES $this->get_prefix()_firms(id), FOREIGN KEY (practice_area_id) REFERENCES $this->get_prefix()_practice_areas(id) ) DEFAULT CHARSET=utf8mb4;"; return $out;
In that file, I quickly wrote a DocBlock for each function, and let the OpenAI playground spit out the SQL. I tested the result and suggested some rigorous type-checking for values that should always be formatted as numbers or dates, but that was the only adjustment I had to make. I think that’s the correct use of AI at this moment: You come in with a strong idea of what the result should be, AI fills in the details, and you debate with it until the details reflect what you mostly already knew.
How it’s going
I’ve implemented most of the user stories now. Certainly enough to release an MVP and begin gathering whatever insights this data might have for us:
It’s working!
One interesting data point thus far: Although all the blogs are on the topic of legal matters (they are lawyer blogs, after all), blogs that cover topics with a more general appeal seem to drive more traffic. Blogs about the law as it pertains to food, cruise ships, germs, and cannabis, for example. Furthermore, the largest law firms on our network don’t seem to have much of a foothold there. Smaller firms are doing a better job of connecting with a wider audience. I’m positive that other insights will emerge as we work more deeply with this.
Regrets? I’ve had a few.
This project probably would have been a nice opportunity to apply a modern JavaScript framework, or just no framework at all. I like React and I can imagine how cool it would be to have this application be driven by the various changes in state rather than… drumroll… a couple thousand lines of jQuery!
I like jQuery’s ajax() method, and I like the jQueryUI autocomplete component. Also, there’s less of a performance concern here than on a public-facing front-end. Since this screen is in the WordPress admin area, I’m not concerned about Google admonishing me for using an extra library. And I’m just faster with jQuery. Use whatever you want.
I also think it would be interesting to put AWS to work here and see what could be done through Lambda functions. Maybe I could get Lambda to make all 25 plus 900 requests concurrently with no worries about browser limitations. Heck, maybe I could get it to cycle through IP addresses and sidestep the 429 rate limit as well.
And what about cron? Cron could do a lot of work for us here. It could compile the data on each of the 25 client sites ahead of time, meaning that the initial three-minute refresh time goes away. Writing an application in cron, initially, I think is fine. Coming back six months later to debug something is another matter. Not my favorite. I might revisit this later on, but for now, the cron-free implementation meets the MVP goal.
I have not provided a line-by-line tutorial here, or even a working repo for you to download, and that level of detail was never my intention. I wanted to share high-level strategy decisions that might be of interest to fellow Multi-Multisite people. Have you faced a similar challenge? I’d love to hear about it in the comments!
#250#admin#ai#Analytics#API#app#applications#approach#architecture#Article#Articles#authentication#author#autocomplete#AWS#Blog#Books#box#browser#bug#bundle#cache#cannabis#career#cell#challenge#chrome#code#columns#complexity
0 notes
Text
PHP Comments : Types, Syntax, Examples & Best Practices
Learn everything about PHP comments including single-line, multi-line, and PHPDoc comments. Explore syntax, real-world examples, best practices, and FAQs to write better PHP code. Understanding PHP Comments: A Complete Guide Comments are an essential part of any programming language, and PHP is no exception. They are used to describe what a specific block of code does, which is extremely…
#comments in PHP#how to comment in PHP#PHP comment best practices#PHP comment examples#PHP comment syntax#PHP comments#PHP documentation comments#PHP multi-line comment#PHP single-line comment#PHPDoc comment
0 notes
Photo

Please Exercise Patience When Connecting to Bill's Bible Basics Blog https://www.billkochman.com/Blog/please-exercise-patience-when-connecting-to-bills-bible-basics-blog/ I just wanted to remind everyone that when you click on my images on Facebook, or on any other social network where I share my work, you need to be patient while you are being transferred to my actual Bill's Bible Basics Blog, where I actually post my images, poetry, KJV Bible Verse Lists, etc. For those of you who may have forgotten, or who may not know -- I normally do NOT actually post content directly on the social networks -- except in rare cases. The few exceptions are personal replies to my friends' comments and more recent news articles on which I post an opinion. These are in fact posted directly on the social networks without any intermediary software. But regarding all of the rest of my content -- meaning my images, etc. -- it is posted on my Bill's Bible Basics Blog first. Then, from my blog, whatever I post is syndicated to the different social networks where I participate. That being the case, when you click on one of my images on one of the social networks, please be patient, and bear in mind, for example, that if you live on the U.S. East Coast, you are literally thousands of miles away from me. That is a lot of server hops from you to me. In other words, the http request that you send in your web browser has to bounce from server to server until it reaches my web server, and the BBB Blog. To add to that, please also bear in mind that in order to function properly -- some of you won't understand this -- the Bill's Bible Basics Blog depends on PHP and a mySQL database to load the content on my blog pages. These are known for being slow players in the IT -- Internet Technology -- field. So, because of the aforementioned factors, it can take a few seconds -- and sometimes a little longer, depending on Internet congestion -- for the BBB Blog page or the BBB web page to load completely in your web browser. Please do not get impatient during this time and take off elsewhere. Let me also remind you that once the BBB Blog page or the BBB website page loads in your web browser, you will see the entire image, along with any Bible verses, commentary or study resource links which I have included below it. This likewise applies to links which take you to my articles and series, to my poetry, to my KJV Bible Verse Lists, etc. Furthermore, on the BBB Blog, directly below each and every entry which I post, you will find a series of buttons which will allow you to either print that particular entry, share it with someone else via email, or share it with your friends on any social network in which you personally participate. Just click the button that you wish to use, and follow whatever instructions -- if any -- appear in the sharing form. I hope that the above information clears up a few things for some of you. Thanks for your patience. https://www.billkochman.com/Blog/index.php/please-exercise-patience-when-connecting-to-bills-bible-basics-blog/?feed_id=258426&Please%20Exercise%20Patience%20When%20Connecting%20to%20Bill%27s%20Bible%20Basics%20Blog
#Ads_BBBFacebook#All_Posts#articles#bible#bible_study#bill_kochman#bills_bible_basics#christian#graphics#king_james_version#kjv#poetry#scriptures#series#verse_lists#verses
1 note
·
View note
Text
What is Canvas ChatGPT and How Should You Use It?
ChatGPT has been one of the most recognizable AI chatbots in the business industry since the end of 2022. Now, OpenAI’s ChatGPT is set to take another leap forward and become the most popular AI with its new integration: Canvas ChatGPT.
Since it’s set to become available to ChatGPT Free users soon, let’s learn how to use it!
What is Canvas ChatGPT?
Canvas ChatGPT is a new version that adds to ChatGPT and goes beyond simple chatting. It’s like ChatGPT’s partner, and opens up in a separate window, allowing ChatGPT to collaborate with it on a project. This new version of ChatGPT is a beta interface that presents a new way of working together by creating and refining ideas. The main focus is on making the content generation process more interactive, feature-rich, and fun for users.
What can you use Canvas ChatGPT for?
Everything you can use ChatGPT for but twice better! This includes:
Blog posts/Articles
Emails (professional/marketing)
Social media post designs
Website coding
Story writing
And more!
But you may wonder why you need Canvas if ChatGPT can already do all these things. Well, ChatGPT is an impressive tool for conducting research, generating ideas, and being a good chatting partner, Canvas is for when you need to create content that you want to show others, such as business articles, college research papers, coding, and more.
Moreover, it’s an intellectual approach for ChatGPT, since it activates Canvas the moment it detects a need for it.
Canvas ChatGPT: Features

This new version of ChatGPT comes with unique and advanced features that aren’t present in ChatGPT:
Once ChatGPT generates a text, you can edit it by adding new text, removing specific lines and words, or updating the formatting with Canvas.
It can suggest changes or modifications you can make to any content you’re working on and make it sound even better.
It can easily shorten or lengthen the generated content and customize it according to the adjusted prompts for specific learning outcomes.
Canvas offers a reading level adjustment that can rewrite content at different reading levels, beginning at the kindergarten stage and ending at graduate school.
Users can work together on projects and form teamwork and peer learning through the new chat functions. Moreover, you can ask it to give your content a final check-up, with grammar check, and final polishing.
It can add relevant emojis through your content where it's required and appropriate.
Since ChatGPT is limited when a user works on projects requiring editing and revisions, Canvas delivers a solution.
Canvas ChatGPT: Coding Speciality

Coding is a repetitive process, and it can become tricky to keep up with the code revisions in chat. Canvas makes it easier to track ChatGPT’s changes and helps us understand our work better.
ChatGPT provides inline recommendations for reviewing and improving your code.
You can insert print statements and add logs to help you with debugging and understanding your code.
Canvas incorporates comments into the code to make it easier for users to understand.
It detects and rewrites problematic code to fix bugs and errors.
It can translate your code and port it to a language, such as JavaScript, Python, PHP, etc.
How to use Canvas ChatGPT?
For now, Canvas is only available for ChatGPT Plus users, so the only way you can use it, for now, is by purchasing ChatGPT Plus, here are the steps:
After creating a ChatGPT Plus account, choose the Canvas model from the dropdown menu at the top left corner and choose “GPT-4o with canvas.”
Enter a prompt asking for a specific type of content, for example: “write an article” or “create a marketing email” and then state what you want it to be about.
Once ChatGPT presents the Canvas interface and generates a response, you can edit the content using its unique features.
Our digital marketing company in Indianapolis stays updated with the latest technological advancements, such as OpenAi’s model o1 and the new version of ChatGPT. Creative’s Genie believes that it is vital to stay updated on the latest technological trends to provide the best services.
Drive your revenue with Creative’s Genie where we have aligned our digital marketing services with AI to give you access to extraordinary AI solutions, SEO, and PPC, for your content as a full-service digital agency. So contact us now and partner with us to unlock the hidden potential of your business!
0 notes
Text
Building Your First WordPress Plugin: A Step-by-Step Guide
Want to extend WordPress's functionality? Creating a plugin is your answer. Let's break down the process into simple steps.
1. Plan Your Plugin
Define the purpose: What problem does your plugin solve?
Identify core features: What functionalities will it offer?
Choose a name: Pick a descriptive and unique name.
2. Set Up the Structure
Create a new folder: In your wp-content/plugins directory, create a folder with your plugin's name.
Create the main file: Inside this folder, create a PHP file with the same name as the folder.
3. Add Plugin Header
Essential information: At the top of your PHP file, add a header comment with details like plugin name, description, author, and version. This is crucial for WordPress to recognize your plugin.
4. Write Your Code
Basic functionality: Start with simple functions. For example, you could create a custom shortcode or add a new menu item to the admin panel.
Leverage WordPress actions and filters: To integrate seamlessly with WordPress, use hooks like add_action and add_filter.
Test thoroughly: Use a staging site to test your plugin before activating it on a live site.
5. Activate and Test
Activate: Go to the "Plugins" section in your WordPress admin dashboard and activate your plugin.
Test features: Ensure everything works as expected.
Debug and refine: If you encounter issues, use debugging tools to identify and fix problems.
Additional Tips
Use clear and concise code: Write clean code for better maintainability.
Document your code: Add comments to explain your code's logic.
Consider security: Protect your plugin from vulnerabilities.
Leverage WordPress APIs: Explore the vast array of functions and classes available.
Remember: Building a plugin takes time and practice. Start small, iterate, and learn from your experiences. With dedication, you can create valuable tools for the WordPress community. Embarking on WordPress plugin development is a rewarding journey that allows you to contribute to the world's most popular CMS.
0 notes
Text
Comments and Case Sensitivity in php
Comments in PHP Comments are used to add notes or explanations to your code, making it easier to understand and maintain. PHP supports two types of comments: 1. Single-line comments: Start with // or # and continue until the end of the line. Syntax: // This is a single-line comment # This is also a single-line comment Examples: $x = 5; // assign 5 to x $y = 3; # assign 3 to y 1. Multi-line…
0 notes