#PHP-FPM configuration
Explore tagged Tumblr posts
Visit Tumblr Blog
Explore Tumblr blogs with no restrictions, modern design and the best experience.
Last Seen Tumblr Blogs


Fun Fact
The Tumblr app for Google Glass was released on May 16, 2013.
Text
Out of Memory OOM Killer issue Investigation
Wednesday morning our monitoring solution suddenly alerted me to a critical issue with our main web server. Attempting to access our WordPress website via browser returned database connection errors, indicating a problem with our hosting environment. When I logged into the server via SSH, I discovered it’s a Linux Out of Memory (OOM) Killer terminating our MariaDB database service due to memory…
#Linux server#MariaDB optimisation#memory management#OOM Killer#Out of Memory#performance tuning#PHP-FPM configuration#server administration#swap space#system monitoring#WordPress hosting
0 notes
Text
How We Improved Site Speed for a Client's PHP Website
When a client approached us with concerns about their website's loading speed and inconsistent performance, we recognized this as a challenge common among businesses with legacy PHP applications. Site speed plays a critical role in user experience, SEO rankings, and overall digital success. Slow performance can directly impact bounce rates and conversions, which is why PHP development companies must prioritize speed optimization in every project.
In this case study, we’ll walk through the methods we used to optimize a PHP-based website for better speed and performance.
Initial Assessment and Problem Identification
The first step was a full performance audit. Using tools like Google PageSpeed Insights, GTmetrix, and server logs, we uncovered several key issues:
Inefficient database queries
No caching mechanisms in place
Poorly optimized assets (JavaScript, CSS, and images)
High server response times
These issues are not uncommon for websites built a few years ago without ongoing optimization. Many PHP development companies in USA encounter such challenges, especially when websites evolve without scalable backend solutions.
Key Optimization Techniques We Applied
1. Optimizing Database Performance
The website’s dynamic content relied on complex and sometimes redundant SQL queries. We restructured these queries and added indexing where necessary. By reducing query execution time, we achieved noticeable backend performance gains.
2. Implementing Caching
To reduce load on the server and improve response time for repeat visitors, we enabled:
Opcode caching with OPcache
Object caching using Redis
Full-page caching for static and semi-dynamic content
Caching is one of the most effective ways for top PHP development companies in USA to immediately enhance site speed with minimal risk to core functionality.
3. Asset Optimization
We minified all CSS and JavaScript files, removed unused styles, and bundled them efficiently to reduce HTTP requests. Additionally, we enabled Gzip compression and browser caching via .htaccess to improve frontend performance.
4. Image and Media Optimization
Large image files were replaced with compressed versions in modern formats like WebP. We also implemented lazy loading to defer offscreen images from loading until they were needed.
5. Server Configuration Enhancements
Our team fine-tuned PHP-FPM and Apache configurations to ensure that the server handled traffic more efficiently. We increased memory limits, adjusted timeout settings, and introduced monitoring tools to keep track of resource usage.
Results Achieved
After deploying these improvements, the client experienced:
70% faster page load times
A 40% drop in bounce rate
Improved search engine visibility
A smoother and more responsive admin dashboard
These outcomes are a testament to what experienced PHP development companies can accomplish with the right blend of strategy, tools, and technical expertise.
Long-Term Strategy
Speed optimization isn’t a one-time fix. We helped the client set up automated performance reports and regular maintenance routines. This proactive approach ensures their website remains fast even as traffic increases or new features are introduced.
Final Thoughts
For businesses running PHP-based websites, performance optimization should be an ongoing priority. Whether you're maintaining a legacy application or building something new, partnering with professionals matters.
Our success in this project reflects the value that top PHP development companies in USA bring to the table. With hands-on experience, performance tuning capabilities, and scalable development practices, we help our clients stay competitive in the digital space.
If you're looking to enhance your website's performance, collaborating with trusted PHP development companies in USA can lead to transformative results.
0 notes
Text
PHP performance tuning: From code profiling to server optimization

Here are the essential techniques to boost PHP performance, including code profiling, opcode caching, and server optimization, with practical examples and actionable tips. Optimizing PHP performance is crucial for web applications. This article delves into code profiling, opcode caching, and server optimization to enhance efficiency. Introduction to PHP Performance Tuning PHP performance tuning is a critical aspect of web development, especially for high-traffic applications. Efficient PHP code ensures faster response times, reduced server load, and improved user experience. This article will guide you through the essential techniques to optimize PHP performance, from code profiling to server configuration. Code Profiling: Identifying Bottlenecks Code profiling is the first step in optimizing PHP performance. It involves analyzing your code to identify bottlenecks and inefficiencies. Tools like Xdebug and Blackfire are invaluable for this purpose. Xdebug provides detailed insights into function calls, execution times, and memory usage, while Blackfire offers a more comprehensive analysis with visual representations of performance data. For instance, consider a scenario where an e-commerce application experiences slow checkout times. By profiling the code, you might discover that a specific function responsible for calculating discounts is taking too long to execute. With this insight, you can refactor the function to improve its efficiency, thereby enhancing the overall performance of the application. Opcode Caching: Speeding Up Execution Opcode caching is another crucial technique for optimizing PHP performance. PHP scripts are compiled into opcode before execution, and this process can be time-consuming. Opcode caching stores the compiled opcode in memory, reducing the need for repeated compilation and speeding up execution. OPcache is a popular opcode caching solution that comes bundled with PHP. Enabling OPcache can significantly improve the performance of your PHP applications. For example, a content management system (CMS) that serves thousands of pages per second can benefit immensely from OPcache, as it reduces the overhead of compiling PHP scripts for each request. Server Optimization: Configuring PHP-FPM and Memory Limits Server optimization is the final piece of the puzzle. Configuring PHP-FPM (FastCGI Process Manager) is essential for managing PHP processes efficiently. PHP-FPM allows you to control the number of child processes, request handling, and resource allocation, ensuring optimal performance under heavy loads. Adjusting memory limits is another critical aspect of server optimization. PHP applications often consume a significant amount of memory, and setting appropriate memory limits can prevent resource exhaustion. For example, a high-traffic e-commerce site might require higher memory limits to handle concurrent user sessions and complex transactions. Additionally, optimizing database interactions can further enhance performance. Techniques such as indexing, query optimization, and using connection pooling can reduce the load on your database server, leading to faster response times. Conclusion: Implementing Performance Tuning Techniques In conclusion, PHP performance tuning is a multifaceted process that involves code profiling, opcode caching, and server optimization. By identifying bottlenecks, leveraging opcode caching, and configuring server settings, you can significantly improve the efficiency of your PHP applications. Implement these techniques to ensure your web applications run smoothly and provide an excellent user experience. Read the full article
0 notes
Text
Deploying Laravel Applications to the Cloud
Deploying a Laravel application to the cloud offers several advantages, including scalability, ease of management, and the ability to leverage various cloud-based tools and services. In this guide, we will explore the steps to deploy a Laravel application to the cloud using platforms like AWS, DigitalOcean, and Heroku. We'll also touch on best practices for server configuration, environment variables, and deployment automation.
1. Preparing Your Laravel Application
Before deploying, it’s essential to ensure that your Laravel application is production-ready. Here are some preparatory steps:
Update Dependencies: Run composer install --optimize-autoloader --no-dev to ensure that only production dependencies are installed.
Environment Configuration: Make sure your .env file is configured correctly for the production environment. You’ll need to set up database connections, cache, queue configurations, and any other service keys.
Caching and Optimization: Laravel provides several optimization commands to boost the performance of your application. Run the following commands to optimize your app for production:bashCopy codephp artisan config:cache php artisan route:cache php artisan view:cache
Assets and Front-End Build: If your application uses frontend assets like JavaScript and CSS, run npm run production to compile them and ensure that assets are optimized.
Database Migration: Make sure your database schema is up to date by running:bashCopy codephp artisan migrate --force
2. Choosing a Cloud Platform
There are several cloud platforms that support Laravel applications, including AWS, DigitalOcean, and Heroku. Let's look at how to deploy on each.
A. Deploying Laravel to AWS EC2
AWS (Amazon Web Services) offers a robust infrastructure for hosting Laravel applications. Here's a high-level overview of the steps:
Launch an EC2 Instance: First, you need to create an EC2 instance running a Linux distribution (e.g., Ubuntu). You can choose the instance size based on your traffic and performance needs.
Install PHP and Required Software: Once the instance is up, SSH into it and install PHP, Composer, Nginx (or Apache), and other necessary services:bashCopy codesudo apt update sudo apt install php php-fpm php-mbstring php-xml php-bcmath php-mysql unzip curl sudo apt install nginx
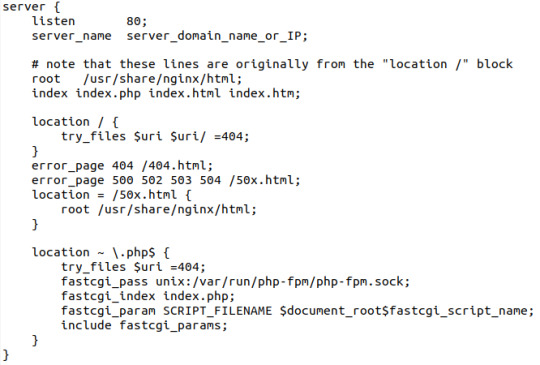
Configure Nginx: Set up Nginx to serve your Laravel app. Create a new Nginx configuration file under /etc/nginx/sites-available/your-app and link it to /etc/nginx/sites-enabled/.Example configuration:nginxCopy codeserver { listen 80; server_name your-domain.com; root /var/www/your-app/public; index index.php index.html index.htm; location / { try_files $uri $uri/ /index.php?$query_string; } location ~ \.php$ { fastcgi_pass unix:/var/run/php/php7.4-fpm.sock; fastcgi_index index.php; fastcgi_param SCRIPT_FILENAME $document_root$fastcgi_script_name; include fastcgi_params; } error_log /var/log/nginx/error.log; access_log /var/log/nginx/access.log; }
Database Configuration: Set up a MySQL or PostgreSQL database (you can use Amazon RDS for a managed database) and configure your .env file with the correct credentials.
SSL and Security: Secure your application with SSL (using Let's Encrypt or AWS Certificate Manager) and ensure your firewall and security groups are configured correctly.
Deploy Code: You can deploy your Laravel application to EC2 using Git, FTP, or tools like Envoyer or Laravel Forge. For Git deployment, clone your repository and configure your environment variables.
B. Deploying Laravel to DigitalOcean
DigitalOcean provides a simple and cost-effective way to host Laravel applications. Here’s how to deploy:
Create a Droplet: Log into your DigitalOcean account and create a new Droplet with a suitable operating system (typically Ubuntu).
Install PHP, Nginx, and Composer: SSH into your droplet and install the necessary dependencies for your Laravel app:bashCopy codesudo apt update sudo apt install php php-fpm php-mbstring php-xml php-bcmath php-mysql unzip curl sudo apt install nginx
Configure Nginx and Laravel Application: Configure Nginx to point to your Laravel application’s public folder and set up SSL.
Database Configuration: Set up MySQL or PostgreSQL on your droplet, then configure the .env file for your database credentials.
Deploying the Code: You can either deploy your code via Git or use an automation tool like Envoyer to streamline deployments. You’ll also need to configure file permissions for storage and cache directories.
C. Deploying Laravel to Heroku
Heroku is an excellent choice for quick and easy Laravel application deployment with minimal configuration. Here’s how you can deploy a Laravel app on Heroku:
Create a Heroku App: Sign up or log into your Heroku account and create a new app. This will automatically provision a server for you.
Install Heroku CLI: Install the Heroku CLI on your local machine if you haven't already:bashCopy codecurl https://cli-assets.heroku.com/install.sh | sh
Configure the .env File for Heroku: Heroku uses environment variables, so make sure you configure your .env file correctly or set them directly in the Heroku dashboard.
Deploy the Code: Push your code to Heroku using Git:bashCopy codegit push heroku master
Database Configuration: Heroku offers a managed PostgreSQL database that you can provision with the command:bashCopy codeheroku addons:create heroku-postgresql:hobby-dev
Run Migrations: Run database migrations on Heroku with:bashCopy codeheroku run php artisan migrate
3. Automating Deployment with Laravel Forge or Envoyer
For smoother deployment management, you can use tools like Laravel Forge or Envoyer.
Laravel Forge: Laravel Forge is a server management and deployment service designed for PHP applications. It automates tasks like server provisioning, security updates, and Laravel deployments to platforms like AWS, DigitalOcean, and others.
Envoyer: Envoyer is a zero-downtime deployment tool that ensures your Laravel app is deployed with no interruption to your users. It handles the deployment process seamlessly, ensuring the application is running smoothly at all times.
4. Conclusion
Deploying a Laravel application to the cloud can seem daunting, but it becomes easier with tools and services that automate much of the process. Whether you choose AWS, DigitalOcean, or Heroku, each platform offers unique benefits for hosting your Laravel application. Using automation tools like Forge and Envoyer, you can further streamline the deployment process, ensuring your app runs smoothly and efficiently in the cloud.
0 notes
Text
How to Fix Missing MySQL Extension Error in WordPress
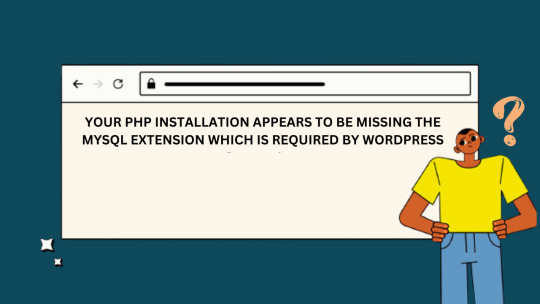
WordPress is a powerful and popular content management system used by millions of websites worldwide. Besides, it relies on various server-side technologies, including MySQL, to store and manage data. Occasionally, users may encounter a “Missing MySQL Extension” error, which can be frustrating but is usually easy to fix. In this guide, we will walk you through the steps to resolve this issue and get your WordPress site up and running smoothly.
WHAT CAUSES THE “MISSING MYSQL EXTENSION” ERROR?
The “Missing MySQL Extension” error typically occurs when your server lacks the necessary PHP extension to connect to the MySQL database. WordPress relies heavily on MySQL to manage and store content, so this error can disrupt the functionality of your website.
STEP 1: CHECK YOUR PHP VERSION
Before proceeding with any fixes, it’s essential to ensure that you are using a compatible PHP version with WordPress. At the time of writing this article, WordPress recommends using PHP 7.4 or later. You can check your PHP version by creating a simple PHP script:
<?php phpinfo(); ?>
Save this script as phpinfo.php, upload it to your website’s root directory, and access it through your web browser. Look for the PHP version information on the page.
STEP 2: ENABLE MYSQL EXTENSION
If you find that you are using a compatible PHP version, but the MySQL extension is still missing, you need to enable it. Follow these steps to enable the MySQL extension:
For Windows Servers:
Locate your PHP installation directory (e.g., C:\PHP).
Open the php.ini file in a text editor.
Search for the following line and remove the semicolon (;) at the beginning:
;extension=mysqli
4. Save the changes.
5. Restart your web server (e.g., Apache or Nginx).
For Linux Servers (e.g., Ubuntu):
SSH into your server.
Open the PHP configuration file using a text editor (e.g., nano or vim). The file is typically located at /etc/php//cli/php.ini.
Look for the following line and uncomment it by removing the semicolon (;) at the beginning if necessary:
;extension=mysqli
4. Save the changes and exit the text editor.
5. Restart the PHP service to apply the changes:
sudo service php<your-php-version>-fpm restart
STEP 3: VERIFY THE MYSQL EXTENSION IS LOADED
After enabling the MySQL extension, it’s crucial to verify that it’s loaded correctly. Create a PHP script named mysql_check.php with the following code:
<?php if (extension_loaded('mysqli')) { echo "MySQLi extension is enabled."; } else { echo "MySQLi extension is not enabled."; } ?>
Upload this script to your website’s root directory and access it through your web browser. You should see a message confirming that the MySQLi extension is enabled.
The “Missing MySQL Extension” error in WordPress can be a hindrance, but it’s usually easy to fix by enabling the MySQL extension in your PHP configuration. By following the steps outlined in this guide, you should be able to resolve the issue and ensure your WordPress website operates seamlessly. Remember to keep your PHP version up to date and perform regular maintenance to prevent similar issues in the future.
0 notes
Text
Self vs Managed WordPress Hosting : An In-Depth Comparison [2023]

The main difference between Self Hosting and Managed WordPress hosting is that Self hosting gives you full control and responsibility for your WordPress website’s server and infrastructure, whereas managed WordPress hosting provides a hands-off approach, letting the host handle security, updates, and performance optimization.
If you're starting a new WordPress website, one of the biggest decisions you'll make is whether to go with self-hosted WordPress or use a managed WordPress hosting provider.
This choice affects everything from your monthly hosting bill to the amount of control you have over your site. It's important to weigh the pros and cons carefully based on your specific needs.
In this guide, we'll dive deep into the self-hosting vs managed WordPress hosting debate and equip you with everything you need to decide. Buckle up for a bumpy ride down the WordPress hosting rabbit hole!
Self-Hosted WordPress Explained
Self-hosting means you rent a virtual private server (VPS) or dedicated server, install WordPress yourself, and manage everything at the system and application level.
With self-hosted WordPress, you take complete ownership over your hosting environment. Here's a closer look at what's involved :
Hardware Provisioning
The first step is sourcing the actual physical server your site will run on. You can rent a VPS or dedicated server from providers like :
DigitalOcean
Vultr
Linode
AWS
Google Cloud
VPS plans start around $10/month for basic setups. Dedicated servers are more expensive but give you sole access to the underlying hardware.
Make sure to choose a provider with servers near your audience for fastest performance.
Software Setup & Configuration
Once you have your VPS or dedicated box, it's time to set up the software powering your WordPress site :
Install a Linux distro like Ubuntu or CentOS
Configure the LAMP or LEMP stack (Linux, Apache/Nginx, MySQL, PHP)
Tweak the Apache/Nginx config for optimal WordPress performance
Secure MySQL, PHP, and other services
Install caching like Varnish and php-fpm
Set up a control panel like CPanel for easier management
This process requires deep Linux server and WordPress expertise. But the payoff is getting everything finely tuned for your particular site's needs.
Ongoing Management
Server setup is just the beginning. With self-hosted infrastructure, you must handle all ongoing management and maintenance yourself including :
OS and software updates
Security patching
WordPress core, plugin and theme updates
Backups and disaster recovery
Monitoring uptime and performance
Optimizing the stack as needed
Troubleshooting any issues that arise
The work never stops when you self-host! You must stay vigilant to keep your site running smoothly.
The Pros of Self-Hosted WordPress
Let's recap the biggest benefits of rolling your own WordPress hosting environment :
Total control: You make all hosting decisions to perfectly fit your specific needs.
Flexibility and customization: You can configure server software like PHP, MySQL, Nginx however you want.
Cost savings: Once optimized, self-hosted sites can cost less per month than managed WordPress hosting.
Performance and scalability: You can fully optimize and tune the server for your particular site.
No vendor lock-in: You can easily migrate between different server providers.
When to Consider Self-Hosted WordPress
Self-hosted infrastructure makes the most sense for :
Developers and engineers with server administration expertise
Sites that require total control over the stack
Companies with large budgets for hosting costs
Complex sites anticipating high traffic and load
Businesses wanting to scale sites across multiple servers
Anyone running advanced stack configurations like HHVM or custom LEMP
Potential Downsides of Self-Hosted
Self-hosting isn't all sunshine and rainbows. Here are the biggest challenges to weigh :
Time investment: Server setup and management is extremely time consuming and complex.
Technical skill required: You must have significant sysadmin, DevOps, and WordPress expertise.
Maintenance overhead: OS, software, and WordPress updates are a never-ending chore.
Security liability: You're fully responsible for protecting against threats and vulnerabilities.
No support: If (and when) problems occur, you're on your own to fix them.
Higher learning curve: Be prepared to invest many hours mastering server configuration.
As you can see, self-managed WordPress hosting is definitely not for the faint of heart!
Managed WordPress Hosting Overview
In contrast to the DIY approach of self-hosting, managed WordPress hosting providers take care of everything related to your infrastructure and server environment.
Companies like WordPress Engine, Kinsta, and Pagely handle all aspects like :
Server provisioning
WordPress installation
Software setup and configuration
Ongoing maintenance and management
Updates
Security
Backups
Caching and performance optimization
24/7 WordPress technical support
This hands-off approach allows you to focus entirely on your site content and not worry about hosting headaches.
How Managed WordPress Hosting Works
Let's look at how managed WordPress hosting operates under the hood :
Optimized Infrastructure
Hosts like WordPress Engine build their architecture specifically for WordPress. This includes :
High-performance server hardware
CDNs for blazing fast static file delivery
Multiple app and database server clusters
Batched updates and maintenance for minimal downtime
Geographic redundancy to keep sites always online
The result is WordPress performance and reliability far exceeding what most self-hosted setups can achieve.
Hardened Security
Managed hosts implement numerous security enhancements like :
Automated malware detection and removal
DDoS protection
Advanced firewalls and access control lists
Ongoing vulnerability scanning and patching
Regular penetration testing
Forced SSL to encrypt all connections
Your site stays locked down and safe from threats.
Hassle-Free Maintenance
Hosts take complete ownership of mundane but critical tasks like :
OS and software updates
Daily offsite cloud backups
WordPress core and plugin updates
Content delivery network (CDN) config
SMTP email delivery management
Performance monitoring and optimization
You'll never have to worry about this stuff again!
White-Glove Support
Managed WordPress hosting providers staff teams of WordPress experts available 24/7 to help with :
Site migrations
Configuration questions
Troubleshooting plugin and theme conflicts
Diagnosing performance problems
Outages and emergency response
Any other issues that come up
For those times when you need a lifeline, support is just a phone call or support ticket away.
The Benefits of Managed WordPress Hosting
Let's recap the biggest perks of handing off hosting management :
No technical skill required: You don't need any sysadmin or DevOps expertise.
Blazing fast performance: Providers optimize WordPress speed right out of the box.
Enhanced security: Hardened environments keep your data safe.
99.9% or better uptime: Clustering and redundancy eliminate downtime.
Automatic updates: WordPress and plugins stay up to date automatically.
Time savings: No need to manage infrastructure yourself.
24/7 expert support: Get help anytime you need it.
Daily backups: Never lose data or worry about disaster recovery.
When to Consider Managed WordPress Hosting
Managed WordPress hosting is a perfect fit for :
Bloggers who want to focus on content instead of backend complexity
Ecommerce sites and client projects needing rock-solid reliability
Publishers and media companies with large audiences
Regulated businesses requiring security and compliance
Sites where fast performance and SEO are critical
Anyone looking to offload infrastructure management
Potential Downsides of Managed Hosting
Managed WordPress hosting isn't without some tradeoffs :
Less control and flexibility: You must accept the provider's system configurations.
Limited customization: Some hosts restrict plugins or forbid code changes.
Higher cost: Managed WordPress hosting is more expensive than self-hosting.
Vendor lock-in: Migrating between managed hosts is harder than switching servers yourself.
Overkill for simple sites: Lots of overhead and cost for basic blogs.
Hybrid Hosting: Getting the Best of Both Worlds
If you like aspects of both self-hosted and fully managed WordPress hosting, hybrid options try to give you the best of both worlds.
Platforms like Cloudways, Kinsta MyKinsta, and Pantheon combine easy WordPress setup and management with more flexibility over your environment.
For example, Cloudways still handles core infrastructure like scaling and security. But you get more configuration control, choice of server location, and the ability to install whatever software you need.
Hybrid platforms can be a great middle ground. Evaluate options like :
Cloudways
Kinsta MyKinsta
Pantheon
Pagely
WordPress-Engine Genesis
DreamPress
The downside is hybrid hosts tend to offer less optimization and fewer enterprise features out of the box compared to true premium managed WordPress hosting.
Migrating Between Environments
One final thing to note - don't get analysis paralysis worrying about picking the "perfect" option upfront.
If your needs change down the road, you can always migrate from self-hosted WordPress to managed hosting or vice versa.
Just make sure to choose a platform that provides tools to make the transition as smooth as possible.
For example, hosts like WordPress Engine offer a migration service to safely transfer your site. And they provide instructions on exporting your database and files for self-migration.
The takeaway? Don't let hosting decisions delay actually launching your WordPress site! Pick an environment, get up and running, and optimize later.
Which is Right for You?
So which type of WordPress hosting should you choose? Here are some final recommendations based on common use cases :
For Bloggers
Go with managed WordPress hosting. The last thing you want is dealing with servers and infrastructure when you should be focused on creating content.
For Developers
Self-hosted is likely the best fit. You'll want access and control to run whatever stack and configurations you need.
For Ecommerce Sites
Managed hosting is ideal. You'll benefit from optimized performance, tight security, and expert support for your business.
For Enterprise Companies
Either self-hosted or managed enterprise-grade hosting. For large complex sites, leave it to the experts.
When In Doubt
You really can't go wrong starting with managed WordPress hosting, even as a developer. Let the provider handle infrastructure so you can focus on building an awesome site!
Don't Stress, Just Start!
I know that was a boatload of information to process. But don't overthink the self-hosted vs managed WordPress hosting decision.
The most important thing is to get your site launched and start sharing your passion with the world! You can always change environments later if you want more control or less complexity.
With the right host and a well-crafted strategy, you can build a WordPress site that achieves all your goals and visions. So take a deep breath, review the options, and make the best decision for today.
The perfect WordPress hosting fit for you is just a signup form away. It's time to stop dreaming and start doing - now get out there and start that site!
#wordpress#managed wordpress hosting#self vs managed wordpress#self vs managed wordpress hosting#self hosting#self vs managed hosting#self hosting vs managed hosting#managed hosting in wordpress#self vs managed hosting in wordpress
0 notes
Video
youtube
How to Install Wordpress With Nginx on Debian 10 VPS
This video shows you how to install WordPress with Nginx on Debian 10 VPS.
============================== INITIAL SERVER SETUP DEBAIN 10 ============================== Login to Server: ssh root@your_server_ip
apt update -y && apt upgrade -y
adduser debian
usermod -a -G sudo debian
Configure SSH : nano /etc/ssh/sshd_config
Add and change the information: Port 22500 Protocol 2 PermitRootLogin no
Add to End of File : UseDNS no AllowUsers debian
Save and Close
Restart SSH service: systemctl restart ssh.service
Logout:
Ctrl+D
Login using user with sudo privilages: ssh -p 22500 user@ip_address
============================== INSTALL NGINX, PHP AND MARIADB ============================== Install Nginx, MariaDB, PHP, and other PHP modules : sudo apt install nginx mariadb-server mariadb-client php-cgi php-common php-fpm php-pear php-mbstring php-zip php-net-socket php-gd php-xml-util php-gettext php-mysql php-bcmath unzip wget git curl -y
Open the php.ini file: sudo nano /etc/php/7.3/fpm/php.ini
Make the following changes: post_max_size = 64M memory_limit = 256M max_execution_time = 300 upload_max_filesize = 32M date.timezone = America/Chicago //optional
Save and Close : Ctrl O+X
Restart PHP-FPM service: sudo systemctl restart php7.3-fpm.service
============================== CONFIGURE NGINX FOR WORDPRESS ============================== Create root directory: sudo mkdir /var/www/domain
sudo nano /etc/nginx/sites-available/domain.name
------------------------------ server { listen 80; root /var/www/linuxscoop.cc; index index.php; server_name domain.name www.domain.name;
access_log /var/log/nginx/domain.name_access.log; error_log /var/log/nginx/domain.name_error.log;
client_max_body_size 64M; location = /favicon.ico { log_not_found off; access_log off; }
location = /robots.txt { allow all; log_not_found off; access_log off; }
location / { try_files $uri $uri/ /index.php?$args; }
location ~ \.php$ { try_files $uri =404; include /etc/nginx/fastcgi_params; fastcgi_read_timeout 3600s; fastcgi_buffer_size 128k; fastcgi_buffers 4 128k; fastcgi_param SCRIPT_FILENAME $document_root$fastcgi_script_name; fastcgi_pass unix:/run/php/php7.3-fpm.sock; fastcgi_index index.php; } location ~* \.(js|css|png|jpg|jpeg|gif|ico|svg)$ { expires max; log_not_found off; } } ------------------------------ sudo nginx -t sudo ln -s /etc/nginx/sites-available/domain.name.conf /etc/nginx/sites-enabled/ sudo systemctl restart nginx.service sudo systemctl restart php7.3-fpm.service
============================== CONFIGURE A WORDPRESS DATABASE ============================== sudo mysql_secure_installation
mysql -u root -p
CREATE DATABASE dbwordpress DEFAULT CHARACTER SET utf8 COLLATE utf8_unicode_ci;
GRANT ALL ON dbwordpress.* TO 'wpuser'@'localhost' IDENTIFIED BY '5tR0n6p@s5WorD';
FLUSH PRIVILEGES;
EXIT;
============================== INSTALL WORDPRESS ============================== cd /tmp wget https://wordpress.org/latest.tar.gz tar -xvzf latest.tar.gz cd wordpress cp /tmp/wordpress/wp-config-sample.php /tmp/wordpress/wp-config.php sudo cp -av wordpress/. /var/www/domain/
WordPress secret key generator : curl -s https://api.wordpress.org/secret-key/1.1/salt/ ------------------------------ define('AUTH_KEY', '|V^%QD3_3G*Q7oaQRYtC).`CRE2c(pOf rR9D8|%G-y~=AmGH.bhf.vYJ1j~-wQR'); define('SECURE_AUTH_KEY', '_Wa.<dawj6|+w0%0:K3D<0;+d,|]H7-oea,CVT_(2ha~+N(&7d+] ${-RA#^S9o<'); define('LOGGED_IN_KEY', 'hQH<I^d3G20Lp,ep%>f}m#beM9|vL&Yxt5iJwK4qlK25Qe#_+Np4Su?WZzQ~)+@R'); define('NONCE_KEY', ')b(/p}n{+BR=<| ^Hs=7G<A?Q9C?X=}fnR2x8r)U-V;|-|A4G:zV58pxicLd~G%/'); define('AUTH_SALT', 'HLJl6K5b4uGPsb^ev?E!Qi<4_0PD[z/|.CNx+cM8 O-&Qe l(tQ_j#@ellU)kd +'); define('SECURE_AUTH_SALT', 'sw1uE~TgH5~gYK23kdvn_p.<yS,G{8_G^=.m)1Y2U+34vvQWK4}D[}} %K:w^tw='); define('LOGGED_IN_SALT', 'y1Yb 2xG;yHgN*&*L|i2{mrfdGmPX2.E|l=U%gekC$x@G;dxTIL|-cw]zJZv{- <'); define('NONCE_SALT', '.coEf^|KY.|$`>MmuW5H(bEFY&_*r4Jky(Dh?,M6V)`!867aG~9-V+ESJK}rq9`8'); ------------------------------ sudo nano /var/www/linuxscoop/wp-config.php ------------------------------ // ** MySQL settings - You can get this info from your web host ** // /** The name of the database for WordPress */ define( 'DB_NAME', 'database_name' );
/** MySQL database username */ define( 'DB_USER', 'database_user' );
/** MySQL database password */ define( 'DB_PASSWORD', 'database_passsword' );
/** MySQL hostname */ define( 'DB_HOST', 'localhost' ); ------------------------------ sudo chown -Rv www-data:www-data /var/www/domain/
============================== INSTALL AND CONFIGURE LET'S ENCRYPT SSL CERTIFICATE ============================== sudo apt install python3-acme python3-certbot python3-mock python3-openssl python3-pkg-resources python3-pyparsing python3-zope.interface sudo apt install python3-certbot-nginx sudo certbot --nginx -d domain.name -d www.domain.name
Renew : sudo certbot renew --dry-run ============================== SETTING UP FIREWALL ============================== sudo apt install ufw sudo ufw enable sudo ufw app list sudo ufw allow 22500/tcp comment 'Open port ssh tcp port 22500' sudo ufw allow 80 sudo ufw allow 443 sudo ufw status
============================== COMPLETE WORDPRESS SETUP ============================== Install wordpress through Web Browser
5 notes
·
View notes
Photo

Comment configurer Apache HTTP avec MPM Event et PHP-FPM sur Ubuntu 18.04 | DigitalOcean ☞ https://bit.ly/30lpRsS #php #laravel
1 note
·
View note
Text
5CloudHost Reviews - 5 years Hosting DONE
https://lephuocloc.com/5cloudhost-review/
If you happen to get the fake web encouraging arrangement you are sunk... from dynamic weight cases, to unsteady servers, with a foul host you are only a hairs broadness away from debacle!
Doesn't have any kind of effect if you are a blogger, branch promoter or online storekeeper, any individual who does 5CloudHost Review one thing on the web needs Net Internet encouraging.
So why take these loopy risks alongside your web based endeavor when you can have over the top profitability (SSD based generally), Totally Redundant Cloud Internet encouraging for an incredible bang down worth...
For the going with scarcely any days as a bit of this Vacation Particular Provide you can safe 5 Years of Internet encouraging for lower than most has cost for 1.
Imperative: This INCLUDES DAILY BACKUPSmost has cost extra for this, these people hurl it in light of they see fundamentally how essential that is.
That isn't all, their 1-Click on coordination with CloudFlare makes it tremendous simple to get the compensations of the BEST CDN (Content material Supply Community) reachable todaygiving you significantly higher site load paces and prosperity!
With 5CloudHost, you can make sure about 5 years of web encouraging for lower than most has cost per 30 days!
5CloudHost offers frantically smart stacking speed in your site
5CloudHost has particularly suitable servers with 40 focuses Intel Xeon CPUs, 128GB of hammer, assault guaranteed SSD Storage and 10Gbps web accessibility.
They use SSD-simply strike made sure about reserves, that can update the adjustment to inner disappointment and the learn/make speed out of the servers(particularly MySQL) therefore your site will stack 10x quicker regardless.
Also, they're CloudFlare Optimized partner, so you can allow Cloudflare's CDN out of your cPanel account with 1 snap on. CloudFlare makes it clear for any website to be as lively and safe in light of the fact that the Web mammoths.
They've a changed web-server configuration filled by Apache with PHP7.3, mod_http2, php-fpm, mod_lsapi, opcache and MariaDB for Mysql Databases, that can make any webpage open immediately.
Send your site on their impacting speedy, easy to-use, sheltered and ultra-strong cloud stage 5CloudHost with large business servers, essentialness by cPanel.
Totally Redundant Cloud
Their cutting edge Cloud and 1Tbps Community system close by CloudFlare's CDN will hold your website on the web and can stack it speedily from any recess of the world.
Nonsensical Efficiency {Hardware}
Their extraordinarily suitable servers with 40 Cores Intel XEON CPUs and 128GB RAM, RAID guaranteed SSD amassing, associated with the web at 10Gbps will improve your website's speed.
Brisk Activation
Your organized thing will in all likelihood be routinely and instantly impelled since you might be utilizing a checked PayPal account in your buy.
Safe Infrastructure
Furthermore reality that all datacenters are Tier Three approved, every server has it is near and dear firewall, waf, threatening to malware and against contamination scanner andThey take each day bakups for each record.
Especially convincing Automation
Quit achieving handbook work. With us you can game plan your webpage, make your electronic mail addresses and get online in minutes, with essentially a couple of ticks.
Given Assist
Their gave in-house help staff is offered all day every day to answer each particular difficulty you could involvement in any of their item.
What 5CloudHost's Prospects Say
Escape Particular Restricted Provide: Get 5 years of web encouraging your can conviction from an insisted provider...
There is no higher strategies for understanding you are in the most ideal spot than REAL recommendations from REAL customers indistinct from you:
"5Cloudhost helped me when my endeavor was so quickly rising my out of date web encouraging couldn't deal with the store any more."
Jean-Paul Autin - eCommerce Firm
"My clients didn't fitness a lone snapshot of individual time since I moved my associations over to 5Cloudhost. Very genuinely extraordinary!"
Diminish Miller - Net Developer
"Tech help is snappy and dependable, Suggest these organization!"
Darrel Pitter
"Changing to 5Cloudhost we had been fit for cut down the web encouraging expenses at any rate the destinations are stacking a lot quicker. Endorsement!"
Maria Popescu - Affiliate Marketer
"Reliable servers with 100% SSD's in 7 spots the world over. Their groups are strong however their assistance is each beguiling and taught"
Engraving Holden - Net Internet encouraging Skilled
likewise, there is tons extra!
This can be a site encouraging firm who put their purchasers first, they know the estimation of completely satisfied clients! Likewise, that is your probability to make sure about 5 years of bliss for a loopy insignificant exertion estimation of underneath $10 PER YEAR!
Most representatives select their first webhost with none real cognizance of what is fundamental, additionally what it may a motivator for the people who select the deceptive each and every one of it goes deceitful...
Consider you have bought your site endeavoring to the stage the spot it is getting lots of, and even 1000's of {dollars} a day after which the unavoidably occurs...
your site is hacked or your server mishaps and you don't have any fortification, no techniques for recovering what you have lost and getting your site again up and working!
The related cost in lost salary alone is terrifying, by then there's the hit to your commonness, from present clients, potential new clients (directly lost), and even your rankings in Google!
Why even take that peril inside the essential spot?
Improve your privately owned business for 2020, legitimately through to 2025deploy your webpage on blasting speedy, easy to-use, protected and ultra-strong cloud web encouraging with large business servers at present.
In light of your clients hate arranged and the region speed can similarly be a web list rating issue, the web encouraging must be quick!
Genuine now you may get totally that, AND you can make sure about 5 years of web encouraging for lower than the ordinary estimation of only one, with no month-to-month charges!
5CloudHost offers 5 years of Blazing-Quick Webhosting for lower than the estimation of 1.
https://lephuocloc.com/5cloudhost-review/
https://lephuocloc.com/

1 note
·
View note
Photo

Your PHP based website could be vulnerable to this flaw if your #NGINX and PHP-FPM configuration looks something like this: Specifically, when there are no checks like try_files $uri =404 or if (-f $uri) to determine whether a script file exists or not. https://t.co/ox4md0tIxo (via Twitter http://twitter.com/TheHackersNews/status/1188180013792645120)
4 notes
·
View notes
Text
Installing Nginx, MySQL, PHP (LEMP) Stack on Ubuntu 18.04

Ubuntu Server 18.04 LTS (TunzaDev) is finally here and is being rolled out across VPS hosts such as DigitalOcean and AWS. In this guide, we will install a LEMP Stack (Nginx, MySQL, PHP) and configure a web server.
Prerequisites
You should use a non-root user account with sudo privileges. Please see the Initial server setup for Ubuntu 18.04 guide for more details.
1. Install Nginx
Let’s begin by updating the package lists and installing Nginx on Ubuntu 18.04. Below we have two commands separated by &&. The first command will update the package lists to ensure you get the latest version and dependencies for Nginx. The second command will then download and install Nginx.
sudo apt update && sudo apt install nginx
Once installed, check to see if the Nginx service is running.
sudo service nginx status
If Nginx is running correctly, you should see a green Active state below.
● nginx.service - A high performance web server and a reverse proxy server Loaded: loaded (/lib/systemd/system/nginx.service; enabled; vendor preset: enabled) Active: active (running) since Wed 2018-05-09 20:42:29 UTC; 2min 39s ago Docs: man:nginx(8) Process: 27688 ExecStart=/usr/sbin/nginx -g daemon on; master_process on; (code=exited, status=0/SUCCESS) Process: 27681 ExecStartPre=/usr/sbin/nginx -t -q -g daemon on; master_process on; (code=exited, status=0/SUCCESS) Main PID: 27693 (nginx) Tasks: 2 (limit: 1153) CGroup: /system.slice/nginx.service ├─27693 nginx: master process /usr/sbin/nginx -g daemon on; master_process on; └─27695 nginx: worker process
You may need to press q to exit the service status.
2. Configure Firewall
If you haven’t already done so, it is recommended that you enable the ufw firewall and add a rule for Nginx. Before enabling ufw firewall, make sure you add a rule for SSH, otherwise you may get locked out of your server if you’re connected remotely.
sudo ufw allow OpenSSH
If you get an error “ERROR: could find a profile matching openSSH”, this probably means you are not configuring the server remotely and can ignore it.
Now add a rule for Nginx.
sudo ufw allow 'Nginx HTTP'
Rule added Rule added (v6)
Enable ufw firewall.
sudo ufw enable
Press y when asked to proceed.
Now check the firewall status.
sudo ufw status
Status: active To Action From -- ------ ---- OpenSSH ALLOW Anywhere Nginx HTTP ALLOW Anywhere OpenSSH (v6) ALLOW Anywhere (v6) Nginx HTTP (v6) ALLOW Anywhere (v6)
That’s it! Your Nginx web server on Ubuntu 18.04 should now be ready.
3. Test Nginx
Go to your web browser and visit your domain or IP. If you don’t have a domain name yet and don’t know your IP, you can find out with:
sudo ifconfig | grep -Eo 'inet (addr:)?([0-9]*\.){3}[0-9]*' | grep -Eo '([0-9]*\.){3}[0-9]*' | grep -v '127.0.0.1'
You can find this Nginx default welcome page in the document root directory /var/www/html. To edit this file in nano text editor:
sudo nano /var/www/html/index.nginx-debian.html
To save and close nano, press CTRL + X and then press y and ENTER to save changes.
Your Nginx web server is ready to go! You can now add your own html files and images the the /var/www/html directory as you please.
However, you should acquaint yourself with and set up at least one Server Block for Nginx as most of our Ubuntu 18.04 guides are written with Server Blocks in mind. Please see article Installing Nginx on Ubuntu 18.04 with Multiple Domains. Server Blocks allow you to host multiple web sites/domains on one server. Even if you only ever intend on hosting one website or one domain, it’s still a good idea to configure at least one Server Block.
If you don’t want to set up Server Blocks, continue to the next step to set up MySQL.
4. Install MySQL
Let’s begin by updating the package lists and installing MySQL on Ubuntu 18.04. Below we have two commands separated by &&. The first command will update the package lists to ensure you get the latest version and dependencies for MySQL. The second command will then download and install MySQL.
sudo apt update && sudo apt install mysql-server
Press y and ENTER when prompted to install the MySQL package.
Once the package installer has finished, we can check to see if the MySQL service is running.
sudo service mysql status
If running, you will see a green Active status like below.
● mysql.service - MySQL Community Server Loaded: loaded (/lib/systemd/system/mysql.service; enabled; vendor preset: enabled) Active: active (running) since since Wed 2018-05-09 21:10:24 UTC; 16s ago Main PID: 30545 (mysqld) Tasks: 27 (limit: 1153) CGroup: /system.slice/mysql.service └─30545 /usr/sbin/mysqld --daemonize --pid-file=/run/mysqld/mysqld.pid
You may need to press q to exit the service status.
5. Configure MySQL Security
You should now run mysql_secure_installation to configure security for your MySQL server.
sudo mysql_secure_installation
If you created a root password in Step 1, you may be prompted to enter it here. Otherwise you will be asked to create one. (Generate a password here)
You will be asked if you want to set up the Validate Password Plugin. It’s not really necessary unless you want to enforce strict password policies for some reason.
Securing the MySQL server deployment. Connecting to MySQL using a blank password. VALIDATE PASSWORD PLUGIN can be used to test passwords and improve security. It checks the strength of password and allows the users to set only those passwords which are secure enough. Would you like to setup VALIDATE PASSWORD plugin? Press y|Y for Yes, any other key for No:
Press n and ENTER here if you don’t want to set up the validate password plugin.
Please set the password for root here. New password: Re-enter new password:
If you didn’t create a root password in Step 1, you must now create one here.
Generate a strong password and enter it. Note that when you enter passwords in Linux, nothing will show as you are typing (no stars or dots).
By default, a MySQL installation has an anonymous user, allowing anyone to log into MySQL without having to have a user account created for them. This is intended only for testing, and to make the installation go a bit smoother. You should remove them before moving into a production environment. Remove anonymous users? (Press y|Y for Yes, any other key for No) :
Press y and ENTER to remove anonymous users.
Normally, root should only be allowed to connect from 'localhost'. This ensures that someone cannot guess at the root password from the network. Disallow root login remotely? (Press y|Y for Yes, any other key for No) :
Press y and ENTER to disallow root login remotely. This will prevent bots and hackers from trying to guess the root password.
By default, MySQL comes with a database named 'test' that anyone can access. This is also intended only for testing, and should be removed before moving into a production environment. Remove test database and access to it? (Press y|Y for Yes, any other key for No) :
Press y and ENTER to remove the test database.
Reloading the privilege tables will ensure that all changes made so far will take effect immediately. Reload privilege tables now? (Press y|Y for Yes, any other key for No) :
Press y and ENTER to reload the privilege tables.
All done!
As a test, you can log into the MySQL server and run the version command.
sudo mysqladmin -p -u root version
Enter the MySQL root password you created earlier and you should see the following:
mysqladmin Ver 8.42 Distrib 5.7.22, for Linux on x86_64 Copyright (c) 2000, 2018, Oracle and/or its affiliates. All rights reserved. Oracle is a registered trademark of Oracle Corporation and/or its affiliates. Other names may be trademarks of their respective owners. Server version 5.7.22-0ubuntu18.04.1 Protocol version 10 Connection Localhost via UNIX socket UNIX socket /var/run/mysqld/mysqld.sock Uptime: 4 min 28 sec Threads: 1 Questions: 15 Slow queries: 0 Opens: 113 Flush tables: 1 Open tables: 106 Queries per second avg: 0.055
You have now successfully installed and configured MySQL for Ubuntu 18.04! Continue to the next step to install PHP.
6. Install PHP
Unlike Apache, Nginx does not contain native PHP processing. For that we have to install PHP-FPM (FastCGI Process Manager). FPM is an alternative PHP FastCGI implementation with some additional features useful for heavy-loaded sites.
Let’s begin by updating the package lists and installing PHP-FPM on Ubuntu 18.04. We will also install php-mysql to allow PHP to communicate with the MySQL database. Below we have two commands separated by &&. The first command will update the package lists to ensure you get the latest version and dependencies for PHP-FPM and php-mysql. The second command will then download and install PHP-FPM and php-mysql. Press y and ENTER when asked to continue.
sudo apt update && sudo apt install php-fpm php-mysql
Once installed, check the PHP version.
php --version
If PHP was installed correctly, you should see something similar to below.
PHP 7.2.3-1ubuntu1 (cli) (built: Mar 14 2018 22:03:58) ( NTS ) Copyright (c) 1997-2018 The PHP Group Zend Engine v3.2.0, Copyright (c) 1998-2018 Zend Technologies with Zend OPcache v7.2.3-1ubuntu1, Copyright (c) 1999-2018, by Zend Technologies
Above we are using PHP version 7.2, though this may be a later version for you.
Depending on what version of Nginx and PHP you install, you may need to manually configure the location of the PHP socket that Nginx will connect to.
List the contents for the directory /var/run/php/
ls /var/run/php/
You should see a few entries here.
php7.2-fpm.pid php7.2-fpm.sock
Above we can see the socket is called php7.2-fpm.sock. Remember this as you may need it for the next step.
7. Configure Nginx for PHP
We now need to make some changes to our Nginx server block.
The location of the server block may vary depending on your setup. By default, it is located in /etc/nginx/sites-available/default.
However, if you have previously set up custom server blocks for multiple domains in one of our previous guides, you will need to add the PHP directives to each server block separately. A typical custom server block file location would be /etc/nginx/sites-available/mytest1.com.
For the moment, we will assume you are using the default. Edit the file in nano.
sudo nano /etc/nginx/sites-available/default
Press CTRL + W and search for index.html.
Now add index.php before index.html
/etc/nginx/sites-available/default
index index.php index.html index.htm index.nginx-debian.html;
Press CTRL + W and search for the line server_name.
Enter your server’s IP here or domain name if you have one.
/etc/nginx/sites-available/default
server_name YOUR_DOMAIN_OR_IP_HERE;
Press CTRL + W and search for the line location ~ \.php.
You will need to uncomment some lines here by removing the # signs before the lines marked in red below.
Also ensure value for fastcgi_pass socket path is correct. For example, if you installed PHP version 7.2, the socket should be: /var/run/php/php7.2-fpm.sock
If you are unsure which socket to use here, exit out of nano and run ls /var/run/php/
/etc/nginx/sites-available/default
... location ~ \.php$ { include snippets/fastcgi-php.conf; # # # With php-fpm (or other unix sockets): fastcgi_pass unix:/var/run/php/php7.2-fpm.sock; # # With php-cgi (or other tcp sockets): # fastcgi_pass 127.0.0.1:9000; } ...
Once you’ve made the necessary changes, save and close (Press CTRL + X, then press y and ENTER to confirm save)
Now check the config file to make sure there are no syntax errors. Any errors could crash the web server on restart.
sudo nginx -t
nginx: the configuration file /etc/nginx/nginx.conf syntax is ok nginx: configuration file /etc/nginx/nginx.conf test is successful
If no errors, you can reload the Nginx config.
sudo service nginx reload
8. Test PHP
To see if PHP is working correctly on Ubuntu 18.04, let’s a create a new PHP file called info.php in the document root directory. By default, this is located in /var/www/html/, or if you set up multiple domains in a previous guide, it may be located in somewhere like /var/www/mytest1.com/public_html
Once you have the correct document root directory, use the nano text editor to create a new file info.php
sudo nano /var/www/html/info.php
Type or paste the following code into the new file. (if you’re using PuTTY for Windows, right-click to paste)
/var/www/html/info.php
Save and close (Press CTRL + X, then press y and ENTER to confirm save)
You can now view this page in your web browser by visiting your server’s domain name or public IP address followed by /info.php: http://your_domain_or_IP/info.php
phpinfo() outputs a large amount of information about the current state of PHP. This includes information about PHP compilation options and extensions, the PHP version and server information.
You have now successfully installed PHP-FPM for Nginx on Ubuntu 18.04 LTS (Bionic Beaver).
Make sure to delete info.php as it contains information about the web server that could be useful to attackers.
sudo rm /var/www/html/info.php
What Next?
Now that your Ubuntu 18.04 LEMP web server is up and running, you may want to install phpMyAdmin so you can manage your MySQL server.
Installing phpMyAdmin for Nginx on Ubuntu 18.04
To set up a free SSL cert for your domain:
Configuring Let’s Encrypt SSL Cert for Nginx on Ubuntu 18.04
You may want to install and configure an FTP server
Installing an FTP server with vsftpd (Ubuntu 18.04)
We also have several other articles relating to the day-to-day management of your Ubuntu 18.04 LEMP server
Hey champ! - You’re all done!
Feel free to ask me any questions in the comments below.
Let me know in the comments if this helped. Follow Us on - Twitter - Facebook - YouTube.
1 note
·
View note
Link
0 notes
Text
WordPress is an open source content management system (CMS) written entirely in PHP. It uses MySQL or MariaDB database server to store its data and website configurations. WordPress is designed to be modular with template system which enables developers to design their own themes and plugins. In this article we will be doing installation of PHP, MySQL and WordPress on Amazon Linux 2 powered by Nginx Web server. You should have a running Amazon Linux 2 server with Bash shell access. A user with sudo privileges is required for escalation to root during installation of packages and modification of configuration files. The minimum requirements for this setup are: Amazon Linux 2 server Memory: 512 MB vCPU: 1 Disk Space: 1GB Internet access Domain name for your website Once you have a Server running you need to configure your DNS by creating an A record pointing to your Amazon Linux 2 public IP address. My test domain used in this guide is mysite.computingpost.com pointing to 35.20.11.34 Step 1: Update Amazon Linux Server As always we work on a server that has been updated to ensure patches are applied to guarantee server security. sudo yum -y update Wait for the updates to be applied then reboot your server. sudo systemctl reboot Login back once the server is up. $ ssh ec2-user@serverip Last login: Wed Aug 12 17:07:32 2020 from 10.0.2.2 __| __|_ ) _| ( / Amazon Linux 2 AMI ___|\___|___| https://aws.amazon.com/amazon-linux-2/ Step 2: Install PHP on Amazon Linux The versions of PHP packages available on Amazon Linux extras repository are more than one. You can list them with the command below. $ sudo amazon-linux-extras | grep php NOTE: The livepatch extra is in public preview, not meant for production use 15 php7.2 available \ 17 lamp-mariadb10.2-php7.2 available \ 31 php7.3 available \ 42 php7.4 available [ =stable ] In this guide we’ll go with the latest stable release of PHP. Enable PHP 7.4 topic. sudo amazon-linux-extras enable php7.4 Then install all required PHP extensions on Amazon Linux 2 server. sudo yum clean metadata sudo yum install php php-cli,fpm,pear,cgi,common,curl,mbstring,gd,mysqlnd,gettext,bcmath,json,xml,intl,zip,imap Accept installation prompt. Dependencies Resolved ================================================================================================================================================================== Package Arch Version Repository Size ================================================================================================================================================================== Installing: php x86_64 7.4.7-1.amzn2 amzn2extra-php7.4 3.2 M php-bcmath x86_64 7.4.7-1.amzn2 amzn2extra-php7.4 68 k php-cli x86_64 7.4.7-1.amzn2 amzn2extra-php7.4 4.9 M php-common x86_64 7.4.7-1.amzn2 amzn2extra-php7.4 1.1 M php-fpm x86_64 7.4.7-1.amzn2 amzn2extra-php7.4 1.7 M php-gd x86_64 7.4.7-1.amzn2 amzn2extra-php7.4 180 k php-intl x86_64 7.4.7-1.amzn2 amzn2extra-php7.4 221 k
php-json x86_64 7.4.7-1.amzn2 amzn2extra-php7.4 70 k php-mbstring x86_64 7.4.7-1.amzn2 amzn2extra-php7.4 513 k php-mysqlnd x86_64 7.4.7-1.amzn2 amzn2extra-php7.4 238 k php-pear noarch 1:1.10.7-3.amzn2.0.1 amzn2-core 354 k php-xml x86_64 7.4.7-1.amzn2 amzn2extra-php7.4 198 k Installing for dependencies: apr x86_64 1.6.3-5.amzn2.0.2 amzn2-core 118 k apr-util x86_64 1.6.1-5.amzn2.0.2 amzn2-core 99 k apr-util-bdb x86_64 1.6.1-5.amzn2.0.2 amzn2-core 19 k generic-logos-httpd noarch 18.0.0-4.amzn2 amzn2-core 19 k httpd x86_64 2.4.43-1.amzn2 amzn2-core 1.3 M httpd-filesystem noarch 2.4.43-1.amzn2 amzn2-core 23 k httpd-tools x86_64 2.4.43-1.amzn2 amzn2-core 87 k libxslt x86_64 1.1.28-5.amzn2.0.2 amzn2-core 243 k libzip x86_64 1.3.2-1.amzn2.0.1 amzn2-core 62 k mailcap noarch 2.1.41-2.amzn2 amzn2-core 31 k mod_http2 x86_64 1.15.3-2.amzn2 amzn2-core 146 k oniguruma x86_64 5.9.6-1.amzn2.0.3 amzn2-core 127 k php-pdo x86_64 7.4.7-1.amzn2 amzn2extra-php7.4 134 k php-process x86_64 7.4.7-1.amzn2 amzn2extra-php7.4 88 k Transaction Summary ================================================================================================================================================================== Install 12 Packages (+14 Dependent packages) Total download size: 15 M Installed size: 61 M Is this ok [y/d/N]: y Verify default PHP version in your system. $ php --version PHP 7.4.7 (cli) (built: Jul 2 2020 23:17:59) ( NTS ) Copyright (c) The PHP Group Zend Engine v3.4.0, Copyright (c) Zend Technologies Step 3: Install Nginx web server As stated earlier we’ll be using Nginx web server to host our WordPress website. Enable nginx topic. sudo amazon-linux-extras enable nginx1 Install Nginx package from extras repository. sudo yum clean metadata sudo yum -y install nginx Start and enable nginx service. sudo systemctl enable --now nginx The service should show status as running
$ systemctl status nginx ● nginx.service - The nginx HTTP and reverse proxy server Loaded: loaded (/usr/lib/systemd/system/nginx.service; enabled; vendor preset: disabled) Drop-In: /usr/lib/systemd/system/nginx.service.d └─php-fpm.conf Active: active (running) since Wed 2020-08-12 19:15:09 UTC; 6s ago Process: 3358 ExecStart=/usr/sbin/nginx (code=exited, status=0/SUCCESS) Process: 3355 ExecStartPre=/usr/sbin/nginx -t (code=exited, status=0/SUCCESS) Process: 3351 ExecStartPre=/usr/bin/rm -f /run/nginx.pid (code=exited, status=0/SUCCESS) Main PID: 3360 (nginx) CGroup: /system.slice/nginx.service ├─3360 nginx: master process /usr/sbin/nginx └─3361 nginx: worker process Aug 12 19:15:09 amazon-linux systemd[1]: Starting The nginx HTTP and reverse proxy server... Aug 12 19:15:09 amazon-linux nginx[3355]: nginx: the configuration file /etc/nginx/nginx.conf syntax is ok Aug 12 19:15:09 amazon-linux nginx[3355]: nginx: configuration file /etc/nginx/nginx.conf test is successful Aug 12 19:15:09 amazon-linux systemd[1]: Failed to read PID from file /run/nginx.pid: Invalid argument Aug 12 19:15:09 amazon-linux systemd[1]: Started The nginx HTTP and reverse proxy server If you have firewalld service active, allow http and https services. sudo firewall-cmd --add-service=http,https --permanent sudo firewall-cmd --reload List allowed services. $ sudo firewall-cmd --list-all public target: default icmp-block-inversion: no interfaces: sources: services: ssh dhcpv6-client http https ports: protocols: masquerade: no forward-ports: source-ports: icmp-blocks: rich rules: Step 4: Configure PHP FPM Service As we’ll be using Nginx web server, we need to configure FastCGI Process Manager (FPM) service. You can check cool features of FPM implementation. By default it is set to use apache user and group and we’ll need to update to nginx $ sudo vim /etc/php-fpm.d/www.conf user = nginx group = nginx Make sure it is listening on unix socket to accept FastCGI requests. listen = /run/php-fpm/www.sock Let’s also set permissions for unix socket: listen.acl_users = apache,nginx Set how the process manager will control the number of child processes to ondemand to save on memory utilization. pm = ondemand When done start and enable php-fpm service. sudo systemctl enable php-fpm sudo systemctl restart php-fpm Check the service status with systemctl command: $ systemctl status php-fpm ● php-fpm.service - The PHP FastCGI Process Manager Loaded: loaded (/usr/lib/systemd/system/php-fpm.service; disabled; vendor preset: disabled) Active: active (running) since Wed 2020-08-12 19:20:53 UTC; 8s ago Main PID: 3657 (php-fpm) Status: "Ready to handle connections" CGroup: /system.slice/php-fpm.service └─3657 php-fpm: master process (/etc/php-fpm.conf) Aug 12 19:20:53 amazon-linux systemd[1]: Starting The PHP FastCGI Process Manager... Aug 12 19:20:53 amazon-linux systemd[1]: Started The PHP FastCGI Process Manager. Step 5: Install and Configure MariaDB / MySQL Database server. You can use either MySQL or MariaDB Database server. Refer to the guides below for installation steps. Install MySQL 8 on Amazon Linux 2 Install MariaDB 10.5 on Amazon Linux 2 With database server installed and started, create a user and database for WordPress website. $ mysql -u root -p CREATE DATABASE mysite; CREATE USER "mysiteuser"@"localhost" IDENTIFIED BY "DBStr0ngP@sswOd#"; GRANT ALL PRIVILEGES ON mysite.* TO "mysiteuser"@"localhost"; FLUSH PRIVILEGES; \q Where: mysite is to be replaced with the name of database to be created. mysiteuser – Name of database user with access to mysite database DBStr0ngP@sswOd# – Database user password Access granted to localhost user. For remote replace localhost with application server IP address. Test database connection: $ mysql -u mysiteuser -p'DBStr0ngP@sswOd#';
mysql: [Warning] Using a password on the command line interface can be insecure. Welcome to the MySQL monitor. Commands end with ; or \g. Your MySQL connection id is 9 Server version: 8.0.21 MySQL Community Server - GPL Copyright (c) 2000, 2020, Oracle and/or its affiliates. All rights reserved. Oracle is a registered trademark of Oracle Corporation and/or its affiliates. Other names may be trademarks of their respective owners. Type 'help;' or '\h' for help. Type '\c' to clear the current input statement. mysql> SHOW DATABASES; +--------------------+ | Database | +--------------------+ | information_schema | | mysite | +--------------------+ 2 rows in set (0.01 sec) mysql> QUIT Bye Step 6: Install WordPress 5.5 on Amazon Linux 2 With PHP and Nginx installed we should be able to download the latest release of WordPress to our local server and configure our first website. Install wget if now available already. sudo yum -y install wget Download the latest release of WordPress. wget wordpress.org/latest.tar.gz Extract downloaded package. tar xvf latest.tar.gz Move wordpress folder to /var/www directory. sudo mv wordpress /var/www/mysite.computingpost.com Create WordPress configuration file from example configuration template. cd /var/www/mysite.computingpost.com sudo cp wp-config-sample.php wp-config.php Edit the configuration file to set database connection details. $ sudo vim wp-config.php define( 'DB_NAME', 'mysite' ); define( 'DB_USER', 'mysiteuser' ); define( 'DB_PASSWORD', 'DBStr0ngP@sswOd#' ); Step 7: Create Nginx Configuration file for WordPress Let’s create a new Nginx configuration file for our website. sudo vim /etc/nginx/conf.d/mysite.conf This a basic site configuration file which can be improved for advanced settings. server files)/.*\.php$ deny all; location ~ \.php$ try_files $uri =404; include /etc/nginx/fastcgi_params; fastcgi_read_timeout 3600s; fastcgi_buffer_size 128k; fastcgi_buffers 4 128k; fastcgi_param SCRIPT_FILENAME $document_root$fastcgi_script_name; fastcgi_pass unix:/run/php-fpm/www.sock; fastcgi_index index.php; Verify configuration file syntax: $ sudo nginx -t nginx: the configuration file /etc/nginx/nginx.conf syntax is ok nginx: configuration file /etc/nginx/nginx.conf test is successful Set web directory permissions: sudo chown -R nginx:nginx /var/www/mysite.computingpost.com Restart nginx service. sudo systemctl restart nginx Access your website domain on a browser to complete WordPress setup. Provide site title and admin username, email and password. Hit the login button after installation. Use username and password that you set in previous step. There you have WordPress dashboard. You’re good to proceed with Website design and installation of plugins which provide additional features suiting your use cases.
0 notes
Text
How to install and configure PHP with Nginx on centos7
This blog will help you to install and configure PHP with Nginx on centos7 Prerequisite Centos version 7, User with Sudo privileges Procedure Step 1: Install the EPEL repository $ sudo yum install epel-release Step 2: Install and start Nginx Run the following command to install nginx, $ sudo yum install nginx To start and enable the service using the below command, $ sudo systemctl enable --now nginx Step 3: Install PHP $ sudo yum install PHP Step 4: Configure the php Edit the php.ini file, $ sudo vim /etc/php.ini Find the line & uncomment it and change it to 0 cgi.fix_pathinfo=0 Then, edit the php-fpm configuration file, $ sudo vim /etc/php-fpm.d/www.conf Modify the following lines, - listen = /var/run/php-fpm/php-fpm.sock - listen.owner = nginx - listen.group = nginx - user = nginx - group = nginx Next, start and enable the PHP processor by running the command, $ sudo systemctl enable --now php-fpm Step 5: Nginx configuration to process PHP pages $ sudo vim /etc/nginx/conf.d/default.conf Change the file as seen as below,
Restart the Nginx service to reload the configuration file changes. $ sudo systemctl restart nginx Then you can test the PHP process on the web server by creating the info.php page on /usr/share/nginx/html. And check whether the PHP is processing on the web browser by visiting the following page in a browser http://your-server-IP-address/info.php Read the full article
0 notes
Text
Webmin alternative

#Webmin alternative how to
#Webmin alternative install
#Webmin alternative password
PHP-FPM is a daemon process which provides us with a new binary, called php-fpm, and a default configuration file called nf is installed in /etc.įor installation please follow below steps. The main features include Adaptive process spawning, Advanced process management with graceful stop/start, Accelerated upload support etc. PHP-FPM (FastCGI Process Manager) is an alternative PHP FastCGI implementation with some additional features useful for sites of any size, especially busier sites. Either you can subscribe for our Server Management or use our Hourly server management PHP-FPM If you need us to setup the sever with nginx or php-fpm with high performance, you can contact us for the setup.
#Webmin alternative install
Install the Webmin module to manage NGINX yum install wbm-virtualmin-nginx wbm-virtualmin-nginx-ssl ( centos )Īpt-get install webmin-virtualmin-nginx webmin-virtualmin-nginx-ssl ( Debian based) Start Nginx using below command /etc/init.d/nginx start Update-rc.d apache2 remove yum install nginx (Centos ) Please perform the below steps after accessing your server over SSH. Installing Nginx in WebminĪpache is the default web server installed in webmin and switching webserver apache to nginx is done only if no virtual servers are created. Ideally the change should be performed on a freshly installed system. This architecture uses small, but more importantly, predictable amounts of memory under load. Instead, it uses a much more scalable event-driven (asynchronous) architecture. Unlike traditional web servers, NGINX does not rely on threads to handle requests. It is suited to websites that have a large amount of static content. Nginx is a lightweight webserver that supports most of the functionality of Apache. NGINX is known for its high performance, stability, rich feature set, simple configuration, and low resource consumption.
#Webmin alternative how to
Where “yournewpassword” should be replaced with your password.In this blog, we will see how to install NGINX, a free, open-source, high-performance HTTP server in webmin with php-fpm.
#Webmin alternative password
In order to change your “root” password for Webmin you need to log in to your server via SSH and proceed with the following command: /usr/libexec/webmin/ /etc/webmin root yournewpassword To remove the site and all the related records, select:ĭisable and Delete > Delete Virtual ServerĬlicking “Yes, delete it” will remove all files belonging to the site, users, email accounts and databases. The site will be suspended until you unsuspend it. If you want a different type, simply before pressing the “Create Record of Type” change the type in the “A – IPv4 Address” gap.ĭisable and Delete > Disable Virtual ServerĮnter the reason for the suspension, and then press “Yes, disable it!”. Just enter the name of the DB and click on the “Create” button.īy default it will create A type record. To add a new MySQL database, select the menu item: Under “Mail forwarding settings” you can create forwarding and auto-reply message.įinally under “Other user permissions” you can specify if user should have FTP and MySQL database access or not.įor both FTP and email accounts login name is “ ”. Under “E-mail settings” you can add additional e-mail addresses. Under “Quota and home directory settings, you can specify the size of the email account. When creating user, specify the email address, username and password. To add an email account or FTP user, select: On the left menu choose “Create Virtual Server”.Įnter domain, description, password, change additional configurations (if needed) and finally press “Create server”.Īdding a new site will create a new menu items which enables to create and manage users and settings. Login details are your server’s “root” login details, which you can find on Clients Portal. Webmin uses 10000 port, so to connect to control panel on you internet browser enter: Wait for 5-10 minutes and refresh VPS management page.Choose operating system, agree with warning and press “Continue”.Press the “Manage” button at the service table.Select at the top of menu the “Services > VPS Hosting” tab.In Hostens you are able to install Webmin template really easy and fast, only with few mouse clicks: More information can be found on official web page: It defaults to TCP port 10000 for communicating, and can be configured to use SSL if OpenSSL is installed with additional required Perl Modules. Webmin is largely based on Perl, running as its own process and web server. With it, it is possible to configure operating system internals, such as users, disk quotas, services or configuration files, as well as modify and control open source apps, such as the Apache HTTP Server, PHP or MySQL. Webmin is a web-based system configuration tool for Unix-like systems.
0 notes
Text
Monit nodejs

#MONIT NODEJS HOW TO#
#MONIT NODEJS INSTALL#
This example uses Apache.Įxecute the sudo kill command to abruptly stop the selected process: $ sudo kill 2000Įxecute the sudo gonit status command to check that Apache is stopped:Īfter a few minutes, check Apache again. The following examples are executed on a WordPress instance deployed in the cloud:Įxecute the sudo gonit status command to identify all the running processes, and note the pid of the server process you want to stop. To test Gonit, try to kill one of its monitored processes and check, after a few minutes, the status of the service as shown below. When a service goes down, Gonit automatically initiates the recovery of the affected services. Gonit continuously monitors server status. The configuration files for the servers monitored by Gonit are located in the /opt/bitnami/config/monit/conf.d/ and /etc/monit/conf.d directories. The main Gonit configuration file is located at /etc/gonit/gonitrc. Use sudo gonit to check the Gonit status: $ sudo gonit You should see output similar to this: $ sudo gonit status To check which services are included in your stack, the main files, processes, and status, run the sudo gonit status command. It monitors processes, program files, directories and filesystems of each service/component included in your stack. Slack, WebHooks, PageDuty, HipChat, and other tools can alert you when something isn't right. You can view the data on a nice pre-built monitoring dashboard or design your own if necessary. With Gonit, system status can be viewed directly from the command line. With NodeJS monitoring, you can track latency, request rate, GC, anomalies, worker, events, heartbeat, and more. To check which services are included in your stack, execute the sudo gonit status command as discussed in the next section. Use Gonit to start a single service, such as PHP-FPM: $ sudo gonit start php-fpm Use Gonit to stop a single service, such as MySQL: $ sudo gonit stop mysql Use Gonit to restart a single service, such as Apache, by passing the service name as argument: $ sudo gonit restart apache Using the sudo gonit command followed by the action and the service name as argument, you can easily stop, start and restart services. Service level Host level Instance level of the Node. Each of these tools is used for different metrics monitoring. It is a combination of three main tools Doctor, Bubbleprof, and Flame. A good Application performance management tool should be able to give insights on the. Clinic.js is a library available to integrate with NodeJS applications to monitor and get critical performance parameters out of it. Application performance management is a vital tool once monitor and optimize the performance of apps.
#MONIT NODEJS HOW TO#
Hope this blog gave you an understanding of how to use monit for monitoring any java application.Apart from the control script that lets you control the services, every Bitnami stack includes Gonit as a component that allows you to monitor and control the services. NodeJS monitoring uses application performance management tools to look at apps. You can see the uptime of the app and other basic metrics here. Monit also provides a nice simple UI which is accessible at ". To confirm the same kill your java process and see that it is automatically restarted. If the script is called with "start" option, the command to start the app will be executed and same goes for the stop case.Īfter configuring this, restart the monit service and changes will be reflected. This python script contains commands monit will run when it is instructed to start or stop our app. Now let us checkout the contents of the "check.py" file > The "if failed port" will judge the application status and will restart the app if nothing is found on port 8080. > The check.py file will contain the start and stop commands, here it is a little trick to use monit syntax with our use case. > The start and stop program line will instruct monit with how to restart the program with the command mentioned after the keywords > The "check process" keyword will check for the process named java matching the name "java -jar" Let us create a file for the same in "/etc/monit/conf.d" directory with the name "java" So here we will see how to monitor on the basis of the port. We can also monitor it based on the pad file but if the application is killed forcefully using "kill -9" the pit file will not be deleted and in this case, monit will consider the application is running. To monitor a Java application, we can monitor it on the basis of the port number on which the application is running and the process name.
#MONIT NODEJS INSTALL#
If you are new to monitor you can refer this link to install and configure it. This blog covers how to monitor your Java application and restart it on failure. Furthermore, monit accompanies a simple web UI through which the majority of the processes can be seen. Monit is a great opensource tool that consequently screens and manages server to guarantee that they remain online, as well as that the applications running, checksum etc are always right.
0 notes