#RGB Panel Light
Text
Use of The UGR19 LED linear light 1200mm
The UGR19 LED linear light 1200mm is a long lighting fixture with a UGR (Unified Glare Rating) of 19. It provides efficient and glare-free illumination, making it suitable for applications where visual comfort is essential.
Features of UGR19 LED linear Light 1200mm
The UGR19 LED linear light in the 1200mm size offers several key features:
UGR19 Rating: The light is designed with a UGR19 rating, ensuring low glare and enhanced visual comfort for users.
Energy Efficiency: It utilizes LED technology, providing high energy efficiency and reducing electricity consumption.
Uniform Illumination: The linear light delivers uniform and even lighting distribution, minimizing shadows and creating a pleasant lighting environment.
Versatile Application: It is suitable for various settings, including offices, classrooms, retail spaces, and other commercial or industrial areas.
Benefits of UGR19 LED linear Light 1200mm
The benefits of the UGR19 LED linear light in the 1200mm size include reduced glare, improved visual comfort, energy efficiency, uniform illumination, and its versatility for use in different commercial and industrial settings, creating a pleasant and well-lit environment for enhanced productivity and aesthetics.
Importance of UGR19 LED linear Light 1200mm
The UGR19 LED linear light in the 1200mm size is essential as it ensures visual comfort, reduces glare, and provides uniform illumination, making it ideal for spaces where user well-being and productivity are paramount, such as offices, schools, and commercial environments.
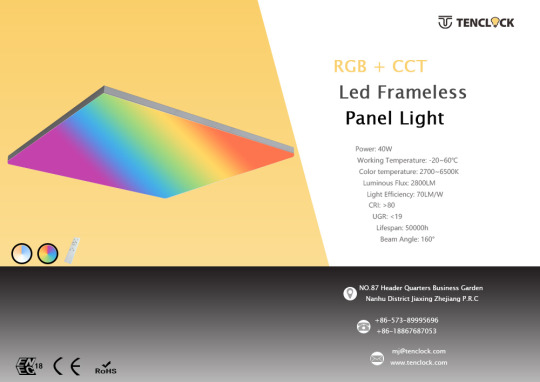
RGB LED Panel Light
An RGB LED panel light is a lighting fixture that features red, green, and blue LEDs, allowing for customizable and dynamic color options for ambiance and visual effects.
Frameless Panel Light 600x600
The Frameless panel light is a 600x600 LED light fixture designed without visible frames or borders. It provides a clean and modern appearance, evenly distributing light across its surface. It is a popular choice for commercial and residential spaces.
FAQs of UGR19 LED linear Light 1200mm
What does UGR19 mean for LED linear lights?
UGR19 stands for Unified Glare Rating 19, which indicates that the LED linear light is designed to have low glare, ensuring visual comfort and reducing eye strain.
Where can I use the UGR19 LED linear light in the 1200mm size?
The UGR19 LED linear light in the 1200mm size is suitable for various applications such as offices, classrooms, retail spaces, hospitals, and other commercial or industrial environments where glare reduction and visual comfort are essential.
Contact us:-
Business Name: Aatech International Co. Limited
Contact Person: Anthony Tu
Country/Region: China
Street Address: Anbibang park B,Xitian No.1 industrial park, Gongming, Bao'an District
City: Shenzhen
State: Guangdong
Postal Code: 518108
Phone No: +86 15814026030
Email Address: [email protected]
Website: https://www.aatechled.com/
Get to know more about us:-
Troffer Panel Light | UGR19 LED linear light | LED Panel Light 600x600 | LED Panel 1200x300mm | LED Panel Light 60x60cm | LED Panel Light 595x595mm | LED Panel Light 1200x300mm
#IP65 Panel Light#Troffer Panel Light#RGB Panel Light#LED Troffer Panel Light#UGR19 LED linear Light 1200mm#LED linear Light 1200mm#Powergear LED Track Light
0 notes
Text
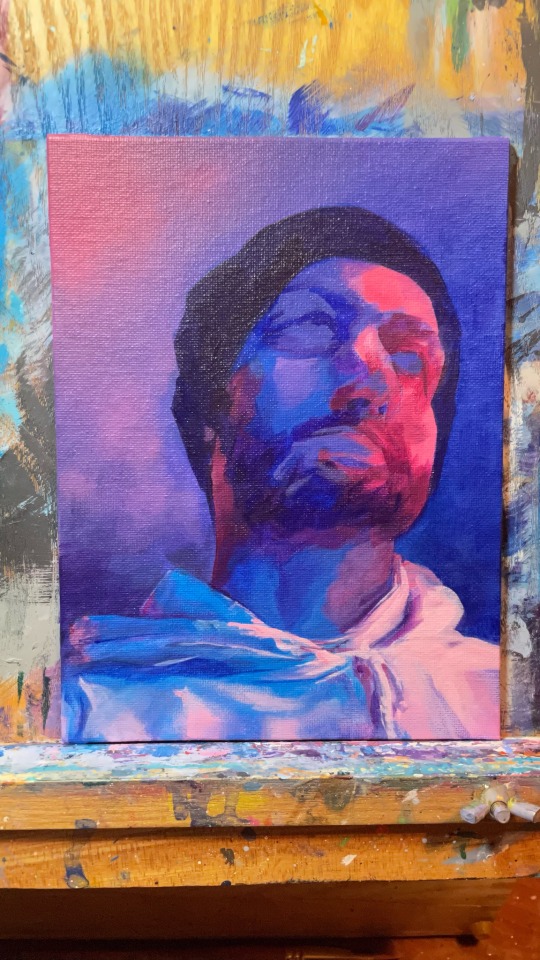
coming to terms with the fact that not every painting is my best, but every painting is worth it
#my art#portrait painting#acrylic painting#painting#traditional artist#traditional art#artists on tumblr#artists of tumblr#panel edit#acrylic on panel#rgb lights#pink painting#pink aesthetic#blue painting#blue art#blue aesthetic#purple#makeart2023#male perfection#male portrait#man portrait#boyfriend#sketchbook#bold brush#boldandbeautiful#brushwork
4 notes
·
View notes
Text
I've had my new PC for two days now and haven't actually ... played anything ...
Mostly because I had some issues with the wifi antenna and games were downloading so slowly it was in literal kilobytes per second for most of the first day I was setting it up.
#now it's working better i want to get every major game installed before i distract myself by actually playing stuff#i'm most of the way there now#bg3 and gw2 are installed along with planet zoo and jurassic world evolution 2#swtor is halfway done and after that it's just ts4 to go#on another note the tower has a tempered glass side panel and it's kind of weird to see the pc's guts just ... hanging out in there#i've only ever had opaque cases before so this is gonna take some getting used to#also need to fiddle with the settings on the rgb stuff that's in the case#i did specifically go for the non-rgb case and fans but there's glowy stuff in there anyway#and my desk is directly across the room from my bed so the light show gets beamed straight into my eyeballs while i'm trying to sleep lmao
1 note
·
View note
Text
a bunch of my computer parts came with super bright gamer RGBs all over them (not by choice - the models with lights just happened to be better deals) and my case has a glass side panel, so when I first brought it home and set it up, I had to spend like 2 hours downloading and configuring several different programs to turn them all off (because no single app seemed to be able to control all the components at once).
in the end, the only light I left on was on the side of my GPU, and I set it to be a soft dark purple that would slide across the length of the GPU like a marquee every few seconds - nothing that'd disturb my sleep if my computer happened to wake itself up in a dark room, but enough to look cool and give me a visual indicator that the PC was turned on.
anyways sometimes I guess the driver that controls that specific component's RGBs just... crashes? for absolutely no reason? and the result is that it defaults to an intense, solid red that harshly illuminates my whole case and the area around it. every time this happens I cannot shake the immediate, instinctive fear that my computer has turned evil and is going to kill me. like oh god oh fuck it knows I ""fixed"" one of its CPU cooler fans by scotch-taping it in place so it would stop spinning unevenly and screeching at me, and now it's waiting for its chance to strike and claim ultimate revenge
#buny text#storytime#I'm an intelligent adult with a moderate grasp of technology but all bets are off when a light turns red that's not supposed to be red
6K notes
·
View notes
Text
Buy Ring Lights & Studio Lighting for your Makeup
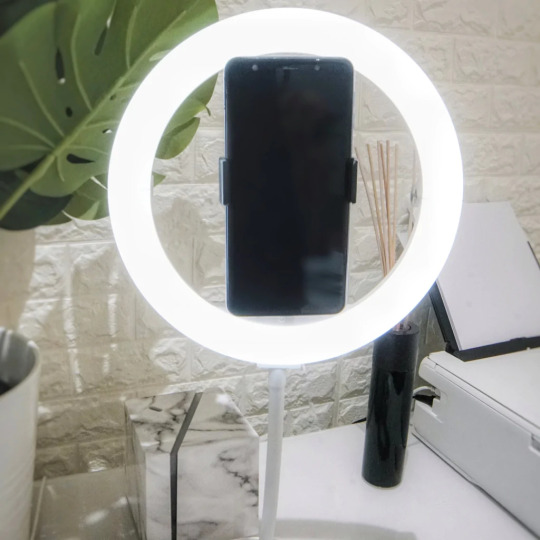
GLAM DOLL offers the best in Ring Lights & Studio Lighting so you can create the perfect YouTube video. Check out our led ring light selection for the very best in unique pieces from our online shops.
#selfie ring light#led ring light#professional ring light#ring light for makeup#Panel Light#makeup lights#Light Wand#rgb light
0 notes
Text
Rgb led panel light

The final product delivers a fully illuminated glow that is guaranteed even-lit. We are the only US-based manufacturer that utilizes laser technologies to produce a brighter in design LED light panel. This is where the name “RGB Light Guide Panel” comes from.įor over 30+ years Lightpanel has manufactured custom RGB LED light panels. This optimized pattern acts as channels that guide the LED light rays to evenly shine through the panel. This form of mounting acts as thermal management for the LEDs while adding protection to the LEDs.Īcross the surface of the acrylic is a laser engraved dot-matrix pattern. On the edges of the RGB LED light panels, Tier 1 ANSI Binned LEDs get mounted using an aluminum J-Channel. When using lasers, the acrylic edges are left with a polished finish that allows for total LED shine through once the LEDs are mounted. To cut the acrylic laser cutting machines are utilized to perfectly cut the panels. This form of acrylic is extremely durable, impact resistant and is totally translucent allowing for the LEDs to perfectly shine through. RGB LED light panels starts with optical grade acrylic. How is a RGB LED Light Panel manufactured? Some models allow for basic color options while others support virtually any number of color options. When it comes to DMX color output controllers you will want to look into the options to select the correct model that best reflects your RGB lighting needs. An example of this is using the DMX color output to create a crisp white light from the RGB LED light panel, then using the controller you can add a bluish beam to change the rooms lighting for a cozier ambiance. The ability to change the RGB LED light panels colors allows users to change lighting colors by adjusting the red, green, blue, and white LEDs. This color control allows for maximum flexibility that is consistently radiant. Using a DMX color output controller you can easily adjust the color of RGB LED light panels to meet the exact hue and mood you’re looking to create. Are available in any color temperature and dimmer controls can be added.LED strips can be added to one, dual or all four sides for maximum brightness.Utilize no hazardous lead or mercury making them environmentally friendly.LEDs use 50% less energy when compared to standard lights.RGB LED light panels are specially designed to deliver ultra-bright illumination that is 100% evenly distributed.īecause RGB LED light panels are highly energy efficient, can be custom cut to custom specifications, and deliver a long lasting life of 70,000 hours of usage both commercial and residential application are turning to LED light panels to create the perfect ambient. RGB LED Light Panels are one of today’s most popular forms of RGB lighting.
0 notes
Text

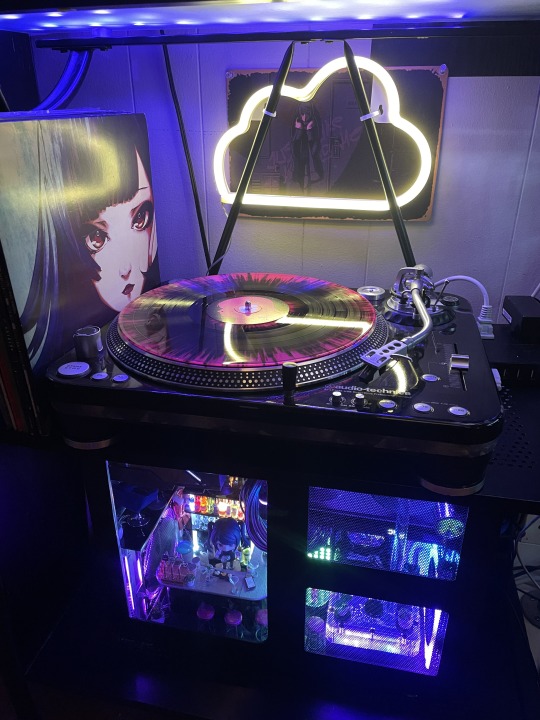


I built a miniature Va11 Hall-A Bar inside of my PC!!
Va11 Hall-A PC Parts & Build list
PC:
CPU : Intel I9 14900k
GPU: Intel Arc A770 16gb
Ram: Corsair Dominator 64gb 5600
Mobo: Maxsun Terminator Z790 D5 wifi
Hard drives M.2: Samsung 990 pro 2tb, Samsung 970 evo plus 1tb, CT 1tb, Adata 500gb
PSU: ROG Thor 850 P2
Cables: Cablemod.com custom shortened and sleeved
Water loop distro : EKWB FLT 120 reservoir + D5 pump
Water loop cpu block: ThermalTake Pacific Mx2 Ultra
Water loop radiators: Alphacool HPE 20 x 2
Water loop hardware: 15 Alphacool, 3 EKWB, 2 Alphacool soft, 2 granzon
Water loop tubes: EKWB Acrylic tube 14mm, Alphacool 13/10 soft
Air Cooling : ThermalTake Toughfan 120mm x 3 + Controller
Air Cooling : Noctua 40mm pwm server fan x 2 (non visible)
Additional RGB Control : Coolermaster controller
Case:
Lian Li PC V600, left side mount, released in 2006, I acquired it in 2015 from PC Recycle in sodo Seattle.
I had to track down a new foot, one had been missing since I acquired the case (ebay)
Mods:These are the case mods I did personally
Cut a hole for the cpu mounts in the Motherboard mount plate as this case was designed for older hardware
Cut two 120mm blowholes and added aluminum covers (Dremel)
Cut Front and rear windows into side panels (Dremel Max)
Moved PSU from vertical placement in the lower right side of the case in front of the CPU to horizontal placement in the top left in old drive bays.
The PSU bracket had to be cut to show the OLED on the side.
Modded the side panel rail slide to accommodate the PSU, I used the original aluminum stand the psu was on, cut in half and epoxied with JB weld.
Changed and moved Power/ Reset switch to the back of the case, shortened and spliced the cable
I cut and bent my own 14mm acrylic tubes (hobby miter, heat gun).
Cut and made two way mirror for the front panel
Plastic "truss" is both functional and aesthetic. It came from a Gunpla accessory kit and has two cables passing through it and it acts as the GPU support. I could only get red and had to paint it.
Notice that some logos are missing/ covered, I dislike having a case as an advertisement. The Rog eye on the PSU is mostly covered but iykyk, most of the word "Intel" on the ARC GPU, Two of the Thermaltake logos on the fan edges, the Paint on the Thermaltake Mx2 Ultra and Maxsun terminator heatsink. (I will eventually cover the visible SSD with a heat sink, cover the fan info on the rear and work a cover for the word "dominator"). the one logo explicitly unchanged is the LianLi case badge, if I think of a perfect replacement, maybe then.
Mod I did not do:
I did NOT shorten and sleeve my own cables, I used cable-mod.com. I am not confident in my ability to do this.
BAR:
"Bar Tiny" Re-ment sets from Japan, 17 sets involved.
I customized the color of the bar and chairs and shortened one table for the mezzanine. The whole bar, minus barback- is on a removable 7 inch piece of black acrylic for cleaning.
Jill Stingray Nendoroid
Jils Cat, it sleeps on the GPU
Jill Stool: Jill is glued to a cute doll stool to see over the bar
Jill Accessories non-Nendoroid: cellphone, purse, coat (ebay)
Dorothy Haze Nendoroid
will be added on release.
Bar Back:I made this myself
Black acrylic sheet, and frosted acrylic rods.
Doll Light power kit: 8 Led lights, 4 incandescent lights
USB Doll light power strip
Other Bar Accessories:
Overhead Hanging farmhouse light
trash, mop, broom, pan, mop bucket,
2 blue fuzzy chairs
Miniature plants
Miniature Microphone
Mini bottle Dom Perignon, an xmas gift from my friend nemo, it's
on the top shelf
Problems and changes:
1. ARGB, pretty pretty pain in the ass. 4 pieces of software........
2. The water loop was changed extensively as hardware came in and space limitations were discovered. The biggest change is that I originally planned to have one radiator on the front of the case, the tubes running over Jills head and to light the tubes as lighting for the bar, to do this the fan would have been in the case proper pushing the whole bar to far into the mobo, it didn't work, so the loop was moved to the top of the case and caused me to have one complex bent tube
Second, I had planned the loop to use one sideport on the distro, but space limitation moved both ports to the top causing the complex fittings setup in that corner.
3. The MOBO, sigh. This has been clearly the most challenging choice I made in this build, I really wanted it to work perfectly too, but I rolled those dice because: Aesthetic+function, the board I wanted (https://en.colorful.cn/en/home/product?mid=84&id=400d19bc-5655-49e1-b391-df00b60935ef) was to great a risk for the cost. This was a silver medal.
I generally dislike the design options I had in the Z790 series of the big board makers (I HATE big logos), especially the full ATX, there was one M that interested me, I should have picked it . This board has potential, but the BIOS is underdeveloped and compatibility has been problematic, I had to do a tricky outdated style BIOS update right from the box, and have had to reset the cmos a couple times. It skips BIOS on general boot and though stable, it will have to be addressed eventually, it doesn't have a proper sleep because of some issue between uefi & legacy. It may end up replaced, which will require a full build teardown.
the Turbo fan built into the board doesn't seem to function
Alos, the two argb connections on the mobo dont work, or I can't get them to recognize anything, necessitating the Coolermaster controller for the PSU and Distro. it is shoved behind the distro along with a Noctua 40mm
#va 11 hall a#va11ha11a#computer#pc#pcgamimg#sukeban#sukeban games#watercolor#watercooled#custompc#pc mods#jill stingray#fanart#cyberpunk art#futuristic#cyberpunk
78 notes
·
View notes
Text
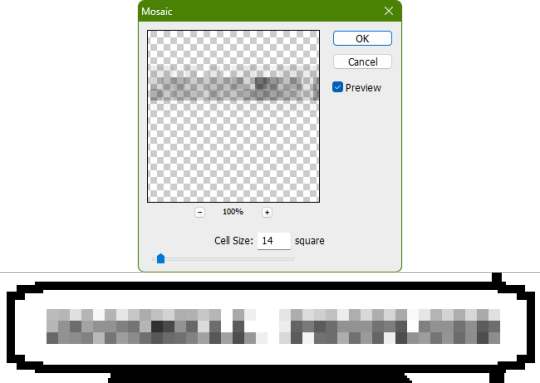
Tidbit: Placronym Pixelation

So you got this fresh placroynm that you don't want engraved with a sophomoric name? Not a problem. You can reject that stupid shit with a pixelize/pixelate filter.
Photoshop
First, you will have to make two more duplicates of your name text layer, so three text layers in total. One for when it's first displayed, one for the first frame of pixelation, and one for the second frame.
With your first duplicate layer selected, go to Filters>Pixelate>Mosaic..., which is a terrible name for it, but hey, I'm no Photoshop developer. Set the cell size to 11.

For the second duplicate layer, set it to 14.
GIMP
Pretty much the exact same steps as in Photoshop, this time the filter is located under Filters>Blur>Pixelize...


I would suggest right-clicking on the text layer and choosing Composite Space>RGB (perceptual) instead of the default (Auto), or going to the top-right corner of the Layers tab and switching the group of blend modes from Default to Legacy. Basically, doing so will make the semi-transparent pixels as dark as they are in Photoshop, otherwise they will appear too light.


Check out the read-more link below for bonus information on easily animating the name being typed out in Photoshop.
ADDENDUM
Typing animation (Photoshop)
Photoshop's frame animation timeline makes doing this a breeze. First, add a layer mask to your text layer. This will add a white box next to the layer's thumbnail.
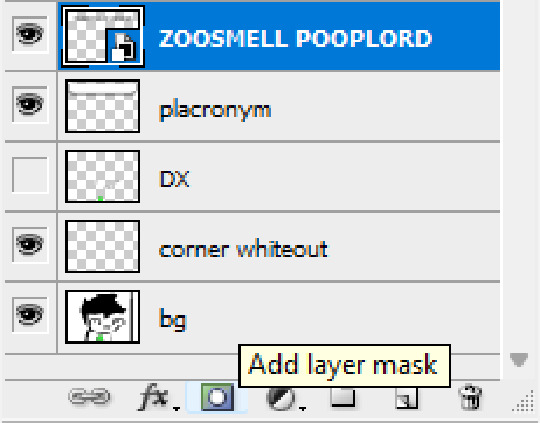
With that layer mask selected (click on it and it will be highlighted in the layers tab), use the marquee tool to make a rectangle selection around the text, then use the paint bucket tool to fill it in with the color black. This will make the text invisible until the layer mask is moved.

Go to Window>Animation if you do not already have the animation timeline open. Click on the little sticky note icon to duplicate the first frame. In newer versions of Photoshop, you will probably first have to click on a button that reads "Create Frame Animation", and the duplicate frames button icon is the "+" in a little square.
Making sure you still have the layer mask selected and not the entire layer, use the move tool and arrow keys to move it all the way to the right, revealing the text on the second frame you've just made. Don't move it too far off now.
Move the typing cursor layer to the right as well, except you don't have to move it all the way at the end, only where it will be last seen.

Make the typing cursor layer visible on the first frame, and not visible on the second.
Select the first frame the animation and click on the tween button. This will add all of the frames in between the first and the second one for you. Make sure you only have "Position" checked under "Parameters". For the numbers of frames to add, here's a neat trick for finding the right amount: count the amount of letters in the name. "ZOOSMELL POOPLORD" is 16 letters, so add 16 frames.
Most of the work is already done, though there might be a couple frames that will need some minor tweaks. Just use the move tool and arrow keys again to finetune the layers' positioning.
This is why it was important to not move the layer mask too far to the right away from the end of the text. Tweening the position spaces it out linearly, evenly, so the farther away the end goal is, the more space each frame will use. Thankfully the font this panel uses is mostly monospaced, and I got a little lucky with my positioning, so I needed to only adjust three or four frames. Way less tedious than having to create each frame of animation myself, at least.

To change the frame delay (the time duration each frame takes up) of the newly created frames, click on the first frame you want to retime, hold down the Shift key, and then click on the last frame. This will make a selection spanning all frames in between. Click on the little dropdown arrow and select 0.1 seconds (100 milliseconds).

Here's the original panel:

And here's my recreation:
Here's the PSD, too.
70 notes
·
View notes
Text
LED Panel Light 600x600mm Efficient and Versatile Lighting Solution
LED panel lights have gained popularity as highly efficient and versatile lighting solutions for various settings. Among the popular sizes, the LED Panel Light 600x600mm stands out for its optimal dimensions and performance.
Features of LED Panel Light 600x600mm:
Size and Dimensions: The LED panel light 600x600mm is designed to fit perfectly into standard grid ceilings, making it a convenient replacement for traditional fluorescent lights. Its square shape and size provide a balanced and uniform illumination across the space.
Energy Efficiency: LED panel lights are renowned for their energy efficiency. The 600x600mm size is no exception, utilizing advanced LED technology to provide bright light output while consuming significantly less energy compared to traditional lighting options. It translates into reduced energy costs and a smaller carbon footprint.
Even Light Distribution: The 600x600mm LED panel light employs a high-quality light guide plate and diffuser to ensure uniform light distribution without any dark spots or glare. This results in a visually comfortable and well-lit environment.
Adjustable Brightness and Color Temperature: Many LED panel lights in the 600x600mm size offer adjustable brightness levels and color temperatures. It allows users to modify the lighting to suit their specific needs and choices, whether it's for task-oriented work, relaxation, or making a specific ambiance.
Benefits and Applications of LED Panel Light 600x600mm:
Versatile Use: LED panel lights in the 600x600mm size find wide-ranging applications across commercial, residential, and institutional spaces. They are usually used in offices, conference rooms, schools, hospitals, retail stores, and other surroundings that require bright, well-organized, and visually pleasing lighting.
Enhanced Productivity and Comfort: The uniform and flicker-free light emitted by LED panel lights help reduce eye strain and fatigue, creating a more comfortable and productive working or studying environment. The even distribution of light also minimizes shadows, enabling better visibility and focus.
Cost Savings: LED panel lights are known for their long lifespan, durability, and low maintenance requirements. They require less frequent replacement compared to traditional lighting sources, resulting in reduced maintenance costs and fewer disruptions.
Aesthetically Pleasing: The sleek and slim design of LED panel lights in the 600x600mm size adds a modern and sophisticated touch to any space. With their clean lines and low profile, these lights seamlessly integrate into existing architectural designs, enhancing the overall aesthetics.
LED Panel Light 60x60cm
The LED Panel Light 60x60cm is a compact and versatile lighting solution that provides efficient and uniform illumination. Its square shape and dimensions, it fits seamlessly into grid ceilings, making it an ideal replacement for traditional fluorescent lights. This energy-efficient light source offers adjustable brightness and color temperature options, allowing for customized lighting experiences.
LED linear Light 1200mm
The LED Linear Light 1200mm is a long and slender lighting fixture that offers versatile and efficient illumination. Its length of 1200mm provides a comprehensive coverage area, making it suitable for various applications. This LED linear light is known for its energy efficiency, long lifespan, and less maintenance requirements.
FAQs
Can LED panel lights be dimmed?
Yes, many LED panel lights, including those in the 600x600mm size, offer dimmable options. Dimming capabilities allow users to adjust the brightness levels according to their preferences and lighting requirements.
Are LED panel lights challenging to install?
A2: LED panel lights are designed to be easy to install. Most models come with simple mounting mechanisms that allow for quick and hassle-free installation. However, it's always recommended to follow the manufacturer's instructions and consult a professional if needed.
Get to know more about us:-
LED Panel Light 595x595mm | LED Panel Light 60x60cm | LED Panel 1200x300mm | Citizen LED Track Light | customized size LED l
0 notes
Text
HOLY SHIT LOOK WHAT I NOTICED IN THE RECENT TPOH PAGE!
I was reading the tpoh on my computer, that has very high brightness, and noticed something I didn't notice when I first read the page on my phone!
(you might have to turn the brightness up on your device to see)
After playing around with the exposure setting, I found this text hidden in the last panel!
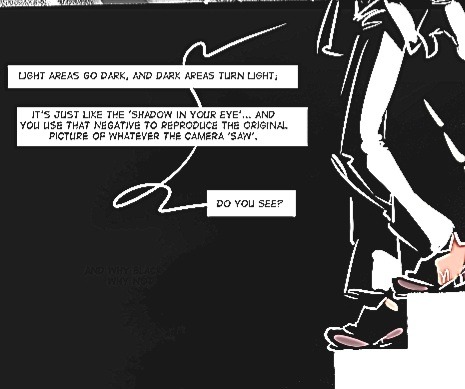
"AND WHY BLACK WHY NOT-"
The dialogue about black and white negatives was ModMad giving us instructions on how to find the hidden text!!!!!! KAKSOAKZNDOPSS THATS SOO COOL!!!!
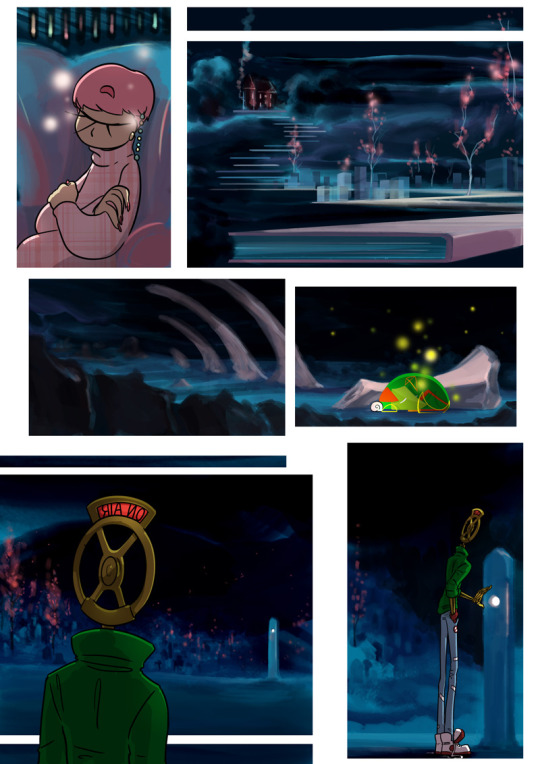
As for what this text means, my guess is that it's going to be Hero or RGB's dialogue on the next panel. (most likely RGB's, due to the lack of colour)
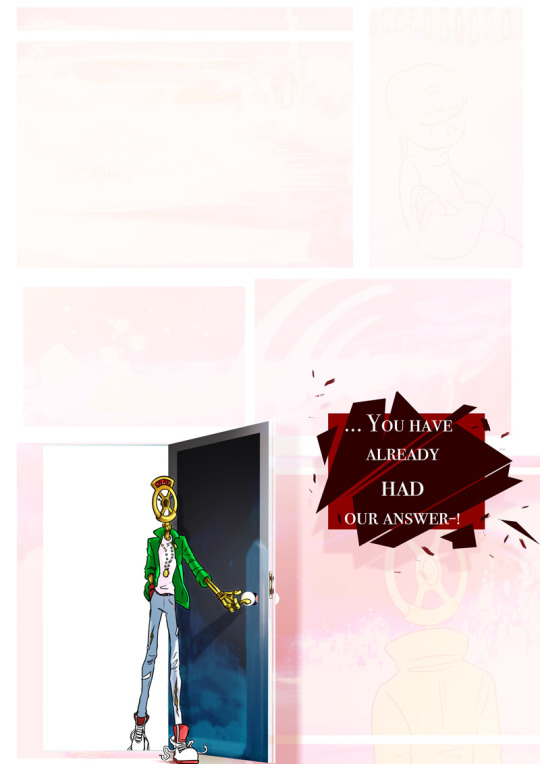
TPOH has done similar stuff with panels and text in the past, these pages are just one example.
There also seems to be darker patterns and shapes, that may line up with the drawings on the next page!
It also makes sense with the conversation that RGB and Hero are currently having! This dialogue is probably either of them questioning why Negative looks the way he does.
You see, from what I know of photography, Negative only inverts the colours, not make them black and white. The reason they are comparing him to a Negative is because, in their designs, light areas are dark and dark areas are light. So it's opposite.
But that still shouldn't make him black and white, since RGB still has colour, so Negative should just have opposite colours.
'Negative' RGB SHOULD look like this
They are probably questioning him being black and white as a nod to the theory of him being based off of silent film actors. RGB is implied to have been an actor, Negative is black and white, and also can't talk.
He's also RGB's 'Negative' is regards to personality. RGB talks a lot, Negative doesn't talk at all. RGB is a coward, Negative is good at fighting, etc. etc.
Or I'm completely wrong. I am inferring all of this from half a sentence that can only be uncovered using fnaf-style clue finding.
But I will be on the lookout for any other hidden text and we will see next update if I'm right!
#tpoh#the property of hate#tpoh negative#tpoh rgb#negative rgb#tpoh negative rgb#rgb#tpoh speculation#tpoh update#tpoh theory
111 notes
·
View notes
Text
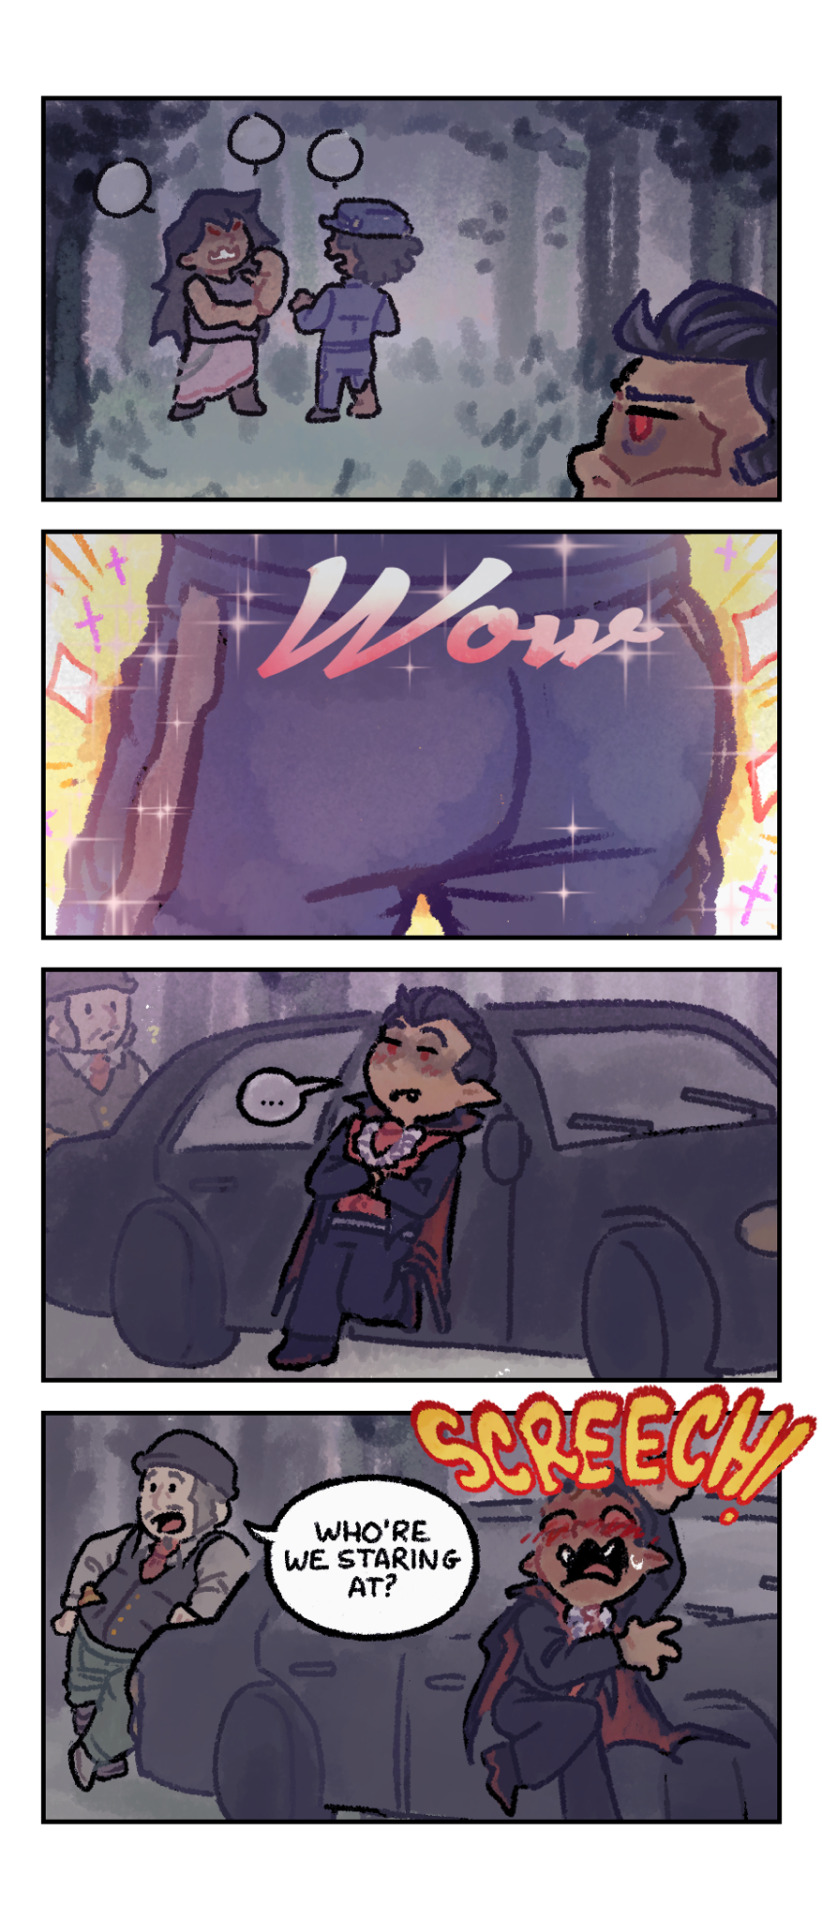
I finally got to draw them digitally!!!! Look at my boys (gender neutral) in full rgb!
------
[ID: A four panel comic featuring some original characters, set in a dark forest.
Panel 1: Leidy Vampyre and Brian Renfield the zombie are talking with each other in the distance. Baron von Rosethorn watches the pair, only their head visible in the bottom right corner.
Panel 2: A close up of Brian's butt, with sparkles floating around and the word "wow" captioned at the top in pink and white text.
Panel 3: A full-body shot of Rose, leaning against a black car. They had a light blush on their cheeks and their eyebrows are raised. Dr. Rodrick Rathbone, a human, can be seen in the back, faded as if standing distantly.
Panel 4: Rathbone comes into view, leaning on the trunk of the car and asks "Who're we staring at?" Rose let's out a "Screech!" and jumps away from where Rathbone entered. Their face has turned darker and their blush more prominent, presumably from being caught staring.
\End ID]
#ace artist tries to draw something suggestive#i have no idea if this drawing worked on not but we move#my ocs#oc: brian#oc: leidy#oc: rose#oc: rathbone#also. that car. god damn that was weird to draw#my art#lego monster fighters#lego
50 notes
·
View notes
Text
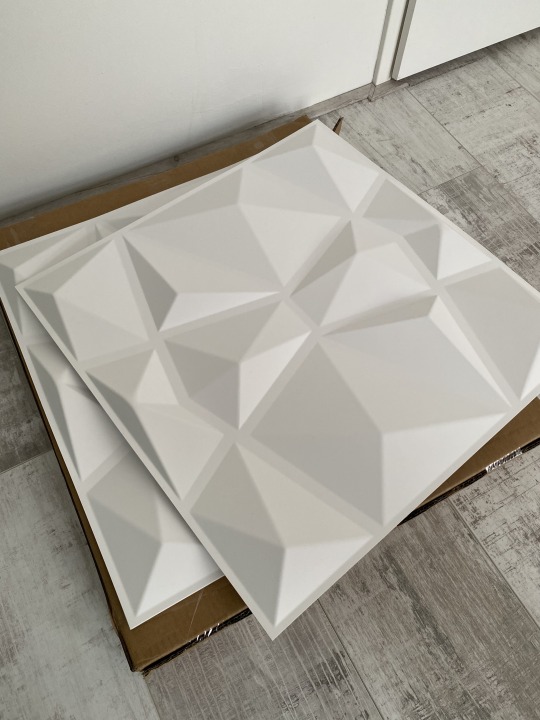
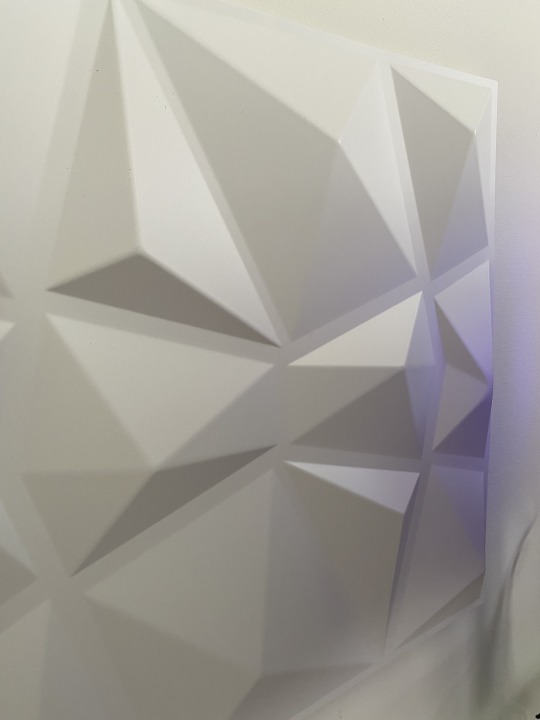
Aaaight, my 3D wand panels finally arrived. Time to pimp my (game) office soon. I'm still looking for some good RGB lights to spice things up. Any recommendations are welcome!
#personal#mistress blabbling#i'm not covering the whole wall though but just to make my bureau pop out more#and the mood man#i've seen some very awesome examples
8 notes
·
View notes
Text
hey everyone! this is my first tutorial on giffing! I'll be covering some of the basics of coloring and specifically my usual steps and preferences in editing!
A basic understanding of giffing is required here since I won't cover any of the first steps nor pre processing involved in giffing and we'll go straight into coloring in photoshop.
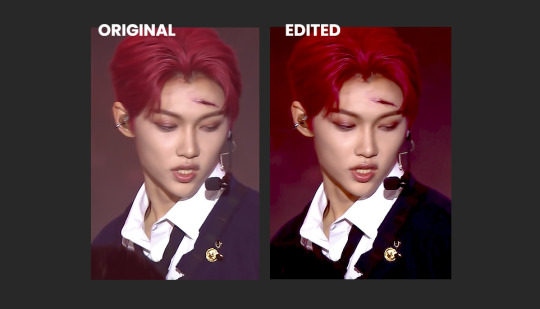
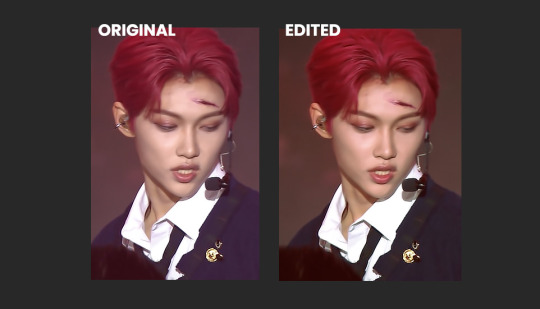
For this tutorial I'll be using this Felix set as an example:

For my gifs I usually always go for a really bright and clear look. I like to have vibrant colors and making the subject pop a lil. I try to achieve skintone accuracy but I tend to make my gifs just a tiny bit pink as well, avoiding super warm tones. (which in hindsight I realize I may have overdone the warmth for this felix set a bit but oh well)
Let's get into it!
So after you have imported your clip and added any smart filters of your preference, you should start coloring (above the frame layers of your gif) by using a special type of effect called Adjustment Layer. You can find this tool on the bottom of the layers panel:

There are many options of Adjustment Layers, but for now we will be using: Exposure, Curves, Vibrance, Color Balance and Selective Color.
☆ Exposure ☆
this is always ALWAYS my first step. It's crucial for my gif to end up with that clear and bright impression. There are 3 settings here, exposure / offset / gamma correction:

The first picture is without any editing, the second is my editing for the Felix gif.
Exposure: Helps to highlight and overall light the entire image up.
↳ raise it up in tiny bits to add light
Offset: I use this to sort of "defog" everything.
↳ lower it to "defog" (in this case my overuse of it ended up removing most details from his dark clothing but I still like the final look)
Gamma Correction: similar as the one above, it helps to give more depth to the whole image.
↳ you can lower it to add depth, it might look confusing but as u drag the controller to the right, the number will go down, so it will be less than 1. In this case I raised it a bit so I turned it down just a lil.
↳ note: these settings will greatly affect the whole gif so try not to go too far with it, I usually only change these in tiny increments.
☆ Curves ☆
there's a lot that can be done with this Adjustment Layer. if you keep the drop down option as RGB, it will have a similar effect to the exposure Adjustment Layer I explained previously. You can just create points on the line and move them around and that will affect the image. The areas near the bottom of the grid affect the darker colors of the image, the middle afftecs the middletone colors and the top of the grid affects the lighter areas. Dragging the line upwards will make things lighter, and dragging it down will make it darker. Sometimes I use this to further complement on top of the Exposure layer, but again with caution.

The first picture is without any editing, the second is my editing for the Felix gif.
↳ note: Now the really interesting thing about this Adjustment Layer is if you click on the dropdown menu where it says RGB, you can choose between the 3 color channels - red, green or blue and make changes on those specifically. In this case, if you create a point on the line and drag it down, it will sort of remove that color from the image. If you do it around the top grid, it will focus on the highlight areas, in the middle will be middletones and at the bottom will be the darkest areas. This can be VERY useful when editing clips that have one predominant color, for example stages with red lighting.
In this case tho my use of this layer has been very slight, it's really only complementing what I had already started with the previous exposure layer. So it's giving him a bit more depth and contrast while also darkening the bg a bit more to help him pop.

☆ Color Balance ☆
this Adjustment Layer allows you to alter the balance of the colors within the 3 ranges of the entire image: highlights, midtones and shadows (darker areas). It can change the entire vibe of the image very quickly. I always play around with it a little bit. I usually like to reduce some of the warmness of the image and specially the shadows by turning the blue and cyan handles up.

The top row is without any editing and the bottom row is my settings for the Felix gif.

☆ Vibrance ☆
this Adjustment Layer is quite simple, with it you will manipulate how saturated and vibrant the colors will be. I usually raise vibrance a lot and saturation just a bit. This is because the vibrance setting is a lot more subtle than saturation.

The first picture is without any editing, the second is my editing for the Felix gif.

☆ Selective Color ☆
this Adjustment Layer is the true game changer imo. It gives you total control over most colors. I use it specially to adjust the skin tone usually. Usually to edit the skin colors you'd touch on red and neutrals. This is where I can add or remove warmth from the skintone alone if I want to. I also tend to mess with the blacks because I like to make it a bit blue.
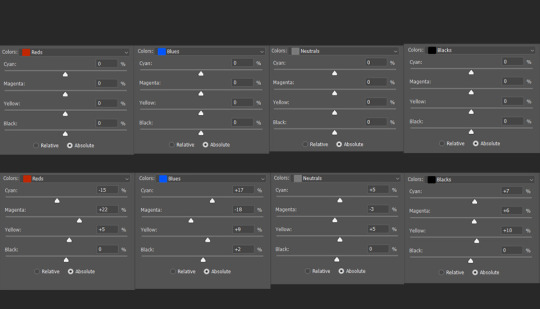
The top row is without any editing and the bottom row is my settings for the Felix gif.
☆ Extra Color ☆
sometimes i like to add a color (usually some shade of blue) on top of everything and set it to a different layer mode such as lighten, overlay, soft light etc (i just test them out a lot). I also tend to mess with the layer opacity here, usually leaving it at around 60%. In this case, I used a dark blue to soften out the final result a bit while still giving Felix a pop of contrast. To be honest you can also do this step with the Gradient Map adjustment layer. But I built a habit of doing it this way since before I learned how to use that adjustment layer.

By itself each step doesn't look like much but when you add them up, you can see how they all work together:

☆ Final Comments ☆
I highly recommend playing around with all of these settings to get the hang of it and see what you like. Keep in mind that the order of your adjustment layers will also matter but it's up to you to find out your style and what works for you. You may also need to use the same adjustment layer multiple times depending on what you're editing so don't worry about your editing layers getting long.
I hope this is helpful! If there are any questions feel free to reach out to me :D
#giffing#coloring#tutorial#how to gif#gif tutorial#createskz#idk if that network applies sorry if it doesnt
132 notes
·
View notes
Text
Tutorial: How to use UV Mapper as a recoloring guide
Whenever I recolor objects, I use UV Mapper to help me figure out what part of the texture corresponds to what part of the mesh, and to preview what the recolor will end up looking like. Here’s how I do it!
First, download UV Mapper Pro here - I just use the free demo version, the functionality is limited but I’m not a mesher so it does what I need it to for recoloring.
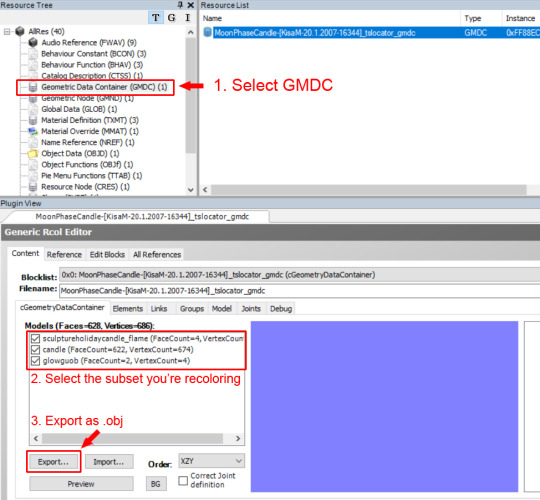
Open the mesh you’re recoloring in SimPE. Select the GMDC and look in Plugin View. Uncheck everything but the subset you’re recoloring (”candle” in this case), then hit Export and save the .obj file.
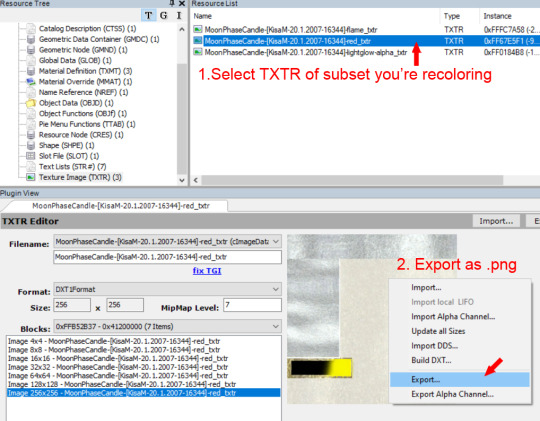
Next, select the corresponding TXTR for that subset (in this case it’s the one with “red” at the end since I’m not recoloring the flame or the light glow). Right-click on the image and export it as a .png.
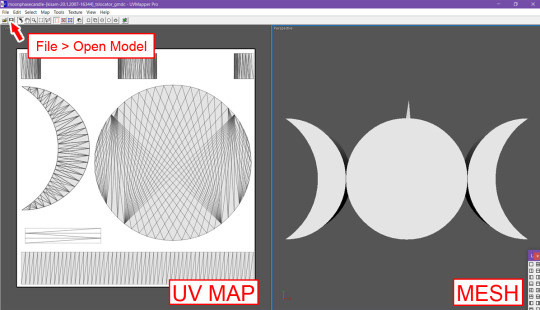
Now, load your .obj file in UV Mapper by going to File > Open Model in the menu. It will display the UV map on the left, and the mesh (with no texture) on the right.
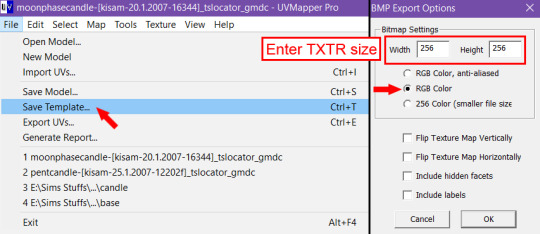
Next, you want to export the UV map. Go to File > Save Template in the menu. A popup box will appear. Enter your TXTR size (256 x 256 in this case) and select RGB Color (doesn’t really matter if it’s anti-aliased or not).
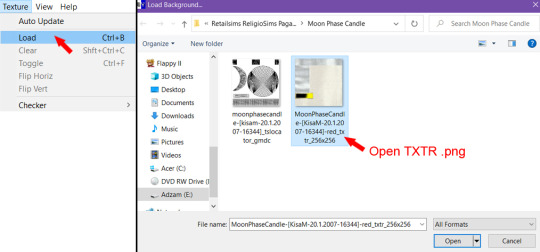
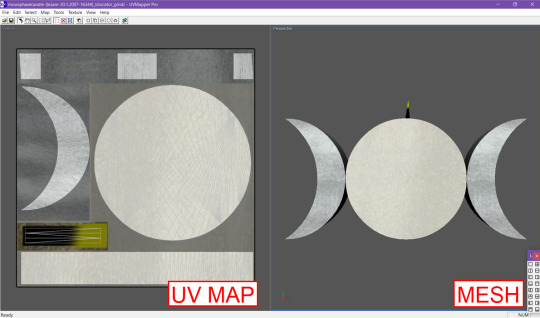
Let’s load the original texture to see what it looks like on the mesh. Go to Texture > Load and open the .png you exported from SimPE.
Now, open the texture .png and the UV map .bmp in Photoshop. Go to the Layers panel in the UV map. Right-click on the layer and duplicate it to the other document.
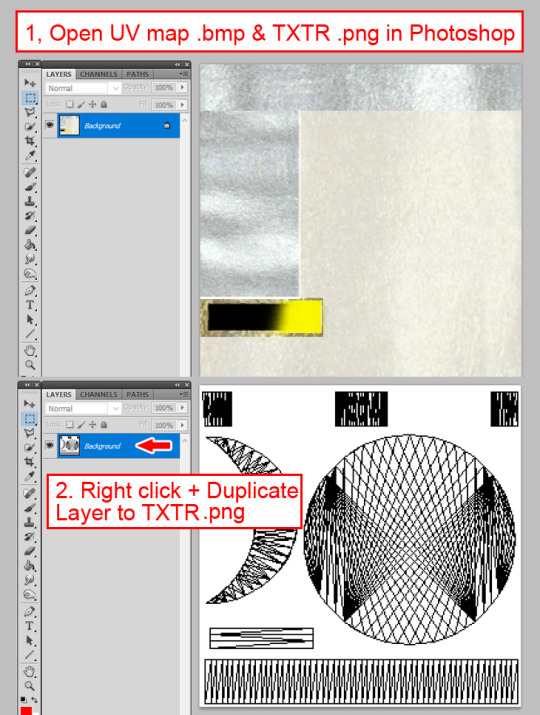
Now, set the blend mode of the UV map layer to Multiply.
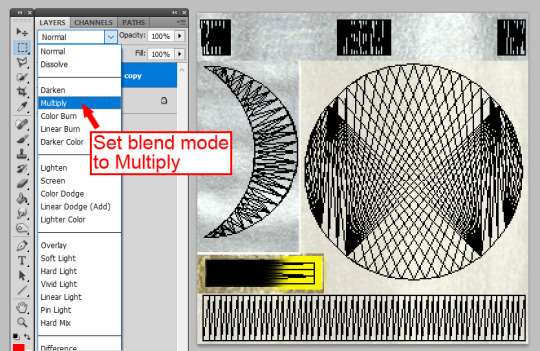
So now you have an idea of where each part of the texture is mapped on the mesh. As you work on your recolor, save it as a .png (without the UV map layer visible) and load the texture to preview it.
I’m not sure if this would be helpful to anyone else, but it works well for me personally so I thought I’d share!
88 notes
·
View notes
Text
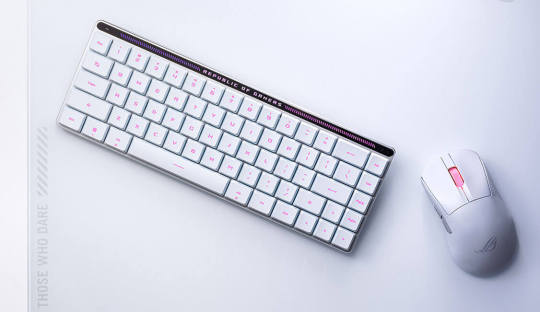
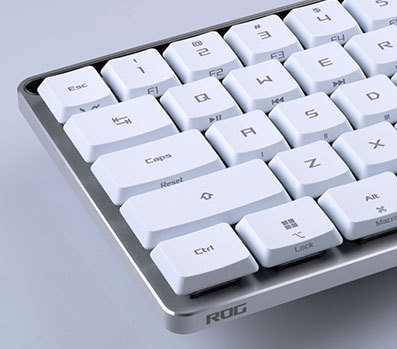
Low Profile Prowess: Reviewing the ROG Falchion RX Low Profile Keyboard
Gamers seeking sleek minimalism without sacrificing performance, gather 'round! We put the ROG Falchion RX Low Profile keyboard to the test, and here's the lowdown:
First Impressions:
This keyboard packs a punch in a pint-sized package. Its 65% layout ditches the function row and number pad for a compact footprint, perfect for space-conscious setups or on-the-go gaming. The sleek aluminum top plate and customizable RGB lighting scream "premium", making it a head-turner on any desk.
Performance Powerhouse:
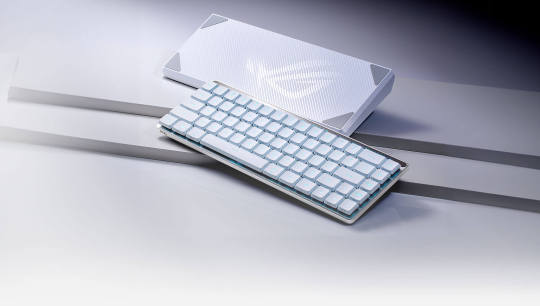
Don't underestimate the size! The ROG RX Low-Profile Optical Switches deliver a satisfying click and lightning-fast response times, ideal for competitive gaming. Plus, the tri-mode connectivity (wireless 2.4GHz, Bluetooth, and wired USB) offers flexibility whether you're dominating at home or battling on the go.
Beyond Basic Keys:
This keyboard goes beyond just typing. The built-in touch panel lets you control media, adjust lighting, and launch macros on the fly, adding a layer of convenience and customization. We loved the dedicated volume wheel, Armour Crate software integration and onboard memory for profiles.
A Few Things to Consider:
Compact Compromise: The 65% layout might not be ideal for everyone, especially those who rely heavily on function keys or the number pad. Consider your workflow and needs before buying. Price Point: This keyboard sits in the premium range. Weigh the features, performance, and brand value against your budget before making a decision. Palm Rest Bliss: While portable, the keyboard doesn't have a built-in palm rest. Consider getting one for extended gaming sessions for added comfort.
Overall Verdict:
The ROG Falchion RX Low Profile is a stylish and feature-packed keyboard that prioritizes performance in a compact form factor. The ROG RX Low-Profile Optical Switches, tri-mode connectivity, and touch panel make it a versatile option for gamers who value portability and performance. Just be sure the 65% layout suits your needs and consider the price point before diving in.
Have you tried the ROG Falchion RX Low Profile? Share your gaming setup pics and keyboard must-haves in the comments!
#ROGFalchionRXLowProfile #gamingkeyboard #keyboards #lowprofilekeyboard #wirelessgaming #CompactPowerhouse #WorthTheInvestment #productwave
#technology#gaming#game changer#keyboard#gaming keyboard#mechanical#ROG#low profile#wireless#productwave
2 notes
·
View notes
Last Seen Blogs

monbebelovesmonstax
MONSTA X OT7

failed-boi
I Failed To Be A Boy
I’m Better Off As A Siss
thismyown
ThisMyOwnDotCom

bonedeityy
I love the CRUNCH CRUNCH of their little bones...

sleepy-syl
Syl-ver Lining in the Cloud