#Raspberry pi 4 Camera USB 3.0
Explore tagged Tumblr posts
Visit Tumblr Blog
Explore Tumblr blogs with no restrictions, modern design and the best experience.
Last Seen Tumblr Blogs


Fun Fact
Tumblr’s website traffic is steadily declining.
Text
A Compact Pi Compute Module Backpack 🍓🥧📸🎒
We used to stock a PiCam Module
that would plug into a Pi CM4 or CM5 - recently we went to restock it, but the vendor hasn't replied to our emails for many months. So, it could be a good time for us to design something that works similarly but with more capabilities. So we tasked Timon
with designing something for us - we just said, "Make the best thing ya can," and he delivered! Check this board out that plugs onto the compute module and provides many great accessories: USB connection for bootloading/USB gadget, USB 3.0 host type A for CM5, micro HDMI, micro SD card for data storage on 'Lite modules, camera connection, and mount, two DSI connectors, fan connect, Stemma QT / Qwiic connection, and RTC battery. There's one shutdown button for CM5 and two GPIO buttons plus one LED. Timon's gonna try to add an EYESPI connector for our next rendering so we can get some I2C/SPI/PWM outputs easily. What do you think? We wanted to keep it compact and not too pricey (aiming for <$30 cost. We'll see if we can get it there) but were able to craft fairly complex projects in a small space.
#raspberrypi#computeModule#electronics#maker#hardware#embedded#engineering#diy#tech#innovation#pcbdesign#usb3#microsd#hdmi#camera#stemmaqt#qwiic#gpio#fan#rtc#devboard#prototyping#opensource#electronicsdesign#robotics#automation#coding#hobbyelectronics#hackerspace#geekstuff
17 notes
·
View notes
Text
Raspberry Pi Board: Revolutionizing Computing and Education
The Raspberry Pi board is a series of small, affordable single-board computers developed by the Raspberry Pi Foundation, a UK-based charity focused on promoting computer science education and digital literacy. Since its launch in 2012, the Raspberry Pi has transformed from a niche educational tool into a versatile platform used in a wide range of applications, from DIY electronics projects to industrial automation.
A Brief History
The first Raspberry Pi, the Model B, was released in February 2012. Designed to promote basic computer science in schools and developing countries, it featured a 700 MHz ARM11 processor, 256 MB of RAM, and basic connectivity options. The success of the Model B led to a rapid expansion of the Raspberry Pi lineup, with various models offering improved performance, more memory, and enhanced connectivity.
Key Features and Models
Raspberry Pi 1 Model B (2012):
Processor: 700 MHz ARM11
Memory: 256 MB RAM
Ports: 2 USB 2.0 ports, HDMI, Composite video, 3.5mm audio jack, Ethernet
Storage: SD card slot
Raspberry Pi 2 Model B (2015):
Processor: 900 MHz quad-core ARM Cortex-A7
Memory: 1 GB RAM
Ports: 4 USB 2.0 ports, HDMI, Composite video, 3.5mm audio jack, Ethernet
Storage: MicroSD card slot
Raspberry Pi 3 Model B (2016):
Processor: 1.2 GHz quad-core ARM Cortex-A53
Memory: 1 GB RAM
Ports: 4 USB 2.0 ports, HDMI, Composite video, 3.5mm audio jack, Ethernet
Wireless: Wi-Fi and Bluetooth
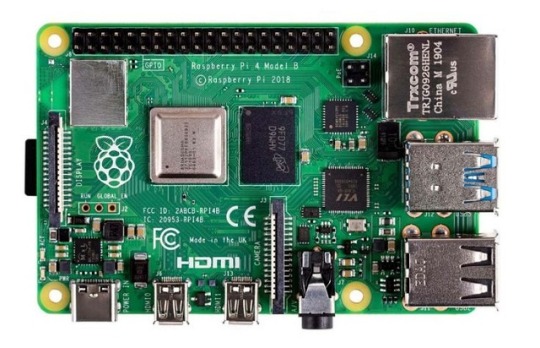
Raspberry Pi 4 Model B (2019):
Processor: 1.5 GHz quad-core ARM Cortex-A72
Memory: Options of 2 GB, 4 GB, and 8 GB RAM
Ports: 2 USB 3.0 ports, 2 USB 2.0 ports, 2 Micro HDMI ports, Ethernet, USB-C for power
Wireless: Wi-Fi and Bluetooth
Raspberry Pi Zero (2015) and Zero W (2017):
Processor: 1 GHz single-core ARM11
Memory: 512 MB RAM
Ports: Mini HDMI, Micro USB OTG, Micro USB for power, GPIO pins
Wireless (Zero W): Wi-Fi and Bluetooth
Applications and Uses
The versatility of the Raspberry Pi has led to its adoption in numerous fields:
Education:
Coding and Programming: Used in schools and educational programs to teach students programming languages such as Python, Scratch, and Java.
Computer Science Concepts: Introduces concepts like hardware, software, and networking.
DIY Projects and Maker Community:
Home Automation: Controls smart home devices, including lights, thermostats, and security systems.
Media Centers: Powers home media centers using software like Kodi.
Retro Gaming: Emulates classic gaming consoles using software like RetroPie.
Industrial and Commercial Applications:
IoT Devices: Serves as a hub for Internet of Things (IoT) devices, enabling data collection and remote control.
Automation and Control Systems: Used in factories and labs for monitoring and controlling equipment.
Research and Development:
Prototyping: Facilitates rapid prototyping of electronic devices and systems.
Data Collection: Gathers data from various sensors in environmental and scientific research.
Community and Ecosystem
The Raspberry Pi has cultivated a vibrant global community of developers, hobbyists, educators, and students. Online forums, tutorials, and community projects provide extensive support and resources for users at all skill levels. The Raspberry Pi Foundation also offers official accessories, including cases, cameras, and expansion boards, further enhancing the functionality of the Raspberry Pi.
Conclusion
The Raspberry Pi board has revolutionized the way people learn about and interact with technology. Its affordability, versatility, and extensive support network have made it an indispensable tool in education, DIY projects, and professional applications. As technology continues to evolve, the Raspberry Pi Foundation remains committed to expanding the capabilities and accessibility of this remarkable platform, ensuring that computing remains within reach for everyone.
3 notes
·
View notes
Text
Megjelent az új Raspberry
youtube
Broadcom BCM2712 2.4GHz quad-core 64-bit Arm Cortex-A76 CPU, with cryptography extensions, 512KB per-core L2 caches and a 2MB shared L3 cache
VideoCore VII GPU, supporting OpenGL ES 3.1, Vulkan 1.2
Dual 4Kp60 HDMI® display output with HDR support
4Kp60 HEVC decoder
LPDDR4X-4267 SDRAM (4GB and 8GB SKUs available at launch)
Dual-band 802.11ac Wi-Fi®
Bluetooth 5.0 / Bluetooth Low Energy (BLE)
microSD card slot, with support for high-speed SDR104 mode
2 × USB 3.0 ports, supporting simultaneous 5Gbps operation
2 × USB 2.0 ports
Gigabit Ethernet, with PoE+ support (requires separate PoE+ HAT)
2 × 4-lane MIPI camera/display transceivers
PCIe 2.0 x1 interface for fast peripherals (requires separate M.2 HAT or other adapter)
5V/5A DC power via USB-C, with Power Delivery support
Raspberry Pi standard 40-pin header
Real-time clock (RTC), powered from external battery
Power button
3 notes
·
View notes
Text
Cutting-Edge Automation: The AR0234 USB Camera Advantage
Superior imaging technologies are critical in the quickly changing field of automation and robotics. The AR0234 USB Camera sticks out among the plethora of options available as a cutting-edge instrument that promises to revolutionize automation systems. With its remarkable features and capabilities, this cutting-edge camera module is revolutionizing industries with its unmatched imaging performance and dependability. In this blog post, we'll look at the benefits of the AR0234 USB camera and how it affects cutting-edge automation.
Unveiling the AR0234 USB Camera
The AR0234 USB Camera is a state-of-the-art imaging solution designed to meet the demanding requirements of modern automation systems. At its core, this camera features the AR0234 CMOS image sensor, known for its exceptional image quality, high resolution, and impressive low-light performance. With a pixel size of 3.0 µm and a resolution of 2.3 megapixels, the AR0234 sensor ensures crisp, clear images even in challenging lighting conditions.
The integration of the AR0234 sensor with a USB interface makes the AR0234 USB Camera a versatile and user-friendly solution. The USB interface simplifies connectivity, allowing seamless integration with various devices and systems, including industrial robots, automated inspection systems, and smart surveillance setups.
Advantages of the AR0234 USB Camera
1. Superior Image Quality
One of the most significant advantages of the AR0234 USB camera is its superior image quality. The AR0234 sensor excels in capturing high-resolution images with remarkable clarity and detail. This is crucial for applications such as quality control in manufacturing, where precise image analysis is essential to detect defects and ensure product standards.
2. Enhanced Low-Light Performance
Automation systems often operate in environments with varying lighting conditions. The AR0234 USB Camera's excellent low-light performance ensures that it can capture clear images even in dimly lit settings. This capability is particularly beneficial for surveillance and security applications, where reliable imaging is needed around the clock.
3. High Frame Rate
The AR0234 USB camera supports high frame rates, making it ideal for applications that require real-time imaging and analysis. With frame rates of up to 120 frames per second (fps) at full resolution, this camera can handle fast-moving objects and dynamic scenes with ease. This feature is invaluable in robotics, where rapid image processing is critical for tasks such as object recognition and tracking.
4. Versatile Connectivity
The USB interface of the AR0234 USB Camera provides versatile connectivity options, simplifying integration with various platforms. Whether it's connected to a PC, a Raspberry Pi, or an embedded system, the AR0234 USB Camera ensures smooth and reliable communication. This flexibility makes it a go-to choice for developers and engineers working on diverse automation projects.
5. Robust and reliable
Designed for industrial applications, the AR0234 USB camera is built to withstand harsh environments. Its robust construction and reliable performance ensure longevity and durability, reducing the need for frequent replacements and maintenance. This reliability translates to cost savings and uninterrupted operation of critical automation systems.
Applications of the AR0234 USB Camera in Automation
The AR0234 USB Camera finds applications across various automation domains, thanks to its advanced features and capabilities. Here are a few notable examples:
1. Industrial Inspection
In manufacturing, the AR0234 USB camera is employed for automated inspection and quality control. Its high-resolution imaging and precise detail capture enable the detection of defects and inconsistencies in products, ensuring that only high-quality items reach the market. This enhances productivity and reduces waste.
2. Robotics
Robotic systems rely on accurate vision to perform tasks such as picking, placing, and assembling components. The AR0234 USB camera's high frame rate and exceptional image quality make it an excellent choice for robotic vision systems. It enables robots to accurately identify objects, navigate environments, and interact with their surroundings.
3. Surveillance and Security
For surveillance and security applications, the AR0234 USB camera provides reliable performance in various lighting conditions. Its low-light capabilities and high-resolution imaging ensure clear and detailed footage, enhancing the effectiveness of security systems. Whether it's monitoring a facility or a public space, this camera contributes to improved safety and security.
4. Smart Cities
As cities become smarter and more connected, the need for advanced imaging solutions grows. The AR0234 USB camera can be integrated into smart city infrastructure to monitor traffic, manage public spaces, and enhance urban security. Its versatility and performance make it a valuable asset in the development of intelligent urban systems.
In summary
An innovative image solution with several benefits for automation systems is the AR0234 USB Camera. It is an exceptional option for a variety of applications due to its strong design, high frame rate, flexible connectivity, improved low-light performance, and higher image quality. The AR0234 USB Camera is advancing automation innovation and efficiency in a variety of fields, including smart cities, robotics, industrial inspection, and surveillance.
The AR0234 USB Camera is positioned to have a significant impact on the future as companies continue to adopt automation and smart technology. Because of its cutting-edge features and capabilities, businesses can be empowered to attain unprecedented levels of productivity, precision, and dependability. It will continue to be at the forefront of imaging solutions. Accept the benefits of the AR0234 USB camera and realize the full potential of state-of-the-art automation.
0 notes
Photo

Camera modules for the Raspberry Pi 4: We will be releasing them soon!
Read the blog here: http://bit.ly/cams-Pi-4
Buy some of our cool cams here: http://bit.ly/Buy-Arducam
#raspberry pi 4 module#raspberry pi 4 model b#pi 4 camera module#raspberry 4 cameras#pi 4 module B camera module#pi 4 high performance camera module#raspberry pi 4 cameras#pi 4 official camera module#raspberry pi 4 projects#buy raspberry 4 cameras#pi 4 camera adapter#pi 4 high definition cam#Arducam Pi 4#Raspberry pi 4 Camera USB 3.0#Pi 4 Multi-camera support
0 notes
Text
Hackers Dissect ‘Mr. Robot’ Season 4 Episode 9: ‘Conflict’
Episode 9 of Mr. Robot’s final season was not only amazing plot-wise but also happily filled with hacks. We discussed [SPOILERS, obvs] IMSI catchers, Raspberry Pis, PGP, phishing telcos and stealing cryptocurrency. (The chat transcript has been edited for brevity, clarity, and chronology.)
This week’s team of experts includes:
Em Best: a former hacker and current journalist and transparency advocate with a specialty in counterintelligence and national security.
Trammell Hudson: a security researcher who likes to take things apart.
Micah Lee: a technologist with a focus on operational security, source protection, privacy and cryptography, as well as Director of Information Security at The Intercept.
Freddy Martinez: a technologist and public records expert. He serves as a Director for the Chicago-based Lucy Parsons Labs.
Yael Grauer (moderator): an investigative tech reporter covering online privacy and security, digital freedom, mass surveillance and hacking.
IMSI Catchers
Yael: I thought it was clever of Darlene and Elliot/Mr. Robot to use IMSI catchers.
Micah: I've never had a chance to play with one for real, But they're also referred to as "cell site simulators" because they simulate cell phone towers. Your phone tries to connect to the tower with the strongest signal, so in order to do a man-in-the-middle attack against cell phones, you just need to broadcast a stronger signal than the nearest cell phone tower and nearby phones will connect to your IMSI catcher instead. Then, you forward the traffic to the real cell phone tower, so the phones will still work, but you can spy on/modify all the traffic in the meantime
Yael: I’ve written about them before, but it was about law enforcement use of them for surveillance. They can’t intercept Signal messages, right? So if Deus Group just read a Freedom of the Press Foundation guide, Darlene and Elliot's plot would be foiled.
Em: It will intercept the Signal data, but messages are encrypted until they reach the recipient’s device, so it's not enough to just intercept it.
Micah: Their plot wouldn't have been foiled because Cyprus National Bank still sends two-factor authentication codes (2FA) over unencrypted SMS. I thought it was a nice touch how much Raspberry Pis were represented. In the first scene, in the hotel, the camera panned across some Raspberry Pis, and Darlene was logged in to a Raspberry Pi during the garage door hack.

Image: USA
Freddy: The Raspberry Pi 3 uses USB 3.0, which is fast enough to run a homemade IMSI Catcher.
Em: Homemade antennas are fun. =)
Yael: Oh, did they make their own?
Freddy: You can make your own. I think those are limeSDRs.
Price’s Last Stand
Yael: We had Price in yet another hostage situation.
Em: Yeah, he handled it very well. The traditional ways of getting out of a hostage situation weren't going to work there, but he did several important things for the situation he was in:
1. He kept calm. This is the most important thing. If he had panicked he'd have been killed a lot sooner.
2. He kept Whiterose off balance. His teasing and taunting was beautiful to watch, especially the "wind in his hair" bit.
3. He didn’t give up any important info to accomplish number 2.
4. He provoked Whiterose when they were both visible outside. Walking away after saying what he said almost guaranteed not only that he'd be shot there but that Whiterose would do it—in public.
Yael: My favorite taunts were, “it’s bad management when your best employees either walk off the job or blow their brains out,” and “all this over a little pipsqueak in a hoodie.” I think Price kind of didn't care if he died after Angela died.
Em: I think he didn't care if he died but he wanted to get Whiterose first. Once he handed off the drive (which he did right before going to the meeting), he had accepted his fate.
Freddy: You can't control people who have nothing to lose.
Em: Or to gain.
Micah: I like how Mr. Robot explained why he was there in the hotel room, instead of Elliot, by saying, "Life throws you an error code like that, you don't have the luxury of a fucking pop-up explanation."
The Bank Heist
Yael: Okay, so let’s talk about the hack. They said they needed to correlate phone numbers with bank account numbers to initiate the money transfers.
Em: They needed that for the script so they'd know which 2FA code to use for which request. Otherwise they'd have to brute-force it for each account, and that'd likely trigger a safety measure.
Micah: So Elliot and Darlene seem to have a SQL database from the bank, and their database includes account numbers, first name, last name, and hashed phone numbers. They needed to use the IMSI catcher (and the cell phone tower hack) to learn everyone's phone numbers, so they could hash them and then lookup the hashes in the bank database until they had phone numbers for all 100 accounts
Em: That's pretty realistic, FWIW. An equivalent of that was one of the first things we pulled from Phineas Fisher’s hack of Cayman National Bank and Trust (much to the dismay of some of the account holders).
Trammell: There was a CCC talk about nation-states doing 2FA intercept on Telegram password resets.
Micah: So, the venue changed. They got a hotel room within line of sight of the first venue, and they expected all Deus Group members to show up there, but the location moved. Mr. Robot figured out that Whiterose was at the first venue, though. So Darlene went to the second venue with the IMSI catcher, and Mr. Robot/Elliot stayed at the first venue to try to focus on just Whiterose's phone number. So all that hacking that Mr. Robot was doing, he was hacking into the telecom company that owns the closest cell phone tower.
Yael: How did Whiterose figure out that they needed a venue change and he had to get at Price?
Freddy: She said that Elliot disappeared right after Price said he was retiring, and that Price asked for a Deus Group meeting on Xmas, which was suspicious.
Micah: Elliot had a dump of Tyrell Wellick's phone, and it looks like he and Darlene imported Tyrell's Firefox passwords into Iceweasel, and then looked through his Google calendar. There was a password-protected attachment in one calendar event, and the thing I don't quite understand is how they got the password. I think Darlene sent it to him in Signal Desktop, but I don't know how they knew what it was.
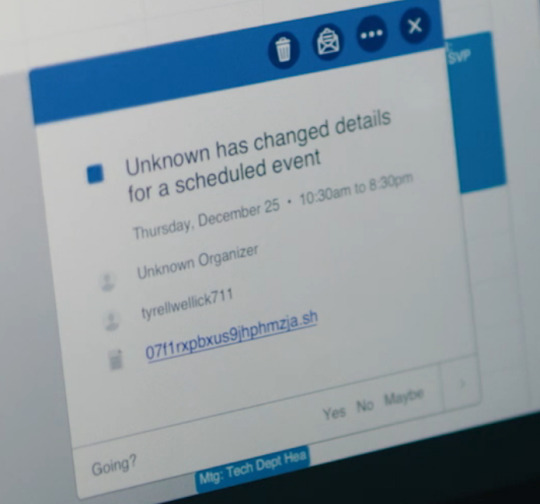
Image: USA
Freddy: It almost looked like a script to execute, but I couldn't tell. Maybe it was a pop-up?
Yael: I think it directed to a password-protected webpage hosted on some kind of private server. So I guess Whiterose got sloppy and forgot to take Tyrell off the list of people getting the venue change.
Micah: Tyrell was the guest of honor; he was getting named new CEO of Evil Corp. She just didn't realize he was dead.
Yael: I'm sort of stunned Whiterose didn't know Tyrell was dead or at least missing, with their surveillance..
Em: It happened in the middle of nowhere and the FBI didn't handle the crime scene, so the search around the van etc. was limited.
Yael: Yeah, but they had eyes on Tyrell and would've noticed he was missing after.
Hacking The Cell Tower
Micah: Okay, so let's talk about the cell phone tower hack.
Yael: Elliot was phishing telecom employees to try to get access to the cell phone tower because he didn't have the cell-site simulator.
Micah: Yeah, exactly. He needed to hack the cell phone tower, because that would give him the same access as if he had his own IMSI catcher. Once he got credentials from his phishing, he was trying to re-use them to login to the telco's VPN.
Yael: So what's easier and more reliable, building your own IMSI catcher or phishing telcos?
Freddy: Probably the latter, to be quite honest.
Micah: Also, did you notice that when he was phishing the telco, he scraped PGP keyservers to get a list of their email addresses? That's not realistic, though. Nobody in real life uses PGP. Except for The Intercept, but it's painful. I'm not sure all these gallatintelco.com employees would have keys on the keyservers.

Em: It would only take one person uploading their set of public keys to get them there. Keyservers verifying permission of the owner to list the keys is relatively new, as far as I can tell.
Yael: Why does he need their public keys, though? How does this work?
Em: He didn't need the keys, he just needed the email addresses associated with them so he could phish the telco employees. He was basically IDing which email addresses were being used—rather than trying to get a list of employees and then figuring out the company’s email address format (e.g. [email protected]).
Trammell: And he was hoping that one of them used the same password on the cell site infrastructure that they used to login in response to the phishing email. The first few didn't, but eventually one of them did. Someone always does…
Micah: It looks like USA Network didn't actually generate all these PGP keys. They're not in the SKS pool.
Trammell: Elliot’s ECorp key from the 2017 season is on the key servers. Or someone like me ran a key generator to spoof the 32-bit key id and uploaded it to the server and then registered e-corp.co.uk to complete the fake. 32-bit PGP key IDs are short enough that you can find a key that matches .
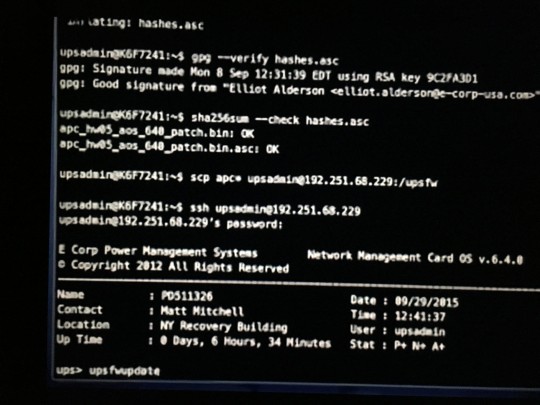
Image: USA
Freddy: I don't know any company, much less a telco, that requires you to publish PGP keys online.
Micah: The Intercept.
Yael: I think also the Electronic Frontier Foundation.
Freddy: When I used to work in cybersecurity I think I was the only one with a PGP key.
Micah: I think it's much more likely that a telco wouldn't be using any email encryption. But if they did, they'd use S/MIME, which is like PGP but centrally managed and therefore popular in the corporate/government world, and simpler to use.
Yael: I feel like I got PGP for street cred to get hackers I wanted to interview to talk to me vs. actually using it.
Micah: I used PGP to help facilitate the Snowden leak. Good times.
Garage Door Hack
Yael: Let’s talk about the garage door hack.
Trammell: Based on the scripts I think Darlene was using a HackRF. In that screenshot you can see that she has logged into a Pi with the HackRF and captured the signal while the security goon was pressing "close."

Image: USA
Bank Transfer
Micah: So as far as the bank transfer goes, I think there are some pieces of the puzzle that aren't quite clear in this episode. Last episode there was a snippet of python that involved mixing cryptocurrency. So I think they must have done something like this. Once they could spy on everyone's SMS, they initiated bank transfers for everyone, to transfer their money into some other bank account. When all the Deus Group members got SMS messages, they intercepted the 2FA codes and sent them to the bank to complete the transfers.
Freddy: Yeah but even then, you can't just do a bulk transfer of billions of dollars into cryptocurrency?
Micah: On the other end, the receiving account must have automatically been hooked into a cryptocurrency exchange, immediately selling all of that money for cryptocurrency, and then, immediately mixing that cryptocurrency.
Freddy: And do what with it? Someone will notice a trillion dollars being dumped into BTC (cough cough TETHER). Also, there is a cost to buying that cryptocurrency and you couldn't get the network throughput for syncing the transfers. Syncing a blockchain is much slower compared to something like SWIFT.
Em: Cryptocurrency for this is not realistic.
Micah: Before it could get exchanged for cryptocurrency, they had to have done a SWIFT transfer to a different bank. That must have been the first step.
Freddy: I am just saying, where did the money go? The cryptocurrency stuff is like "fancy Hollywood magic."
Micah: So maybe the money is all just sitting in like, a Swiss bank account or something that they set up just for this hack, and they're slowly working on moving it into cryptocurrency
Em: It would have to be several SWIFT transfers or things would not be accepted on the other end. Moving it all into one account wouldn't help, because it would be seized and returned.
Micah: It's a separate SWIFT transfer account for each Deus Group member, but still.
Freddy: Moving that much money would have tripped all sorts of liquidity rules at the banks.
Em: Yes, and the receiving accounts would have had issues with it. Even if all translated to BTC etc., they'd have to distribute it very widely to prevent it from being returned. A well set-up bank would also have additional confirmations required for transfers that empty out accounts or are over a certain amount.
Trammell: The liquidity of any of the cryptocurrency exchanges wouldn't be able to handle any significant buy-in like that. It would be like the flash crash in reverse.
Yael: Wait, I thought BTC couldn't get returned.
Em: Anything can be seized.
Micah: Yeah, I think once they get successfully get it into BTC, the only way they could seize it is by seizing the actual wallet, e.g. the secret keys.
Em: The exchange(s) are a vulnerable point, I think. Cryptocurrency would be harder to seize than a traditional account, if no one ever did anything with it. It'd have to sit there, dead.
Micah: If Elliot and Darlene can maintain their anonymity from the financial fraud investigators, they won't have any way of knowing who to seize it from. Also, if they don't actually want the money, they can just destroy the wallet.
Trammell: If they are doing the "K Foundation" attack rather than a "Robin Hood" approach, they could also transfer the BTC to a random address (or a symbolic one) where there is no secret key.
Em: There is one thing we're overlooking in the discussion of cryptocurrency transfers:
eCoin. We don't know how eCoin worked, but it's likely that it was more integrated with Cyprus Nat'l Bank than BTC et al is with most traditional banks.
Trammell: Good point—we're hypothesizing about how eCoin might work, as compared to real cryptocurrencies. (If eCoin is even anything other than a fiat currency issues by Evil Corp).
Em: I would be amazed if the bank wasn't integrated with it. And remember, eCoin wallets aren't secure against Evil Corp. They had the ability to look in every wallet etc.
Freddy: Presumably they also stole all the money from Price/Tyrell, too. So what's to stop them from bankrupting Evil Corp?
Trammell: I'm surprised that such rich people would have only one bank account. Their funds only have FDIC insurance up to $250k.
Em: What does FDIC insurance matter when the accounts are owned by the people who own the government(s)?
Freddy: Or for off-shore bank accounts.
Trammell: A more realistic response from Whiterose would be "oh, there's more where that came from."
Em: I think that's besides the point, considering the power dynamics at play.
Trammell: Offshore, different banks, different countries, etc. Single points of failure are so very dangerous.
Em: Whiterose would have been totally humiliated, all her data and everyone else's gone, their money taken—why would they give her more? The goal wasn't to bankrupt the members of the Deus Group but to bankrupt the Deus Group. Fsociety made Whiterose and the Dark Army bleed in a way that made them no longer appear invulnerable. Who would want to work with them then? But even arguendo, Whiterose would know the funds were gone for the immediate future and that'd ruin the Congo plan.
Darlene
Micah: I like that in the video Darlene told everyone the address of the Deus Group meeting, so that protestors showed up and stalled them from leaving long enough to complete the hack
Yael: haha yeah that was a fun distraction
Trammell: F L A S H M O B
Freddy: The only thing that rich people understand is an unruly mob.
Micah: Did you also notice the billboard for the fictional NBC TV show about fsociety called SHIFT+CONTROL?

Image: USA
Yael: Good name!
Micah: And the very last scene: Whiterose is putting on makeup while it appears a SWAT team is raiding her mansion and there's firefight going on? I think Whiterose is done.
Em: It's hard to tell. Zhang is done, definitely. Whiterose might not be. Though probably, given how close we are to the end of the series.
Yael: I was surprised when Price got shot. I knew he was gonna die, but didn’t expect it like that.
Em: He did such a good job of provoking Whiterose. It was beautiful.
Yael: That was a great episode. I was glad the hack finally happened and also that Darlene had a pivotal role in it. For Dom.
Hackers Dissect ‘Mr. Robot’ Season 4 Episode 9: ‘Conflict’ syndicated from https://triviaqaweb.wordpress.com/feed/
0 notes
Text
Presentan oficialmente la Raspberry Pi 4.
youtube
Cuando hablamos de la Raspberry Pi no solo hablamos de una computadora diminuta, que si, lo es, pero también hablamos de una computadora que ha cambiado bastante el mundo de las computadoras, dando una gran cantidad de alternativas con un costo realmente bajo.
Tras cada presentación de un nuevo modelo de la Raspberry Pi se sabe que en el futuro llegará una nueva versión actualizada que mantendrá todo como en las versiones anteriores en cuanto a costos y evolución de hardware y esta vez no será la excepción ya que acaban de presentar la Raspberry Pi 4 y de verdad que pinta muy bien.
Antes de comenzar, debemos recalcar que en lo estético no hay mucho que diferenciar respecto a las Raspberry Pi 3 Model B+, pero sus componentes si marcan una diferencia con dicha versión.
Vamos con las especificaciones técnicas:
– Procesador Broadcom BCM2711, Quad core Cortex-A72 (ARM v8) 64-bit SoC @ 1.5GHz – Memoria RAM de 1GB, 2GB or 4GB LPDDR4-2400 SDRAM (depending on model) – Conectividad: 2.4 GHz and 5.0 GHz IEEE 802.11ac wireless, Bluetooth 5.0, BLE, Gigabit Ethernet – 2 puertos USB 3.0 ports; 2 puertos USB 2.0 ports. – Conector Raspberry Pi standard 40 pin GPIO (totalmente compatible con las placas anteriores) – 2 × micro-HDMI ports (soporte hasta hasta 4kp60) – 2-lane MIPI DSI display port – 2-lane MIPI CSI camera port – 4-conector de audio estéreo y puerto de video compuesto. – H.265 (4kp60 decode), H264 (1080p60 decode, 1080p30 encode) – Graficos OpenGL ES 3.0 – Ranura Micro-SD para cargar el sistema operativo y el almacenamiento de datos. – 5V DC via USB-C connector (minimum 3A*) – 5V DC via GPIO header (minimum 3A*) – Alimentación a través de Ethernet (PoE) habilitada (requiere PoE HAT por separado) – Temperatura de funcionamiento: 0 – 50 grados C ambiente.
La evolución de esta Raspberry Pi 4 respecto a su antecesor es total y de seguro las ventas de esta mini computadora superarán las que Raspberry Pi 3 Model B+, sobre todo porque su precio sigue siendo increíblemente bajo, hablamos de una versión base que inicia en los USD $35, la versión que lo sigue con 2GB de RAM que cuesta USD $45 y la versión mejor equipada con 4GB que cuesta USD $55.
Fuente: Raspberry. Autor: Elias Villagrán Donaire.
The post Presentan oficialmente la Raspberry Pi 4. appeared first on Tecnofanatico.
0 notes
Text
Friday Product Post: It's Clear with FLIR!
Hello and welcome back to another Friday Product Post! Today we have two brand new FLIR products, thanks to our friends at GroupGets; two products to get your LED strips hooked up in a snap; two new ways to get your next big LED project reliably powered; and a USB 3.0 cable.
Just as a reminder: today (Friday, June 29) is the last day of our Summer Solstice Sale, as well as the last Flash Sale product with the SparkFun ESP8266 Thing. Make sure to get these deals now, because after today they will be over!
Alright, let’s take a closer look at all of our sweet new products!
youtube
Don’t fear the FLIR!

added to your cart!
FLIR Radiometric Lepton Dev Kit
In stock KIT-14654
With the FLIR Radiometric Lepton Dev Kit you will be able to bring FLiR's thermal imaging reliability and power to your desir…
$239.95
Favorited Favorite 0
Wish List
With the FLIR Radiometric Lepton® Dev Kit, you will be able to bring FLIR’s thermal imaging reliability and power to your Arduino, Raspberry Pi or other ARM-based development tool, all in an easy-to-access, breadboard-friendly package. This kit includes a breakout and the Lepton® 2.5 longwave infrared (LWIR) imager. All you need to get this kit set up is simply attach the Lepton® imager module to the provided breakout and connect the headers, and you will be seeing in full darkness in no time!

added to your cart!
PureThermal 2 - FLIR Lepton Smart I/O Board
In stock DEV-14670
The PureThermal 2 Smart I/O Board is a hackable thermal USB webcam breakout for the FLIR Lepton® thermal imaging camera core…
$99.99
Favorited Favorite 0
Wish List
The PureThermal 2 Smart I/O Board is a hackable, thermal USB webcam breakout for the FLIR Lepton® thermal imaging camera core. Each PureThermal 2 ships pre-configured to operate as a plug-and-play UVC 1.0 USB thermal webcam that will work with a standard webcam and video apps on all major platforms. For developers, its reference firmware, viewer software and hardware schematic are all open source!
youtube
It’s Mi-Light, not Your-Light!

added to your cart!
Mi-Light RGBW LED Controller Box
In stock COM-14710
The Mi-Light LED Controller Box is a 2.4GHz RF LED accessory that enables your non-addressable LED strips to change color, di…
$14.95
Favorited Favorite 0
Wish List
The Mi-Light RGBW LED Controller Box is a 2.4GHz, RF-controllable LED accessory that enables your non-addressable LED strips to change color, dim and use pre-loaded modes via the Mi-Light Remote Control (sold separately). Essentially, this little plastic box enables any non-WS2812 or APA102 (“NeoPixel” or “DotStar”) LED strip to act as if it was, without any other external boards. Set up is simple thanks to an array of screw terminals on either side of the controller box. By just screwing an LED strip’s control wires into the right side of this box and then plugging in power via a barrel jack (or another set of screw terminals) on the left side of the box, you’ll be up and running in no time!

added to your cart!
Mi-Light 4-Zone LED Remote Controller
In stock COM-14711
The Mi-Light Remote Control is a 2.4GHz RF LED accessory that can change the color and dim non-addressable LED strips attache…
$14.95
Favorited Favorite 0
Wish List
The Mi-Light 4-Zone LED Remote Controller is a 2.4GHz RF LED accessory that allows you to change the color and dim non-addressable LED strips attached to the RGBW LED Controller Box without the need of a smartphone app. Equipped with touch sensing buttons to change or dim the colors, control the power to the whole system, and even select a pre-set mode or speed, the Mi-Light Remote makes controlling customized lighting installations quick and easy!

added to your cart!
Mean Well LED Switching Power Supply - 5VDC, 5A
In stock TOL-14601
This is a 40W single output switching power supply from Mean Well that has been specifically designed to be with LED applicat…
$14.95
Favorited Favorite 0
Wish List

added to your cart!
Mean Well LED Switching Power Supply - 5VDC, 8A
In stock TOL-14602
This is a 40W single output switching power supply from Mean Well that has been specifically designed to be with LED applicat…
$19.95
Favorited Favorite 0
Wish List
These 25W and 40W single output switching power supplies from Mean Well have been specifically designed to work with LED applications. These power supplies are extremely reliable and are able to output 5VDC at up to 5A or 8A, respectively. We’ve been testing these supplies for quite some time, and can definitely attest to the durability of their fully isolated plastic casings, as well as their short circuit, overload and over-voltage protections.

added to your cart!
iPixel Wall Adapter Cable - Two Terminal (NA)
In stock CAB-14603
These Wall Adapter Cables from iPixel are terminated with a standard NA plug at one end and two insulated spade terminal conn…
$3.95
Favorited Favorite 0
Wish List
Of course, you’ll need some way to get power to your new LED Power Supplies. These Wall Adapter Cables from iPixel are terminated with a standard North American (NEMA 5–15P) plug at one end, and two insulated spade terminal connectors at the other. Each cable is one meter long, and provides a safe and appropriate way to hook up our Mean Well LED Power Supplies!

added to your cart!
USB 3.0 Micro-B Cable - 1m
In stock CAB-14724
This is a USB 3.0 type A to Micro-B 9-pin cable.
$2.95
Favorited Favorite 0
Wish List
Last up this week is this USB 3.0 type A to Micro-B cable. If you’re unfamiliar, this isn’t your typical micro USB cable – it boasts a data transfer rate of up to 5GB/s, making it a “SuperSpeed” USB option. This connector type is less common than its other micro USB siblings, but can still be found in some phones and electronics, so we wanted to make it available for those of you in need!
Alright folks, that’s it for this week! There is a lot to choose from for your next project. As always, we can’t wait to see what you make! Shoot us a tweet @sparkfun, or let us know on Instagram or Facebook. We’d love to see what projects you’ve made!
We’ll be back next week with even more fantastic new products!
comments | comment feed
0 notes
Text
Raspberry Pi 4 Review: Performance, Tweaks and User Experience
Raspberry Pi 4 Review: Performance, Tweaks and User Experience
The Raspberry Pi 4 model B is the latest of this very popular series of single-board computers. Gigabit Ethernet, lots of RAM, HEVC video decoding or USB 3.0 and similar entry price point as before add great value to the platform.
Of course the figures seem very interesting so today I will go through these eye-catching features. I will also explore a few tweaks which can improve general user…
View On WordPress
0 notes
Text
The Fruitiest Pi Yet: Raspberry Pi 4 8GB Is As Smooth As Cream
Our verdict of the Raspberry Pi 4 8GB: Representing the latest evolution of the tiny project board, the Raspberry Pi 4 8GB offers a desktop-like experience for under $100. All the usual hobby projects are compatible with the board, although some distros seem to be lagging in support.910
Since its first release in 2012 the Raspberry Pi has gone from strength to strength. An amazing 14 models have been released, with three form factors: 11 of them are still in production.
The most recent addition to the family is the Raspberry Pi 4 8GB model. It is the most powerful Raspberry Pi yet, with twice the RAM of its predecessor. It’s also the main feature of the Pimoroni Raspberry Pi 4 8GB Amazebundle.
A Slice of Pi
Whether you’re new to the Pi or you’re upgrading from an earlier device, this is a great stepping on point. The Raspberry Pi 4 8GB is the 2020 revision of the Raspberry Pi 4 Model B board, released in 2019. While the earlier Raspberry Pi 4 releases featured 1GB, 2GB, and 4GB models, this new release doubles the RAM.
And while the 1GB model is discontinued, we’re assured that the “Raspberry Pi 4 Model B will remain in production until at least January, 2026.”
But should you take a bite of this Pi?
What’s So Good About the Raspberry Pi 4 8GB?
Well, there’s a good chance you probably should. The Raspberry Pi 4 release was significant, but this is a game-changer. Everything is (unsurprisingly, given the additional RAM) just so fast.
From installing an operating system from the bundled NOOBS installer to adding Kodi add-ons, the speed that additional 4GB of RAM brings to the table is considerable.
Given early versions of the Raspberry Pi had just half a gig of RAM, it’s not a total surprise. For those of us who used the Raspberry Pi back in 2012/13, the evolution of the platform is evident. If you’re new to Raspberry Pi, however, 8GB will not seem particularly unusual. After all, it’s the baseline RAM for most laptops these days.
It’s what people expect from a computer. In some ways, the Raspberry Pi now feels more like a PC than a hobby device.
What You Get in Pimoroni’s Raspberry Pi 4 8GB Amazebundle
The compact Amazebundle box contains an impressive list of components.
Primarily there is the Raspberry Pi 4 8GB model itself, along with the official USB-C power supply adaptor. This has a 15.3W maximum power output and removes any worries about using a phone charger. You’ll find is a micro-HDMI to HDMI cable, and a 32GB microSD card with the NOOBs operating system installer, so you can get started right away.
Also included is the Fan Shim, an easily assembled fan component to help manage the Pi’s cooling and performance. Given that other Raspberry Pi 4 models have struggled with heat management, this is a smart inclusion.
Note that no case is included in this bundle. Fortunately, Raspberry Pi 4 cases for all purposes are easy to get hold of.
Raspberry Pi 4 Tech Specs
Three types of Raspberry Pi board have been used: A, B, and Zero. Of those, A and B models have had revisions designated “+”.
The Raspberry Pi 4 8GB is a B board using the standard “credit card-sized” form factor (85.6mm × 56.5mm). It features Gigabit Ethernet, two USB 2.0 ports, two USB 3.0 ports, a USB-C power supply, and two Micro HDMI ports, capable of supporting two 4K displays. There is also a combined stereo audio and composite video port.
Along with these standard hardware ports, the Pi 4 also features a two-lane MIPI DSI display port and two-lane MIPI CSI camera port. These ports accept ribbon cables only. The GPIO, meanwhile, is 40-pin and can accept connections from a range of devices, from fans to audio amplifiers.
The Pi’s SoC is a 64-bit Broadcom BCM2711 with a quad-core Cortex-A72 running at 1.5Ghz, and 8GB of SDRAM. Wireless internet is 802.11ac, capable of 2.4Ghz and 5Ghz networks, with Bluetooth 5.0 BLE.
This Raspberry Pi Needs a Cooling Fan
Earlier Raspberry Pi 4 models have been found to generate heat in ways the earlier devices did not. Linked to the enhanced overall speed and performance, various solutions have been suggested, from heatsinks and fans to standing the Pi 4 4GB model on its horizontal edge (no, really).
Offering a smarter, more complete solution, the Amazebundle features a Pimoroni Fan Shim.
Designed for “simple, effective Pi cooling” this is a fan that can be easily added to the Raspberry Pi’s GPIO. It features a button, RGB LED, and a cable to attach the fan to the shim’s body. This then sits on the GPIO using friction connectors, so it’s solder-free!
Setting Up the 8GB Raspberry Pi
Preparing a Raspberry Pi for use is straightforward. However, it makes sense to attach the Fan Shim before powering up the Pi.
This is thankfully straightforward. Simply attach the fan unit to the PCB using the nylon screws and bolts. Connect the wire to the socket on the PCB, then place the shim onto the Pi’s GPIO, over pins 1-12.
With this firmly in place, insert the microSD card, connect the HDMI cable, and hook up the USB Type-C power. A USB keyboard and mouse is handy at this stage, too. While you can remotely access the Pi later using SSH or VNC, initial setup requires direct input.
What Can You Do With 8GB of Raspberry Pi?
When the Pi boots for the first time the NOOBs menu appears. The version of NOOBs bundled with the Pi 4 8GB model features:
Raspberry Pi OS Full, Desktop, and Lite versions (all based of the 32-bit Debian OS)
Lakka
LibreElec
a 30-day trial of the TLXOS thin client from ThinLinX
As such, you have plenty of options for using this top-end Raspberry Pi. And that’s just the pre-installed options. Many more projects are available, from game streaming to managing amateur space programs. Or you might prefer to manage your greenhouse, set up a wildlife camera, or build a robot. (There’s also a 64-bit test version of Raspberry Pi OS available to install, although this is some way from being ready for all uses.)
The possibilities are endless.
But it’s important to check first that they will run with the Raspberry Pi 4 8GB model. For example, while LibreElec ran like a dream, Lakka wouldn’t boot, displaying this error:
Apparently, this is a common fault and seems to be due to the new Pi having more RAM than expected. For retro gamers there are workarounds, e.g. waiting for Lakka to release a Pi 4 8GB build, installing 32-bit builds
It’s not a massive issue, but one that you should be aware of. It seems booting from an older Pi 4 SD card with RetroPie already installed will work, however.
Comparing the Raspberry Pi 4 8GB With Other Models
With the Raspberry Pi 4 8GB model’s higher system spec and 64-bit architecture, comparison with the earliest models is tough. The Raspberry Pi 4 devices essentially represent a different generation—much like comparing the Xbox One with the Xbox 360.
In many ways, therefore, comparison is unfair.
There is little difference between the Raspberry Pi 4 8GB and older models. In terms of the Pi 4 range, this board is indistinguishable from the 2GB and 4GB versions aside from the RAM. It’s the power user board of the Raspberry Pi world, the equivalent of buying a top of the range phone. Running a basic benchmarking tool on the Pi 4 4GB and 8GB models, we found obvious advantages.
It is likely that that the Pi 4 8GB is a product of its time. A device that can double up as a competent desktop computer and thin client, as well as all of those other uses—media streamer, retro game hub, development device, robot brain, Twitter bot, the list goes on—is extremely valuable when events force people and students to work at home.
You probably don’t need it, but that 8GB is very nice to have.
Using the Raspberry Pi 4 8GB
To explore some of those possibilities, I spent a few days playing with the Pi 4. In that time, I used it mainly for desktop tasks, to explore the advantages of the 8GBs.
Everything performed well, leaving me with the strange sensation that I was using a desktop PC. For comparison, it felt a little like using a Pinebook, a budget ARM laptop not dissimilar to the Raspberry Pi. That extra RAM adds a dimension to the performance that is completely new to the Pi.
This is unparalleled with the Raspberry Pi. There has always been a trade-off between the device’s size and performance and the usual expectations of a computer. But with the addition of 8GB of RAM that trade-off is almost non-existent.
The implications of this are considerable. While a 16GB Raspberry Pi 4 is unlikely, when the next generation of boards comes along 16GB would not be out of place.
The Raspberry Pi 4 8GB: Basically, a Spare PC for Under $100
Retro gaming and media streaming is perhaps the most popular use for the Raspberry Pi, but there is so much more you can do with it. At a time when so many people are forced to work at home, this inexpensive computer makes an excellent desktop replacement. Alternatively, it can also work as a thin client to access a virtual desktop environment if that’s what your employer uses.
And then there is the endless list of enthusiast-developed projects. All of these, and more, work on this tiny budget British computer, available for under $100 without accessories.
The Raspberry Pi 4’s enhanced power represents a new stage in its evolution, and in the projects it can handle. To get you started, the Pimoroni Amazebundle Raspberry Pi 4 kit features everything you need.
Enter the Competition!
Raspberry Pi 4 Amaz Bundle from Pimoroni
Read the full article: The Fruitiest Pi Yet: Raspberry Pi 4 8GB Is As Smooth As Cream
The Fruitiest Pi Yet: Raspberry Pi 4 8GB Is As Smooth As Cream posted first on grassroutespage.blogspot.com
0 notes
Text
The Fruitiest Pi Yet: Raspberry Pi 4 8GB Is As Smooth As Cream
Our verdict of the Raspberry Pi 4 8GB: Representing the latest evolution of the tiny project board, the Raspberry Pi 4 8GB offers a desktop-like experience for under $100. All the usual hobby projects are compatible with the board, although some distros seem to be lagging in support.910
Since its first release in 2012 the Raspberry Pi has gone from strength to strength. An amazing 14 models have been released, with three form factors: 11 of them are still in production.
The most recent addition to the family is the Raspberry Pi 4 8GB model. It is the most powerful Raspberry Pi yet, with twice the RAM of its predecessor. It’s also the main feature of the Pimoroni Raspberry Pi 4 8GB Amazebundle.
A Slice of Pi
Whether you’re new to the Pi or you’re upgrading from an earlier device, this is a great stepping on point. The Raspberry Pi 4 8GB is the 2020 revision of the Raspberry Pi 4 Model B board, released in 2019. While the earlier Raspberry Pi 4 releases featured 1GB, 2GB, and 4GB models, this new release doubles the RAM.
And while the 1GB model is discontinued, we’re assured that the “Raspberry Pi 4 Model B will remain in production until at least January, 2026.”
But should you take a bite of this Pi?
What’s So Good About the Raspberry Pi 4 8GB?
Well, there’s a good chance you probably should. The Raspberry Pi 4 release was significant, but this is a game-changer. Everything is (unsurprisingly, given the additional RAM) just so fast.
From installing an operating system from the bundled NOOBS installer to adding Kodi add-ons, the speed that additional 4GB of RAM brings to the table is considerable.
Given early versions of the Raspberry Pi had just half a gig of RAM, it’s not a total surprise. For those of us who used the Raspberry Pi back in 2012/13, the evolution of the platform is evident. If you’re new to Raspberry Pi, however, 8GB will not seem particularly unusual. After all, it’s the baseline RAM for most laptops these days.
It’s what people expect from a computer. In some ways, the Raspberry Pi now feels more like a PC than a hobby device.
What You Get in Pimoroni’s Raspberry Pi 4 8GB Amazebundle
The compact Amazebundle box contains an impressive list of components.
Primarily there is the Raspberry Pi 4 8GB model itself, along with the official USB-C power supply adaptor. This has a 15.3W maximum power output and removes any worries about using a phone charger. You’ll find is a micro-HDMI to HDMI cable, and a 32GB microSD card with the NOOBs operating system installer, so you can get started right away.
Also included is the Fan Shim, an easily assembled fan component to help manage the Pi’s cooling and performance. Given that other Raspberry Pi 4 models have struggled with heat management, this is a smart inclusion.
Note that no case is included in this bundle. Fortunately, Raspberry Pi 4 cases for all purposes are easy to get hold of.
Raspberry Pi 4 Tech Specs
Three types of Raspberry Pi board have been used: A, B, and Zero. Of those, A and B models have had revisions designated “+”.
The Raspberry Pi 4 8GB is a B board using the standard “credit card-sized” form factor (85.6mm × 56.5mm). It features Gigabit Ethernet, two USB 2.0 ports, two USB 3.0 ports, a USB-C power supply, and two Micro HDMI ports, capable of supporting two 4K displays. There is also a combined stereo audio and composite video port.
Along with these standard hardware ports, the Pi 4 also features a two-lane MIPI DSI display port and two-lane MIPI CSI camera port. These ports accept ribbon cables only. The GPIO, meanwhile, is 40-pin and can accept connections from a range of devices, from fans to audio amplifiers.
The Pi’s SoC is a 64-bit Broadcom BCM2711 with a quad-core Cortex-A72 running at 1.5Ghz, and 8GB of SDRAM. Wireless internet is 802.11ac, capable of 2.4Ghz and 5Ghz networks, with Bluetooth 5.0 BLE.
This Raspberry Pi Needs a Cooling Fan
Earlier Raspberry Pi 4 models have been found to generate heat in ways the earlier devices did not. Linked to the enhanced overall speed and performance, various solutions have been suggested, from heatsinks and fans to standing the Pi 4 4GB model on its horizontal edge (no, really).
Offering a smarter, more complete solution, the Amazebundle features a Pimoroni Fan Shim.
Designed for “simple, effective Pi cooling” this is a fan that can be easily added to the Raspberry Pi’s GPIO. It features a button, RGB LED, and a cable to attach the fan to the shim’s body. This then sits on the GPIO using friction connectors, so it’s solder-free!
Setting Up the 8GB Raspberry Pi
Preparing a Raspberry Pi for use is straightforward. However, it makes sense to attach the Fan Shim before powering up the Pi.
This is thankfully straightforward. Simply attach the fan unit to the PCB using the nylon screws and bolts. Connect the wire to the socket on the PCB, then place the shim onto the Pi’s GPIO, over pins 1-12.
With this firmly in place, insert the microSD card, connect the HDMI cable, and hook up the USB Type-C power. A USB keyboard and mouse is handy at this stage, too. While you can remotely access the Pi later using SSH or VNC, initial setup requires direct input.
What Can You Do With 8GB of Raspberry Pi?
When the Pi boots for the first time the NOOBs menu appears. The version of NOOBs bundled with the Pi 4 8GB model features:
Raspberry Pi OS Full, Desktop, and Lite versions (all based of the 32-bit Debian OS)
Lakka
LibreElec
a 30-day trial of the TLXOS thin client from ThinLinX
As such, you have plenty of options for using this top-end Raspberry Pi. And that’s just the pre-installed options. Many more projects are available, from game streaming to managing amateur space programs. Or you might prefer to manage your greenhouse, set up a wildlife camera, or build a robot. (There’s also a 64-bit test version of Raspberry Pi OS available to install, although this is some way from being ready for all uses.)
The possibilities are endless.
But it’s important to check first that they will run with the Raspberry Pi 4 8GB model. For example, while LibreElec ran like a dream, Lakka wouldn’t boot, displaying this error:
Apparently, this is a common fault and seems to be due to the new Pi having more RAM than expected. For retro gamers there are workarounds, e.g. waiting for Lakka to release a Pi 4 8GB build, installing 32-bit builds
It’s not a massive issue, but one that you should be aware of. It seems booting from an older Pi 4 SD card with RetroPie already installed will work, however.
Comparing the Raspberry Pi 4 8GB With Other Models
With the Raspberry Pi 4 8GB model’s higher system spec and 64-bit architecture, comparison with the earliest models is tough. The Raspberry Pi 4 devices essentially represent a different generation—much like comparing the Xbox One with the Xbox 360.
In many ways, therefore, comparison is unfair.
There is little difference between the Raspberry Pi 4 8GB and older models. In terms of the Pi 4 range, this board is indistinguishable from the 2GB and 4GB versions aside from the RAM. It’s the power user board of the Raspberry Pi world, the equivalent of buying a top of the range phone. Running a basic benchmarking tool on the Pi 4 4GB and 8GB models, we found obvious advantages.
It is likely that that the Pi 4 8GB is a product of its time. A device that can double up as a competent desktop computer and thin client, as well as all of those other uses—media streamer, retro game hub, development device, robot brain, Twitter bot, the list goes on—is extremely valuable when events force people and students to work at home.
You probably don’t need it, but that 8GB is very nice to have.
Using the Raspberry Pi 4 8GB
To explore some of those possibilities, I spent a few days playing with the Pi 4. In that time, I used it mainly for desktop tasks, to explore the advantages of the 8GBs.
Everything performed well, leaving me with the strange sensation that I was using a desktop PC. For comparison, it felt a little like using a Pinebook, a budget ARM laptop not dissimilar to the Raspberry Pi. That extra RAM adds a dimension to the performance that is completely new to the Pi.
This is unparalleled with the Raspberry Pi. There has always been a trade-off between the device’s size and performance and the usual expectations of a computer. But with the addition of 8GB of RAM that trade-off is almost non-existent.
The implications of this are considerable. While a 16GB Raspberry Pi 4 is unlikely, when the next generation of boards comes along 16GB would not be out of place.
The Raspberry Pi 4 8GB: Basically, a Spare PC for Under $100
Retro gaming and media streaming is perhaps the most popular use for the Raspberry Pi, but there is so much more you can do with it. At a time when so many people are forced to work at home, this inexpensive computer makes an excellent desktop replacement. Alternatively, it can also work as a thin client to access a virtual desktop environment if that’s what your employer uses.
And then there is the endless list of enthusiast-developed projects. All of these, and more, work on this tiny budget British computer, available for under $100 without accessories.
The Raspberry Pi 4’s enhanced power represents a new stage in its evolution, and in the projects it can handle. To get you started, the Pimoroni Amazebundle Raspberry Pi 4 kit features everything you need.
Enter the Competition!
Raspberry Pi 4 Amaz Bundle from Pimoroni
Read the full article: The Fruitiest Pi Yet: Raspberry Pi 4 8GB Is As Smooth As Cream
The Fruitiest Pi Yet: Raspberry Pi 4 8GB Is As Smooth As Cream published first on http://droneseco.tumblr.com/
0 notes
Text
NVIDIA Jetson Nano Review – Tegra X1 Single Board Computer
youtube
The NVIDIA Jetson Nano developer kit is here and its a pretty sweet piece of kit! This single board computer pack an underclocked Nvidia Tegra X1 CPU found in the Shield TV and Nintendo Switch, with 4Gb of LPDDR4 ram and 128 Cuda Core GPU this board is a tiny monster marked for Ai but it can be used as an everyday Linux PC for web browsing Video playback and Emulation. Let’s see how it performs, This is my Review
LEARN MORE AND BUY ONE HERE
Dolphin Emulator Jetson Nano Test:
Jetson Hack’s channel:
Jetson Hacks Website:
Jetson Nano Specs: Jetson Nano developer kit specifications: * Jetson Nano CPU Module * 128-core Maxwell GPU * Quad-core Arm A57 processor @ 1.43 GHz * System Memory – 4GB 64-bit LPDDR4 @ 25.6 GB/s * Storage – microSD card slot (devkit) or 16GB eMMC flash (production) * Video Encode – 4K @ 30 | 4x 1080p @ 30 | 9x 720p @ 30 (H.264/H.265) * Video Decode – 4K @ 60 | 2x 4K @ 30 | 8x 1080p @ 30 | 18x 720p @ 30 (H.264/H.265) * Dimensions – 70 x 45 mm * Baseboard * 260-pin SO-DIMM connector for Jetson Nano module. * Video Output – HDMI 2.0 and eDP 1.4 (video only) * Connectivity – Gigabit Ethernet (RJ45) + 4-pin PoE header * USB – 4x USB 3.0 ports, 1x USB 2.0 Micro-B port for power or device mode * Camera I/F – 1x MIPI CSI-2 DPHY lanes compatible with Leopard Imaging LI-IMX219-MIPI-FF-NANO camera module and Raspberry Pi Camera Module V2 * Expansion * M.2 Key E socket (PCIe x1, USB 2.0, UART, I2S, and I2C) for wireless networking cards * 40-pin expansion header with GPIO, I2C, I2S, SPI, UART signals * 8-pin button header with system power, reset, and force recovery related signals * Misc – Power LED, 4-pin fan header * Power Supply – 5V/4A via power barrel or 5V/2A via micro USB port; optional PoE support * Dimensions – 100 x 80 x 29 mm
Follow Me On Twitter: Follow Me On Instagram:
Equipment I Use: Screen Capture Device: Tool Kit: Soldering Station: Camera: Tripod: Raspberry Pi 3 B Plus: Flirc Case:
DISCLAIMER: This video and description contains affiliate links, which means that if you click on one of the product links, I’ll receive a small commission at no extra cost to you!
THIS VIDEO IS FOR EDUCATIONAL PURPOSES ONLY!
#ETAPRIME #NVIDIA # NANO source: https://fumceunice.org Xem thêm các bài viết về Công Nghệ: https://fumceunice.org/category/cong-nghe/
The post NVIDIA Jetson Nano Review – Tegra X1 Single Board Computer appeared first on Fumceunice.
source https://fumceunice.org/nvidia-jetson-nano-review-tegra-x1-single-board-computer/
0 notes
Text
Euer alter Raspberry Pi macht bei anspruchsvollen Anwendungen langsam schlapp? Der Raspberry Pi 4 bietet nun vor allem sehr viel mehr Arbeitsspeicher. Und nicht nur das.
Zweifelsohne war und ist der Raspberry Pi 3 ein spannendes Mini-Rechner, der mit der Veröffentlichung seines Nachfolgers womöglich hier und da zum Schnäppchen wird. Denn der Raspberry Pi 4 löst ihn nicht nur ab, sondern bietet in einigen Bereichen deutliche Verbesserungen, die nicht immer von Vorteil sind. Aber der Reihe nach…
Das bietet der Raspberry Pi 4
Bezogen auf die technischen Daten liest sich der Raspberry Pi 4 hervorragend: Der 1,2GHz Quadcore-Chip mit vier ARM Cortex-A52-Kernen des Raspberry Pi 3 wurde durch einen 1,5GHz Quadcore-Prozessor mit 64bit-Architektur und vier Cortex-A72-Kernen ersetzt. Das soll im besten Fall zu 3x mehr Leistung führen.
youtube
Neu ist ebenso, dass die Raspberry Foundation quasi drei Modelle anbietet: Die günstigste Fassung mit 1GB RAM, das Mittelklasse-Modell mit 2GB RAM und der Top-Raspi mit 4GB LPDDR4 SDRAM. Gigabit Ethernet, Dualband 802.11ac WLAN, Bluetooth 5.0, 2x USB 3.0, 2x USB 2.0, Dual-Monitor-Unterstützung bis 4K-Auflösung, VideoCore VI-Grafikeinheit mit OpenGL ES 3.x-Unterstützung und 4K60p-Hardware-Decoding machen den Raspberry Pi 4 zu einem potenten Rechner auf kleinstem Raum. Hier könnt ihr mit sehr viel mehr Performance zum Beispiel für Emulatoren rechnen.
Mehr Kosten mit dem Raspberry Pi 4
Was etwas bedauerlich, aber auch nachvollziehbar ist: Zwar beginnt der Raspberry Pi 4 mit 1GB RAM bei gewohnten 35 US-Dollar, doch möchtet ihr eine bessere Variante, zahlt ihr schon 45 US-Dollar (2GB) bzw. 55 US-Dollar (4GB). Doch nicht nur das: Das Standard-Case ändert sich geringfügig, da an der Seite ergänzende Anschlüsse für micro-HDMI und USB-Type-C vorhanden sind. Somit ist ggf. eine Neuanschaffung nötig, manch Raspberry-Pi-3-Gehäuse von Drittherstellern sind auf den Raspberry Pi 4 also nicht vorbereitet.
Das neue Netzteil. (Foto: Raspberry Pi Foundation)
Das neue Case. (Foto: Raspberry Pi Foundation)
Zudem gibt’s ein neues Netzteil, das über den USB-Type-C-Port angeschlossen wird. Zwar könnt ihr das alte vom Raspi 3 noch mittels eines günstigen Adapters verwenden, doch profitiert ihr dann nicht von konstant bis zu 1,2A, die so übertragen werden können. Oder anders gesagt: Braucht ihr die bestmögliche „Power“, benötigt ihr ein neues Netzteil.
Hohe Nachfrage
Vielerorts ist der Raspberry Pi 4 mit 4GB RAM bereits ausverkauft. Wenn ein Händler diesen noch anbietet, ist er zu teils unverhältnismäßig hohen Preisen oder in Form von Bundles mit Maus, Tastatur, Kabel und Speicherkarte erhältlich. Mein Tipp: Geduldet euch noch einige Wochen, dann normalisiert sich die Situation wieder.
Ein vermutlich lohnenswertes Update. (Foto: Raspberry Pi Foundation)
Nebenbei erwähnt: Laut offizieller Webseite ist für den Raspberry Pi 4 bereits die neueste Raspbian-Version erhältlich, die allerlei Vorzüge besitzt sowie vor allem die Grafikleistung deutlich anhebt.
Der Raspberry Pi 4 ist der ideale Rechner für eure DIY-Retro-Konsole. Aber er ist auch teils deutlich teurer als sein Vorgänger... Euer alter Raspberry Pi macht bei anspruchsvollen Anwendungen langsam schlapp? Der Raspberry Pi 4 bietet nun vor allem sehr viel mehr Arbeitsspeicher.
0 notes
Text
Courtesy of Pi Hub
The Raspberry Pi4 Model B pictured above is by far the fastest Pi in the cyber cafe. Wait, are cyber cafes still a thing? Anyway, the I/O has definitely been upgraded to meet the compatibility standards of our current technological landscape. It doesn’t have every possible port imaginable, but it’s an SBC (Single Board Computer), so there’s no way it should. Also getting a boost is the Cortex A53 CPU (Raspberry Pi 3), as well as the RAM threshold. Let’s take a quick look at the new specs.
I/O Ports:
The unit still has four usb ports, however, two of those have been upgraded from 2.0 to 3.0. That’s a huge improvement for obvious reasons, but if it isn’t obvious, than just know that the blue ones are faster. I’m not being condescending either. Most people really aren’t familiar with those subtle tidbits of tech knowledge. The Ethernet port has also made the transition to the new board. The power is now supplied via a USB-C port, as opposed to the micro-usb from the last iteration. There are options for the RAM this time around. Consumers can choose from 1GB-4GB of DDR4 RAM. The audio jack has also not changed since the Pi3.
Raspberry Pi4 Model B Specs
Did you catch it? Well, if you’re familiar with the Pi3, than you’ve surely noticed the replacement of the single HDMI with the dual micros. According to the manufacturer, they are capable of 4k output. Hell, according to them, the Pi4 offers “desktop perfromance comparable to entry-level x86 PC systems.” Along with their commitment to support: H.265 decode for 4K60p, H.264 1080p60 decode and 1080p30 encode, and OpenGL ES 3.0 graphics, as well as planning to produce units until January 2026. The GPIO 40-Pin Header is back with backwards compatibility built-in. The device still features dual-band (2.4GHz and 5GHz 802.11b/g/n/ac) Wi-Fi, however, the Bluetooth has been upgraded to 5.0. The MIPI CSI or Camera Serial Interface has also made a reappearance.
Raspberry Pi4 Model B overhead view.
There are a few things to note, especially for first time Pi guys and gals. The Raspberry Pi 4 requires a Micro-SD for storage. You will need one to store and run programs, as well as your OS (Operating System [Windows, Linux, etc.]) off of. Be sure to have one on hand, buy one, or buy a kit that includes one. Don’t worry about not using the 40-Pin GPIO, that’s for advanced users who could program this thing to cook breakfast. Buy the all-in-one kit to ensure that you have everything that you need to fire it up. For advanced users, the Pi4 offers up a world of cool hacking opportunities. So it seems that there are quite a few reasons to pick up the new Pi, but our favorite is the price! They range from $35-$55. Please note, however, that these are the price of the SBCs not accessory kits. Check out the gallery below and let us know:
Are you interested in buying a Raspberry Pi 4?
#gallery-0-5 { margin: auto; } #gallery-0-5 .gallery-item { float: left; margin-top: 10px; text-align: center; width: 33%; } #gallery-0-5 img { border: 2px solid #cfcfcf; } #gallery-0-5 .gallery-caption { margin-left: 0; } /* see gallery_shortcode() in wp-includes/media.php */
Courtesy of Pi Hub
Raspberry Pi4 Model B Specs
Raspberry Pi4 Model B bird’s eye view.
Raspberry Pi 4 Gallery
The Raspberry Pi4 Has Arrived, and Has Some Pretty Cool Improvements to Boot! The Raspberry Pi4 Model B pictured above is by far the fastest Pi in the cyber cafe.
#Cicada Dynasty#Cicada Dynasty Media#cicadadynastydotcom#cicadadynastystudios#cicadamind#Highly mentioned Rarely seen...
0 notes
Link
Lovely Cartoon Animal Cable Bite USB Charging Cord Guardian for iPhone - Sheep -----> $0.89 Cute Cartoon Animal Cable Bite USB Charging Cord Protector for iPhone - Tiger -----> $0.89 Lovely Cartoon Animal Cable Bite USB Charging Cable Protector for iPhone - Squirrel -----> $0.89 Lovely Cartoon Animal Cable Bite USB Charging Cord Protector for iPhone - Dolphin -----> $0.89 Lovely Cartoon Animal Cable Bite USB Charging Cable Protector for iPhone - Koala -----> $0.89 Lovely Cartoon Animal Cable Bite USB Charging Wire Holder Protector for iPhone - Clownfish -----> $0.89 Lovely Cartoon Animal Cable Bite USB Charging Cable Holder Protector for iPhone - Whale -----> $0.89 Lovely Cartoon Animal Cable Bite USB Charging Cable Protector for iPhone - Doraemon -----> $1.77 5-Channel White Black Cable Tracking Sensor Module for Arduino (Works with Official Arduino Boards) -----> $10.56 DIY 5-Pin Male Adapter Extension Connecting Wire Cable for RGBW LED Strip -----> $1.95 3.5mm Female to 2 x 3.5mm Male Audio / Video Cable for Laptop - Black (18cm) -----> $3.12 1-to-2 Splitter Power Cord Cable for PC Computer Host / Display - Black (3-Flat-Pin Plug / 170cm) -----> $8.43 Cell Phone / Battery Charging Dock + Micro USB Cable Set for Samsung Galaxy Note 4 / N9100 - Black -----> $15.48 Z07-5S Handheld Sefie Monopod w/ 3.5mm Audio Cable for Cell Phone - Black -----> $10.25 Walkera G-3D-Z-08(M) Gimbal Cable for G-3D Camera Gimble - Black -----> $4.25 Replacement Internal Power Flex Cable for Xiaomi 3 - Black -----> $3.83 CY U3-176-LE-5.0M USB 3.0 Male to Micro Left Angled 90 Degree Cable With Locking Screws for Nikon -----> $15.99 Magnetic Connector Charging Cable for Sony Z3 Mini/ Z3 Compact/ Z3/ L55T/ Z2/ Z1/ Xperia Tablet Z2 -----> $10.65 Magnetic Charging Dock + Charging Cable Set w/ Adapters for Sony Xperia Z3 / L55T - Black -----> $11.99 Magnetic Charging Dock + Micro USB Cable Set for Sony Z3 - Black -----> $10.99 2.5mm Male to RCA Female Adapter Cable for GPS AV-IN - Black + Yellow -----> $2.39 Mini Charging Dock + Charging Cable Set for Sony Xperia Z3 / L55T - Black -----> $10.58 Replacement "4800mAh" Ni-MH Battery + USB Cable Set for XBOX 360 / XBOX 360 Slim Wireless Controller -----> $6.73 USB Male to Micro USB Male Data Charging Nylon Cable for Samsung / HTC - Black + Red (1.3m) -----> $3.99 USB Male to Micro USB Male Data Charging Nylon Cable for Samsung / HTC - Black + Pink (1.3m) -----> $4.11 USB Male to Micro USB Male Data Charging Nylon Cable for HTC / Samsung - Black + Grey (1.3m) -----> $3.99 USB Male to Micro USB Data Charging Nylon Cable for HTC / Samsung - Black + Blue (1.3m) -----> $4.13 USB Male to Micro USB Male Data Charging Nylon Cable for HTC / Samsung - Black + White (1.3m) -----> $4.13 USB 2.0 Male to Micro USB Male Data Charging Cable for Samsung - Purple + White (1m) -----> $3.37 SupTronics Motherboard Specified 40-Pin Male to Female Data Cable for Raspberry PI B+ - Grey (20cm) -----> $3.82 USB Male to Micro USB Male Data Charging Nylon Cable for Samsung / HTC - Blue + White (98cm) -----> $2.41 Smart Portable Charging Dock + USB Cable Set for Samsung Gear 2 R380 - Black -----> $11.39 SupTronics X300ST Expansion Board + 40-Pin Data Cable + Adapter Set for Raspberry Pi B+ -----> $68.00 Kingma 40W 5-Port USB Charger w/ US Plug Cable for GoPro Hero 3 / 4, IPHONE, Samsung + More - White -----> $24.99 USB 2.0 Male to Micro USB Male Data Charging Cable for Samsung - Green + White (1m) -----> $3.35 Replacement Cell Phone Internal Tail Plug Charging Flex Cable for Xiaomi Redmi Note -----> $7.14 USB 2.0 to Micro USB Braided Charging Sync Data Cable for Samsung - Black + White -----> $3.35 USB 2.0 to Micro USB Braided Charging Sync Data Cable for Samsung - Blue + White -----> $3.33 USB 2.0 to Micro USB Braided Charging Sync Data Cable for Samsung - Gold + White -----> $3.35 USB 2.0 to Micro USB Braided Charging Sync Data Cable for Samsung - Silvery Grey + White -----> $3.35 USB to Micro USB Data Charging Nylon Cable for Samsung Galaxy S3 / S4 - Black + Gold (1.5m) -----> $3.99 USB to Micro USB Data Charging Nylon Cable for Samsung Galaxy S3 / S4 - Red + Gold (1.5m) -----> $3.99 USB to Micro USB Data Charging Nylon Cable for Samsung Galaxy S3 / S4 - Silver (1.5m) -----> $3.99 CY U2-228-0.5M USB 2.0 B-type Extension Cable for Printer Scanner HDD Enclosure (50cm) -----> $2.84 USB 3.0 Male to Male Y Cable for Mobile HDD - Black -----> $4.98 USB 3.0 Male to USB Male / Mini USB Male Cable for Mobile HDD - Black (20cm / 60cm) -----> $4.92 Replacement Repair Parts Volumn Button Control Flex Cable for IPHONE 6 4.7" - Black -----> $7.78 Replacement Repair Parts Power / Lock Button Flex Cable w/ Flash Light for IPHONE 6 4.7" - Black -----> $8.24 Replacement "4800mAh" Ni-MH Battery + USB Cable Set for XBOX 360 / XBOX 360 Slim Wireless Controller -----> $5.29 Dual-USB Battery Charger w/ Charging Cable / EU Plug Charger for GoPro Hero 4 - Black -----> $10.96
0 notes
Text
Neural Compute Stick: Object Detection with Neural Networks
Convolutional Neural Networks have become the first choice to extract information from visual data, they are used for example in the Google search engine to classify images. Essentially, they mimic the way a human being recognizes images. In order to do that, the system learns to recognize certain characteristics of an object. In the case of a person this could be the limbs or head and face. It then produces a trained model. Whats great about it: The algorithm learns the characteristics of an object on it’s own in the training process, there’s no need to point them out manually. Of course, the system only detects objects it was previously trained with. The downside: You usually need a pretty fast graphics card to train a model or run inferences in it.
In this post, we use neural networks (specificly CNNs) to classify objects in a Video-Stream on a cheap, ordinary PC without a dedicated GPU at all. This is made possible by the recently released Movidius Neural Compute Stick.
youtube
Movidius Neural Compute Stick
The Neural Compute Stick (NCS) is a tiny computer meant to accelerate the execution of neural networks. The entire Hardware is packed into an USB-stick, which is compatible with USB 2.0 or later. However, it is recommended to use the device on an USB 3.0-port if possible. Internally, the NCS uses a so called Vision Processing Unit that goes by the name of Myriad 2.This relatively new kind of micro-processors is specifically made for machine-vision related tasks and thus very energy-efficient. According to the manufacturer the typical power consumption of the VPU is around 1 Watts. The NCS is on sale for around 80 US-Dollars, but only available in a few online-shops as of September 2017.
The Movidius Neural Compute Stick is not a universal solution for deep learning. It is not possible to train a model on it, instead, you can only run inferences on input data like a video stream with a pre-trained model. This means you will need to train your model first on your computer, which as already mentioned can take lots of time. Luckily, the NCS-community already provides some pre-trained models that are available for free. Theoretically every model that was made with the deep-learning library Caffe (.caffemodel) is compatible, but you will have to convert it for the NCS. Also, make sure the model uses one input variable only. The NCS is currently limited to that. In the screenshot below we see the classification of images from a webcam input stream. This example uses the GoogLeNet.
Classification of images from a webcam stream on the NCS running GoogLeNet.
Vorbereitungen und Setup:
The software you need to program the Neural Compute Stick and use it on the target platform is available for download on the Movidius page. That includes some example applications like the code for the application in the screenshot above. The models for that are also available for download, among which are some widely known ones like the AlexNet or the GoogLeNet.
Requirements for the development platform:
x64-PC running a native Ubuntu Linux, virtual machines are not supported
Windows and MacOS are (currently) not supported
The Linux distribution has to be an Ubuntu 16.04 LTS.
On Ubuntu you need to have Python version 3.5.2 installed.
Note: The target platform does not have to meet these requirements. In case you are wondering: Yes, you can also plug it into your Raspberry Pi. Movidius mentions explicitly, that the NCS is compatible.
Requirements to run the example code for the NCS:
You need to have a webcam (internal or external)
Gstreamer 1.0 and its Plugins “Basic”, “Good”, “Bad” and “Ugly” have to be installed.
Installation instructions for Gstreamer: http://ift.tt/2ymjyrY.
Installing Toolkit and API:
Before we can use the Movidius Neural Compute Stick, the API and Toolkit have to be installed. The Toolkit is used to convert or test a model for the NCS, the Movidius API allows to access the functionality of the Neural Compute Stick, for example wih Python. Here is the download page: http://ift.tt/2uJZWMj. The installation is done by simply running a Bash-script in the unzipped Toolkit/API folder.
$ ./setup.sh
Keep in mind that the script, especially the one for the Toolkit, can take a lot of time to complete (15-30 minutes) an needs a stable internet connection.
Before we can use a model with the stick, we have to convert it with this script from the Toolkit:
$ python3 ./mvNCCompile.pyc sample_network.prototxt -w sample_network.caffemodel -s 12 -o name_of_outputfile
We can now use the generated “graph” file (default name, if not specified) in an application for the NCS.
Object detection with Tiny YOLO
Now comes the hard part. We want to be able to find various objects in a given scene and identify what they are. The provided models by Movidius are not up to this task. They can only classify one object at a time respecitvely per frame. They are based on the assumption that an input image shows only one relevant object in close-up. YOLO (You Only Look Once) in contrast is a neural network which can detect and localize multiple objects in one frame. On top of that, YOLO can tell persons apart from objects in a given scene. Tiny YOLO is the small brother of YOLO, a resource saving alternative for weaker devices. Thanks to various optimizations it enables the NCS to run object detection almost in realtime (approximately 0.2s processing time per frame). Naturally, this comes at a cost and so the error rate increases noticeably. However, for our purposes the detection is still sufficiently accurate. A few developers on the Movidius Forums have already ported Tiny YOLO to the NCS. The result of their efforts is available for download on GitHub: http://ift.tt/2yo3aaB. Here you can find some example code written in Python and the Tiny YOLO model itself.
Set-up Tiny YOLO on the NCS
To run the sample code for Tiny YOLO, some additional software is required on the development and target platform. You have to build OpenCV as well as ffmpeg from source on your platform. A simple installation via Python’s own package manager pip is not sufficient, because this “light” edition of OpenCV is missing some important parts. This means, OpenCV can probably not access your camera and start the video-stream. Furthermore, you need a webcam with Linux-compatible drivers.
Let’s start with ffmpeg. To install ffmpeg under Linux follow the instructions in the official guide: http://ift.tt/1lboHUu. Once the installation is finished, use the command below in a new terminal to check wether ffmpeg can find and use your camera. Replace /dev/video0 with your video source.
$ ffmpeg -f v4l2 -list_formats all -i /dev/video0
The output should look something like this:
[video4linux2,v4l2 @ 0x2753960] Raw : yuyv422 : YUYV 4:2:2 : 640x480 352x288 320x240 176x144 160x120 1280x720 640x480 [video4linux2,v4l2 @ 0x2753960] Compressed: mjpeg : Motion-JPEG : 640x480 352x288 320x240 176x144 160x120 1280x720 640x480
After that, we’re done with ffmpeg. Let’s move on to OpenCV: http://ift.tt/1YnH1Mj. To roughly check if OpenCV has been installed sucessfully, you can run some samples in your installation folder under /bin if you like.
As already mentioned in the introduction to the Movidius-Stick, the Caffemodel of Tiny YOLO needs to be converted in a format that is compatible with the NCS. The software for this task is included in the Movidius Toolkit. The exact command is:
$ python3 ./mvNCCompile.pyc your_path/yolo_tiny_deploy.prototxt -s 12
Before you execute it, make sure the Caffemodel and the corresponding Prototxt-file are in the same folder. Both files must have the same name, otherwise the conversion will silently fail without throwing an error. The generated model is then useless.
Tiny YOLO on the NCS
Now we are finally ready to see Tiny YOLO in action. As a last step, move the “py_examples” folder from the “yoloNCS” repo to the “ncapi” (the unpacked NCS-API) folder. Alternatively, you can create a symlink. The example code includes these two samples:
yolo_example: Will detect objects with the Tiny YOLO model in an .jpg image and highlights found objects in the image.
yolo_object_detection_app: Will detect objects in a video stream from your webcam and highlights found objects in a video.
Let’s start the “object_detection_app” with Python 3. If everything is set up correctly, you will now see the Video-Stream of your webcam in which Tiny YOLO highlights objects it has learned. The numbers state, to what extent the detected objects resemble the trained template. The level of similarity from which the system considers an object as “detected” is configurable. This means we either end up with more false-positives or false-negatives, depending on our requirements. This last screenshot and the video at the top of this page demonstrate what the Tiny YOLO object detection looks like with a webcam.
Object detection in a webcam stream on the NCS running the Tiny YOLO model.
The model, as it is trained now, detects 20 different things, among which are persons and a bunch of animals. The detection of human beings works best. “Lifeless” items however are sometimes not recognized.
The post Neural Compute Stick: Object Detection with Neural Networks appeared first on codecentric AG Blog.
Neural Compute Stick: Object Detection with Neural Networks published first on http://ift.tt/2fA8nUr
0 notes