#Resize Objects
Explore tagged Tumblr posts
Visit Tumblr Blog
Explore Tumblr blogs with no restrictions, modern design and the best experience.
Last Seen Tumblr Blogs


Fun Fact
In February 2021, Tumblr had 518.6 million blog accounts.
Text
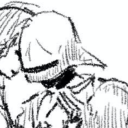
Learn how to Resize Objects in The Sims 4 across PC, Mac, Playstation and Xbox!
Full Tutorial: https://simscommunity.info/2023/09/01/sims-4-resize-objects-tutorial/
15 notes
·
View notes
Text

"Don't you want to battle to win a prize?"
#Bfdi#battle for dream island#bfb#four bfb#bfb four#x bfb#bfb x#bfdi four#four bfdi#bfdi x#x bfdi#black hole bfb#bfb black hole#i am NOT tagging everyone in the background#I didn't even get to draw all of them because I ran out of room in the circle#see if you can spot whos missing#osc#object show community#ovrrdoggart#procreate#for the love of the universe PLEASE click for higher quality#I had to resize this image three times#thats what I get for liking to draw on 600 by 600 px canvas
241 notes
·
View notes
Text
I procrastinated again so y'all get more Fairy Tail dragon slayer memes


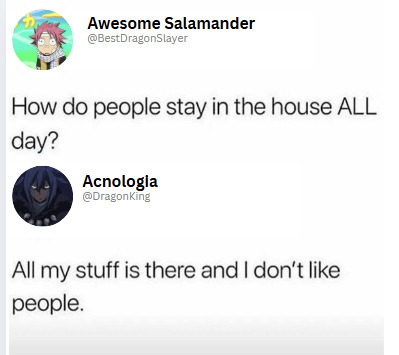
#low budget memes#memes#Fairy Tail#Dragon slayers#The shitty editing software will remain#I'm having too much fun -#I cannot explain to you all how much joy these lil guys give me#Natsu#Natsu Dragneel#Gajeel#Gajeel Redfox#Erik#Cobra#Laxus#Laxus Dreyar#Wendy#Wendy Marvell#Acnologia#Sting#sting eucliffe#Rogue#rogue cheney#Sorry folks Serena didn't make an appearence today#This is 100% to procrastinate on the Dragon Slayer fanfic#Also if anyone with ANY experiance in adding pictures to Tumblr knows how to resize objects#I will owe you my life
100 notes
·
View notes
Text
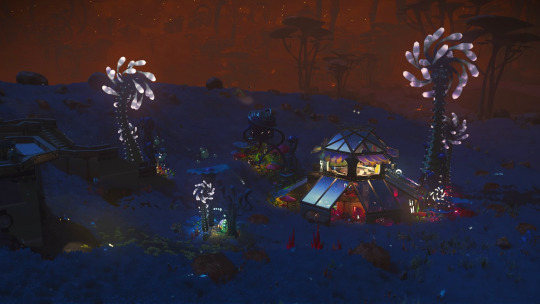
chapel of the restless dead
#no man's sky#NMS#nms photography#i will probs drop the coordinates for this one once i take some better screenshots. also when i built this like halfway through#i realized that i could uh. resize objects#like i was visiting other ppl's builds via the anomaly portal and i came across this one that was like an art gallery?? with resized statue#and a wall of light boxes and iwas like OH DAMN OKAY
13 notes
·
View notes
Text
BLYX Studio presents users with a single platform delivering digital marketing solutions. And design abilities to produce advanced professional standard materials quickly. This program offers a basic design interface. Which enables people with no experience to learn. But its complex capabilities serve the needs of experts. Details ...
#Blyx Studio#Background Remover#Resize and Upscale#Text Removal#Object Removal Tool#Replace Backgrounds#Text Effects#Image Generator
0 notes
Text

(suggested by @cuyama)

Grant Street, Carson, North Dakota.
#house flipper 2#suggestion#yes. the windows are two square ceiling lights floating in the middle of the room#ive been using more forced perspective lately since hf2 only lets you resize specific objects#i wonder if you can scale things up/down with console commands...
556 notes
·
View notes
Text
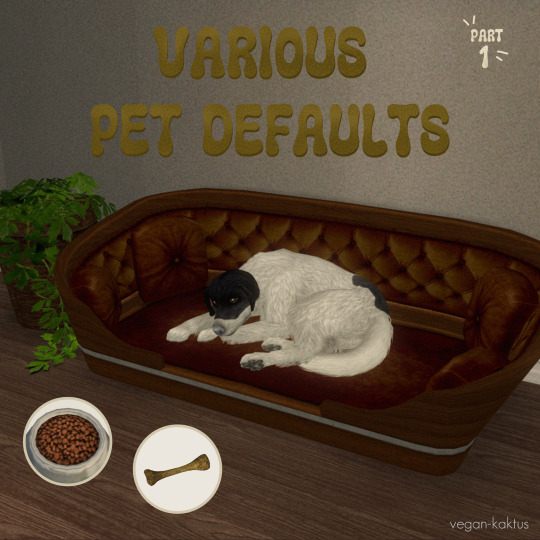
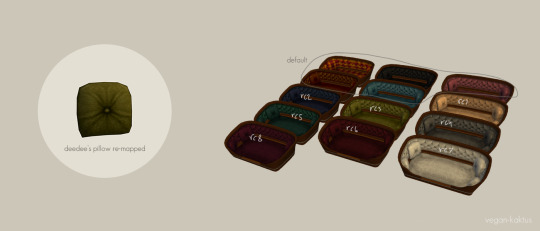


Various Pet Defaults - Part 1
Pet Bed Basket Expensive
Replaced with chrissy6930's mesh edit of said pet bed (scroll down) and re-mapped by me to use 512x512 textures. Existing recolors will break unfortunately, but I couldn't even find many to begin with. I did include 8 recolors (some of them are remakes of windkeeper's (T$R) recolors). They all have a dirty state, it's not as dirty (/turquoise) as Maxis' but it's something at least. I will include my .psd for this in part 2.
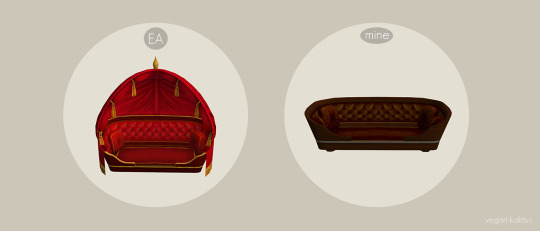
Maxis: polycount: 2784, texture size: 1024x512
My default: polycount: 1294, texture size: 512x512
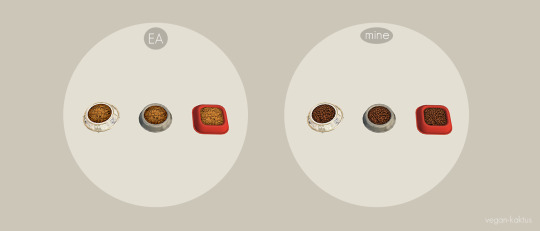
Pet Food
I dislike the original pet food texture, but I liked the one from this upload by @beautifulnerdkitty. I edited it slightly and turned it into a default replacement.
Note: custom pet bowls might not use my default, since I think they often have their own?
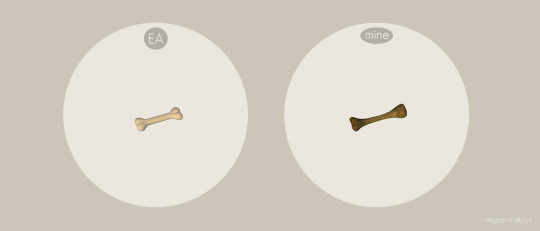
Bon Voyage Bone
The bone sims can dig up from bon voyage is identical to the chew bone from pets ep (but a separate object completely), so I replaced it with the bone from castaway. I re-mapped it to use 140x100px texture (yes!) and I also made it buyable (you can find it under misc - pets) but this edit is in a separate file. If you install the buyable file in your downloads folder, it will have a custom star and can be deleted in-game, and doing so will corrupt your game. If you decide to install the buyable file as well, be careful not to delete the bone in-game!
Maxis made a custom description for this bone, but only in English. I fixed this and now the description is available in all languages, courtesy of Google translate (the Swedish translation I'm confident in but please let me know if any translation needs fixing). They also broke the shadow, which I've successfully restored and edited to fit the new mesh.
Maxis: polycount: 672, texture size: 64x32
My default: polycount: 452, texture size: 140x100 (original was 512x512)
Edited CC
All of the edited custom downloads I mention below, I've re-used their files so you have to choose between my versions or their original!
I re-mapped @deedee-sims' pet pillows to match my new 512x512 textures.
I swapped mesh on hmiller61615's dog chew treat, repo'd it to Maxis' treat texture and also made a version using BV's animations to get rid of the squeaky sound. The file ending with _pets is using the animations from pets with the squeaky sound. The file with _bv at the end is using the animations from bon voyage, with a "boney" sound (and therefore requires bon voyage). Choose one of the files!
hmiller61615's original: polycount: 672, texture size: 64x32
My edit: polycount: 160, texture size: repo'd to Maixs' texture (64x32).
I edited one of the bones by @vampirekiss6661 from here (scroll down). I made it smaller and a tad thicker and gave it a shadow. I made a bv version of this as well, choose one file; either pets or bv!
Polycount: 402, texture size: 128x256
I also re-mapped, resized + edited the textures of ats2's pet bowl & recolor, converted by @beautifulnerdkitty's here. I removed the sheen, repo'd it to Maxis' resources when possible, and gave it a dirty state. My .psd is included if you'd like to make more recolors.
Polycount: 482, texture size: 256x256 (original was 1024x1024)
Recommend Mods
@episims' no rotating pet bowl fix (thank god for that) and Aaron's finicky pet fix (ad-free direct link, SFS mirror).
My pet bed default is required for my recolors to work, and the bv bone default requires bon voyage, otherwise nothing in this dowload is dependent on anything so you can pick and choose what you want. As usual, no mip-maps and everything has been compressed to reduce file size. You can choose between merged or separate recolors (which are clearly named).
Do let me know if anything is wonky or you stumble upon any problems. I am so sorry for the long post, this download wasn't supposed to be more than just two defaults (well, technically it is only 2 defaults included here but I kept getting sidetracked as you can see).. and I have so many more I'll have to make a part 2 (cats are not forgotten)!
DOWNLOAD: SFS | MEGA
Edit 2025-03-25: So sorry!! The pet bowl from ats was incomplete, I apparently never finished that one? Hahah so sorry, the links above have been updated with the fixed mesh. It's only the mesh you need to replace (stroda3t2petbowl1MESH_vk.package) all other files are the same. Because MEGA doesn't allow one to update an uploaded file, I had to delete it and upload it again. Thank you so much @sweetbeagaming for letting me know about the broken shadow<3
No MTS you might ask, and yeah sadly. I'm done uploading to MTS, the upload-wizard completely hates me haha. I've lost all my text more times than I want to admit and keep in mind I have to write [b] and [url=] manually over there. From now on I'll only upload to my tumblr. No offense to MTS, it's a great site and I love it dearly.
Credits: chrissy6930 for the edited mesh, @deedee-sims for the pillows, SpaceDoll for their dirty overlay, hmiller61615 for the chew treat, @vampirekiss6661 for the bone, @cluedosims for the cluedo metal resource, architechture_th for the wood texture, chirokung for the paw texture, aroundthesims2/sandra and @beautifulnerdkitty for the pet bowl, someone(?) for the hyena bone converted from castaway, and lasty, Maxis.
#ts2cc#sims 2 custom content#sims 2 default replacement#dl: default replacement#dl: object default#dl: object recolor#dl: me poking at other people's files
446 notes
·
View notes
Text
Quick GIF tutorial (Photoshop)


#holy shit this is perfection!!#i am so jealous of this set!#the coloring op THE COLORING!!! (original post)
alright @dontyouknowemma-itsyou and anyone interested, this was really easy to colour so I'm gonna give you a quick breakdown. (i didn't save the psd file?? so i'm redoing this i guess, but i did it on autopilot in the first place. i've been making gifs for over 15 years.)
GONNA INCLUDE A VIDEO AT THE END SHOWING OFF THE SETTINGS!!
General GIF stuff
This is in Photoshop CC. I extract a clip from a video as an MP4 file, which photoshop can open. (I use AviDemux for this, which is free, because it lets you save clips using 'copy' encoding for video output and still change from MKV to MP4 format - without losing any video quality, cause you're not re-encoding.)
Open that shit directly in photoshop as a video layer (just drag and drop), that lets you scan through it to check the colouring works overall. Convert the video layer to Smart Object, that lets you resize and edit it. (Do NOT open a full movie in Photoshop, it'll probably die and it has a max length anyway.)
Also all the colour adjustments are gonna be adjustment layers you can tweak and turn on/off whenever. There's a lil button at the bottom of the Layers window to add them quickly.
When we're done we're choosing a section of the video in the Timeline window and we're doing File->Export->Save For Web. 'Adaptive' (or selective) palette selection, 'pattern' style dithering.
Colouring
Curves layer to lighten. Just pull the curve up. Curves seem to give a much smoother lightening, since it mostly affects the middle, leaving the brights and the darks where they are.
Levels to make the darkest darks pure black, and the lightest lights pure white. Good for limiting GIF size. Don't overdo it though.
Colour balance!! My beloved, most important. So for the Shadows and Highlights, you're gonna move the sliders towards Cyan and Blue, but for the Midtones you're gonna do the opposite - towards Red and Yellow. This means you don't shift the overall colour of the picture, but trust me it does SO MUCH for the contrast and colour. I swear I do this for almost any edit, and also my art tbh. Also if the original clip is like very green or whatever, you can correct that here.
Selective colour. For this I did one thing. For 'Black' dropdown, I upped 'black' and 'yellow' sliders (the latter to counteract the blue in the darks). This in combination with:
Levels again. Bring in those darks, turn them pure black. Basically this does a couple things. It preserves GIF file size, by making sure the dark areas are static (file sizes mostly depends on pixels that are CHANGING). It ALSO makes the palette much more optimized, meaning you don't waste palette on the darks no one sees anyway, and instead uses them in the mid range colour variation, giving much smoother gradients. That's it!! That's all the colouring!!
EDIT: Uh I probably also had a Vibrance layer?? Idk. This just ups the saturation, but it's softer than upping Saturation. Makes the colours pop without overdoing it.
Other tips and tricks
Often I'll put a Smart Sharpen (50% amount, 0,5px radius) filter on the video layer, just to make it a bit crisper. Subtle but effective.
You can manually edit the palette when you save as a GIF, either to reduce file size, or because some colour areas look pixelly. See the video for how.
If your file size is huge but you don't want to shorten or resize, you can reduce the frame rate manually. To do this, FIRST save the GIF, then open the GIF you just saved. Go through in the Timeline window (which is now a Frame Animation rather than a Video Timeline), select every other frame, and delete them. When you do this, remember to select the rest of the frames and double their Frame Delay so you don't end up with a super speedy GIF. (You can also make a GIF slow-mo like this.)
Since the video is a smart object, I literally just resized it in between saving the different GIFs, to change composition between the different shots.
Selective Colour layer can be used for a lot of image tweaking. For example, if something is overly yellow or green, I may go to the Yellow and Green in dropdown and just reduce the yellow slider. (I usually then go to Red in dropdown and ADD some yellow to that, to balance out the reds to be less pink.) Or maybe the overall colours are nice but the blues are dull, so I'll just go to Blue/Cyan and tweak those specifically.
If you have a colouring you like that you want to use on lots of things, remember you can drag-and-drop layers between different images. You can also save a photoshop file with nothing but those layers, to use on later gifs and just tweak as needed. (You can also make Actions to automate stuff, but I won't go into that.)
How easy or hard something is to colour HUGELY depends on the original video, both lighting/colouring and video quality.
Finally the video showing settings!
This is like 5 minutes long and has no commentary or anything. This is mostly to show off where you find each individual thing, and what difference it makes in the colouring.
ANYWAY hope someone found this useful!!! ♥
#next to normal#gif making#photoshop#gif tutorial#photoshop tutorial#my posts#my gifs#art things#tutorials#PS if you can't afford Photoshop then just you know.... yo ho ho and all that
119 notes
·
View notes
Text
SIMONE ASHLEY GIF PACK
— ✰ on the page linked below in the SOURCE LINK, you will find ( FIVE HUNDRED AND FOURTY-THREE ) gifs of SIMONE ASHLEY sourced from her role as PIA JASWANI in the first half of PICTURE THIS (2025). simone is 29 but was 28-29 while filming this project. she is of indian ( tamil ) descent, so please cast her accordingly. all gifs were cropped at 245x145 and were made from scratch by feifer for roleplaying purposes only. therefore, i am taking full credit for these.
gifs feature: Luke Fetherston, Anoushka Chadha, Sindhu Vee, Adil Ray, Eben Figueiredo, Nikesh Patel.
warnings/triggers: Cameras, alcohol (champagne), bright lights, repeated visuals of artistic imagery, flashing/strobing lights, kissing, sharp objects (epipen).
CLICK HERE FOR MORE GIF PACKS OF SIMONE
RULES FOR USAGE:
DO: LIKE or REBLOG if you found these helpful or have any intention of using these.
DO NOT:
add or compile into other sources ( gif hunts, gif sets).
edit or claim in any way (redistribute or resize into smaller forms - gif icons. giftangles, etc).
use to portray the faceclaim in smut rps or real-life celebrity groups.
use these gifs as imagery/visuals for smut writing.
#simone ashley gif pack#simone ashley gifs#gif pack#*gif pack#gifpacknetwork#gifpackshq#gifsociety#gifpacksgalore#thegifpackreblogs#gifhunthub#southasianfcs#userfyp#gmcentral#fcxdirectory#supportcontentcreators#userdevon#usermina#userkel#useryalli#tonkinwrites#usernare#dcminions#userandiie#userdails#userbirb#lexiresources#usersnoppy#dearindies#underused fc
165 notes
·
View notes
Text
Why I started using DXT1 texture format for TS2 CC again (sometimes)
In the past I discouraged ppl from using it. But it has one benefit, which TS2 CC creators shouldn't ignore: DXT1 textures are about half the size of DXT3. In TS2 DXT1 is only used for textures without transparency.
There are two facts about textures that some ts2 cc creators and cc hoarders are probably unaware of:
Lossless compression (compressorizer etc) significantly reduces file sizes, but it does NOT help texture memory, because texture files get uncompressed before being stored in GPU texture memory cache
Byte size does NOT equal resolution. For example: Raw32Bit texture takes up around four times more space in texture memory cache than DXT5
DXT3 2048*2048 px takes up ~4MB, but DXT1 2048*2048, thanks to its harsh 8:1 compression, takes up only ~2MB of texture memory cache, which is an equivalent of two makeup textures 512*512 px Raw32Bit format (TS2 makeup creators' favourite :S ).
@episims posted a comparison of DXT formats here - but please note Epi compared texture sizes after those were compressorized. Also, I believe the DXT1 preview actually shows glitches that are not visible in the game.
To change texture format in SimPe you need to install Nvidia DDS utilities, which can be downloaded here (SFS). Also, Yape package editor is much faster and easy to use.
*This is about GPU texture memory. As far as I know, it's unclear how internal TS2 texture memory works - does it benefit from lossless file compression or not? No idea. But IMO we don't have a reason to be optimistic about it :/ What we know for sure is - the easiest way to summon pink soup in TS2 on modern systems, is to make the game load large amounts of texture data (large for TS2 standards anyway) in a short amount of time.
DXT1 built in SimPe with Nvidia DDS Tools tend to look bad - but as I had learned very recently, SimPe DXT1 preview (and export) is broken! It displays some artifacts that are not actually visible in game!
The only way to correctly view DXT1 created in SimPe outside of the game is the new YaPe package editor. You need to switch the texture format preview to AltRGB24 (Raw24Bit).
DXT formats use lossy compression which affects texture quality - this compression matters for texture memory.
DXT1 512*512*4 (4 bytes per pixel) / 8 (divided by 8, because of 8:1 compression ratio) = ~131 KB
DXT3 512x512 px (4:1 compression) = ~262 KB
Raw32Bit 512x512 px = ~1MB
2048x1024 px DXT1 texture takes up around as much texture memory as 1024x1024 px DXT3 or DXT5 (non transparent*) = ~1 MB
*Flat (non transparent) DXT3 size is the same as DXT5.
Fun fact: flat DXT1 and DXT5 built in GIMP look identical, and also not much better than SimPe DXT1 (in game!).
DXT5 has 4:1 compression just like DXT3 but it can store more data in alpha channel, and that allows for much better looking transparency (if smooth alpha is present, size is increased). As I already mentioned, DXT1 does not support alpha transparency.
I don't want my game to look like crap, but if texture looks OK as DXT1, then why not use it. Aside from hood decor, I've been reconverting some wall and floor textures for myself to DXT1 recently, instead of resizing.
Some ppl might cringe on seeing 2048x2048 skybox textures but to me large texture is justified for such a giant object. I cringe at Raw32Bit makeup.
I'm slowly turning all Raw32 makeup content in my game to DXT5 (no mipmaps). I've edited enough of those to know, that quite often the actual texture quality is not great. If a texture has been converted to DXT3 at some point, alpha channel is a bit choppy. "Upgrading" such texture to Raw32 doesn't do anything, other than multiplying texture size by four. I don't know how 'bout you, but I only use one or two skyboxes at a time, while my sims walk around with tons of face masks on them, so it's a real concern to me. And don't make me start on mip maps in CAS CC. My game certainly doesn't need 33% larger hair texture files :S
*note - another thing I've "discovered" after writing this post, SimPe DDS Builder can actually make crisp mipmaps as long as you set Sharpen to "None".
Note2: Raw8Bit (bump maps) / ExtRaw8Bit (shadows etc) are also uncompressed formats, but don't contain color data and weight around as much as DXT3.
/I've taken out this part from a long post I'm writing RN /
129 notes
·
View notes
Text
Cantina Collection

Straight from Oga's Cantina comes this cobbled together industrial set.
A bit later than planned but finally here. All items are very low poly as they are all frankenmeshed from the original bar back counters.
The textures are all composites and rearrangements of the originals, as a result they are not seamless - but we'll say it just adds to the look that they've just been made from whatever scrap metal was around!
Also as the cabinet doors all have the same rust pattern, it looks odd/repetitive on very big kitchens but works fine for small spaces.
There is only one swatch for all items except the seating, which comes in the same colours as the originals.
All items are base game compatible, except the resized bar backs which require Journey to Batuu.
See below for further details, pictures and download links.
Comfort (5 items):


Industrial Bar Stools x 2 - Low Back & No Back
Industrial Dining Chairs x 2 - Low Back & No Back (shown with original JtB high back chair)
Metal Dining Chair (shown with original JtB bar stool)
Surfaces (16 items):


Kitchen Counters & Islands


Bar Table
Dining Tables x 2


Coffee & End Tables
Console Tables x 3


Smaller Replicas of the original Cantina Barbacks x 5 - resized to match the height of regular counters NOTE: You'll need to use bb.moveobjects on to align these properly. JOURNEY TO BATUU PACK IS REQUIRED.
Industrial Shelf
Decor (2 items):
Metal Splashbacks x 2
Activities & Skills (3 items):


Oga's Bars x 2
Sabacc Game Table NOTE: BGC but JOURNEY TO BATUU is required in order to change the game type to Sabacc. Without this it will function as any other base game card table.
Download All (Downloads ZIP file from Google Drive)
Pick and Choose (Opens Google Drive folder)
If there's any problems with any of these items or you have any constructive feedback, suggestions or questions, please just get in touch, I'm still learning every day!
My TOU
Credits
All textures and meshes are edited or frankenmeshed from in-game EA assets.
@myshunosun - for their gorgeous sona dining chair which I cloned in order to have an object with the necessary transparency for the chair and bar stool - can be downloaded here.
Lizbot3000 - for their base game bar tables, which I cloned for my bar table and can be found here.
@ravasheencc - for her Crop It Like It's Hot Backdrops which I used to take some preview photos and can be downloaded here.
CC created using Blender, Sims 4 Studio & GIMP. Preview images using Canva Pro.
Everyone on the S4S forums and the Creator Musings discord group for all the tutorials and advice/help.
#always free cc#alwaysfreecc#custom content#download#journey to batuu#maxis match#my cc#sims 4#sims 4 buy mode#sims 4 cc#sims 4 custom content#sims 4 futuristic cc#sims 4 industrial#sims 4 industrial cc#sims 4 futuristic#sims 4 journey to batuu#sims 4 maxis match#sims 4 star wars#sims 4 star wars cc#star wars cc#star wars sims#star wars sims 4#the sims 4#ts4 cc#ts4#ts4 bb#ts4 buy cc#ts4 custom content#ts4 download#ts4 futuristic cc
221 notes
·
View notes
Text
How to convert Sims 4 3D CAS Rooms to Sims 3

Disclaimer: If you’re not familiar with Blender/TSRW/UVs then this tutorial may not be for you. If you don’t have Sims 4 Studio which needs the Sims 4 base game (or don’t know how to extract the meshes without it) this tutorial may not be for you. Honestly it’s pretty straight forward, but there’s a lot of trial and error and going in game and out of game checking placement, etc. I use Blender 4.1 for this, but you should still be able to do the same things in the older versions. I'm trying to make this as easy as possible. I’m here to answer any questions though 💕 Tutorial below
Things you’ll need:
Blender (whatever version you prefer)
Sims 4 Studio
TSRW ( I use version 2.0.86)
My Christmas CAS Room here
My TSRW work file here
Tutorial:
Find a Sims 4 CAS room that you like and open it up in Sims4Studio. This is the one I'll be using for the tutorial.

In the Texture tab, export the textures. The only textures that matter are the first 3 diffuse. Go to the Meshes tab and export the mesh, it will save as a .blend file. After that you can close out of Sims4Studio.


Open my Christmas CAS Room in TSRW. You'll get this message. Hit ignore and don't send. We only need this file as a reference to resize the SIms 4 CAS room. Export the mesh as an obj, name it whatever you like. You can close TSRW for now.

Open Blender and open the .blend file you exported from Sims4Studio. Make sure to delete studio_mesh_0 as it's just the shadow map and we don't need that. This is what mine looks like after fixing the textures.

Then import the wavefront obj you just exported from TSRW. Again we're just using this as a size reference.
This is what it looks like after I added the obj. I scaled, moved, and rotated the room to match up as close as I could with my reference mesh. When you have it lined up to your liking you can delete the reference mesh. I usually import the sims 3 body to see where my sim would be in CAS as well so feel free to do that too.

Now we have to separate the objects that use transparency in the scene to their own group. The transparent objects will always be located on studio_mesh_1. I usually do this in UV mode. Make sure UV Sync Selection is on. Where the red arrow is, that's the UV Selection button. It's blue so that means its on.

Tip: If you're using the same Blender version I am (I'm not sure if the older versions below Blender 3.0 do this) you can disconnect the alpha in shader editor and then you can easily see what uses transparency because it has a black background like the plants. Don't worry about the one outside the window as that's on the backdrop image and doesn't show in CAS.
Important: Also, make sure you delete the back of the mirror frame or it will show through the mirror in game. I usually select it in the UV editor as well and delete it.

After selecting all the objects that use transparency, I go to the 3D viewport window and press P, then selection. Now they're on their own layer as you can see. That's a very important step so please don't miss it.

Sims 4 CAS Rooms don't have a closed room like ts3 and if you don't add walls/ceiling with planes you'll be able to see that it in CAS. You can do this in any way you're comfortable with. If you don't understand how to do it feel free to ask me. For this tutorial I will not be doing this perfectly lol I've done enough rooms and I'm just trying to teach here 😩

Okay now last is renaming groups to import into TSRW. Make sure it's in this exact order and uses the exact group numbers.
Group 0 - Mirror
Group 1 - Windows/Curtains
Group 2 - View outside the window
Group 3 - Walls
Group 4 - Objects with transparency
Depending on the CAS Room you convert, yours may not have a mirror you know. You can delete groups in TSRW, experiment, feel free to ask me questions as well.
After renaming the groups, select only the groups you renamed and export as an obj. Make sure that object groups is checked so that they can stay in groups.

Open TSRW and open the testroom_cas.wrk file.
After opening the file you'll see this exact room in this tutorial lol because I had to test some things first 😅

Import the CAS room you converted from ts4. You'll get these two messages. Click yes on the first and no on the second.
Disclaimer: Make sure you reduce polygon sizes or it won't import and give you an error


Import your textures (yours may be different than mine depends on the converter) but most have been the same that I've seen. Group 0 is the mirror it doesn't require a texture. Group 1 and Group 4 usually have the same texture.
Disclaimer: TSRW an be finnicky with textures sizes, I havent gotten any issues since using the 4GB patch, but just in case. Texture sizes from ts4 can run pretty big 4096x2048 even 8196x4096. I would resize to no bigger than 2048x1024 in my opinion, but whatever works for you.
After export to sims3pack or export as package file. Make sure you compress your files and you should be good to test your CAS room in game.

This is the finished product. Should look something like this or better lol considering this was quick 😅
If you would like to make your own from the original ts3 cas room, I would suggest watching this Youtube video (it's for TS4 but it still applies and is helpful) and the link to the original ts3 cas room is here. Since we can convert ts4 to ours you could probably just build your own and go from there as well.
Thanks to @mookymilksims for testing things for me and converting her own. If you would like to try this tutorial out and experiment with room placements using @boringbones Ultra wide CAS mod which changes the field of view in cas so that you can see the whole cas room, it is here. I didn't use it for mine, but that's only because I found out about it after from Mooky lol and I'm tired of converting them 😅 but feel free to ask me any questions if you need help 😊
#ts3#tutorial#sims3#I hope this helped#been procrastinating finishing this 🙃#cas room tutorial#sorry if it's long#tried to be thorough and make sure everything was correct#my tutorials
172 notes
·
View notes
Text


+900 Followers Gift!
Was going to be a 1k followers gift but I haven't reached that number yet and I'm excited to share this :p
Okay so I don't do full sets often but I love these sets so figured I would convert every piece (; - disclaimer: okay no, not every piece, some are variations for taller walls (which are possible in ts3 but I think they suck so I'm sticking to short walls)
Some general notes;
>Most items are low poly (under 2k verts, with a few exceptions) and have small textures.
>Everything that could be made functional is functional. Columns are decorative and include 'half' versions in case you want to place them on the wall (and avoid seeing part of it through the wall which gets on my nerves lol) / I recommend using either OMSP or S3DT to move some of the objects up or down, since I didn't resize decor objects to fit short walls (in case you don't want it to cover just one level ;)
>*Known issues: One of the sides from the medium 2x1 & 2x2 doors from the "Soho" set sink a bit into the ground after use, I couldn't fix it but I'll update the files if I ever manage to get them to work as expected </3 - Also the "Soho Shop" windows' glass clips a bit with each other but it's almost unnoticeable unless you set the camera very close :s
>All mesh and texture credits go to Felixandre and Harrie for their Soho (2, 3, 4), Paris & Brownstone sets (: / More Info + polycounts are found below the cut - Enjoy!
>DOWNLOAD< (always free on patreon)
If you feel like it, you can support my tears me on Patreon or Ko-fi 🥺🥰
SOHO (includes collection file! named accordingly so you should be able to find it among the other packages ;)
Shop Window Ending Short (original & wide versions) - 524 poly
Shop Window Middle Short - 252 poly
*Shop Door Medium 2x1 - 1,9k poly
*Shop Door Medium 2x2 - 1,9k poly
Shop Door Short 2x1 - 1,7k poly
Shop Door Short 2x2 - 1,7k poly
Ornate Trim - 182 poly
Ornate Trim Column Ending Right - 352 poly
Ornate Trim Column Ending Left - 352
Ornate Trim Column Middle - 502 poly
Exterior Column Short - 1,5k poly (half version is 750 poly)
Exterior Column Short V2 - 482 poly (half version is 241 poly)
Brick Arch - 732 poly
Brick Arch 2 - 338 poly
Brick Pilaster - 62 poly
Brick Pilaster Corner - 256 poly
Brick Pilaster Half - 62 poly
Brick Pilaster Corner Extention - 76 poly
Brick Pilaster Extention - 14 poly
Brick Pilaster Half Extention - 14 poly
Brick Arch Extention - 22 poly
Window 1 Short - 688 poly
Window 2 Short - 484 poly
Brick Trim - 94 poly
Brick Trim Outside Corner - 128
Cast Iron Trim - 70 poly
Cast Iron Trim Outside Corner - 98 poly
Window 1 Tall - 688 poly (includes 2x1 version)
Window 2 Medium - 776 poly (2x1 only!)
Window 3 Medium - 778 poly (includes 2x1 + unedited version)
Window Frame 1 Short - 648 poly
Window Frame 2 Short - 650 poly
Window Frame 2 - 686 poly
Window Frame 3 - 586 poly
Cornice 2 - 780 poly
Cornice 2 Outside Corner - 2,2k poly
Cornice - 726 poly
Cornice Outside Corner - 2,3k poly
Fire Escape Stairs Short - 998 poly (these only fit the "short" landing, but I converted the other sizes too because they're wider)
Fire Escape Landing Short - 1,3k poly
Fire Escape Landing Medium - 1k poly
Fire Escape Landing Tall - 1,4k poly
Pilaster Short - 826 poly
Pilaster Short V2 - 284 poly
Pilaster Medium - 826 poly
Pilaster Medium V2 - 284 poly
Shop Window Medium - 336 poly
Shop Window Ending Medium - 720 poly (includes wide version)
Light Switch Short (aka the tubes) - 2,2k poly
PARIS (fully recolorable + includes all swatches)
Awning Open Long - 664 poly
Awning Open Short - 664 poly
BROWNSTONE
Traditional Window 1 (+2x1 version) - 682 poly
Steel Window Single Medium - 248 poly
Steel Double Door Medium - 752 poly
Steel Frame Bifold Medium - 1k poly (no diagonal version)
Steel Frame Double Arch Medium - 136 poly
Traditional Glass Arch Medium - 608 poly
Traditional Arch Medium - 659 poly
Traditional Door Medium - 1,6k poly
Traditional Door Frame Medium - 976 poly
#ts3cc#s3cc#conversion#download#4to3#sims 3 download#sims 3 custom content#sims 3 cc#ts3 download#ts3 custom content#felixandre#harrie
355 notes
·
View notes
Text

Outdoor Rock Shower and Grog Barrel End Table
Note: This is for Sims 3
I remembered I made these last year (looks like June?) for my sim when I was doing a Midnight Sun Challenge.
If I remember correctly, the rock I used for the shower is one from the base game that I resized and I mashed together with an outdoor shower. I know lhawk07 did one on MTS here, but it wasn't quite what I was looking for that I couldn't quite put my finger on so I poked at my own until I liked it.
However, the grog barrel end table was something I'd been salty about for a lonnng time. I remember when I got Barnacle Bay (pretty much after it first came out hehe) and I was annoyed even way back then that the grog barrel was just deco and not a table. So I finally fixed it for myself. I resized it to where it was end table height and cloned an end table from the base game and adjusted the slots in TSRW so they actually sat on the barrel.
These are standalone objects, you don't need anything else to use them. Both have been compressorized.
Known issues:
The sim will momentarily clip into the rock at certain points when they shower, and the shower spray kind of starts in mid-air at certain angles. This was the middle ground I found that I was happy with where the sim wasn't showering inside the rock or the shower spray wasn't too far away from the rock. I also didn't make it recolorable because I didn't feel the need to. Feel free to do so if you want to.


Details:
Castaway Outdoor Shower: S3PE says 203 Vertices/242 Polygons. File size: 816K. Download here: BOX
Grog Barrel End Table: S3PE says 458 Vertices/342 Polygons. File size: 125K. Download here: BOX
TOU: No paysites or paywalls. Other than that, I don't really care. I just make things for my sims sometimes for funsies or just to see if I can.
122 notes
·
View notes
Text

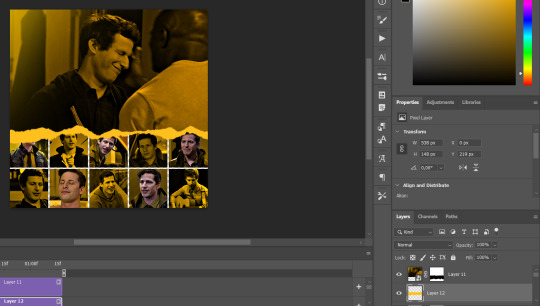
GRID + TORN PAPER + RAINBOW LAYOUT TUTORIAL (yeah, i'm sorry, but that is the title i came up with)
Hi everyone! This tutorial was requested by an anon, and we're going to make a gifset like this. You need, as usual, basic gifmaking skills and basic photoshop knowledge, but i'll try to explain this as easily as possible!
You'll also need a torn paper brush, which you can download here.
And here are the links to download the fonts used in my gifset: x, x
Okay let's start!
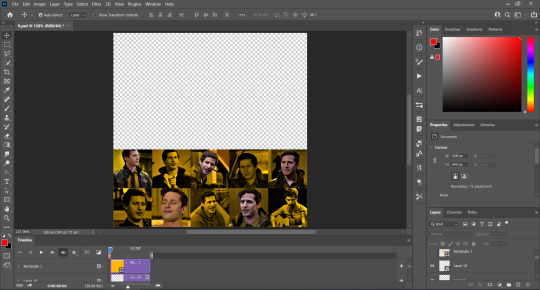
→ First you're going to create a new canvas, and it will be 540x540 px. Make sure to click on create video timeline (if you dont have a timeline, go to window > timeline. We'll leave this canvas there waiting for us :)

Then, onto our first gif. We're going to make the small square gifs first. All i do is resize the image and make it 120 px high, and you'll see why in a moment.
Make sure to remember the number of frames of this gif!! All the gifs we're going to put in the same canvas should have the same amount of frames.
Okay, so we have our first small gif:
As you can see it's a smart object, and I added some brightness, but so far that's all. You can sharpen it, but i like to sharpen until i've colored it. Now onto the important part:
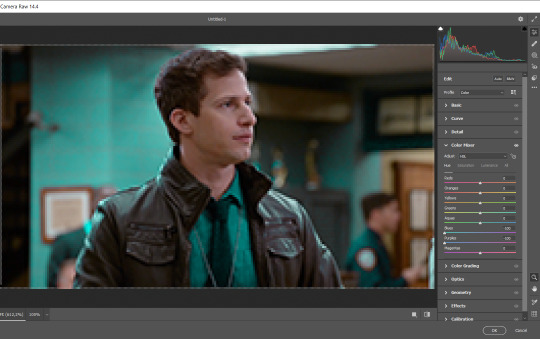
Most of the gifs i worked with were mostly blue (aside from the skin color), which is recommendable, because you can create lots of colors starting from blue, using the hue/saturation adjustment, or camera raw filter. I also recommend you to use a gif that doesn't move a lot, so it'll be easier to color the background:
For the tutorial, we have our predominantly blue gif, but we are going to make it yellow, which is the opposite color, so it's the hardest to get. I hope you can see how i manipulate colors, and do it yourself :)
Here, you can use camera raw filter (filter > camera raw filter) to turn the blues and purples greener, like this:
And click ok to exit the camera raw filter. Then, we're going to use hue/saturation (image > adjustments > hue/saturation) to turn it yellow:

Since it was cyan, i changed the cyans, but if you got a much greener result you'll have to use green (duh, right? i dont know i just dont want anyone to get confused akjsdhs)
And you can also add a selective color adjustment to make those yellows more yellow:

The reason i don't directly use hue/saturation is cause it might look ugly and lose quality, or it wont pick up all the colors i want it to but they're also very small gifs so if you wanna do that, do it :)
I sharpen it until this point, but if you already have that's okay.
Now we're going to color the background! For that, you just add a new layer, and set the blending mode to color.
Then you'll use your brush, set it to 20px and 0% hardness, and pick the color you're using for this gif, you can use the eyedropper tool. This is why it's important that the gif doesn't move a lot, so you can color the bg like this:
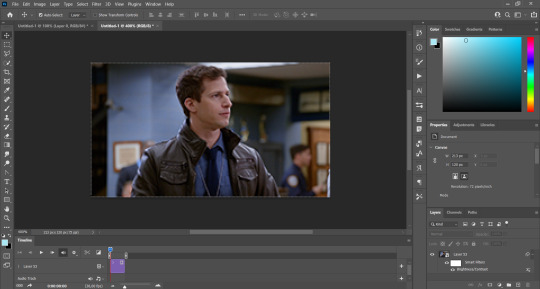
I colored carefully around the edges, and that's the result. In some gifs from my gif set I colored Jake's jacket too because i was too lazy, but this looks cleaner :)
You might want to select the color layer and the gif layer to convert them both to a smart object, just to make everything easier. So, be careful, because after that you won't be able to change anything!
But let's say you have a scene that you want to include, and it moves too much and has no blue and it's going to be a nightmare to color it.
Well, don't worry, you can! Simply, instead of manually coloring everything, you can just choose to add a gradient map to it (image > adjustments > gradient map), like this:
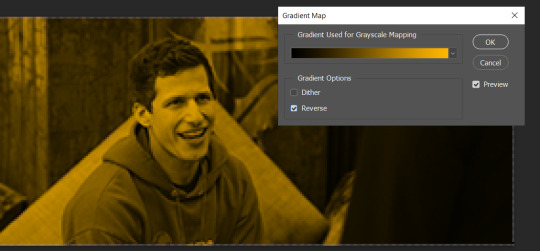
And this is the result:

Just remember, it has to be the same amount of frames as the other ones!
You repeat the process, until you have 10 small gifs. I made around 5 manually colored gifs, and 5 gifs with gradient for each gif. That's a confusing sentence but i hope you get it.
We are going to start pasting the small gifs on our first canvas.
(You can paste them one by one but i did this so you can see my 10 gifs)
You're going to create a square that has to be 108x108 px, using the rectangle tool. You can remove the default white background.

And you may be wondering, why did we not just crop the small gifs into those dimensions? Well, you can do that, but to me it's much easier this way, because sometimes cropping isn't accurate, or it's tedious.
Place the small square on top the gif you're going to crop, right where the face of the character is (or whatever objects you're giffing), and while holding ctrl, click on the square. It will select it:

You're going to create a layer mask:

And then drag that layer mask to the gif:

And voila! It's now the same size as the small square. Once that's done, right click on the layer and convert it to a smart object, because we have to remove that mask. Make the square layer invisible, and start placing your gifs where you want them:
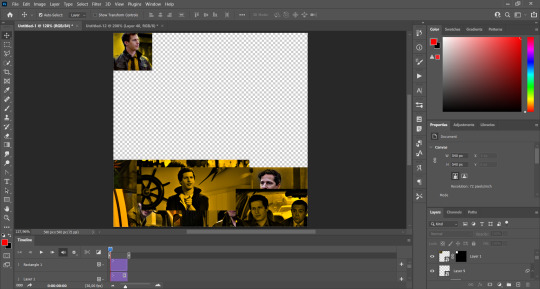
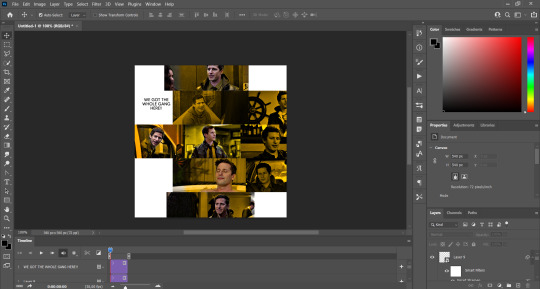
You're going to repeat that process with the rest of the gifs, and then place them all together. Don't forget that if you're making the first gif, they will all be at the bottom of the canvas, if it's one of the middle gifs, one row should be at the top and the other one at the bottom, and when you're making the last gif, they should all be at the top. Here we're making the first one, so they will all be at the bottom:
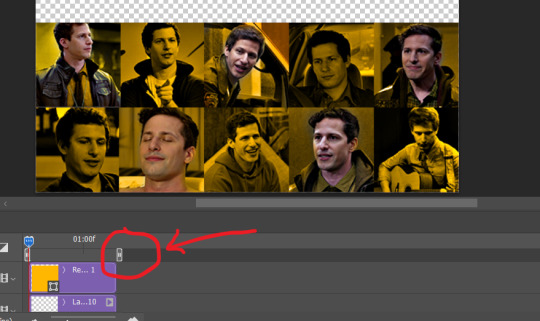
If you forgot to check that all the gifs had the same amount of frames, you can fix it here, just make sure no gif is past this little guy:
Okay! Now, to create the gutter, we're going to add a layer mask to each small gif, so that we can cut some of it.
The gutter has to be 4 pixels, (i recommend you to REALLY zoom in). What i do is make sure the width of the gutter takes 2 pixels from the edges of the gifs, since they are all together. As you can see in the image above, there's no a single empty pixel between the gifs.

This is a close-up of what i'm talking about. I select two pixels from each gif, and go all the way down to create the gutter:

(I hope I'm not over or underexplaining)
I usually use this tool when i have to make so many selections:
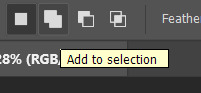
But that was just an example :)
(Another way you can do this, is by changing the size of the small square from the beginning and make it be 104x104 px, but i don't know why that seems more complicated to me ajsdks)
Anyway, this is what we have so far:

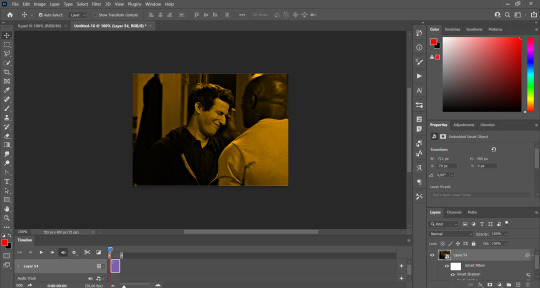
Now we're going to create the big gif. Its normal dimensions are usually around 1920x1080, unless you have different dimensions and have to crop it, but whatever it is, we're going to resize it and crop it to be around 550 px wide, and 400 px high:

We'll do the same thing of adding an adjustment of gradient to it to make it the color we're using. For this, i usually add a brightness layer before, because sometimes the gradient is a bit dark.
And using a 600px brush with 0% hardness, you can add some "light" on a new layer, like this:

Selecting all the layers, right-click on them and convert them to a smart object. Again, be careful, because once its a smart object, you wont be able to change any of it!
Then we paste our big gif on the canvas with small gifs, and add a layer mask to it. Using the torn paper brush at 600px, remove some of the gif to shape it like the torn paper. Make sure you're using black, otherwise it won't work correctly:
To make the effect better, add a layer UNDER the big gif, and using the torn paper brush, with the same size, you can paint under it:
Yeah, I covered some of jake's face, but that's how it supposed to look so the effect works!
And finally for the text! I used Granesta, at 150 px, and at -10.00º to make it a bit askew.
We're going to double click on it and give it a color overlay, set to normal, and give it a solid shadow if you want, then place it right here on the corner:
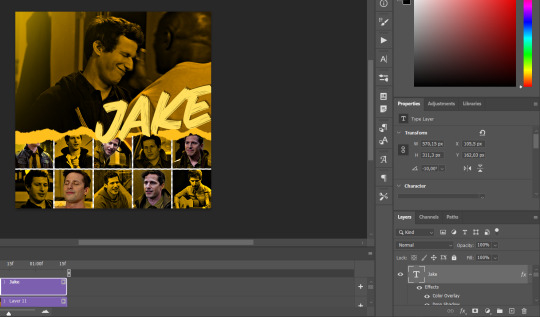
But as you can see, it's too big for the gif. So we're going to add a layer mask to it, and again, shape it the same way that we did with the gif. Make sure they're exactly the same shape, like this:

And that's it! This is our final result:

As always I'm sure there are easier ways to do many of these things, this is just how i do it but if you know an easier way to do it, go ahead. I hope this was at least understandable enough so you can apply the logic of it any way you want :)
If you have any questions you can send me an ask and i'll clarify!
If you found this helpful i'd really appreciate it if you left a tip on my ko-fi!
Happy giffing!
#will i ever learn how to properly explain things 😭#tutorials#uservivaldi#userraffa#userbuckleys#userhallie#tuserheidi#usertina#userfern#usersole#usercera#userzaynab#userisaiah#usernik#userpriyas#usertj
405 notes
·
View notes
Text
About Draconym
Hey tumblr, I’m Wren. I’m a millennial who works outdoors. Sometimes I post pictures of the animals that I get to work with. I also post art, comics, and weird dreams. Here's some FAQ.
Common Tags art, comic, dreams, nature center, park ranger, poll, ripley parrot, cheese bird, snake, cockatiel, video, me, music, bug, bird, dragon, vulture, the fair folk, puppet, printable
Links Website: cyaneus.com Patreon: cyaneus Art Reblogs/Inspiration: @insectivus Fanfiction: @ironbeaks-journal Redbubble: tillery Bluesky: cyaneus Mastodon: art.vulture, social.cyaneus
Featured Creatures Ripley, 15 year old African grey parrot. Dinosaur toddler and menace to household objects. Enyo: My grumpy old man (2004 - 2024). Cheese: ??? year old cockatiel. Weird little guy. Mousetrap: Eastern rat snake rescued from a glue trap in 2016. Frequent animal ambassador at park programs. Galaga: Western hognose. Less skilled at being an animal ambassador due to being kind of an asshole. Elvira: Curly hair tarantula. Decaf Cappuccino: @adoubtifitbeus's rabbit.
Content Warnings I try to tag for common phobias such as snakes, spiders, bugs, and animal death. Some may want to consider blocking posts tagged "medical" or "the agonies" as well.
Art Usage If you’d like to use my art as an icon or a blog header, I’m honored. Please credit either my blog (this one, @draconym) or my website (cyaneus.com). Please don’t edit my art except to crop or resize it for icons. I don’t mind if you share my tumblr posts to non-tumblr social media as long as you link back to me, but within tumblr please reblog instead of reposting my content. Don’t use my art for any commercial purpose. This includes uploading it to print on demand websites like Redbubble. Don't.
Donation Reblog Requests I get a lot of requests to reblog donation posts. I don’t mind if you privately send me a link to a fundraiser, though I don’t always have the means to donate. I only reblog fundraisers for people I know personally.
Askbox Usually open. Messages welcome, though I don't usually answer them quickly. Not really available for commissions at the moment.
230 notes
·
View notes