#Resize PDF
Explore tagged Tumblr posts
Visit Tumblr Blog
Explore Tumblr blogs with no restrictions, modern design and the best experience.
Last Seen Tumblr Blogs


Fun Fact
Mobile US users spent an average of 115.8 minutes on Tumblr app monthly.
Text
How to Resize a PDF
Learn to resize a PDF easily with Adobe Acrobat Pro. Follow our step-by-step guide for a hassle-free experience. #ResizePDF #AdobeAcrobatPro #PDFEditing #AccessibilityGuide
Welcome to today’s blog post, where we’re learning how to resize a PDF in Adobe Acrobat Pro. Downsizing large PDFs saves disk space, bandwidth, and computer memory. It also allows for paper size adjustment when printing. Video Guide Get accessible Documents Now Follow these steps to resize a PDF in just a few short minutes. Check Your Current PDF Page Size Open PDF in Adobe Acrobat…

View On WordPress
0 notes
Text
idk man i dont really wanna pay upwards of ten dollars for a pattern people say is poorly written and wasn’t test-knit in my size lmao
#nowadays everyone on ravelry thinks theyre a pattern designer but like. most of them aren't and im not paying that lol#if i have to resize everything and fix their fucked up stitch counts and basically do their job for them. well then i am not doing that.#i know people argue about it being rude to riff on patterns based on their pictures but. i will be doing that and you cannot stop me.#i am not paying twelve dollars for a google translated pdf of a top down sweater. peace on planet earth.#knitting#~~~
148 notes
·
View notes
Text
the thing thats probably been the most frustrating in regards to bookbinding is the printing.
#bookbinding#i forgot that exporting the word doc to pdf will resize the format wnough to reduce the page number#meaning i have to edit and reprint the table of contents#again#because the printer is being hilarious today
17 notes
·
View notes
Text
The Ultimate All-in-One File Conversion Tool – Fast, Easy & Free!

The Ultimate All-in-One File Conversion Tool – Fast, Easy & Free!
Are you tired of searching for different tools to convert your files? Say goodbye to the hassle! Our powerful online tool lets you convert PDFs, images, CSV, Excel, HTML, JPG, JSON, PNG, Word, XML, ZIP, WebP, text files, and more—all in one place! Plus, enjoy image resizing and compression with just a few clicks.
Why Choose Our Tool?
1. Save Time & Effort
No more wasting time on multiple websites. Convert any file type instantly without downloading extra software.
2. 100% Free & Secure
Our tool is completely free to use with no hidden charges. Your files are processed securely, and we never store your data.
3. High-Quality Conversions
Get crisp, clear, and accurate conversions every time—whether you’re turning a PDF into Word, resizing an image, or compressing files.
4. Works on Any Device
Access our tool from anywhere—on your phone, tablet, or computer. No installation needed!
5. User-Friendly & Fast
With a simple, clean interface, anyone can use it—no tech skills required! Just upload, convert, and download in seconds.
Who Can Benefit?
✅ Students – Convert lecture notes, research papers, and assignments easily.
✅ Professionals – Quickly edit PDFs, Excel sheets, and Word documents.
✅ Designers & Developers – Resize, compress, and convert images without losing quality.
✅ Business Owners – Handle invoices, reports, and data files efficiently.
How It Works?
1️⃣ Upload your file (PDF, image, Excel, etc.).
2️⃣ Select your desired format.
3️⃣ Convert & Download in seconds!
Stop Wasting Time—Try It Now!
Why juggle between multiple tools when you can do it all in one place? Fast, free, and secure—our converter is the ultimate solution for all your file needs.
🚀 Click Here to Convert Your Files Now! 🚀
[Visit Our Website. www.deeptools.in & Start Converting!]
Don’t wait—boost your productivity today with the easiest file conversion tool online!
This ad highlights the benefits, ease of use, and strong call-to-action to drive traffic to your website. Let me know if you'd like any modifications!
#pdf converter#pdf download#jpg#pdf tool#pdf to word#pdf to excel#pdf master#image converter#image resizer#many others#business#travel#movies#web series
0 notes
Text
spin rune

this is so funny. in my evil wizard chamber learning fucked up evil math
#spent way too long fiddling on libre office#was using export as pdf and then searching for png/jpg#instead of export and then choosing the format#also tried for a while to fix the image getting cropped for no reason#just resized the page and it worked#honestly it wasnt that much time#just like 10-20min -ish
2K notes
·
View notes
Text
Reading on the module website, which is basically a digital textbook 👍😊📝✍️
Reading from a textbook PDF ☹️👎😴🚫
#it doesn't help that the text is fairly clear but slightly blurry in some places#so it just feels like you can't focus#and to fix/change the font I've converted it to a word document#which is easier to read but it really fucks up all the formatting and some of the images that have text on#so sometimes I have to go back to the PDF anyway#opposed to a nice resizable web page
0 notes
Text

🎁 Day 7 of the DR Winter Gift Calendar has arrived with Gundham- and Sonia-themed gifts!
(A masterlist of all gifts will be posted at the end of the event!)

🐹 GUNDHAM - PRINTABLE STICKERS


grab your sticker paper and send it thru your printer for these guys so you can have Gundham ANYTIME ANYWHERE. (much like Sonia, if you know what i mean. ha ha anyway.)
these stickers are 100mm x 100mm (like 4"x4"-ish) and were intended for a circle cut, but also work as squares. you can additionally resize them smaller to fit more on a page.
💝 [download as PNGs or a PDF] 💝
[thank you for the transparents: 1 | 2 | 3 ]
👑 SONIA - PHONE WALLPAPER
jesus shit you son of a bitch, it's a 1080x1920 cute-horror phone wallpaper with The Princess of All Time! as i said before, and i'll say it again with other phone wallpapers this year, it should be big enough for almost any device. show your princess pride!!!
💝 [download as a PNG] 💝
[thank you for the transparents: 1 ]
➡️ you may freely share, use, and edit these: just link back if you post them online!
[See other 2024 Winter Gift days at the tag #danganronpa❄️24!]
77 notes
·
View notes
Note
ppl do human designs of the sonic characters but do you ever wonder what omega would look like. would he look the same, the same but resized to fit alongside human rouge and shadow's heights, or would he have a different design altogether. ive been thinking about this for some time and i know ur robotpilled
human versions of sonic robots is honestly just not something i’ve ever given much thought to, mostly because it just doesn’t click in my mind. with most of those characters, their robotic nature is essential to who they are. if you make them human, you might as well just make a different character. i always figured that in these human AUs, the robots are still robots and omega just kinda looks the same lol. maybe taller
the closest I’ve gotten to a human omega design is a mobian-badnik hybrid AU version of him in dance in fire - he’s half magpie. this is literally just a photo from the zine rn because i can’t access the pdf LOL

i really like this design but just . haven’t drawn it again LOL
121 notes
·
View notes
Note
how do you make your physical comic books? i want to start making my own but i have no idea where to start
just google for online print places (in your country's language bc they exist locally too and that might save u in shipping costs) so you can compare costs and info and when you find something you like you just download their template and follow the instructions for how they want the files to be sent/which format they want!
the main two formats are stapled comics and perfect bound, stapled can work if you have fewer pages like.. under 40-50, I never used it personally, perfect bound are held together with glue and it's more like a small book with a spine and everything
usually you'll need to make 2 PDFs, one for the cover and one for the pages in cymk 300dpi, there are also usually multiple choices for paper and paper weight, you can talk with the store support for clarifications or paper samples
it's better to decide on the print place in advance so you can make the pages in the required format from the get go instead of having to resize everything later!
and if you want you can order a proof copy first but it tends to be pretty expensive on small scale orders/some places have a minimum order amount so it can be tricky, but there's places that will send the proof copy for free if you order over a certain amount too (also I'm sticking with the same print place lately but I tried out like.. other 4 prior lol)
good luck! c:
160 notes
·
View notes
Text
WoD Hallozine - a mini-Zine!
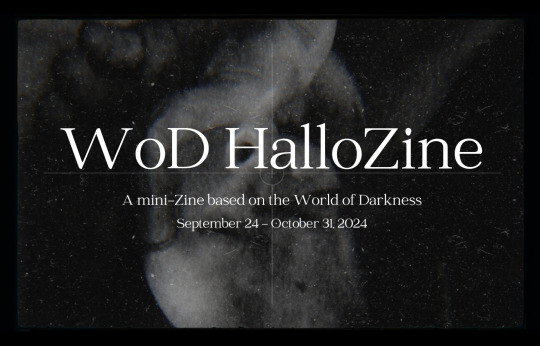
Introducing WoD HalloZine, a mini-Zine project for the Month of October!
WoD HalloZine is a short, one month project celebrating community and fanworks based on the World of Darkness. This zine will be free and distributed digital-only on socials. The theme of the zine is Haunting. Whether it be wraiths roaming the halls of an abandoned mansion, demons bound to their hosts, vampires lamenting on the nature of their immortal existence, or Garou communing with spirits in the Umbra, tell us your tales of dread, longing, and sorrow featuring your original characters. What sordid secrets are hiding in the dark? What Haunts You? How to Participate This is a time-sensitive event that's accepting submissions from September 24 - October 31, 2024. You can submit any art or written work based on original characters in any of the World of Darkness properties. You are welcome to submit existing work that hasn't been featured in a zine or create a new piece based on the theme. To sign up and be eligible to participate, please submit a form here: https://forms.gle/nnrShH3LDhbBtvip9 You will be contacted at least two times during the event: first to confirm your participation, second to check in and collect your final submission. You can always message more for questions and inquiries. Submit your piece through email or via DM on Discord. My Discord Art Server Gallery Noir will have an event specific channel for up-to-date news and a space to socialize. Joining is optional and not required for the zine. There are no limits on number of participants or submissions for this project. After October 31, all submitted pieces will be compiled into the zine and distributed via PDF format on my socials. No submissions will be accepted starting November 1st. Along with being in the Zine, you are welcome to post your pieces to your own socials and use as you see fit. If you do, I would appreciate if you tag me and use the tag #wodhallozine , though it's totally optional to do so! Submission Guidelines
This is a low pressure event where there are no hard standards on quality or content. I want everyone at all levels and mediums to express themselves however they see fit. There are no editing or draft phases and I will do my best to showcase the biggest variety of work across the community. That being said, to keep the project manageable and social media-friendly, there is a small list of guidelines for all work. General Content Guidelines
16+ or Rated-R at most
NO NSFW or sexual content
NO Gore or Extreme Violence
Light Blood and implied violence allowed
NO Offensive content like slurs or hate speech
NO AI generated or assisted work
If you have questions on what these mean, send me a DM.
Art Guidelines
You can choose to submit the following categories:
Single illustration/Image file
Short Comic (1-2 pages)
Any Size, 300 DPI, CMYK, PNG or TIFF format
Subject to formatting and placement choices
Writing Guidelines
You can choose to submit the following categories:
Short Story (3k words max)
Poetry/Prose (2 pages max including formatting)
English only, DOC, PDF, or ODT format
Subject to formatting and placement choices (please note if you'd like me to keep specific font and formatting choices)
You are open to submit as many pieces as you like. I reserve the right to include, exclude, resize, and rearrange pieces at my discretion for the sake of the zine's final composition. If a piece requires edits, I will touch base with you on the specifics. For any questions or concerns, email me at vampy269@gmail or message me on Discord at vampy8020. Thank you for your interest and have fun!
#wod#vtm#vamily#world of darkness#vampire the masquerade#wraith the oblivion#werewolf the apocalypse#mage the ascension#demon the fallen#hunter the reckoning#changeling the dreaming#wod hallozine
58 notes
·
View notes
Text
Updating... The Tattooer (ver. 3.4)!

Finally! Took me a while, huh. This is the updated version of the Tattooer project. It skips some steps, making the workflow much, much faster! Huge thanks to @applewatersugar for his suggestion on how to bake textures while preserving the transparency. This is kind of a repost of the original Tattooer post, but it actually has some new stuff and a few changes here and there, so please take a look if you want to learn how to use this new version.
This is a series of Blender template files already set up to quickly bake textures from The Sims 4 to The Sims 2. The different Blender files will allow you to: -Bake body textures from TS4 to TS2 (Female) -Bake body textures from TS4 to TS2 (Male) -Bake body textures from TS4 (Female) to TS2 (Male) -Bake body textures from TS2 (Female) to TS2 (Male) [Bonus!] -New! Bake face textures from TS4 to TS2 (Unisex) [Bonus!] -Bake head textures from TS4 to TS2 (Face + Scalp) (Unisex) [Still experimental] Check the file names to see which one is which, and the resolution of the baked texture it will give. Everything you see in the render above was 100% converted using those Blender files.
Download here! SFS / GD
Update: Version 3.4.1 (27/08/2023) Fixed some issues on the shoulders for the AF-body-4t2-1024 and AF-body-4t2-2048 templates. Now the top straps on most converted underwear/swimwear should look right.
Update: Same version (13/12/2023) As requested, added a new spanish version of the included pdf guide!
These templates were made mainly to bake and convert tattoos, but there’s more you can do with them if you get creative. I have to say, these are NOT perfect. Results may vary depending on what you are trying to convert, so! With that in mind, this is all the stuff you will be able to convert almost seamlessly from TS4 to TS2: -Tattoos. -Other body details such as body hair, scars, freckles, supernatural/occult details… -Body painted underwear and swimwear, as well as some other clothing that’s mostly painted on the body. -Socks, stockings and maybe leggings. -Even skintones! In some areas they will look weird, so I recommend editing and blending them with other existing TS2 skins. -Makeup, eyebrows and beards. In the old version this was just a proof of concept, but now I’ve added a new Face file template which gives some pretty decent results! -Hair scalps. Very useful when converting some hairs! Although keep in mind part of that texture might also need to be baked on the face mesh, you know, that hairline makeup stuff.
Got your attention? Nice! Editing some of the textures from TS4 to match the UV mapping in TS2 using a 2D editing program can be incredibly hard. That’s where texture baking in Blender comes to the rescue!
You will need to download Blender, at least version 3.4, but you could always use a newer version. It is only incompatible with versions older than 3.4. -You can download Blender for free here. -You will also need Sims 4 Studio to extract the original Sims 4 CC textures you want. In the first version of these Blender files, there was a necessary step using Photoshop, but that’s no longer needed. However, there’s still a tiny extra step which requires resizing the newly baked texture on some of the high resolution templates, so you might need a 2D editing program like Photoshop. More on that later.
So, before we begin, let’s clear out some questions you might have. What the heck is this texture baking thing and what does it do? Well, let’s imagine you have a video projector and point an image into a blank wall. Then you pick up some brushes and start painting and copying that projected image in that wall. Texture baking is kinda like that when it comes to 3D models. You align two models and match them as closely as you can in shape and form, and once you adjust some parameters and values, Blender does the rest for you: it will give you a new texture for a new model with a different UV map. These files I’m sharing have everything already set up, so it’s a matter of plopping in that Sims 4 texture and you will get that new texture for TS2 in just a few clicks.
This tutorial assumes you know literally nothing about how to use Blender, so if you feel uncomfortable with it, worry no more! This will guide you with pictures showing where you need to click and explaining what is happening. For Sims 4 Studio and Photoshop the process might be a bit less detailed, but still this should be pretty beginner friendly. For this tutorial, I will use some tattoos as an example (properly credited at the end of the post). Alright, enough with the rambling. Let’s get started!
·EXTRACTING TEXTURES IN SIMS 4 STUDIO: First things first, you will need to extract as pngs all the textures you want to convert from TS4 using Sims 4 Studio. It should be pretty straightforward. Just open the packages and export the Diffuse textures. Keep them organized in a folder for easy access.
·BAKING THE TEXTURES IN BLENDER: PRELIMINARY STEP 1: CONFIGURING BLENDER’S GRAPHICS SETTINGS: Open your preferred Blender file depending on what you’re going to bake and the desired resolution (in this example I’m going to use the AF-body-4t2-1024 file). Before we start messing around in Blender, there’s one thing you should set up. It is a onetime step, and once it’s done, you won’t need to do it again. So, does your computer have a dedicated graphics card? If you don’t know or you’re not sure, just skip to the next step. Configuring Blender so it uses your graphics card instead of your CPU will make the baking render much faster, so it is recommended you set it up correctly. If your computer has a dedicated graphics card, click File (1) > Preferences (2) > and on the window that pops up click System (3) > and select CUDA and make sure your graphics card is there and tick it (4). I have an Nvidia Graphics card but your case may vary. Once you’re done, click on the tiny button on the bottom left corner and Save Preferences (5).

PRELIMINARY STEP 2: CHOOSING THE RENDERING DEVICE: Click on the tiny camera button on the right, called Render Properties (1), and on Device (2) select GPU Compute if it’s not already selected. If you’re not sure if you have a graphics card or not, just select CPU. Then select the Material Properties tab (3) and Save your changes, either by pressing Ctrl + S, or clicking File (4) > Save (5). You might need to do this second step with the other Blender files, but once you have it done and saved, you won’t need to do this again. Okay, time to get into the good stuff!

·STEP 1: LOADING YOUR TS4 BASE TEXTURE: In the Material Properties tab, click the folder icon that says Open (1) and on the window that pops up, navigate through your folders and select your first texture. To navigate easily, the 3 buttons on the top right (2) are for the display mode. They will show your files in list mode, vertical and horizontal, and the one on the right will display the file thumbnails, pretty useful if you want to easily preview your textures here. The icons on the left side (3) will let you go one folder back and forward, go to the parent directory, and refresh the folder in case you just dropped something new in there. Double click on the image you need and that will load the texture into the Sims 4 body model, named “ts4 body”.

·STEP 2: SETTING UP YOUR SELECTION AND BAKING THE TEXTURE: On the top right of the screen, you will see the names of the 2 models in the scene. Hold the Ctrl key in your keyboard and left click on the “ts2 body” model (1). If you did it correctly, you should see “ts2 body” in a yellowish orange color, and right down below, “ts4 body” should look more like a red orange. If not, try again by clicking first on ts4 body, and then while holding Ctrl click again on ts2 body. Then switch to the Render Properties tab by clicking the tiny camera icon (2) and click Bake (3). Depending on your screen resolution, you might need to scroll down a bit with your mouse to see the Bake button. Wait a few seconds for it to finish. You will see the progress percentage down on the bottom of your screen. Don’t panic if you notice your computer fans start ramping up, that’s completely normal! As I said in the beginning, using your GPU will bake the textures much faster than the CPU.

·STEP 3: SAVING YOUR NEW TS2 TEXTURE: Once it’s finished, switch to the UV Editing Mode by clicking “UV Editing” on the top of your screen. And there it is: your new texture! You might have to scroll up your mouse wheel a bit to zoom in and see it in all its glory on the left side of the screen. We’re still not done yet though. You need to save it to yet another new folder (always try to keep your stuff organized!).

You can save it by pressing Shift + Alt + S, or clicking on Image* (1) and then Save As… (2). That will pop a window where you’ll need to navigate again and save it somewhere. Give it a proper name (3) and hit Enter to save it… well, Enter doesn’t always work for me for some reason, so if that happens just click Save As Image (4). And that’s it! You’ve successfully converted your baked texture. Congrats!

·STEP 4: GOING BACK TO STEP 1: Alright! If you’re done with your textures, you can close Blender without saving and call it a day. But let’s say you want to keep baking other swatches. In order to go back to step 1 and start the process once again, click Layout (1), go back to the Material Properties tab (2), select “ts4 body” (3) and click on the folder icon (4) to open and load your next swatch.

Then it’s just a matter of repeating the process from step 2. When you’re ready to move on, close Blender without saving. If you see a small check telling you it will save some images, make sure you uncheck it, so you will be able to use it again in the future from the starting point with no issues. I don’t think it really matters if you accidentally save your progress in these files, but I like to keep it clean and fresh so I can do the process where I left it from the beginning next time I open it. And in case you mess up and save somewhere, you can always just delete the .blend file and download the template files again.
In case you’d like a video tutorial on how to use these files, the amazing @platinumaspiration recorded this fantastic video showcasing the process! You can watch it here.
One final note: some of the baking .blend files save the textures with a resolution of 2048x2048 pixels, as clearly stated at the end of their file name. That’s way too overkill, because TS2 only properly supports up to 1024x1024 for most of its textures and you should always resize your final product to that max resolution (or lower if needed). I just made those 2048 versions because there might be some really tiny and slim details on some tattoos that might look a little too blurry when baked into a 1024 resolution texture, so for those cases use that if you want and then resize them using your 2D editing software of choice. In Photoshop, in the Resample mode of the Image Size menu, there are a few options to choose. For the fine details, I like the Nearest Neighbor (hard edges) option, which, even if it looks a bit pixelated, it still preserves most of the texture and quality.

For anything else, I would just directly bake them using the 1024 versions in Blender (512 for the face and scalp).
And for the folks who feel comfortable playing around in Blender, this is just the beginning! Texture baking opens a LOT of possibilities, so feel free to move stuff around and edit the models to your liking! If you notice the baked textures look warped or stretched somewhere, or don’t like where some textures are placed in the S2 body, poke around that area moving stuff and then give it another try. The main objective of the baking process is keeping both overlapping models as close in shape as possible. You may also edit and save new copies of the templates, or make new ones from scratch using mine as a reference (keep a close look on those Baking settings and values, I think they work pretty well) and share them if you want to. Go ham, do whatever you want with them! I still have plans on making templates to convert body textures from Sims 3 to Sims 2, but for now it’s not on my priorities, so we’ll see when that happens.
Whew! Hope none of this was too confusing. Need help or have any issues with these? Please ask/message me here and I’ll be glad to help when I’m able to!
Credits for the CC used in the render demonstration: -Skin by Sims3Melancholic. -Eyes by Northern Siberia Winds. -Eyebrows by PeachyFaerie. -Tattoos by xtc. -Top by SerenityCC. And the Tattoo I used for the tutorial can be found here, by ValhallanSim.
Last but not least, a huge thanks to all the people who somehow contributed to make this project and update possible, either by doing initial testing, finding issues to fix, or teaching me new Blender tricks to make the workflow way faster and easier. So thanks again to @elvisgrace @moyokeansimblr and @applewatersugar on Tumblr! <3
And thank you for reading! Hope you have fun playing with this (not so) new toy hehe.
#tattooer project#tattooer update#ts2 tutorial#ts2 resources#ts2 blender#ts2 overlays#ts2 texture baking#4t2 conversion tutorial#this took me so LONG to update#im really sorry for the delay :(
406 notes
·
View notes
Text
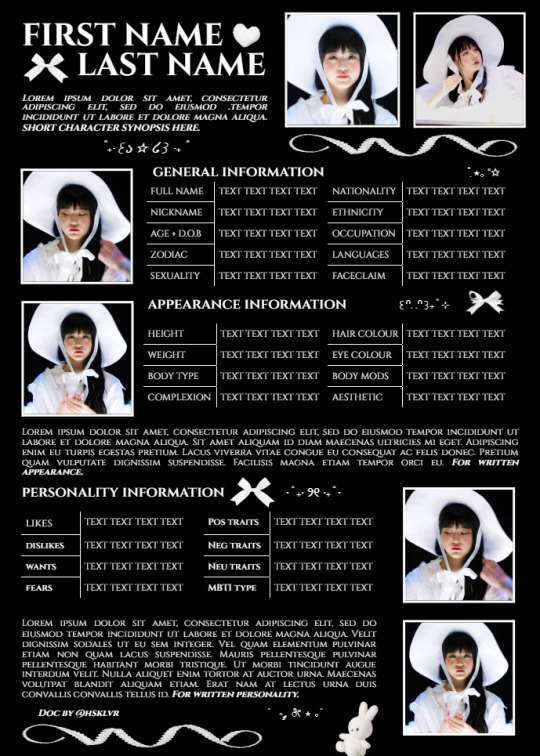

"bows, bows, bows." ୨୧

introducing. . . "bows, bows, bows". a single-muse doc perfect for a minimalistic character, it also includes 3 connection slots. you will need at least 4-6 images of your face claim. the template is themed around the bows & "dollette" core! the png's on this doc are all from tumblr, you may add or delete them as you wish since it won't ruin the layout of the doc. you will get a pdf file (617kb), from there you can follow the instructions on how to edit your own copy of the doc.
note: my apologies for the low quality screenshots! i promise the doc looks better in person.

the rules are simple:
✧ ፧ do NOT remove credits from this doc. I worked extremely hard to make it and would be upset to find out someone did this.
✧ ፧ the price of the doc is £2.50, but you can pay higher if you wish to give a small tip!
✧ ፧ do NOT play this doc off as your own. You won't get very far with lying.
✧ ፧ any modifications to the doc can be made after purchase! :)
✧ ፧ if you are having any issues accessing or working out how to use the doc, feel free to dm me on tumblr, or adding me on discord @/jhopez! i'm always happy to help :)
how to use, what and what not to do:
✧ ፧ moving, resizing or removing things on the doc may cause it to look strange. so I suggest to leave everything where it is when editing.
✧ ፧ all images are easy to edit on mobile, the only drawings on this doc are the png images i used to decorate it :)
✧ ፧ try not to go over the space given to type in. this will also make the doc look strange.
#hsklvr#google docs#docs#google docs template#muse template#discord rp#rp template#roleplay resources#muse doc#character template#character sheet#discord#doc template#character#aesthetic#ribbons and bows#white#wonyoung#Spotify
121 notes
·
View notes
Note
You have a very, very lovely portfolio. Your art is very charming and I am very curious about the comics you post on your portfolio page. But, there are only a few pages. Is there anywhere I could go to see your comics in their entirety?
ty for the kind words!! i'm so sorry i didn't see this question earlier.. the full versions of some of my older comics are up on behance:
the loneliest whale
our glorious deeds
reunion
dear wonderful world
also a bunch of fancomics i put up on kofi for free bc i am lazy and it was faster to save and upload the pdfs than to resize every single page
my genshin / ff14 fancomics on kofi
tbh i put them on kofi thinking i would be able to see stats like number of downloads, etc, but i can't, maybe bc i made them free LOL...
have fun and ty for reading!
101 notes
·
View notes
Text
do you ever have those therapy sessions where you have to go back to work after sobbing half your body weight and there's just no chance you can do a thing? resize a pdf? send an email? sign off "thanks! :)" ?? none of you know anything !! this means nothing to me rn !!
28 notes
·
View notes
Text
Hello everyone,
Congratulations on another amazing Twice Per Year! We hope everyone has been enjoying the batch of new content, or if you haven't had the chance yet, we encourage you to take a look.
This publication was a bit rough going, and largely because of that, the Admin Team has decided to write this post to share with everyone the state of TPY and our (tentative) plans moving forward.
The Process
First, we'd like to explain a little about our process. At the beginning of a year, we open up a poll to take idea submissions from everyone, regardless of whether they hope to participate or not. The admins then compile these submissions into specific choices and themes for people to vote on what they'd like to see for the coming year. This is what acts as our "interest check," to see a birds' eye view of not just participants but also readers. After that, we open sign-ups for the selected theme. While we underline the fact that sign-ups are a show of commitment and there are penalties for dropping out later, we have also attempted to emphasize that these penalties are mild and temporary and mostly just to discourage noncommittal sign-ups. The admin team uses sign-ups to gauge the size of TPY (both literally in page numbers, and fandom-wise in "activity" especially in comparison to interest check numbers), and has to manually collate a spreadsheet of each participant's sign-up info and progress at every check-in. Then, the check-ins. These are checkpoints at set dates during the TPY "term" where we message participants to get an idea of where they're at in the creation process and answer any questions or concerns they may have. The actual status of the work isn't really what matters here - the more important function of a check-in is to open an avenue of dialogue with people so they don't feel shy or hesitant to message the admin team. We understand that stuff happens, and either people don't want to be a bother, or it slips their mind because they're busy with other things, so the check-ins function as, well, a check-in to see how things are going. Finally, the submissions. This is where the admins' crunch time begins, as we rush to begin production of the actual zine itself. If participants do not submit their works correctly with the template provided, then this stage can also involve chasing people down for info within a timely manner (and if responses are slow, can delay production). Unfortunately, this part has been a struggle over the last 3-4 TPYs, as participants have not consistently submitted their works as requested (mostly artists). At this point we are aware that things tend to drop into radio silence, so we'd like to briefly list what we're busy working on. In addition to participants' submissions, the sum total of a TPY publication is made up of: a cover page (whose artist is selected from the sign-up sheet); a disclaimer and thank you page; original graphics for the acknowledgements, table of contents, and contributors pages; original graphics for the SFW and NSFW category pages; and an original document template for written works. It is a large amount of work and can take time to get looking right. We also re-format and SPAG (spelling and grammar) check written works, and resize any incorrectly submitted artwork. Once everything is made and ready, it is compiled with Adobe Acrobat into a single PDF.
The Numbers
There are a couple of pain points in this process that we'd like to elaborate on.
In 2022, we took over TPY from the old team, and as such only ran one theme as we built our new system and processes. We are missing full voting and participant information from this time, but we do know that there were:
24 sign-ups, with 12 final participants (12 drop outs/potentially ghosted)
Last year (2023), TPY had:
52 votes on the themes
23 sign-ups for part one, with 19 final participants (4 drop outs)
31 sign-ups for part two, with 24 final participants (7 drop outs)
This year (2024), so far TPY has had:
43 votes on the themes
26 sign-ups for part one, with 18 final participants (8 drop outs - 5 of which ghosted)
Overall numbers are varied, but it's the ratio for each year we're looking at. For 2023, the percentage ratio from votes to sign-ups were 44~59.5%, dropping to 36.5~46% for final participation (a drop of 7.5~13.5%). These are pretty good numbers - it means roughly around half of the people who voted were planning to participate! For 2024 however, it started out strong (60%!) but dropped to 41.9% upon final submissions (a whopping 18.1% right out of the gate). But more importantly: not only did it drop below the participant threshold that the admin team has set, but there were a staggering number of people who simply vanished and did not inform us of dropping out. This was when we posted our notice saying that we were extending the submission deadline, in hopes to get word from those people on their status - which severely delayed the production of the zine. We received 2 further submissions in this way, but the rest remained MIA.
But What Does It Mean
The takeaway here is the growing number of drop outs (not to mention the ghosting). Sign-up numbers are largely looking great, as it's natural for that number to rise and fall as people come and go from the fandom, get busier or have more leisure time, are interested in that term's theme or not, etc etc. The admin team's threshold is for a 20 participant minimum, as we believe this is a reasonable number for current fandom activity/popularity, in addition to allowing for a wide variety of fanworks submitted (the ratio of written works to artworks can be very skewed). Dropping below this number is concerning, as not only does it mean decreasing interest, but it also starts tipping the level of work needed by the admin team into unbalance. We're working adults, with jobs and responsibilities, and dedicate not only our personal time but also our personal money (Adobe ain't cheap) to this fandom tradition. Understandably we want TPY to be the very best it can be, but that does require others to "meet us halfway," so to speak, by participating. If not enough people do so, the work involved begins to feel less like a willing celebration to contribute to and give back to the fandom, and more like we're, well, wasting our time and effort (and money).
And while we understand life does happen and sometimes it's necessary to drop out despite original intentions to participate, the Admin Team would like to re-emphasize that if you don't believe you can fully commit (perhaps you don't have a solid idea for the theme, or you know you'll be gone on holiday for an extended period, etc.), then please don't sign-up. If you must drop out - no worries, truly, but please let us know! Don't just disappear! Conversely, we really hope that more people do consider signing up - there's no "requirements" you must meet (anyone can participate), the process is easy (all we ask is you respond to the check-ins and follow submission rules, otherwise we do the rest), and you get to be published in one of this ship's longest running events!
We hope that by making all this information transparent, we can empower and encourage people to be more willing to participate and support TPY. The Admin Team has occasionally received some absolutely lovely and kind messages thanking us, which we appreciate more than words can say, as this really is a labor of love. But we'd also love to see those feelings returned to the fandom at large, not just kept in our email inbox!
Moving Forward
Thankfully this time, we were able to get TPY out at the very end of September/start of October, but unfortunately this has messed up our timeline for the remainder of the year.
The Admin Team took some additional time to discuss whether TPY would continue or not, after this rough term, but we didn't want to just end things with no transparency and no chance for people to have their say. So we've chosen to continue for now, with some changes.
As there are only 3 months left in the year, it would be a very rushed term (not to mention end of year holidays), and we have decided that that would be unfair to hopeful participants. As such, the Admin Team has made the decision to push the voted-on theme, "Ocean's 1923" (love at sea), to the beginning of next year (2025-1).
Sign-ups will start December 1st and run through December 31st. (A further timeline of check-in and submission dates will be shared later.)
As the numbers start rolling in, and we see how that term fares in sign-up and final participant rates, we will make a final decision on the ultimate fate of TPY. If interest has simply waned over the years and people no longer wish to participate, then we would like to end TPY with dignity, and would likely hold one final wrap-up theme to top things off.
Final Words
We know this was a lot to get through, so thank you if you got this far. We are so appreciative of everyone who has touched TPY in some way - whether as a participant or a reader, you are an important part of this ship.
We understand if there's questions or comments people would like to make in response to this. Our email is always open (usukustwiceperyear (at) gmail (dot) com), or feel free to message Narcoleptic via Discord (@narcoleptic).
Thank you again, and until next time, The USUKUS Network & Twice Per Year Admin Team
23 notes
·
View notes
Text
Hi! As you may or may not know, I'm making Astarion Ancunin cosplay and, just in case someone needs this, the link goes to a pdf on my drive with the print of the tattoo: I resized it on A4 paper sheets (basically it's 30 cm / 11 inches wide) so you can print it and use it for your cosplay (or other) needs!
I personally used it to draw the tattoo on water soluble paper so I could sew it with white thread on his white shirt (NO ONE is gonna notice at the con, I know, but I will know and I'm ok with it lol) but you can also print it and make something else lol
Here a preview, I swear I'm not rickrolling you :3
I used a picture I found online for the tattoo btw, so if you want to thank someone, here is the reddit post of the person who actually drew this:
Have fun! <3
#astarion ancunin#cosplay#cosplay resources#bg3#bg3 astarion#astarion#astarion cosplay#astarion reference#astarion tattoo
27 notes
·
View notes