#instead of export and then choosing the format
Explore tagged Tumblr posts
Visit Tumblr Blog
Explore Tumblr blogs with no restrictions, modern design and the best experience.
Last Seen Tumblr Blogs


Fun Fact
Tumblr posted its first advertisements in May 2012 and subsequently earned $13M in revenue.
Text
spin rune

this is so funny. in my evil wizard chamber learning fucked up evil math
#spent way too long fiddling on libre office#was using export as pdf and then searching for png/jpg#instead of export and then choosing the format#also tried for a while to fix the image getting cropped for no reason#just resized the page and it worked#honestly it wasnt that much time#just like 10-20min -ish
2K notes
·
View notes
Text
Quick GIF tutorial (Photoshop)


#holy shit this is perfection!!#i am so jealous of this set!#the coloring op THE COLORING!!! (original post)
alright @dontyouknowemma-itsyou and anyone interested, this was really easy to colour so I'm gonna give you a quick breakdown. (i didn't save the psd file?? so i'm redoing this i guess, but i did it on autopilot in the first place. i've been making gifs for over 15 years.)
GONNA INCLUDE A VIDEO AT THE END SHOWING OFF THE SETTINGS!!
General GIF stuff
This is in Photoshop CC. I extract a clip from a video as an MP4 file, which photoshop can open. (I use AviDemux for this, which is free, because it lets you save clips using 'copy' encoding for video output and still change from MKV to MP4 format - without losing any video quality, cause you're not re-encoding.)
Open that shit directly in photoshop as a video layer (just drag and drop), that lets you scan through it to check the colouring works overall. Convert the video layer to Smart Object, that lets you resize and edit it. (Do NOT open a full movie in Photoshop, it'll probably die and it has a max length anyway.)
Also all the colour adjustments are gonna be adjustment layers you can tweak and turn on/off whenever. There's a lil button at the bottom of the Layers window to add them quickly.
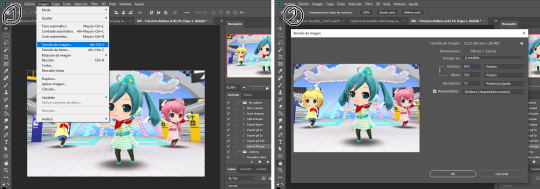
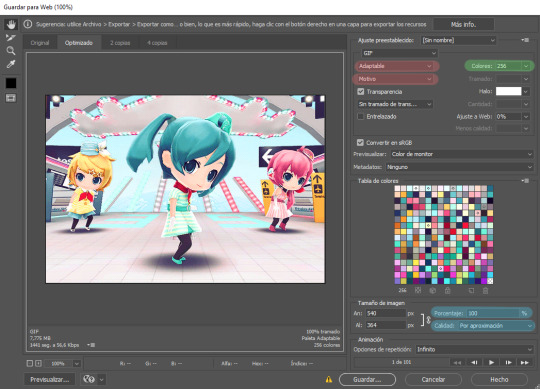
When we're done we're choosing a section of the video in the Timeline window and we're doing File->Export->Save For Web. 'Adaptive' (or selective) palette selection, 'pattern' style dithering.
Colouring
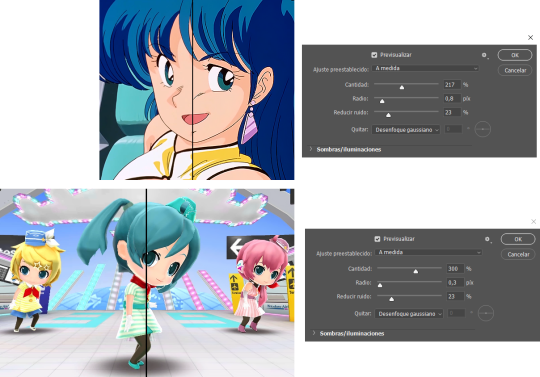
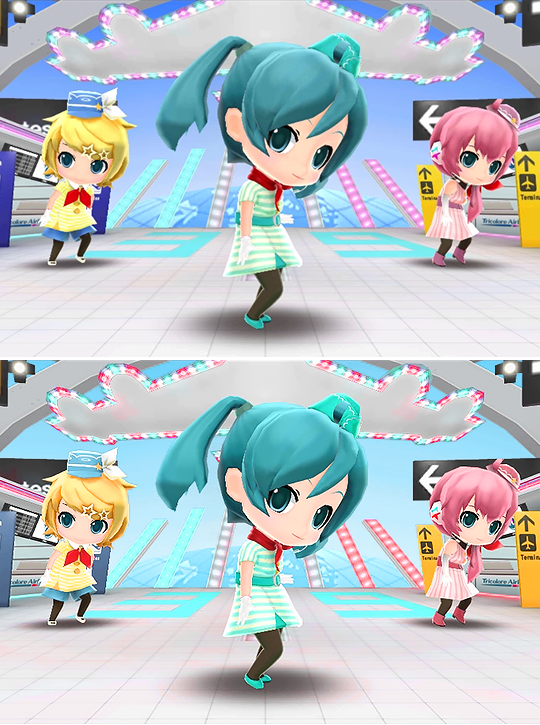
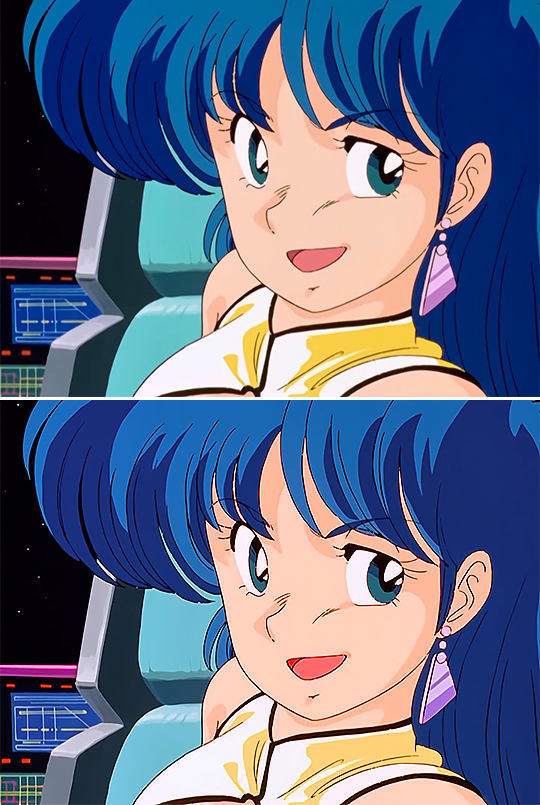
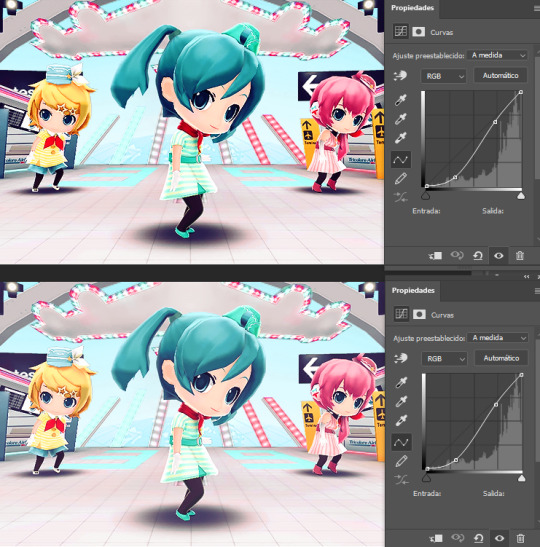
Curves layer to lighten. Just pull the curve up. Curves seem to give a much smoother lightening, since it mostly affects the middle, leaving the brights and the darks where they are.
Levels to make the darkest darks pure black, and the lightest lights pure white. Good for limiting GIF size. Don't overdo it though.
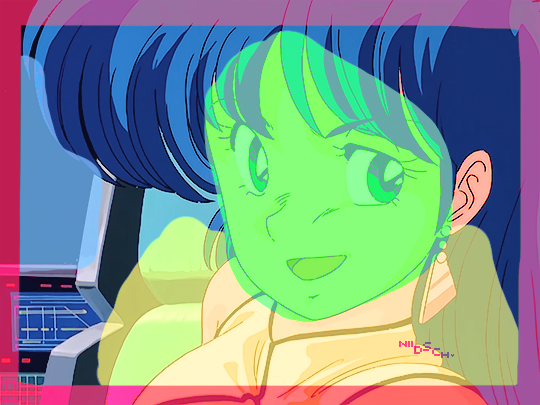
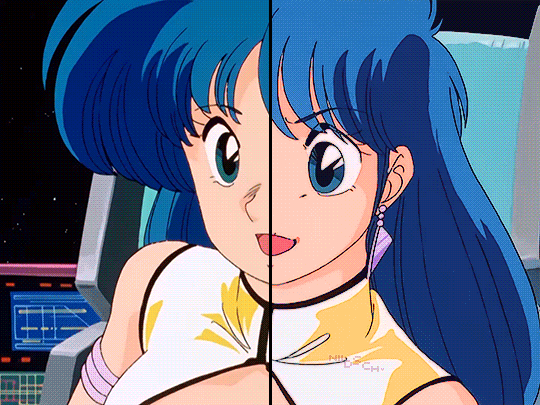
Colour balance!! My beloved, most important. So for the Shadows and Highlights, you're gonna move the sliders towards Cyan and Blue, but for the Midtones you're gonna do the opposite - towards Red and Yellow. This means you don't shift the overall colour of the picture, but trust me it does SO MUCH for the contrast and colour. I swear I do this for almost any edit, and also my art tbh. Also if the original clip is like very green or whatever, you can correct that here.
Selective colour. For this I did one thing. For 'Black' dropdown, I upped 'black' and 'yellow' sliders (the latter to counteract the blue in the darks). This in combination with:
Levels again. Bring in those darks, turn them pure black. Basically this does a couple things. It preserves GIF file size, by making sure the dark areas are static (file sizes mostly depends on pixels that are CHANGING). It ALSO makes the palette much more optimized, meaning you don't waste palette on the darks no one sees anyway, and instead uses them in the mid range colour variation, giving much smoother gradients. That's it!! That's all the colouring!!
EDIT: Uh I probably also had a Vibrance layer?? Idk. This just ups the saturation, but it's softer than upping Saturation. Makes the colours pop without overdoing it.
Other tips and tricks
Often I'll put a Smart Sharpen (50% amount, 0,5px radius) filter on the video layer, just to make it a bit crisper. Subtle but effective.
You can manually edit the palette when you save as a GIF, either to reduce file size, or because some colour areas look pixelly. See the video for how.
If your file size is huge but you don't want to shorten or resize, you can reduce the frame rate manually. To do this, FIRST save the GIF, then open the GIF you just saved. Go through in the Timeline window (which is now a Frame Animation rather than a Video Timeline), select every other frame, and delete them. When you do this, remember to select the rest of the frames and double their Frame Delay so you don't end up with a super speedy GIF. (You can also make a GIF slow-mo like this.)
Since the video is a smart object, I literally just resized it in between saving the different GIFs, to change composition between the different shots.
Selective Colour layer can be used for a lot of image tweaking. For example, if something is overly yellow or green, I may go to the Yellow and Green in dropdown and just reduce the yellow slider. (I usually then go to Red in dropdown and ADD some yellow to that, to balance out the reds to be less pink.) Or maybe the overall colours are nice but the blues are dull, so I'll just go to Blue/Cyan and tweak those specifically.
If you have a colouring you like that you want to use on lots of things, remember you can drag-and-drop layers between different images. You can also save a photoshop file with nothing but those layers, to use on later gifs and just tweak as needed. (You can also make Actions to automate stuff, but I won't go into that.)
How easy or hard something is to colour HUGELY depends on the original video, both lighting/colouring and video quality.
Finally the video showing settings!
This is like 5 minutes long and has no commentary or anything. This is mostly to show off where you find each individual thing, and what difference it makes in the colouring.
ANYWAY hope someone found this useful!!! ♥
#next to normal#gif making#photoshop#gif tutorial#photoshop tutorial#my posts#my gifs#art things#tutorials#PS if you can't afford Photoshop then just you know.... yo ho ho and all that
119 notes
·
View notes
Note
As you've asked for asks!:
Do you have any quick-and-dirty book/fic binding methods a terrified-of-failure novice could use to bang something out to get over the first collywobbling step of Actually Doing The Thing? (this may be something I've been meaning to ask for ages)
yes! I absolutely do! in my opinion the best quick-and-dirty bookbinding method is a no-glue pamphlet: you don't have to mess with glue or measuring or cutting anything, all you need is your text, some paper, a needle and thread. you can use the same needle to punch holes if you don't have an awl.
this is going to be a little long but that's because I'm going to write out some fairly detailed instructions for an A5 sized pamphlet. If you don't want detailed instructions and think you can glean the necessary info from photos, just skip to the photos! I've also linked tutorials.
for preparing the text to printing, in whatever software you use (word, libreoffice, gdocs, whatever) make sure your document is set to page size A5. make it look readable. then save as/export that document as a straight-paged PDF. now go to the bookbinder JS tool (https://momijizukamori.github.io/bookbinder-js/), and upload the PDF. source manipulation: none printer paper size: A4 display unit (you can ignore, or choose cm if it gives you anxiety that it automatically displays points) printer type: select single-sided or duplex accordingly* rotate paper: ignore flip on long side: check if you are printing duplex and if your duplex printer flips the paper on the long side page layout: tick folio page scaling: original page positioning: centered ignore the rest flyfleaf: ignore signature format tick: standard signatures. in the length drop down, this depends on the type of pamphlet you are doing. for folio i generally find 4-5 pages per signature a comfortable thickness. if you have 6 whole A4 pages you can still do that as a single signature or you can split it into two signatures 3 pages each. wacky small layouts: ignore this signature info click the generate preview button to see what your PDF looks like imposed! I love this step especially when I'm doing quarto (A6) or octavo (A7) sized books generate output - click this to generate an imposed PDF
for A6 and A7 sized books the instructions are much the same, except for these you make sure the page size is A6 or A7 in your software, and then you choose quarto or octavo instead of folio. for signature length drop down I keep signature length to 1 for octavos typically and 2 for quartos, as this still refers to sheets of paper, and for octavo 1 sheet of A4 paper will turn into 4 smaller sheets in one signature once folded and cut.
*if you don't have a duplex printer you will have to manually turn the paper to print on the other side. I cannot be arsed with this so I bought a printer capable of duplex printing (I didn't have a printer anyway). if you already have a printer check what it can do as you might be surprised and go from there.
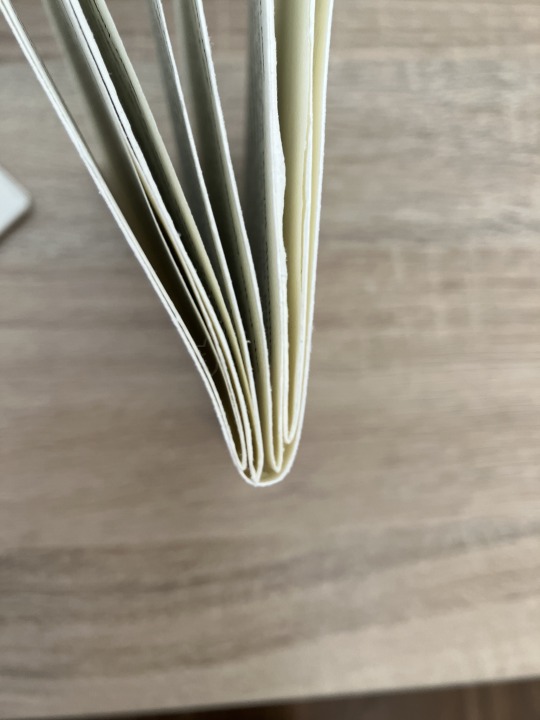
now to the pamphlets! you don't need a cover - I have one for the long stitch pamphlet but for the saddle stitch one I didn't bother and just made sure the first page had a title on it. you can always take a different piece of paper and print a cover on or or just use coloured cardstock and create a simple cover, but a cover is not necessary unless you're doing a long stitch pamphlet. all you need to do is to punch holes and start sewing. there are a few different stitch types below, I wouldn't say any of them are more difficult or easier than others, but they do look different so...pick one you like the look of and go from there?
pamphlet stitch (uneven number of holes) I haven't ever done a pamphlet stitch but here's a tutorial for how to do it: https://www.starpointestudio.com/simple-pamphlet-stitch-book-step-by-step/
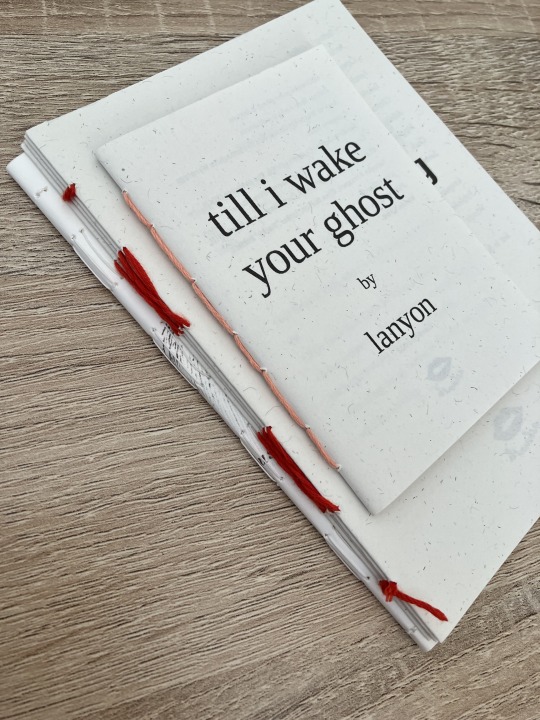
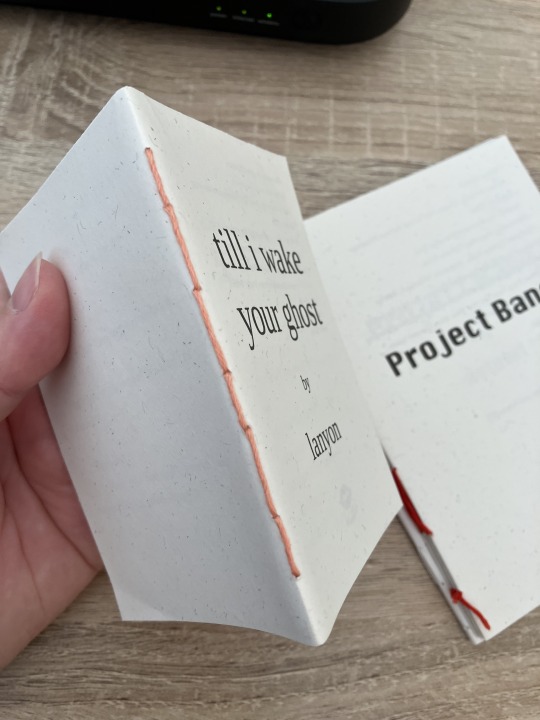
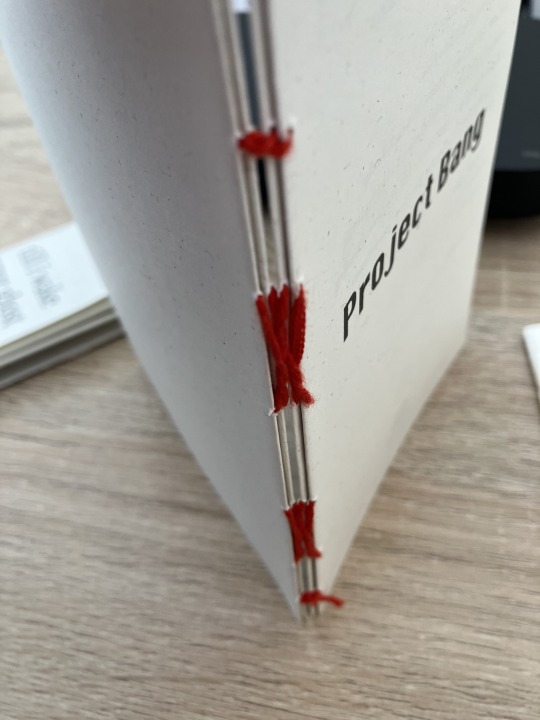
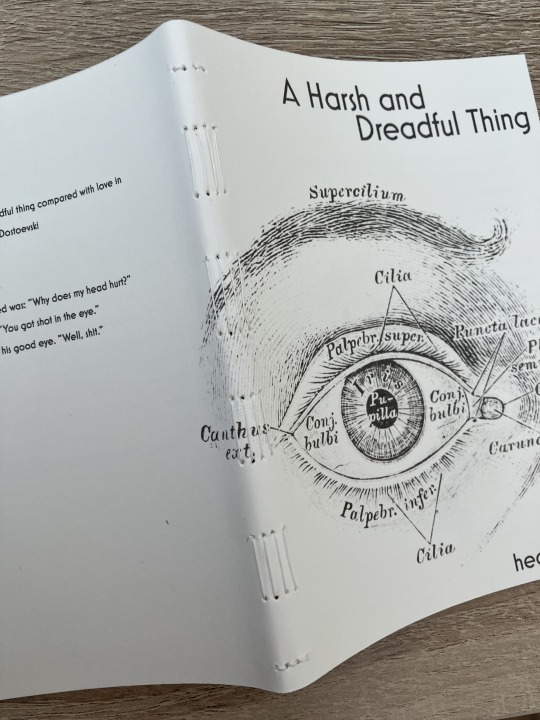
saddle stitch (uneven number of holes) I realised that what I was thinking of as a pamphlet stitch is actually saddle stitch, as in this A7 pamphlet:
here's a tutorial for how to sew saddle stitch: https://www.bookbindingworkshopsg.com/saddle-stitch-bookbinding-tutorial/ here's a video tutorial: https://www.youtube.com/watch?v=aWHkY5jOoqM (sealemon has a lot of bookbinding tutorials and I know many people who like her videos, I used her tutorial for coptic binding way back when I first made a book but I can't otherwise vouch for the quality as I haven't used her videos)
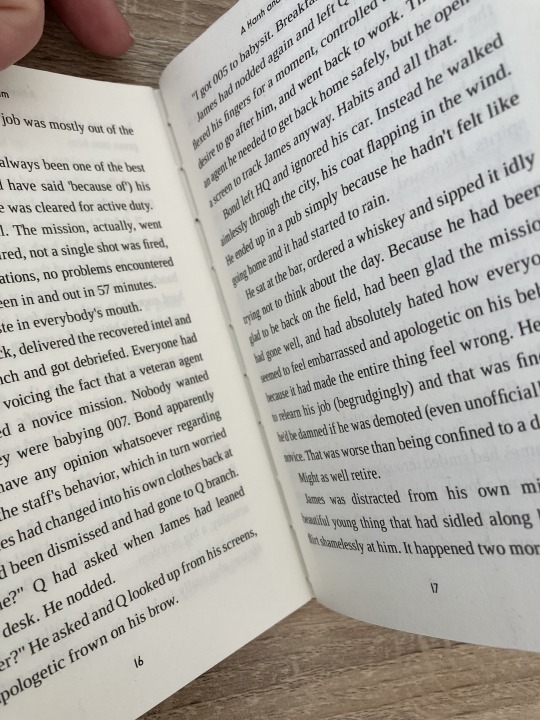
french link stitch (even number of holes) in this one I used french link stitch which I typically use for thicker textblocks that i'm not planning to use tapes with as the french link gives it some robustness, I used it here because I had never done it before and wanted to try it out. I am planning to take these stitches out and re-sew this pamphlet with a cover now that I've found a suitable piece of transformer fanart to use as a cover:
french link tutorial. it's quite long but it has a colour coded bit towards the end that shows how the thread is supposed to link which i find very helpful to visualise: https://www.handmadebooksandjournals.com/bindings/french-link-stitch-binding/
here's a video tutoral from DAS bookbinding (he is my go to for techniques and he has the most soothing Australian accent as well, though fair warning not all of his videos are for beginners): https://www.youtube.com/watch?v=O4ZPdbaM-Ws
long stitch (even number of holes) for this one I used long stitch and I had a cover. this one is my favourite variation because I can make these pretty and simple covers and the stitch looks nice on the outside as well, so this one scratches the 'i want to make a book' itch for me.

here's a tutorial that also includes a how to on a cover that is different from my cover: https://lccprintmaking.myblog.arts.ac.uk/files/2020/06/Long-Stitch-Tutorial-A4.pdf DAS also has a video tutorial for long stitch but it's like three videos long, maybe watch it later :'D here's one I haven't watched but seems decent: https://www.youtube.com/watch?v=XnignTL_wDQ
you can use saddle stitch for this kind of pamphlet as well, that's what I did for dozens of ships and hundreds of souls (https://ashmouthbooks.tumblr.com/post/681587080267202560).
I hope this helped!!
2K notes
·
View notes
Text
quick guide on backing up your tumblr from someone who has tried it various ways over the years
so, you noticed that tumblr is so understaffed that they didn't even do april fools this year and you're thinking of backing up your tumblr. maybe even using tumblr's built-in export function.
there are plenty of third party apps that will scrape your blog and grab all the posts. tumblr-utils is one that i have used historically to great effect. another option here. or find your own.
however, if you want to save your dms and asks, you need to use tumblr's export function.
first go to your blog settings and click export blog. you'll get an email when it finishes exporting. this may take a couple days.
now, my blog's file was about 400GB. that's almost half a terabyte. it's a lot of data. there's no way to shrink it or only download parts. it also will not tell you how big the file is going to be. my blog has ~250k posts and another 5k unanswered asks. and yours will probably scale with that.
(this is a good reason to use third party scrapers instead, by the by. tumblr-utils at least allows you to 1) download only your own original posts and not reblogs, 2) download only text and not media, and 3) download in batches not all at once. you're not forced to take the whole thing, which is a lot of data. the html result from tumblr utils is also more usable than the one from tumblr as well).
anyway. the first thing you'll want to do is make sure you choose what folder something downloads to. you do NOT want half a terabyte in your downloads folder. you want it going straight to an external drive. you can set firefox to open a little "save as" dialogue box everytime you download something, which honestly i would recommend doing anyway. or you can use a download manager like jdownloader, which will also help in other ways. though personally i found that jdownloader seemed to choke on the fact that tumblr doesn't tell you the size of the download, and that meant i couldn't interrupt the download or jdownloader would assume it was done.
second is just. make sure your external drive is big enough. i ended up literally bailing out files onto other random thumb drives because i only had about 250GB free on my external drive when i started downloading.
third. turn off your computer's ability to sleep. if you've got a pc that should be in the control panel under power settings. it should say power plan. my blog took about 15 hours to download. i had to just let my computer sit there downloading, and my computer needed to not go to sleep.
fourth, i would recommend using an ethernet cable if you have one. that will make it go faster.
you should get a file. though my computer literally choked on mine and i had to open it with 7zip because the zip file didn't quite work.
honestly if you're willing to spend an unreasonable amount of time and storage space on this i would recommend grabbing the tumblr native backup and then also using tumblr utils and scarping the text, then using the tumblr utils version of the text. my suspicion is that you can just grab the media folder from the tumblr export download and dump it into the tumblr utils folder and you'll be good. tumblr utils handles the text posts way better and more accessibly.
another space saving option is to just literally delete the media folder. or to delete the media in the folder that's not labeled "conversations," since the stuff labeled "conversations" is media that was sent in your dms and you may want to save that.
tumblr export WILL give you all you dms (including with deactivated users and users you have blocked and who have blocked you) and it will also give you unanswered asks (again including from deactivated users etc). probably also submissions and possibly also old fanmail, i haven't checked. i have not figured out yet whether you get your draft posts. if you do they're not in their own folder they're just mixed in with the rest.
the html formatting, however, is dogshit. even of the dms. the dm conversations are literally presented backwards.
94 notes
·
View notes
Text
How to format, print, and bind a zine

This is a consolidated version of previous posts on zine making, with more detail and screenshots. For a version of this post on gdocs, click here.
This is a step-by-step guide on how to use InDesign (or similar programs) to format and print a zine. This can be used for fanzines, sketchbooks, anything. It’s also only one way to do things - there are as many methods as there are zines under the sun. If you’re interested in other ways, searching for zinemaking on youtube would be a start.
If you are printing your zine, your total page count must be a multiple of 4.
Examples of multiples of 4 ✅
4, 16, 112
Not a multiple of 4 ❌
7, 99, 31
This is because our book will be made of folded A4 sheets (that’s regular printer paper). 1 folded A4 makes 2 A5 pages. Each A5 page has a front and back. Therefore each sheet of paper makes 4 pages.

How to format
Open InDesign. Go to Create New > Print. Choose A5 and tick Facing Pages. Enter your page number (this can be changed later). I’ve put 12. Hit Create.

Locate the Rectangle Frame Tool.

Draw a rectangle over your whole page, or just the part where you want your images to go.

Press Ctrl+D and insert the image you want on that page.

That’s it! Repeat on every page and you’ll have a book. Promise.

Further reading
I need a free alternative to InDesign.
InDesign is free for the savvy but I also recommend Scribus which is free and open source and very lightweight. The method is exactly the same but the Rectangle Frame Tool is called Image Frame and the Ctrl+D shortcut will now be Right click > Get Image instead.
I need help with designing my A5 pages.
For my first sketchbook zines, I arranged several images on an A5 canvas in a program like CSP or Procreate and exported them as a JPG into InDesign or Scribus. You can do this if your images aren’t already A5 size or you don’t want to waste time with InDesign’s formatting tools.
I need to get fancier with it, format text, or export my file as small as possible.
Here are the InDesign tutorials I used and liked:
How to Add Page Numbers
How to keep Page Numbers on Top
How to Create a Table of Contents
What is Overset Text and How to Fix It <- essential for formatting text onto multiple pages
How to Reduce InDesign File Sizes
Formatting best practices
Remember that in addition to your front and back cover you also have an inside front and inside back cover. You can leave these blank or create an endpaper with a pattern or include a short message or something. Look inside any books or zines on your shelf for inspiration. Or don’t listen to me and put your first drawing or poem there. Just be aware printer paper is thin so you might be able to see it through the cover.
Avoid putting anything important in the gutter (inside edge) or outside edges of the page. Also be careful of creating double page spreads that go across the centre of the book. Because of how we will print and fold the pages, each half of your spread might not meet up perfectly.

How to print it out
Open your completed book’s PDF file in Acrobat Reader (free download: https://get.adobe.com/reader/)
Print with the following settings: Booklet, and Booklet subset: Both sides.
We can see a preview of our print-out on the window on the right. The pages will look jumbled up, but form the book in order when folded.

Congratulations! Now you’ll have a stack of paper. Once it’s folded it should resemble your (unbound) final book. Use a bulldog clip or similar to keep your pages together neatly.

How to bind (2 methods)
If your book is less than 30 pages, I recommend using a long arm stapler, or a stapler that can open to lay flat. They are cheap.
There are also special book binding staplers or heavy duty staplers, if your book is thicker than 30 pages. Just position your book so the staples are in the middle of the spine (or as close as you can get) and send it. They will be a little wonky… that’s fine.
You can also separate your book into staple-able segments and then join them into 1 big book with tape or thread.
For my 112-page zine, I used thread to bind it.
These instructions are copied from the video ‘How to Print & Bind a Zine’ by LFONinja.
You can watch it here: https://www.youtube.com/watch?v=zKYy6G7lIy8
You will need: Ruler, awl, thread, sewing needle
Make 5 holes in the crease of the pages like so. (½ page, then ½ of that, then ½ of that again)

If the paper is thick, be careful when making the holes. It helps to have a piece of blu tack, putty, or soft eraser underneath the spine of the book as you work for the point of the awl to push into.
I don’t recommend separating the papers into smaller stacks as your measurements will likely vary and the holes won’t align.
Use a needle and thread to go through the holes in the following pattern. At the end, tie a knot with the ends of the thread (1 and 9) in the centre of the book. You’re now done.

About page creep
Because we are using folded pages inserted into each other, they push each other out like so:

From: https://www.greenerprinter.com/ support/page-creep/
You can use a heavy duty or industrial paper cutter/trimmer to remove this edge. This is why we kept any important contents away from the edge of the page during formatting, because we don’t want this process to destroy our book’s contents.
About image edges
Because of how the printer works, the images in the book don’t extend all the way to the very edges of the paper and have a thin white border on all sides. It’s possible to crop these edges from your book with a heavy duty paper cutter. Be careful and start small (3mm or less). Depending on how much your pages move during the printing process, the size of the white edge can be different on different pages. Or you can just leave them in.
To read some of the zines featured in this post, check out naumin.itch.io.
104 notes
·
View notes
Note
hello!! I really hope this isn't a rude question, bc I'm genuinely curious. I've been wondering for a while now why people who make gifs from a movie or a show or whatever get upset when somebody else uses the gif in something or want credit for it. Is the process difficult? I'm not 100% how to make a gif but I can't imagine it being that arduous. Anyway like I said not trying to be rude have a good day :D
hey there! it's not a rude question if only because you're asking in the first place instead of just discrediting it.
the thing a lot of people don't understand is how much work actually goes into making a gif, because we don't just plug the video into a gifmaking program and call it a day. a lot of us start JUST with the process of pirating the highest quality video we can find, which can be anywhere from an hour or two of downloading to days at a time (my record is five days for all five seasons of the a-team, but that's a story for another day)
so there's already at least a few hours potentially, just from downloading. granted, we do other things obviously but that's still time that's going into the process.
so you have to download those videos, find the clip you want, and then there are several different methods of getting the clip into whatever program you use (i use photoshop). most of the time i have to reformat the video from .mkv to .mp4, because PS doesn't take .mkv but the highest quality videos are typically in that format. so i put that into a reformatting program, which can take at least another hour depending on how long the file is.
so i've finally got the file ready to go in photoshop, and then i can actually start working on the gif itself. i've now spent at MINIMUM two or three hours just getting this video ready. then i personally clip it down to the exact scene i want it and go from there. if you're just doing a random assortment of scenes, you can choose whatever you want. but if you're doing a scene itself, you have to clip that scene in bursts so you can add the subtitles based off the mouth-movement.
so say you're doing a gifset of your favorite character from a tv show. well, you don't want to just have all of the gifs come from the same episode. so you do the reformatting process all over again. more hours. you do that eight or nine or ten times until you have all the scenes you want. and THEN you can start the actual editing process.
what size should it be depending on what kind of gifset you want to do? 540x540? 540x405? do you just crop it first or should you resize it? the resolution might go down depending on how you resize it. do you know what smart sharpen is, and which levels you should have it on in order to make the scene look the best? what's a smart object? what percentage should your frame rate be so it doesn't look too fast? it's completely different between live action and animation, after all. do you know which colors you should use in the adjustment layers, like selective color? does levels or curves work better for what you're trying to do? how do i get rid of the yellow in this scene so it matches the other gifs? what's the difference between linear contrast and medium contrast? should you use exposure or vibrance to get the shadows you want?
you've done all that, it looks good! you go to export it as a proper gif so you can post it to tumblr. but don't forget your settings on that either! transparency dither, web snap, the amount of colors and what size it should be. you do all that and the gif ends up being over the 10mb limit. so now you have to go back and carefully chip away at the frames until it's under the limit, which means you ultimately have to choose what to sacrifice from that scene so you can properly export it.
so you try again. okay, it's on 9.7MB. that's going to read as 10MB on tumblr. back in you go to chip at it again until it's going to read as 9MB instead. finally. you export the gif, add it to tumblr, and then tumblr doesn't like how it looks when you import it and destroys the quality, so you have to go back and try different export settings until it looks the way you want it.
so you do that nine more times. The Entire Process. downloading and reformatting the .mkv, getting the scene you want, clipping it, resizing and cropping it, coloring it, exporting it, and if you're adding subtitles then it's an entirely new process to add on! and don't forget that if you're doing a mix of scenes, you have to color them all depending on their own lighting, so you're basically doing the process again from scratch.
then you try to think of a fun caption. maybe you want to choose a line you feel best summarizes the character or scene. you put that caption through an HTML formatting program so it can be a gradient (the easiest part!), make the caption look pretty, and then tag it and press send.
you've spent HOURS on this process. literal fucking hours. you've been learning how to carefully manipulate the colors to look good, you know what frame rate looks the best, you have all of your settings saved as .psds.
and then someone right clicks, saves the gif (or just copies it) and posts it to twitter with their own funny little caption.
they get 26k likes, who knows how many retweets, a bunch of new follows. they get all the attention for that gif when they put zero work into it. all they did was write a caption and press send.
you got 400 likes and 165 reblogs on your gifset over on tumblr. maybe you get some tags on it if you're really lucky.
so tell me. wouldn't you be a little frustrated, too?
and just in case anyone wants to try and tell me this doesn't happen, you're welcome to compare the stats on this gifset of godzilla versus the repost on twitter.
#so yes it's a very arduous process#and yes we DO have a skillset that no one really acknowledges#part of the reason i stopped making gifs is simply because they kept getting stolen#and i was tired of seeing it#replies!#and i'm not putting this under a read more so yall can read it yourselves
266 notes
·
View notes
Text

⪩﹒⫻ 𝙊𝙑𝙀𝙍𝙂𝙍𝙊𝙒𝙉 𝙂𝘼𝙍𝘿𝙀𝙉 ﹒✿ . . . RP Template ! ─── Free to use (with credit!)
Hi! Its been a while since I had time/motivation to make a new sheet! Since its been so long - this ones a bit simpler, and I used a vertical format instead of a landscape one. This sheet uses a lot of assets and its fully customisable!
Also I was a little silly writing the placeholders for the sheet.

Instructions on how to edit below! - Consider Supporting me too! [ Reblogs Appreciated! ] - [ My Kofi! ] - [ Art commissions! ]
Important Notes :
Most of the sheet is fully customisable - but it uses a LOT of drawings.
[ Important ] Some pictures may be layered! To access objects blocked by another photo/text box - move them aside temporarily - or you can select the blocking item - order - send backward until you can access it and bring it back to the front when you're done!
Please make your own copy of the sheet! Do not send me requests to give you permission to edit the sheet! Making a copy will give you your very own version to edit! pls guys my email-
How to get your own copy [DESKTOP] ・Open the link ・Click on the 'File' button on the top left ・Click on 'Make a Copy' ・Name the file, and click 'Make a Copy' ・You can now edit your own copy!
How to get your own copy [MOBILE] ・Open the link on your Docs app ・Tap on the 3 dots on the top right ・Tap on 'Share and Export' ・Tap 'Make a Copy' and name the file! ・You can now edit your own copy!
How to Edit . . .
Images! - [ DESKTOP ] Right click on the placeholder image and select 'Replace with' and choose your downloaded image. - [ MOBILE ] Tap on the image, and at the bottom there should be an image icon. Tap on that to look for the new image you want to use.
♡ Let me know what you think! ♡
#roleplay#google docs#google docs template#rp template#rp doc#roleplay doc#rp#rp resources#character sheet#google doc templates#google doc#muse template#discord rp template#oc template#docs template#gdocs template#rp doc template#tai post#awesamdude#tai template
478 notes
·
View notes
Note
Hello, I'm your lover. I'm from Thailand. Can I ask you something? I use SRWE program but when I upload photos to social media, my photos are not as clear as yours. I've been worried about this for 7 months. Please advise me. Love you so much.
Hello! Thank you for the kind message! I’ll try my best to help you with the issue. If your photos look blurry when uploaded to tumblr or other socials, here are some tips I can give you:

Save in High Resolution: Make sure you're saving your SRWE screenshots in PNG format instead of JPG. I find that PNG keeps better quality.
Check In Game Resolution: Before taking the screenshot, make sure your game is running at a high resolution (1920x1080 or higher). The better the resolution, the sharper your photos will be.
Use SRWE Correctly: When using SRWE, set the Sims 4 game window to a custom high resolution, like 2560x1440 or even 3840x2160, if your computer can handle it. This will give you really sharp screenshots.
Avoid Compression: Platforms like Instagram and Tumblr can reduce your screenshot quality. You can try:
Uploading PNGs instead of JPGs (like mentioned above)
Using image dimensions recommended by tumblr (1280px wide)
Avoid too many edits or resaves, which can often add blurriness to photos.
Editing Software Settings: If you edit your screenshots, always export at maximum quality. Programs like Photoshop or Canva let you choose which quality to export at.
Have a lovely day and enjoy taking screenshots of your simmies. 🤍
31 notes
·
View notes
Note
hey! I feel a little awkward asking this question, but I really need an answer to it. You sometimes write stories that are quite long in content (10k words or 6k??? It's different for you). And I have a question: how can I write stories that are roughly similar in length, since Tumblr limits my use of simbols. It's a little awkward, since I had to make several parts with headcanons about a yandere! poet (((maybe I'm stupid and don't understand something, but I really need an answer! Thank you in advance for your help
my process is pretty unoptimised (i do all my writing on mobile shush) so do take it with a grain of salt.
I don't like writing directly on tumblr because I've accidentally refreshed the page and lost my work about a bajillion times. Instead, I write all my stuff in my notes app and then convert it to html using this site.
Next, I create a new tumblr post, click on the settings option and choose HTML from the Text Editor options.
Paste your html code and voila, fic exported easily with formatting still in place.


That's it. There's probably a better way to do it, but that's what works for me.
45 notes
·
View notes
Text

THE SIMS 3 TUTORIAL
HOW TO CREATE DEFAULT REPLACEMENT MOD USING CUSTOM MESH & TEXTURE FOR SIMPLE OBJECT
⚠️ Tumblr has 30 pictures limit, so I cannot include too many pictures. If you want to zoom in the pictures, click the pictures to enlarge, or save the pictures into your PC, zoom the pictures on picture viewer or zoom in the pictures on your mobile phone. ⚠️
----------------------------------------------------
I create this tutorial to make easier to follow because there are older tutorials available before but scattered on internet and usually only say "Export to replace s3asc" without explaining how to export the edited object properly.
My method is using TSR Workshop instead of exporting the object using Sims 3 Object Export/Import plug in because exporting to replace the s3asc using that plug in always giving error notification "ERR: Model has 1 groups; original had 0" and cannot be exported.
For beginners who are very new using s3pe and haven't created default replacement mod before, better start from simple object first.
Simple objects I mean in-game object that has single MODL and single texture with no morphs, no GeoStates, no presets, no CAS colour channels, and easily cloned from OBJD on catalogue. Usually as utensils that Sims holding in their hand, not buy/build objects. For example: Pencil, pan, fork, spoon.
----------------------------------------------------
Tools to prepare:
s3oc
s3pe
Milkshape 3D for bone assignment (Version I use 1.8.5 beta, discontinued by its developer, therefore feel free to download the full version with its license key provided).
Sims 3 Object Export/Import 1.01 by Wesley Howe (Milkshape plug-in. Download msS3ObjPluginsV101.rar )
TSR Workshop (Older version for TS3 only version 2.0.88)
TSR Workshop plug-ins for export.import TSRW Object.
3D Program (Blender/Maya/3dsMax)
Editing images software (Photoshop, make sure you have to install .dds plugin by Nvidia. For free software alternative, you can use GIMP with its .dds plugin)
This tutorial will not teach you how to:
Meshing object ❌
Create alpha texture ❌
Change thumbnails in-game ❌
Install programs and plug-ins ❌
This is how I created Chinese chopsticks replacement mod using custom mesh and texture.
In summary, this tutorial has 10 steps:
Step 1. Clone the Object using s3oc
Step 2. Open S3PE to Copy the Original Resource Code and Export the Files
Step 3. Export the Original Mesh as Base Mesh to .obj format
Step 4. Create Your Custom Mesh
Step 5. Bone Assignment & Create Group
Step 6. Create custom Texture
Step 7. Import the .wso of Edited Mesh on TSR Workshop & Export the package
Step 8. Export MODL file from Package saved from TSR Workshop
Step 9. Finalizing in s3pe & Replacing the Original file with Edited File & Correcting the Code As Same As Default Code
Step 10. Test the CC in your game.
-----------------------------------
✳️ Step 1. Clone the Object using s3oc
Before cloning the object, check the Game Folder for in-game object file location. Settings > Game Folders...
Take a look if the Base Game or Expansion Pack for object file you want to clone is in the right folder. For example, my The Sims 3 game are all bought from Steam, so the location is D:\SteamLibrary\steamapps\common\The Sims 3
If you want to clone object from Expansion Pack, make sure input the folder location. For example, the location for World Adventures EP is D:\SteamLibrary\steamapps\common\The Sims 3\EP1

If you are done, close the pop-up box. You can continue click Cloning then choose Normal Object...
Wait until you get the whole catalogue. Click Search...

For example, I clone object from World Adventures Expansion Pack. You can clone object from Base Game or other Expansion Packs as long it is considered as "utensil" that Sim holding on hand. For example: "Pencil" or "Pan"
Search for text: chopsticks
or if you want to clone object from Base Game, search: utensil
Tick check marks for Resource Name, Object Name, Object Desc then click "Search button"
Search result gives you results with name "chopsticks". Here is the object we are looking for: UtensilChopsticks
We need the OBJD file to clone. OBJD = Object Data.

Click "Clone or Fix" at the right bottom. Then you see the next page to determine if you want to clone with renumber or not. If you want to make default replacement, then do not check the Renumber box. Keep it blank.
Tick check box means the s3oc will generate new resource code for new item. Not tick the check means the s3oc will overwrite the same resource code, it is to replace object you cloned in-game.
I am personally a detailed person, so I usually tick as many as I want: tick "Deep clone" "Missing String Tables" and "Include Thumbnail" to include more details. Then click "Start" to proceed.

It will give you file name [CreatorName]_ObjectName_Number
Then save your package file in "DBPF Package" format in your project folder. Always make folder for any file to make everything organized.
✳️ Step 2. Open S3PE to Copy the Original Resource Code and Export the Files
Open S3pe, locate your package file you cloned from s3oc. Find the MODL of Utensil Chopsticks, Right-Click, "Details..."

On Resource Details, click "Copy TGI" to copy the Resource Code. Type, Group, and Instance will automatically be copied on clipboard. Then open Notepad, Right-Click to "Paste".
Click GRID on bottom of the s3pe (I mark it red on picture), it will give you pop-up box with Data Grid. Click "Resources", it will be highlight blue and there's 3 dots button appeared on the right side. Click the 3 dots button. It will give you TGI Block List Editor.
Inside MODL's TGI Block List Editor only has IMG. You may wondering why, but that's how the game coded. Type, Group, Instance of _IMG inside TGI Block List Editor should be the same as _IMG on the package.
Copy the TGI, Group, Instance to your Notepad.

After you copied code of MODL, do the same for the texture image (_IMG), but only copy the code from Resource Details. You cannot edit TGI Block List Editor for _IMG as the Grid button for _IMG is greyed out.
The main task is the code of your edited mesh and texture should be the same as the code you copied now from original package you cloned with s3oc.
Keep the code on notepad. You will need this code later.
Export the MODL file. Right-Click, "Export to s3asc". The file appears in long string such with name for example: S3_01661233_08000001_B619DB2238C3430B%%+MODL_filebase
Do not rename the file. Save.

Export the texture file. Right-Click "Export > To File..." The file will be saved in .dds format. Do not rename the file. Save.

✳️ Step 3. Export the Original Mesh as Base Mesh to .obj format
Open Milkshape. Import the s3asc file you saved before.
More steps click spoiler tag "Read More / Keep Reading" below
File > Import > Sims 3 Object Import v 1.01 by Wesley Howe

Locate the s3asc file, then the original chopsticks mesh appears.
Click the "Joints" tab. It has 4 codes. Check box "Draw vertices with bone colors" It will show Bone Assignment colors on the original mesh. Yellow on top chopstick and light blue on bottom chopstick. The colours are to make the object has rig and movement following the Sim's interaction.

Take a look at the 4 codes on Joints Tab. You can play around to see which colour of the code will appear, after that copy paste the code to Notepad to make it easier to comprehend.
Click Select from Tools menu, Select Options: Face. On "Right/Left/Top/Bottom 2D View", Left-click make selection of one part of chopsticks. While the part of object being selected (Red), click Joints then Choose "Assign".
0x96239247 --> Yellow 0xFEAE6981 --> Purple 0xCD68F001 --> Light Blue 0xD0DECA8E --> Red
Your edited mesh must have the exact same Bone Assignment colour later. Check again if the code and colour are correct.

You can save object mesh as .obj to other 3D software such as Blender or any other 3D software.
✳️ Step 4. Create Your Custom Mesh
Use the original .obj as base model. While you can create longer mesh or any edited version as you wish.
Make sure the scale and position of the edited mesh is same as base original mesh, because the edited mesh will be used on Sim's hand.

If you are done editing the mesh, export the UVmap.
You can export the uvmap in higher resolution, as long as it is Power of 2. 64x64, 128x128, 256x256, 512x512, 1024x1024, 2048x2048, 4096x4096. I export in 1024x1024 pixels to make the size of texture larger and have more details.
Then export the mesh object in .obj format.
✳️ Step 5. Bone Assignment & Create Group
Open Milkshape. Import the original mesh.
Check the Groups Tab. Original mesh has 1 group, "group 00". Group 00 means it is the main mesh. There is no shadow beneath the object.

Import the edited mesh as .obj file.

My edited mesh has one single name "default" name on the Group Tab. While edited mesh may have a lot of file name scattered on Group Tab. Regroup the file name to simplify your edited mesh into one single name. Select > Regroup.
The main task is replacing the EA's original mesh with your edited mesh.
Before you delete anything, you must do Bone Assignment first to the edited mesh you created.
Your edited mesh does not have Bone Assignment, so it appears white.
Remember the 4 codes you copied earlier in Notepad.

Copy Bone Assignment from original mesh to your edited mesh.
This case, your want to Bone Assign Yellow colour.
Select > Face to select one part of chopsticks of your edited mesh. On Joints Tab, double click the appropriate code 0x96239247 in blue highlight then the code box on the right side of "Rename" will appear 0x96239247. Make sure the code is correct. Then you can click "Assign".

Your edited mesh will appear in Yellow colour. Then do the same for another part of chopsticks.
Select another part of chopsticks of your edited mesh. On Joints Tab, double click the appropriate code 0xCD68F001 in blue highlight then the code box on the right side of "Rename" will appear 0xCD68F001. Click "Assign".

Your edited mesh will appear in Light Blue colour.
Then what's the other code for? With colour purple and red?
Leave them. Let the codes have the same exact codes as appear in original mesh and let the colours only assigned Yellow and Light Blue. The colours are to determine rig for interaction in-game, which only use Yellow as upper part of chopstick and Light Blue as bottom part of chopstick.
You can safely delete the original mesh with name group00 until it remains your only your edited mesh.

Rename your edited mesh to group00. Type group00 on the box then click "Rename" on the left side.

Export to TSRW Object in .wso format. .wso is format with bone assignment on object attached.

Save your .wso in your project folder.
✳️ Step 6. Create custom Texture
Import original texture you exported from s3pe to your editing image software.
Look at the original texture made by EA. 32x64 pixels. It is very low resolution, blurry and stretched, because the texture should be compressed as low as possible by game designer. As player you want it has higher detail to look realistic as possible and your PC of course can handle high resolution content, sure you can make the resolution much higher than EA's.

Import the UVMap you saved from 3D software. For example, UVmap I imported has 1024x1024 resolution. Add your custom texture. Then save it to .dds format in the same name as original texture. Save in separate folder, name it "Edited Texture" to keep it separated from original texture.
✳️ Step 7. Import the .wso of Edited Mesh on TSR Workshop & Export the package
Open your TSR Workshop.
Create New Project > New Import >Next...

Then Browse original mesh by EA in package format in your project folder.
On Open file box, you cannot see .package file because the filter is .wrk (TSR Workshop Project). Choose the .package dropdown.

Then you can see .package file.
Open the .package. After the file is located, then Next. On Project Details I usually skip without giving name of Project Name and Title. Next.
You must have seen green land with white blank sky.
Where's the mesh? It is actually there... just being zoomed in too close. You need to zoom out by scrolling down mouse.
You can see the original chopsticks mesh by EA. You can save the project file in .wrk format. After you save the file, import the .wso of your edited mesh. Mesh tab > High Level detail. Click green arrow folder icon to import. Then your edited mesh will appear replacing the original EA mesh.

As you see, the texture is messed up because the texture is still using original EA's texture. But then you check Textures tab and it has blank dropdown...
I cannot change the texture on this TSR Workshop!
Don't worry, we can replace the texture on s3pe later.
No need to change anything other than importing mesh. Click Edit > Project Contents to save as package.
You will see pop up box with number or files DDS, FTPT, LITE, MODL, OBJD, OBJK, etc. Export > To. package. Give name such as "EditedChopsticks_TSRW"

✳️ Step 8. Export MODL file from Package saved from TSR Workshop
Open S3PE, File > Open package "EditedChopticks_TSRW" that you saved from TSR Workshop.
Export MODL. Right-Click, export. It gives you file name with [StringOfNumber] .model .
Save it on project folder. Keep it organized and separated from original MODL. Name the folder "Edited MODL". Do not rename the file.
✳️ Step 9. Finalizing in s3pe & Replacing the Original file with Edited File & Correcting the Code As Same As Default Code
Open s3pe, File > Open original package that you cloned from s3oc. [CreatorName]_ObjectName_Number
Find the MODL. Right-Click > Replace...
Locate to your edited MODL with filename .model .
Then click Open.
The original MODL of the package should be replaced with your edited mesh.
Do the same for the texture.
Locate to your edited texture with filename .dds
Then click Open.
The original texture of the package should be replaced with your edited texture.
Take a look at MODL's Type, Group, Instance. It has the same code as original MODL in the original package cloned with s3oc (because it has been replaced)
Don't forget to see the code inside TGI Block List Editor.
Repeat step 2 how to check the code. Right-Click on MODL/IMG > Details... and click GRID > Resources > TGI Block List Editor.
The Type, Group, Instance of the _IMG are different compared from IMG from original package clone, which means that is the evidence of edited mesh replaced the original.
Rename the Instance with default/original Instance you copied on notepad from Step 2. Type, Group, Instance should be the same as default/original Type, Group, Instance.

Open notepad with resource code you copied from Step 2. Make sure the Type, Group, and Instance are all the same.
If the codes are the same, then your edited mesh and texture will overwrite the default mesh and texture with the same code in the game. Save, Commit, Save the package.
Check again if the texture is replaced properly. Right-Click on _IMG > ViewDDS.
ALTERNATIVES!
Yes, you can delete unwanted files in your edited package, to keep the package clean. Simply Right-Click>Deleted.
The only files needed in package are: MODL, _IMG, _KEY
They are the only files with your edited mesh/texture including codes to overwrite the default codes.
You can Start new fresh blank s3pe. Right-Click>Import from file...
Locate your edited MODL and _IMG (texture) file.
On Resource Details box, tick mark "Use resource name" > OK.
Make sure all the Type, Group, and Instance of MODL and _IMG including in the TGI Block List Editor are all the same as the code in original package.

Save the package.
✳️ Step 10. Test the CC in your game.
Put the package to your CC folder in your The Sims 3 document folder to see if the CC is working or not.
If the CC is working as your intended, with your custom mesh and texture, then test the animation. Are the chopsticks animation working as the same as original EA's? If the animation are working well too, then congratulations!

Your default replacement are working. Give applause to yourself. 👏
-------------------------------------
QUESTIONS!
Q:
Can I use this tutorial for making default replacement for buy/build object?
A: This tutorial covers basic method of using TSR Workshop and replacing the default codes (Type, Group, Instance), so you will understand the basic principle of doing default replacement mod.
Keep in mind that different object has different case. Buy / build object has MLOD (not just MODL) more than one, texture images more than one, has presets, and CAStable colour channels.
The TGI Block List Editor for buy/build object has a lot of codes, so have to spend a lot of time to do trial-and-error to make the default replacement working properly, because a lot of times the texture doesn't work (still using default EA's texture), or when the object appears right with your edited mesh and texture, after you choose the presets, the object reverts back to your edited mesh with default EA's texture.
Q:
Help! The texture is black! / still using same EA's texture when tested in the game!
A: The texture codes must be not the same. Check the Type, Group, Instance of _IMG. Do the codes are the same like codes in original package? Check the TGI Block List Editor for MODL, is the _IMG inside has the same Type, Group, Instance as in original package.
Q:
Help! The object disappears when tested in the game!
A: You must be replacing OBJD in your package. Do not replace OBJD. Just MODL and texture only.
#tutorial#the sims 3#the sims 3 tutorial#thebleedingwoodland#the sims 3 default replacement mod#modding#s3pe#s30c#TSR Workshop
120 notes
·
View notes
Note
Would you be able to share some of your gif making process/programs you use to make them? They look great! 💕
Omg thank you,,, 🥺💕💖💕 And yes ofc! I'm going to write down everything I can think of about my gif making process but if I forget anything/you have questions about something specific let me know! ✨
(Long post ahead)
Emulators & Recording
I use different emulators and recording programs, depending on the game I want to play/record:
DesMuMe: This is the one I use for DS games, and it comes with a neat “Record AVI” feature under the “File” tab. Just click it, choose a location for the file and click OK (make sure the Compressor is set to “Full frames (No compression)”). Recordings have a limit of 2 minutes/2GB, but when it reaches it, the program will automatically create a new file and keep recording until it reaches 2 minutes, and the process will repeat (the next recordings will have “part_X” in the name file). When you’re done recording, just lick on File > Stop AVI. Also! The recordings will always have the original resolution. My DesMuMe is set to be 2x its size with a gap between the screens, but all recordings are 256x384 pixels with no gap.
VisualBoyAdvance: Like DesMuMe but for GBA games. Also has a recording feature in Tools > Record > Start AVI recording. The resolution of the video will be that of the original game but I think there’s no limit on how long the recording can be. I’d still recommend stopping and restarting the recording every 5 minutes or so.
Other games & OBS Studio: For 3DS games I use Citra, and Dolphin for Wii ones. They both have Recording features but I don’t use them because they create weird files. Instead, I record them with OBS Studio. Open the program, click on "Start Recording" and then on "Stop Recording" when you’re done. Pretty simple, just remember OBS records your screen so obviously if your emulator window is minimized it won’t record it. You can change your OBS settings to only record the emulator window but I’m too lazy to tinker with OBS so I just record the whole screen lol. There’s always a slight loss of quality with OBS. If you’re recording games with 3DS models then it won’t be too noticeable, but I do not recommend using OBS for pixel/pixelated games like Nintendo DS and Game Boy ones.
Misc: Before OBS, I used to use Camtasia Studio 8. Also does the trick, but instead of saving a .mp4 file it creates its own type of file and it requires you to manually export it as a .mp4 (it's a hassle). It has some editing features too, which OBS does not as far as I can tell. Also, besides DesMuMe I have MelonDS. Highly recommend it if you need to use the multiplayer option (to trade pokemons between games for example) and most importantly for the better mic feature (you WON’T get past the Nintendogs tutorial on DesMuMe). Also the 3D model graphics are of higher quality, but it doesn’t have a recording feature so you will have to rely on OBS and as I said it lowers the quality.
As for video file types, both .avi and .mp4 are allowed in Photoshop. However, .mkv (mostly used for TV shows and movie files) is not, so if you want to edit, say, an anime episode in that format you’ll need to convert it to .mp4. I use Format Factory for that, although I think here’s a slight quality loss.
Here's a comparison of a pixel game recorded with OBS vs with DesMuMe. It's tiny but it will have you shaking the screen violently when you notice it.
OBS recording vs. DesMuMe recording
Do not delete or move the video file until you’re done making gifs of it. Even if you save the file as a .psd, you will get an error message if the video file is gone from its original location and you'll have to start over again.
Editing (I)
I exclusively use Photoshop 2020. If you use CSP, GIMP or other editing program you’ll have to find the equivalent features or look at other tutorials, because I’m only familiar with Photoshop. Other PS versions should have either the same or similar features. Here are the steps I usually follow (names might be wrong because my PS is in Spanish “OTL):
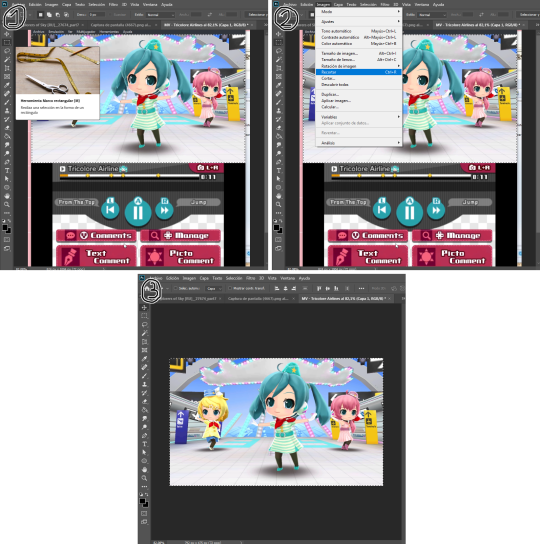
Importing: Drag and drop your file into PS. You should have your Timeline window on the bottom part. If you import a .mp4 or .avi file you should get the Video Timeline, which is what we will work with. If you export a .gif you will get the Frame Animation Timeline; in that case you need to convert it to a single timeline. Click on “Convert to Timeline Video”, then select all the layers (click on Layer 1 and then hold Shift+Click on the last layer) and then right-click on the last layer > “Convert to Intelligent Object”. This is what your PS window should look like for both cases:
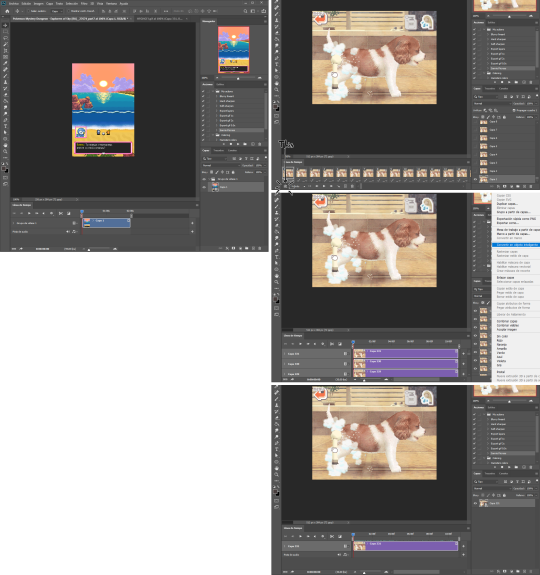
avi/mp4 file (has a Video Timeline) vs. gif file (has a Frame Animation Timeline)
Cutting and resizing: Often your file will either be the wrong size or have unnecessary parts. To resize your video, go to Image > Image Size (NOT Canvas size) and change the resolution. For good gif quality, the image resolution should always be 540 pixels wide (Tumblr’s image size), height doesn’t really matter. PS will change the height proportionally if you change the width. So, for example, a 1440x1080 video will be 540x405 after the conversion. Similarly, you can crop out parts with the Selection tool + Image > Crop. Making pixel games bigger requires a different method (more on this later).
Cropping vs. Resizing
Cutting the timeline: Your gif will likely be too long, or you might need to stitch two parts together. In the Timeline window, move the vertical red line to the part where you want to make the cut. You can precisely move frame by frame with the arrows next to the play button. You can also zoom in and out the timeline with the slider at the bottom. Once you’ve placed the red line on the part where you want to make a cut, click on the scissors. You’ll get two layers – delete the one you don’t need and repeat until your gif is the right length. Similarly, you can click on either end of the timeline and drag it left and right to extend/reduce the length, but it’s less precise. I recommend moving the gif layer out of the video group in the Layer window, especially if you’re going to stitch parts together or add new layers that aren’t Color adjustment layers (like your watermark). If you do so, you’ll notice that each layer occupies a different line in the timeline, while if it’s in a group, it will all be in the same line (this means that all layers will be one after the other, you won’t be able to overlay them).

Cutting the timeline (1-3) + Moving the gif layer out of the video group (4)
Color adjustments: The fun part! You can get hella crazy with this one. If you want to go for really fancy stuff, I recommend checking out @/usergif, they have lots of tutorials and gifsets you can use as inspiration. I am however a simple man and will mostly use the same tools: Sharpen, Hue/Saturation, Gradient Map and Curves.

Soft sharpen in the Filters tab + Curves, Hue/Saturation and Gradient Map in the Layer window
Editing (II)
Can't make a bullet list of a bullet list so here's each adjustment layer explained. Note that this part is very personal so feel free to tinker with the settings for each tool until you get what you like:
Sharpen: Used only with non pixel media, aka for 3D models and series/movies. It makes the image look sharper. You'll notice that the video layer can have two icons: a movie film or a folded paper (in the "Import" section, the Pokémon gif has a movie film icon, while the converted Nintendogs gif has a folded paper icon). If your layer has the former, the sharpen tool will only be applied to one frame. To avoid that, right-click on the layer > Convert to intelligent object. Resizing the image will also do the trick. Filters are always applied to the layer, they don't create a new one (this is what the rest of the following adjustments will do). As for settings, this is what I usually have:
Two types of Sharpen settings (original on the left)
Hue/Saturation: Changes both the global colors and specific hues. To do the latter, open the menu right above all three sliders (by default it's set to "All") and then choose the color you want to change. Be careful! Sometimes you might accidentally edit the wrong hue, for ex a bluish green if you are editing blue hues. If you want to see what parts of the gif you're targeting, set the saturation to the max. Colors play a heavy role on gif size: the more diverse and brighter the color palette, the bigger the file. Gif size will be the ruin of your gif making process, so don't go too overboard with this. More on gif size later, but for now, I recommend "unifying" the color palette (aka making some hues similar).
Two examples of Hue/Saturation adjustments (Original above)
Gradient map: Adds a gradient overlay to the image. When you open the Gradient Map window, click on the gradient and you'll be able to edit it or create a new one. To do so, click on the tiny boxes with colors (only the lower ones, the upper ones won't work), then on the slightly bigger box to change the hue. To add a color, click anywhere below the gradient; to move the colors around, drag the tiny boxes and move them, and to edit the limit between each hue, drag the tiny diamond. The way gradient maps work is by editing the colors from lighter (right) to darker (left). So if you have blue on the right of the gradient, light hues will be blue, and if you have pink on the left of the gradient, dark hues will be pink, with mid tones being a mix of pink and blue (either purple, or bluish purple or pinkish purple). The image will look weird when you add a gradient map, but don't mind that for now. Just create the gradient you want and click OK. Now, select the new layer that has been created and play with the blending modes and the opacity of the layer until you get something you like. For blending modes, I usually go for the ones in the second and third sections. To edit either the Hue/Saturation layer or the Gradient Map one, click on the black and white icons (left to the mask, aka the white box) in the Layer window.
Video showing how Gradient map works

Two examples of Gradient maps, with a readjustment of the Hue/Saturation layer (Original above)
Curves: Edits the light, dark and mid tones. Click any point in the curve/line and then drag it around to see what it does. You can make more than one point in the curve. Afterwards, change the blending mode and the opacity.
An example of a Curve and the same example with the Curves layer at 40%
Gaussian blur: Sometimes I add a blurry/fuzzy effect to certain gifs. To do so, duplicate the gif layer (right-click > Duplicate layer), then, while selecting the new layer, go to Filters > Gaussian blur and pick a small numer (0,4-1). Click OK, set the blending mode of the new layer to Darken and lower the opacity.
Two examples of images with Gaussian blur applied (Original above)
Watermark: Add a watermark to your image. Click on the Text tool, create a text box, pick the font, the size, the color and the placement, and then click the ✔ button. Change the blending mode and opacity of the text layer. Personally, I have a .png image of my watermark that I just import to the gif and then edit, instead of creating a text box everytime. Regarding watermarks, I get that they are annoying but it's going to be far more annoying when someone reposts your gif without credit or crops the watermark out. Tumblr sucks when it comes to reporting this kind of stuff and you deserve to have your work respected (you've spent time and effort on this!!), so I highly recommend putting a watermark on your gifs. If you want to avoid having someone crop it, put it towards the middle of the image and not in a place that can be edited easily. Also, I usually save gifs without a watermark and add it afterwards.
Red: Danger zone, can get cropped easily. Blue: Also Danger zone, can be edited out. Green: Too obtrusive. Yellow: Perfect place, can't be edited out and it's not on the main focus of the image
Exporting
This is the "hell on earth" part. To export a gif, go to File > Export > Save for Web (Legacy), then once it loads (may take some time), play the gif a couple of times to make sure it looks good and save it. These are my settings:
Settings for the Save for Web (Legacy). You'll only need to tinker with the settings on the right.
However, there's one thing to keep in mind: Tumblr has a size limit of 10MB per gif, meaning your gif won't be uploaded if it's larger than that, and you'll be surprised how easily you can surpass that limit. Also, gifs can't be longer than 500 frames, aka 8 seconds (to check the duration of your gif, zoom in in the Timeline Window, you can see the seconds at the top). Here are some pointers regarding gif size:
Pixel games and anime have a smaller size than life-action and 3D models: This is because the former have limited color palettes and the latter has way more colors. For example, Pokémon Mystery Dungeon or Sailor Moon will rarely pose problems, but Arcane, Breaking Bad, Nintendogs or Baldur's Gate 3 will.
The more complex the animation/motion, the bigger the size: This is because complex animations/motions, like a fight, have more unique frames than, say, someone moving their head up and down and nothing else, and that means there's more information to store.
The longer the gif/the bigger the resolution, the bigger the size: Kind of self-explanatory, longer gifs or gifs with big resolutions means more information stored in the file.
Bright and diverse color palettes increase the gif size: As explained in the first point, more colors means more information and thus a bigger file size.
The more it exceeds the limit, the bigger the changes you'll have to make: If it's 10.5MB you can get that number down easily. If it's like 20MB, you might need to cut the gif in half.
How do you solve this? There are a couple of methods:
Make the gif shorter: In the Timeline window, cut parts of your gif until it's short enough. If you don't want to delete certain parts, you can divide your gif in two separate ones.
Make the colors less bright/unify the color palette with an Hue/Saturation layer: If you haven't done this in the editing process and your gif exceeds 10MB, it's time to edit the gif colors.
Reduce the color palette: In the Save for Web (Legacy), you'll see that there's "Colors: 256" on the left (marked in green in the screenshot). 256 is the max amount of colors you can have, but you can reduce it. PS will automatically get rid of colors that have a smaller presence first (for example, in the anime gif above, if I reduced the colors it would get rid of the reds and magentas before the yellows or the blues).
Change the settings in the Save for Web (Legacy) window: Besides the color palette, there's a setting on the right side, marked in red in the screenshot above (the first one). I have it set to "Adaptable", which is the highest setting, but you can change it to "Perceptual", "Selective" or "Restrictive". This will lower the quality and thus the size, but sometimes it might mess up the gif. Similarly, you can change the setting below that one (set to "Motive" in the screenshot) to "Noise", "Difusion" or none at all to change the quality and size.
Optimize the gif: I use ezgif.com for this. Click on "Optimizer", upload your gif, make the Compression level smaller, click on "Optimize" and then save your gif. This will inevitably lower the quality, so I usually don't go lower than 35. Also, try to get your gif right below the 10MB limit, so if a compression level of 20 gets your gif to 9.5MB but a 15 gets it down to 9.9MB, choose 15. ezgif also has other cool features like one to slow down your gif's speed, so check it out!
Don't make gifs of media that causes problems: If you regularly find yourself being frustrated with gifs of X media exceeding the size limit, you might need to find something else. It sucks to think that you might not be able to make gifs of your favourite piece of media, but gif making should be fun, not ruin your day. Of course, it's up to you to decide how much effort you're willing to put on a gif, but don't overexert yourself either.
The Save for Web (Legacy) window is also where you can make your gif bigger in the case of pixel/pixelated games like Pokémon Mystery Dungeon or Nintendogs. In the "Image Size" section, set the quality to "Nearest Neighbor" and the percentage to 200% to double its size (it will be somewhat close to 540 pixels wide). You can make the gif three, four or even more times its size wih this method.
Closing thoughts and results
Managing a gif blog would require a whole new post with some advice so I'll leave that out for now. There are other things I've also left out like actions (highly recommend learning about them) but these are the basics methinks. Again, if you have any questions, my ask box is open ✨
And here are the gifs with a comparison to the original 🎉
Sharpen, Hue/Saturation, Gradient map and Gaussian blur

Sharpen, Hue/Saturation, Gradient map, Curves and Gaussian blur
Hue/Saturation and Gradient Map
#ysiposting#whew this took a while#now if you'll excuse me I'm going back to studying for exams. regrettably
34 notes
·
View notes
Note
How do you make gifs?
Hi! The process I use is done completely online using several websites (which will be attached here). In fact my process probably makes things a bit more complicated than it really should but tbf I don't know how else to do it pff
First of all, you'll need to download whatever you want to make gifs from in a mp4 format. If you're grabbing a video off of YouTube there are plenty of YouTube to mp4 websites available online. However, if you were to download from a different website (such as Newgrounds, for example) then you'll likely have to install a browser extension to download videos. For example, since I use Firefox I use the Video DownloadHelper extension.
Once I have the video I need I drop it into Canva, though any video editing website/software works. All you need is a program that allows you to crop videos and export them in a gif format. If not then you can export the cropped video in an mp4 format and use a website/program that allows you to convert mp4 files to gif. I recommend the following sites: Ezgif CloudConvert FreeConvert
However, I'm going to use Canva for this tutorial since it's how I work.
First of all, you gotta upload your video to Canva (it will appear beside the blank 'canvas').
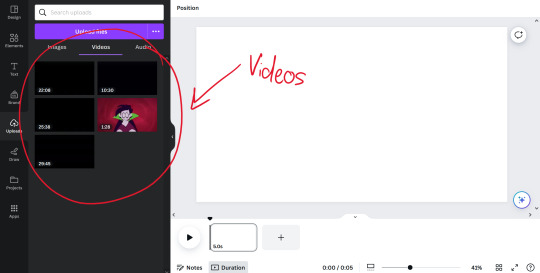
Once you've uploaded the video(s) you want to make gifs with, all you need to do is drag and drop them onto the blank canvas. It should automatically fit it to fill the whole canvas if you drag the video to the edge of the canvas instead of the middle.
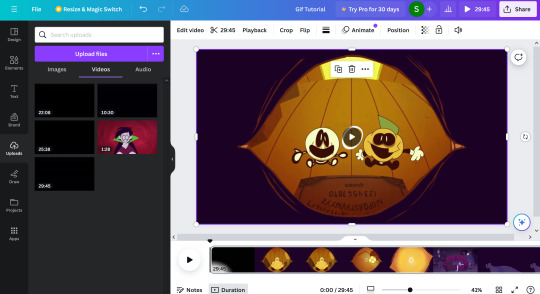
All you have to do from here is figure out which part you want to crop out! The great thing about Canva (and some other programs, though not all) is you can search through the timeline frame by frame with the arrow keys to make sure you get the exact part you want (just make sure you click on the timeline before you start touching the arrow keys, because if the video is still selected you'll just end up moving the video across the canvas pixel by pixel).
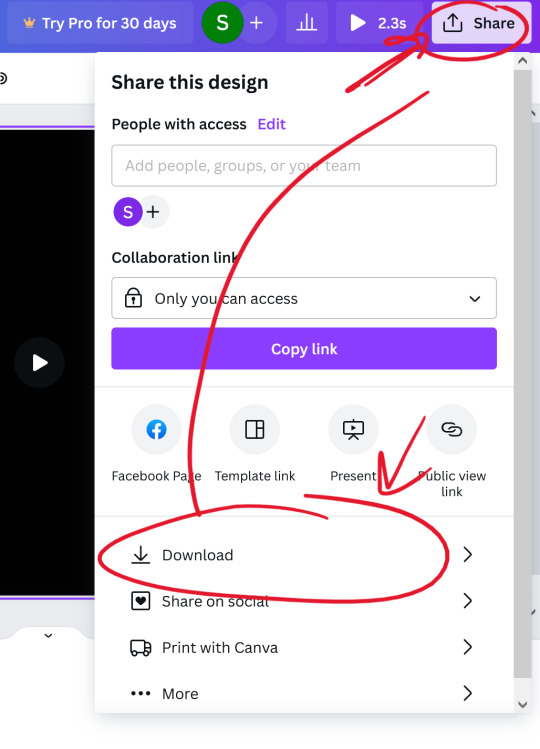
Once you've cropped out the part you want, all you have to do is export it as a gif. You do this by going to 'share', 'download', and choosing gif under the 'file type' dropdown.

(Once you select the gif option, don't worry about adjusting the size of the video.)
Once you have your gif you can stop there! Unless you want to crop the gif to focus on a specific character or section of the scene, for example. If you plan on making a gifset just remember to keep the same aspect ratio for each gif.
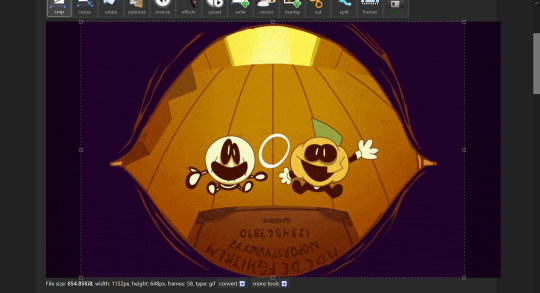
I use Ezgif to crop my gifs. It makes the process extremely simple and has several presets for the aspect ratio too!!
And yeah! That's about it! I hope this tutorial makes sense,, it's my first time making one qwq but if you have any questions just lmk!!
11 notes
·
View notes
Text
Can I talk shop for a second?
For those of you out there who edit video in Premiere Pro and/or do podcasts, if you're not using Adobe's new text-based editing feature, you are reeeeeeally missing out! It's new, so you're not completely missing the boat, but definitely check it out as soon as you can.
Their tagline for it goes something like editing a video is now as simple as editing a text document, and it's so true! Being able to see the words spoken and to search through the transcript makes things 5000x easier and quicker! If you're a podcaster, and like me you use a lot of filler words and pause a lot, you don't have to listen to the entire to find them and manually delete. Whenever you see [...], that's a pause, and if you hover over it, it tells you how long it is. You can just right-click and ripple delete it. Same thing with all the filter words. You can search for them and delete them, and it makes the cut and deletes them right on the timeline. It's freakin genius! Try it! It'll be life changing.
[another pro tip under the cut]
I learned this at the Adobe MAX conference last month, but you can use the video transcript to create Closed Captions! Just click on the Captions tab and then Create captions from transcript.
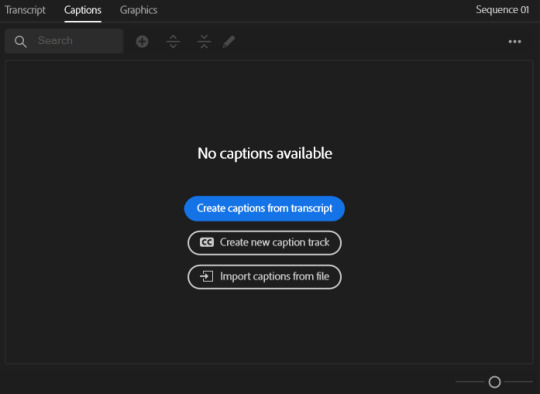
From there you can edit the caption length and stuff to make sure they fit and display on the screen well. When you're done, simple export the file to your file type of choice! You can export as a plain txt file or some caption specific format; that depends on where you're uploading. YouTube likes the CEA-608 preset, and exporting as a txt file works perfectly fine. Instead of having YouTube automatically set the timings, choose upload file with timings.
I hope that helps somebody!
12 notes
·
View notes
Text
Five Tips to Use Skype Call Recorder for Mac & Record Video from Screen
In today’s digital-first world, recording Skype calls and screen videos has become more than just a convenience—it’s a necessity. Whether you're a business professional conducting virtual meetings, an educator delivering online lessons, or a content creator looking to repurpose conversations, having the right tools to record Skype calls and screen activity on Mac is essential.
In this blog, we’ll walk you through five simple yet powerful tips to use a Skype call recorder for Mac and effectively record video from your screen—without technical headaches or costly software.
1. Choose the Right Skype Call Recorder for Mac
Before you hit that record button, the first and most important step is choosing the right screen recorder that works seamlessly on Mac. Not all tools are built the same—some offer high-quality video and audio output, while others are bloated with features you may never use.
Flonnect is a great choice for Mac users. It works directly from your browser with no software installation required. You can record Skype calls, screen activity, and even include webcam and audio—all in one simple click.
✅ Pro Tip: Choose a recorder that offers both internal and external audio capture, so you get both sides of your Skype conversation clearly.
2. Test Your Audio and Video Settings Before You Start
One of the most common mistakes users make when recording Skype calls or screen videos is not checking their settings. Before you start your call or screen recording session, take a moment to:
Select the correct microphone and speaker
Adjust your webcam angle and lighting
Test the recording quality with a quick trial run
This ensures that your recording will be clear, professional, and usable. Poor audio can ruin even the most informative conversation.
✅ Pro Tip: Always keep your Mac’s system sound and microphone settings aligned with the screen recorder you are using.
3. Use Screen Region Selection to Focus on Key Content
When recording video from your screen, you may not want to capture the entire display—especially if you’re sharing sensitive data or multiple open windows. Most advanced screen recorders (including Flonnect) allow you to select a specific region or window to record.
This keeps your recording clean and distraction-free. For example, you can focus only on the Skype call window instead of recording your entire desktop clutter.
✅ Pro Tip: Use “Window Capture” if you’re only recording Skype. Use “Full Screen” when demonstrating workflows or tutorials.
4. Enable Webcam Overlay for Personal Connection
If you're recording a Skype interview, webinar, or a tutorial, consider enabling the webcam overlay. This allows your face to appear in a small corner of the recording while the main screen content stays visible.
This technique is especially effective for:
Teachers explaining concepts visually
YouTubers sharing reaction content
Professionals giving walkthroughs or demos
Adding your webcam creates a human touch and boosts engagement—viewers are more likely to stay tuned when they can see your expressions and gestures.
✅ Pro Tip: Position your webcam window where it doesn’t block any important part of the screen. Bottom-right corner usually works best.
5. Save and Export Your Recordings Efficiently
Once you’re done recording your Skype call or screen activity, it’s crucial to save your file in the right format and optimize it for sharing. Many recorders will let you export your video in common formats like MP4 or WebM, which are ideal for uploading to YouTube, sharing via email, or embedding on a website.
Make sure to:
Rename your file with a descriptive title
Save it in a dedicated folder for easy access
Trim any unnecessary parts before sharing
✅ Pro Tip: Use basic editing tools (Flonnect offers simple trimming) to remove silences, lags, or off-topic discussions.
Final Thoughts
Recording Skype calls and screen videos on Mac doesn’t need to be complicated. With the right tool and a few simple tips, you can create high-quality recordings for meetings, tutorials, or online content.
Flonnect offers a powerful, easy-to-use solution that works directly from your browser—no installations, no clutter. Whether you're recording a business call or capturing your screen for a tutorial, Flonnect makes it easy, fast, and reliable.
👉 Start recording with Flonnect today and never miss a moment that matters!
0 notes
Text
check list
✅ Final Deliverables
Final comic with the correct number of pages/panels
Cover page included
500x500px thumbnail
Saved and exported in appropriate file format(s) for upload
All pages meet dimension requirements
✅ Story & Script
Storyboard/script written out clearly
Ensure no erotic, pornographic, or violent/bloody content
✅ Artwork Production
📘 Comic/Manga Format:
Page Count: 8–16 pages + 1 cover (Total: 9–17 pages)
OR
📱 Webtoon Format:
Panels: 40–80 panels total
🎨 Artwork:
Choose between black & white or colour
Choose traditional or digital tools (no restriction)
Minimum width: 800px (Recommended: 2400px width for best quality)
Pick a reading direction (left to right, right to left, scroll )
Create a 500x500px thumbnail for the project sheet ▸ You can crop this from a page instead of making a new one
0 notes
Text
My Story: How I Launched a Successful Effervescent Wellness Brand with Herbal Hills
I still remember the day I decided to start my own wellness brand.
I wasn’t from a manufacturing background. I didn’t have a big team. But I did know one thing—consumers were bored of the usual health capsules and powders. And I knew I wanted to do something different, something modern.
That’s when I discovered effervescent tablets.
You know, the kind you drop in water and watch fizz? Not only do they taste great, but they also make taking supplements a lot more fun, especially for younger users and busy professionals. I saw a big opportunity.
But I didn’t know how to manufacture something like this—or where to begin.
Why I Chose Effervescent Tablets Over Powders or Pills
Let’s be honest—nobody enjoys swallowing big tablets or scooping bitter powders every day. I wanted my brand to stand out with a supplement that was:
Easy to consume
Fast to absorb
Great in taste
Ideal for e-commerce
And backed by something trustworthy like Ayurveda
That’s when I came across Herbal Hills—a well-known ayurvedic third-party manufacturer in India. And honestly, things changed for me from that point on.
The First Call with Herbal Hills
I explained what I was trying to build—an Ayurvedic wellness brand with clean-label, modern products that actually work. I told them I wanted effervescent tablets but didn’t want to compromise on quality or branding.
They didn’t just say “yes” and send a price list.
Instead, they walked me through their R&D process, showed me samples of existing effervescent products, and even discussed which wellness categories were trending.
That’s when I learned they already had ready formulations in effervescent format for:
Men’s energy and stamina
Women’s daily wellness
Green nutrition and detox
Skin, hair, and nail beauty
All of it sounded perfect. And all I had to do was brand it as my own.
The Products I Launched (And What Worked Best) I started small, launching three products with their support:
Men’s Vitality Tablet (L-Arginine + Shilajit + Ashwagandha)
Green Superfood Detox Tablet (Spirulina, Wheatgrass, Moringa, Enzymes)
Vegan Collagen Beauty Tablet (Biotin, Amla, Supergreens)
Herbal Hills helped me adjust the flavor, choose packaging, and design the labels. Their team was always available for suggestions. I didn’t feel like “just another client.” I felt like I had a partner.
They also provided documentation for Amazon listings, export support, and even helped me with marketing content.
What Happened After Launch Within 30 days of launching on Amazon and my D2C site:
My green tablet hit the “frequently bought” list in detox
I got hundreds of organic views on reels and demo videos
Repeat orders came in within 2 weeks
I got inquiries from 2 international resellers
And honestly? I did all this without a big budget or office space. It was just me and Herbal Hills.
Why I Recommend Effervescent Tablets (and Herbal Hills) Effervescent tablets are the future of daily health. They are not only easier to consume but they also offer faster absorption. Plus, they look great on social media, are easy to sample, and get people talking about your brand.
If you’re thinking of launching your own Ayurvedic brand—start here.
And if you need a manufacturer who won’t just make the product but guide you through every step of building a successful business, Herbal Hills is the partner I recommend.
They’re not just another ayurvedic product manufacturer—they’re innovators. And more importantly, they care about your success.
Final Thoughts You don’t need to be an expert. You don’t need a massive budget. You just need the right idea and the right team behind you.
I launched a successful wellness brand with Herbal Hills—and if you’re serious about launching your own effervescent product line, you can too.
Ready to Start? Reach out to Herbal Hills. Request samples. Ask questions. Start small.
And build something big.
Herbal Hills – A trusted name in effervescent and Ayurvedic supplement manufacturing.
#ayurveda#manufacturer#wellness#business#ayurvedic#branding#privatelabel#ecommerce#entrepreneur#digestive health#effervescent#ayurvedic manufacturing company
0 notes