#SD Card file organization
Explore tagged Tumblr posts
Visit Tumblr Blog
Explore Tumblr blogs with no restrictions, modern design and the best experience.
Last Seen Tumblr Blogs


Fun Fact
Post activity is at the highest at 4:00 pm EDT; notes peak at 10:00 pm EDT.
Text
Mastering SD Card File Management: A Comprehensive Guide for Accessing, Organizing, and Transferring Files
With the increasing reliance on portable devices such as cameras, smartphones, and audio recorders, SD cards have become an essential storage solution. Mastering the art of SD card file management is crucial for efficiently accessing, organizing, and transferring your digital files. In this comprehensive guide, we will delve into the intricacies of SD card file management, providing you with the knowledge to streamline your digital workflow.
1 Understanding SD Cards:
2 Accessing an SD Card:
3 Mounting and Formatting an SD Card:
4 Transferring Files to an SD Card:
5 Managing Files on an SD Card:
6 Conclusion:
Understanding SD Card Basics:
Before we embark on the journey of mastering SD card file management, it's essential to grasp the basics. Secure Digital (SD) cards come in various capacities, ranging from a few gigabytes to terabytes, with different speed classes affecting data transfer rates. Familiarize yourself with your SD card's capacity and speed class, as this information influences file storage and transfer capabilities.
Accessing SD Card Files on Different Devices:
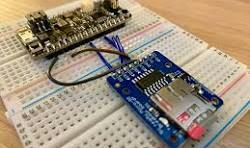
SD cards are versatile and compatible with a wide range of devices, including cameras, smartphones, laptops, and more. To access your files seamlessly, ensure your device has an SD card slot or use an SD card reader. Insert the SD card, and your device should recognize it as external storage. On some devices, you may need to navigate to the file manager or settings to access the SD card.
Organizing Files on Your SD Card:
Effective file organization is the key to a stress-free digital experience. Create a well-structured folder system on your SD card to categorize files logically. For instance, create folders such as "Photos," "Videos," "Documents," and "Music" to keep different types of files organized. Subdivide these folders further based on specific projects or events to maintain a granular level of organization.

Naming Conventions:
Implementing consistent naming conventions for your files is essential for quick and easy retrieval. Use clear and descriptive names, including dates or project names, to make it easier to identify files at a glance. Avoid generic names like "IMG_001" or "Document1," as these can lead to confusion over time.
Utilizing Backup Strategies:
Protect your data by implementing backup strategies for your SD card. Regularly transfer files from your SD card to a computer or cloud storage to create duplicates. This ensures that even if the SD card fails or gets lost, your precious data remains secure. Additionally, consider using backup tools or applications that automate the process, providing an extra layer of protection.
Transferring Files Between Devices:
Transferring files to SD card between devices is a common task when managing SD cards. Use a USB cable, SD card reader, or wireless transfer methods (such as Bluetooth or Wi-Fi) to move files between your SD card and other devices. When transferring large files, ensure that your devices support the file formats and sizes to prevent any compatibility issues.
Maintaining SD Card Health:
Regularly check and maintain the health of your SD card files to prevent data corruption and loss. Use the built-in tools on your devices to scan for errors and fix them. Avoid removing the SD card while files are being accessed or transferred to prevent potential data corruption. Additionally, keep the contacts on the SD card clean to ensure a reliable connection.
Conclusion:
Mastering SD card file management is essential for anyone dealing with digital media and documents. By understanding the basics, creating an organized folder structure, implementing backup strategies, and adopting proper file transfer practices, you can optimize your workflow and ensure the safety of your valuable data. With these tips, you'll be well-equipped to navigate the complexities of SD card file management and make the most of your digital storage experience.
Tagged:
mastering sd card file management
Accessing files on SD Card ,
files transfer to SD Card ,
files on an SD Card ,
formatting SD Card ,
Manage files on SD Card ,
SD Card data back up ,
SD Card file organization ,
SD Card files ,
SD Card management guide
RELATED POSTS
· Nifty Tips To Evaluate The Growth Of New Joiners
· New Law Can Save You Money on Your Internet and TV Service
· Four good reasons to write a product requirement document
How marketing can boost your company’s online presence
Life off Screen: The Lives of Women in Esports
The Digitalization of Games on Chance in 2023
Mastering SD Card File Management: A Comprehensive Guide for Accessing, Organizing, and Transferring Files
The Dos and Don’ts of Media Relations
Contact us: [email protected]
https://www.facebook.com/techaddanews
#mastering sd card file management#Accessing files on SD Card#files transfer to SD Card#files on an SD Card#formatting SD Card#Manage files on SD Card#SD Card data back up#SD Card file organization#SD Card files#SD Card management guide
0 notes
Text

situation so dire I hadn't even made a 2025 art folder half the year in
#the update is i finally flew home and that helps me not be stressed 24/7. I saw the sun again! incredible#now I have to sort all the files I've been dumping into a mixed sd card into proper folders on my hard drive#which is- an awful soup of work school and fun#what am i trying to say#i will be finding things to post basically#the return of the sisyphean dumpster dive. where even was I ?#i need to start tagging the years I made things in for in blog organization
2 notes
·
View notes
Text
ACNL CUSTOM VILLAGER/NPC/NPC VILLAGER GUIDE 2025
PLEASE READ THROUGH EVERYTHING BEFORE ATTEMPTING!!!
I AM NOT RESPONSIBLE FOR ANYTHING THAT HAPPENS WITH YOUR 3DS OR GAME!!!
PLEASE BACKUP YOUR FILES BEFORE ATTEMPTING!!!
Hi! I'm here to make a guide on how to make a custom villager/switch an npc to a villager in 2025, since there are not a lot of guides, and any guides out there are now old and obsolite
WHAT YOU'LL NEED:
A hacked 3DS with CFW
Computer
7-Zip or Winrar
Animal Crossing: New Leaf (cartridge or digital)
Any Image Editing Software (i.e FireAlpaca, Gimp, Photoshop)
Ohana 3DS [link]
Ohana 3DS Rebirth [link]
HxD [link]
First things first- you're gonna need the romfs files of your game. The way to get them is through GM9 (GodMode9) The way to acsess GM9 is to turn on your 3DS, and as it boots up, hold down the START button.
Besides editing the sprites, this will be the LONGEST part out of this entire process. The romfs has EVERY SINGLE GAME ASSET, so youre basically dumping every single thing from the game onto your SD. For me, this took ALMOST 2 HOURS, so be ready!
FOR CARTRIDGE
Go to [C:] GAMECART ()
Go to the file that has .3ds (NOT THE .trim.3ds)
Click NCSD image options…
Click Mount image to drive
Click yes when prompted
Click content0.game
Go down to romfs and hit Y to copy the romfs files
You can now paste the romfs files to any folder on your SD, but if you want to be organized, created a designated folder for your romfs on the root of your SD
To get to your SD, go back by hitting B until you get to the first page
Go to [0:] SDCARD and click on it, and you'll be in your SD card.
Find the folder you'd like to paste your romfs in
Open the folder and hit Y to paste the romfs, and now you wait
FOR DIGITAL
Hit the Home Menu button in GM9
Go down and click on Title manager
Click [A:] SD CARD
Find Animal Crossing: New Leaf
Go to Open title folder and click it
Click 00000000.app
Click NCSD image options…
Click Mount image to drive
Click yes when prompted
Click content0.game
Go down to romfs and hit Y to copy the romfs files
You can now paste the romfs files to any folder on your SD, but if you want to be organized, created a designated folder for your romfs on the root of your SD
To get to your SD, go back by hitting B until you get to the first page
Go to [0:] SDCARD and click on it, and you'll be in your SD card.
Find the folder you'd like to paste your romfs in
Open the folder and hit Y to paste the romfs, and now you wait
When that is finished, power off your 3DS, eject your SD, and put it into your computer.
Move your romfs to your computer or a USB, that way you don't have them clogging your 3DS' SD and you have a backup of the vanilla files
To keep things organized, make a folder to copy any files you're going to edit to that folder.
Finding NPC files
FOR VILLAGERS
romfs> Npc> Normal> Model
There you can find the .bcres files of every villager
FOR NPCs
romfs> Npc> Special> Model
There you can find the .bcres files of every NPC
Open Ohana3DS rebirth to open and view the .bcres files so you can find the villager or NPC you're looking for
Once you find them, copy them to your desiganted folder
If you want to edit a villagers name you'll need the STR_NNpc_name.umbst file
To find the file go to romfs> Script> Str and find the file, then copy it to your designated folder
If you want to edit your villager's icon go to
romfs> Item> Model
the file will look like brm_(villager id).bcres , FOR EXAMPLE brm_mus17.bcres
When making an NPC into a villager, you're going to have to find a villager to replace. FOR EXAMPLE I edited Sabel and replaced Penelope, so I renamed Sabel's file, hgc.bcres, to mus17.bcres
EDITING THE VILLAGER/NPC
use this guide when it comes to editing the textures and renaming your villager [link]
LOADING YOUR FILES
Now that you have finished your character, heres how you'll put your files on your SD so they'll load into the game
Put your 3DS's SD card into your computer
on the root, located the luma folder
now go to luma> titles> and find Animal Crossing: New Leaf's title ID
US title ID's are
0004000000198F00 for New Leaf
0004000000086300 for Welcome Amiibo
If there is no title ID folder for ACNL, make one
Inside the title ID folder make a romfs folder
In the romfs folder, make a folder for whatever files you edited, so if you edited an NPC, the script, and the NPC icon make 3 folders and name them: Item, Npc, Script
Lets start with Npc first, if you edited a villager or replacing a villager with an NPC, open the Npc folder, make a folder named Normal, open the Normal folder, and make a folder named Model, and in the Model folder put your .bcres file
So luma> title> (title ID)> romfs> Npc> Normal> Model
If you edited an NPC open the Npc folder, make a folder named Special, open the Special folder, and make a folder named Model, and in the Model folder put your .bcres file
So luma> title> (title ID)> romfs> Npc> Special> Model
Now with the script, open the Script folder, and in the Script folder, make a folder named Str, and in the Str folder is where you'll put the .umsbt file
So luma> title> (title ID)> Script> Str
Finally, the villager icon. In your Item folder, make a folder named Model, and in your Model folder, put in the .bcres file that is the villager's icon
So luma> title> (title ID)> Item> Model
Once you have finished that, put your SD back into your 3DS, turn on your console, boot up Animal Crossing, and your custom villager should be there waiting!!
That's All!!
#fan#fandom#animal crossing#animal crossing new leaf#animal crossing hacking#hacking#hack#acnl#ACNL#custom#customs#3DS#3ds#CFW#cfw#rom hack#rom hacking#guide#animal crossing hacks#mod#modding#tutorial#nintendo#Nintendo#Nintendo 3DS#nintendo 3ds#villager
17 notes
·
View notes
Text
One of the first projects I made on the MPC. Ended up losing the project when trying to organize the SD card files on my computer 😞
11 notes
·
View notes
Note
How does Vimm's Lair work in regards to ds games? Do you just download the files, move them to the sd card of your ds, and then put the sd card back in? Also do you know of an alternative to Vimm's Lair for the games like Pokemon that aren't available for download anymore?
#also yes#you just put them on the SD card.#tho keep in mind the DS lite/ DS phat does Not have an SD card#you'd need to get a flash cart#which is just a game cartridge that works like a flash drive#the DSi and above have SD cards but you must first hack it. just putting roms in there won't work#asks
10 notes
·
View notes
Text
I DID end up getting an old-ish but still newer than my current phone phone specifically for big storage and micro SD slot for even bigger storage and going to not get a sim card for it and use it solely as an MP3 player with wifi specifically for lastfm scrobbling and not as an upgrade from my phone since that's using degoogled android out of a deep burning personal loathing for google as a company, because I am possibly the only organism with that specific use requirements lol
And I gotta admit it is kind of satisfying, too, going in and enabling developer options and then plugging my phone into my computer and typing in ADB commands to uninstall bloatware and bullshit and literally anything I want, I could make the phone unusable without a factory reset if I wanted to, reminds me of when I was a kid messing around changing all of the settings and exploring system files in fuckin' windows 98 hand-me-down family computer turned my first very own computer goddamn sudden swell of nostalgia sidetracked oops
What's not satisfying is the reminder of how fucking bad things have gotten when, before doing this whole "gutting android like a fish and ripping out its unnecessary internals" process, I was getting fucking ads in the notification space? Preinstalled unremovable apps for facebook shit and google shit? The fact that after a system update, suddenly the USB cable connected to my computer that had been working perfectly fine five seconds ago suddenly stopped being in file transfer mode, instead showing a "check your charger cable! you're on slow charge mode!" notification and nothing else, and upon looking this shit up found threads of people saying the same shit happened to them, sudden slow charging and not transferring files after an update, with replies ranging from "same thing happened to me! any updates? no!" to "buy specifically a samsung cable! :)"
only to finally find an article saying that a "security update" blocked USB connections except for charging, like holy fuck removing the headphone jack wasn't obnoxious enough, no longer including disc drives in desktop computers wasn't obnoxious enough, are they seriously trying to turn USB into phone charging only and not data transfer, like there's not already an option that popped up when you plugged a phone into a computer confirming that you wanted to be able to transfer data between the computer and the phone, because tech companies are for SOME FUCKING REASON... AAAALLLL about taking all autonomy and ability to customize and FUCK AROUND with our OWN TECHNOLOGY, away from individual users, and...
...people just live like this? The majority of people who didn't happen to gain the technological know-how to be aware that they might be able to disable or remove or mitigate this bullshit, and be comfortable actually attempting it... just fucking. Live with it?
Hooooly fuck
3 notes
·
View notes
Note
Photos compromise: move a bunch to your computer
Not really worried about deleting them off my phone—they're already backed up. So moving them to my computer would just be a second backup. Which is fine but not the problem. What I don't like is that I'm dedicating so much storage space to thousands of meaningless things. It also makes it harder to find actually good photos since they're mixed in with all the rest. Many of my albums on my phone are already like "best of xyz" because it's the only way I'd ever be able to find my good photos.
So yeah, it needs to be culled, not just backed up and forgotten about again (which is what I've already been doing for years.) Not to mention my computer needs to keep a fair amount of GB available at all times for photos. You'd be surprised how fast you fill up an 128 GB SD card shooting in jpg + raw. I think I'm working with like 18 GB of photos right now in Lightroom.
Of course, once I complete a cull, I can also back them up for safe-keeping on my external hard drive. But I want to do that with only what I'm keeping.
But anyway your ask has reminded me of a 3rd priority: re-organizing all my files on the computer! I've got the files going back to like 2 laptops ago and I know I am keeping some useless crap from when I was 14.
#quara asks#lets call it spring cleaning#i also decided do this several weeks ago to our Teams channel at work LMAO#i was like guys why do we have a whole top level folder for an EOY bean count from 2017. can we get rid of that#and then i remade it in my vision
6 notes
·
View notes
Text
How to Delete Apps on Kyocera 902KC Flip Phone: A Complete Guide

The Kyocera 902KC Flip Phone is a solid, durable device, offering the essential features you need in a compact form. While it's primarily designed for simplicity, managing apps on your phone can still feel a bit tricky. Whether you're running out of storage space or just want to clean up your device, deleting apps on the Kyocera 902KC is a simple process. In this guide, we’ll walk you through the steps to remove apps from your Kyocera 902KC Flip Phone, ensuring your device stays organized and free of unnecessary clutter.
Why Delete Apps on Your Kyocera 902KC Flip Phone?
Before we dive into the process, let’s quickly review why you might want to delete apps on your Kyocera 902KC:
Free up storage space: Over time, apps can take up valuable space on your device. Deleting unused or unnecessary apps can free up space for new content, such as photos, music, and messages.
Improve phone performance: Removing apps that you no longer use can help speed up your phone’s performance, making it run smoother.
Clear clutter: If your phone’s app list is cluttered with apps you rarely use, deleting them helps keep things organized.
Step-by-Step Guide: How to Delete Apps on Kyocera 902KC Flip Phone
Now, let’s get into the actual process of deleting apps on your Kyocera 902KC. The steps are straightforward and easy to follow.
1. Access the Menu
Turn on your Kyocera 902KC Flip Phone and press the Menu button. This will bring up the main menu of your phone.
Use the arrow keys to navigate through the options. You will want to locate the Apps or Applications option.
2. Navigate to the App Manager
In the menu, look for the App Manager or Applications section (depending on the phone's software version).
Press the OK or Enter button to access the list of installed apps on your Kyocera 902KC.
3. Select the App to Delete
Browse through the list of installed apps and use the arrow keys to scroll to the app that you wish to delete.
Once you’ve highlighted the app, press the Options button. This will open a menu with various actions you can take with the selected app.
4. Delete the App
In the options menu, look for the Delete or Uninstall option. It might be listed under Manage Apps or App Settings.
Press OK or Enter to confirm that you want to delete the app. A prompt will appear asking if you’re sure you want to remove it.
5. Confirm Deletion
Select Yes to confirm that you want to delete the app from your phone. The app will be removed from your Kyocera 902KC.
Repeat these steps for any other apps you want to delete.
6. Exit the Menu
Once you’ve finished deleting the apps you no longer need, press the Back or Exit button to return to the main menu.
Things to Keep in Mind
Pre-installed apps: Some apps on your Kyocera 902KC are pre-installed by the manufacturer or carrier and may not be removable. These apps are essential for the basic functioning of the phone and can't be deleted.
Reinstalling apps: If you accidentally delete an app that you need later, don’t worry! You can reinstall it from the App Store or Market if the app is available.
Storage management: If you are running low on storage, deleting apps is just one way to free up space. You can also delete old messages, photos, and videos, or move files to an SD card if your phone supports one.
Troubleshooting
App won't delete: If you're having trouble deleting an app, make sure it’s not running in the background. Close any active apps, then try deleting it again.
Phone performance is still slow: If your phone is still running slow after deleting apps, try turning the phone off and back on to refresh the system. Also, check if you have sufficient storage left on the device.
Conclusion
Deleting apps on your Kyocera 902KC Flip Phone is an easy and efficient way to free up space and improve the performance of your device. By following the simple steps outlined in this guide, you can quickly remove unwanted apps and keep your phone organized. Whether you're making room for new apps, photos, or simply want to declutter, managing your apps has never been easier. Keep your Kyocera 902KC running smoothly by regularly deleting apps you no longer need.
2 notes
·
View notes
Note
hi i just read your blog description and
how does one even begin to go about downloading an entire bootleg onto a Nintendo 3DS, of all things? what exactly prompted you to do this?
I am so glad you asked!
I enjoy the 3DS (and have an alt blog dedicated to my Nintendo shenanigans!) and I absolutely love having access to media entirely offline and without a buffering time! And to complete the trifecta, I had very bad writers block at the time. So uh there’s the why, the but how is chaos so do buckle in
First, I needed a bootleg as an MP4 as the 3DS no longer runs YouTube and I wanted to have it 100% offline. YouTube downloader and 5 minutes and that part was done. Next, actually getting it on the 3DS. A 3DS doesn’t tolerate MP4 files, and despite mine being homebrewed, I couldn’t find a program to play MP4 files. I, being me, tried to finagle it into working anyway. Unsurprisingly it didn’t, so back to the drawing board.
It took a few minutes of furious googling to remember that the 3DS had a pre-installed camera. That could take videos. However, there were some unfortunate limits..
- The filetype needed to be changed from MP4 to AVI.
- The videos could not exceed 10 minutes.
- The resolution is.. bad. 480x240. But if I wanted to watch Tanz with good resolution, why would I download it to a 3DS, eh? A grade-A viewing experience is clearly not the goal here.
Got to work chopping Tanz into 7-10 minute segments in the most sensible places I could. This is what took the longest, as I wanted the cuts to make some sort of sense. I tried to cut between songs or scenes, on top of an already present break in the music. Next, I ran all of these files through a converter to get them in the AVI that the 3DS can understand. Lastly, there was the small task of getting them onto the SD card and storing backup files in an organized manner on my computer so I can get Tanz onto my OTHER 3DS consoles at a later date. I also have a Switch Lite that I’d like to put it on, but my silly camera exploit won’t work because the Switch doesn’t have a camera. Shame.
Anyway I had to name the files so they would appear in order on the laptop and on the 3DS, and I had an AVI and MP4 for each portion. I think there were like 15 parts? I’ll check in the morning, I’m very tired and the system is dead at the moment. But there’s a folder in the applications section than I transferred the video files into, checking every so often to make sure they were working and uploading properly, and luckily they were so it was just a drag and drop operation from there. And that’s how I got Tanz on a 3DS.
I’ll proofread and add images (I think my blog banner is the Tanz credit screen on the 3DS) in the morning, and better explain some stuff. If you have any questions about this or other 3DS stuff please feel free to ask! I love to talk about it!
10 notes
·
View notes
Text
This sd card corruption thing is still fucking me up. Tech issues like this always make me freak out, even if all I'm permanently losing is save date for some games (but that's also one of the absolute worst things to lose!!!). Got another program I'm gonna run on it overnight, and see if it extracts Normal Human Files instead of whatever the hell photorec did. It really took me way too fucking long to get this thing all set up and organized. Even if I can recover any of my saves, I'm not looking forward to doing all that again.
2 notes
·
View notes
Text

From Grimes about what happened at Coachella
I want to apologize for the technical issues with the show tonight. I wanted to come back rly strong and usually I always handle every aspect of my show myself – to save time this was one of the first times I’ve outsourced essential things like rekordbox bpm’s and letting someone else organize the tracks on the sd card etc. i had a bad feeling beforehand not having run everything thru the cdjs myself and tho I flagged it I wasn’t insistent. the big lesson for me was a mix of 1 if u want it done right, do it yrself 2 be a cunt even if ppl feel bad 3 probably pretend it’s fine and engage w the crowd rather than spend a whole show slumped over the desk trying to fix software when ur meant to be entertaining.
I will personally organize all the files next week. I will not let such a thing happen again.
I’ve spent months on this show, making music and visuals, and admittedly am not in the best mood atm
But, yeh – next week will be flawless, everything will run thru my hands
Some good lessons learned. Bless y’all. The cdjs were showing me bpms like 370 so I couldn’t even mix manually by ear and the front monitors were off so it was literally sonic chaos on my end trying to guess how stuff was sounding for u guys
Plz forgive me! Love, always
Video footage from Coachella
2 notes
·
View notes
Text
Price: [price_with_discount] (as of [price_update_date] - Details) [ad_1] Product Description UNIVERSAL FIT FOR ALL 2.5" DRIVES No More Worrying About Compatibility. Whether You're Storing A Seagate Backup, A Wd Game Drive, Or A Toshiba SSD, This Case Holds All Standard 2.5-inch HDDs And SSDs, Giving You One Reliable Solution For Every Drive. ELASTIC SAFETY STRAP FOR EXTRA SECURITY The Integrated Strap Holds Your Drive Firmly In Place, Preventing Movement And Internal Scratches While In Transit-Something Many Other Cases Miss. SHOCK-ABSORBING PROTECTION THAT MATTERS Every Bump, Drop, Or Jolt Is Cushioned By High-Density Padding And Anti-Static Lining. It’s Peace Of Mind In A Case-Especially For Those Storing Precious Photos, Work Files, Or Irreplaceable Content. SMOOTH ZIPPER WITH RUBBER PULLER No Snags, No Broken Pulls. Just A Smooth-Glide Zipper With Rubberized Grip For Easy Opening, Even While Moving Or Wearing Gloves ORGANIZE MORE THAN JUST A DRIVE Includes A Dedicated Mesh Pocket For Accessories Like Usb Cables, Sd Cards, Or Adapters-So You Never Lose A Cable At The Bottom Of Your Bag Again BUILT TO HANDLE LIFE’S LITTLE ACCIDENTS Spilled Coffee? Sudden Rain? No Problem. The Water-Resistant Pu Leather Exterior Defends Your Drive Against Moisture, So Your Data Stays Dry And Protected Even When Life Gets Messy. PROFESSIONAL LOOK, EVERYDAY DURABILITY Crafted With A Sleek Matte Finish And Reinforced Stitching, This Case Looks Great On Your Desk And Stands Up To Daily Use. Ideal For Both Corporate Professionals And Tech Enthusiasts. A THOUGHTFUL GIFT FOR TECH LOVERS Looking For A Smart, Affordable Gift? This Is A Perfect Choice For Gamers, Digital Creators, It Professionals, And Students Who Need To Keep Their Tech Protected. DESIGNED FOR TRAVEL & DAILY COMMUTE Lightweight And Ultra-Slim, It Slides Easily Into A Backpack, Laptop Bag, Or Carry-On. Ideal For Students, Remote Workers, And Travelers Who Carry Sensitive Data On The Go.
Universal Compatibility – Fits All 2.5" Drives: Compatible with all standard 2.5 inch external hard drives and SSDs, including models from WD, Seagate, Toshiba, ADATA, Sony, Dell, HP, and more. No need to remove your drive for use—simply unzip and plug in for seamless access. Ideal for both casual users and IT professionals needing flexible, plug-and-play storage support. Premium Protection – Shockproof & Scratch-Resistant: Built with high-quality PU leather exterior and a soft, anti-static inner lining, this shockproof HDD SSD protective case safeguards your drive from everyday bumps, drops, and dust. Inner padding absorbs impacts while protecting delicate circuitry—giving peace of mind at home or on the go. Smooth Zipper & Secure Closure System: Designed for durability and convenience, the rubberized zipper puller offers a secure grip, even while moving. The heavy-duty zipper glides smoothly, ensuring hassle-free access to your devices while maintaining tight closure for long-term use and dust protection. Water-Resistant & Weather-Ready Design: Rain, spills, or damp travel conditions? No problem. The water-resistant PU surface shields your drive from moisture, vapor, and weather damage. Perfect for business travelers, commuters, and anyone storing data on the move—this portable hard drive pouch is built to resist the elements. Travel-Friendly Storage with Smart Organization: Stay organized wherever you go with a slim external hard drive case that fits into backpacks, luggage, or even large pockets. An elastic strap keeps your drive secure, while a mesh pocket neatly stores USB cables, SD cards, and accessories—everything stays in place, even in transit. [ad_2]
0 notes
Text
Professionals & Certified Engineers

We are reputable IT organization specializing in data recovery services. With a positive approach and competitive pricing, they have successfully recovered data from various devices such as hard drives, SSDs, SD cards, and more. We also offer data erasure solutions, including disk destruction, data sanitization, and disk degaussing. We specialize in recovering lost or corrupted data from hard drives, SSDs, mobile devices, and more. With their advanced tools and expert team, they have a high success rate in retrieving lost files - Data Recovery Services.
We all carry large amounts of both official and personal data each day in our Laptops, External Hard-Drives, Mobile Phones, Hand-Held Devices etc. Whether it is vacation pictures, childhood memories, important certificates or official mails, this data remains invaluable to us, something that we cannot afford to lose. We understand the importance of data and the vital nature of making it available when it is needed the most. Our Data Recovery services help consumers recover their valuable data from a wide range of devices and data storage media including Laptops, USB, Hard Drives - Data Recovery Company.
From small businesses to large enterprises, RAID configurations support mission-critical applications by ensuring data redundancy and improved read/write speeds. However, even RAID systems are not immune to failure, and when they do, it can result in complex data loss scenarios that require specialized recovery. This is where reliable RAID recovery services play a crucial role, as they possess the expertise and tools needed to restore valuable data from compromised RAID arrays. We’ll explore the top RAID recovery services available, highlighting their unique features and strengths to help you make an informed choice in the event of data loss. Based on our research, data recovery services are often costly and take a lot of time.
Our team of experienced professionals & certified engineers offer an unparalleled experience across consumer services & enterprise solutions. We have tailored superior technology services for consumers, vendors, and enterprises alike, helping them leverage the power of technology to its full potential, acting as a catalyst for growth. We are uniquely qualified to offer recovery services from data loss caused by power surges & outages, static electricity, lightning strikes, fires, floods, other natural disasters, sabotage, viruses, equipment malfunctions. For more information please visit our site https://www.quora.com/Can-any-one-suggest-me-best-data-recovery-centre-in-Bangalore
0 notes
Text
CX File Explorer: The Ultimate File Manager for Android Users
Managing files on your smartphone can be overwhelming, especially when your device starts to fill up with photos, downloads, videos, and app data. That’s where a powerful file management app like CX File Explorer comes in. Simple, fast, and feature-rich, CX File Explorer has quickly gained popularity among Android users who want more control over their device storage.
Whether you're a tech-savvy user or just someone looking to keep your phone organized, CX File Explorer offers the tools and performance needed to get the job done.
What Is CX File Explorer?
CX File Explorer is a free, lightweight, and ad-free file management app available on the Google Play Store. Developed with a clean and user-friendly interface, the app provides a smooth experience for navigating through internal storage, SD cards, cloud storage, and even network drives.
Unlike some bloated file managers, CX File Explorer strikes the perfect balance between functionality and simplicity.
Key Features of CX File Explorer
Here’s a breakdown of the standout features that make CX File Explorer a must-have Android app:
1. Intuitive User Interface
The app's interface is modern and easy to navigate. Files are categorized clearly, and the home screen gives you instant access to storage usage and essential folders. Even first-time users can operate the app without confusion.
2. Powerful File Management Tools
With CX File Explorer, you can:
Copy, move, rename, delete, and compress files
Create new folders
Search for files quickly
Open and share files with ease
It also supports drag-and-drop operations for added convenience.
3. Storage Analysis
One of the app’s best features is its storage analyzer. It visually displays how much space each folder or file is using, helping you identify what’s taking up valuable storage. This is especially useful if you have limited space on your device and need to clean up junk files or large media.
4. Cloud Integration
CX File Explorer supports multiple cloud storage services, including:
Google Drive
Dropbox
OneDrive
Box
And others via WebDAV
This allows you to access and manage your cloud files directly from the app—no need to switch between different cloud apps.
5. Access to Network Storage
For advanced users, CX File Explorer offers access to:
FTP and SFTP servers
SMB (Windows shared folders)
NAS (Network Attached Storage)
This is especially helpful for users who need to transfer files between their phone and a computer or media server without using cables.
6. Ad-Free Experience
Unlike many free apps, CX File Explorer does not display ads, making the experience smooth and distraction-free. This is a huge plus for users tired of pop-ups and banner ads in their tools.
Why Users Love CX File Explorer
CX File Explorer stands out because it focuses on delivering what users actually need—without unnecessary extras. Here are some of the reasons users prefer it:
Fast performance: The app runs smoothly, even on older Android devices.
Low memory usage: It doesn’t hog RAM or drain your battery.
All-in-one functionality: From internal storage to cloud and LAN connections, everything is accessible in one place.
Reliable and secure: It doesn't collect personal data or overload you with permissions.
How to Download and Install
Installing CX File Explorer is easy:
Go to the Google Play Store
Search for “CX File Explorer”
Tap Install
Open the app and grant necessary permissions (like storage access)
Once installed, you’re ready to organize, manage, and analyze your files efficiently.
Final Thoughts
If you're looking for a clean, efficient, and powerful file manager for Android, CX File Explorer is a top contender. Whether you need to clean up space, move files around, or manage content across devices and platforms, this app delivers all the tools you need in a lightweight, user-friendly package.
Say goodbye to clutter and slow file operations—CX File Explorer gives you the power to take control of your digital life.
1 note
·
View note
Text
Upgrade Your Digital Lifestyle with the Right Technology Accessories
In today’s fast-paced digital world, the right technology accessories can enhance how you work, communicate, and stay organized. Whether you're a student attending online classes, a professional managing projects remotely, or simply someone who enjoys staying connected, tech accessories make a noticeable difference in your daily routine.
At Poshace, we believe that accessories should be more than just add-ons—they should be reliable tools that support your lifestyle and reflect your personal style. Here’s a look at some must-have technology accessories that are transforming everyday experiences in 2025.
Why Technology Accessories Matter
Accessories are no longer optional extras. They help improve productivity, maintain comfort, and protect your valuable devices. More importantly, the right tech tools allow you to get the most out of your existing setup without spending on entirely new equipment.
Here are some of the top accessories that are practical, efficient, and worth considering this year.
USB-C Hubs and Docking Stations
Modern laptops are often slim and minimal, which usually means fewer ports. A USB-C hub solves this problem by offering multiple connection options—USB ports, HDMI, SD card slots, and more—through a single device. It's an ideal solution for professionals who need to connect multiple peripherals at once.
Wireless Charging Pads
Tired of tangled cords? Wireless chargers offer a clean, modern way to keep your devices powered throughout the day. They're especially useful if you carry multiple devices like smartphones, earbuds, or smartwatches that support wireless charging.
Ergonomic Laptop Stands
Posture matters, especially if you spend long hours in front of a screen. A laptop stand raises your screen to eye level, improving your posture and reducing neck and back strain. It also allows better ventilation, which helps in keeping your device cool and efficient.
High-Quality Headphones
Whether you’re attending virtual meetings, editing videos, or just enjoying some downtime with music, a good pair of headphones is essential. Look for models with noise cancellation and strong battery life to enhance your audio experience without interruptions.
Portable Power Banks
On the move and worried about battery life? A power bank is a must-have accessory. The best ones are compact yet powerful enough to charge multiple devices, making them ideal for travel, work commutes, or simply busy days away from a charger.
External Storage Devices
If you work with large files or need reliable backup solutions, external SSDs and hard drives offer a fast, secure way to store your data. They’re especially useful for content creators, designers, and anyone managing large digital libraries.
Cable Organizers and Tech Pouches
Cables, adapters, chargers—it’s easy for your workspace or bag to become cluttered. A tech pouch or cable organizer keeps everything in one place, making it easier to find what you need when you need it, and helping you stay more organized on the go.
Why Choose Poshace?
At Poshace, we curate accessories that blend design and function. Every item in our collection is selected to offer both performance and style. Whether you're upgrading your home office, traveling for work, or simply looking for reliable tech companions, you'll find quality accessories that suit your needs and elevate your setup.
Final Thoughts
Technology accessories aren’t just about convenience—they’re about getting the best out of your devices and your time. As we continue to rely more on digital tools, having the right accessories makes a meaningful difference in how we work, connect, and live.
1 note
·
View note
Note
im playing project mirai 2 again and its so good...
also i was curious, do you know of a way to transfer a save onto another system? my 3ds hurts to use after a while but my 3dsxl doesnt .. either way i dont mind completely redoing the game again because its fun ^_^
ALSO also the models in project mirai 2 are so cute oh my goddd i love project mirai 2 so much . sorry i need to talk about this game its so good man everyone should play it its really beginner friendly and fun!!!!!!!!! sorry. vocaloid hyperfixation. anyway project mirai 2 best game fight me
yaya I love vocaloid!!! I forgot project mirai existed- I like project diva a lot, I really wish they made a project diva 3ds port...
use universal updater and install checkpoint if you haven't already! it's an app that backs up save data and organizes it for you! you just use checkpoint on project mirai and transfer the save file from the old 3DS' SD card to the new one. you then use checkpoint to inject the new safe file and boom!!!!! save data transferred!!! (if the game uses ex data you'll need to grab that as well using checkpoint)
6 notes
·
View notes