#step-by-step guide
Explore tagged Tumblr posts
Visit Tumblr Blog
Explore Tumblr blogs with no restrictions, modern design and the best experience.
Last Seen Tumblr Blogs


Fun Fact
69% of Tumblr users are millennials.
Text
youtube
Exactly what I needed to know when I buy my Switch 2.
I want to keep the Switch OLED I have exactly as it is with all the games on but if you do a full out swap when you boot up the Switch 2, it will also delete everything on the Switch. If you don’t want it to do that, then you should follow this step-by-step guide on how to transfer your saved data to your Switch 2 whilst keeping it on the Switch. Most of us will not have the storage space to transfer every game and all saved data for those games anyway even with the micro SD express card.
I just want to transfer everything I have for ‘Breath Of The Wild’ and ‘Tears Of The Kingdom’ because I know I have the option to start all over again on a second save file later on. That will already take up a lot of storage space when upgrading to the “Switch 2 editions” for both games along with the downloads of ‘Mario Kart World’ and ‘Super Smash Bros: Ultimate’ as virtual game cards. You own all the games on the Switch so you should have the option to redownload them for the Switch 2 at any time you want whilst also still keeping them on the Switch. Nintendo should not be deleting anything without your expressed consent. Hence why there is virtual game cards which means if you have the physical games cards, you can just download the digital versions of those games for the new console. But I will not want to be doing that without the storage capacity for it but I may want to do that when there’s a micro SD express card available that has 1-2TB storage capacity.
I do not want to overload my Switch 2 with saved data.
So a very useful step-by-step guide if, like me, you want to keep everything that’s on your Switch as it is whilst still transferring some of the games and saved data to your Switch 2 like ones that have “Switch 2 editions”.
#nintendo switch 2#transfer games#transfer saved data#without deleting from previous console#switch 2 editions#virtual game cards#step-by-step guide#how to step up your nintendo switch 2#and keep your original switch#128KB#Youtube
2 notes
·
View notes
Text
Count The Rows In A Power Apps Gallery With AllItemsCount
Overview:
In this blog post, we’ll explore how to count Power Apps Gallery Rows using the AllItemsCount property. We’ll insert a label to show the count of all gallery items and then implement the exact code for precise counting. Each step comes with images and clear instructions. By the end, you’ll master the display of the total number of items in any gallery. Let’s dive in!
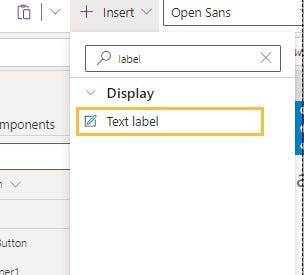

This code we use and count how many items in gallery
Read Full Post here: How to Count Rows in Power Apps Gallery: A Step-by-Step Guide (softwarezone365.com)
View Post On: LinkedIn: (4) Software Zone 365: Company Page Admin | LinkedIn Twitter: https://twitter.com/365_zone40741/status/1712883279580614768 Medium: Microsoft’s Power Platform Potential: Unlocking Business Impact (softwarezone365.com) Pinterest: https://www.pinterest.com/pin/1065875436793645010 Reddit: https://www.reddit.com/user/SoftwareZone365/comments/1773k2e/count_the_rows_in_a_power_apps_gallery_with/ Quora: https://www.quora.com/profile/Software-Zone-365/In-this-blog-post-we-ll-explore-how-to-count-Power-Apps-Gallery-Rows-using-the-AllItemsCount-property-We-ll-insert-a-l GitHub: Count The Rows In A Power Apps Gallery With AllItemsCount · softwarezone365/PowerApps Wiki (github.com) Instagram: https://www.instagram.com/p/CyWOuK8sGc9/ Facebook: https://m.facebook.com/story.php?story_fbid=300738072723966&id=100083633251137&mibextid=ZbWKwL
#development#AllItemsCount#App Development#BrowseGallery1#Coding in Power Apps#Gallery Items#Gallery Management#Gallery Rows#Item Counting#Label Count#Microsoft Power Apps#Power Apps#Power Apps Functions#Power Apps Gallery#Power Apps Tips#Power Apps Tutorial#Power platform#Row Counting Technique#Step-by-Step Guide#Text Property
2 notes
·
View notes
Text
DIY: FURNITURE UPCYCLING
Hello everyone, how are you my DIY lovers who like to reuse their old things and do new things in their home.Today we’re going to delve into furniture upcycling where old repurposed pieces are given a second lease of life.All my mates grab your paint brushes and a little circus because we are going to turn trash into gold in one less and get ready to do as you did. Gold from Waste: Some Guidance…

View On WordPress
#Budget-Friendly#Creative Projects#diy#Eco-Friendly#Environmental Sustainability#Furniture Makeover#Furniture Restoration#Furniture Upcycling#Green Living#Home Decor#home improvement#Interior Design#recycling#Recycling Furniture#Repurposing Furniture#Step-by-Step Guide#Sustainable Living#Thrift Store Finds#Upcycled Home Decor#WOOD
2 notes
·
View notes
Text
“Grant Folder-Level Permissions with RHosting: A Step-by-Step Guide”
When multiple users are accessing the same remote server, controlling access to specific folders is critical. Whether you’re working with finance files, development resources, or client data, folder-level permissions help protect sensitive information and streamline collaboration.
With RHosting, managing folder access is simple and secure. In this guide, we’ll walk you through how to grant, restrict, and customize folder-level permissions on your Windows server through RHosting.
🔧 Why Folder-Level Permissions Matter
Giving all users full access can lead to:
Accidental data loss or modification
Unauthorized access to sensitive files
Compliance violations
Security risks
With precise folder permissions, you can control who can view, edit, or delete files — keeping your server organized and secure.
🛠️ Step-by-Step: How to Set Folder-Level Permissions in RHosting
✅ Before You Begin: Make sure you’re logged into your RHosting remote desktop with an admin-level account.
Step 1: Navigate to the Folder
Connect to your RHosting session.
Open File Explorer.
Locate the folder you want to manage (e.g., D:\Projects\TeamA).
Step 2: Open Folder Properties
Right-click the folder.
Select "Properties".
Go to the "Security" tab.
Step 3: Edit Permissions
Click on "Edit…" to manage user access.
In the new window, click "Add…" to add a user or group.
Type the username or group name (e.g., john.doe or FinanceTeam).
Click "Check Names" to verify, then click OK.
Step 4: Assign Access Levels
Once the user or group is added, assign the appropriate permission:
Full Control – View, edit, and delete everything
Modify – Edit files but not change permissions
Read & Execute – Open and run files, no editing
List Folder Contents – Browse the folder
Read – View only
Write – Add files but not read or edit existing ones
🔐 Tip: For sensitive folders, avoid using “Full Control” unless absolutely necessary.
Click Apply → OK to save changes.
Step 5: Test the Access (Recommended)
Log in as the user (or ask them to test).
Try accessing the folder.
Confirm they can only perform the intended actions (e.g., read but not edit).
✅ Best Practices for Secure Folder Management
Group users by role and assign permissions to groups, not individuals
Regularly audit folder permissions to remove outdated access
Use descriptive folder names to avoid confusion
Back up sensitive folders regularly
🔒 With RHosting, You’re in Control
RHosting empowers you to manage file access quickly and securely, without complicated IT setups. Whether you’re collaborating across departments or working with external partners, folder-level control keeps your data organized, safe, and accessible — only to the right people.
0 notes
Text
The Irish Start-Up Scene: Opportunities for Global Entrepreneurs in 2025
In 2025, Ireland continues to establish itself as a prominent hub for global entrepreneurs, characterized by a dynamic start-up ecosystem fueled by innovation, investment, and a supportive business environment. The country’s strategic position, coupled with its friendly regulatory landscape, makes it an attractive destination for entrepreneurs looking to scale their businesses internationally.
Key Factors Driving Start-Up Growth
Favorable Tax Regime: Ireland's corporate tax rate remains one of the lowest in Europe at 12.5%, creating an enticing proposition for start-ups. This favorable tax environment encourages investment and allows businesses to reinvest profits back into growth.
Access to Funding: A robust network of venture capital firms, angel investors, and government grants provides ample funding opportunities for entrepreneurs. Initiatives such as Enterprise Ireland and the Local Enterprise Offices play a vital role in supporting start-ups through financial assistance and mentorship.
Innovative Ecosystem: Ireland’s emphasis on research and development, coupled with strong partnerships between academic institutions and industry, fosters an innovative environment. Initiatives such as the Innovation Partnership Programme encourage collaboration, leading to the development of cutting-edge solutions.
Technology and Digitalization: The tech sector is thriving, with Dublin recognized as a European technology hub. The presence of major players like Google, Facebook, and Microsoft has created an ecosystem that attracts talent and fosters innovation, making it an ideal base for tech start-ups.
Skilled Workforce: With a well-educated and multilingual workforce, Ireland offers access to a diverse talent pool. Universities and educational institutions are also adapting their curriculums to meet the evolving demands of the start-up sector, ensuring that entrepreneurs have access to the skills they need.
Emerging Industries and Sectors
In 2025, several sectors are poised for significant growth, providing unique opportunities for entrepreneurs:
FinTech: The financial technology sector in Ireland continues to thrive, driven by a need for innovative solutions that enhance the banking experience. Start-ups focused on payments, digital wallets, and blockchain technology are particularly noteworthy.
HealthTech: With advancements in digital health and telemedicine, the HealthTech sector presents lucrative opportunities. Start-ups developing health management solutions and personalized medicine are attracting considerable attention.
Renewable Energy: As Ireland commits to sustainability goals, there is a surge in clean energy start-ups focused on innovations related to wind, solar, and other renewable resources, creating opportunities for entrepreneurs in this vital sector.
AgriTech: The agriculture sector is embracing technology to improve yields and sustainability. Start-ups focusing on precision farming, smart agriculture tools, and supply chain optimization have great potential for growth.
Support Networks and Resources
Navigating the start-up landscape can be challenging for global entrepreneurs. However, various support networks and resources are available to facilitate their journey:
Networking Events: Frequent start-up events, pitch competitions, and industry meet-ups provide invaluable networking opportunities, allowing entrepreneurs to connect with potential investors and collaborators.
Incubators and Accelerators: Programs like Dogpatch Labs and NDRC offer mentoring, resources, and investment opportunities for early-stage companies, helping them scale effectively.
Government Support: The Irish government actively promotes entrepreneurship, offering various incentives and support programs through agencies like IDA Ireland and Enterprise Ireland, ensuring entrepreneurs have the resources they need to succeed.
As Ireland's start-up scene flourishes in 2025, global entrepreneurs are presented with unprecedented opportunities to launch and grow their businesses. The combination of a supportive regulatory environment, access to funding, and a thriving innovation ecosystem makes Ireland a prime destination for those looking to make their mark on the global stage. Entrepreneurs willing to embrace the vibrant culture and unique advantages that Ireland offers will find a landscape ripe for success.
#TechIreland#Step-by-Step Guide#Moving to Ireland#Expat Life in Ireland#Immigration to Ireland#Critical Skills Employment Permit#DualCitizenship#Financial Planning#Education Planning#Cost of Living in Ireland#I Want to Invest in Ireland#Relocating to Ireland#Banking in Ireland
0 notes
Text
A Roadmap to SAP S/4 HANA Implementation Success
Discover a step-by-step guide to achieving successful SAP S/4 HANA implementation. Learn key strategies, best practices, and solutions for a seamless transition.
#SAP S/4 HANA#implementation guide#success roadmap#digital transformation#business optimization#best practices#seamless transition#key strategies#step-by-step guide#implementation solutions
0 notes
Text
Discover the detailed process of constructing a house in India with our comprehensive step-by-step guide. From initial planning and approvals to the final finishing touches, this guide covers every aspect of building your dream home. Learn about site preparation, foundation laying, structural work, and interior design, along with tips for choosing the right materials and ensuring quality control. Ideal for homeowners, builders, and anyone interested in understanding the nuances of house construction in India.
#House Construction#Home Building#Construction Process#India#Step-by-Step Guide#Building a House#Construction Tips#Home Design#Construction Planning#Real Estate#Shree TMT#Quality Construction Materials#Indian Construction Methods#Homeowner Guide#Construction Approval Process
0 notes
Text
Welcome to the exciting world of creating and selling adult colouring books – a venture where artistic flair meets savvy business strategy. This comprehensive guide will help you harness the power of artificial intelligence (AI) tools and Amazon Kindle Direct Publishing (KDP) to transform your creative visions into a potential source of income.
#AI#Amazon KDP#Colouring Book Creation#Colouring for Stress Relief#Mindfulness Colouring#Publish on Amazon#Relaxing Colouring Books#Step-by-Step Guide
1 note
·
View note
Text
How to Make Custom Shirts With Cricut: A Step-by-Step Guide
I am obsessed with my Cricut machine and create projects on it every day. You can call it my hobby or my big passion for crafting. Recently, I have made dozens of custom shirts with my Cricut Maker machine, and you can create some on your own, too. Following this guide, your guesswork will be reduced to zero, as I will share some of the easiest steps on how to make custom shirts with Cricut.
If you are interested in my tutorial, I would recommend you continue it till the end so as not to miss anything important. I have been creating unique stuff with my Cricut for more than 6 years now; it has been a beautiful journey for me.
Whether you are a beginner or a well-trained Cricut user, this post will help you get some ideas for starting something new. I hope you found this blog helpful and that you will come back for more Cricut-related blogs like this one. Let’s start learning how to design shirts with Cricut for beginners.
Which Is the Best Cricut for Making Shirts?
When you are making a custom shirt, you will have this doubt about which machine to choose. My answer would be to choose anyone you have. Whether you have Cricut Maker, Joy, or Explore, you can choose anyone with your iron-on vinyl to make a perfect custom shirt.
However, you will need to insert the fine point blades to cut this type of vinyl. I hope you got an answer to it. Let’s move forward with this guide on making your custom shirt.
How to Make Custom Shirts With Cricut Machine?
When you are clear about which machine to use and what design you wanna make, let’s get started with my steps. Well, you will need a few things before you move your hands on the desktop. So, gather up all the listed things here.
Cricut Explore Air 2
EasyPress 2
EasyPress mat
Shirt apparel
Weeding tool
Brayer tool
Scissors
Standard mat
Premium vinyl
Are you ready with all these? So you’re good to go. When you are ready, head to your Cricut Design Space and show some of your creativity. And follow all the steps carefully.
Step 1: Go to the Cricut Design Space App
In the first step, you should go to your Design Space and pick a design to print on your shirt. As the Cricut app is full of ready-to-make designs, fonts, images, and templates, you won’t have to hustle to make a design. I am using my Explore Air 2 machine; you can use a machine you’re familiar with.
Step 2: Adjust Your Design
Once you are ready with your final design, you can take some time to make that fit for you. For example, you can change the design’s color. On the Cricut Design Space canvas, you will get a few options on the right-hand side, from where you can choose your favorite color for the shirt.
Step 3: Change Vinyl Color
Here, you need to change your vinyl color as your shirt’s color may not be a good match with the vinyl’s color. In order to keep the color vibrant and not blend them, you have an option to change the color of your iron-on vinyl. To do this, you should click on the Layers option on the canvas. After that, you can click on the white box with the Layer option and pick a color for your vinyl.
Step 4: Final Your Design
If you find the color combo not as expected, you can change it. Once you have done all the updates, you are ready to save your design. You need to hit the Save button along with the name of your project to remember what this design is about. I am making a design that says “Cutest Bachelor.” Let’s check more steps on how to make custom shirts with Cricut.
Step 5: Load Your Material (Iron-on Vinyl)
In this step, you are ready to cut your project with your special Cricut machine. Don’t forget to load your vinyl on a Cricut cutting mat and then into the Cricut machine. Once you are done, you can start the cutting. Also, select the correct size of your mat on your machine so that your design fits the cutting mat. And the most important thing is to align the iron-on vinyl correctly to get an expected cut.
Step 6: Cut Your Design
When your design is ready, and you have checked all the settings, you can allow your Cricut machine to perform a cut for you. Once you hit the Go button on your machine, it will show you a preview of your final design. If you are satisfied with it, click the Continue button to get a cut. Once the design is fully cut, unload your cutting mat.
Step 7: Weed Out the Excess Vinyl
When you have a cut in your hand, take a weeding tool and take out excess vinyl to make the design clear and ready to be ironed. You can use your hands too, but a weeding tool is more convenient. Now, you have finally come to the main part of how to make custom shirts with Cricut.
Step 8: Ready Your EasyPress
When your design is ready, you can set your Cricut EasyPress to cotton or linen to get the desired results. So, now you need to put your weeded design on the shirt apparel and use a Cricut EasyPress 2 to heat it. However, before that, you must use a brayer tool to remove lint and fibers from the shirt’s fabric. Once you do that, for the next steps.
Step 9: Preheat Your Shirt
When your apparel is ready, use your EasyPress to preheat it for 15 seconds with moderate pressure to remove the moisture and wrinkling. For the final heating, you should consider a Cricut Heat Guide that will help you find the best setting for your design. After that, use the temperature and pressure accordingly.
Step 10: Apply Heat to Your Shirt
And the last step is to just apply the heat as the Cricut guide suggests. Use a towel to place on your vinyl design, and apply heat for 30 seconds. Using a towel will prevent your iron-on from getting damaged. Viola, you have just designed a perfect custom shirt with your Cricut.
Conclusion
You were all wondering how to make custom shirts with Cricut. And with my blog, you might have found this process a bit easier than before, I guess. Don’t worry; if you follow the instructions carefully, I can bet you can make a fabulous shirt.
However, be mindful of the heating setting as it can ruin your project and waste everything. It’s always better to use a household iron while making your first project. When you get familiar with the process, you can take one step ahead with an EasyPress.
Source Url :- how to make custom shirts with Cricut
Visit here for more Information:- · cricut design space log in
· cricut machine
· cricut machine setup
· how to make custom shirts
· step-by-step guide
· install cricut design space
#how to make custom shirts with Cricut#CRICUT DESIGN SPACE LOG IN#CRICUT MACHINE#CRICUT MACHINE SETUP#STEP-BY-STEP GUIDE#INSTALL CRICUT DESIGN SPACE
0 notes
Text
Beginning to End: The Creation of a Blog Post
I’ve been asked by several new start-up businesses how I do everything that I do. That’s a long list. I decided that today I would tackle the process I go through to put out a blog post and hopefully the step-by-step guide will help some people create their own method for blogging about their passions. Idea Inspiration can come from anywhere as cliche as that sounds. Since I’ve themed my blog…

View On WordPress
#blog guide#blog post#blog post guide#blogger#blogging#how to#sidehustle#smallbusinessadvice#smallbusinesssupport#step-by-step guide
0 notes
Text
Looking for a quick and reliable method to find your passport number? Look no further than their meticulously crafted A Step-by-Step Guide to Locating Your Passport Number. This comprehensive resource offers expert tips and detailed instructions to seamlessly locate that elusive number and take the stress out of the passport management process. Read to know more.
0 notes
Text
Check out my newest tutorial - How to Fill A Shape With An Image in Microsoft Word. It will guide you through the process of inserting an image into a shape in Microsoft Word and aid in improving your graphic design skills. #imagefill #insertimage #microsoftwordtutorial #godservdesigns #shapefill #fillashape #graphicdesigner
BUY THE BLUE SKY FUNERAL PROGRAM TEMPLATE
https://etsy.me/3NSVLFn
#shapefill#wordtutorial#godservdesigns#diywordhack#insertimageintoword#funeralprogram#bluefuneralprogramtemplate#wordtemplate#Microsoft Word#image insertion#Graphic Design#Microsoft Office#Microsoft Word Tips#Tutorial for Beginners#DIY Design#Graphic Design in Word#Image Editing#Step-by-Step Guide#designtutorial#Document Editing
0 notes
Text

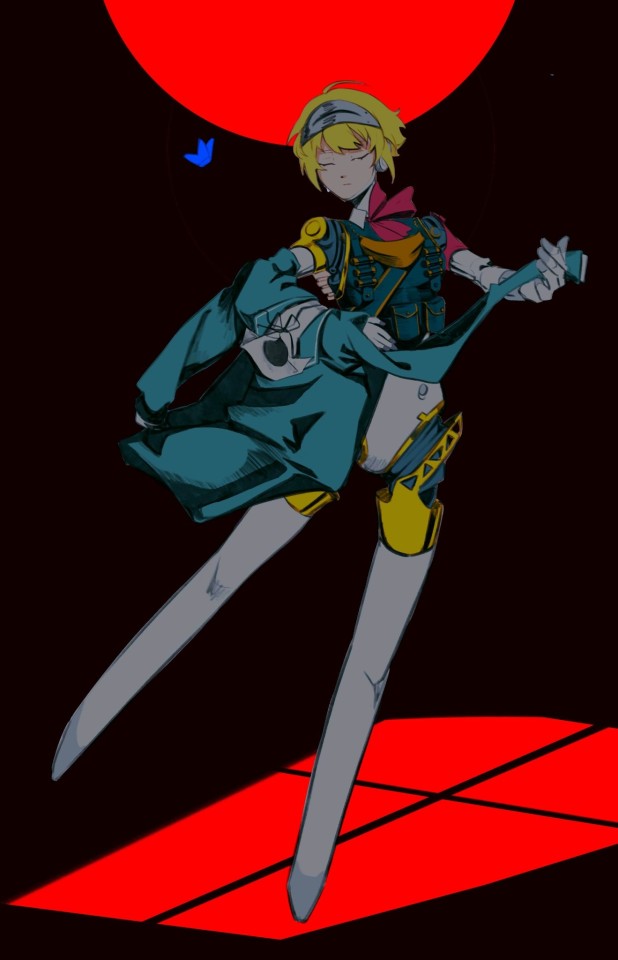
One last dance, please
#art#illustration#my art#persona#sketch#makoto yuki#minato arisato#persona 3#persona 3 reload#aigis#persona 3 aigis#wanted to add the “im so lost without you” from the ep aigis opening#was thinking about how makominato was smthn like aigis' guide (teaching her the steps) but then he left and now shes so lost without him#what if i cried#i cant wait for episode aigis#crying thumbs up emoji
4K notes
·
View notes
Text
Unleash Your Festive Glam: A Step-by-Step Guide to Simple Yet Creative Makeup Looks
The gleeful season is upon us, and it’s the perfect time to sparkle and radiate with festive makeup looks that mirror the joyful spirit of festivities. Whether it’s a cosy gathering with loved ones or a swanky shindig, your makeup can be the highlight of your festive ensemble. Embrace the magic of the season and plunge into these step-by-step guides to easily elevate your festive makeup looks and…

View On WordPress
#beauty tips#creative makeup looks#Festive makeup#Festive Season#holiday beauty#makeup inspiration#Makeup tutorial#simple glam#step-by-step guide
1 note
·
View note