#Serveradmin
Explore tagged Tumblr posts
Visit Tumblr Blog
Explore Tumblr blogs with no restrictions, modern design and the best experience.
Last Seen Tumblr Blogs


Fun Fact
Tumblr was the first site to host the blog for President Barack Obama in 2011.
Text
The Importance of Website Management Services for Business Success
In an era where digital presence is paramount, businesses need to ensure that their websites are not only up-to-date but also secure and performing optimally. This is where website management services come into play. By leveraging professional website management services, businesses can focus on their core activities while leaving the technical intricacies to the experts. This article delves into the critical aspects and benefits of website management services.
What Are Website Management Services?
Website management services encompass a wide range of activities aimed at maintaining, optimizing, and securing a website. These services ensure that a website runs smoothly, remains secure, and stays relevant in an ever-evolving digital landscape.

Key Components of Website Management Services
Regular Updates and Maintenance:
Software Updates: Keeping the website’s CMS, plugins, and themes updated to ensure compatibility and security.
Content Updates: Regularly refreshing content to keep it relevant and engaging for visitors.
Security Management:
Monitoring and Prevention: Implementing measures to protect against cyber threats such as malware, DDoS attacks, and hacking attempts.
Backups: Regularly backing up the website’s data to prevent data loss in case of a security breach or server failure.
Performance Optimization:
Speed Optimization: Ensuring fast load times by optimizing images, leveraging caching, and utilizing Content Delivery Networks (CDNs).
Uptime Monitoring: Continuously monitoring the website to ensure it remains accessible and resolving any downtime issues promptly.
SEO and Analytics:
Search Engine Optimization (SEO): Implementing strategies to improve search engine rankings and drive organic traffic.
Analytics and Reporting: Utilizing tools like Google Analytics to track visitor behavior, assess performance, and make data-driven decisions.
Technical Support:
Providing assistance with technical issues, troubleshooting errors, and ensuring the website functions correctly across different devices and browsers.
Benefits of Website Management Services
Enhanced Security: Professional website management services offer robust security measures that protect your website from potential threats. This includes regular security audits, malware scans, and the implementation of firewalls.
Improved Performance: Optimizing website speed and performance not only enhances user experience but also positively impacts search engine rankings. Website management services ensure that your site runs efficiently and swiftly.
Time and Resource Savings: By outsourcing website management tasks, businesses can save valuable time and resources. This allows them to focus on their core competencies and business growth strategies.
Expertise and Knowledge: Website management service providers possess specialized knowledge and expertise in various aspects of website maintenance and optimization. This ensures that your website benefits from the latest industry practices and technologies.
Consistent Updates and Fresh Content: Regular updates and fresh content are crucial for engaging visitors and retaining their interest. Website management services ensure that your website remains dynamic and up-to-date.
Choosing the Right Website Management Service Provider
When selecting a website management service provider, consider the following factors:
Experience and Expertise: Look for providers with a proven track record and extensive experience in website management.
Comprehensive Services: Ensure the provider offers a wide range of services that cover all aspects of website management, from security to performance optimization.
Customer Support: Reliable and responsive customer support is essential for addressing any issues promptly and effectively.
Customization: Choose a provider that offers customizable packages to meet the unique needs of your business.
Conclusion
Website management services are indispensable for businesses aiming to maintain a strong and effective online presence. From ensuring top-notch security and performance to providing expert technical support and continuous updates, these services play a critical role in the digital success of any business. By partnering with a reliable website management service provider, businesses can achieve greater efficiency, enhanced security, and improved overall performance, ultimately driving growth and success in the competitive digital landscape.
Source
#WebManagement#ServerHosting#WebsiteMaintenance#TechSupport#CloudHosting#DataCenter#ServerManagement#WebHosting#ITInfrastructure#WebsiteSecurity#ServerAdmin#HostingSolutions#WebsitePerformance#ServerMonitoring#WebDevelopment#CloudComputing#NetworkSecurity#DomainRegistration#BackupandRecovery#Cybersecurity
0 notes
Text
Einen Webserver mit Caddy unter Linux Ubuntu 22.04 installieren
In diesem Artikel zeige ich euch, wie Ihr mit dem Caddy-Webserver eine eigene Webseite unter Linux Ubuntu 22.04 (alternativ auch Debian 12) hosten und im Internet bereitstellen könnt. Caddy ist der einzige Webserver, der HTTPS vollständig automatisiert. Das bedeutet, dass er SSL/TLS-Zertifikate selbstständig implementiert und sich auch um deren Gültigkeit kümmert...[Weiterlesen]
0 notes
Video
youtube
(via https://youtube.com/watch?v=0jiDyAOsC34&si=hGRYIFJgHLZ0bAp_)
0 notes
Text
How to Enable HTTP/2 on WHM/cPanel Using EasyApache 4 🚀
Want faster site speed, better efficiency, and modern web performance? HTTP/2 is the upgrade you need. We’ve written a detailed step-by-step guide to help you enable HTTP/2 on your WHM/cPanel server using EasyApache 4 or via the command line.
💡 Boost performance 🔧 Reduce latency 📈 Improve resource handling
Read the full guide now → What is HTTP/2 and How to Enable It on WHM/cPanel Server | EasyApache 4 Guide
🔗 Powered by ServerMO — Experts in Dedicated Servers & DDoS Protection. #http2 #webhosting #cpanel #apache #serveradmin #linux #dedicatedserver #servermo #tutorial
0 notes
Text
After some rather significant technical gymnastics some very smart people (myself not included) seem to have employed a fix to get #Microblog to #Mastodon crossposting working again with my setup! Here now is a test post to see how it works :) Documentation sometime next week for the benefit of other admins, as long as everything remains stable 😁🤞 #socialmedia #serveradmin #tech
0 notes
Photo

We're Hiring!!! #eagletechitsolutions #etschennai #ets #fullstackdeveloper #javadeveloper #desktopsupport #networkmarketing #networkengineer #linuxadministrator #penetrationtesting #webdeveloper #serveradmin #hrrecruiter #hrmanager https://www.instagram.com/p/Cjx96novKJz/?igshid=NGJjMDIxMWI=
#eagletechitsolutions#etschennai#ets#fullstackdeveloper#javadeveloper#desktopsupport#networkmarketing#networkengineer#linuxadministrator#penetrationtesting#webdeveloper#serveradmin#hrrecruiter#hrmanager
0 notes
Link
#Extend #HardDisk #DiscoDuro #LVM #Linux #Ubuntu #Video #HowTo #storage #Almacenamiento #Administración #Servidores #ServerAdmin #Server #Administration #Admin Cuando se trata la administración de Discos en Sistemas operativos Linux, es muy importante saber el tipo de formato que se le dará, es altamente recomendado utilizar formato LVM, ya que se crean discos (o almacenamiento) dinámicos, debido a que es posible extender las unidades lógicas, agregando más discos duros. Todo este proceso se realiza "en caliente" y, por tanto, transparente a los usuarios. https://goo.gl/H9VxfL
#Linux#LVM#ubuntu#video#Howto#storage#Almacenamiento#Administración#Servidores#Servers#ServerAdmin#Server#Admin#Tutorial#technology#teaching
1 note
·
View note
Photo

Are you looking for fully managed Shopware Cloud Hosting Services?
LeasePacket specializes in providing complete managed web hosting services for businesses. The certified experts in our company will review your application infrastructure and construct your architecture based on detailed diagrams, cost models, and best practices.
For more Info:- Mail:- [email protected] Website:- www.leasepacket.com Contact:- +91-76159 52893
#shopware#shopwarecloudhosting#cloud#cloudhosting#cloudhostingservices#hosting#hostingservices#hostingprovider#hostingweb#hostingcompany#hostingservice#webhosting#webhostingservices#webhostingcompany#webhostingprovider#websitehosting#serveradmin#leasepacket#cloudservices
0 notes
Text
Instalar TeamSpeak Server en Ubuntu 20.04
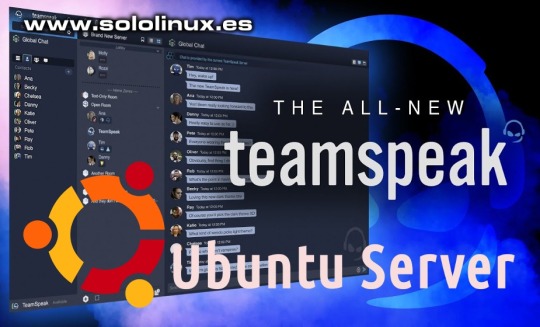
Instalar TeamSpeak Server en Ubuntu 20.04 y versiones superiores. TeamSpeak es una solución VoIP multiplataforma ampliamente utilizada en juegos online. Los usuarios del juego, lo usan para comunicarse con sus compañeros de equipo con una seguridad extrema. Debemos destacar, que además de permitir tus comunicaciones a través de voz, también se permiten mensajes de texto. Viene con muchas características de tipo empresarial, entre las que se incluyen: privacidad incorporada, calidad de voz excelente, sistema de permisos avanzado, sonido muy bueno, conectividad móvil y muchas más. En este artículo, veremos cómo instalar tu propio servidor TeamSpeak en Ubuntu 20.04, ya sea en un VPS, servidor dedicado o servidor local.
Comunidad de ayuda TeamSpeak
Instalar TeamSpeak Server en Ubuntu 20.04
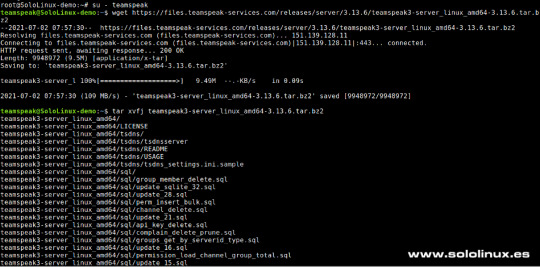
Iniciamos sesión sudo. sudo su Actualizamos nuestro Ubuntu 20.04. apt update apt full-upgrade Agregamos el usuario teamspeak. adduser --disabled-login teamspeak Si quieres puedes agregar tus datos, aunque no es obligatorio. root@SoloLinux-demo:~# adduser --disabled-login teamspeak Adding user `teamspeak' ... Adding new group `teamspeak' (1000) ... Adding new user `teamspeak' (1000) with group `teamspeak' ... Creating home directory `/home/teamspeak' ... Copying files from `/etc/skel' ... Changing the user information for teamspeak Enter the new value, or press ENTER for the default Full Name : Room Number : Work Phone : Home Phone : Other : Is the information correct? root@SoloLinux-demo:~# Ahora cambiamos de usuario y, descargamos la última versión de la herramienta. A día de hoy tenemos disponible la versión 3.13.6, pero es interesante que revises si existe otra más nueva en su sitio oficial. su - teamspeak wget https://files.teamspeak-services.com/releases/server/3.13.6/teamspeak3-server_linux_amd64-3.13.6.tar.bz2 Descomprime el archivo descargado. tar xvfj teamspeak3-server_linux_amd64-3.13.6.tar.bz2 Imagen de ejemplo.
Descargar y descomprimir TeamSpeak Copia el contenido al directorio de inicio. cp teamspeak3-server_linux_amd64/* -R /home/teamspeak/ Puedes borrar el archivo descargado anteriormente. rm -rf teamspeak3-server_linux_amd64 teamspeak3-server_linux_amd64-3.13.6.tar.bz2 Creamos la licencia. touch .ts3server_license_accepted Salimos del usuario. exit Bien, ahora creamos un servicio systemd. nano /lib/systemd/system/ts3server.service Copia y pega lo siguiente. Description=Teamspeak Service Wants=network.target WorkingDirectory=/home/teamspeak User=teamspeak ExecStart=/home/teamspeak/ts3server_minimal_runscript.sh ExecStop=/home/teamspeak/ts3server_startscript.sh stop ExecReload=/home/teamspeak/ts3server_startscript.sh restart Restart=always RestartSec=15 WantedBy=multi-user.target Guarda el archivo y cierra el editor. Recargamos systemd, e iniciamos y habilitamos el servicio. systemctl daemon-reload systemctl start ts3server systemctl enable ts3server Imagen de ejemplo.

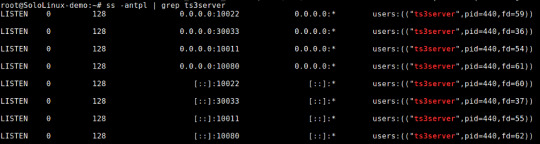
Habilitar el servicio Para saber que todo funciona correctamente, verificamos el servicio. systemctl status ts3server Ejemplo... root@SoloLinux-demo:~# systemctl status ts3server ● ts3server.service - Teamspeak Service Loaded: loaded (/lib/systemd/system/ts3server.service; enabled; vendor preset: enabled) Active: active (running) since Fri 2021-07-02 08:13:26 UTC; 5min ago Main PID: 440 (ts3server) Tasks: 21 (limit: 19660) Memory: 24.5M CGroup: /system.slice/ts3server.service └─440 ./ts3server Jul 02 08:13:27 SoloLinux-demo ts3server_minimal_runscript.sh: serveradmin rights for your virtualserver. please Jul 02 08:13:27 SoloLinux-demo ts3server_minimal_runscript.sh: also check the doc/privilegekey_guide.txt for details. Jul 02 08:13:27 SoloLinux-demo ts3server_minimal_runscript.sh: token=PfJ5VvctpE5fZ6lD3OVadnKlCqLOm0KAGHP86+M0 También puedes verificar los puertos utilizados por la herramienta. ss -antpl | grep ts3server Imagen de ejemplo.
Puertos de TeamSpeak Debes crear una contraseña para el admin de TeamSpeak, así que sigue los pasos indicados a continuación. systemctl stop ts3server su - teamspeak Ejecuta este script, sin olvidar la contraseña deseada al final del comando. ./ts3server_startscript.sh start serveradmin_password=MiContraseña Detenemos el script y salimos del usuario. ./ts3server_startscript.sh stop exit Iniciamos el servicio de nuevo. systemctl start ts3server Ejemplo de la secuencia de comandos. root@SoloLinux-demo:~# systemctl stop ts3server root@SoloLinux-demo:~# su - teamspeak teamspeak@SoloLinux-demo:~$ ./ts3server_startscript.sh start serveradmin_password=123456789 Read the full article
#Apache#InstalarTeamSpeak#juegosonline#serveradmin#serviciosystemd#servidordedicado#servidorHTTP#servidorlocal#servidorTeamSpeak#systemd#TeamSpeak#TeamSpeakServer#TeamSpeakServerenUbuntu20.04#ts3wi#Ubuntu20.04#usuarioteamspeak#voip#vps
0 notes
Photo

Productive (8th Day)
I was taught by Sir James Andrew D. Atos how to reformat HASEE and ASUS office laptops. It requires the use of a bootable hard drive. Drivers were installed as well as other applications needed.

Another accomplished task was the installation of softwares (MS Office, SocPen, Abode Reader) at Community Based Services Unit (CBSU) , Conference Room , Human Resource Management and Development Division (HRMDD).

In the afternoon, Sir Carmelo discussed about Server Administrator. Topics talked about were about common administration tasks, problems encountered as a server administrator. He also discussed about Domain Name System (DNS), Dynamic Host Configuration Protocol (DHCP), and Active Directory. He contrasted Domain Administrator Accounts and Local Accounts and its significance in the establishment of password. He also mentioned about Network management protocol – Windows Registry Editor (regedit), System Utility - System Configuration (msconfig), Configuration manager - Group Policy Editor (gpedit.msc) and Run command for user accounts and groups using lusrmgr.msc.
0 notes
Text
Affordable Domain Registration and Website Management: A Comprehensive Guide
Understanding Domain Registration
A domain name serves as your unique address on the internet, allowing users to find and access your website easily. Registering a domain involves securing the rights to use a particular name (e.g., yourbusiness.com) for a specified period, typically one year, renewable annually.
Choosing a Domain Name: Selecting the right domain name is crucial. It should be memorable, relevant to your brand or purpose, and ideally include keywords related to your business. Tools like domain name generators can assist in finding available options.

Where to Register: Numerous domain registrars exist, offering competitive pricing and various services. Popular registrars include GoDaddy, Namecheap, and Google Domains. Compare prices, customer service, renewal rates, and additional features (like email hosting or SSL certificates) before making a decision.
Cost Considerations: Prices for domain registration can vary widely depending on the registrar and the domain extension (.com, .net, .org, etc.). Some registrars offer discounts for the first year or bundle services, so consider long-term costs beyond the initial registration fee.
Website Management Tools and Tips
Once you have your domain, effective website management ensures your site remains functional, secure, and aligned with your goals. Here’s how to manage your website affordably and efficiently:
Content Management Systems (CMS): Platforms like WordPress, Joomla, and Drupal simplify website creation and management. They offer themes, plugins, and tools for customization without requiring extensive technical knowledge.
Hosting Services: Choose a reliable hosting provider that offers good uptime, security features, and scalable plans. Shared hosting is cost-effective for small to medium-sized websites, while cloud hosting provides flexibility and scalability as your site grows.
Security Measures: Protect your website and visitors with SSL certificates (to encrypt data) and regular backups. Many hosting providers offer these as part of their packages or as add-ons.
Optimization and SEO: Ensure your website loads quickly, is mobile-friendly, and optimized for search engines. Tools like Google Analytics help track performance and identify areas for improvement.
Budgeting Wisely: Consider your ongoing expenses for domain renewal, hosting fees, and any additional services. Some registrars offer bundled packages that may include hosting or email services at a discounted rate.
Conclusion
Affordable domain registration and effective website management are essential for establishing and maintaining a successful online presence. By choosing the right domain registrar, leveraging content management systems, and prioritizing security and optimization, you can create a professional website without breaking the bank. Regularly review your options and adapt to technological advancements to ensure your website remains competitive and relevant in the digital landscape.
Whether you’re launching a new business or expanding your online reach, investing in these foundational elements will set you on the path to online success. Start today and watch your digital presence thrive!
#WebManagement#ServerHosting#WebsiteMaintenance#TechSupport#CloudHosting#DataCenter#ServerManagement#WebHosting#ITInfrastructure#WebsiteSecurity#ServerAdmin#HostingSolutions#WebsitePerformance#ServerMonitoring#WebDevelopment#CloudComputing#NetworkSecurity#DomainRegistration#BackupandRecovery#Cybersecurity
0 notes
Text
Prometheus Installation: Komplettanleitung für Linux Ubuntu 22.04 und Debian 11
In diesem Tutorial installieren wir Prometheus auf einen Linux-Server mit Ubuntu 22.04 oder alternativ Debian 11. Prometheus ist eine Open-Source-Monitoring- und Alarmierungsplattform für die Überwachung von Microservices und Linux-basierten Hostsystemen. Prometheus verwendet für die...[Weiterlesen]
0 notes
Text
::Shockwave, you read? Rodimus told me you had Kaon. Is he hurt bad? I can get supplies and meet you at Swerve's.::
@serveradmin-shockwave
8 notes
·
View notes
Photo

Server migration is boring but necessary. #ServerAdmin (at Zerflin)
0 notes
Note
"I will talk about it if prompted" well then, more info about eret and their outfits? 👀
okay. so. this is not actually about any outfits in particular but rather clothing as a symbolism for control. i'm gonna point out a couple passages from to me, i say and talk about what they represent
He'd challenged Ranboo to a duel, like a dumbass, because he'd been high on adrenaline and fear and he'd kept looking up to see Eret, beautiful and terrifying in their highest platforms and most formal wear, looking less like a king and more like the ServerAdmin that they truly are.
doomsday is. well. doomsday. half of control is appearances. eret dresses formally and wears platforms (and unmentioned but her hair is ornately braided) for her greatest act of violence so that she appears just as powerful as her actions make her out to be. most of the people there are her enemies. she cannot let her guard down, and the stiff formality and controlled expression is her guard.
even eretsmp!eret's daily wear is formal. she's often wearing heels or platforms and towers over everyone else. she is the ServerAdmin. she is in control.
but. around someone she trusts? around foolish?
their crown and sunglasses are sitting in the sand beside them, their typical platforms exchanged for a worn pair of sneakers, their shirt untucked.
the crown is quite possibly the biggest symbol of control. when eret is wearing it, she is thinking about the Server as a whole, about what is best for it, about what actions she has to take to protect the whole. and, well, before doomsday,
"i'm doing the right thing." eret tells themself, crown on their head, tnt in their hand.
in conclusion: the more formal they look, the less they trust you. nobody except foolish knows eret owns sneakers.
#i might be incoherent i just. clothing and hair as symbolisms for control go brrr#> eretsmp au <#> asks <
2 notes
·
View notes
Text
How To Make Your Own Website and Monetize it?

By following up with me in less than twenty-four hours, you will be ready to launch a Website that will undoubtedly earn you thousands of dollars every month! How to generate the money? Well, the website that we make will be offering SAAS service.
What is a SAAS service?
A SAAS (Software As A Service) service is essentially an online software or service that you pay to use.
For example, Mailchimp.com, which is a SAAS service, provides email marketing services that you pay for.

A SAAS service is anything you pay for to get an online service.
Now you can be the owner of a SAAS service, you will have your own Website, and people will subscribe to your service and pay you monthly recurring payments.
Let’s say you have 100 customers who use your SAAS service, and your service costs about $10 a month; you’d make $1000 per month!
All you have to do is sit at home and watch your passive income develop on your computer screen. It’s a fantastic and easy way to earn money.
How to get a SAAS service?

“How can I get my own SAAS service or software?” you might be wondering. The good news is that you don’t have to create one, learn to program, or even employ a programmer to do so.
You can simply buy it Online for $40–$60. You can buy software from a website called codecanyon
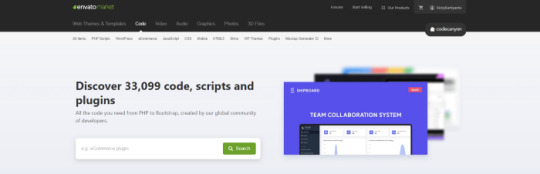
You can simply visit the website, click on the php scripts and search for SAAS and choose what kind of SAAS service that you preferred.
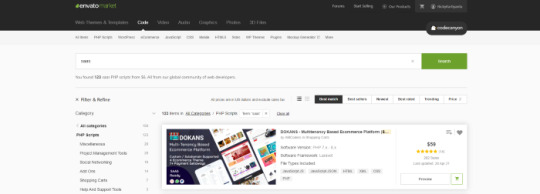
There are several types of SAAS applications available for purchase. Discount networks, accounting and billing software, email marketing systems, and employee management software are only a few examples. Take your time browsing the services and choose the one you like best, the one that fits you and you feel that you can be successful with.
Hosting Your Service
After you’ve created your SAAS service, the next move is to host it and make it public. To host it online, you’ll need a domain name and a server.
Now it is sounds hard since you don’t have any technical background in this term. Don’t worry, it is actually a simple and easy steps.
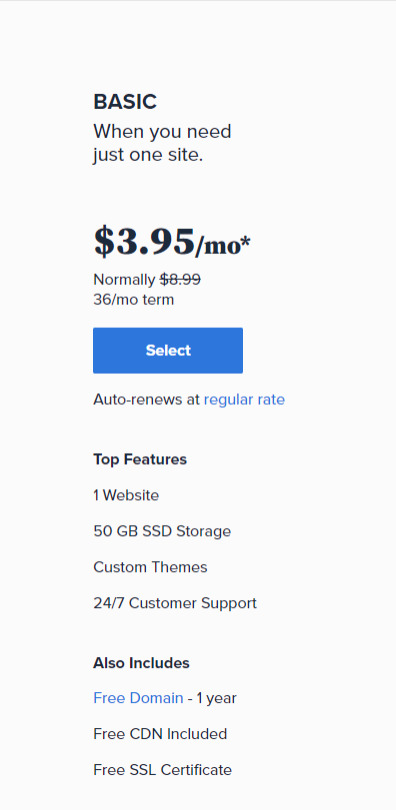
First you need a VPS server, you can visit and buy a cheap one from Bluehost. its only $3,95 permonth with and they give you free domain for 1 year! Check the price below. Buy the “LAMP” administration.
So What is VPS server? We do what we call “online hosting” when we want to publish a PHP page, script, or some other web application. This basically means uploading the files and database to a public server so that it can be accessed over the internet. On simple word, the place where you put the file is from VPS server.
In this tutorial we will used the shared server from Bluehost. Shared server only means that your server will be host with others website.
Now everything is ready, the only things that matter is how to install it. Let get to it.
Getting Started
After having your own server and domain on Bluehost, you need to connect them. Your VPS Server can be accessed now your Bluehost profile, but of course, we don’t want to access our website though an IP! we want to use our domain name. So simply, we are going to map the domain name to our VPS IP, so then we access the VPS and the WordPress website through both the domain and the IP.
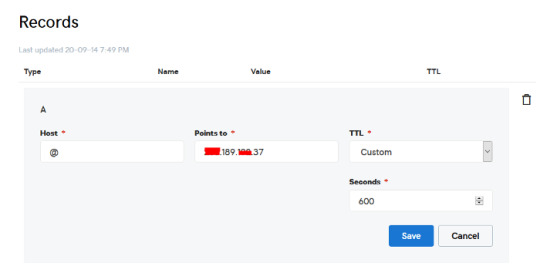
Configure your DNS Records
Simply open DNS management zone in your Domain Provider and edit the main A record.
Than we need to create MySQL database for the application. So Let’s Create one. Connect to your VPS server using any SSH client like putty. and Let’s start!
Just open Putty and enter the Server IP or Name, and Press Open. It will ask you to login, just enter “root” as the user, then enter your password which is sent to you by email.
Note: while typing the password, putty will now show it for security reasons, but It’s there, just type it!
What’s nice, is that we have MySQL installed already as part of the LAMP Stack, but we need to create a database and a user for out application.
Note: Every MySQL statement must end in a semi-colon (;)
To get started, log into the MySQL root (administrative) account by issuing this command:
mysql -u root -p
You will be prompted for the root password, just write or paste it and press Enter.
First, create a separate database that your PHP application will use. You can call this whatever you want, but we will be using TestDb in this guide to keep it simple. Create the database by running this command:
CREATE DATABASE TestDb DEFAULT CHARACTER SET utf8 COLLATE utf8_unicode_ci;
Next, we are going to create a separate MySQL user account that we will use exclusively to operate on our new database. Creating one-function databases and accounts is a good idea from a management and security standpoint. We will use the name DbUser in this guide. Feel free to change this if you’d like.
We are going to create this account, set a password, and grant access to the database we created. We can do this by typing the following command. Remember to choose a strong password here for your database user:
CREATE USER 'DbUser'@'localhost' IDENTIFIED BY 'enter_a_custom_password_here';GRANT ALL ON TestDb.* TO 'DbUser'@'localhost';
You now have a database and user account, each made specifically for Your PHP application. We need to flush the privileges so that the current instance of MySQL knows about the recent changes we’ve made:
FLUSH PRIVILEGES;
Exit from it by typing :
EXIT;
Upload The Script Files To The Server.
To upload the files, you need an application called WinSCP.
It is a free tool and you can download it from here.
Connect to Your VPS Server using WinSCP, and Update the PHP Files to the server to this path: “/var/www/html”
In most cases, the files would be zipped, so we need to extract them.
Again to Putty SSH CLient and Let’s install the unzip utility using the following command:
sudo apt-get install unzip
Clear putty screen to make in clean using the following command:
clear
Change directory to /var/www/html using the following command:
cd /var/www/html
Unzip the “.zip” file using the following command:
unzip YOURFILENAME*.zip
*Note: the file name may be different in your case, so replace YOURFILENAME with your file name.
Now, Move the latest folder content to the upper directory so it can be accessed directly -> use WinSCP Just copy all the files inside “YOURFILENAME” folder and paste them directly in html folder.
Configure Apache to Publish PHP Website
Well Done, Now your files are uploaded and placed in the html folder, we just need to configure apache so we can our Publish PHP Website and access our script using our domain name. To do so, open WinSCP again and navigate to this directory: /etc/apache2/sites-available/
Now, create a new empty file and name it “yourdomain.conf” . You can replace “Scriptname” with any name you want
Open yourdomain.conf Then copy and paste the content below into the file and save.
<VirtualHost *:80> ServerAdmin admin@YOUDOMAINNAME DocumentRoot /var/www/html ServerName YOUDOMAINNAME ServerAlias YOUDOMAINNAME <Directory /var/www/html/> Options +FollowSymlinks AllowOverride All Require all granted </Directory> ErrorLog ${APACHE_LOG_DIR}/error.log CustomLog ${APACHE_LOG_DIR}/access.log combined </VirtualHost>
Replace with your own domain, in my case its “YOURDOMAINNAME”
Enable your script configuration in apache and restart the service.
Now simply, run the following commands to finish the setup:
sudo a2ensite yourdomain.conf sudo a2enmod rewrite sudo systemctl restart apache2.service
ALMOST DONE!
Connect to MySQL Database.
Open your web browser now and navigate to your server name.
Continue the setup by entering the database info and your admin login information. In our example, the database name is TestDb and the user is DBUser with the password set.
That simple!
Setup cronjobs.What are cronjobs?
cron is a Linux utility which schedules a command or script on your server to run automatically at a specified time and date. A cron job is the scheduled task itself. Cron jobs can be very useful to automate repetitive tasks.
For example, you can set a cron job to delete temporary files every week to conserve your disk space. Some PHP web applicaitons, may require you to set up a cron job to perform certain functions.
Setup cronjobs.
To setup cronjobs, you need to add all required jobs to the server. This depends on your script, so if you bought a script from code canyon, the script owner should provide the cronjobs.
To do this, open WinSCP and got to /etc Open crontab file using the editor And paste all the jobs from your script to this folder. (cronjobs are listed in the app documentation)
Make sure each job is on a line and an empty line in the end.
Secure with a Free SSL.
SSL certificates are used within web servers to encrypt the traffic between the server and client, providing extra security for users accessing your application. Let’s Encrypt provides an easy way to obtain and install trusted certificates for free.
Connect to your Server using Putty SSH client. and Let’s Start!
Install the Let’s Encrypt Client
Let’s Encrypt certificates are fetched via client software running on your server. The official client is called Certbot.
First, add the repository to install Certbot:
sudo add-apt-repository ppa:certbot/certbot
You’ll need to press ENTER to accept.
Then, Update the package list to pick up the new repository’s package information:
sudo apt-get update
Install Certbot’s Apache package:
sudo apt install python-certbot-apache
Certbot is now ready to be used.
Set Up the SSL Certificate
Generating the SSL certificate for Apache using Certbot is quite straightforward. The client will automatically obtain and install a new SSL certificate that is valid for the domains provided as parameters.
Simply run the following command: (change the domain)
sudo certbot --apache -d YOUR_DOMAIN_NAME
You will be asked to provide an email address for lost key recovery and notices, and you will be able to choose between enabling both http and https access or forcing all requests to redirect to https. It is usually safest to require https, unless you have a specific need for unencrypted http traffic.
That’s it!
Test your website now and it should be SSL encrypted.
This tutorial I used are originated and made by Hasan By H-educate, you can check his link Here : https://h-educate.com/ or check his youtube on H-educate.
Other tips to make money online, check here : https://ricky-kartiyanta.medium.com/
Cheers!!
#website#saas solutions#saas#monetize#passive income#business#workfromanywhere#easy money#gettingrichfromhome
2 notes
·
View notes