#Smart-object layers
Text
Clean Carpet Logo PSD Mockup

Unlock the magic! Dive into the video below and witness the mesmerizing process of crafting your logo’s stunning showcase on a pristine carpet, all in a distinctive style, powered by our PSD Mockup and the enchanting capabilities of Adobe Photoshop.
Get Free Mockup Now
#Logo presentation#PSD mockup#Clean carpet showcase#High-resolution design#Unique style#Display medium#Smart-object layers#Logo design#Adobe Photoshop#Captivating allure#Creative love
1 note
·
View note
Text
this is so random but i was thinking that if there's one tip i could give to my fellow gifmakers who use photoshop is to try and familiarize themselves with actions more cause they really are that one feature that can save you hours of work cumulatively when used right imo
#ari.txt#text#like i've been using them for years for stuff like sharpening and turning layers into smart objects all at once#but now that i made myself one singular and personal action that combine ALL of my basic giffing steps#all there's left to do then is to color and choose the typo + layout#aka the fun stuff and not the repetitive mindnumbing stuff#lifechanging tbh
25 notes
·
View notes
Text
wait since when does having multiple text layers make photoshop double the frames before exporting????????????
#i never had this problem before#but it happened three times now#once it QUADRUPLED the frames#but it saved fine after i made the text layers a smart object#wtf#sary rants
3 notes
·
View notes
Text
if any gif makers out there know how to compress gifs for posting on social media without obliterating the quality pls hmu ... like i see some nice quality gifs on this site + other sites and its like how do they look so clear and perfect ??? is there something im missing?
#my process for the splat gifset i just posted:#>take videos on game >trim vids as desired >upload vids to twitter >download vids in HD >import/convert video to layers in PS#>convert to smart object >save for web legacy#>then told by tumblr/discord etc '' gif too big !!!'' when trying to upload#>use ezgif to compress >upload to blog w poor quality :((#( :彡
4 notes
·
View notes
Text
haven't fucked around with PS in a hot second so my plan to mess around with some promo designs and book cover mockups ended up making me more annoyed than actually writing would have so that's two hours of my life i'm never getting back.
#in a world where smart object layers actually work how i need them to.#text tag.#i intend to get a proper cover commissioned for Profane Sacraments but uhhh accidentally went a little TOO hard on the placeholder#and now i'm lowkey in love with it.#but we'll see how this goes.#i'll probs use it for the patreon promo but go with the actual proper cover when the KU and B&N release rolls up.#which should be around april!#tgc tag
2 notes
·
View notes
Text
youtube
https://youtu.be/M2ORc9baLsA
Photoshop CC 2024 tutorial showing how to create the look of neon tube signs.
#bluelightningtv#photoshop#martygeller#adobephotoshop#bltv#photoeffect#photography#graphicdesign#neon#neon effect#text effect#typography#graphic design#neon sign#neon tubes#brick wall#invert#copy layer#rasterize#smart object#layer style#outer glow#inner glow#color#hue#bend mode#opacity#drop shadow#color overlay#blur
0 notes
Text
Reaching the stage of an experiment where I have to actually learn a very specific skill that I will probably never use again and I just want it to be DONE already
#kite rambles#i have the bulk of this thing down but how do animated ripple#how do#transforming smart objects wouldn't ripple right#hmm#also i do generally love procreate but it isn't quite capable of what i want right now#can't keep my paper filters on top of the whole thing without copying it into every#single#frame#it would be so many layers dear god i ain't doing it#when i get home I'll see how similar cs5 animation is to cc
1 note
·
View note
Text
Moody.
Coriolanus Snow x Reader | 3.3k words
depression, arguing, manipulation/toxic marriage, fucking each other over, possessiveness. it’s tamer than some of my others in an objective sense, but emphasizes dark thoughts and internal monologue.
requests always open! thanks for your kindnesses. i think this one is more experimental than the others. the objective here was to show how both of them mimic regular human feelings because they know they should, but it’s a poor pantomime. two sickos with nothing else but each other <3 i think i am going to call these works the Truculent series.
Coriolanus grew cold fast and did not tolerate heat well. He only slept only in his underclothes and wore heavy layers at the first sight of winter. His alarmingly fair complexion meant excessive sun wasn’t in the cards. In spite of his name, his scrappy build wasn’t meant to cut through harsh January terrain either. His nails chipped at labor, and his mind grew uneasy at laziness.
The world was tough on Coriolanus and he was tough right back on the word.
There was little Coriolanus was designed to do. Many people were strong, or smart, or wealthy, or drop-dead-gorgeous, or violent, or talented. There was something about every person Coriolanus could think of that made them stand out. He could easily categorized people by them. Here was the group of people known for their beautiful voices; here, those who could benchpress four-hundred pounds… Coriolanus could not be quantified like that.
Coriolanus Snow had to take what was left, like a runt. He was only good at two things: enduring and controlling. Since those were the only options leftover for him, Coriolanus became the best at them both. When, like Coriolanus, one has been gifted such shitty talents and nothing else, they have to figure out how to use them well enough to win against everyone with a better gift. Eventually, he realized his talents were not the ability to endure and the ability to control, but actually the ability to win. Eventually, he won so much, Coriolanus forgot there was ever a time when he lost (most days).
(The days he didn’t forget were the Bad Days).
Coriolanus felt like he couldn’t get out of bed on the Bad Days when the crushing weight of his failures and his ego landed across his chest. He told himself he was done with love after Lucy Gray. Disgusting Lucy Gray, a name he never wanted to even think again. He thought he would marry someone he hated and be done with love.
But junkies and addicts quit every Monday anyway.
Once he found [Y/N] again after their childhood together, there was no quitting. He knew it was bad for him, so he married what was bad for him to make sure he had an endless supply. How he hated that familiar feeling of obsession, the feeling of being so desperate that he had to rely on something other than himself. Somehow, he would have to sustain the feeling without losing his girl like an idiot. Marriage was likely the thing to steel their attempt at a bond.
Upon waking up to the alarm that morning, Coriolanus knew this was one of those Bad Days. Maybe it was the weather, the stress of Games. First year as head Gamemaker had almost driven Coriolanus mad under the pressure to succeed. He reached over to turn off the clock that buzzed painfully at six in the morning every day ending with a Y.
“Coryo…” [Y/N] mumbled, hearing him stir beside her. The sound must have woken her. She tossed an arm over his chest.
“‘Mornin’, Darling,” Coriolanus replied, wishing he were dead.
[Y/N] immediately picked up on the flatness of his tone, but she knew better than to push him too far. “All good?” She asked.
Coriolanus grumbled passively. He rarely did anything passively. Coriolanus grabbed the hand over his chest and dragged it up to the side of his face to rest it there, but only after he had kissed [Y/N] palm.
“You’re affectionate this morning.”
“I just missed you. I’ve been busy.” He said dismissively, pressing his face further into her hand.
“Well, thanks, dear, but don’t you have work?” [Y/N] asked. She propped her chin up on his shoulder to stare at him inquisitively. This attitude was odd. First thing in the morning during Games seasons, she got a kiss on the forehead and then Coriolanus was gone for a run and a shower and out til nightfall, barring special occasions.
“Don’t you?”
“Not til early evening today. Normally, you’re up and out of here first thing on a Tuesday morning,” [Y/N] told him, as she rubbed from his cheek to the side of his throat gently. She dragged her hand up his face to rest on his worried forehead. “You sick, or something?”
“No.” Coriolanus replied weakly. He closed his eyes again. He couldn’t face the legendary blunder he had made at work. Coriolanus had allowed his aides to code the program for the arena wrong. The open water was nowhere near as deep as was needed for the aquatic muttations. It was causing all sorts of trouble. The Games would end too fast if he didn’t do something, yet the stress of thinking of reaching across the nightstand for his Communicuff was paralyzing.
“You sure? You don’t feel feverish,” She confirmed. [Y/N] sat up to press her lips to his forehead just in case her cold hands had misread his temperature. “I can call the doctor, though.”
“[Y/N], stop. I’m fine.” Coriolanus lied harshly. He tried to sit up, but his psychological anguish made him feel like vomiting.
“Call in. Stay here.” She suggested, watching his weak movement to sit up.
“I’m head Gamemaker, I don’t get to call in. I need to go for a run’n I’ll be fine.”
[Y/N] raised an eyebrow. “So you aren’t currently fine? Because you said—“
“I know what the fuck I said, okay?” Coriolanus barked. “Wanna recap anything else, or can I go?”
Sharply, [Y/N] scooted away from him to the other side of the bed. His moods were hardly predictable. She sighed. “Fine,” She said, averting her eyes to her hands like a scolded girl. “I was merely concerned that you—“
Coriolanus scoffed at her and shakily stood up from the bed. He quickly stepped into the closet and stepped joggers and a wifebeater. [Y/N] hoped he would grab a jacket as well; the weather was much too cold for mid summer. The Capitol itself got disproportionately cold often. She didn’t say anything out loud, though. “Get off my ass. Can’t you sit there and be grateful for once? With all that I do for you?Fucking hell.” Coriolanus said. He did not so much as look back at her as he stormed out of the bedroom.
[Y/N] could not understand what she had done wrong. The only things she had were provided through Coriolanus or simply the man himself. Once Coriolanus was presumed out of earshot, [Y/N] dropped her head into her hands and cried. Not tears of frustration or anger, but tears of self-pity that her one lifeline had yelled at her like that.
—
By the time Coriolanus returned from his run, it appeared his wife had gone out for the day. Strange since she usually capitalized on the extra sleep if she was not working downtown with Capitol News until evening shift. Since their reckless young adulthood of media stunts, Coriolanus had watched [Y/N] grow a stifling love for spectacle. With his support and their shared deranged name recognition, she had quickly risen from an editor, to a correspondent (brief. He had helped her but her way up and out of that position) to Associate Head of Programming for Capitol News. It helped to have his wife steer both their media narratives from the inside.
Except for when she was mad at him.
Coriolanus wiped the sweat off his brow in the shower as he thought. There was no doubt in his mind that [Y/N] was going to run some sort of primetime bulletin that made him look a fool during his Games coverage that night. It was bad enough that Lucky Flickerman was beginning to look like botox had gotten better of him, in addition to Coriolanus’ own fuck up with the muttations. Fact of the matter was that viewership was down and [Y/N] was going to make it worse. She was going to make his Bad Day worse and he knew it.
He could feel his heart rate racing as he stood under the shower’s cold stream. His equally cold blue eyes glanced across the bathroom at the clock. Six-fifty AM. Realistically, he need to be into the Gameroom by no later than eight-thirty, but it frustrated him to be in later than eight. In roughly an hour, how could he perform the maximum amount of damage control? Coriolanus’ head began to ache at the thought.
She had never run that harsh of a piece on him before, but it was a Bad Day, and no doubt she was angry with him for his attitude. [Y/N] was capable of a great many horrible things. Wouldn’t Coriolanus himself want to sting somebody back who he had known was pissy with him?
When he exited the shower, Coriolanus rushed to dress himself. [Y/N] said she wasn’t working until late. But where, then, had she gone? With all the thinking about his own feelings, he hadn’t considered that conundrum.
—
Coriolanus called her secretary, a boring woman with a name neither man nor wife could recall. According to that woman, [Y/N] had not gone early to work. He rang Tigris. Tigris said [Y/N] had not been over unless she was lying which Coriolanus wouldn’t put past her. The Plinths swear they had not encountered her.
Coriolanus stared down at his datapad of phone numbers. He refrained from calling all of their friends because he didn’t want to to exude the panic he was starting to feel for letting his wife run away. None of her belongings seemed out of place. Her suitcase was present in the back of their closet. Still, Coriolanus was terrified in the back of his mind that his wife had finally left him. A year and half was a dreadful lifespan for a marriage in his opinion. [Y/N] was not getting away that easily.
However, his watch told him it was eight and the Games weren’t going to run themselves.
Throughout the day, Coriolanus could not get his heart rate to settle. It made him feel ill. So ill, in fact, that he couldn’t keep down most of breakfast, or all of lunch. He skipped dinner all together. Who was [Y/N] to up and leave him like that?
The slight rational segment of his brain told him to walk it back, but the rest of his brain paid no mind. Coriolanus had nothing going for him other than gut instincts and his gut instincts now were implying something was fundamentally wrong.
Coriolanus’ decision-making was way off of its game at work. Coriolanus, for ratings, could not allow the Hunger Games to end on a Tuesday night. Somehow, he would have to create obstacles to last the four remaining tributes til Friday. He didn’t much like those odds. He was going to cave and hand in his resignation before the end of the day, he was certain.
Though, at eight in the evening, the primetime announcement or chiron that Coriolanus was a shitty husband or a murderer never cut through his broadcast to make his Day irreparably Bad. Nor did it at eight-thirty, or even nine. Coriolanus felt shaky. Maybe with relief for his reputation, maybe because he had nothing in his system.
If nothing had aired at Coriolanus’ expense on TV, had something happened to [Y/N] while he was on his run, or later? Was this some rebel attempt to bring the head Gamemaker to his knees? An attempt from a bitter rival to play games with him? Coriolanus frowned. Many things could have happened to his wife between six in the morning and nine at night. Coriolanus could barely stand up as it was. He clocked out and summoned his driver as quick as he could.
The second Coriolanus’ key entered the lock, he started shouting with the energy he had left. The door had yet to even close behind him. “[Y/N]! [Y/N], my love! Are you here?” Coriolanus pushed open every cabinet and closet on his way to the bedroom. Empty. He checked the closet - her suitcase remained. Coriolanus had called her office on his way home. She had not shown up for work. Unheard of.
Coriolanus ran through every room of the townhouse shouting [Y/N]’s name over and over until he felt hoarse. He could only imagine what the neighbors thought. Then he saw the attic door open.
The door remained open, but the stairs to the attic had snapped back up halfway and gotten jammed. “Coryo!” He heard [Y/N] yell faintly from upstairs.
“Darling, are you… in the attic?” Coriolanus shouted back cautiously under the open door. He watched as [Y/N]’s tearstained face peered around the edges of the attic door. It was really her. Not a Jabberjay, not a setup. Coriolanus exhaled for what felt like the first time all day. “Let me come up. I’ll come to you. Hold on!” Coriolanus’ finally left behind the Bad Day as he leapt into action. Protecting his wife was his job before Gamemaker, or any other obligation. Anyone in the Capitol would remember their vows, or her smashing cake into his face much to his dismay. Marriage was socially his most binding contract of all. Coriolanus did not take contractional obligations lightly.
Coriolanus had not realized that his wife was so delicate and helpless as to get stuck in the attic. She needed him more than he thought. His heart swelled with pride. Coriolanus grabbed a broomstick and hooked the hinge in the stairs. He yanked with all his strength until the ladder descended. Quickly, he dropped a large sack of rice from the kitchen counter over the bottom step in hopes it would weight the stairs down and he took off up them.
“[Y/N], are you alright?” Coriolanus asked, popping his head through the attic door
There on the unfinished attic floor sat [Y/N], bundled up in her thin teddy she had been wearing when Coriolanus left. She had only that and a too-short blanket Tigris had crocheted as a child. There was very little in the attic at all. Some of the Grandma’am’s belongings in clear glass bins and whatever surviving relics had carried on from their post-war childhoods.
It was clear [Y/N] had been crying. “I thought you would come back.” She sniffled.
Coriolanus urgently climbed the rest of the way up the ladder and sat carefully down beside [Y/N], wrapping her in his long arms possessively. “I thought something happened to you,” Also, that you tried to leave me. “You’re freezing… How long have you been up here?”
“Since you went on your run.”
“Shit… All that time?”
[Y/N] thought her tears had long since stopped, but seeing Coriolanus appear upset about ignoring her all day made her want his attention more. She wanted him to feel bad.
The tears started flowing the second his arms were looped around her waist. [Y/N] rested her head on Coriolanus’s shoulder heavily. “Coryo, you just left. I come up here all the time to think and I didn’t think it would—“
The blonde man’s heart softened at the sight of her. “Darling, Darling, shh, don’t cry,” Coriolanus combed his hand through sobbing [Y/N]’s hair. “You’re okay. I’m here now.”
Coriolanus felt like he was able to play the role of comforter and protector nobly tonight in a way he had recently felt inadequate at. With ease, he draped her legs across his lap and adjusted her arms around his neck so that her body was completely supported by his. She clung to him like a desperate child. The skin-to-skin contact was most appreciated by Coriolanus after the Day he’d had. Coriolanus excitedly drew a breathe from her neck, taking in her scent.
[Y/N] sobbed dramatically into Coriolanus’ dress shirt, but he pretended not to care like a good husband. “I’m sorry. I c-couldn’t—couldn’t get down. I th-thought you would come get me. I shout-ted for you,” she played up her tears. [Y/N] played up everything for attention; they both knew that. But the situation was mutually beneficial for people that liked attention so damn much. “You didn’t hear me.” You never hear me.
“Oh, Princess…” Coriolanus rubbed his hands up and down her arms, hoping it would warm her up. He pulled away from her regrettably and stripped off his blazer. He wrapped it around her shoulders and pulled it carefully in front of her. He knew [Y/N] would like the gesture. Now, Coriolanus did not say I’m sorry. It was not his fault that [Y/N] had fled to the attic. He did instead try to make good from now forward. “I was so worried, I started to think something happened to you. I wanted to give you space, but then I didn’t hear from you all day. I’m relieved to know the only monster that got you was the attic,” Coriolanus leaned into her neck to kiss her in his favorite place. “You sat up here in all this junk and dust today; how are you still so stunning?”
[Y/N] laughed through a wet sniffle as Coriolanus searingly kissed her neck. “I didn’t know I’d worried you this much.” She muttered.
“I didn’t know I’d upset you this much,” Coriolanus agreed. That was as close to I’m sorry as she was going to get. “What did you do up here all day?”
“W-Went through some boxes. Found your old uniform.” [Y/N] smiled back.
“My Peacekeeper uniform?” Coriolanus asked in surprise. He hoped that she had not found anything else, if there was anything more scathing up in the attic.
“Mhm,” she affirmed. [Y/N] stood shakily from the floor, snot dripping from her nose. Snot, which she knew better than to wipe on the sleeve of his blazer. She followed where the beams were in the floor nimbly so she didn’t put her foot through the ceiling below her. [Y/N] collected a decently sized metal crate with a handle on it. PRIVATE SNOW, CORIOLANUS B. was stamped on top of the dusty, dented metal. She carried it back to Coriolanus and sat down with it in front of him.
“I didn’t go through everything in here, that felt intrusive, but I did pull this out,” they both knew that was a lie and that she had absolutely gone through every item, but Coriolanus let her keep going without cutting in. [Y/N] decided she would still let him explain the history behind every item he wanted to share anyway.
When she shook the long gray-blue jacket out of the box, something happened that hadn’t happened last time she took the jacket out. “Coriolanus, what’s this?” [Y/N] asked, plucking a bulky chain off the floor that had tumbled from the coat’s breast pocket.
“Ah, I’d forgotten where those went. Dog tags from my time in Twelve.” Coriolanus said.
“I still have my father’s. You were like a real soldier then, huh?”
“Peacekeeper.” Coriolanus corrected.
“Yes, Peacekeeper.” [Y/N] agreed quietly.
[Y/N] held the two identical pendants in her hands.
SNOW, CORIOLANUS
CITADEL, CAPITOL
4147769218S 12
O NEG
CREMATE
His entire identity all on two pieces of nickel. While she squinted at the embossed metal, Coriolanus leaned forward across the box that had once held his entire world and grabbed the chain she was holding as well as her hands. [Y/N]’s red weepy eyes met his crystal clear blue ones. “Would you like them?”
“You don’t want to keep them?”
“Certainly not. My name right there on your chest? That’s preferable to them sitting in a dusty box forever. People will know who you belong to if you wander off like this again. ‘Know you’re not, hm, like… up for finders-keepers.” Coriolanus shifted them out of [Y/N]’s hands and dropped the chain around her neck as if it were the finest gold necklace he had ever purchased her.
Coriolanus put that box up in the attic because he had not wanted to think about it ever again. Above all, though, Coriolanus Snow was an opportunistic man and he put those dog tags on [Y/N] just like he had Lucy Gray because he knew this move was flattering. If it worked once, it would work again. Sickeningly, he pulled out the same words he had used before too: “There. All mine.”
“All yours.” [Y/N] replied.
TAGLIST:
@badwicht @stelleduarte @cinnamongirl127 @prettyppetty @soulessien @bejeweledreverie @jjstyles @arminsarlerts @chmpgneprblem @co1dmountains @miscellaneousmoonchild @lille999 @pumkinnxsmut @taykorsyogurt @ndycrls @watermelonharry @nananarwhal @ohantonia @catlover420sstuff @justaproudslytherpuff @notarabellasstuff @scarytiger111 @zucchinimalfoy @secretsicanthideanymore @h-l-vlovesvintage @dannydevsbbg @clintsupremacy @lookclosernow @10ava01 @or-was-it-just-a-dream @lucielsstuff @fairyydvst
as usual, apologies if your tag didn’t work. tumblr’s tough like that. also so sorry if i forgot anyone! remind me if i did!
#coriolanus snow#coriolanus snow x reader#hunger games#coriolanus snow x you#coriolanus snow imagine#coriolanus x reader#coriolanus x you#coryo snow#the hunger games
944 notes
·
View notes
Text
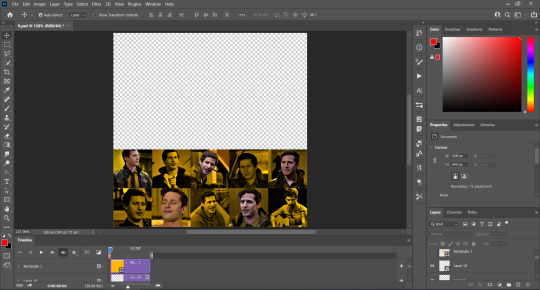
TILE TRANSITION TUTORIAL

a couple of people have asked me for a tutorial on how I did the penultimate gif in this set, so here goes! this is my first tutorial, so please feel free to reach out with further questions if anything's unclear.
note: this tutorial assumes you know the basics of gifmaking, can create the base gifs, and are familiar with timeline mode.
STEP ONE: create the base gifs! I'd recommend staying between 25-40 frames for each gif, since the transitions we'll use later tend to increase gif sizes. these are the ones I'll be using for this tutorial:


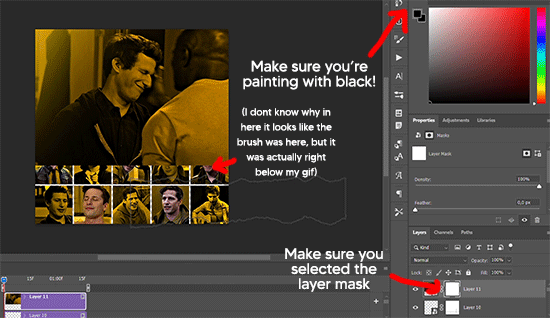
STEP TWO: create the guide layouts for both base gifs. for this panel, I chose a 4x4 grid — I would recommend keeping the number of "tiles" low because it can get tedious, but have a minimum of 9 (3x3 grid).


now your canvas should look like this:

STEP THREE: create the tiles. this is where the going gets rough; there might be easier ways to do this that I couldn't think of 😭 if there are any please send me an ask!
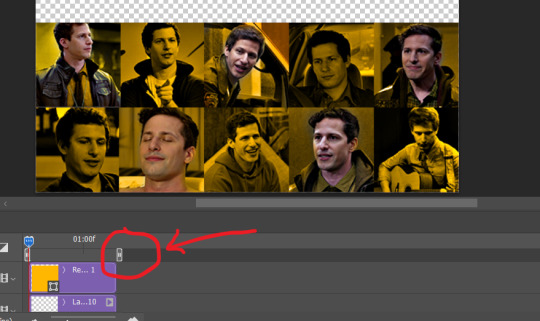
essentially, in this step we'll cut up the base gifs into smaller squares so that each tile can be manipulated separately when we put both gifs together. to do this, first create a square using the rectangle tool and the guides. then duplicate the base gif, move it above the square, apply a clipping mask, and then convert the clipped gif and square (selected in the image below) into one smart object.


ALTERNATELY: you could duplicate the original base gif and use layer masks to isolate tiles. create a layer mask for the duplicated gif layer and, with the layer mask selected, drag your mouse over a square (using the guide layout) and press delete. then press ctrl/cmd + i to invert the layer mask so that the gif only shows in the square of your choosing.
now repeat until you've got the entire gif in tiles, and do the same for the other gif!
since the transition effect is achieved by staggering the crossfades for each tile of the final gif, you can cheat by having multiple tiles "flip" at a time, ideally no more than four. this means you need to cut the base gif up into fewer pieces. to do this, simply draw multiple squares instead of one and then merge the shapes, before duplicating and clipping the gif onto them.


if you do this, it's essential to remember that you have to divide both gifs up in the exact same way. each piece of the b/w gif has to correspond to a piece of the purple gif!
this is what the layers look like for each gif once I'm done:


I have them lettered so that it'll be easier to match them up in the next step.
STEP FOUR: this is the complicated bit that took me two days to figure out. I'll do my best to explain but don't hesitate to reach out if something isn't clear!
to begin, open up a new psd and import both base gifs into it. (remember to click "create video timeline" and ensure that your gifs are all in order before proceeding.)
now, the trickiest part about this transition is ensuring that all the little tiles sync up so that the larger gif is coherent. so first we'll create some markers (just empty layers) to ensure that everything lines up as it should.
— marker 1: at about halfway through the first gif (b/w in this case)
— marker 2: at about a quarter of the gif length
— marker 3: close to the end of the gifs

at this point we're ready to start bringing in the tiles. I'm going to delete the base gifs from this new psd just to keep things cleaner!
first thing to do is import my b/w tile. move the timeline slider over to marker 1 and split the first gif. (if it helps, rename the split gifs and add (start) and (end) to the two halves.) then, move the (end) half to the beginning of the timeline, and the (start) half to line up with marker 3.
the purple tile is easier to manage. simply import it into the psd and line it up with marker 2.
your timeline should now look like this:

notice the overlap between the gifs at their beginnings and ends — this is where you'll be able to cascade the tiles flipping, so it helps to have a significant amount of overlap.
crop the three gifs for this tile as you see fit! since this is the first tile I want to flip from b/w to purple, I'll crop gif 1a (end) all the way to the current position of the timeline slider (red line with blue tip) and leave the beginning of gif 2a uncropped. for the flip from purple to b/w, I'll crop both gifs a bit.
once that's done, drag all three gifs onto the same level in timeline so they form a video group. your timeline should look something like this:

now you just repeat the process for all the other tiles! as long as you made sure that all the tiles in one gif correspond with tiles in the other gif in step three, this should be a fairly painless process. make sure to crop the starts/ends of the gifs separately so that they don't all flip together.
this is what my layers look once I've done all the tiles:

and the gif!

STEP FIVE: transitions! click on the half-white square (top right of the left column in the timeline, beside the scissors) and select the crossfade transition, then drag it between two gifs in a video group. it should create a two-triangle symbol and shorten the overall length of the video group.


apply the transition to all the tile flips, ensuring that the duration of all transitions is constant. this can sometimes be tricky because ps likes to change the duration of each transition, so right click on the transition symbol and manually change all your transition durations to be the same.
your layers should now look something like this:

STEP SIX: draw the grid. bring back the guide layout from step two and using the line tool (I like 2px thickness), trace the grid. adjust opacity as you see fit (50-80% is usually a good idea), so that the canvas looks like this:

STEP SEVEN: export and celebrate! you're done!
I hope this tutorial made sense and was easy to follow, and happy giffing! my inbox is always open for any questions <3
#tutorial#ps help#ps tutorial#userace#alielook#userabs#usercats#userhella#userfaiths#tuserabbie#usershreyu#usertreena#tuserlucie#uservivaldi#usertj#usergiu#userroza
740 notes
·
View notes
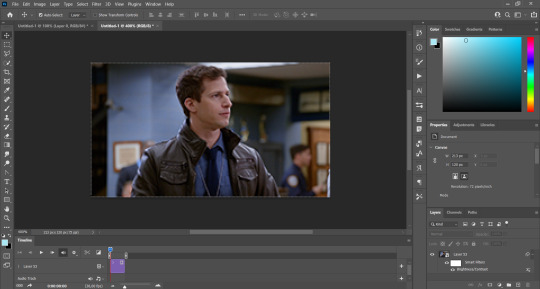
Text
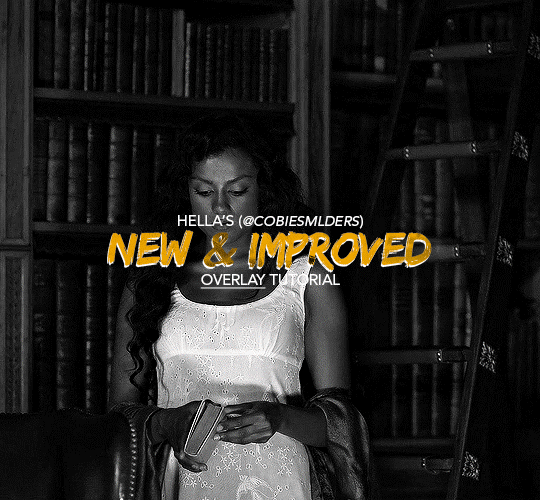
Hello!! A couple years ago I posted this tutorial for making gifs with a moving overlay effect. In the two and a half years since I made that tutorial, I've learned some new tricks for this gif effect but most importantly I've learned how to explain things better.
For that reason, I've created this new and improved tutorial for my overlay gif effect. The basics are the same but it's simpler, I go into more detail, give better explanations, and have more comprehensive instructions.
The easiest way to do this effect with this method is to use smart objects and work in timeline. For this tutorial, I’m assuming you know the basics of giffing like cropping, resizing, colouring, etc. If you need help with this I’d suggest you look at some other tutorials and guides!!
First, we’re going to start off with three things.
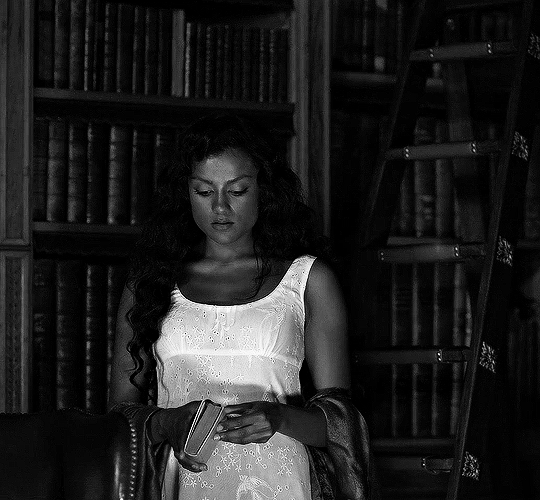
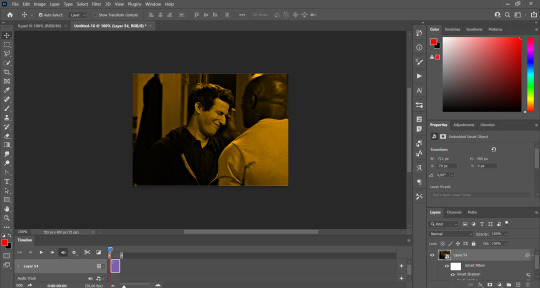
1. A completed gif converted into a smart object that is going to be the base gif. I'm going to call this "gif1". You’ll want this gif to be at least 3 seconds because it needs to last as long as the overlay plus a little bit of extra time in the beginning.
This is the base gif I’ll be using in the example (except I trimmed it so that I could meet the size limit).
2. A second completed gif converted into a smart object that is going to go over the base gif. We’re going to call this "gif2". This gif should be at least 2 seconds but I’ve made it work with shorter. Gif2 needs to be the same dimensions or bigger than gif1.
This is the gif I'll be using in the example (except I trimmed it so that I could meet the size limit).

3. An overlay in video form. These can be found on tumblr and youtube by search for overlay or transition packs. For this example, I'll be using an ink drop overlay I found on youtube.
Step 1: Turning the overlay video into an overlay gif
Most overlays aren’t going to instantly fit the gif effect you’re trying to achieve right away. This is the overlay I got from youtube and as you can see it’s too slow and needs a crop/resize to be usable.

To fix it, I sped the frame rate up, cropped the overlay, and resized the overlay so it fits over my base gif. I also sharpened the overlay (500% amount, 0.3px radius) so that the edges were smooth. This is the new overlay gif and the one I’ll be using for the gif effect.

A tip: I also like to add a brightness/contrast layer to get rid of the grey on the overlay gif. Because we’re working with blending modes to achieve this effect, any parts of the overlay that are grey will be a blended mix of gif1 and gif2. If you think this will look good for your gif effect then don't worry about it!
Another tip: try to get the entire overlay movement to fit into a 2-3 second window. Anything longer than that will likely be cut off when you have to trim your gif to meet the upload size limit and it would suck to only have half of the overlay.
Step 2: Creating the gif effect
Drag a copy of gif2 and a copy of the overlay gif onto the gif1 canvas. I like to use Ctrl+Shift+V so that the layers are pasted in the same position as they were on the previous canvas. MAKE SURE that both overlay layers are in the same position on the canvas. If one of the overlay layers is higher/lower/etc. than the other then the effect won't work properly.
Then, make a second copy of the overlay and invert it (Ctrl+i). These are the layers you should have:

Before you go any further, trim gif2 and both overlay layers so they are all the same length.
Now, we need to rearrange the layers and set blending modes. The top layer should be whichever overlay goes from black to white. This is because when we change the blending modes, the white part of this layer will disappear and look like its being replaced by gif2. In this case, that is the overlay (inverted) layer. Then we want gif2, the other overlay layer, and then gif1.
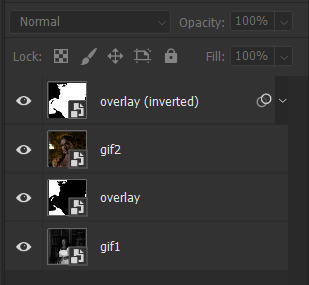
A tip: this process can be done the other way where the top layer is the overlay that goes from white > black however, you are much more likely to have an error where there is a grey/black line around the overlay effect in your final gif. In order to avoid that, I always use the black > white layer on top.
Next, set the top overlay layer to darken. You should only see the black part from the overlay and gif2 should fill in the white part. Here’s how that looks in my example.
Next, select the top overlay layer and gif2 and convert both layers into one smart object. Your layers tab should look like this now.

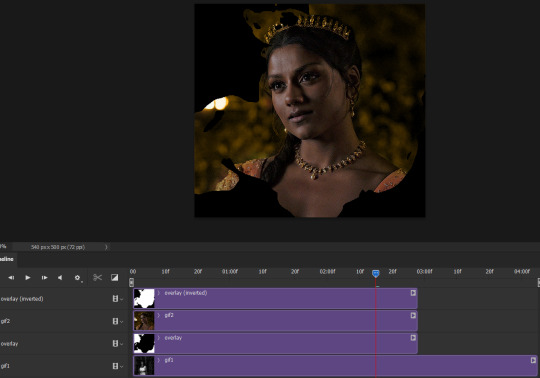
Now, set the new layer’s blending mode to lighten and the overlay layer’s blending mode to darken. Once you do this, you should be able to see gif1 as well as the overlay gif.
Step 3: Timeline and exporting
At the moment, gif1 is still significantly longer than the overlay gifs. Since this gif is just over 10 mb (which is pretty small for this effect) I’m going to trim about 1/4 of a second off the end of gif1 and then drag the overlay layers so they all end at the same time.

Now you’re free to export the gif! This is the finished effect for the example gif!

A tip: sometimes, when I convert to from timeline to frames, the gif becomes a little longer and slower. It has to do with different frame rates across the videos and photoshop but I'm not smart enough to understand it. If that happens, just set all the frames with the overlay layers to 0.04 speed instead of 0.05.
And we're finished! I hope that was helpful and made sense. If you have any questions feel free to drop them in my inbox or send me a message!! <3
#gif tutorial#allresources#completeresources#dailyresources#chaoticresources#ps tutorial#photoshop tutorial#usertreena#tuserssam#usernik#tuserabbie#tuserace#userk8#usershreyu#uservalentina#useryoshi#userannalise#userrobin#usersalty#uservivaldi
1K notes
·
View notes
Text

⠁ ⠀⸻⠀GRAIN HALFTONE is a halftone photo effect made with grain filters, available on Ko-fi for free. It comes with some adjustments, but may need more depending on the image.
⠀
⸻⠀TERMS OF USE
don’t repost nor reupload
don't reuse my layers
don't claim it as yours
personal use only
credits are MANDATORY
⸻⠀CONTENT
⠁ ⠀two different halftone effects:
simple grain
heavy grain
both require basic knowledge about smart objects, filters and adjustment layers
to use it for free, add a '0' on the price bar.
#♱﹔coloring#rp psd#psd#rp resources#coloring#psd download#psd coloring#roleplay#coloring psd#photoshop resources#character psd#psd for icons#psd moodboard#psd template#psds#roleplay psd#soft psd#icons with psd#filter#aesthetic#rp#twitter#twitter rp#discord rp#discord#rp help
282 notes
·
View notes
Text

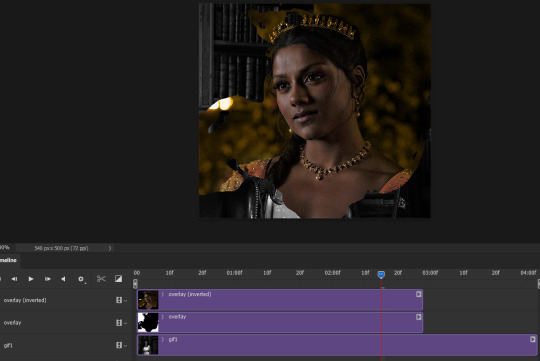
GRID + TORN PAPER + RAINBOW LAYOUT TUTORIAL
(yeah, i'm sorry, but that is the title i came up with)
Hi everyone! This tutorial was requested by an anon, and we're going to make a gifset like this. You need, as usual, basic gifmaking skills and basic photoshop knowledge, but i'll try to explain this as easily as possible!
You'll also need a torn paper brush, which you can download here.
And here are the links to download the fonts used in my gifset: x, x
Okay let's start!
→ First you're going to create a new canvas, and it will be 540x540 px. Make sure to click on create video timeline (if you dont have a timeline, go to window > timeline. We'll leave this canvas there waiting for us :)

Then, onto our first gif. We're going to make the small square gifs first. All i do is resize the image and make it 120 px high, and you'll see why in a moment.
Make sure to remember the number of frames of this gif!! All the gifs we're going to put in the same canvas should have the same amount of frames.
Okay, so we have our first small gif:
As you can see it's a smart object, and I added some brightness, but so far that's all. You can sharpen it, but i like to sharpen until i've colored it. Now onto the important part:
Most of the gifs i worked with were mostly blue (aside from the skin color), which is recommendable, because you can create lots of colors starting from blue, using the hue/saturation adjustment, or camera raw filter. I also recommend you to use a gif that doesn't move a lot, so it'll be easier to color the background:
For the tutorial, we have our predominantly blue gif, but we are going to make it yellow, which is the opposite color, so it's the hardest to get. I hope you can see how i manipulate colors, and do it yourself :)
Here, you can use camera raw filter (filter > camera raw filter) to turn the blues and purples greener, like this:
And click ok to exit the camera raw filter. Then, we're going to use hue/saturation (image > adjustments > hue/saturation) to turn it yellow:

Since it was cyan, i changed the cyans, but if you got a much greener result you'll have to use green (duh, right? i dont know i just dont want anyone to get confused akjsdhs)
And you can also add a selective color adjustment to make those yellows more yellow:

The reason i don't directly use hue/saturation is cause it might look ugly and lose quality, or it wont pick up all the colors i want it to but they're also very small gifs so if you wanna do that, do it :)
I sharpen it until this point, but if you already have that's okay.
Now we're going to color the background! For that, you just add a new layer, and set the blending mode to color.
Then you'll use your brush, set it to 20px and 0% hardness, and pick the color you're using for this gif, you can use the eyedropper tool. This is why it's important that the gif doesn't move a lot, so you can color the bg like this:
I colored carefully around the edges, and that's the result. In some gifs from my gif set I colored Jake's jacket too because i was too lazy, but this looks cleaner :)
You might want to select the color layer and the gif layer to convert them both to a smart object, just to make everything easier. So, be careful, because after that you won't be able to change anything!
But let's say you have a scene that you want to include, and it moves too much and has no blue and it's going to be a nightmare to color it.
Well, don't worry, you can! Simply, instead of manually coloring everything, you can just choose to add a gradient map to it (image > adjustments > gradient map), like this:
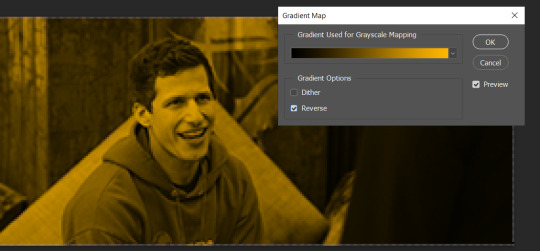
And this is the result:

Just remember, it has to be the same amount of frames as the other ones!
You repeat the process, until you have 10 small gifs. I made around 5 manually colored gifs, and 5 gifs with gradient for each gif. That's a confusing sentence but i hope you get it.
We are going to start pasting the small gifs on our first canvas.
(You can paste them one by one but i did this so you can see my 10 gifs)
You're going to create a square that has to be 108x108 px, using the rectangle tool. You can remove the default white background.

And you may be wondering, why did we not just crop the small gifs into those dimensions? Well, you can do that, but to me it's much easier this way, because sometimes cropping isn't accurate, or it's tedious.
Place the small square on top the gif you're going to crop, right where the face of the character is (or whatever objects you're giffing), and while holding ctrl, click on the square. It will select it:

You're going to create a layer mask:

And then drag that layer mask to the gif:

And voila! It's now the same size as the small square. Once that's done, right click on the layer and convert it to a smart object, because we have to remove that mask. Make the square layer invisible, and start placing your gifs where you want them:
You're going to repeat that process with the rest of the gifs, and then place them all together. Don't forget that if you're making the first gif, they will all be at the bottom of the canvas, if it's one of the middle gifs, one row should be at the top and the other one at the bottom, and when you're making the last gif, they should all be at the top. Here we're making the first one, so they will all be at the bottom:
If you forgot to check that all the gifs had the same amount of frames, you can fix it here, just make sure no gif is past this little guy:
Okay! Now, to create the gutter, we're going to add a layer mask to each small gif, so that we can cut some of it.
The gutter has to be 4 pixels, (i recommend you to REALLY zoom in). What i do is make sure the width of the gutter takes 2 pixels from the edges of the gifs, since they are all together. As you can see in the image above, there's no a single empty pixel between the gifs.

This is a close-up of what i'm talking about. I select two pixels from each gif, and go all the way down to create the gutter:

(I hope I'm not over or underexplaining)
I usually use this tool when i have to make so many selections:
But that was just an example :)
(Another way you can do this, is by changing the size of the small square from the beginning and make it be 104x104 px, but i don't know why that seems more complicated to me ajsdks)
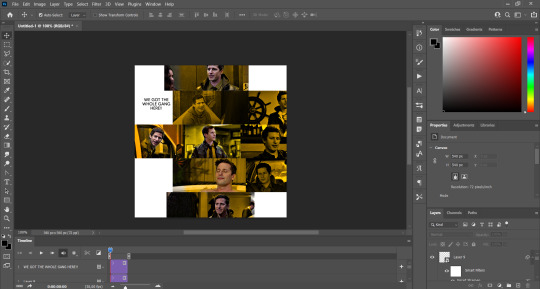
Anyway, this is what we have so far:

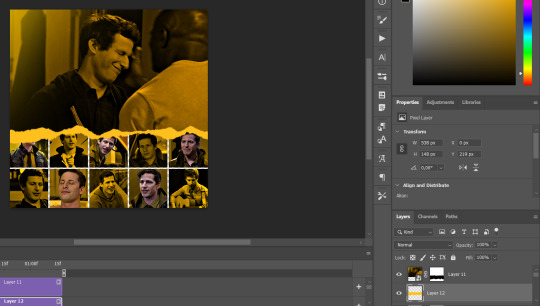
Now we're going to create the big gif. Its normal dimensions are usually around 1920x1080, unless you have different dimensions and have to crop it, but whatever it is, we're going to resize it and crop it to be around 550 px wide, and 400 px high:

We'll do the same thing of adding an adjustment of gradient to it to make it the color we're using. For this, i usually add a brightness layer before, because sometimes the gradient is a bit dark.
And using a 600px brush with 0% hardness, you can add some "light" on a new layer, like this:

Selecting all the layers, right-click on them and convert them to a smart object. Again, be careful, because once its a smart object, you wont be able to change any of it!
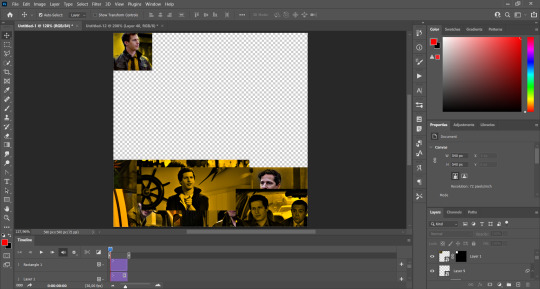
Then we paste our big gif on the canvas with small gifs, and add a layer mask to it. Using the torn paper brush at 600px, remove some of the gif to shape it like the torn paper. Make sure you're using black, otherwise it won't work correctly:
To make the effect better, add a layer UNDER the big gif, and using the torn paper brush, with the same size, you can paint under it:
Yeah, I covered some of jake's face, but that's how it supposed to look so the effect works!
And finally for the text! I used Granesta, at 150 px, and at -10.00º to make it a bit askew.
We're going to double click on it and give it a color overlay, set to normal, and give it a solid shadow if you want, then place it right here on the corner:
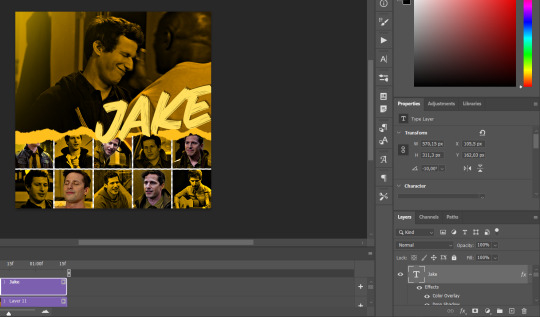
But as you can see, it's too big for the gif. So we're going to add a layer mask to it, and again, shape it the same way that we did with the gif. Make sure they're exactly the same shape, like this:

And that's it! This is our final result:

As always I'm sure there are easier ways to do many of these things, this is just how i do it but if you know an easier way to do it, go ahead. I hope this was at least understandable enough so you can apply the logic of it any way you want :)
If you have any questions you can send me an ask and i'll clarify!
If you found this helpful i'd really appreciate it if you left a tip on my ko-fi!
Happy giffing!
#will i ever learn how to properly explain things 😭#tutorials#uservivaldi#userraffa#userbuckleys#userhallie#tuserheidi#usertina#userfern#usersole#usercera#userzaynab#userisaiah#usernik#userpriyas#usertj
349 notes
·
View notes
Note
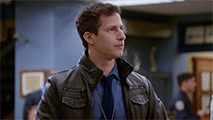
how do you sharpen your gifs???? they're insanely high quality!
Hello, Anon dearest, and thank you so much! ✨ To answer your question properly, I would first have to know which gifset(s) of mine you're referring to because I've made a lot over the years and I often change my sharpening settings, too. It totally depends on what I'm working with at the moment, to be honest. 😅
But, as for the last few sets of mine (this, this, and this in particular), I used these settings:
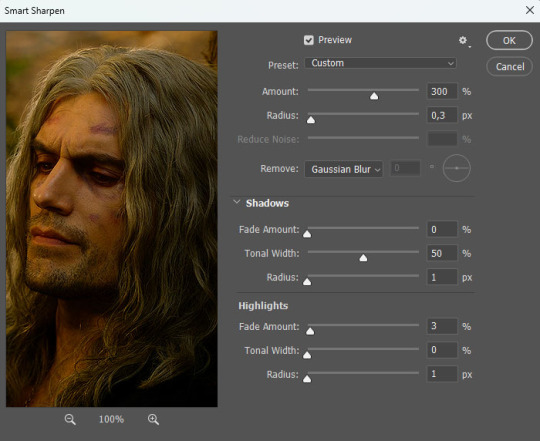
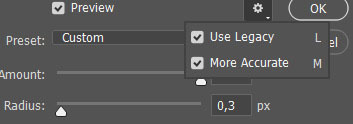
After converting my frames/layers into a smart object, I applied the settings above. Remember to click on the gear icon in the upper right corner and check both 'Use Legacy' and 'More Accurate' as well. This will make your sharpening look more 'natural' and less cakey imo.
Below is a comparison of before and after:
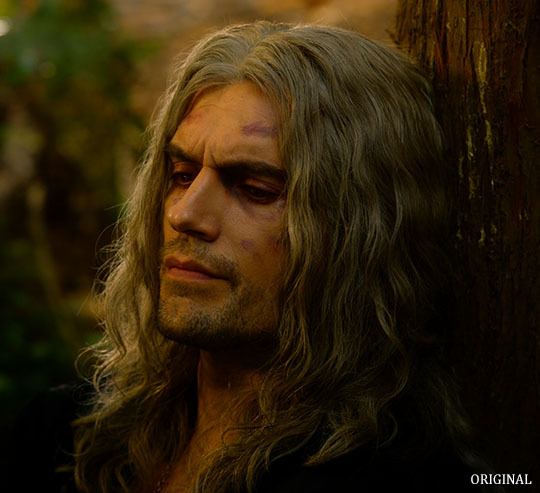
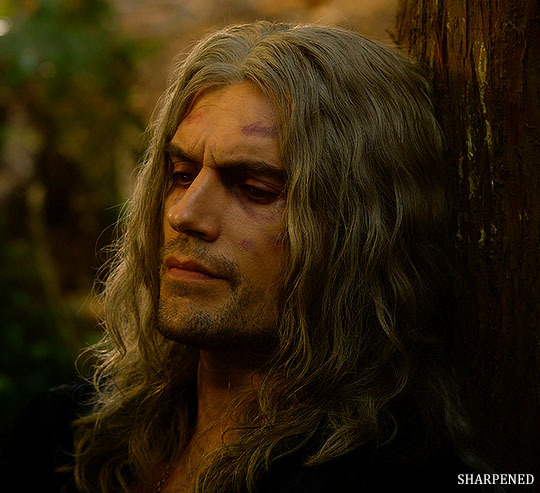
Note: This Geralt screenshot was taken from a 4K (2160p) video. Most videos I work with are at least 1080p or 720p because quality matters.

And here's the final result: colored, brightened, and sharpened.
—
I hope this answers your question. If not, feel free to send me more questions about this kind of stuff. I'm always happy to help out :)
#replies#anon#photoshop#tutorial#resources#ps help#sharpening#gifs#giffing#completeresources#allresources#chaoticresources#my gifs#my tutorials
261 notes
·
View notes
Text
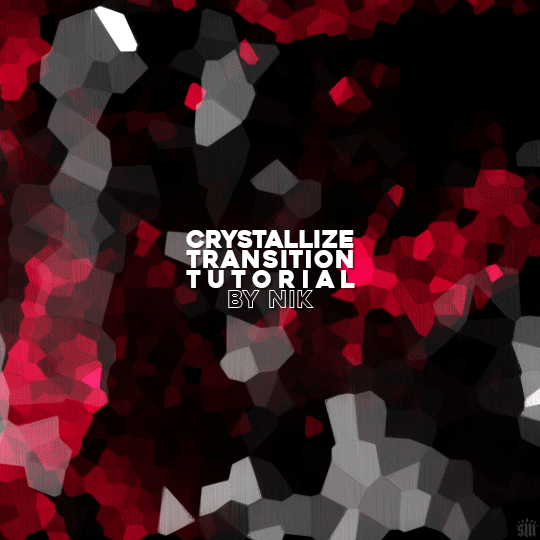
HOW TO: Do A Crystallize Gif Transition
Hi! I was asked to explain how I did the transition effect in this gifset, so here's a quick tutorial! Disclaimer: This tutorial assumes you have an intermediate understanding of gif-making in Photoshop using Video Timeline and requires the use of keyframes.

PHASE 1: THE GIFS
1.1 – Determine how many frames you need.
Since you need at least 2 scenes for a transition, consider limiting the amount of frames you'll use per scene. For a transition between 2 scenes that's 540x540px, I would recommend no more than 30 frames per scene (for a final gif that's 60 frames). Even that may be pushing it depending on your coloring. Just be sure to consider the dimensions and colors of your gifs in relation to the amount of frames to keep your final gif under Tumblr's 10MB limit.
1.2 – Import frames, crop, resize, convert to smart object for Video Timeline, color, blend, etc.
Do this as you normally would! If you need a tutorial for the basics, here's my tutorial. :) Please note, the methods in this tutorial only work with gifs that are converted into smart objects in the Video Timeline workspace.
Tip A: I recommend using scenes where there's a lot of one color (or scenes where you can manipulate it to look like that). The crystallize filter on a gif creates A LOT of movement that can feel a bit chaotic. Having your gif be primarily one color reduces the eye strain a bit imo.
Tip B: I like how this effect looks with blended scenes because it allows me to use different "crystal" sizes (more on this in Step 2.2). Check out the USERGIF Resource Directory for plenty of blending tutorials!
1.3 – Move all your gifs into one document, group into folders, and arrange.
Once everything's in one doc, keep everything organized in a group folder! I have just two scenes, so that's Folder 1 & 2. Within those folders are the gifs I blended, which I labeled by gif color. Then, simply drag Folder 2 so it continues right after Folder 1. (Make sure none of your adjustment layers from Folder 2 accidentally affect Folder 1! You can do this by clipping your adjustment layers to match the length of the gif as I did, or using clipping masks.)
(Ignore that lone Hue/Saturation layer lol. I decided last-minute that I wanted my gif to lean more pink than red.)
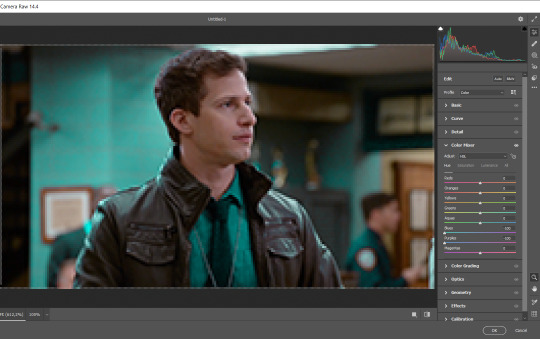
PHASE 2: THE FILTERS
2.1 – Duplicate each scene.
We're going to use opacity keyframe animations on these duplicated scenes that allow it to go from "normal" to "effect" and vice versa. The filters will only be applied to the duplicates. In the screenshot below, all of my duplicates are highlighted:

2.2 – Apply the Crystallize Filter.
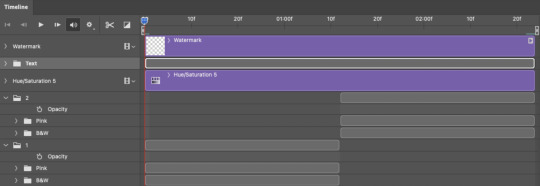
Above your sharpening settings, apply this filter by going to Filter → Pixelate → Crystallize. On the pink gifs, I made the crystals bigger (cell size: 45), and on the black and white gifs, I did a cell size of 25.
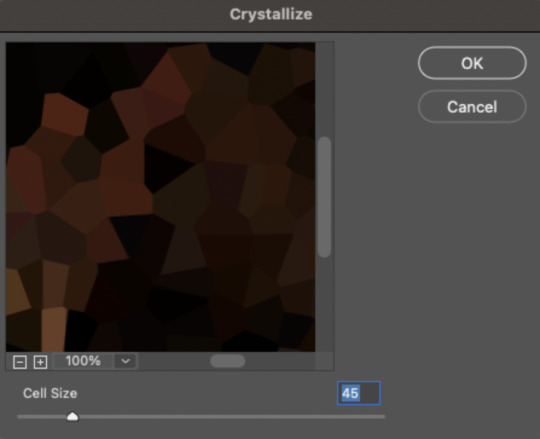

The different sizes help break up the uniformity of the crystals imo, creating more of a mosaic-like look, which is what I wanted to match my gifset concept.

2.3 – Apply the Oil Paint Filter (Optional).
Filter > Stylize > Oil Paint. Here are my settings (they're the same for both crystal cell sizes):
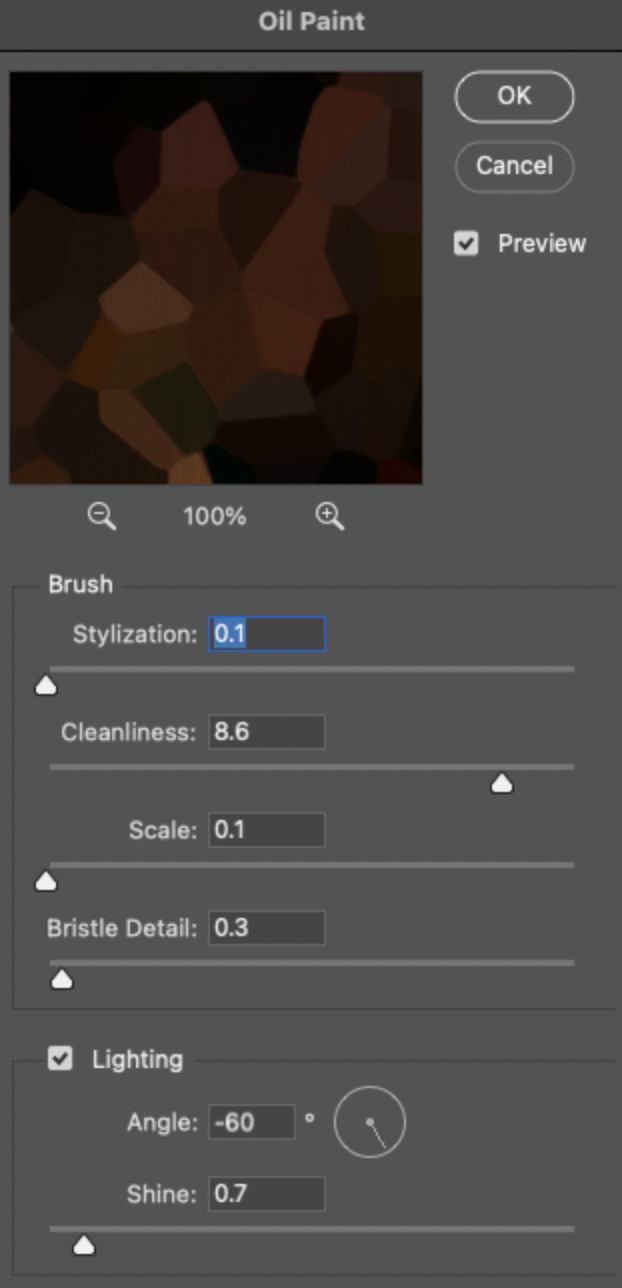
Brush – Stylization: 0.1, Cleanliness: 8.6, Scale: 0.1, Bristle Detail: 0.3
Lighting – Angle: -60, Shine: 0.7
This filter helps soften the cells a bit while adding some texture (left: no oil paint; right: with oil paint):

2.4 – Repeat steps 2.2 & 2.3 on all duplicated scenes.
PHASE 3: THE KEYFRAMES
3.1 – Add opacity keyframes.
The very start and end of each scene needs an opacity keyframe set to 100% opacity. Move 0.09 seconds from each of those points, and place another opacity keyframe, this time set to 0% opacity. We're basically making the crystals fade in and out. Please reference the screenshot below for keyframe placement:

If you need more info on opacity keyframes, check out Phase 2 from this fade transition tutorial I did on usergif.
3.2 – Repeat step 3.1 on all duplicated scenes.
All the keyframes in Folder 1 should line up exactly and all the keyframes in Folder 2 should line up exactly!
PHASE 4: THE DUPLICATES
4.1 – Convert back to Frame Animation.
If you're not sure how to do this, I've written out the steps here. I rec the action linked in my general gif tutorial which I shared earlier!
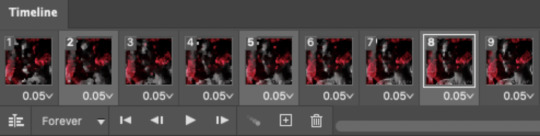
4.2 – Delete duplicate frames.
Whenever you use keyframe animations, you'll get duplicate frames. That's just how it works, unfortunately. If you follow my steps exactly (specifically the 0.09-second spacing, which follows my tried-and-true 0.03-second rule), you'll have a total of 12 duplicate frames exactly — 3 duplicates per keyframe section. Just manually delete them! You can spot the duplicates by eye, but with this spacing, it's usually the 2nd, 5th, and 8th frame for each transition section. The selected frames below were my duplicates:
If you want to learn more about why there are duplicates and the math behind it all, I explained it in more detail in this ask.
4.3 – Export and you're done!
I hope this tutorial helps! Let me know if you have any questions :)
#gif tutorial#completeresources#usershreyu#usernanda#useryoshi#userzaynab#userrobin#usersalty#userhella#alielook#uservivaldi#tuserabbie#useraish#userabs#tuserlucie#mialook#resource*#gfx*
341 notes
·
View notes
Text
An original species inspired my the moon phases :]! Long post warning ⚠️
These are new moons, they are the smallest and the weakest sub species of the moon kinds
These little creatures can be found everywhere, some living amongst the humans, some in the forest, some even under water
Their height range from 5cm to 30cm
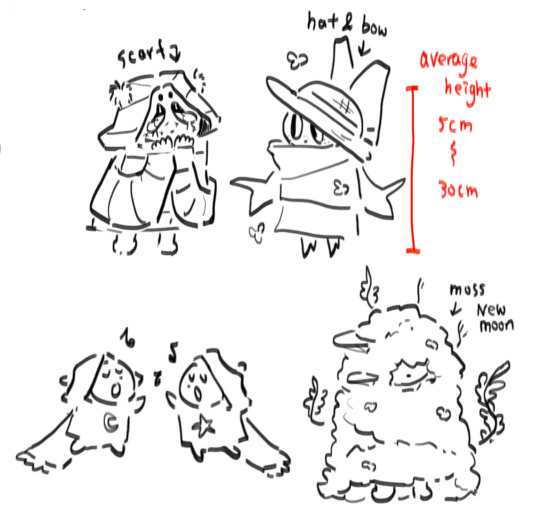
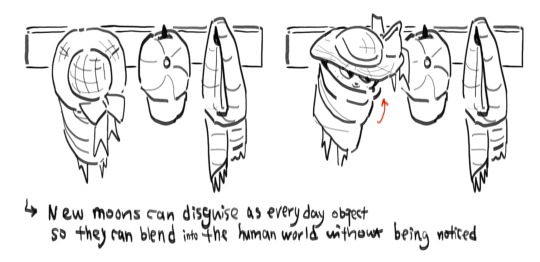
New moons who lives in the human world disguises themselves as everyday objects so they can blend in and not be caught, they steal little trinkets and foods when human’s not looking
These are the crescent moons, they act mostly the same as new moons the only difference is they’re taller and stronger
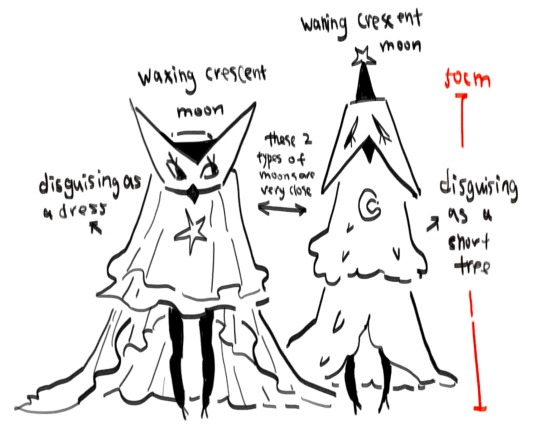
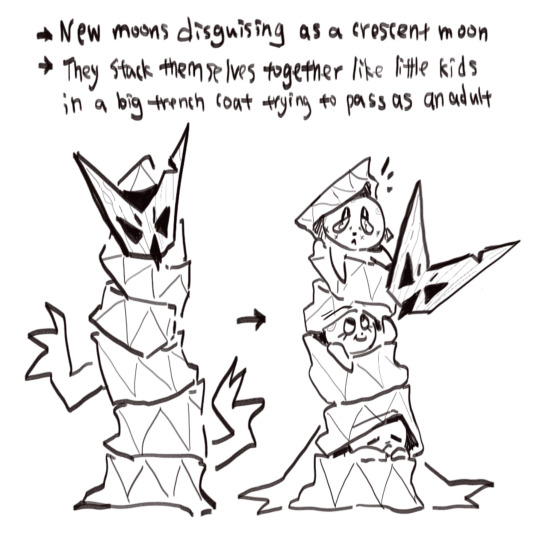
New moons would sometimes disguise themselves as other moon species so they don’t get attacked by them. Moons are not the kindest to the other sub species. New Moons usually go out in a group of 3 or more, that way they can look out for each other in the big dangerous world.
New moons dress up in heavy layers not only to blend in with their surroundings, it also because their natural body is very soft and fragile, they need the layer of protection to not die easily in the wild
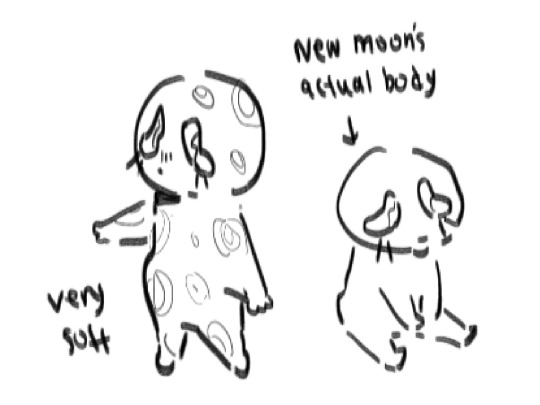
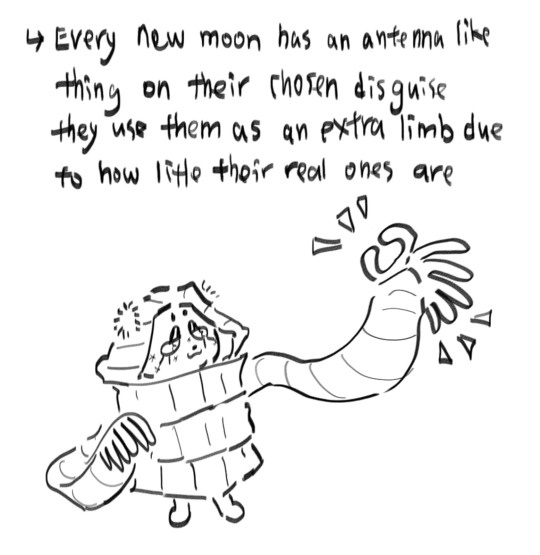
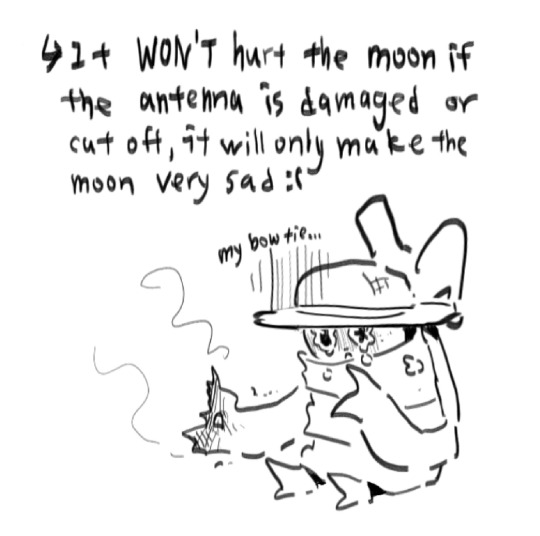
Their disguise of choice is like their second skin it aids and protects them, even tho it is changeable and won’t hurt them when damaged, the little guys value them greatly

This is a Sun, they are the natural enemies of the Moons, while Moons are like little humans, Sun are more like big shiny long dogs, they’re not as smart as the moons but they are much stronger and faster than them
Suns hunts New Moons as food
And in return New Moons do the same
Whenever a Sun is killed by the New Moons, the little creatures would gather together and throw a big party to celebrate their rare victory against their biggest threat in the wild
They called the celebration “The Feast of Eclipse”, like the name, Eclipse appears rarely, and it is the only time a moon can dominate a sun, even if only for a short amount of time
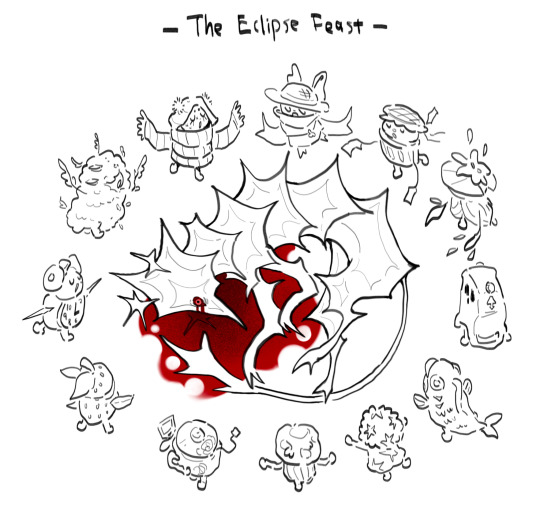
During the celebration, they would dance and sing around their kill and pray for the safety of their kind and for their god to protect them against the many predators they face. It’s a traditional ritual for them
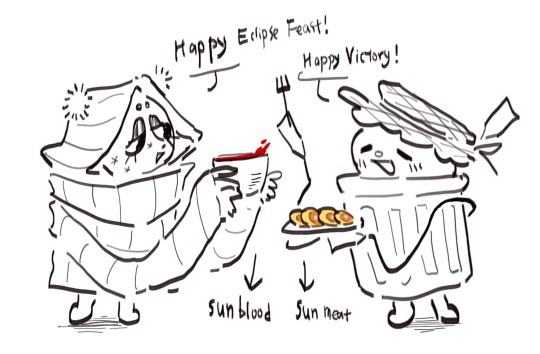
After the ritual, they would cut up the Sun beast and prepare its flesh for the feast. Suns are very good nutritions for the Moons so they won’t let anything go to waste, they make wine out of their blood and meat for the main dishes, after the meal left over flesh will be make into jerkies, and bones will be turn into tools or decorations
Enough about New Moon, let's talk about some other sub species of Moons
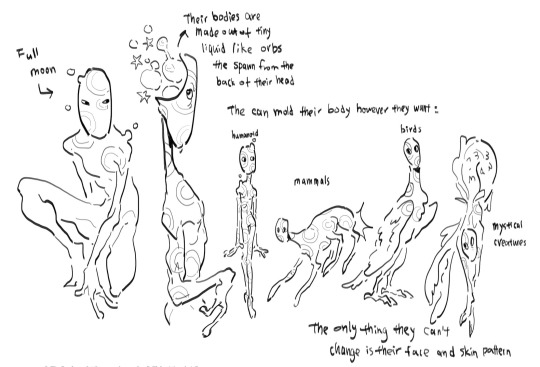
This is a Full moon, they are the rarest of the Moon kind. Alike other Moons, they also disguises themselves to blend in their surroundings, but unlike others who gathers material to make their second skin, Full Moons are natural shapeshifters. They release a orb like liquid from the back of their head which made up their body, they can mold it into any form, the only flaw is that they are not able so change their facial structure and their skin patterns.
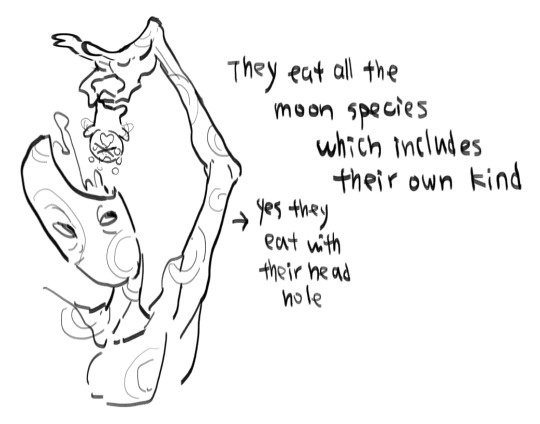
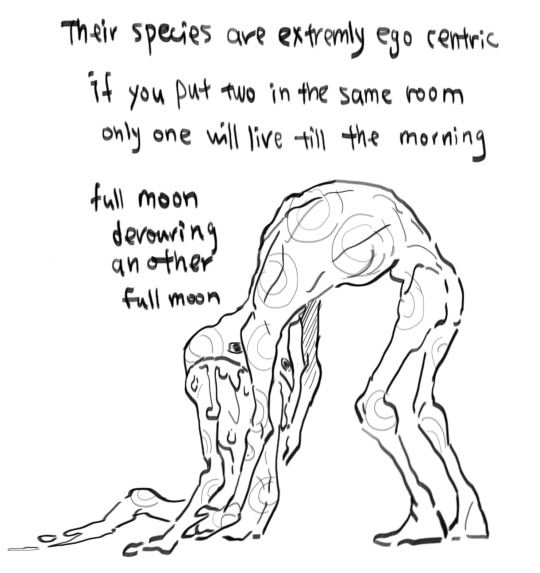
Full Moons are on the top of the Moon food chain, they eat every single Moon species which including their own kind. These bastards eat ugly look away.
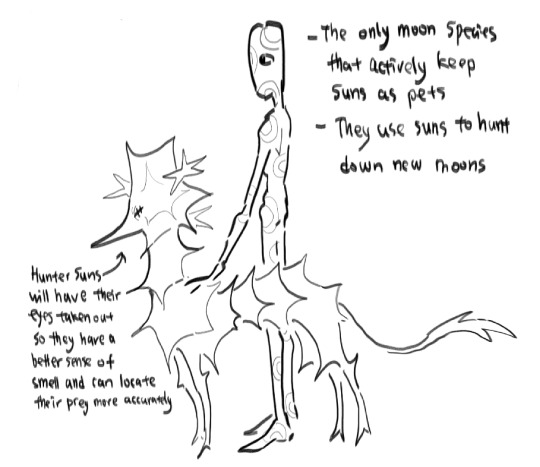
They are the only Moon kind who can own and train a Sun, some keep them as pets but most use as hunting dogs to catch New Moons.
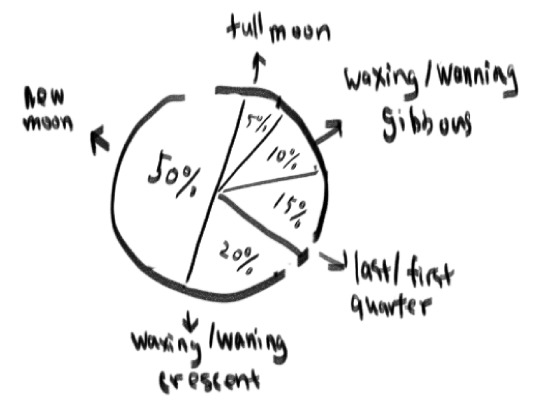
This is all I got at the moment! here's a chart of all the Moon phases, I am planning to introduce the Quarters and Gibbous in the future so keep an eye out if you're interested! I love making character concept it gives my brain something to work with when I'm on break :]
Oh also! feel free to make your own little Moon Phase creature designs and please tag me if you plan to post it I wanna see I’m curious what y’all make of them!
#my art#oc#Moon phase creatures#character design#character concept#cw animal death#cw blood#tw blood#cw body horror#full moons are so weird I love them so much
290 notes
·
View notes
Note
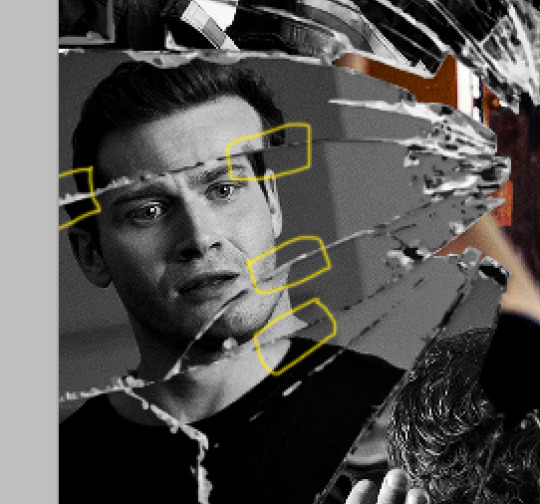
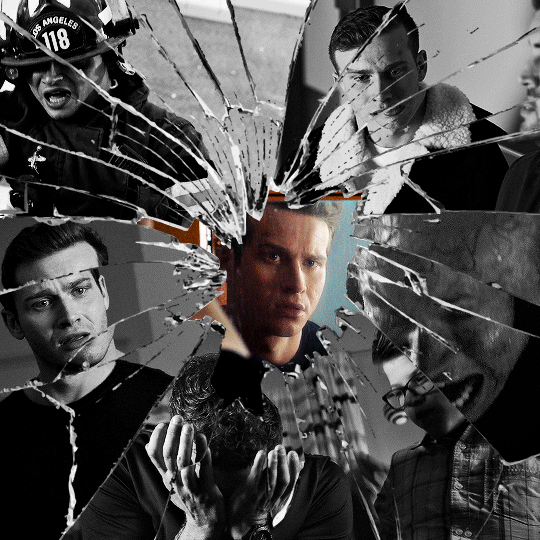
alie! I absolutely adore this mirrorball x buck set that you made last year! (/post/701462848238403584/) (also I can't believe it's been a year, like seriously what is time?) I was wondering how you did the shattered glass effect in the first gif? in particular how you made the black and white gifs appear distorted within the glass if that makes sense? thank you!!!
ahhh thank you so much renee! literally what is time lol, this gifset is still one of my faves that i made. the shattered glass effect is mostly just a lot of layer masks to be honest hahaha. i'm so glad i still have the psd, so here's how i did it under the cut~

(this tutorial assumes you know how to put multiple gifs in the same canvas and are familiar with layer groups and masks)
I. PREPARATION
first things first, create an empty canvas of your desired size. mine was 540x540 px.
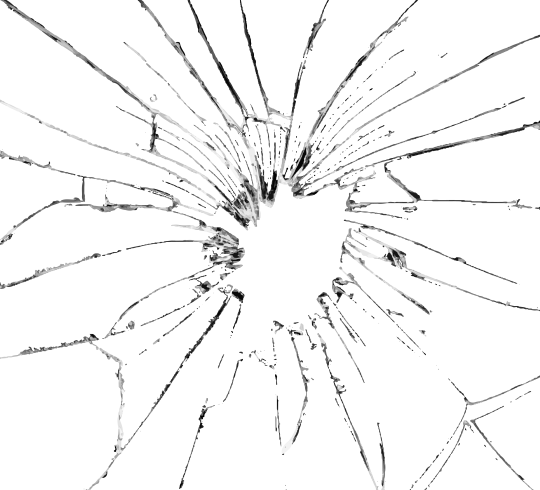
then, you need to find a cracked glass texture. if i remember correctly i simply googled something like "broken glass png", "cracked glass png", because i wanted something already transparent.
(a texture that's something like black lines over a white background definitely works too, you'll just have to put that layer's blending mode to darken or multiply.)
here's the png i used (and a download link for best quality):
and after positioning it into my canvas.

II. CREATING MAIN SECTIONS FOR GIFS
so basically when i did is i sectioned parts of the texture for each gif that i wanted to put. following the texture's lines, i zoomed in and carefuly drew a first shape along the lines with the polygon tool. you can also put a color fill layer behind the cracked glass layer so it's easier to see, like i did.
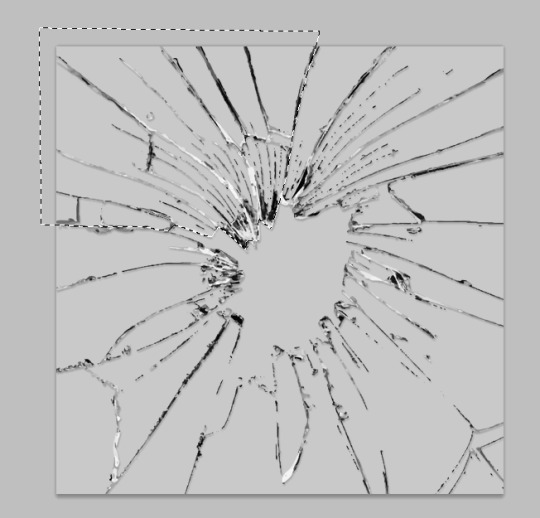
once you have your shape selected, click on the folder icon (1), then on the layer mask icon (2). it should give you a nice masked group to put gifs in hehe
then i repeated the process until i had all of my desired shapes. i've put some color layers so it's easier to see, but here are my 6 main shapes and how my layer groups look like so far:
III. GIFFING TIME
after screencaping and making all 6 gifs required for each section, you need to put all of them in the same canvas. i simply put one smart object gif layer in each group created earlier. then, i resized and rotated each gif to fit its group (by hitting ctrl + T while selecting the gif layer), as you can see with the gif labeled 6x02 in the layers preview. for the coloring, i went simple with black and white for most of them.
once i have all six gifs sharpened, colored, and placed in each shape group, the gif looks like this. the broken glass texture does most of the work to be honest:


obviously the center gif doesn't have any kind of effect, it's just colored as usual, so i'm not gonna go over it. it's just one gif layer in a masked group.
IV. SUBSECTIONS FOR DISRTORTED EFFECT
okay so for the distorted effect it's even more layer masks! basically i created more smaller sections within each main shapes already, still following the cracked glass texture's lines with the polygon tool and put them in individual masked groups like i did in the second step. here's how i ended up dividing each main sections:
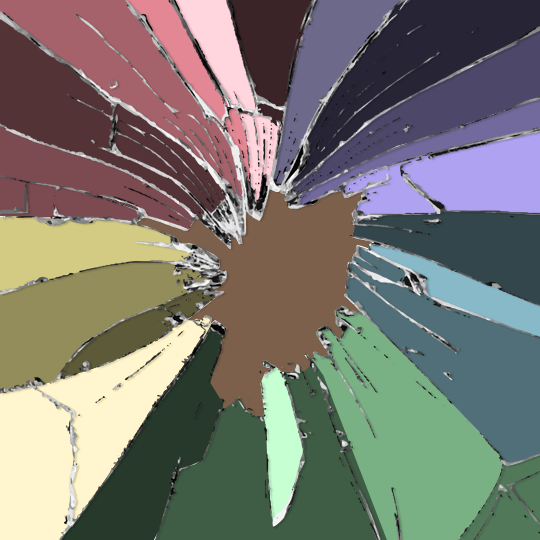
yep, each color here is a different masked group, for example the 2nd and 3rd shape sections:

for each main shape section, you want to duplicate your gif layer the same amount of times as you have subsections within that shape. so if the main shape has 5 smaller subsections, i want 5 layers of that same gif. just make sure to not change its duration or position yet, and make sure the coloring layers/group stays on top of the groups in its shape section. then, simply put one gif layer duplicate in each group. example of my layers for the second shape so far:
then just repeat this until all subsections have its own gif layer.
V. DISTORTED EFFECT
this is the best part! and it's really easy. basically you want to slightly move each subsection by a few pixels, so they're in a slightly different position than the ones next to it.
to do so, select one of the gif layers and with the arrows on your keyboard, move it left or right, and even up or down if it looks good. i do this for all duplicated gif layers, making sure it looks like they're all slightly offset. focus on the cracked glass overlay's lines while nudging the gif layers, it's easy to see how the shapes break when you move them. for example here:
this is really just all trial and error, you just need to move each subsection gif layer by a few pixels with the keyboard arrows until it looks good to you.
here's my result once i've done this for all (23!!) subsections:
VI. FINAL TOUCHES
i don't think i did much else to this before typography besides adding a bit of contrast overall and a thin drop shadow to the cracked layer texture on top of everything. if you have a transparent png this definitely helps to give a bit more dimension to the effect. so here's the final result:
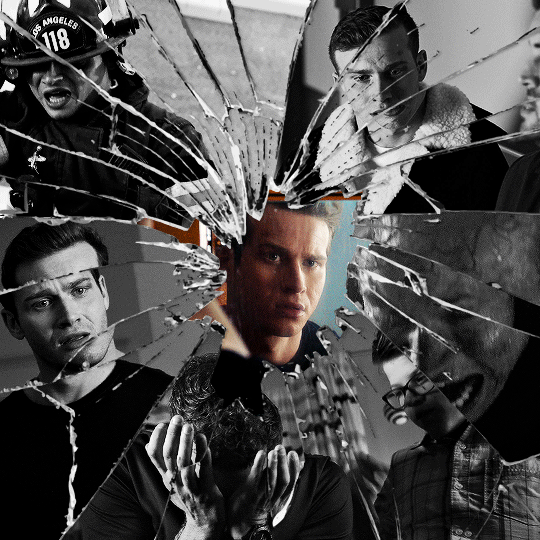
i hope that was clear enough hehe :D
#alie replies#tutorial#photoshop#resource#*ps help#completeresrouces#allresources#userhella#userabs#userkarolina#userdena#tuserheidi#usercats#userrainbow#userbunneis#usersmia#tuserabbie#usertreena#usernik#swearphil
433 notes
·
View notes
Last Seen Blogs

ravinstillregime
FOR PUBLIC COMMUNICATIONS

hott-mctominay
Danny

tired-chaos
Tired-Chaos

lucifers-playtoy
I'm just chillin in cedar rapids

2sunshine
Untitled