#Stripe API Integration
Explore tagged Tumblr posts
Visit Tumblr Blog
Explore Tumblr blogs with no restrictions, modern design and the best experience.
Last Seen Tumblr Blogs


Fun Fact
In 2020, 27% of US Tumblr users had an annual household income of over $100,000.
Text
How to Integrate Stripe Payment with Liferay: A Step-by-Step Guide
Introduction
There are mainly two ways to implement stripe payment integration
1. Prebuit Payment Page
This payment provides by the stripe so we do not need to code for it.
It has all functionality coupons for discounts, etc
The UI part for the payment integration is fixed. We cannot change it.
Need to create a product in the stripe dashboard.
And only passing quantity at payment time total price and discount all those things managed by the stripe.
2. Custom Payment flow
This flow will use when we have a custom payment page or a different design
And customization from the payment side and only the user will do payment only not specify any product.
In this flow, no need to create a Product for the payment.
Need to create below APIs
Create-payment-intent API: add payment-related detail in the stripe. It will return client_secret for making payment.
Webhook
Need to do the below things from the FE
Confirm Payment: It will take the card detail and client_secret that we got from the create-payment-intent API.
We are going to use a custom payment flow for the Event Module Payment integration.
Object Definition for the Stripe
Introduction
We are using the stripe for payments but in the feature, there might be clients who will use other payment service provider use.
So, using two objects we will handle it
Payment Object that contains unique data like used, stripe user id, type, and relation with Calander Event Payment object
Calander Event Object contains data related to the Event.
Payment objects have one too many relations with the Calander Event Object.
P-Flow for the Stripe payment integration
We will perform the below operations for Stripe payment integration in the Calander event.
Create a customer in Stripe while the Liferay user gets created.
Add create a customer in register API
Also, while the Liferay user gets created using the Liferay admin panel
Create Payment Intent API for adding payment related in the stripe and take payment stripe ID for confirm Payment
Add the same detail in the Liferay object with event data (status – pending) while they call payment intent API.
Custom method for customer management for stripe
private void stripeCustomerCrud(User user, String operationType) { // If operation type is not equal to create, update, or delete, give an error if (!Arrays.asList(CREATE_OP, UPDATE_OP, DELETE_OP).contains(operationType)) { log.error(“Operations must be in Create, Update, and Delete. Your choice is: ” + operationType + ” operation.”); return; }
try { Stripe.apiKey = “your api key”; String stripeCustomerId = “”;
// Get Stripe Customer ID from the user custom field when operation equals to update or delete if (operationType.equals(UPDATE_OP) || operationType.equals(DELETE_OP)) { ExpandoBridge expandoBridge = user.getExpandoBridge(); stripeCustomerId = (String) expandoBridge.getAttribute(STRIPE_CUST_ID);
if (stripeCustomerId == null || stripeCustomerId.isEmpty()) { throw new NullPointerException(“Stripe Customer Id is empty”); } }
Map<String, Object> customerParams = new HashMap<>();
// Add name, email, and metadata in the map when operation equals to create or update if (!operationType.equals(DELETE_OP)) { Map<String, String> metadataParams = new HashMap<>(); metadataParams.put(“liferayUserId”, String.valueOf(user.getUserId()));
customerParams.put(“name”, user.getFullName()); customerParams.put(“email”, user.getEmailAddress()); customerParams.put(“metadata”, metadataParams); }
Customer customer = null;
// Operation-wise call a method of the stripe SDK if (operationType.equals(CREATE_OP)) { customer = Customer.create(customerParams); setExpando(user.getUserId(), STRIPE_CUST_ID, customer.getId()); } else if (operationType.equals(UPDATE_OP)) { Customer existingCustomer = Customer.retrieve(stripeCustomerId); customer = existingCustomer.update(customerParams); } else if (operationType.equals(DELETE_OP)) { Customer existingCustomer = Customer.retrieve(stripeCustomerId); customer = existingCustomer.delete(); }
log.info(operationType + ” operation is performed on the Stripe customer. (Data = Id: ” + customer.getId() + “, ” + “Name: ” + customer.getName() + “, Email: ” + customer.getEmail() + “)”);
} catch (NullPointerException e) { log.error(“Site custom field does not exist or is empty for the Stripe module: ” + e.getMessage()); } catch (StripeException e) { log.error(“Stripe Exception while performing ” + operationType + ” operation: ” + e.getMessage()); } }
Webhook API
Params: payload and request
This API will call when any update is there for the specified payment
We must update the Liferay Object according to the status of the payment Intent Object. A few statuses are below of Payment Object
payment_intent.amount_capturable_updated
payment_intent.canceled
payment_intent.created
payment_intent.partially_funded
payment_intent.payment_failed
payment_intent.requires_action
payment_intent.succeeded
APIs wise Flow for the Stripe payment integration
Create Payment Intent API
Using Payment Intent API, we insert transaction data and status as incomplete in the stripe, so it takes a few parameters like Liferay user id, calendar event id, stripe customer id, total amount, and currency. It will return the payment Intent id and client secret.

Get User Payment Detail Id if Not Prent Then Add
Get the Parent object Id from the below API for passing it into
We need the id of the parent object to make a relationship so we will call the user payment details headless API by passing the Liferay user id from the session storage. It will return the id in the items for the POST eventpayments API.
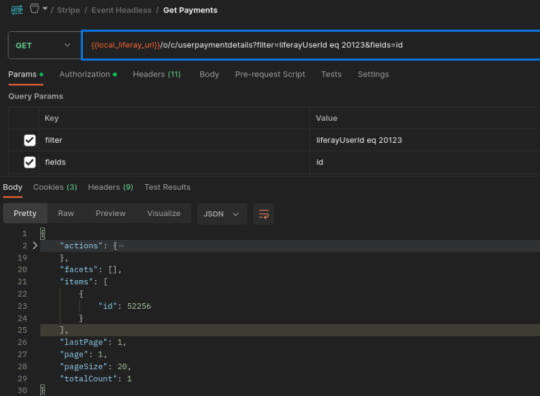
If the above API items tab is empty, then you need to add user-related data in the user payment details object and take the id from the response and pass it in POST eventpayments API.

Add Data in Calendar Event Payment Object
The calendar Event object is used to track the event payment transaction data in our database.
To add an entry in the calendar event object after the payment intent success response because we are passing payment intent id as transaction id in the Object.
Add prices, quantity, payment status (default – in Complete), tax amt, total amt, transaction Id(Id from the create payment intent response), r_event_c_payment_id(id from the userpaymentdetails headless API), site id as 20119 as default value.
Conclusion
Integrating Stripe payment functionality with Liferay Development has proven to be a seamless and efficient solution for businesses seeking to streamline their online payment processes. By implementing this integration, businesses can offer their customers a secure and convenient payment experience, leading to increased customer satisfaction and loyalty.
Read More Stripe Payment Integration With Liferay
0 notes
Text
youtube
16 -Sign Out (Actions Button) - (Next js 15, React 19, PostgreSQL , Prisma, ShadCN, Paypal, Stripe API integration)
2 notes
·
View notes
Text
Choosing Between PayPal, Stripe, and Local Gateways for Business
Selecting the right payment gateway is a key decision when starting an e-commerce business or moving into digital payments. Each gateway comes with its features and benefits, which can be helpful for different types of businesses. In this article, we'll compare three options: PayPal, Stripe, and local payment gateways, to help you decide which one is best for your business, such as mobile app development.
1. PayPal: Well-Known and Widely Used
Easy to Set Up: PayPal is known for its ease of use. Setting up an account and starting to accept payments can be done quickly, making it ideal for small businesses, startups, or anyone new to e-commerce.
Customer Trust: PayPal is trusted and recognized by many consumers. People feel comfortable using a payment system they know, which can help increase sales.
Higher Fees: One downside is that PayPal charges transaction fees, which can be higher than some other options. If your business processes a large number of transactions, these fees can add up.
Mobile Integration: PayPal works well across websites, apps, and other platforms, making it a versatile option for different types of businesses.
2. Stripe: Developer-Friendly with Advanced Features
Customizable for Developers: Stripe offers a lot of customization options, making it great for companies with their developers. You can have more control over the payment process.
Supports Multiple Currencies: Stripe is ideal for businesses operating globally. It supports payments in various currencies, making international transactions easier.
Mobile App Integration: If your business involves mobile app development, Stripe's simple APIs can be easily integrated into your app for a smooth payment experience.
Complex for Beginners: While Stripe offers flexibility, it might be harder to use for those without coding skills.
3. Local Payment Gateways: Best for Regional Needs
Lower Transaction Fees: Local payment gateways often have lower fees compared to international options like PayPal and Stripe, making them attractive for businesses focusing on a specific region.
Local Payment Methods: Some customers prefer using local payment methods. Local gateways allow businesses to accept these, which can improve sales within a particular market.
Customer Support: One advantage of using a local gateway is that customer support is often more accessible and personalized, which is helpful for small businesses.
Limited Global Reach: The main drawback of local gateways is that they’re better suited for businesses with little or no international presence.
Final Words
The best payment gateway for your business depends on several factors. If ease of use and customer trust are important, PayPal might be the right choice. Businesses involved in mobile app development or those that need more customization may find Stripe to be a better fit. For businesses focusing on local markets and wanting to save on fees, local gateways are a good option.
Choosing the right payment system is an important step, and understanding the features of each option will help you make the best decision for your business.
2 notes
·
View notes
Text
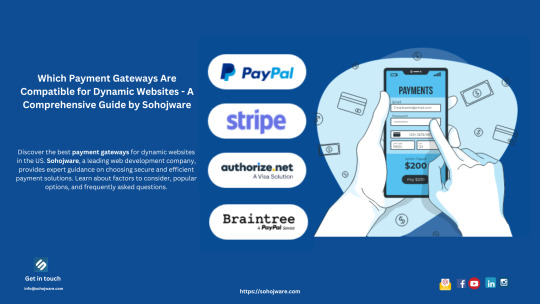
Which Payment Gateways Are Compatible for Dynamic Websites - A Comprehensive Guide by Sohojware
The digital landscape is constantly evolving, and for businesses with dynamic websites, staying ahead of the curve is crucial. A dynamic website is one that generates content on the fly based on user input or other factors. This can include things like e-commerce stores with shopping carts, membership sites with customized content, or even online appointment booking systems.
For these dynamic websites, choosing the right payment gateway is essential. A payment gateway acts as a secure bridge between your website and the financial institutions that process payments. It ensures a smooth and safe transaction experience for both you and your customers. But with a plethora of payment gateways available, selecting the most compatible one for your dynamic website can be overwhelming.
This comprehensive guide by Sohojware, a leading web development company, will equip you with the knowledge to make an informed decision. We’ll delve into the factors to consider when choosing a payment gateway for your dynamic website, explore popular options compatible with dynamic sites, and address frequently asked questions.
Factors to Consider When Choosing a Payment Gateway for Dynamic Websites
When selecting a payment gateway for your dynamic website in the United States, consider these key factors:
Security: This is paramount. The payment gateway should adhere to stringent security protocols like PCI DSS compliance to safeguard sensitive customer information. Sohojware prioritizes security in all its development projects, and a secure payment gateway is a non-negotiable aspect.
Transaction Fees: Payment gateways typically charge transaction fees, which can vary depending on the service provider and the type of transaction. Be sure to compare fees associated with different gateways before making your choice.
Recurring Billing Support: If your website offers subscriptions or memberships, ensure the payment gateway supports recurring billing functionalities. This allows for automatic and convenient payment collection for your recurring services.
Payment Methods Supported: Offer a variety of payment methods that your target audience in the US is accustomed to using. This may include credit cards, debit cards, popular e-wallets like PayPal or Apple Pay, and potentially even ACH bank transfers.
Integration Complexity: The ease of integrating the payment gateway with your dynamic website is crucial. Look for gateways that offer user-friendly APIs and clear documentation to simplify the integration process.
Customer Support: Reliable customer support is vital in case you encounter any issues with the payment gateway. Opt for a provider with responsive and knowledgeable customer service representatives.
Popular Payment Gateways Compatible with Dynamic Websites
Here’s a glimpse into some of the most popular payment gateways compatible with dynamic website:
Stripe: A popular and versatile option, Stripe offers a robust suite of features for dynamic websites, including recurring billing support, a user-friendly developer interface, and integrations with various shopping carts and platforms.
PayPal: A widely recognized brand, PayPal allows customers to pay using their existing PayPal accounts, offering a familiar and convenient checkout experience. Sohojware can integrate PayPal seamlessly into your dynamic website.
Authorize.Net: A secure and reliable gateway, Authorize.Net provides a comprehensive solution for e-commerce businesses. It supports various payment methods, recurring billing, and integrates with popular shopping carts.
Braintree: Owned by PayPal, Braintree is another popular choice for dynamic websites. It offers a user-friendly API and integrates well with mobile wallets and other popular payment solutions.
2Checkout (2CO): A global payment gateway solution, 2Checkout caters to businesses of all sizes. It offers fraud prevention tools, subscription management features, and support for multiple currencies.
Sohojware: Your Trusted Partner for Dynamic Website Development and Payment Gateway Integration
Sohojware possesses extensive experience in developing dynamic websites and integrating them with various payment gateways. Our team of skilled developers can help you choose the most suitable payment gateway for your specific needs and ensure a seamless integration process. We prioritize user experience and security, ensuring your customers have a smooth and secure checkout experience.
1. What are the additional costs associated with using a payment gateway?
Besides transaction fees, some payment gateways may charge monthly subscription fees or setup costs. Sohojware can help you navigate these costs and choose a gateway that fits your budget.
2. How can Sohojware ensure the security of my payment gateway integration?
Sohojware follows best practices for secure development and adheres to industry standards when integrating payment gateways. We stay updated on the latest security protocols to safeguard your customer’s financial information.
3. Does Sohojware offer support after the payment gateway is integrated?
Yes, Sohojware provides ongoing support to ensure your payment gateway functions smoothly. Our team can address any issues that arise, troubleshoot problems, and provide updates on the latest payment gateway trends.
4. Can Sohojware help me choose the best payment gateway for my specific business needs?
Absolutely! Sohojware’s experts can assess your business requirements, analyze your target audience, and recommend the most suitable payment gateway based on factors like transaction volume, industry regulations, and preferred payment methods.
5. How long does it typically take to integrate a payment gateway with a dynamic website?
The integration timeline can vary depending on the complexity of the website and the chosen payment gateway. However, Sohojware’s experienced team strives to complete the integration process efficiently while maintaining high-quality standards.
Conclusion
Choosing the right payment gateway for your dynamic website is crucial for ensuring a seamless and secure online transaction experience. By considering factors like security, fees, supported payment methods, and integration complexity, you can select a gateway that aligns with your business needs. Sohojware, with its expertise in web development and payment gateway integration, can be your trusted partner in this process. Contact us today to discuss your requirements and get started on your dynamic website project.
2 notes
·
View notes
Text
The Ultimate Guide to Developing a Multi-Service App Like Gojek

In today's digital-first world, convenience drives consumer behavior. The rise of multi-service platforms like Gojek has revolutionized the way people access everyday services—from booking a ride and ordering food to getting a massage or scheduling home cleaning. These apps simplify life by merging multiple services into a single mobile solution.
If you're an entrepreneur or business owner looking to develop a super app like Gojek, this guide will walk you through everything you need to know—from ideation and planning to features, technology, cost, and launching.
1. Understanding the Gojek Model
What is Gojek?
Gojek is an Indonesian-based multi-service app that started as a ride-hailing service and evolved into a digital giant offering over 20 on-demand services. It now serves millions of users across Southeast Asia, making it one of the most successful super apps in the world.
Why Is the Gojek Model Successful?
Diverse Services: Gojek bundles transport, delivery, logistics, and home services in one app.
User Convenience: One login for multiple services.
Loyalty Programs: Rewards and incentives for repeat users.
Scalability: Built to adapt and scale rapidly.
2. Market Research and Business Planning
Before writing a single line of code, you must understand the market and define your niche.
Key Steps:
Competitor Analysis: Study apps like Gojek, Grab, Careem, and Uber.
User Persona Development: Identify your target audience and their pain points.
Service Selection: Decide which services to offer at launch—e.g., taxi rides, food delivery, parcel delivery, or healthcare.
Monetization Model: Plan your revenue streams (commission-based, subscription, ads, etc.).
3. Essential Features of a Multi-Service App
A. User App Features
User Registration & Login
Multi-Service Dashboard
Real-Time Tracking
Secure Payments
Reviews & Ratings
Push Notifications
Loyalty & Referral Programs
B. Service Provider App Features
Service Registration
Availability Toggle
Request Management
Earnings Dashboard
Ratings & Feedback
C. Admin Panel Features
User & Provider Management
Commission Tracking
Service Management
Reports & Analytics
Promotions & Discounts Management
4. Choosing the Right Tech Stack
The technology behind your app will determine its performance, scalability, and user experience.
Backend
Programming Languages: Node.js, Python, or Java
Databases: MongoDB, MySQL, Firebase
Hosting: AWS, Google Cloud, Microsoft Azure
APIs: REST or GraphQL
Frontend
Mobile Platforms: Android (Kotlin/Java), iOS (Swift)
Cross-Platform: Flutter or React Native
Web Dashboard: Angular, React.js, or Vue.js
Other Technologies
Payment Gateways: Stripe, Razorpay, PayPal
Geolocation: Google Maps API
Push Notifications: Firebase Cloud Messaging (FCM)
Chat Functionality: Socket.IO or Firebase
5. Design and User Experience (UX)
Design is crucial in a super app where users interact with multiple services.
UX/UI Design Tips:
Intuitive Interface: Simplify navigation between services.
Consistent Aesthetics: Maintain color schemes and branding across all screens.
Microinteractions: Small animations or responses that enhance user satisfaction.
Accessibility: Consider voice commands and larger fonts for inclusivity.
6. Development Phases
A well-planned development cycle ensures timely delivery and quality output.
A. Discovery Phase
Finalize scope
Create wireframes and user flows
Define technology stack
B. MVP Development
Start with a Minimum Viable Product including essential features to test market response.
C. Full-Scale Development
Once the MVP is validated, build advanced features and integrations.
D. Testing
Conduct extensive testing:
Unit Testing
Integration Testing
User Acceptance Testing (UAT)
Performance Testing
7. Launching the App
Pre-Launch Checklist
App Store Optimization (ASO)
Marketing campaigns
Beta testing and feedback
Final round of bug fixes
Post-Launch
Monitor performance
User support
Continuous updates
Roll out new features based on feedback
8. Marketing Your Multi-Service App
Marketing is key to onboarding users and service providers.
Strategies:
Pre-Launch Hype: Use teasers, landing pages, and early access invites.
Influencer Collaborations: Partner with local influencers.
Referral Programs: Encourage user growth via rewards.
Local SEO: Optimize for city-based searches.
In-App Promotions: Offer discounts and bundle deals.
9. Legal and Compliance Considerations
Don't overlook legal matters when launching a multi-service platform.
Key Aspects:
Licensing: Depending on your country and the services offered.
Data Protection: Adhere to GDPR, HIPAA, or local data laws.
Contracts: Create terms of service for providers and users.
Taxation: Prepare for tax compliance across services.
10. Monetization Strategies
There are several ways to make money from your app.
Common Revenue Models:
Commission Per Transaction: Standard in ride-sharing and food delivery.
Subscription Plans: For users or service providers.
Ads: In-app promotions and sponsored listings.
Surge Pricing: Dynamic pricing based on demand.
Premium Features: Offer enhanced services at a cost.
11. Challenges and How to Overcome Them
A. Managing Multiple Services
Solution: Use microservices architecture to manage each feature/module independently.
B. Balancing Supply and Demand
Solution: Use AI to predict demand and onboard providers in advance.
C. User Retention
Solution: Gamify the app with loyalty points, badges, and regular updates.
D. Operational Costs
Solution: Optimize cloud resources, automate processes, and start with limited geography.
12. Scaling the App
Once you establish your base, consider expansion.
Tips:
Add New Services: Include healthcare, legal help, or finance.
Geographical Expansion: Move into new cities or countries.
Language Support: Add multi-lingual capabilities.
API Integrations: Partner with external platforms for payment, maps, or logistics.
13. Cost of Developing a Multi-Service App Like Gojek
Costs can vary based on complexity, features, region, and team size.
Estimated Breakdown:
MVP Development: $20,000 – $40,000
Full-Feature App: $50,000 – $150,000+
Monthly Maintenance: $2,000 – $10,000
Marketing Budget: $5,000 – $50,000 (initial phase)
Hiring an experienced team or opting for a white-label solution can help manage costs and time.
Conclusion
Building a multi-service app like Gojek is an ambitious but achievable project. With the right strategy, a well-defined feature set, and an expert development team, you can tap into the ever-growing on-demand economy. Begin by understanding your users, develop a scalable platform, market effectively, and continuously improve based on feedback. The super app revolution is just beginning—get ready to be a part of it.
Frequently Asked Questions (FAQs)
1. How long does it take to develop a Gojek-like app?
Depending on complexity and team size, it typically takes 4 to 8 months to build a fully functional version of a multi-service app.
2. Can I start with only a few services and expand later?
Absolutely. It's recommended to begin with 2–3 core services, test the market, and expand based on user demand and operational capability.
3. Is it better to build from scratch or use a white-label solution?
If you want custom features and long-term scalability, building from scratch is ideal. White-label solutions are faster and more affordable for quicker market entry.
4. How do I onboard service providers to my platform?
Create a simple registration process, offer initial incentives, and run targeted local campaigns to onboard and retain quality service providers.
5. What is the best monetization model for a super app?
The most successful models include commission-based earnings, subscription plans, and in-app advertising, depending on your services and user base.
#gojekcloneapp#cloneappdevelopmentcompany#ondemandcloneappdevelopmentcompany#ondemandappclone#multideliveryapp#ondemandserviceapp#handymanapp#ondemandserviceclones#appclone#fooddeliveryapp
0 notes
Text
Integrating Third-Party APIs in .NET Applications
In today’s software landscape, building a great app often means connecting it with services that already exist—like payment gateways, email platforms, or cloud storage. Instead of building every feature from scratch, developers can use third-party APIs to save time and deliver more powerful applications. If you're aiming to become a skilled .NET developer, learning how to integrate these APIs is a must—and enrolling at the Best DotNet Training Institute in Hyderabad, Kukatpally, KPHB is a great place to start.
Why Third-Party APIs Matter
Third-party APIs let developers tap into services built by other companies. For example, if you're adding payments to your app, using a service like Razorpay or Stripe means you don’t have to handle all the complexity of secure transactions yourself. Similarly, APIs from Google, Microsoft, or Facebook can help with everything from login systems to maps and analytics.
These tools don’t just save time—they help teams build better, more feature-rich applications.
.NET Makes API Integration Easy
One of the reasons developers love working with .NET is how well it handles API integration. Using built-in tools like HttpClient, you can make API calls, handle responses, and even deal with errors in a clean and structured way. Plus, with async programming support, these interactions won’t slow down your application.
There are also helpful libraries like RestSharp and features for handling JSON that make working with APIs even smoother.
Smart Tips for Successful Integration
When you're working with third-party APIs, keeping a few best practices in mind can make a big difference:
Keep Secrets Safe: Don’t hard-code API keys—use config files or environment variables instead.
Handle Errors Gracefully: Always check for errors and timeouts. APIs aren't perfect, so plan for the unexpected.
Be Aware of Limits: Many APIs have rate limits. Know them and design your app accordingly.
Use Dependency Injection: For tools like HttpClient, DI helps manage resources and keeps your code clean.
Log Everything: Keep logs of API responses—this helps with debugging and monitoring performance.
Real-World Examples
Here are just a few ways .NET developers use third-party APIs in real applications:
Adding Google Maps to show store locations
Sending automatic emails using SendGrid
Processing online payments through PayPal or Razorpay
Uploading and managing files on AWS S3 or Azure Blob Storage
Conclusion
Third-party APIs are a powerful way to level up your .NET applications. They save time, reduce complexity, and help you deliver smarter features faster. If you're ready to build real-world skills and become job-ready, check out Monopoly IT Solutions—we provide hands-on training that prepares you for success in today’s tech-driven world.
#best dotnet training in hyderabad#best dotnet training in kukatpally#best dotnet training in kphb#best .net full stack training
0 notes
Text

Composable Commerce: Why It’s the Future of eCommerce Architecture
In today’s fast-moving digital world, traditional eCommerce platforms are hitting their limits.
If your team is stuck with inflexible tech or struggling to scale, it’s time to explore Composable Commerce — a modular, API-first approach that lets you build your store your way.
What is Composable Commerce?
Composable Commerce allows brands to integrate and manage only the best tools for each part of their eCommerce system. That means:
You’re no longer tied to one all-in-one platform
You can replace or upgrade individual services without breaking your site
You get better performance, scalability, and user experiences
This is especially helpful for B2B eCommerce and brands that need customized workflows, flexible pricing, and advanced integrations.
💡 Think of it like LEGO blocks — you choose the best piece for search, checkout, CMS, and so on — and connect them with APIs.
Why Developers and Brands Are Adopting It
With Composable Commerce, developers can use their favorite frameworks (React, Vue, Next.js) and connect them to tools like Stripe, Contentful, or Algolia.
Business teams benefit too:
Faster launches
Easier testing and experimentation
Better user experiences
Less dependency on legacy systems
This approach aligns perfectly with headless commerce and Progressive Web Apps (PWAs) — both of which Wagento supports. Check out their PWA Development Services to see how they help brands go mobile-first.
Recommended Reading
Wagento published a comprehensive guide that breaks everything down in simple terms:
👉 What is Composable Commerce? A Simple Guide for eCommerce Brands
It explains:
What composable means
When to use it
How to start transitioning away from monolithic systems
Looking to Modernize Your eCommerce?
Here are more useful resources from Wagento:
B2B eCommerce Services
Magento Development
BigCommerce Implementation
Adobe Commerce Solutions
If you're building the next generation of eCommerce, it's time to go composable.
1 note
·
View note
Text
Real-Time API Monitoring: The Key to Building Reliable, High-Performing Web Applications

today’s fast-paced digital world, Application Programming Interfaces (APIs) are the backbone of every modern web or mobile application. Whether it’s a weather app fetching real-time data or an e-commerce site processing payments via Stripe, APIs power almost everything behind the scenes.
But what happens when an API silently fails? Your app becomes sluggish—or worse—completely unusable. That’s where real-time API monitoring comes in.
What Is API Monitoring? API monitoring refers to the process of automatically testing and tracking the availability, performance, and response of APIs over time. Think of it as a health check system that watches your APIs 24/7, ensuring they’re up, fast, and doing exactly what they’re supposed to do.
Real-time API monitoring takes it a step further—you’re alerted the moment something breaks.
Why API Monitoring Matters Your application may look fine on the surface, but behind every button click, data request, or user login, there's often one or more APIs at work. If any of them fail:
Users get error messages
Transactions fail to process
Performance slows down
Trust, traffic, and revenue are lost
Real-time monitoring ensures you catch these issues before your users do.
What Does Real-Time API Monitoring Track? Availability (Uptime): Is the API online and accessible?
Response Time: How long does it take to get a response?
Correctness: Are the responses accurate and as expected?
Rate Limiting: Are you close to hitting API usage limits?
Authentication Issues: Is your token or API key expired or invalid?
Use Case: WebStatus247 API Monitoring in Action Let’s say you’re using WebStatus247 to monitor your app’s integration with a payment gateway like Razorpay or Stripe.
Here’s what happens:
You set up real-time monitoring for the endpoint /api/payment/status.
Every few minutes, WebStatus247 sends a request to test the API.
If the status code isn’t 200 OK, or the response time spikes, you receive instant alerts via email or SMS.
You check the logs, identify the issue, and take corrective action—often before users even notice a problem.
Real-Time Alerts: Your First Line of Defense The core advantage of real-time monitoring is instant awareness. With platforms like WebStatus247, you can:
Set custom alert thresholds (e.g., response time over 800ms)
Receive notifications via email, Slack, SMS, or webhook
Access logs and trend data for root-cause analysis
No more guesswork. No more blind spots.
Benefits of Real-Time API Monitoring
Improved Reliability Downtime is expensive. Monitoring helps you stay ahead of outages, ensuring high availability for your services.
Faster Incident Response The faster you know about a problem, the faster you can fix it. Real-time alerts reduce mean time to resolution (MTTR) significantly.
Better User Experience Users do not tolerate broken features. Monitoring ensures that critical functionality—such as login, search, or checkout—remains operational.
Developer Efficiency Developers and DevOps teams can focus on building instead of reacting. With confidence in system health, teams can innovate more freely.
Real Metrics Drive Better Decisions API monitoring is more than just failure prevention. It helps teams:
Optimize performance by identifying slow endpoints
Detect traffic patterns and usage peaks
Justify infrastructure investments with performance data
Improve API documentation and reliability over time
Monitoring Helps Security, Too Real-time monitoring can alert you to signs of potential security issues, such as:
Unauthorized access attempts
Token expiration or failures
Unexpected status codes or response anomalies
In a world where data breaches are costly, proactive monitoring adds a layer of protection.
Synthetic Monitoring vs Real User Monitoring Real-time API monitoring is a form of synthetic monitoring—it simulates user behavior by sending requests to your APIs at regular intervals. This is proactive, meaning it catches problems before users encounter them.
In contrast, Real User Monitoring (RUM) collects data from actual user interactions. Both have value, but synthetic monitoring is essential for early detection.
Best Practices for Effective API Monitoring Monitor All Business-Critical Endpoints: Especially those that affect user sign-in, checkout, and real-time data delivery.
Set Thresholds Carefully: Avoid alert fatigue by defining meaningful conditions.
Automate Token Checks: Monitor for token expiry or authentication errors.
Use Multiple Locations: Test from different regions to catch geo-specific outages.
Review and Analyze Logs: Use dashboards to understand trends and identify root causes.
Global Monitoring = Global Reliability For applications with a global audience, testing from a single server is not sufficient. API responses can vary by location due to server load, latency, or network issues.
WebStatus247 allows you to simulate user requests from multiple global locations. This helps ensure consistent performance and availability across regions.
Conclusion: Visibility Builds Confidence APIs are mission-critical. They power everything from user authentication to content delivery. Yet, because they’re invisible to the end user, their failure can go unnoticed—until the damage is done.
Real-time API monitoring helps teams stay ahead. It empowers you to identify issues early, act quickly, and ensure your application remains fast, stable, and trustworthy.
For any serious development or DevOps team, this is no longer optional. It is essential.
Start Monitoring Today Ready to ensure your APIs are fast, reliable, and always online? Visit WebStatus247 and start monitoring in minutes. Gain full visibility, prevent costly downtime, and improve user satisfaction with every request.
0 notes
Text
Own Your Fintech Fraud AI App in 30 Days: Fraud Detector MVP
Limited to 3 buyers at this price. Exclusivity option: Add $3,000. Page retires after 3 sales.
The Idea
Fintech Fraud Detector is a high-octane AI app that stops fraud dead in its tracks, protecting financial platforms from massive losses. Manual fraud checks are too slow — this MVP spots suspicious transactions in real-time, alerts teams, and syncs with payment systems. Perfect for fintech startups, it’s a golden ticket to dominate a high-demand market, ready to scale into a SaaS for banks, processors, or crypto platforms.
What You’ll Get
Real-Time Fraud Detection
Smart AI catches transaction anomalies instantly, saving millions.
Instant Alert System
Delivers clear, actionable alerts via web or mobile.
Web + Mobile App
Sleek interface for monitoring and managing fraud alerts.
Payment Platform Integration
Connects to Stripe via API for seamless transaction monitoring.
Bank-Grade Security
Encrypted data and secure access, meeting SOC2 standards.
Cloud Deployment Blueprint
Scalable AWS setup for high-volume transactions.
Future Roadmap Document
A plan to scale your MVP with predictive analytics and more.
What’s Excluded
Custom fraud models (available in full build).
On-premise hosting (cloud-only in pilot).
Advanced analytics dashboards (included in roadmap).
Ongoing support beyond handoff (optional add-on).
What You Need to Provide
Stripe API Access: Provide credentials or API key at project start for integration.
AWS Account: Your active AWS account for hosting (we’ll handle setup).
No other dependencies — our AI uses open-source tools for fraud detection.
Timeline
MVP Delivery: 30 Days
Planning + Setup: 3 days
AI Fraud Pipeline: 7 days
Frontend Interface: 8 days
Integration & Security: 8 days
Testing & Deployment: 4 days
Total: ~180 hours, 2–3 engineers
Price
$9,999
Exclusivity: Add $3,000 for sole ownership, or keep non-exclusive to save.
✔ Complete MVP with codebase, documentation, and future roadmap
✔ Full tech handoff or optional continued development
✔ 30-day delivery, under NDA
✔ No hidden costs
✔ Option to scale into a full product
After You Buy
Once you claim Fintech Fraud Detector:
Limited to 3 buyers; page retires after third sale or exclusivity purchase.
Our MVP team calls you within 12 hours to start.
Work begins on your timeline, as fast as same-day.
Why It’s Valuable
Market Gap: Fraud costs fintech billions — this MVP ensures trust and savings.
VC Magnet: Fintech is investor gold — pitch this for massive funding.
First-Mover Edge: Launch a market-leading solution in 30 days.
Revenue Potential: Sell to banks or crypto platforms as a SaaS.
Proven Speed: Built by our 150+ AI experts with 100+ projects and 98% client satisfaction.
Ready to Own Fintech Fraud Detector?
Ditch freelancers and slow agencies. Get a production-ready AI MVP in 30 days, built for fintech success. Book a free 30-minute strategy call to secure one of 3 slots or pitch your own idea. Act now — demand is sky-high!
Claim Your MVP | Get a Free Consultation
Pricing is an estimate. Final costs confirmed during your free consultation.
For More Updates: www.mvp.tech4bizsolutions.com
0 notes
Text
What Comes Prebuilt in EasyLaunchpad: A Deep Dive into Features & Architecture

If you’re a .NET developer or startup founder, you’ve likely spent countless hours just getting the basics of your web app in place: login, admin dashboards, email systems, user roles, payments — the list goes on.
Now imagine you didn’t have to.
EasyLaunchpad is a complete .NET boilerplate designed to help you skip the time-consuming setup phase and go straight to building your core application logic. But unlike generic templates, it’s not just a UI skin or a half-done framework. It’s a full production-grade starter kit with everything you need seamlessly working together.
In this blog, we’ll break down what actually comes prebuilt in EasyLaunchpad and how the architecture helps you launch scalable, maintainable apps faster than ever before.
🔧 Why Boilerplate? Why Now?
Before diving into the tech, let’s align on the problem EasyLaunchpad solves:
Every time you start a new project, you repeat:
Configuring authentication
Setting up admin panels
Managing users and roles
Handling emails and templates
Integrating payments
Adding job scheduling and logs
EasyLaunchpad does all of this for you — so you don’t have to start from scratch again.
⚙️ Core Technologies Behind the Boilerplate
EasyLaunchpad is built with a modern and stable tech stack designed for production:
Layer and Techbology used:
Backend Framework — .NET Core 8.0 (latest LTS)
Language — C#
UI — Razor Pages + Tailwind CSS + DaisyUI
ORM — Entity Framework Core
Dependency Injection — Autofac
Background Tasks — Hangfire
Logging — Serilog
Templating Engine — DotLiquid (for email templates)
This foundation ensures that your app is fast, secure, scalable, and easy to maintain.
Let’s explore what comes ready-to-use as soon as you start your EasyLaunchpad project.
✅ Authentication (Email + Google + Captcha)
EasyLaunchpad includes secure login flows with:
Email-password authentication
Google OAuth integration
CAPTCHA validation during login/registration
You don’t need to spend days integrating Identity manually — just plug and play.
✅ Admin Panel (Built with Tailwind CSS + DaisyUI)
The admin panel is clean, responsive, and fully functional. It’s built using Razor views and styled with TailwindCSS and DaisyUI, giving you a modern UI that’s easy to extend.
Pre-integrated modules in the admin panel include:
User Management: View, add, deactivate users
Role Management: Basic role assignment and user filtering
Package Plans: Define product plans for sale
SMTP & Email Settings: Easily configure mail servers
Feature Settings: Enable or disable system options without touching code
✅ Email System with Templates (DotLiquid)
Forget the hassle of writing email logic from scratch. EasyLaunchpad includes:
Prebuilt transactional email templates (e.g., registration, password reset)
SMTP integration
Templating via DotLiquid, making it easy to insert variables and personalize content
All email dispatches are logged and tracked, so you never lose sight of what’s been sent.
✅ Queued Emails & Background Tasks (Hangfire)
Want to schedule tasks like email reminders or data syncs?
EasyLaunchpad uses Hangfire for:
Background job processing
Scheduled cron jobs
Retry logic for email dispatch and failed tasks
You can manage jobs through the Hangfire dashboard or extend it into your app logic.
✅ Logging with Serilog
Every serious app needs structured, searchable logs. EasyLaunchpad integrates Serilog for:
Real-time activity tracking
Error logging
Request/response data logging
This gives you full visibility into what’s happening in your app, both during development and in production.
✅ Stripe & Paddle Payment Integration
Monetizing your app? EasyLaunchpad includes out-of-the-box integration for:
Stripe
Paddle
You can configure:
Payment plans
One-time purchases
Trial periods
And manage all of it through the admin panel without coding custom APIs.
✅ Packages & Licensing Management
You can create, manage, and connect subscription packages via the admin dashboard.
Each package can be tied to payment providers and synced to your external website or product gateway, making EasyLaunchpad ideal for:
SaaS products
License-based tools
Tiered services
✅ Notifications System
Built-in support for system alerts and user notifications includes:
Inline admin messages
Success/failure alerts on actions
Extendable for real-time or email notifications
🧱 Architectural Design That Supports Growth
Beyond just features, the architecture of EasyLaunchpad is designed for maintainability, extensibility, and scalability.
🧩 Modular Structure
Each module (e.g., Auth, Payments, Email, Jobs) is built to be independently extendable or replaceable. This lets you:
Swap Stripe for PayPal
Replace DotLiquid with Razor templates
Add new modules like CRM or Analytics
📁 Clean Codebase Layout
plaintext
CopyEdit
/Controllers
/Services
/Repositories
/Views
/Models
The code is separated by responsibility, making it easy to onboard new developers or modify any layer.
🔌 Plug-and-Play Capabilities
Need to build your own modules? The boilerplate is interface-driven and uses Autofac for dependency injection, so you can override or extend any logic without rewriting core code.
🌐 Real Use Cases
Here are a few real-world examples of how EasyLaunchpad can be used:
🧠 AI Tools: Launch OpenAI-based chat tools with user plans & payments
💼 B2B SaaS: Create dashboards with multi-user access, logs, and subscriptions
🛠 Admin Systems: Quickly build portals for internal staff or clients
💸 Subscription Services: Monetize features via built-in plans & licensing
🧠 Final Thoughts
Most boilerplates are either too basic or too bloated. EasyLaunchpad hits the sweet spot — it’s production-ready, focused, and elegant.
Everything you’d normally spend 3–4 weeks building? Already done.
With the structure and flexibility of a custom-built project — but without the hassle — you’re free to build what really matters: your product, your logic, your innovation.
👉 Ready to dive in? Get your copy of EasyLaunchpad and start building today:🔗 https://easylaunchpad.com
0 notes
Text
Secure E-Commerce: SSL, PCI Compliance & Beyond with Jurysoft
In the age of digital commerce, e-commerce security is no longer a luxury—it’s a business-critical necessity. With data breaches, fraud, and privacy concerns on the rise, consumers expect secure and transparent online shopping experiences. At Jurysoft, a leading e-commerce development company in Bangalore, we deliver end-to-end secure e-commerce solutions that align with the latest global security standards—SSL, PCI DSS, GDPR, and more.
🔐 Why Secure E-Commerce Development Matters
Every online transaction involves the exchange of sensitive data: credit card numbers, login credentials, shipping addresses. One weak link in your security infrastructure could result in irreparable brand damage and significant financial penalties. That’s why businesses across industries trust Jurysoft to build secure and scalable e-commerce websites.
✅ SSL Encryption: Your First Layer of Trust
Secure Socket Layer (SSL) certificates encrypt the communication between a user’s browser and your server. This is what activates the “HTTPS” protocol and the padlock icon, both of which signal safety to your shoppers.
Our approach at Jurysoft:
We implement 2048-bit SSL certificates for maximum encryption strength.
Configure HTTPS site-wide to ensure secure data transmission.
Integrate SSL monitoring and automatic renewal to avoid certificate expiration issues.
📚 Learn more about how SSL works
💳 PCI DSS Compliance: Secure Payment Gateways
PCI DSS (Payment Card Industry Data Security Standard) is required for any business that processes credit card transactions. Non-compliance can lead to fines or even suspension of your merchant account.
Jurysoft ensures PCI compliance by:
Using certified PCI-compliant payment gateways like PayPal, Razorpay, and Stripe.
Implementing tokenization and encryption for cardholder data.
Following secure coding practices and data access controls.
📖 Official PCI DSS documentation
🌍 GDPR Compliance: User Privacy First
If your business serves users in the EU, GDPR (General Data Protection Regulation) compliance is mandatory. Even for global stores, GDPR compliance builds customer trust and transparency.
Jurysoft’s GDPR strategy includes:
Consent banners and user opt-in for cookies.
User data export, correction, and deletion features.
End-to-end data encryption and restricted access policies.
🔗 What is GDPR? - A Simple Guide
🛡️ Regular Security Audits & Penetration Testing
Security is a continuous effort, not a one-time investment. Our team performs regular vulnerability assessments, code audits, and penetration testing to ensure your store remains protected against the latest threats.
Our ongoing security services include:
OWASP-based code reviews and penetration testing.
Automated vulnerability scans and patch management.
Real-time monitoring with alert-based incident response.
🧪 Related keyword: e-commerce website vulnerability testing services
🧭 Jurysoft’s Secure E-Commerce Development Process
From consultation to deployment, Jurysoft’s custom e-commerce development services are designed with security at the core:
Discovery & Planning Define security goals, data flow, and compliance requirements.
Secure Architecture & Design Build with HTTPS, secure APIs, and encrypted storage.
Secure Coding & QA Apply static code analysis and penetration testing.
Launch & Maintenance Continuous security monitoring and updates post-launch.
Whether you're building a B2B platform, multi-vendor marketplace, or a high-performance D2C store, we provide secure, compliant, and future-proof digital experiences.
🚀 Start Building a Secure Online Store with Jurysoft
At Jurysoft, we believe that security builds trust, and trust drives conversions. That’s why our team integrates SSL encryption, PCI DSS standards, GDPR compliance, and continuous security audits into every e-commerce platform we develop.
🔗 Talk to our e-commerce security experts
0 notes
Text
How Much Does It Cost to Develop an Android eCommerce App in 2025?

In today’s fast-evolving digital economy, having a mobile presence is crucial for any business aiming to succeed in the eCommerce landscape. As of 2025, Android continues to lead the mobile operating system market globally, making it the ideal platform for launching your online store. But before getting started, most entrepreneurs and business owners have one common question: How much does it cost to develop an Android eCommerce app in 2025?
This blog explores all the key factors that influence the development cost, the essential features your app should include, the technologies used, and what to expect from a professional development process.
Why You Should Invest in an Android eCommerce App
Android has a massive user base and offers unparalleled reach, especially in emerging markets. Building an Android eCommerce app enables businesses to:
Connect with millions of mobile users worldwide.
Offer a personalized, convenient, and real-time shopping experience.
Increase brand visibility and customer loyalty.
Drive sales through push notifications, targeted offers, and one-click checkout.
Key Features Every Android eCommerce App Must Have
Creating a successful eCommerce app requires more than just displaying products. Users expect speed, security, and seamless functionality. Some of the core features that your Android app must include are:
1. User Registration & Login
Allow customers to sign up or log in using their email, phone number, or social media accounts. This sets the foundation for a personalized user experience.
2. Product Catalog
A clean and organized display of products with filtering and search functionality is critical. Customers should be able to browse categories, view product details, and easily compare items.
3. Shopping Cart & Checkout
This is where the real action happens. An intuitive shopping cart and seamless, secure checkout process can significantly increase conversion rates.
4. Payment Integration
Multiple payment options like credit/debit cards, digital wallets (Google Pay, Paytm, etc.), net banking, and even cash-on-delivery options enhance customer trust and convenience.
5. Push Notifications
Use push alerts to notify customers about offers, discounts, new arrivals, and abandoned carts to boost engagement and sales.
6. Order Management
Customers should be able to track their orders, view history, and even cancel or return items within the app.
7. Product Reviews and Ratings
These features build credibility and help other customers make informed decisions.
8. Admin Dashboard
A back-end dashboard helps you manage products, inventory, customer details, transactions, and analytics in real time.
9. Customer Support Integration
Live chat or AI-powered chatbots improve customer satisfaction by offering instant support.
Advanced Features That Can Elevate Your App
To stay competitive in 2025, consider adding innovative features such as:
AI-Based Recommendations: Analyze customer behavior and recommend personalized products.
AR/VR Integration: Let users try products virtually, especially useful for fashion and furniture industries.
Voice Search: Make product discovery faster and hands-free.
Loyalty Programs: Encourage repeat purchases by offering reward points and exclusive discounts.
While these features require more investment, they significantly enhance user experience and brand loyalty.
Technology Stack Used in Android eCommerce App Development
Choosing the right technology stack is crucial for performance, scalability, and maintenance. Here’s what powers a modern eCommerce app:
Front-end (Android): Kotlin or Java
Back-end: Node.js, Python (Django), or PHP (Laravel)
Database: Firebase, MySQL, MongoDB
Cloud Services: AWS, Google Cloud
Payment Gateways: Stripe, Razorpay, PayPal, etc.
Other APIs: Google Maps, Push Notification Services, Analytics Tools
Each of these tools contributes to different aspects of your app, from speed and responsiveness to secure data handling and user tracking.
Team Required to Build an Android eCommerce App
The development team typically includes:
Project Manager to oversee timelines and quality.
Android Developer to build the user interface and logic.
Backend Developer to handle server-side functions and data.
UI/UX Designer to create an intuitive, branded experience.
Quality Analyst (QA) to test and debug the application.
Marketing Strategist (optional) to plan app launch and engagement campaigns.
Depending on whether you choose a freelancer, in-house team, or a professional app development company, the overall cost and timeline can vary.
Total Cost to Develop an Android eCommerce App in 2025
Now to answer the big question—how much does it cost?
As of 2025, the estimated cost to develop an Android eCommerce app is:
For a basic app with minimal features, the cost ranges between $5,000 to $15,000.
A moderately complex app with payment integration, product filters, and admin panel can cost around $15,000 to $35,000.
A highly advanced app featuring AI, AR, multiple language support, and extensive backend may go from $40,000 to $100,000 or more.
This cost includes design, development, testing, and deployment. If you opt for post-launch support and maintenance (highly recommended), consider an additional 15–25% annually for updates, bug fixes, and scaling.
How to Reduce Android App Development Costs
Here are a few smart ways to optimize your budget without compromising on quality:
Start with an MVP (Minimum Viable Product): Launch with essential features first. Add more features as your user base grows.
Use Pre-built APIs: Leverage third-party services for payments, chatbots, and analytics instead of building from scratch.
Choose Offshore Development: Companies in regions like India offer excellent quality at a fraction of the cost charged in the US or Europe.
Go Agile: Agile methodologies allow iterative development and help you adapt to changes without major cost overruns.
Conclusion
Building an Android eCommerce app in 2025 is a strategic move that can offer long-term benefits in terms of customer acquisition, brand loyalty, and revenue growth. The development cost depends on your business goals, feature set, and the expertise of your Android app development company. Investing in the right team and technology is critical to delivering a seamless shopping experience and achieving success in a competitive market.
If you're ready to build your Android eCommerce app, USM Systems is one of the top mobile app development companies specializing in scalable and feature-rich solutions. With a proven track record in Android app development, we help businesses turn their ideas into powerful digital products.
#AndroidAppCost2025#eCommerceAppPricing#AppDevelopmentCost#eCommerceAppCost#MobileAppCost2025#eCommerceDevCost#BuildEcomAppCost#AndroidDevPricing#OnlineStoreAppCost
0 notes
Text
How to Build a Website and Application from Scratch
In the modern digital landscape, a professionally crafted website or application is no longer a luxury—it’s a necessity for businesses, brands, and startups alike. Whether you're a solo entrepreneur or managing a growing company, understanding how to build a website and application from the ground up can empower you to bring your ideas to life and reach a wider audience.
Define Your Goals and Requirements
Before you start designing or coding anything, it's critical to clearly define your objectives:
What is the purpose of the website/app?
Who is your target audience?
What features are necessary?
Will it be a static website, dynamic platform, or full-stack web app?
Pro Tip: Create wireframes or sketches of the user interface (UI) to visualize your idea.
2) Choose the Right Tech Stack
Depending on your project, select the technologies that suit your needs. Some popular stacks include:
Frontend: HTML, CSS, JavaScript (React, Vue, Angular)
Backend: Node.js, Python (Django), PHP, Ruby on Rails
Database: MySQL, MongoDB, PostgreSQL
Mobile App: Flutter, React Native, Swift (iOS), Kotlin (Android)
Tip: For startups, using open-source tools or low-code platforms can reduce costs and time.
3) Register a Domain and Choose Hosting
Your domain name is your digital identity. Choose a name that reflects your brand, and register it through a reliable provider like GoDaddy, Namecheap, or Google Domains.
For hosting, consider:
Shared Hosting for small websites
Cloud Hosting (like AWS, Azure, DigitalOcean) for scalable applications
4) Design the User Interface (UI/UX)
An intuitive, mobile-responsive design increases user engagement and conversions. Tools like Figma, Adobe XD, or Sketch can help you prototype the layout before development.
5) Begin Development: Frontend and Backend
Start with building the frontend using frameworks like React or Vue.
Develop the backend API to handle business logic, databases, and server interactions.
Ensure proper data validation, security, and error handling.
6) Integrate Features & APIs
Add features like:
User registration/login
Contact forms
Payment gateways (Stripe, Razorpay, PayPal)
Third-party APIs (Maps, SMS, etc.)
7) Test Thoroughly Before Launch Conduct:
Unit Testing (for individual components)
Integration Testing (for connected modules)
User Acceptance Testing (UAT) to get feedback from real users
Tools: Jest, Selenium, Cypress, Postman
8) Launch and Monitor
Deploy your app/website using tools like:
CI/CD pipelines (GitHub Actions, Jenkins)
Monitoring tools (Google Analytics, Hotjar, Sentry)
Announce your launch across social media, email lists, and digital forums.
9) Market Your Product
Use SEO, content marketing, paid ads, and social media to promote your new platform. Don’t forget to collect user feedback and iterate.
Conclusion
Building a website or application Development from scratch may sound complex, but with the right plan, tools, and mindset, it becomes a structured process. Whether you choose to DIY or hire expert developers, understanding each phase helps ensure a smooth journey from idea to launch.
#Website development from scratch#App development guide#How to build a web application#Full stack development#Custom website development services#business solutions software#custom software development#development of software#full stack developer#ios app development services#it consulting#it services & consulting#mobile app development#software consulting#software development company
0 notes
Text
🚀 How EasyLaunchpad Helps You Launch a SaaS App in Days, Not Months

Bringing a SaaS product to life is exciting — but let’s be honest, the setup phase is often a painful time sink. You start a new project with energy and vision, only to get bogged down in the same tasks: authentication, payments, email systems, dashboards, background jobs, and system logging.
Wouldn’t it be smarter to start with all of that already done?
That’s exactly what EasyLaunchpad offers.
Built on top of the powerful .NET Core 8.0 framework, EasyLaunchpad is a production-ready boilerplate designed to let developers and SaaS builders launch their apps in days, not months.
💡 The Problem: Rebuilding the Same Stuff Over and Over
Every developer has faced this dilemma:
Rebuilding user authentication and Google login
Designing and coding the admin panel from scratch
Setting up email systems and background jobs
Integrating Stripe or Paddle for payments
Creating a scalable architecture without cutting corners
Even before you get to your actual product logic, you’ve spent days or weeks rebuilding boilerplate components. That’s precious time you can’t get back — and it delays your path to market.
EasyLaunchpad solves this by providing a ready-to-launch foundation so you can focus on building what’s unique to your business.
🔧 Prebuilt Features That Save You Time
Here’s a breakdown of what’s already included and wired into the EasyLaunchpad boilerplate:
✅ Authentication (with Google OAuth & Captcha)
Secure login and registration flow out of the box, with:
Email-password authentication
Google OAuth login
CAPTCHA validation to protect against bots
No need to worry about setting up Identity or external login providers — this is all included.
✅ Admin Dashboard Built with Tailwind CSS + DaisyUI
A sleek, responsive admin panel you don’t have to design yourself. Built using Razor views with TailwindCSS and DaisyUI, it includes:
User management (CRUD, activation, password reset)
Role management
Email configuration
System settings
Packages & plan management
It’s clean, modern, and instantly usable.
✅ Email System with DotLiquid Templating
Forget about wiring up email services manually. EasyLaunchpad includes:
SMTP email dispatch
Prebuilt templates using DotLiquid (a Shopify-style syntax)
Customizable content for account activation, password reset, etc.
✅ Queued Emails & Background Jobs with Hangfire
Your app needs to work even when users aren’t watching. That’s why EasyLaunchpad comes with:
Hangfire integration for scheduled and background jobs
Retry logic for email dispatches
Job dashboard via admin or Hangfire’s built-in UI
Perfect for automated tasks, periodic jobs, or handling webhooks.
✅ Stripe & Paddle Payment Integration
Monetization-ready. Whether you’re selling licenses, subscription plans, or one-time services:
Stripe and Paddle payment modules are already integrated
Admin interface for managing packages
Ready-to-connect with your website or external payment flows
✅ Package Management via Admin Panel
Whether you offer basic, pro, or enterprise plans — EasyLaunchpad gives you:
#CRUD interface to define your packages
Connect them with #Stripe/#Paddle
Offer them via your front-end site or API
No need to build a billing system from scratch.
✅ Serilog Logging for Debugging & Monitoring
Built-in structured logging with Serilog makes it easy to:
Track system events
Log user activity
Debug errors in production
Logs are clean, structured, and production-ready.
✅ Clean Modular Codebase & Plug-and-Play Modules
EasyLaunchpad uses:
Clean architecture (Controllers → Services → Repositories)
Autofac for dependency injection
Modular separation between Auth, Email, Payments, and Admin logic
You can plug in your business logic without breaking what’s already working.
🏗️ Built for Speed — But Also for Scale
EasyLaunchpad isn’t just about launching fast. It’s built on scalable tech, so you can grow with confidence.
✅ .NET Core 8.0
Blazing-fast, secure, and LTS-supported.
✅ Tailwind CSS + DaisyUI
Modern UI stack without bloat — fully customizable and responsive.
✅ Entity Framework Core
Use SQL Server or switch to your own #DB provider. EF Core gives you flexibility and productivity.
✅ Environment-Based Configs
Configure settings via appsettings.json for development, staging, or production — all supported out of the box.
🧩 Who Is It For?
👨💻 Indie Hackers
Stop wasting time on boilerplate and get to your #MVP faster.
🏢 Small Teams
Standardize your project structure and work collaboratively using a shared, modular codebase.
🚀 Startup Founders
Go to market faster with all essentials already covered — build only what makes your app different.
💼 What Can You Build With It?
EasyLaunchpad is perfect for:
SaaS products (subscription-based or usage-based)
Admin dashboards
AI-powered tools
Developer platforms
Internal portals
Paid tools and membership-based services
If it needs login, admin, payments, and email — it’s a fit.
🧠 Final Thoughts
#Launching a #SaaS product is hard enough. Don’t let the boilerplate slow you down.
With EasyLaunchpad, you skip the foundational headaches and get right to building what matters. Whether you’re a solo developer or a small team, you get a clean, powerful codebase that’s ready for production — in days, not months.
👉 Start building smarter. Visit easylaunchpad.com and get your boilerplate license today.
#easylaunchpad #bolierplate #.net
1 note
·
View note
Text
Unlock Growth: Why Your Business Needs an E-commerce Mobile App

Imagine your customers browsing your products, adding to their cart, and checking out. All while waiting for their coffee or relaxing on the couch. That’s the undeniable power of an e-commerce mobile app. In a world glued to smartphones, not having a dedicated app is like leaving money on the table. But building a successful app isn’t just about coding; it’s about partnering with the right mobile app development company to bring your vision to life.
The Mobile Imperative: Beyond Responsive Websites
A responsive website is essential. But an app offers something more. It provides a direct, personalised, and frictionless channel to your customers. Push notifications announce flash sales instantly. One-tap logins remove checkout barriers. Personalised recommendations based on browsing history feel like having a personal shopper. Apps foster loyalty, increase engagement, and significantly boost conversion rates compared to mobile browsers. They live right on your customer's most personal device, ensuring your brand is always at the top of their mind.
Why Expertise Matters: Choosing the Right Mobile App Development Company
Crafting a high-performing e-commerce app requires deep expertise in user experience (UX), mobile-specific functionalities, security, and backend integration. This is where partnering with a specialised mobile application development company becomes non-negotiable. Here’s what they bring:
⦁ Strategic Insight: They don’t just build; they consult. A good company understands your business goals, target audience, and competitive landscape to shape the app's strategy.
⦁ Technical Mastery: From choosing the right tech stack (native vs. cross-platform) to ensuring seamless integration with your existing inventory, payment gateways (like Stripe and PayPal), and CRM systems.
⦁ User-Centric Design: Creating intuitive navigation, stunning product displays, and a checkout process so smooth that customers barely notice it. They prioritise usability above all.
⦁ Rigorous Testing: Ensuring the app is bug-free, performs flawlessly across different devices and OS versions, and offers a consistently excellent experience.
⦁ Ongoing Support: Launch is just the beginning. A reliable partner provides maintenance, updates, and new feature development.
Demystifying E-commerce App Development Services
What exactly do you get when you engage expert e-commerce app development services? It’s a comprehensive suite designed to cover every aspect:
⦁ Discovery & Strategy: Defining the app's core features, user flows, and technical architecture.
⦁ UI/UX Design: Crafting visually appealing interfaces with wireframes, prototypes, and pixel-perfect designs focused on maximising conversions.
⦁ Feature Development: Implementing essential e-commerce features: product catalogues, search/filter, user accounts, multiple payment options, secure checkout, order tracking, wishlists, and reviews.
⦁ Advanced Capabilities: Integrating push notifications, AR/VR product previews, AI-driven recommendations, loyalty programmes, chatbots, and social media logins.
⦁ Backend & API Integration: Building the robust engine that powers the app. It connects to your e-commerce platform (Shopify, Magento, WooCommerce, or custom), inventory, payment processors, and shipping APIs.
⦁ Quality Assurance (QA): Meticulous testing for functionality, usability, performance, and security.
⦁ Deployment & Launch: Guiding the app through the App Store and Google Play submission process.
⦁ Maintenance & Updates: Providing ongoing support, fixing bugs, releasing updates, and adding new features post-launch.
Selecting Your Perfect Mobile App Development Partner
Choosing the right mobile app development company is critical. Look beyond flashy portfolios. Consider:
⦁ Proven E-commerce Experience: Do they have a strong track record specifically in building successful e-commerce apps? Ask for case studies.
⦁ Transparent Process: Do they communicate, involve you in key decisions, and offer transparent pricing models?
⦁ Technical Proficiency: Are they up-to-date with the latest mobile technologies and security best practices (especially PCI compliance for payments)?
⦁ Post-Launch Commitment: Do they offer robust maintenance and support packages?
⦁ Cultural Fit: Do you communicate well? Do they understand your vision and business ethos?
Investing in Your Mobile Future An e-commerce mobile app is no longer a luxury; it’s a fundamental growth engine. It deepens customer relationships, drives sales, and builds brand loyalty in an increasingly mobile-first marketplace. By partnering with a skilled mobile application development company offering comprehensive e-commerce app development services, you transform your online store from a destination into a convenient, engaging, and indispensable part of your customers' daily lives. Don’t just meet your customers where they are; rather, live in their pocket, ready to delight them with every tap. Start planning your app journey today.
0 notes
Text
Ambulance App Development
Imagine being stuck in traffic with a loved one in need of urgent medical attention. You dial emergency services, but help is delayed. Unfortunately, that scenario is far too common in many parts of the world. Now picture this: with just a few taps on your phone, an ambulance is on its way, with real-time tracking and updates. That’s the magic of Ambulance App Development.
In recent years, mobile technology has completely reshaped how we access healthcare. Much like ride-hailing apps changed the way we book taxis, on-demand ambulance app development is now doing the same for emergency medical services.
Let’s break it down.
What Is an Ambulance App?
An ambulance app is a digital platform that connects users with the nearest available ambulance in real time. It allows for fast booking, live location tracking, medical data sharing, and even direct coordination with hospitals.
You could think of it as an Uber for Ambulance. Just as ride-hailing services made cabs more accessible and efficient, ambulance apps are revolutionizing how emergency care reaches people.
Why Do We Need Ambulance Apps?
Across the globe, the traditional emergency medical system has struggled with delays, miscommunication, and lack of transparency.
Here’s what ambulance apps bring to the table:
Faster response times
Real-time GPS tracking
Digital patient records sharing
Route optimization for drivers
Cashless payments and digital receipts
These features not only help patients but also make operations smoother for healthcare providers and EMT teams.
Real-World Examples
India's Ziqitza Healthcare has been leading the charge in providing on-demand ambulance services in several states through a user-friendly mobile app. In Kenya, Flare offers an Uber-style service for ambulances, connecting users to a network of emergency responders across the country. The UK’s GoodSAM platform integrates with the NHS and uses crowd-sourced first responders to help patients before the ambulance even arrives.
These examples show that on-demand ambulance app development is not a luxury anymore—it’s a necessity.
Key Features of a Successful Ambulance App
Creating an ambulance app isn't just about throwing in a few features. You need a well-thought-out design that considers the needs of both patients and healthcare providers.
Here’s a quick peek at what makes a solid app tick:
1. Instant Booking
Users can book ambulances with a tap and share their live location instantly.
2. Real-Time Tracking
See exactly where your ambulance is and how long it will take to arrive.
3. Multiple Ambulance Types
Let users choose from basic, advanced, ICU-equipped, or neonatal ambulances.
4. Driver & EMT Profiles
Build trust by displaying driver and EMT details with ratings and certifications.
5. Digital Payments
Simplify transactions with integrated payment gateways and insurance options.
6. Emergency Contacts & Medical Info
Allow users to add medical history and emergency contact numbers in advance.
7. Hospital Integration
Hospitals can prepare for the incoming patient, reducing wait time on arrival.
Technology Stack: What’s Under the Hood?
Just like a high-performance car, an ambulance app needs a powerful engine behind it. Here’s what you’ll typically find:
Frontend: React Native or Flutter for cross-platform functionality
Backend: Node.js, Python, or Java with robust APIs
Database: MongoDB, PostgreSQL, or Firebase
GPS & Navigation: Google Maps, Mapbox, or OpenStreetMap
Payment Gateways: Stripe, Razorpay, or PayPal
Real-Time Features: WebSocket or Firebase for live updates
The key to success? Choosing scalable, secure, and fast technologies that ensure zero lag during critical moments.
Business Models for Ambulance Apps
Thinking of investing in ambulance app development? You’ve got options. Here are some popular business models:
Aggregator Model: Like Uber, connect multiple ambulance providers under one platform.
Hospital-Based Model: An internal app exclusively for a hospital’s emergency fleet.
Subscription-Based: Offer premium memberships with priority response and additional features.
Pay-Per-Use: Users pay a one-time fee per emergency trip.
Each model has its pros and cons. Your choice depends on your market, goals, and target audience.
Challenges to Watch Out For
Let’s be real: this isn’t an easy business. Here are some bumps on the road you’ll need to steer around:
Regulatory compliance with healthcare and transport authorities
Ensuring data security, especially with patient medical records
Maintaining a well-trained and verified network of EMTs and drivers
Managing operations during peak demand or natural disasters
With proper planning and the right tech partner, these challenges can absolutely be managed.
Conclusion
In a world where everything is moving faster, healthcare can’t afford to lag behind. Ambulance app development is more than just a tech trend—it’s a life-saving tool that brings emergency services to the fingertips of millions. From reducing response times to helping hospitals better manage patients, these apps are changing the game.
Whether you're a healthcare provider looking to modernize, an entrepreneur exploring med-tech, or a government agency wanting to improve emergency services, now’s the time to take the leap.
Don’t just follow the trend. Be the reason someone gets help when they need it most.
Building an Uber for Ambulance app can be your way of doing just that.
If you’re ready to dive into on-demand ambulance app development, find a tech partner with real healthcare experience, focus on user needs, and never compromise on reliability. Because when it comes to emergencies, there are no second chances.
0 notes