#Vinyl polymer
Explore tagged Tumblr posts
Visit Tumblr Blog
Explore Tumblr blogs with no restrictions, modern design and the best experience.
Last Seen Tumblr Blogs


Fun Fact
The average Tumblr user visits about 67 pages every month.
Text

Illustration detail from a Bakelite Plastics promotional postcard - 1938.
#vintage illustration#vintage advertising#bakelite#bakelite plastics#plastics#plastic products#chemistry#bakelite company#molded plastics#resins#polymers#chemical companies#plastic manufacturers#union carbide#vinyl#union carbide and carbon corporation#deco design#art deco#vintage postcards#industry#science#product design#industrial design
18 notes
·
View notes
Text

Pastel melodies set
9 notes
·
View notes
Text


Meet the clay HEART DUDES!Originally made from clay and now turned into VINYL stickers! These are all my original characters and works! 👁️👄👁️💕✨(@lilsboobthangs)
Shop: https://lilsboobthangs.etsy.com
#digital journal#kawaii#cute art#heartbreak#kawaii art#kawaii aesthetic#polymer clay#clay art#air dry clay#clay sculpting#vinyl stickers#stickers#art blog#small artist#artists on tumblr#digital journey#journaling#digital illustration#weird art#weirdcore#wonky#its a little wonky#clay#cute#stay weird#funny stuff#indie artist#original character#original art#stationary
2 notes
·
View notes
Text
Table 26.1 gives some examples of polymers formed from compounds related to ethene, along with their common names and most important uses.
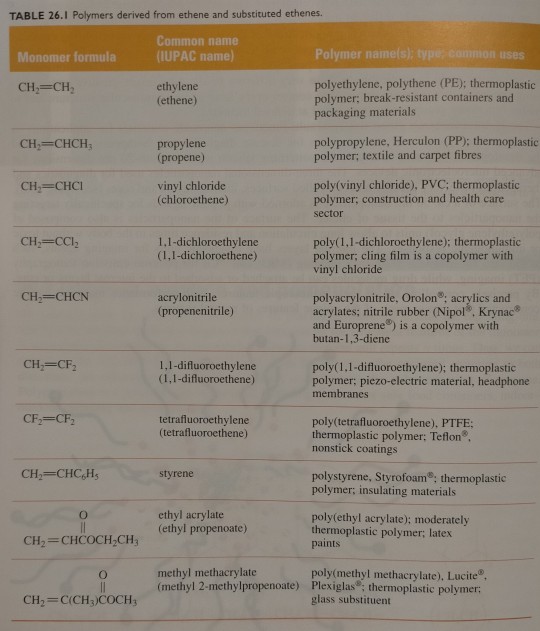
"Chemistry" 2e - Blackman, A., Bottle, S., Schmid, S., Mocerino, M., Wille, U.
#book quotes#chemistry#nonfiction#textbook#polymers#ethene#ethylene#propene#propylene#chloroethene#vinyl chloride#dichloroethene#dichloroethylene#propenenitrile#acrylonitrile#difluoroethene#difluoroethylene#tetrafluoroethene#tetrafluoroethylene#styrene#ethyl propenoate#ethyl acrylate#methyl methylpropenoate#methyl methacrylate
2 notes
·
View notes
Text

These were originally made from clay and now turned into VINYL stickers! These are all my original characters and works! 👁️👄👁️💕
✨(@lilsboobthangs)
#artists on tumblr#clay figures#air dry clay#clay figurine#clay art#clay sculpting#polymer clay#vinyl stickers#stickers#laptop sticker#original character#original art#wonky#wonky art#weird art#unique art#stationery stickers#notebook stickers#car sticker#pen pals sticker#indie artist#sticker community#Instagram
0 notes
Text

When I do cross-stitch I wax my thread, which makes it easier to get onto the needle and in my opinion causes fewer tangles. I use plain beeswax, and I've had the same puck (bought from Yankee Candle) for years because you don't need much wax for thread. But the puck was finally getting a little fragile and I wanted to have separate pucks for separate projects anyway. So I busted out my wax sealing kit and melted the puck into three separate round molds, then when they were cool I sealed the top of each with a different stamp.
The sealing wax is the new "supple" wax which is mostly vinyl polymer (think hot glue, but nicer) so it can't be used to wax the thread, but it's a good reinforcement for the beeswax, which tends to get deep grooves and then crumble. And I think they look quite nice, too.
230 notes
·
View notes
Text

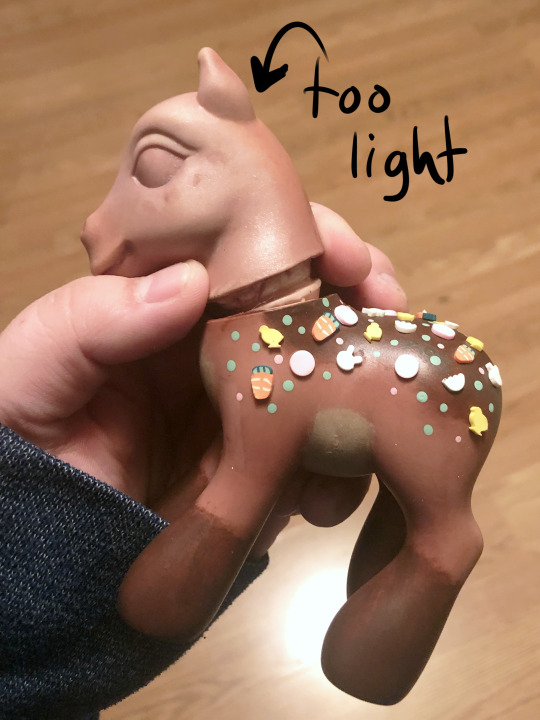
Hello! I wanted to share my process of how I made my Easter Pony! She is my second ever custom and she made all the trouble I had with the first one seem like a walk in the park in comparison ಥ_ಥ Let's begin!
DISCLAIMER: Custom ponies like this one are not to be played with by children nor made by children. This pony was made with the use of nail polish remover (acetone) which is toxic. You need to wash your hands throughly after use and use in a well ventilated area. This pony was also made with sharp tools such as an xacto knife, sewing pins, rehairing needles, and an awl.

First, the concept art! Trial and error caused her to look a little different than the concept art but I still love the end result!
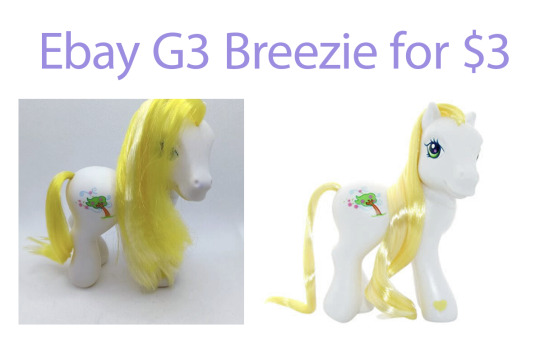
I wanted to start with a white base to give myself a clean canvas for dyeing so I got this G3 Breezie off Ebay for only $3. I decided to first remove her mane and tail which requires removing the head. If you know anything about G3 pony customzing, you know their heads are difficult to get back on once they come off. Even when you run them under warm/hot water. So to get it back on for dyeing, I tried trimming a little excess of vinyl off the neck ring with my xacto knife. It slipped and got me right under my nail! Bad omen for what's to come!
After getting her prepped (removing her mane and tail, cleaning her, using acetone (nail polish remover) to remove her cutie mark) she was ready for a dye bath! I used Rit DyeMore as regular Rit Dye won't dye the vinyl material that ponies are made of. This was my first ever time dyeing anything that wasn't fabric so I was thrilled when she came out this warm rich brown! So pretty!

I read online that dyed ponies will leach dye onto other ponies if they touch, so I wanted to try and prevent this as much as possible with some matte sealer. Lesson #1: Even though she was dry, the matte sealer reactivated the dye! The smallest touch left a print! :(

I pushed forward! And tripped immediately after! I thought, "Surely matte Modge Podge will seal her just that much more" and to my dismay, the Modge Podge kept every brush stroke I made when it dried!! She looked like a leather hand bag! ˚‧º·(˚ ˃̣̣̥᷄⌓˂̣̣̥᷅ )‧º·˚ I learned later you can buy matte Modge Podge spray online but all I had was the type you brush on to your surface.
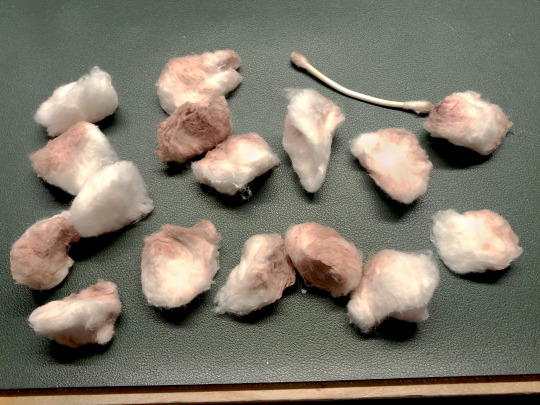
Thankfully, with the help of sixteen cotton balls and a q-tip with acetone, I managed to remove all the sealer but she was no longer that nice rich brown. Oh well I still loved her!
And whoever said the paint will protect the eyes from the dye has clearly never dyed a dark pony! Her eyes were so brown after this lol

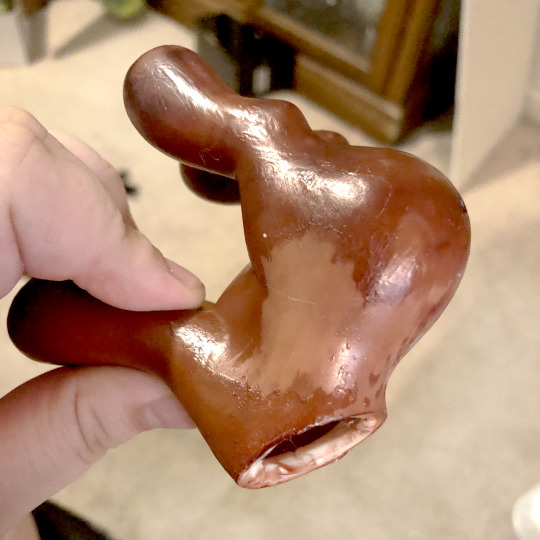

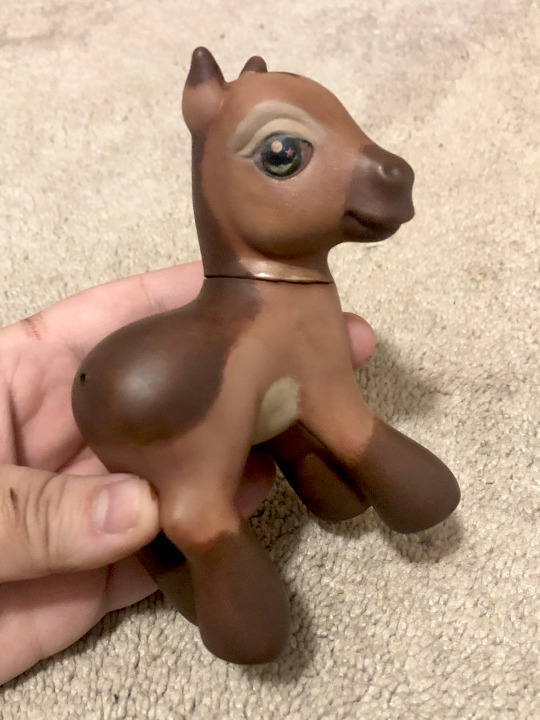
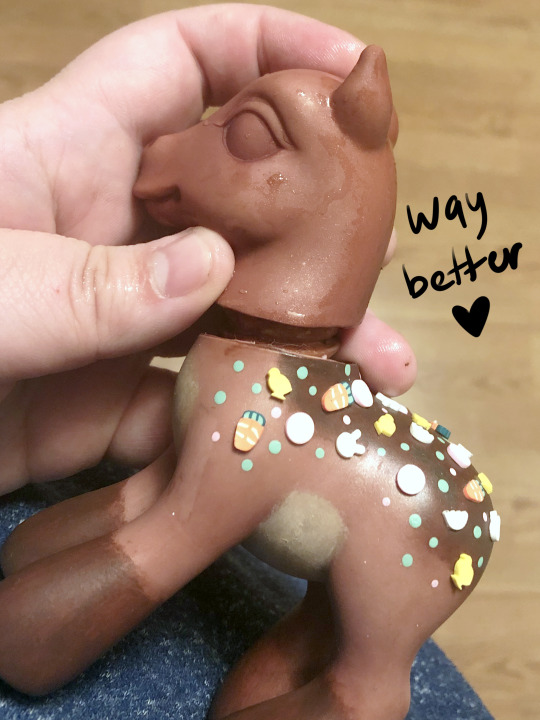
Painting, adding of polymer clay easter themed confetti, and adding her 3D chocolate bunny cutie mark went great! It was all going well until the eyes.
I had never fully painted pony eyes before so the first attempt was pretty bad. Not even my multiple attempts at glitter and using clear nail polish as a cheap gloss on the eyes could save them.
It was so bad that I almost didn't take any pictures but when I went to seal her head, this weird white powder covered half of her face?? I had never seen this before and it freaked me out thinking I just ruined her. I managed to get it off with a cotton ball and some acetone but her paint was fully damaged.
Turns out this was caused because I didn't shake the can of sealer well enough. I needed a break....
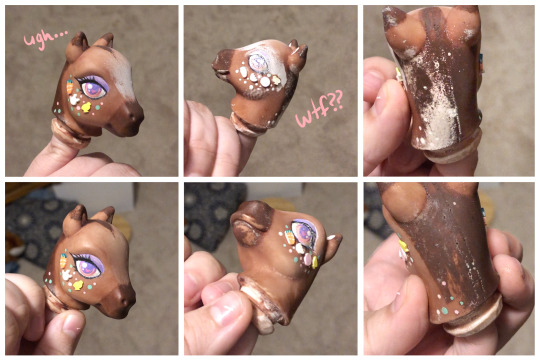
While I took a break for a few days, I decided to watch tutorials on how to paint doll eyes and learned that it's actually pretty common to use high quality watercolor pencils; either Faber Castell or Derwent (which is what I ended up buying).
When I came back, I made the hard decision of removing all the paint and decorations from the head and starting over. Hours of work gone but it was so worth it! 🩷 Removing the paint with acetone ended up making her head lighter than her body so I had to redye her head lol. This time I mixed Derwent pencils with acrylic paints for her eyes.


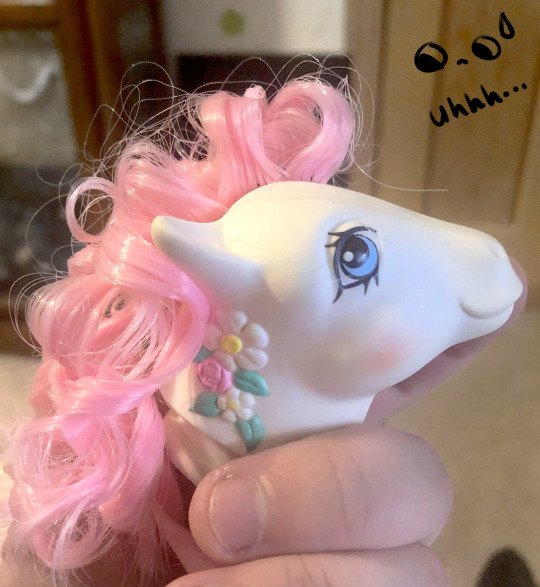
Time for the hair! I've never done curls before and my original plan was to buy curly hair online but it's so hard to find in the color and curl size I wanted.
So my second idea was to buy small curlers to use on regular nylon doll hair bought from ShimmerLocks on Etsy. But when I tested them out on poor Flower Bouquet it looked so bad ಥ_ಥ
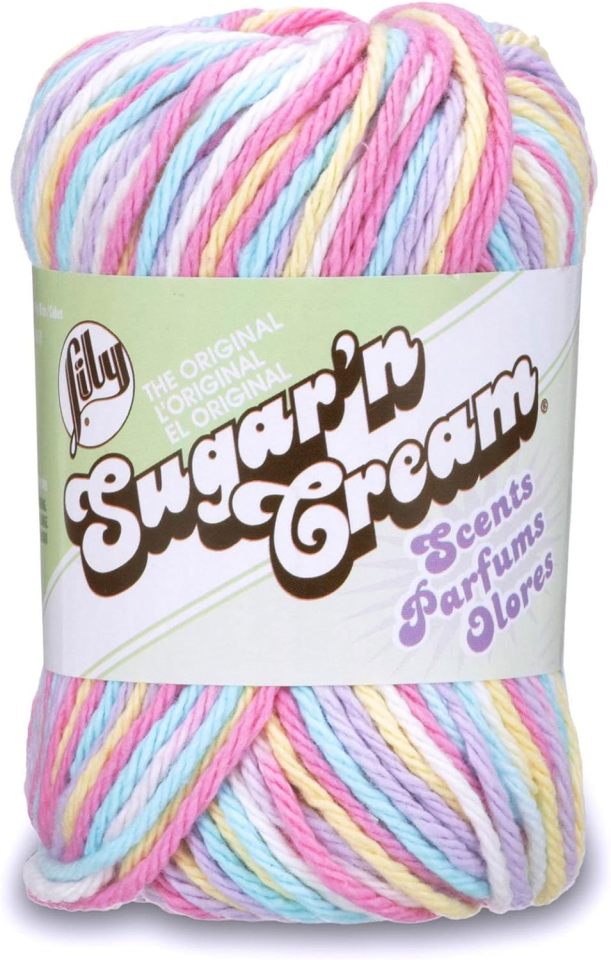
I discovered a Youtube channel you may know called Dollightful where in one of her Stock Box videos she used yarn that she unraveled to make super cute tight wavy hair for a doll. It was a perfect solution! It looks so good but omg it was tedious haha! I used it for her tail too; sectioning off the colors hoping they'd stay separated (they didn't lol).
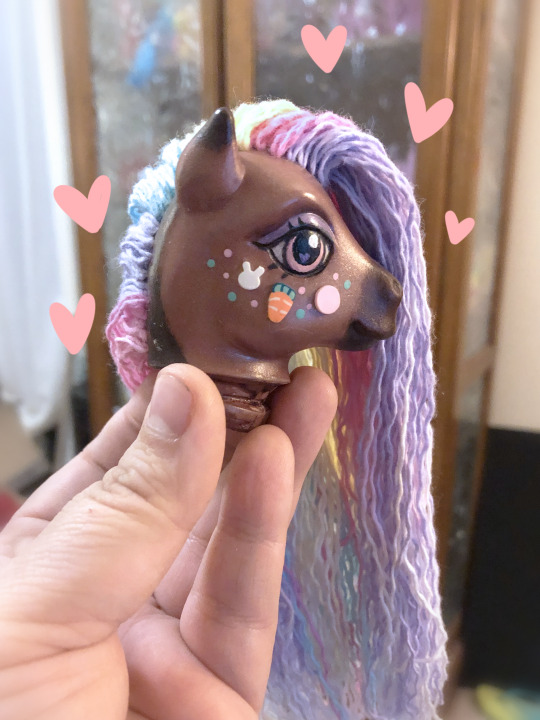
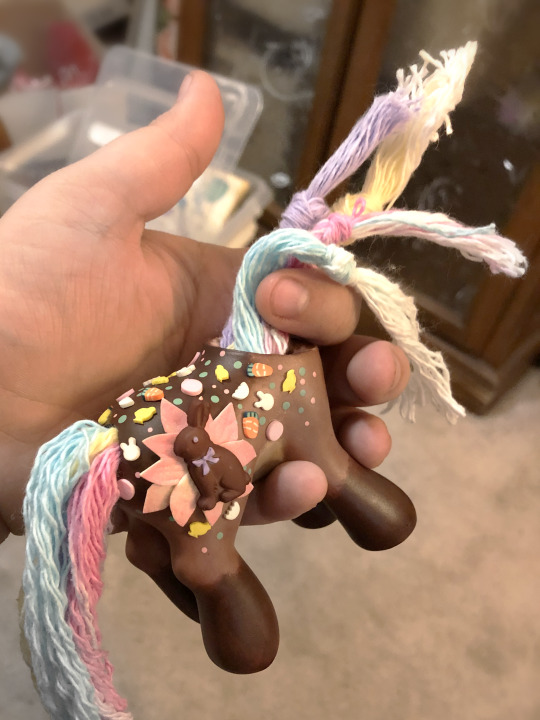
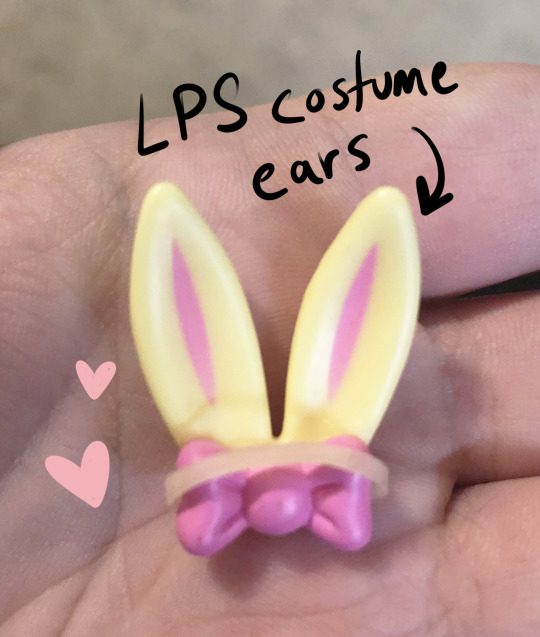
She's nearly complete! Time for small decorations! I tried so many different ears from air dry clay to stealing some from bunny decorations I bought at the store and nothing was working! But I had one last idea...
I gave these old Littlest Pet Shop costume bunny ears some use with a flat top sewing pin and some glue so now my pony has bunny ears! Yay!
I forgot it in the concept art, but I originally wanted to add flowers to her mane but I couldn't figure out how to do that without glue which I didn't want to do, too permanent, so I opted for some beads I had on hand. I didn't have any light blue so I made some with the use of acetone (nail polish remover in my case) and boom! Light blue beads! Then I washed them off so the acetone wouldn't damage anything :)
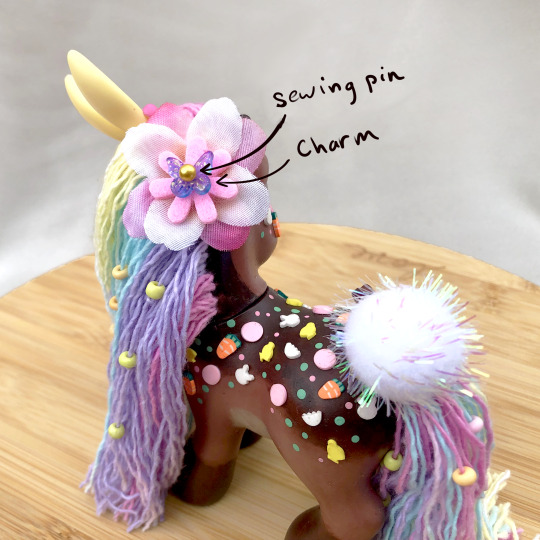
I used a gold topped sewing pin, a butterfly charm, a felt flower and two faux flowers to create a cute hair accessory!
Finally I sewed a hair tie to a puffball to give her a removable cottontail if I ever wanted to take it off.

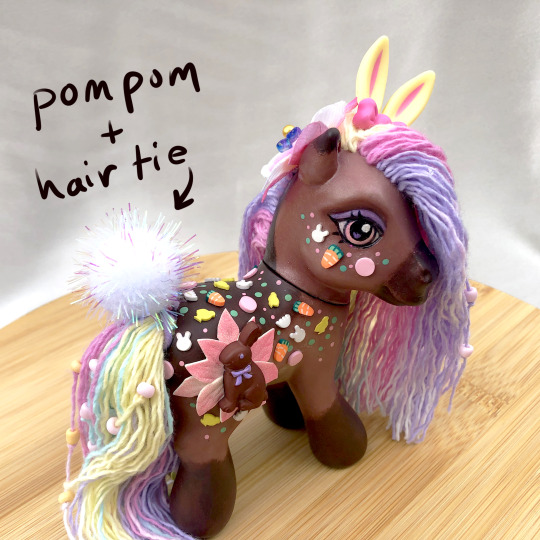
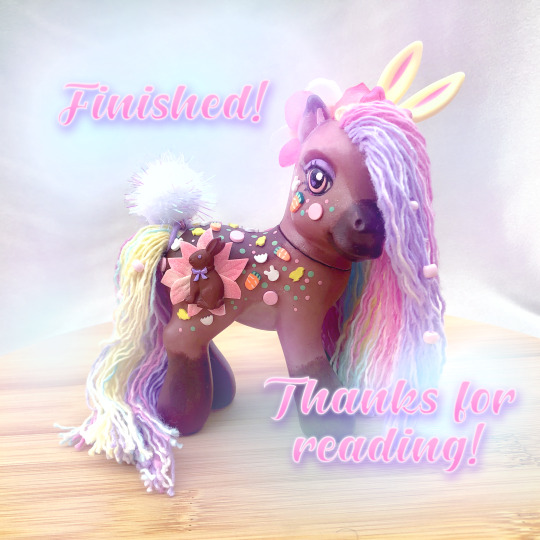
And DONE! She looks so good after so much time and effort! I worked on this girly for two weeks I think? She actually had a partner I designed but I've run out of time to make her :') Maybe next year? 👀 🩷🩷
#my art#art#horse#pony#equine#equine art#artist on tumblr#mlp#mlp art#mlp g3#my little pony g3#g3 mlp#custom pony#ooak#ooak doll#ooak mlp#ooak my little pony#custom mlp#my little pony#my custom ponies#easter#bunny#pastels#pastel rainbow#walkthrough#custom
210 notes
·
View notes
Text
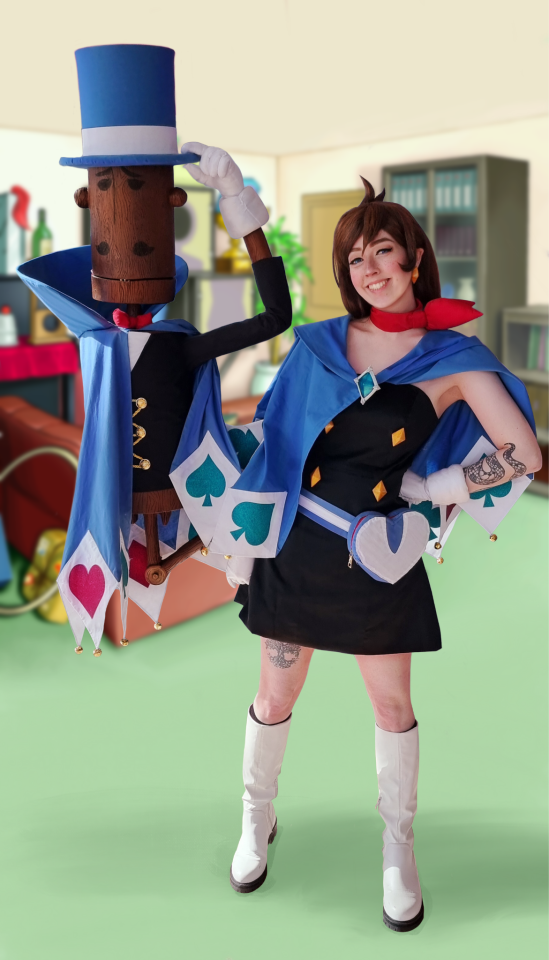
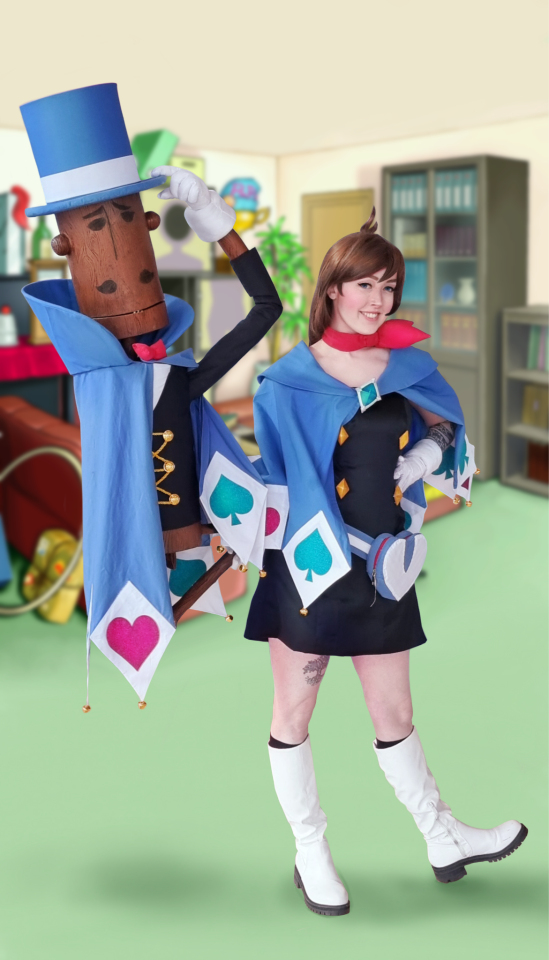

Trucy Wright and Mr Hat ~ Ace Attorney
Finally got round to editing some pics that were taken way back in March (oops). Trucy is such a favourite of mine, as is Mr Hat, and they were such a joy to cosplay (though I did keep spooking people at con who thought Mr Hat was a real person hovering over my shoulder 🙃)
I made pretty much everything myself, and I am so proud of it all! (Details below the cut, feel free to skip)
Mr Hat is made from 2 cylinders of eva foam with PVC piping (plus lots of nuts and bolts) for support. And that's not editing! There is nothing supporting him from underneath, and he is hands-free to carry around; he is attached to me at the waist via 2 belts that thread through openings I made in the side seams of my dress. All the wood detailing was engraved in with a dremel before he was painted, and I drafted patterns to sew up his cape and shirt. Similarly, his hat is also made from eva foam and covered with the same fabric I used for the cape. The hat fits me too, just only when I have my Trucy wig on or else it's much too big :') His head is also on a hinge so his mouth can open and close. He's basically a big puppet!
Some notes: There are magnets in the hat and gloves to hold his hand in place as well as magnets in his jaw to hold his head close but unfortunately I didnt use strong enough magnets and my lovely Apollo (pictured) had to keep fixing him. His head also started drooping towards the end of the day (this is why I always test my cosplays before entering any competitions!) and I'm struggling to think of a better way to stablise it - if anyone has any tips, please let me know!
In any case, I am so so proud of him! Now onto Trucy...
I've cosplayed Trucy before, but I updated her a bit to go with Mr Hat. I sewed up a new cape (used the old one to make Mr Hat's) and used some glittery iron-on vinyl for the patterns on the diamonds, and added bells so I jingle when I move around!
The dress I found in a charity shop but it initally was a lot longer and much too big for me, so I took it in and up and added the adjustable side-openings + padding on the inside to hide the bumps the belts would make. I made the buttons + the earring from Polymer clay, and the broach with a polymer clay encasing and a resin jewel (which i had to make a mold for. They don't sell em that big)
The bag I also found but sewed fabric over the top to make it look more like Trucy's + added the belt. The neckscarf and Mr Hat's bowtie I completely winged. I stuffed them both plus part of the globes to give everything that cartoonish shape.
I think that's everything. Let me know if you have any questions!
76 notes
·
View notes
Text

Foretell sales success for your new designs. Ad for Bakelite Plastics - 1939.
#vintage advertising#chemistry#plastic#plastics#bakelite#bakelite company#vinyl#polymer#resin#molded plastics#bakelite plastics#vintage illustration
10 notes
·
View notes
Text

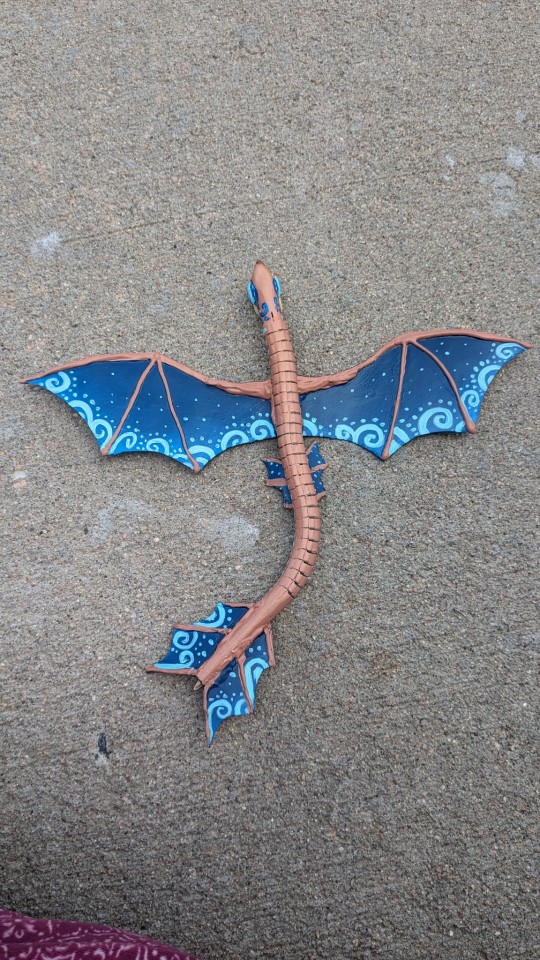
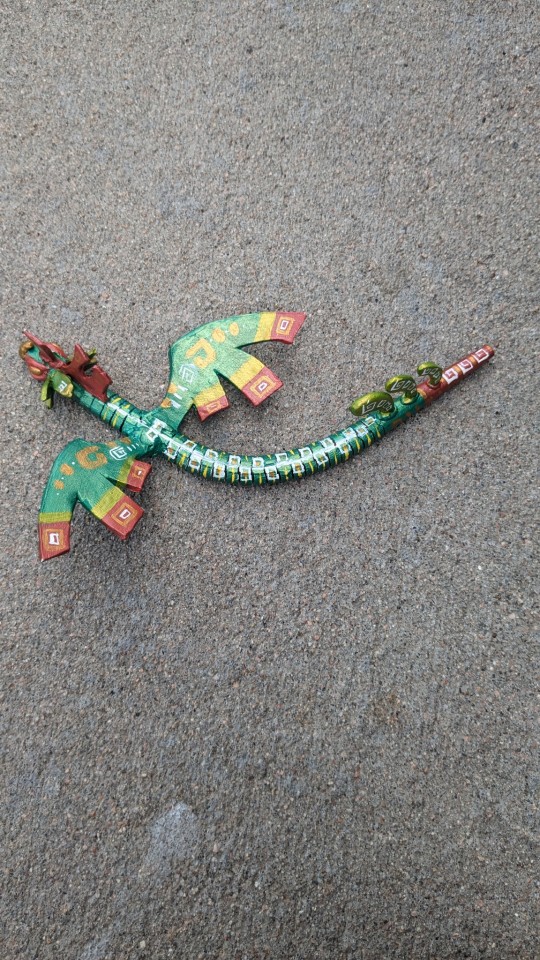
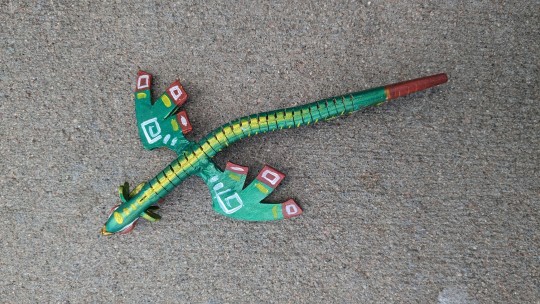


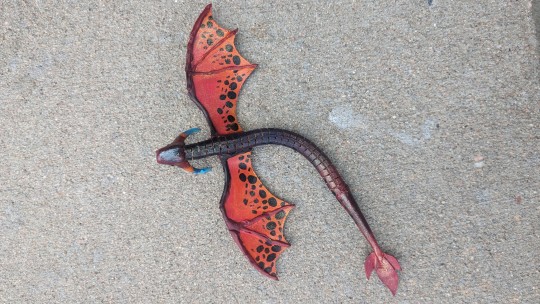
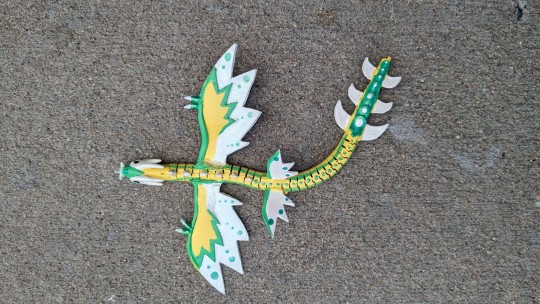

Wooden dragons go BRRRRR
These start off with a plain wooden snake, then I sculpt on extra parts with polymer clay. I bake them, then sculpt wings and glue them on. I use vinyl for some of the bigger wings. Then I paint and cover them in finish!
#dragons#wooden snake#wooden snakes#wooden dragon#wooden toys#hand painted#hand sculpted#polymer clay
34 notes
·
View notes
Text

Synthesizing polymers with an unprecedented structure
For more than two decades, the Ihara research group has been focusing on the development of new methods for polymer syntheses using diazocarbonyl compounds as monomers. They found that diazoacetate can be polymerized by a palladium(Pd)-based initiator to afford carbon–carbon (C–C) main chain polymers bearing an alkoxycarbonyl group (ester) on each main chain carbon atom. The findings are published in the Polymer Journal. In contrast to the well-known vinyl polymerization, where the main chain is constructed from two carbon units of vinyl monomers such as ethylene and styrene, the polymerization of diazoacetate forms the C–C main chain from one carbon unit, which is the remarkable characteristic of this polymer synthesis (C1 polymerization). The products of C1 polymerization are expected to possess enhanced physical properties and functionalities. Following the first publication on this C1 polymerization project in 2003, intensive efforts have been devoted to this C1 polymerization by many groups around the world.
Read more.
11 notes
·
View notes
Text
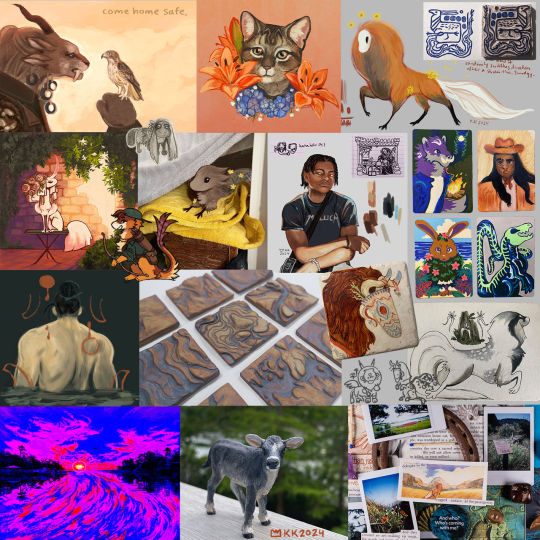
2024 art year in review ↫
Wow. Here we are again. Long time no see or speak, friends. Hope you have all been doing and keeping well!
This past year has been the strangest and most onerous yet for me yet. I'll get into it a bit in this post but fair warning that I may mention difficult, emotionally charged topics. If you're not in the headspace for that, no worries, you can skip to the other symbol. I'll see you next year.
∵
Art was extremely difficult this year. I really struggled even finding 12 pieces to throw into a collage like this. I tend to keep a steady pace of one medium-largeish, "postable" piece a month, interspersed with little doodles and sketchbook scribbles here and there. Therefore, it's usually fairly straightforward to compile these. I scroll through my digital art folder, pick out the best or my favorite piece I made within each designated month, sometimes sprinkling in mini works or traditional pieces when applicable. This year, I only made about 8 that I would consider posting--some of which are featured, most of which are actually not. Why? Why am I so hard on myself? (A rhetorical question, but one I ask myself every day and have yet to find an answer to.) Online platforms have become a formalized space for me--a "only the polished enter the portfolio" kind of mentality. I can't quite figure out if that is something to wrestle with or listen to. On top of the usual frustrating strain of perfectionism, I haven't felt the desire to post anything at all this year.
This reticence was mostly due to deep and inordinate amounts of interpersonal stress from changes in a community that I loved and had a huge part in building. I grew fearful to be perceived publicly online and to share any part of my art or life. February and March were black holes. I felt alienated from my identity. I didn't know who I was anymore. It got so bad, I was suicidal. Truthfully, the only thing that stopped me was knowing I had to live until April.
In April, thankfully, I went on a massive trip I had been planning with all of my best friends for four years. (vlpn, Kiire, 1ore, I love you so much!!!) I traveled out west to watch the eclipse and go on a road trip to a national park that I have always wanted to see. Better yet, I was surrounded by so much restorative, healing love. I sat on Kiire's warm leather couch soaking in the real, tangible community that I had built, and drew for the first time in ages. Kiire also gave me the most thoughtful gift--a little hand lino cutter and some vinyl squares. We all gathered at her kitchen table, carving away, laughing and sharing stories. Part of me is still in April, I think.
In May, I started a summer-long pottery class (turned residency, let's be real. I lived in the studio.). It was my first time working with real clay, after dabbling with oven-bake polymer clay and play-doh before that. Since it was focused on handbuilding, I didn't get the chance to use the wheel...which I desperately want to do this summer if I'm still in town. However, even if I was only making pinch pots and tiles, I felt myself grow by leaps and bounds as an artist. Not just in technique, but also in the conception. Why am I doing xyz? What does it mean? What does my medium add to my work? I enjoy working with my hands at a physical craft, but I still wrestle with creating stuff. I love physical objects, but have no space for them at the moment.
I lived more in my sketchbook this year, continuing the trend from last year. My former boss gifted me a shitty little 5.5 x 8.5" journal that I've been using as my work sketchbook. It helps keep me sane at my desk, and my creativity muscles exercised, but does not keep me from still drawing on lined notepads...lol. That work sketchbook has truly helped me break even further away from the trapping of art perfectionism. More and more I am embracing the messy, the ugly, the unfinished. I love drawing in ballpoint pen now, and have started Yet Another Sketchbook of pen plein airs. Okay, some pencil doodles here and there. But mostly pen.
Despite having an upward swing mid-year, my world kind of collapsed in on itself September onward. I don't want to go into too much detail about everything, because it's a little personal and frankly, there's too much to go over. From housing precarity, major random trauma-related panic attacks, a natural disaster, nasty people rearing their heads in my life, grief over losing family land, my grandma getting cancer, my job being so soul-crushingly frustrating and about to become much worse in the new year...it's been so much for me to handle. I'm tired, uncertain, quaking from what has and what may be. I'm creeping through the loamy undergrowth towards 2025, trying to drag myself towards what I love. I want to forge a better life for myself; I just want to live again.
Back to art, as all things seem to go--last year I wrote that I wanted to experiment with new mediums and techniques. Good news, bestie, you absolutely did. From linocut to pixel art to markers to to clay!!!, it has definitely been an experimental year at least. In 2025, hm...I think I want to keep at studies and focus on light and depth. I also want to keep up the trend of getting weirder and less literal with my work. I'm interested in trying out some interesting compositions and having patience with myself when stuff is not turning out. Turns out you can put down the pen and pick it back up. I also miss zines and want to make more...and also I want to keep up valuing my creative time and mini projects (like my tarot journal & my media journal).
I did hit some other interesting art milestones this year--I was rejected from some zines and even gallery openings. There's this great song off the new John Craigie live album that especially resonated with me. Listen to the whole song and whole album if you've got time. "If you haven't been failing, you haven't been trying." / "Maybe the cool thing was that even though [Van Gogh] wasn't successful, he still painted, every day, all the time, right up 'till the end. I wondered why. Probably for the same reason I was driving to these coffee shops. 'Cause it felt good to swing." / "As I passed under that sign, I could almost hear the tired voice of Jiffy Lube call down to me. "Oh Johnny. How long must we watch you fail?" And as I raced past into the unknown darkness, I called back, "Oh Jiffy, how long you got? We gon be up for a while."
∵
To close, I've never really done this before, but since I haven't posted much this year, I thought I'd go through everything pictured for some context. This is generally left -> right, top -> bottom...
A panel from my comic for Commander of your Heart zine, featuring Ximone and Sappho. I was also published in 2 others this year; very cool! A tiny doodle of Wideeyes from my mini sketchbook. A gift for my friend's birthday of his cat, Lily. Her muzzle really does look scrunkly like that. Ahku, sweet Ahku, from when I did a challenge to draw with your Least Favorite Brush. I still hate the brush. A linocut stamp I made of Xiyu using the aforementioned supplies. One of many stamps I carved this year.
A piece for Archalyte to gift a character to 1ore. Fletcher, my Wermz NPC and the mascot of the summer event I ran this year. Getting into pixel art! A goofy paintover of a guinea pig featuring Nickle. A study that I did using a tablet in the studio I helped build--my third time ever working with one! I think it came out alright. Work notebook doodles for a self-published zine I'm working on. Copic markers on trading cards, featuring two of my Neopets and a Werm of mine. Ora's was done freehanded with some leftover acrylic paint I had after painting a sculpture. Since this year has sucked so bad, I've been self-soothing in silly ways; namely, spending some time on Neopets and getting wildly back into Pokemon cards / into Battledome cards for the first time. I've been enjoying tiny scene compositions and collecting little art prints.
Daihei for Artfight for 1ore...I did this while on vacation with my family and it was my first digital painting on my computer in months. Tiles from my ceramics class; my first project! I wish I could show my final project, but it does not photograph well. Ceramic coaster I painted with The Archivist. Doodles of The Sphinx and The Archivist I unearthed today. Marker drawing of vlpn's character 6298.
Vent painting from October. Painted sculpture of Starrain. Ink painting of Ahku surrounded by stuff.
Onward, blinking towards the sun...
#art#artists on tumblr#year in review#year in art#art summary#ximone atropos#ahku#xiyu#nickle#wideeyes#fletcher#ora#neopets#kiiyi#coha#llavere#the archivist#the sphinx#starrain
10 notes
·
View notes
Text
(regarding this post and this post)
@1960z I can’t just let myself be biased without trying to find a real answer so. I tried to record a test of different types of erasers as fairly as I could
tw pencil writing and papery scratching sounds
I’ve had both pink erasers just sitting in a box for probably about 5 years. The packaging from the white eraser calls it “hi-polymer” or “high quality plastic” and google says the white erasers are typically made of soft vinyl
#my posts#out of the four pink erasers i found. the one i grabbed for the video was the hardest#there was only one pink pearl but the other three were varying degrees of hardened
6 notes
·
View notes
Text
I want dragon quest slime earrings. I am very surprised that I can't find any that look like the ones in the game. I want them to be clear! I'm gonna make my own...If anyone has ever used transparent polymer clay: how transparent would a pea-sized sphere be? Or perhaps I could try making them with resin...But how would I make the face if I did that? I imagine paint wouldn't stick to a smooth surface. Vinyl stickers might work but making a tiny face would be really hard. If anyone has any knowledge/suggestions, I'm all ears.

15 notes
·
View notes
Text
instagram
#polymer clay#clay art#clay sculpting#air dry clay#clay#clay figurine#clay figures#blob#blob art#stickers#vinyl stickers#cute#weird art#wonky#its a little wonky#art blog#Instagram
0 notes
Note
No carpets!? *horrified Bobert voice*
Not only are there no carpets—whether cut pile, Berber pile, sisal carpet, Saxony cut, plush carpet, texture cut, frieze cut, shag carpet, sculpted cut, cut-and-loop; whether made out of wool, cotton, silk, bamboo, jute, sisal, hemp, seagrass, coir, nylon, olefin, or polyester—there are no finished floors of any kind, linoleum, cement, whether fast setting, colored, fiber reinforced, self-leveling, mortar, high early-strength, sand mix, silica sand, plastic, hydraulic, or sheet vinyl, tile, cork tile, terrazo, rubber, epoxy, ceramic & stone, slate, aputitsiarvaq, or marble, whether white—Danby Imperial, Colorado Yule, or Carrarra—or black or green; or hardwood, whether overlay, strip flooring with alternate joints, or herringbone, inlaid, basket weave, Arenberg, Chantilly, or Versailles parquet; in fact no wood anywhere, whether redwood, treated western hemlock, yellow pine, cedar, wood-polymer, Engelmann spruce, pecan, southern magnolia, Colorado spruce, alpine fir, american beech, northern red oak, Canada Hemlock, red maple, sugar maple, eastern white pine, butternut hickory, shagbark hickory, american plane tree, eastern black walnut, ponderosa pine, white fir, northern catalpa, common bald cypress, american sweet gum, bur oak, California live oak, mahogany, Douglas fir, eastern cottonwood; nor any kind of a subfloor, sheathing, drywall, any kind of insulating material, polyicynene or other.
Picture that. In your Beetle-induced hypnotic visions.
#ask#house of leaves#most of this is quoted from house of leaves but i did have to write the carpet part myself#with the aid of a better homes and gardens article#for best results imagine this post appearing inside a blue square in the middle of a different post on your dashboard#during one of the tumblr updates where they broke the whole site
11 notes
·
View notes