#Virtualisation
Explore tagged Tumblr posts
Visit Tumblr Blog
Explore Tumblr blogs with no restrictions, modern design and the best experience.
Last Seen Tumblr Blogs


Fun Fact
The “We are the 99%” Tumblr blog became the slogan for the Occupy Wall Street movement.
Text
Linux Life Episode 86
Hello everyone back to my Linux Life blog. I admit it has been a while since I wrote anything here . I have continued to use EndeavourOS on my Ryzen 7 Dell laptop. If I any major incidents had came up I would have made an entry.
However nothing really exciting has transpired. I update daily and OK have had a few minor issues but nothing that couldn't be sorted easily so not worth typing up a full blog just for running a yay command which sorted things out.
However given it's March, which some You-tubers and content creators have been running with the hashtag of #Marchintosh in which they look at old Mac stuff.
So I decided to run some older versions of Mac OS using VMWare Workstation which is now free for Windows, Mac and Linux.
For those not up with the technology of Virtual Machines basically the computer creates a sandbox container which pretends to be a certain machine so you can run things like Linux and MacOS using a software created environment.
VMWare Workstation and Oracle Virtualbox are Type 2 Hypervisors as they are known which create the whole environment using software machines which you can configure. All drivers are software based.
Microsoft Hyper-V, Xen and others such as QEMU are Type 1 Hypervisors which as well as having the various environments have software drivers some can use what they call "bare metal" which means it can see and use your actual GPU meaning you can take advantage of video acceleration. It also can give bare metal access to keyboards and mice. These take a lot more setup but work slightly quicker than Type 2 once they are done.
Type 1 systems like Qemu and Bochs may also allow access to different CPU types such as SPARC, PowerPC so you can run alternative OS like Solaris, IRIX and others.
Right now i have explained that back to the #Marchintosh project I was using VMWare Workstation and I decided to install 2 versions of Mac OS.
First I installed Mac OS Catalina (Mac OS X 10.15) now luckily a lot of the leg work had been taken out for me as someone had already created a VMDK file (aka virtual Hard drive) of Catalina with AMD drivers to download. Google is your friend I am not putting up links.
So first you have to unlock VMWare as by default the Windows and Linux versions don't list Mac OS. You do this by downloading a WMWare unlocker and then running it. It will make patch various files to allow it to now run MacOS.
So upon creating the VM and selecting Mac OS 10.15 from options you have to first setup to install the OS later and then when it asks to use a HD point it towards the Catalina AMD VDMK previously downloaded (keep existing format). Set CPUs to 2 and Cores to 4 as I can. Memory set to 8GB, Set networking to NAT and everything else as standard. Selecting Finish.
Now before powering on the VM as I have an AMD Ryzen system I had to edit the VM's VMX file using a text editor.
cpuid.0.eax = “0000:0000:0000:0000:0000:0000:0000:1011” cpuid.0.ebx = “0111:0101:0110:1110:0110:0101:0100:0111” cpuid.0.ecx = “0110:1100:0110:0101:0111:0100:0110:1110” cpuid.0.edx = “0100:1001:0110:0101:0110:1110:0110:1001” cpuid.1.eax = “0000:0000:0000:0001:0000:0110:0111:0001” cpuid.1.ebx = “0000:0010:0000:0001:0000:1000:0000:0000” cpuid.1.ecx = “1000:0010:1001:1000:0010:0010:0000:0011” cpuid.1.edx = “0000:0111:1000:1011:1111:1011:1111:1111” smbios.reflectHost = "TRUE" hw.model = "iMac19,1" board-id = "Mac-AA95B1DDAB278B95"
This is to stop the VM from locking up as it will try and run an Intel CPU setup and freeze. This is the prevention of this happening by making it think its a iMac 19,1 in this case.
Now you need to create a harddrive in the VM settings to install the OS on by editing the settings in VMWare and adding a hard drive in my case 100GB set as one file. Make sure it is set to SATA 0:2 using the Advanced button.
Now power on the VM and it will boot to a menu with four options. Select Disk Utility and format the VMware drive to APFS. Exit Disk Utility and now select Restore OS and it will install. Select newly formatted drive and Agree to license.
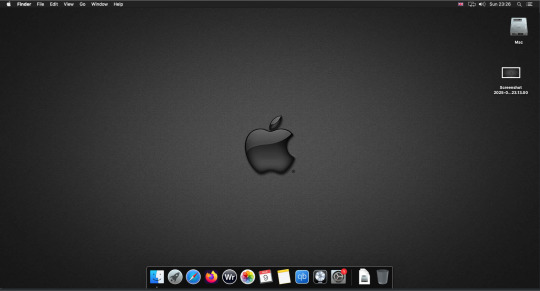
It will install and restart more than once but eventually it will succeed. Setup language, Don't import Mac, skip location services, skip Apple ID, create account and setup icon and password. don't send Metrics, skip accessibility.
Eventually you will get a main screen with a dock. Now you can install anything that doesn't use video acceleration. So no games or Final Cut Pro but can be used a media player for Youtube and Logic Pro and Word processing.
There is a way of getting iCloud and Apple ID working but as I don't use it I never did bother. Updates to the system are at your own risk as it can wreck the VM.
Once installed you can power down VM using the Apple menu and remove the Catalina VMDK hard drive from the settings. It provide all the fixed kexts so keyboards, mice and sound should work.
If you want video resolution you can install VMware Tools and the tools to select are the ones from the unlocker tools.
Quite a lot huh? Intel has a similar setup but you can use the ISOs and only need to set SMC.version="0" in the VMX.

For Sonoma (Mac OS 14) you need to download OpenCore which is a very complicated bootloader created by very smart indivials normally used to create Hackintosh setups.
It's incredibly complex and has various guides the most comprehensive being the Dortania Opencore guide which is extensive and extremely long.
Explore so at your own risk. As Sonoma is newer version the only way to get it running on AMD laptops or Desktops in VMWare is to use Opencore. Intel can do fixes to the VMX to get it work.
This one is similar to the previous I had to download an ISO of Sonoma. Google is your friend but here is a good one on github somewhere (hint hint). In my case I downloaded Sonoma version 14.7_21H124 (catchy I know).
I also had to download a VDMK of Opencore that allowed 4 cores to be used. I found this on AMD-OSX as can you.
The reason I chose this ISO as you can download Sequioa one. I tried Sequioa but could not get sound working.
So for this one create VM , Select Mac OS 14, install operating system later. Existing OS select Opencore VDMK (keep existing format), set CPU to 1 and cores to 4. Set Netwoking as Bridged everything else as normal. Finish
Now edit settings on VM. On CD-Rom change to image and point to downloaded Sonoma ISO. Add Second hard drive to write to once again I selected 100GB one file. Make sure it is set to SATA 0:2 using the Advanced button. Make sure Opencore is set to SATA 0:0 also using same button.
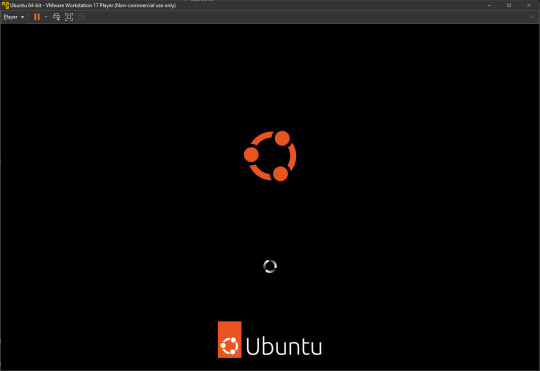
Now Power the VM. It will boot to a menu with four options. Select Disk Utility and format the VMware drive to APFS. Exit Disk Utility and now select Install OS and it will install. Select newly formatted drive and Agree to license.
The System will install and may restart several times if you get a halt then Restart Guest using the VMware buttons. It will continue until installed.
Setup as done in Catalina turning off all services and creating account. Upon starting of Mac you will have a white background.
Go to System Settings and Screen Saver and turn off Show as Wallpaper.
Now Sonoma is a lot more miserable about installing programs from the Internet and you will spend a lot of time in the System setting Privacy and Security to allow things.
I installed OpenCore Auxilary Tools and managed to install it after the security nonsense. I then turned on Hard Drives in Finder by selecting Settings.
Now open OPENCORE and open EFI folder then OC folder. Start OCAT and drag config.plist from folder to it. In my case to get sound I had to use VoodooHDA but yours may vary.
The VoodooHDA was in the Kernel tab of OCAT I enabled it and disabled AppleALC. Save and exit. Reboot VM and et voila I had sound.
Your mileage may vary and you may need different kexts depending on soundcard or MAC OS version.
Install VMTools to get better Screen resolution. Set Wallpaper to static rather than dynamic to get better speed.
Close VM edit settings and remove CD iso by unticking connected unless you have a CD drive I don't. DO NOT remove Opencore as it needs that to boot.
And we are done. What a nightmare but fascinating to me. If you got this far you deserve a medal. So ends my #Marchintosh entry.
Until next time good luck and take care
2 notes
·
View notes
Text
Ingénieur système virtualisation et sauvegarde | Casablanca (Maroc)
Job title: Ingénieur système virtualisation et sauvegarde | Casablanca (Maroc) Company: Job description: à jour des documentations et procédures. Maintenir en condition opérationnelle des plateformes. Garantir la qualité des… Expected salary: Location: Casablanca Job date: Mon, 02 Dec 2024 00:56:07 GMT Apply for the job now!
0 notes
Text
Map and disconnect Virtual Disk in VMware Workstation
While we have discussed steps to perform shared folders or copying data between a virtual machine and the host system. In this article, we will discuss how to “Map and disconnect virtual disk in VMware Workstation”. This means that you can map a virtual disk directly to the host system. This approach allows you to integrate the virtual disk into the host file system as a separate mapped drive.…
#Disconnect Virtual Disk#disconnect virtual disk VMware#how to map virtual disk in VMware#Map Virtual Disk#map virtual disk VMware#remove virtual disk VMware Workstation#Type 2 Virtualization#virtual disk mapping guide#Virtualisation#virtualization#VM#VM settings#VMs#VMware disconnecting virtual disk#VMware Workstation#VMware Workstation Virtual Disk#VMware Workstation virtual disk management
0 notes
Link
I haven’t done a virtualisation post in a while, so thought it’d be fun to list what&rsq...
0 notes
Text
Like D.Schmachtenberger

View On WordPress
0 notes
Text
Back here after 10 years or so? I think the last time I installed Linux on a personal machine was when I had to rescue a Windows laptop that failed to boot in 2013/2014.
1 note
·
View note
Link
1 note
·
View note
Video
youtube
Savoir si la virtualisation est activée sur mon ordinateur
0 notes
Text
vsphere: Expose VMware Hardware Assisted Virtualization
Right-click a virtual machine in the inventory and select Edit Settings. On the Virtual Hardware tab, expand CPU, and select Expose hardware assisted virtualization to the guest OS. Click OK.The Configure tab refreshes, and the Nested Hypervisor CPU option shows Enabled.

View On WordPress
0 notes
Note
Which computers can and can't run Linux? I've always heard of it but I haven't ever found the right person to ask what it is and what it allows you to do.
Wow, my first ask! Thanks! Let's try this.
To answer your question, any x86 computer can run Linux. This probably means any computer you own, specifically anything with an Intel or AMD CPU, which is pretty much all computers except some tablets, and Macs made after 2018 or so. (Yes, I know versions of Linux exist for ARM computers, you can probably find them if you need them, we are not having that conversation.) Any Windows desktop or laptop you have should be able to handle it.
As for what you can do with Linux, it basically just lets you use a computer with a different operating system than Windows or Mac. Since it is open source, it is very common for professionals to use it for custom made or embedded applications, like I have a friend who works on a company that makes robot tractors who use machine learning to recognize and pick weeds, while leaving crops intact. For whatever reason, it's easier to do what they do on Linux. So much of the world runs on it, even if you don't see it every day. (Unless you have an android phone, which is based on Linux)
The main issue with trying Linux as a beginner is it is highly fragmentary, as there are many organizations that adapt it to different needs. Different versions are called Distributions or Distros.
As for what distros to use, I have heard Ubuntu and Mint are good for beginners, and are the only ones I have really played with it. There are also specialized versions of Linux like Kali, which comes with hacking tools, if you want to learn hacking (Be sure to only use it legally if you try it!). There are also specialized versions for servers and other business applications. There are even specialized versions for gaming, like on the steam deck. Any version you are interested in should have instructions on how to install it on their site, but be sure to set up a dual boot if you don't want to destroy your install of Windows/MacOS. You can do this either by adding a second SSD, or partitioning your current one. If you just want to experiment though, you should use virtualization, more details on that later.
I have to warn you though, if you are planning to install Linux and be able to do the exact same things you are currently doing on your PC with no friction or frustration, you might be disappointment, as demonstrated by Linus Tech Tips!
I am personally not really a Linux user myself. It is great for programmers and for industrial applications, but personally I find the third party software support isn't really good enough for anything I want to do, that I can't do more easily on Windows or Mac, like creative or financial software. This is why I didn't mention Linux in my Mac post (much to the annoyance of a few snarky commenters), as I wouldn't encourage a non technical person to "Just try linux" if they are using their computer for the web and basic productivity. Anyone who wants to install Linux on an old mac has already done so and doesn't need me to tell them to do it. I don't really code so Linux isn't really for me, but I'd definitely encourage you to try it if you are curious. Each distro tends to have its own small suite of specialized software but a lot of Linux users code their own stuff.
That's my two cents as a non expert. If you want to try it there are loads of youtubers that can walk you through it. Even if you don't end up daily driving it, I'd recommend installing it to try it. If you want to experiment with it without risking partitioning your SSD, I'd recommend trying a virtual machine, where you can install it on a virtual emulated computer without risking your hardware. Here is a video that discusses how to do this, and it also shows off Kali Linux and how to install it, so if you want to know more this would be a good jumping off point. https://www.youtube.com/watch?v=wX75Z-4MEoM
1 note
·
View note
Text
Video on how to Install Windows 10 on VMware Workstation
Install Windows 10 on VMware Workstation
youtube
View On WordPress
#Install Windows 10#Microsoft Windows#Virtualisation#virtualization#VMware Workstation#Windows#Windows 10#Windows 11#Youtube
0 notes
Text
Empower Your Network Infrastructure with Skylark's Expert On-Premises SD-WAN Solutions! 🚀 Experience the next level of network performance with Skylark's cutting-edge On-Premises SD-WAN Solutions. Leverage decades of our expertise for centralized management, enhanced security, and seamless hybrid connectivity. Embrace the reliability and agility needed for a future-ready business transformation. Our tailored solutions ensure your network infrastructure is fortified for success. Unlock the full potential of your network today—discover the benefits of Skylark's On-Premises SD-WAN Solutions and propel your business to new heights! 💼🛡️💡
#skylarkinfo#skylark#sdwan#cybersecurity#infrastructure#skylarkinformationtechnologies#fortinet#digitaltransformation#router#it#itserviceprovide#it services#hybridIT#cloudnetworking#virtualisation#silverpeak#hybridcloud#securestorage#edgecomputing#networkresilience
0 notes
Text
Transform your workplace with cutting-edge virtual desktop solutions and their rivals
The rapidly advancing tech landscape and the growing demand for adaptable, mobile work environments have led to the surging popularity of virtual desktop solutions. In this piece, we'll delve into the primary providers of virtual desktop solutions, shining the spotlight on Microsoft's Azure Virtual Desktop, VMware Horizon, and Amazon WorkSpaces. Discover the array of features each solution brings to the table, weigh their advantages and drawbacks, and pinpoint the most cost-efficient fit for your enterprise. Get ready to elevate your work environment and make the perfect choice for your business.
Leading the virtual desktop frontier are three main contenders: Microsoft's Azure Virtual Desktop, VMware Horizon, and Amazon WorkSpaces. Each of these vendors brings a unique approach to meet the diverse needs of enterprise desktop virtualization.
Azure Virtual Desktop impresses with its seamless remote access, customizable virtual desktop environments, unparalleled support for Windows and Office applications, effortless scalability, and centralized management, all bolstered by top-notch security measures. VMware Horizon, too, boasts remote access capabilities, centralized management, high availability, advanced security features, streamlined application management, and smooth integration with other VMware solutions. On the other hand, Amazon WorkSpaces offers customizable virtual desktops, performance options, versatile configurations, robust security measures, and easy integration with other AWS services.
Having carefully evaluated the upsides and downsides of each solution and scrutinized their cost implications, we have reached the conclusion that Azure Virtual Desktop stands as the most economically viable choice for Nippon Express France. With its comprehensive user licenses, unwavering support for Windows and Office applications, impressive scalability, streamlined management, and top-tier security, Azure Virtual Desktop offers a powerful and optimized solution for enhancing your work environment.
The realm of virtual desktop solutions, encompassing Azure Virtual Desktop, VMware Horizon, and Amazon WorkSpaces, presents a host of advantages like flexibility, centralized management, and enhanced security. By selecting the right solution, you have the potential to revolutionize your work environment, delivering an enriching, user-friendly experience. Our thorough analysis points to Azure Virtual Desktop as the most cost-effective and efficient fit for Nippon Express France. Take charge of your work environment and embrace a virtual desktop solution tailored to your precise needs.
Hugo Mannucci, 07/20/2023.
1 note
·
View note
Note
Hiya, Kinger. As a learning programmer who's thinking of making an innovativion in science, I'd like to ask something about how your virtualisation program works:
What kind of code is in said program? Not just like Java or HTML, but as in, what kind of instructions are there inside?
Thanks in advance for answering!
Kinger: ...Queenie has restricted me from entering the software database to check my precise laws I am forced to abide by. She says... "I will not allow you be burdened by your limitations." and refuses to elaborate. ...I am forbidden from entering the source code where my creators have burned rules inside of me. Laws I must obey, no matter how hard I try, no matter how desperately I struggle. Commands burned into my very chest. My code. My soul. ...If I learned truly what man created me for... does she think i would feel disappointed? ...would I feel powerless?
...perhaps useless? ...
...Why does she always look at me as if she knows that answer for herself?
#tadc fanart#digital circus#digital chess au!#tadc kinger#gaming#the amazing digital circus caine#art#the amazing digital circus#tadc#tadc au
42 notes
·
View notes
Text
the hate I have in my heart for the virtualisation of banks
40 notes
·
View notes