#Windows 10 Tutorial for Beginners
Explore tagged Tumblr posts
Visit Tumblr Blog
Explore Tumblr blogs with no restrictions, modern design and the best experience.
Last Seen Tumblr Blogs


Fun Fact
Tumblr has been banned in Indonesia for providing people with access to pornographic content.
Text
youtube
Simple beginners guide how to build create WebHID API Electron JS Desktop App for windows 10 & windows 11. Electron webhid api Desktop App html js Script: https://bit.ly/4egIyAw or https://drive.google.com/file/d/1euT1JxtpOgdZwVpA5C1nXOZRZ7bnbsoa/ Electron JS Desktop App Project Tutorial for Beginners: WebHID API Example w/ Source Code
#tutorials#how to#programming#arduino#esp32-s2#esp32#WebHID API#Desktop App#Electron#Electron JS#Source Code#Project Tutorial for Beginners#windows 10#windows 11#Youtube
0 notes
Text

Hello folks! As someone who never did any celebrations nor tutorials for giffing, I decided it's finally the time now. So thank y'all for putting up with my horror shenanigans, 8k is just amazing and I hope y'all will keep enjoying my blog and posts!
PHOTOPEA GIF TUTORIAL
Moving to Photoshop after years of using Photopea, I can say while they both work very similarly, they're also different. Photoshop is far superior, you can still make very HQ and nice gifs in Photopea too! This post aims to show you my personal way of making crispy gifs while also covering the basics of getting the frames and uploading them to Photopea. (If you're looking for more detailed beginner tutorial, there's plenty of those out there, amazingly done!)
Photopea is completely free, video player is completely free, downloading movies is completely free. Only thing it'll cost you is your time.
WHAT YOU'LL NEED:
- photopea - potplayer - good quality movie file ( i go for the highest GB ones, above 10gb is amazing. Sometimes I get 40gb and prefer 1080p source. Note that higher file doesn't immediately mean higher quality - if the movie looks weird just download another one)
GETTING THE FRAMES: Once you get your source file and open it via PotPlayer, find the scene you want to gif. Using D and F keys you can go backwards or forward by single frames. When you get the perfect frame where you want the gif to start, I always go back 10 frames because PotPlayer tends to cut those out. It's better to get more frames than you need as you can always delete those extra ones later on.
I'll be giffing scene from Longlegs alongside the tutorial.
PRESS CTRL + G. This will open the frame capturing window. Fix the setting to match these:

and press "START". Click back on the PotPlayer to bring focus back on the window and hold or press the forward key - F - to play the scene and capture the frames. You can see the frames number going up on your other window. If it stays on 0 you're not capturing anything. Once the desired scene is over, press "STOP" on the frame capturing window and voila - you have your frames in your selected folder. Delete any extra or unwanted ones. The amount of frames usually sits between 40-80 depending on what ratio you'll use later on for the gifs to fit the 10mb Tumblr upload limit.
Now it's time to open PHOTOPEA.
FILE > NEW: you have to write down the exact dimensions of your frames. This action will create a new file with single background. Go back to FILE > OPEN AND PLACE > SELECT ALL YOUR FRAMES and upload them. Depending on the size of the frames, this could take a while or even lag your browser. Make sure to not click anywhere within the app before all frames are done uploading.
Now lets finally make the gif. The following were my most used gif making steps in general, play around other options and find out what works - every gif or scene is different!
Delete the original empty layer at the bottom and then select all the frames (clicking the first/last layer and then click the last/first layer while holding shift to easily select all) and by pressing CTRL+G, group them. Select all layer again and
RIGHT CLICK (on the layers) > RASTERIZE LAYER (on the upper taskbar) > ANIMATION > MAKE FRAMES Now your frames should have _a_ in their names. CREATE NEW LAYER

and select all your frames again.
CROP the whole project to whatever ratio you want, Ill be using 64x44 ratio for wider gif.

By pressing ALT+CTRL+I open the RESIZE window. Tumblr gif dimension is 540px wide max (heres tutorial for other dimensions and why correct sizing is important) so using that and "bicupic sharper" option under resample, resize the gif.

Now you have the base gif done.

Its dark, muddy and unclear. We sharpen it and give it the clear crispy look using noise. FILTER > NOISE > ADD NOISE and set the Amount to 1% and select monochromatic FILTER> SHARPEN > SMART SHARPEN > 150% amount with 1px radius FILTER> SHARPEN > SMART SHARPEN > 50% x 10px

Now its time to bring the gif to life. Create NEW ADJUSTMENT LAYER. This is where all the editing options are.

For this specific gif Im doing:
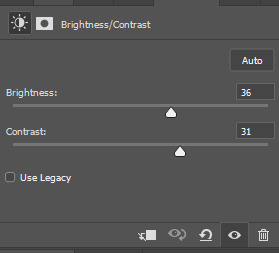
BRIGHTNESS/CONTRAST +50 brightness, +10 contrast
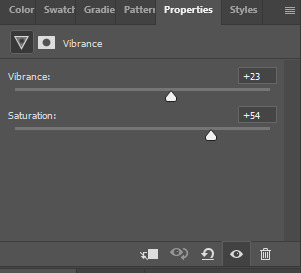
VIBRANCE +20 vibrance, +10 saturation
HUE/SATURATION master -50 , red +50, cyan +50, blue +50 (the reason i tune all colors in master down by 50 is to mute them all down. Adding back on colors you want is making them stand out way more! It works on gifs with dominant few colors but if the gif is very colorful, you're better off leaving this option out completely and rather work with selective colors. As I said, try it out and see!)
another layer of BRIGHTNESS/CONTRAST +20 brightness
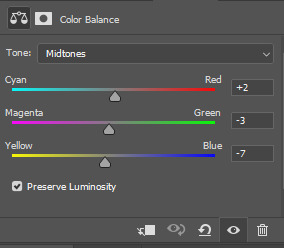
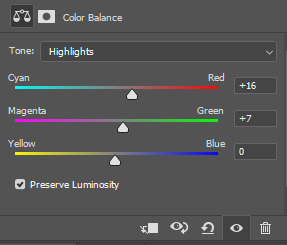
COLOR BALANCE range: midtones > magenta - green: -11, yellow - blue: +8
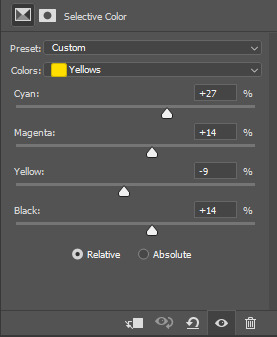
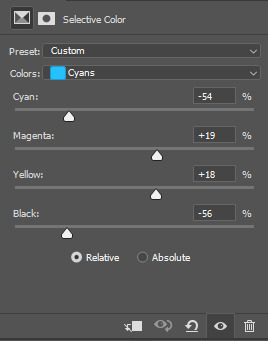
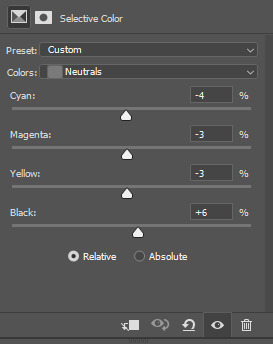
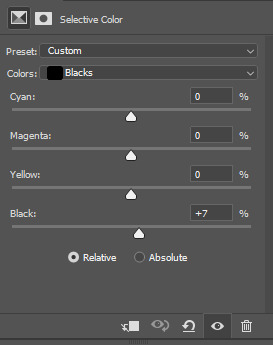
SELECTIVE COLOR red: cyan: -20%, yellow: +20, black: +10 yellow: yellow: +50% white: yellow: -10%, black: -20% black: black: +4%
CURVES(those are something I didnt use much in Photopea as in general youre just fine with brightness and selective color. Just move the point on the curve and see what it does! For this gif I went with Curves like these and it enhanced the gif nicely.)

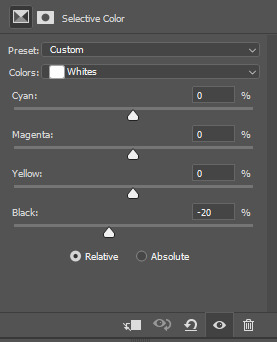
another layer of SELECTIVE COLOR > black: black: +2%

Now Im satisfied with the gif and want to save it. Clicking FILE > EXPORT AS > GIF will open this window:

Make sure the quality is at 100%, the size in darker numbers lower than 10MB. Speed in Photopea is quite tricky for some reason, but 180% - 190% is the "normal 100% speed" of the gif.

Enjoy giffing and feel free to ask anything if unclear!
55 notes
·
View notes
Note
As a fellow gifmaker (only not quite as skilled as you are) I've been struggling and your gifs always look so amazing and nice and colourful so I was wondering if you could share some tips on how do you colour tinted scenes like in MoTA? thank you Jess you are amazing 🤗
heey there!!!! First of all sorry for taking so long to reply to this, I was so happy with your nice comments that I wanted to give you a proper insight on how I do it, but unfortunately I'm quite HORRIBLE at explaining things?
I'll put it under the cut because it's gonna be a long post! but if you have any doubts my askbox is always open!!!!

So first of all I already gave some tips on how does my process with coloring gifs work so you can check it on my resources and tips tag
As you said you are also a fellow gifmaker so I'll take it from there as I assume you already know gif 101, but if you are new to this you can again check my tag for some beginners tips
Also want to point out this lovely tutorial by @ajusnice that might be even more helpful, since I learned a lot from it
Disclaimer: i'm colorblind, I can see all the hues, just not all the shades and I tend to struggle with greens, oranges and yellows so apologies for any mistakes or if this turns out looking weird!

HOW TO COLOR TINTED SCENES????
So at this point I hope you already have you gif all cut down to the size that you want and used your fav action/sharpening presets ( I use this or this actions to sharpen my gifs
Now I'll use the footage down bellow as it is really blue tinted and I worked with it for this gifset (MoTA SPOILERS AHEAD!!!!!!!!!) so it looks like this
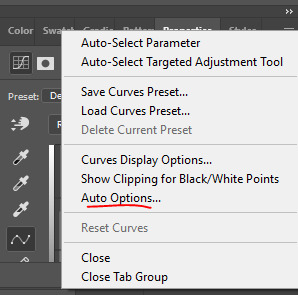
3. So the first thing I do is work with curse as it gives me a better grasp of what I have and how do I want to go with it. I have been using this method where you go to Curves >> Click on the top right menu >> Auto Options
4. Now a new window thing will open up and then I click on the option Find Dark and Light Colors, as you can see my gif already looks a lot brighter and now so tinted
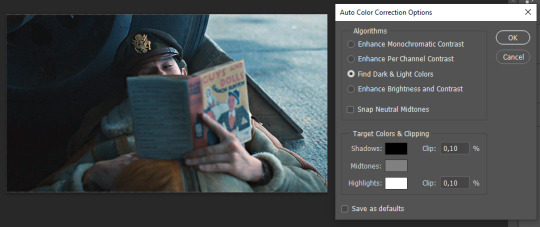
5. this is how my gif looks like I selected that option
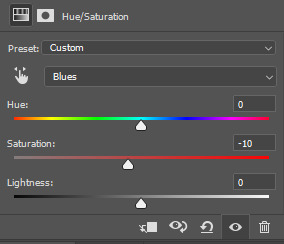
6. still does look a little blue-ish doesn't it? Okay so now I'll go to some adjustment layers, the first thing I do is work with hue/saturation. I'll go to the cyans and blues first and I want to remove some of the blue tint of my scene. I prefer to decrease the saturation of those colors so it looks a bit like this
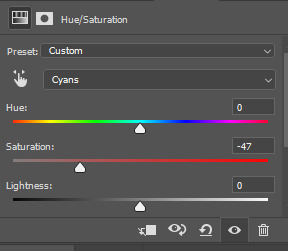
and my gif looks like this
7. So here is our first problem, while I took away the blues my gif now looks a little dull as the scene was delivered to us in such a different color scheme, It wasn't supposed to look like this so now we need to color correct!! For this I work my way around vibrance/saturation so my menu looks like this
And my gif looks like this
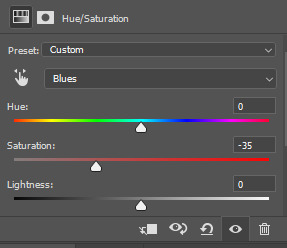
8. Problem #2 because now it looks too blue tinted AGAIN! so I just repeat step 6 again so my menus look like this
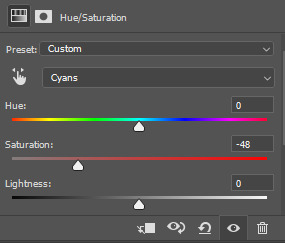
and my gif looks like this
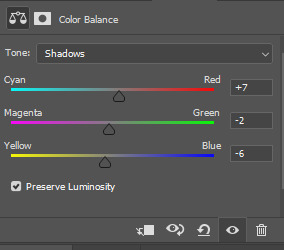
9. from now on it's only about some details such as correct the brightness/contrast of the scene and I personally like to use the color balance adjustment layer, I'll leave it all here
10. finally one of my fav adjustment layers -> SELECTIVE COLOR i just mess around until it looks nice to me, I'll leave the configs I used down bellow

Finally after all those steps my gif looks like this
#asks#anon#s: resources#requests#coloring tutorial#usergif#allresources#chaoticresources#gif tutorials#gif tutorial#psd tutorial#completeresources
221 notes
·
View notes
Text
Gamer girl gets transmigrated into a farm boy Chapter 6 [<<Prologue | <Chapter 5 || Chapter 7>>] Ao3 link
-
Tutorial in Age of Tales goes like this:
The main character is woken up by Janelle, who calls him a sleepy head and tells him to get the cart ready, because her daddy wants to go to town. The game teaches the player how to move, climb, jump, and interact with objects there.
The main character drives the cart to Westbrook in a cutscene and gets a chance to explore the town for a moment before Mr. Gylcross concludes his business. It's implied that it's a rare visit for the main character, and he's still new to town. He's given only enough money to buy a few health items maybe, just enough to learn how to interact with shops.
The main character returns to the farm with Mr. Gylcross and there's a time skip to the next day where, after they're done with their various farm-related duties, Josel approaches the main character and says…
"Hey, Van - there's some rabbits in the field again. Do you think you could take care of them?"
Which then teaches the main character the very basics of combat, specifically long ranged combat, seeing as the beginner weapon for the main character of Age of Tales is a sling. In the game, there's auto aim you can turn on, which helps with long ranged weapons, but they were never a particularly well designed part of the game.
In this sort of real live version of the game…
"How the hell are you supposed to use this damn thing," Van mutters, trying to fit a pebble in the sling and figure out how to spin it in a way that didn't send the rock flying off prematurely.
Unfortunately it's not one of those slingshots with a y-shaped piece of wood and elastic band, no, this is the much older kind with a woven cord and a small pouch in the middle where you put the rock and then spin it around before releasing. Which is, it turns out, pretty tricky to master.
Katie had kind of loved the sling thing, though. It was very historical, she felt. Traditional weapon of commoners. Very cool that they included it in the game. You could even do some real damage with magical ammunition, though it was never as good as just specialising in magic, or even being a ranger. Still, with auto aim it was a cool beginner weapon for ranged combat, and considering that the early fights were all about running away…
It never made much sense for the main character to have it, though, because Van wasn't actually a commoner.
Van tries to spin the sling, and the stone slips out of the nest, landing in front of him with a thud. He grunts, frustrated. "System can't you help me out here? There's the automated chore thing - why isn't this automated? I should know how to do this, right?"
The System opens up his character window, which is not very helpful.
[Farmboy] [Van] [Lvl. 3 Commoner]
[Status:] [Constitution: 10] [Strength: 10] [Dexterity: 1] [Intelligence: 1] [Wisdom: 10] [Charisma: 1] [Luck: 1] [You have 4 unused Stat Points.] [You have 2 unused Skill Point]
"That's not very helpful - wait," Van says and peers at the list of stats. Intelligence is highlighted. "Huh - I need intelligence to figure out how to use a sling? Wait, wait, wait," he pauses, coiling up the sling. "Say I wanted to become a… rogue. I want to sneak around and assassinate my enemies. What would I…?"
The status screen shifts, and it's dexterity that gets highlighted this time. "Huh," Van says again. "Okay, that's actually really good to know." It's nothing he didn't already know - he had played as a rogue before, but still. It's neat that the System is giving him this kind of info. "I didn't need intelligence to use a sling in the game, though. Also, why are chores automated but this isn't? It makes way more sense for me to know how to fight, doesn't it?"
System just highlights intelligence again.
Van really doesn't want to spend any stat points yet, not before he decides what class he's going for - also, who knows what will happen in Westbrook. He might need a sudden burst of charisma to persuade the bad guys not to kill him, or dexterity to avoid being skewered, or any number of things. Intelligence is only good for Wizards, and Katie did not enjoy Wizard build all that much. It was too slow, and the combat didn't quite have the oomph of getting up close and personal with a big sword.
Shaking his head, Van closes the System window and continues working on the sling. He does figure out how to get the stone to stay in the sling, but trying to get it to fly even to the right cardinal direction…
Hm. Maybe he could put one point in intelligence? Just to see what it would do?
… No, he will not be tempted. He'll save the points until he needs them.
At any rate, the rabbits have been dealt with - he might've not hit any of them, but he definitely made enough of a racket to scare them off. Shaking his head, Van puts the sling away, his ammunition pouch five pebbles lighter. Whatever. He's got more important things to figure out right now, anyway.
Like how to make a spear.
-
The tutorial goes on to then try and deepen the main character's relationship with Josel and Janelle - giving the player a chance to eavesdrop on them during a cute moment. Van gets that opportunity too.
While he's doing a little bit of gathering in a copse of trees, figuring out how to get a Wooden Pole as opposed to mere Branches he's been finding, Van happens to spot Josel, picking up flowers out in the meadow just beyond the forest's edge. And then Janelle just so happens to come across Josel, greeting him cheerfully with, "Hey there, Josel - what are you up to?"
"Well, uh, I just, um," Josel stammers, looking between her and the sorry bunch of flowers he's holding. Then he tries to, comically, hide them behind himself, as though they haven't been fully on display already. "It's - it's nothing!"
"Oh?" Janelle asks, instantly mischievous, and skips forward. "It's nothing, is it? What's that behind your back, Josel, what have you got there? Hmm?"
Josel squirms and backs away while she tries to sneak a peek past him and it's very cute until he finally gives up. "It's stupid, I didn't -" he says and then holds the flowers to her. "For you, Miss."
"Oh, for me? Why, thank you, Josel!" Janelle says cheerfully, accepting the flowers with a little bow. "You are most kind, sir. You didn't have to."
"I thought it would - that it would brighten your day," Josel says, flushed bright red all the way down his neck and wringing his hands with embarrassment. "It's nothing, just a bunch of flowers."
"Well, I think it's very sweet," Janelle answers warmly, hugging the flowers and then grinning. "Say, have you ever made a flower crown?"
It's almost unbearably saccharine, the whole thing, but Van can't help but watch, leaning onto a tree trunk and grinning fondly as Janelle gently bullies Josel into learning how to weave flower crowns, before plopping the one she made on Josel's head. The whole thing is so blatantly wholesome that the first time Katie saw the scene, she'd shouted out loud, "Oh, they're definitely going to die!"
Van is half impressed that the developers refrained from including promises about the future and how they'd make flower crowns for each other until the end of their days. Or reminisce about their past as childhood friends, or something. Honestly, Janelle and Josel didn't really have much of a background beyond their roles as cannon fodder for the plot.
Still, it is pretty cute.
Janelle finishes the flower crown Josel can't figure out how to tie properly and puts it on her head, smiling. "There, now we match," she says with satisfaction, making herself comfortable amidst the flowers. "It's been ages since I did something like this."
"You're very good at it," Josel says earnestly.
Janelle laughs, hugging her knees. "Thanks! I used to make wreaths for the Flower Festival, you know - I won the first Prize and everything!" she says and then her smile fades. "We haven't really gone since Momma died. I thought maybe next spring would be different. With you and Van here, Daddy is in much better spirits these days."
"I'm glad we've been able to help," Josel says, adjusting his crown. "If there's anything else I can do to help out, you just let me know."
"Thanks," Janelle says with a chuckle and then looks at him. "Van's not going to stay until the Flower Festival, though, is he? I don't think he's even going to stay over winter."
In the shadows of the trees, Van folds his arms, interested.
"What makes you think that?" Josel asks. "Did he say something?"
"Not really. He's just acting a bit weird, isn't he? Like he's waiting for something," Janelle says and sighs. "I think he's remembering stuff from before."
"He hasn't said anything to me," Josel says, frowning.
"Me neither, but he's all… I don't know," Janelle sighs and looks away. "I just think he's getting ready to leave. It's funny, he's not even been here for that long, but I was kind of hoping he'd stay longer. Daddy's been a lot more active since he appeared, you know? Like with more people around, he has a purpose again."
"Yeah. Mr. Gylcross has seemed more energetic."
"Yeah," Janelle says with a sigh.
Josel looks at her like he's not sure what to do or say. For a moment it looks like he might put an arm around her, before awkwardly refraining. "Well, I'm not going anywhere," the farmhand promises earnestly. "Even if Van leaves, I'll always be here, ready to help you out."
Janelle laughs. "I know I can count on you, Josel," she says and rocks back and forth before rolling up to her feet. "Come on, let's head back - you can help me catch a chicken for dinner."
Van watches them leave, leaning his head against the tree trunk and frowning. He still doesn't feel any particular attachment to these people - it's hard to, really, after Katie had watched them die over and over again in the exact same way. Even the most sympathetic NPCs stop looking like people when you can see their strings being pulled. Even so…
It would be nice if he could save them this time.
Glancing up at the sky, Van tries to gauge how long he has until sundown. Then, shaking his head, he heads back into the forest, to find poles for his spearheads.
He got maybe three hours until the Rift would open and no proper weapon yet.
He really needs to get a move on.
-
And then, the Rift.
In the tutorial, it's not expected of the main character to have a proper weapon when the Rift opens. That's why the farm is littered with low grade farming tools - though they barely had any attack power, they could be used as weapons in a pinch, usually to comedic effect. The whole point of the Rift is to mess up the farm, kill everyone there - except the main character - and send the main character running to town.
Most of that happens in cutscenes, of course. There was no way to stop the Rift from appearing, or close it once it had, and there wasn't meant to be a way to stop the demons coming through, either. You could kill a few of them, maybe, but they kept coming and coming in an endless, steady flood. The whole thing was meant to be a hopeless fight.
Of course, no good set piece survives contact with players, and it took less than a day after Age of Tales launched for people to turn the traumatic Rift event into a mob farm.
For a Gylcross Mob Farm you need at minimum two things, plus a weapon to kill the mobs with. You need one of the carts, parked in a specific location before the Rift opened, and a barrel, set down just a little to the right of it. Because the rift opens right next to the barn, the demons coming through can move only in three directions, and the cart and barrel block two of those, creating a bottleneck. If you do it right, the arrangement cuts down the number of enemies you have to fight to a single one at a time.
And the Rift never stops spewing enemies at you. So, in effect, you can just stand there, for hours, for days, killing imp after imp after imp, just collecting exp. Add to this some better gear and those sweet, sweet Draughts of Memory… and it takes you approximately eight hours and fifty four minutes to boost the player character up to level 100.
Van might not have those potions - but he still intends to take advantage of the Rift's mechanics as much as he can. Without the Draughts it would take literal days to reach the same effect - but right now, he'll settle for ten, twenty levels at least. Just something to get him started properly.
Assuming, of course, that the Rift worked the way it did in the game. If not, well, it still wouldn't hurt to prepare.
"Uh, Van - what are you doing?" Josel asks, watching Van push the cart into place.
"I'm going to clean up the barn. Getting the place set up for the harvest, you know," Van answers, huffing while turning the cart around, aiming to get it just below the window. "Just… getting this… out of the way."
Josel looks at him, at the cart, at the barn, and then scratches at his cheek. "… Okay, you need a hand with that?"
"Sure - grab that barrel in the back, will you?" Van says and then thinks better of it. It wouldn't hurt to over prepare. The game mechanics haven't exactly been on his side so far. "Actually, let's move the other cart first."
In the game once you're done with fighting the Rift, however long you take, the player character escapes in one of the carts that's, mysteriously, ready to go with Bell strapped in and everything. It's very dramatic and convenient, and Katie could even forgive the plothole there - here… here Van doesn't think he can trust the plot holes to be on his side.
Better get the cart in place for easy access.
Josel gives him a weird look at the very precise way Van wants to position the cart once outside, conveniently close to the stables and nowhere near the barricade. The other farmhand says nothing, though, confusedly helping him situate the cart just so that Bell could be easily strapped on in a hurry. Van makes sure all the necessary straps and such go in the cart as well.
The barrels and boxes and other things from inside go to and around the first cart, with Van carefully situating them around to box in the spot where the Rift would be, enclosing the space as much as he can.
By the barn doors, Josel pauses. "Did you make these?" he asks, taking one of the spears Van has lined up against the wall.
The shafts Van had made for them are pretty rough - they're basically just trunks of young oak trees, which had been the only things to register as Wooden Poles to the System. Cleaning them and attaching the spearheads to them had taken some effort, and Van can't say he's particularly confident about his woodcraft skills - but after he'd sharpened the spearheads, the System had approved his craftsmanship by re-designating them as Rough Spear, lvl. 2s, each with 15 Attack power, so Van's satisfied with them. The enemies he's about to face are only lvl. 1, and with his strength stat lvl. 2 weapons would be more than enough to handle them.
"Yeah - just leave them there," Van says, hauling another barrel in place and testing its stability. Yeah, that wouldn't go anywhere. "I'll deal with them."
Josel gives him a rather concerned look but leaves the spear where it is. He goes to pick up the barrel lids sitting in a stack beside the spears instead, but Van tells him to leave them, too.
"I'll need them for something later," Van says, inspecting his Rift barricade, trying to fill in the gaps
"... Okay," Josel says slowly and then shakes his head. "I guess I'll get a broom and start sweeping then…"
Van lets him do it and finishes up his barricade, leaving just the one opening for the imps to get through - the one he'd be covering with a spear. With his mob farm ready, Van brushes his hands together and then heads inside to join Josel in "cleaning".
Another hour or so until sundown, and his preparations are just about ready. Now he just needs to wait.
-
"Van? Van, my boy, are you in here?"
Van, who's sitting on the hayloft just in case he needs to be in a specific position to trigger the Rift, peers down. It's his boss, peeking into the empty barn. "Yes, Mr. Gylcross?"
The farmer looks around the empty barn and then outside at the Rift barricade. "Would you like to explain what's going on here?" he asks, baffled.
Van goes down the ladder. "I just thought of doing a bit of cleaning," he says. "Before the harvest, I mean. I, uh," what would be a good explanation, "I heard some mice or something the other night, and I thought we should close up all the holes before bringing the harvest in. I'll put everything back tomorrow, I promise." Nailed it.
"Mice, hmm? I see," the farmer says, anxiously twiddling with his moustache. "And the - the spears?" he asks worriedly. "What's that about?"
Van looks at the spears and the various barrel and pot lids he'd gathered to serve as shields. "Uh," he says. "A new hobby?"
The farmer looks at him, looking very concerned indeed. "My boy, is everything alright?"
"Yeah, everything's fine," Van assures him. "I'm just trying new things, that's all."
"I know about your visit to the tailor - Ms. Arbury sought me out," Mr. Gylcross says slowly. "As I understand you ordered something quite expensive, and she was a tad concerned. Where did you get all that silver from, Van?"
"Uh," Van says. Well that explains how and why Mr. Gylcross knew about the gambeson. "From the inn?"
"Van, surely you didn't just… take it?" Mr. Gylcross says, anxious.
"No, no, nothing like it - I gambled," Van says quickly. "And taught a gambler a trick about how to play Echo better - she paid fifty silver for it."
Mr. Gylcross doesn't look quite convinced, eyeing him with grave concern before turning to look at the spears again. "And - and then spears?" he asks. "What do you need spears and a gambeson for?"
Having no better explanation to give, Van tells him what he told Janelle. "It just… feels like I need them?" he says awkwardly. Hooray for amnesia as a convenient excuse for weird behaviour. "I can't really explain. It's just a… feeling."
That doesn't seem to quite soothe the farmer's mind, though his look of worry turns into something more serious. "You know you can always come to me if you have concerns, right?" the man says earnestly. "If you remember something, if you have issues. I know waking up here the way you did was quite traumatic."
"Um, yeah," Van says, awkward. "Thank you, Mr, Gylcross. I'm grateful that you, um, took me in," he adds, which feels like something the character would say, had this conversation been in the game.
"You looked quite rough, when Janelle found you - like you'd been in a fight," Mr. Gylcross says sadly, shaking his head. "Have you remembered what happened?"
No, though Van knows about it from the game. The player character had been hit over the head with a hammer while trying to escape assassins. Very creative of the developers. "No, I haven't. Sorry, Mr. Gylcross."
"That's quite alright," the farmer says and looks at the spears. "I didn't really expect you to remember much, not after all this time - though it looks like something's getting through anyway," he mutters, considering the weapons. "I'm not sure I'm comfortable with having weapons on my homestead, Van."
"Oh. Um. I'll put them away tomorrow, then," Van offers. If Mr. Gylcross still objected to their presence by the morning, he'd be pretty surprised. "You won't have to deal with them, I promise."
"… Very well," Mr. Gylcross says and then gives him a look. "You'll still stay for the harvest, though, won't you? I planted a lot more than I would've without you here - we'll need all the hands we can get, to get the fields harvested in time."
"I won't go anywhere just yet, Mr. Gylcross," Van assures the man, and smiles. "I'll see my job here to the end."
"Good, good," Mr. Gylcross says and clears his throat, looking at the makeshift barricade before peering up at the sky. "Well, at least it doesn't look like it will rain tonight… I suppose it's fine, this once," he then says, moving to leave. "And you'll put the spears away?"
"I will," Van says - as soon as they wouldn't have any more use, he would. "Have a good night, Mr. Gylcross."
"You too, my boy - sleep well."
Van smiles at the sentiment, nods and then watches as the farmer heads back to the house, making sure the man is inside before going to double check the barricade, just in case. Everything is where he put it, nothing has been moved. Good.
There's maybe another half an hour until the Rift opens.
No one would be sleeping in Gylcross Farm that night.
-
Proofread by @nimadge [<<Prologue | <Chapter 5 || Chapter 7>>]
-
Cue suspenseful background music...
Gotta say guys, not really seeing point in posting this on tumblr anymore. Might just post on ao3 after this.
53 notes
·
View notes
Text
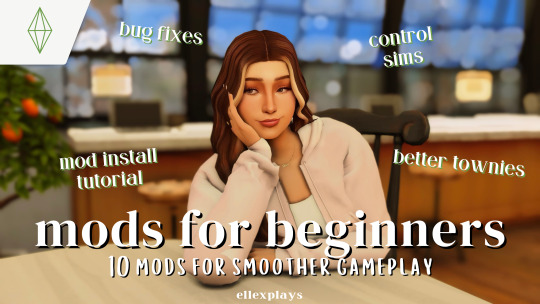
10 base game mods for smoother gameplay mod install tutorial & advice for beginners
mods list:
better exceptions - runs mod reports for outdated/conflicting mods
mc command center - change multiple settings of your sims game
ui cheats extension - use cheats by right clicking on the item
more columns in cas - changes cas to have 3-5 columns
stand still in cas - sims will no longer move/look around while in cas
control any sim - control sims that are not in your household
remove sims from conversations - remove sims by right clicking on their picture
steady sit & seat any sim + xml injector - sims stay seated for a longer period of time
smarter pie menu - search interactions by typing it in
phone call overhaul - adds conditions for sims to be able to call you
optional add ons:
npc fashion - adds preset outfits to random townies so they are dressed better
delayed invitations - allows a window of time before meeting with a sim when invited out
this video showcases my top 10 base game mods for new simmers. we will go further in depth to understand how to use each mod. there are so many mods out there and I know it can get overwhelming, so I hope this video helps ease yall into downloading/installing mods to your game!
now on youtube
107 notes
·
View notes
Text
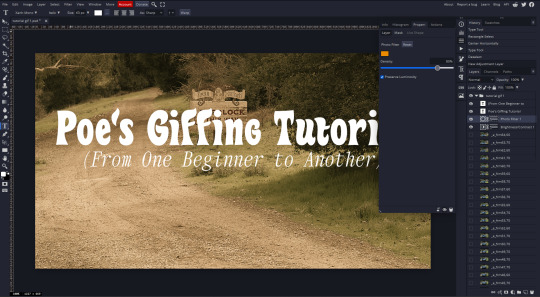
Poe's Giffing Tutorial (From One Beginner to Another)
Hey, everyone! So, I've been thinking about this for a while, and decided to finally make it happen. This post aims to be a giffing tutorial that isn't a bunch of technical jargon that nobody except experienced giffers understands. This is for the person that I was when I first started out: someone who wants to make gifs, for free, without having to learn the entirety of a new program. As such, if you're already familiar with the basics, this probably won't be super helpful to you.
In this, I'll cover the basics of actually capturing a gif, the how-to of color correction (though without getting into the nitty-gritty detail of it), some basic text effects, and some more decorative effects like overlays and ~fancy coloring. I'll also show you the program I use to resize gifs.
I don't have a fun quip to lead us into the next part, so, uh, let's just dive in.
Tools*:
A PC capable of handling heavy processor loads (I use a mid-range gaming laptop; it's a little slow sometimes, but it works)
Whatever you're giffing (obviously...)
ScreenToGif (a free, basic screencapture program)
Photopea (a free, in-browser Photoshop dupe)
RedKetchup (a free file resizer/converter)
*Note: These are not the end-all, be-all of gifmaking. They may not even be the best tools for the job! But they're free, they work well, and they're relatively intuitive.
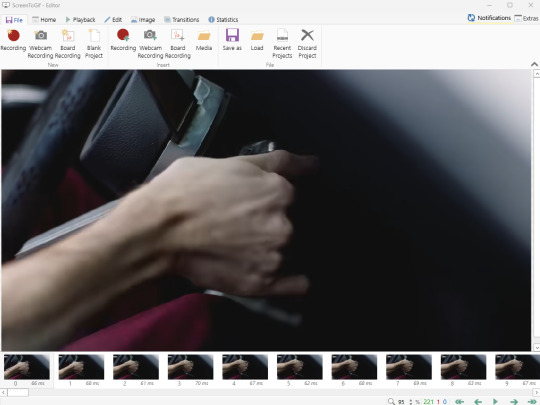
Step 1: Capture your gif.
I'm going to use ScreenToGif for this. The first thing I do is open the program and click Recorder, which opens the recording interface.

I click and drag (or manually input dimensions in the boxes next to the recording button in the lower right corner) to set my dimensions, and then I press record. The red "Record" button will change to a blue square that says "Stop," and a timer will appear in the upper right corner, showing how many seconds your gif is.
Generally, I'll pause the video 5-10 seconds before my desired start time, to give myself a buffer (you'll be able to delete those frames later), start the recording, and then start the video. You'll probably find a system that works for you once you do it a few times.
Once the scene that I want to capture is done, I'll click the blue "Stop" button, and the overlay will close itself. A few seconds later, depending on how long/complex/large your gif is, the program will pop up with a new window where you can edit. Here's what it looks like:
You can do a lot with ScreenToGif, but we'll be using the dead simple stuff today. Click the "Edit" tab, fourth from the left, and this will show up.

"Delete All Previous" and "Delete All Next" are our friends here. Go to the FIRST frame that you want in your gif, using either your arrow keys or just dragging the slider, and select it. Then hit "Delete All Previous." This will make that frame the first frame of your gif. Then, go to the LAST frame of your gif, and hit "Delete All Next." This makes the last frame of the scene that you want the last frame of the gif. You can also use the "Delete" option to delete frames by selecting them with your cursor if you want a more manual option.
Now you have your raw gif! Go to the "File" tab, the first one on the left, and select "Save As" from the menu. You want to make sure that it's saving as a .gif file, not an .mp4 or .apng --- you can check this up at the top. Don't worry, though, as .gif is the default, so unless you change it, you should be golden. Select whatever folder you want to put it in, name it, and save it.
You could absolutely stop here. It is by no means required to color your gifs or slow them down or any other number of things associated with giffing. But if you want to, here's how I do it.
Step 2: Edit your gif.
Head on over to Photopea. You'll see this:
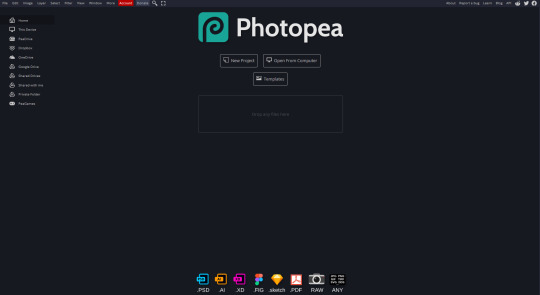
What we want is the "Open From Computer" option. Click it, and your File Explorer will show up. Navigate to whatever folder you saved your gif in and select it by double clicking or clicking once and hitting "Open."
It'll open in a new workspace that looks like this.
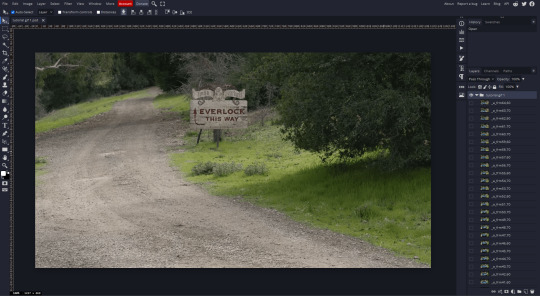
You may be saying, "Gee, Poe, that sure looks a lot like Photoshop!" Yes, it absolutely does. If you're familiar with Photoshop, you will most likely be able to find your way around Photopea just fine, and can probably go from here. But if you're not familiar with Photoshop, here's the basics.
First thing's first: gifs are frequently pretty fuzzy/blurry. Luckily, sharpening them is easy.
Select all your frames (the list on the right with all the numbered layers) by clicking one end, scrolling up/down, holding Shift, and clicking the other end. Then go up to the tabs and do Filter > Sharpen > Smart Sharpen. This will automatically sharpen each frame using a percentage; the default is, I believe, 150%, and this is usually what I use because I am fundamentally lazy.
If you don't select all your frames, only the one that you're currently on (the one highlighted in a lighter color) will get the effect applied to it. This goes for basically anything you do, so it's good to get in the habit of selecting all.
Now that it's sharpened, we can color it. Go up to the tabs again, and go to Layer > New Adjustment Layer > [whatever you want to adjust]. Most commonly in Escape the Night, you'll have to adjust brightness, because there's a lot of dark, moody scenes; Season 3 is also especially yellow/orange tinted, so you'll probably want to color correct it, too, using the Color Balance adjustment layer. This is a total guessing game based on the exact scene you're doing and my method is just selecting random things and adjusting sliders until it looks good (remember: fundamentally lazy). Honestly, I'm not an expert in coloring gifs, so I won't pretend to be — especially since people can and do write entire posts just dedicated to it. For this gif, I'm just lightening it a little.
And if this is all you want to do — no text, no effects — you're done! Go to File > Export As > GIF. It will take a few moments to load, so don't panic when your page freezes. A new window will pop up that allows you to do things like set looping, time, etc. but you can also just "Save" and you're done!
But let's say you want something fun. Maybe you'd like to overlay a quote or make it a cool color. If that's the case, continue on...
Step 3: Make your gif shine.
Three parts in this: text, fun colors, and overlays. You can combine these three to do some awesome things, and they're all very simple to do, once you know what you're doing. Think of them less like steps and more like a mix-and-match deal. You can use one, two, or all three!
So, here we go.
Option 3a: Add some text.
The easiest option of the three, this one works exactly like you think it does. The uppercase T symbol on the sidebar will create a new text layer where you can type something and set a font, size, and color.

I'll spare you the lecture on typography that I could give you — you can find better ones than I could make. Generally, though, you have a decorative/display font for headings and emphasis, and then a different, more generalized font for subheadings and other things. In this, the display font is Heavy Heap, which was used on the Season 3 tarot cards, and the general font is a relatively generic serif font.
(Sidenote: you can load fonts into Photopea! Just go to a font website like Dafont, download the font you want, and then open it as you would any other file by going to File > Open and selecting it from your files. You should get a message that says "Font [Your Font Name Here] Loaded," and then you'll be able to use it in your design. That's how I got Heavy Heap in there.)
You can change size and color with these, which will show up at the top when you select the text tool. Keep in mind that if you're making changes after you type something out, you will need to select (highlight) the text you want to change — it won't do it automatically.

I will admit that Photopea's text editor is not the cleanest, simplest, or nicest to use, especially at first. I came from Canva where it was much faster and easier. The downside, of course, is that Canva is highly limited with what you can do.
There are also ways to warp the text, change the blending, and do outlines, but I'll leave that for another time as to avoid making this any longer than it already is.
Option 3b: Make it a cool color.
You have a couple different ways to do this. Probably the most intuitive is to go to Layer > New Adjustment Layer > Photo Filter. Select the color box, pick the color you want using the picker or a hex code, select your desired density, and click OK. Boom, color over your gif.
It defaults to this vintage-y orange, but you can pick whatever color your heart desires.
However, I usually use a different method using Gradient Maps. This is also pretty easy; Layer > New Adjustment Layer > Gradient Map. If you leave it black and white, by the way, you get a B&W gif (you can also just select the Black and White option in the Adjustment Layer menu). Click on the gradient, select the white square on the right side of the gradient line, and then select the square down at the bottom of the window and change it to whatever color you want.

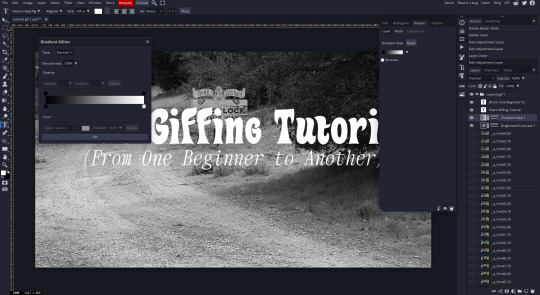
For this gif, I'm leaving it B&W.
(You can have a lot of fun with gradient maps. Play around with them!)
Option 3c: Overlay another gif on top.
Ooookay, so, this is the most advanced and tedious of effects to do (at least of the ones documented in this post), but it's worth it, I promise. For this, you'll need at least one other gif. I usually use a base gif that's relatively neutrally colored, oftentimes B&W but sometimes just faded or pastel, plus one (or more than one) colored, brighter gif. These are, of course, just guidelines — combine whatever gifs you want. The only real requirement, per se, is that they have the same amount of frames. If they don't, it'll look weird. (But if you do end up with two gifs that have different amounts of frames, you can delete the difference right in Photopea, so I don't stress about it too much.)
You also generally want to add text after this step, so if you're planning on doing this, save the text for last.
First things first: color your gifs the way you want and then save both of them. Then re-open them both in Photopea. Yes, this is annoying. I did say it was tedious.

So now I have both of them in my navbar, labeled as "tutorial base" and "tutorial overlay."
Go to your overlay gif and right-click on the gif folder. This is the top layer with a little arrow and folder icon next to the name of the gif.

Select "Duplicate Into" and then pick your base gif in the popup. In my case, it's named "tutorial base."

Now you'll click over to your base gif, and you'll see that your accent has been put on top of your base. Now you get to have fun with blending!
Right click on the overlay gif's folder again. Then, select Blending Options, which is the first menu item. It'll bring up a popup with all sorts of options for styling your layer.

The default setting is Pass Through, which is what we see here. If you want, you could just change the opacity to get your desired effect.
You could also play around with blending options such as Overlay, Color Burn, Lighten, and Screen. Every gif is different, and every gif will look different with different options, so experiment and see what looks best! You may have to go back and recolor it a few times, so I recommend just keeping the project open in your navbar for easy access.
For this gif, I think I'll go with Darker Color at 67%.
One last step, and then you're done with blending!
Go to Layer > Animation > Merge. This will merge each frame of your animation (the gifs) with each other, meaning that they'll play at the same time. If you forget this step, as I do frequently, you'll go to save your gif and find that it plays as a sequence.
Once you've merged your gifs, you can add texts, more effects, PNG overlays, whatever you want! Congrats! You did it!
Step 4: Resize your gif (if necessary).
Maybe you've made a gif, and it's beautiful, and it's amazing, and you wanna show everyone...but it's five million megabytes and you can't send or post it anywhere. Tumblr's max file size is 10 MB, while Discord's (standard) max file size is..7 MB, I think? Either way, if you try to upload something bigger than that, you'll get an error message and the familiar taste of disappointment.
Never fear, Redketchup is here!

This is Redketchup, and it's super simple.
Go to "GIF Resizer" under Animation Tools. Upload your gif, then scroll until you see the Resize GIF section. Input the percentage you'd like to reduce it by (presets are 25%, 50%, and 75% smaller, but you can set it manually, as well).
This is also the step where you can slow it down if you desire if you didn't do it in Photopea — it's in the next section down. Set the speed, if you'd like, and then go down to the bottom and hit Download.

It'll take you to a preview tab where you can check if your gif is small enough. If it is, hit Download again up in the top left, and that's that! Go share your gif with the world!
Conclusion:
Thank you for reading! I am by no means an expert gifmaker, but I want to spread the love and give other people the option to do it. I wouldn't know any of this stuff without the people who taught me, and I'll put a list of tutorials down at the bottom that I referenced when I was first learning to make gifs.
At any rate, if you use this post to make a gif, feel free tag me or send it to me so I can see! And for those of you who are on the fence about learning or starting to gif...
Do it. I double-dog dare you.
:)
References:
Blending Gifs by @the-mother-of-lions
Photopea Coloring Tutorial by @heroeddiemunson
Merging in Photopea by @bellamyblakru
And, though not a specific reference, I frequently browse @usergif for inspiration (they have tutorials there, as well, but I haven't checked them out yet).
#gifset#giffing#gif tutorial#how to gif#how to make a gif#photopea#escape the night#etn#I wrote this instead of socializing at my family's thanksgiving dinner#because that's just who I am
143 notes
·
View notes
Note
computer/firefox anon, no questions this time. just my undying thanks! as tumblr users say, i am kissing you on the mouth etc etc. huge thank you to you and everyone else who added stuff in the replies or reblogs — i feel much more confident about this now<33. tldr: y’all are awesome, thanks a bunch!
happy to help! and i think i said this deep down under the read-more in the first response to your Linux ask, but it's worth highlighting--@compusever's advice to get a Windows 10 or 11 Home laptop and do what you can with the privacy settings is not AT ALL incompatible with trying Linux or eventually replacing Windows with it. once you've booted up the computer from an installation USB drive, most distros will offer a temporary "preview" version of the OS that runs from the USB drive without changing anything on the computer. you can try Ubuntu, mess around, see if you like it, wipe the USB drive, put Mint on it, and try that; if you go for the full install you can dual-boot and keep Windows around in hard-drive quarantine in case you need it.
in other words, you don't have to take the entire plunge all at once! but i suspect that if you don't have pre-existing desktop UI preferences, and you strongly prefer a device that won't pester/spy on/micromanage you, a beginner-friendly Linux will be easier to use than any of the current versions of Windows.
btw, here's the install guide for Mint: https://linuxmint-installation-guide.readthedocs.io/en/latest/ compared to the Ubuntu one, which goes out of its way to be friendly and dead simple, the Mint guide is... a lot closer to what you can expect from most Linux tutorials, lmao. i especially love that the very second step explains a bit about why it wants you to check that the file didn't get corrupted in the download process, immediately starts providing commands you can copy into a Linux terminal to generate cryptographic checksums, and only then adds a "how to do this on Windows" link... to a forum post with commands you can paste into a Windows terminal. (meanwhile, Ubuntu gives you a download link and then displays an unobtrusive "here's how to verify the file if you want" with a one-off command and a link to more info.) even the friendliest Linux tends to be built on the labor of absolute nerds who are into this stuff as a hobby, and they are very helpful, but be warned that they often have a wildly skewed frame of reference about what "normal computer use" consists of.
51 notes
·
View notes
Note
Would you mind teaching me how to create gifs? ♥️ Like what program do you use, how to adjust their sharpness or things like that because your gifts are both beautiful and high-quality! I am still an amateur when it comes to editing. 😭
Hellloooo, sweet anon! Of course I can give a mini tutorial on that for you! :3 PHEW, honestly I haven't made GIFs in a fucking hot minute (since early May!). I put that on the back burner to focus on crunching away that writer's block. 🥲🙄 BUT... Making GIFs is like second nature to me because I've been at it for 2 years now, so allow me to tell you all I know! ❤️
I use Adobe Photoshop 2023! My GIFs are started, edited, cooked and finished all up in there. I know there's plenty of cheaper/free alternatives, but I've literally only ever used Photoshop so I have zero experience with those alternatives. 🥲
Remember, a huge part of how smooth and high quality your GIFs are gonna be is 95% where your GIF source is coming from. Stay away from 720p quality files! You want your GIF screencaps to be pulled from the most HD, crisp source material. At least 1080p unless you absolutely can't get your hands on anything else.
Once you pop open Photoshop, you want to follow...
Click "File"
Click "Scripts"
Click "Load files into stack..."
Now select all of your GIF screencaps. I would recommend a maximum of 85 screencaps otherwise your GIF will be longer/beefier and Tumblr for some reason hates GIFs over 10mb.
Wait for it to load! If your computer is older/slower, this might be a pain in the ass and will be 2x a pain in the ass if you have a high screencap amount.
CROPPING YOUR GIF: Select W x H x Resolution on the top bar.

It's honestly best to crop out as close to the edges as possible for the sharpest gifs. A general rule of thumb I like to follow for cropping/GIF sizing is:
One gif: 540 px x 400 px.
2 gifs side by side: 268 px each.
3 gifs side by side: 177 px, 178 px, 177 px.
Hit enter twice to crop!
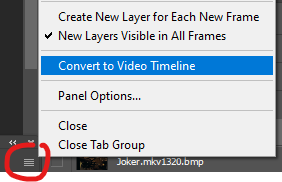
Once your GIF screencaps are loaded in, click on "Create Video Timeline" on the "Timeline" option. If you can’t see the Timeline > Window > Timeline.
Click on the stack of 3 small lines on the far right of your Timeline and click "Convert to Video Timeline".
8. Click on those 3 lines again and click on "Make Frames From Layers".
9. Click on those 3 lines again and click "Select All Frames".
10. Click on the 3 lines again and click "Reverse Frames" otherwise your GIF will play backwards!!
11. Then you'll notice all your frames like this showing 0 seconds.
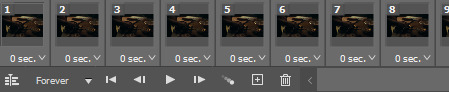
Now you get to decide how fast or slow you want your GIF to play, but we're not using whole numbers like 1 2 3 4. Those will make your GIFS incredibly choppy and slow. Instead, we use numbers like 0.01. I would recommend sticking to 0.05 or 0.06. The higher the number, the slower it is. 0.06 feels just right to me, but 0.05 is more like watching the clip live from the movie. I also use 0.07 and 0.08 when I try to GIF a screencap that's very short so unfortunately you have to slow it down otherwise your GIF zoom replays and if you're making a GIF set it'll look horrible next to the other ones going at normal speed LMAO. 0.08 is a good, sensual slow motion type of GIF. Definitely play around with the speeds until you feel comfortable with how your GIF plays out. Not all GIFs are made with equal speed!
For my example, I'm choosing 0.06.
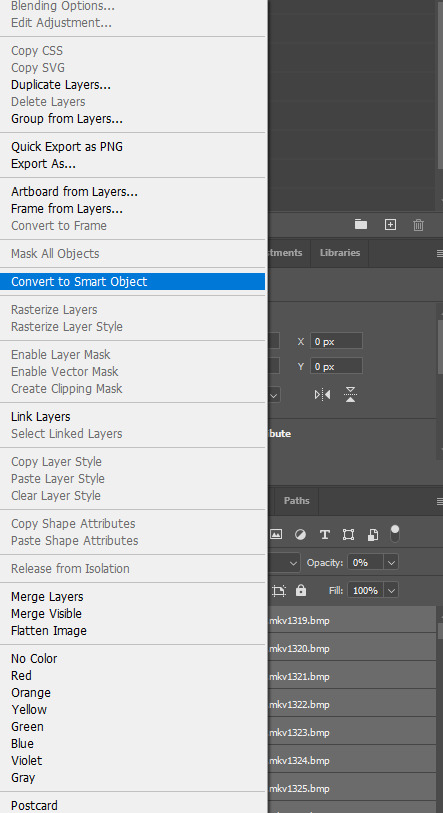
12. Next, go to the far right where your screencaps are all layered and select every single one of them from top to bottom. Then, right click on any random layer until this menu pops up. Click "Convert to Smart Object".
13. On your Timeline, you'll get your smushed chunky little GIF looking like this.
Now with my extensive experience in navigating Tumblr's hellish rules for GIF size and keeping my GIFS clean, smooth and not too long or not too short, I can easily eyeball this every time but I can see why a beginner with Photoshop GIFs might struggle. You see how big that purple block, AKA your GIF, is? It basically needs to be half of that. The bigger that block, the longer/beefier the GIF.
Slowly drag your mouse over that purple block from start to finish to watch your GIF essentially manually play out in front of you. Then you can decide what parts to trim out using the scissors option.

You can then click anywhere on the Timeline to unselect those now 2 chunks of purple. Then you can select just the one piece you want to delete and either hit the backspace key on your keyboard (Like I do) or right click it and click delete.
14. Next, make sure you drag that little blue arrow thing that lets you comb through the GIF all the way back to the beginning. We're going to edit the actual GIF now and we want to edit the whole thing from start to finish, not have effects randomly playing right before the GIF ends or in the middle of it.

15. Time to sharpen up that GIF as the first part of our editing and make it pretty!!

Click on lower left convert button to Convert from Frame Animation to Video Timeline.
Select > All Layers.
CTRL + click on any Layer > Select Convert to Smart Object.
16. Filter > Sharpen > Smart Sharpen.
A little menu will pop up and you can select/input these defaults I use for my crispy GIFs:
Preset: CUSTOM.
Amount: 500%.
Radius: 0.4 PX.
Remove: GAUSSIAN BLUR.
Once more...
Filter > Sharpen > Smart Sharpen again only this time for the second Smart Sharpening, make the attributes:
Amount: 10%.
Radius: 10 PX.
17. Colouring the GIFs!
If you don’t have Adjustments tab > Window > Adjustments.
Adjustments > Exposure.
Another little menu will pop up, and you can use my defaults:
Preset: CUSTOM.
Exposure: 0.99
Offset: 0.0000
Gamma Correction: 1.00
Adjustments > Brightness/Contrast.
Brightness: *anything you want* Drag your mouse around to play with how you want this to look, there are no set numbers however you might want to note down the amount of brightness you put or took away if you want all of your GIFs to match this one!
Contrast: *anything you want*
18. Colouring GIFs when skintones or scenes are too orange/red:
Adjustments > Selective Color.
Colors: REDS.
Cyan: +6.
Magenta, Yellow, Black: 0.
The reds result in the orange color to begin with, but remember each color has its own counterpart. To decrease red tones, increase the cyans!
Example: Making a blue dress more vibrantly blue à Adjustments > Selective Color.
19. Adding text.
Remember, text layers should be on top of the rest of your layers, even if you have several pieces of text on the GIF. It doesn't matter in which order you stack text layers on top, they just have to be up there.

Click Text Tool on the lefthand bar and then click wherever you want to add the text.
To change text settings on a panel > Window > Character.
18-20 pt font is suitable for 540 px gifs! It's to use Calibri font in italics for text talking or Myriad Pro. Those are GIF text classics.
Right click on Text Layer > Blending Options > Stroke > + Stroke.
Size: 1 px.
Position: OUTSIDE.
Blend Mode: NORMAL.
Then hit OK.
Right click on Text Layer > Blending Options > Drop Shadow > Drop Shadow +.
Once again, right click on Text Layer > Blending Options > Stroke > + Stroke.
Blend Mode: NORMAL.
Angle: 30 > Use Global Light.
Distance: 1 px.
Spread: 17%.
Size: 3 px.
Noise: 0.
Layer Knocks Out Drop Shadow > OK.
To center and move the text, just press Y on your keyboard to use the move tool.
20. Finishing up the GIF!
File > Export > Save for Web (Legacy). Check bottom left corner of save screen for GIF size.
Do not go over 10MB EXACTLY! Otherwise Tumblr won't let you post it. You'll have to go back and shorten your GIF as a result, even if that means just splitting the clip off at the very end or very beginning.
Happy GIF making!! :3 ❤️❤️❤️
7 notes
·
View notes
Text
Street Fighter V Modding Guide and Tutorial Archived Links
People are actually still interested in modding SFV. Since Modderbase is down, here's some SFV modding links from archive.org. If you don't see images or spoiler boxes in the thread, click on the Way Back Machine search bar where you see the link url address and hit 'Enter' again. FYI this may load quite slowly. Also, If you need to download a tool from these archived links, copy the url of the tool and paste it on the browser's address bar, erase the archive.org parts and then hit enter on the actual link address. Example, copy the address from the hyperlink (https://web.archive.org/web/20240316160336/https://fluffyquack.com/tools/REtool.zip), delete the web.archive stuff, and then it should be ( https://fluffyquack.com/tools/REtool.zip ) and then hit Enter on the address bar.
Anyway, here are the tutorial links:
Unreal Engine Version : Unreal Engine 4.7.6
AES Key : _aS4mfZK8M5s5KWC2Lz2VsFnGKI7azgl
---SFV Modding Tutorial for Beginners---
https://web.archive.org/web/20230227205009/http://modderbase.com/showthread.php?tid=445
https://web.archive.org/web/20170920143910/http://modderbase.com/showthread.php?tid=97
---Tools List---
https://web.archive.org/web/20230619234458/http://modderbase.com/showthread.php?tid=18
---SFV Character Codes---
https://web.archive.org/web/20201028055311/http://modderbase.com/showthread.php?tid=60
https://web.archive.org/web/20240324163507/http://modderbase.com/showthread.php?pid=20364&tid=1000#pid20364
---Character Resource Pack---
https://web.archive.org/web/20201029015331/http://modderbase.com/showthread.php?tid=20
---Texture Guide---
https://web.archive.org/web/20230306152351/http://modderbase.com/showthread.php?tid=274
https://web.archive.org/web/20230117144443/http://modderbase.com/showthread.php?tid=1878
---Injecting Texture into UASSET file---
https://web.archive.org/web/20231013070905/http://modderbase.com/showthread.php?tid=57
https://web.archive.org/web/20220906234610/http://modderbase.com/showthread.php?tid=1448
---Color Editing---
https://web.archive.org/web/20170920143734/http://modderbase.com/showthread.php?tid=39
---Sound Modding---
https://web.archive.org/web/20210321104439/http://www.modderbase.com/showthread.php?tid=77
---Camera and Posing via Cheat Engine---
https://web.archive.org/web/20240316171311/http://modderbase.com/showthread.php?pid=23177&tid=89#pid23177
https://web.archive.org/web/20240316172307/http://modderbase.com/showthread.php?tid=89
---Hiding Some Costume Parts & Easter Eggs ---
https://web.archive.org/web/20200130095243/http://modderbase.com/showthread.php?tid=269
https://web.archive.org/web/20240324163506/http://modderbase.com/showthread.php?pid=25521&tid=1732#pid25521
---Swap A character to another Character Slot---
https://web.archive.org/web/20240303200429/http://modderbase.com/showthread.php?tid=53
https://web.archive.org/web/20220623143544/http://modderbase.com/showthread.php?tid=1000
https://web.archive.org/web/20240316164750/http://modderbase.com/showthread.php?tid=811
https://web.archive.org/web/20200926055244/http://modderbase.com/showthread.php?tid=576
---Swapping Movesets---
https://web.archive.org/web/20201030162142/http://modderbase.com/showthread.php?tid=1099&pid=22087#pid22087
---How to Pack a Mod into a Pak file---
https://web.archive.org/web/20230619231455/http://modderbase.com/showthread.php?tid=122
---Creating Physics Assets in UE4---
https://web.archive.org/web/20200130095618/http://modderbase.com/showthread.php?tid=37
---Custom Animations---
https://web.archive.org/web/20201224123539/http://modderbase.com/showthread.php?tid=873
---VFX Modding and Tips---
https://web.archive.org/web/20210825014646/http://modderbase.com/showthread.php?tid=1470
---Packing mod Powershell way if you have Windows 10---
https://web.archive.org/web/20230619231456/http://modderbase.com/showthread.php?tid=122&pid=3943#pid3943
---Hex Editing Files to be Larger---
https://web.archive.org/web/20240324163507/http://modderbase.com/showthread.php?tid=1900
Good luck!
8 notes
·
View notes
Note
hello! I found you through one of your art tutorials and absolutely loved it, it's really inspired me to try it. I was just wondering, not being familiar with digital art, what set up/ app/ tools do you use (or recommend)? do I need a fancy tablet? thank you :)
I'm so glad to hear it! I hope wherever your drawing journey takes you, that you will keep having fun along the way :)
I am always glad to show my setup!
Let's start with the hardware!
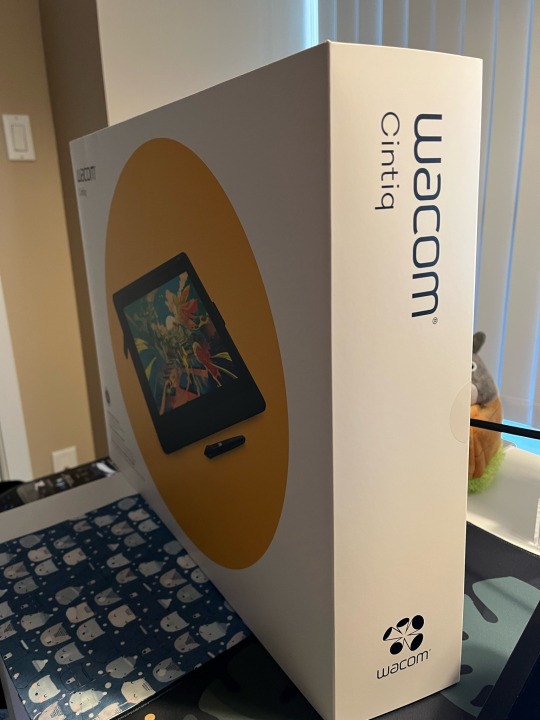
Nowadays, I use a Wacom Cintiq 16, which I purchased this year for around $800 CAD.
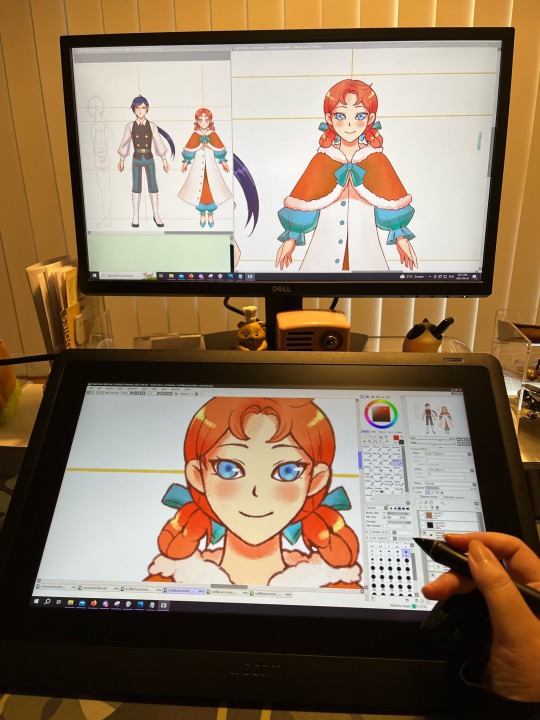
This device very much on the fancy side but as someone who has done digital art for 20+ years, it has helped me complete my works in a much shorter amount of time. The Cintiq surface allows me to draw directly on the screen.
Before that, I used a tablet - the Wacom Intuos v4 S, which I received as a gift from my Dad. It held up for 10+ years and was still working excellently when I gave it away for my Mom to use. :) In 2009 I believe it was priced around $250 CAD.
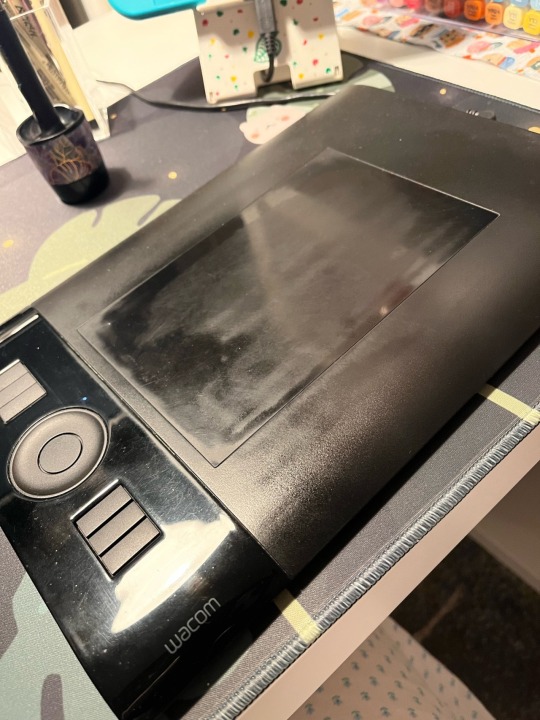
The surface was a lot more matte when I purchased it and has since gotten shinier from all the abrasion and usage and skin contact. I remember it had a protective transparent sheet which I tore off on the first day of use. LOL
My desktop PC is i7 processor @ 3.20 GHz with Windows 10 64bit, 16gb, with a NVIDIA GeForce GTX 1060 video card. Monitor is 24". Notably I use my PC for other activities such as gaming.
Now let's talk about drawing programs!
My software of choice is PaintToolSai v2! It is very lightweight and has a smaller toolset compared to Photoshop or Clip Studio.
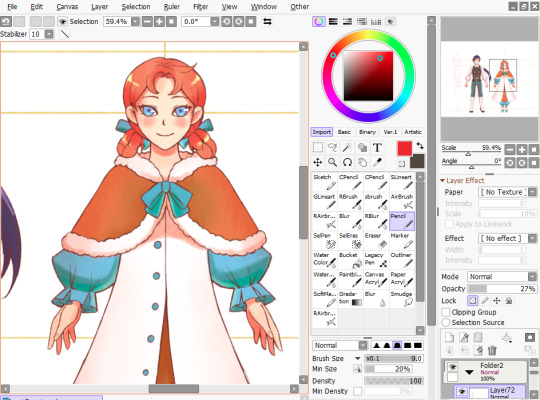
I favor it because I feel that it has a better response to pen input, which helps create higher quality lines. It is very stable and performs very well - I don't think I've ever had any crashes while using v2, which is still in development. The smaller price point helps. The current price is 5500JPY, which should be around $50 CAD these days? The price was lower when I purchased it years and years back, and I was able to upgrade to v2 without any additional cost.
As for what I recommend for a beginner? I admit, it's a little hard for me to say - the landscape of digital painting has changed so much over the past ten years that so many new tools and software have come out while I was still using Sai and my Intuos!
But if you start shopping around, there are some things that may factor into your decision. Please note that I will be speaking as someone who uses mainly desktop systems and tablets for digital art.
Price: The price of a good-quality drawing tablet can range from the $100s to the $1000s. If you are a beginner, you may not experience the benefits of a professional-standard tablet right away, so it's ok to start small! For software, there are quite a few free options to get you started, such as Medibang or Krita. If you have an iPad, Procreate is available on the store for $9.99, though you may need to invest in a stylus.
System Specs: If you have a laptop or a PC, be sure to double check your specs to make sure it can support the hardware and software of your choice! The requirements are less stringent than gaming, so at least i3 with 8gb RAM will work! You will also need to make sure you have enough storage space to hold large files. I've read that the sweet spot for storage is 128GB. If you are a beginner, you probably won't hit the limit in a short amount of time - just be aware that file sizes for digital art can reach 100s of MB depending on size and complexity.
Pressure Sensitivity: This is a measure of how sensitive your tablet is to pressure changes so that you can vary between solid/translucent and thin/thick lines as you are drawing. The recommendation for newcomers is 1,024 levels. Any less, and the experience may be lacking and the results less than satisfying.
Display Size: Tablet size can vary! Wacom Tablets in particular come in Small, Medium and Large. Make sure it can fit on your working space! I've had no problems creating art work using the smallest size, though it has caused a bit of wrist strain.
A monitor/display screen of at least HD quality with a resolution of at least 300dp is recommended! Screen size will also affect your experience. So, similar with gaming, consider what might be most comfortable for you!
Learning Curve: If you are drawing on a screenless tablet for the first time, then it may take some time to get used to the feeling of drawing the tablet surface while keeping your eyes on the monitor. Don't be discouraged if you're not getting the same results as you would using pen and paper! It will definitely feel different, but with time and practice you will gradually get accustomed to it.
Each software comes with its own toolset - some larger than others! For complex programs like Clip Studio and Photoshop, the number of features and the level of customization available can be overwhelming! That said, most software programs for digital art come with a standard set of basic tools, such as Brush, Select, Straight Line, Erase, Zoom, Copy + Paste, Undo etc. So it is perfectly feasible to get started using a complex program, familiarize yourself with the basics, and try some of the more advanced features once you get confident.
(Meanwhile, I am terrified of Clip Studio's seemingly endless features whenever I open it and usually find myself running back to Sai for safety lolol)
Public Opinion: Take caution when watching Youtube reviews, as artists (especially popular ones) are known to accept company sponsorships. Ask around if you can, take a look at the best, worst, and average customer reviews, and check out a public discussion like Reddit where opinions may differ! Take note of the good and bad experiences. And, where invited, ask artists like or not-like me. :)
I should note this far that I'm not sponsored by anyone or anything. ;;;; I swear on my Mom I'm not a Wacom plant. (That said I will gladly continue to sing my praises of PaintToolSai for free. It is an excellent program and please consider supporting the smaller devs!)
That's it! ...I think? I'm almost certain that there are at least one or two things that I've neglected to mention, but so far, those are the points I can think of, so I hope you find it useful. :)
Each digital art journey is different, and so your mileage may vary with the factors above! I do hope that as you get started with creating stuff digitally, that you have a fun and enjoyable experience.
I also invite other people to share their opinions, agreements, and disagreements to the points above! Especially if there is anything important that I may have missed. I hope this is helpful and thank you again everyone for your positive comments on my tutorials. :')
12 notes
·
View notes
Text
How to Begin Your Web Design Journey: A Step-by-Step Guide in Simple Terms

Understanding the Basics:
Learn about HTML, which is like a web page’s skeleton.
Understand CSS, which is like makeup for web pages.
Know how to make websites look good on different screens.
2. Choose your tools:
Start with simple text editors like Notepad (for Windows) or TextEdit (for Mac).
Later, try fancier editors like Visual Studio Code.
For making pictures, try Adobe Photoshop or Illustrator.
3. Learn HTML and CSS:
Use websites like W3Schools or Codecademy.
If you want to learn more about web design with certification and placement, ACTE Institute offers comprehensive machine learning training courses that can give you the knowledge and skills necessary to excel in this field. Consider the infinite possibilities for data analysis, automation, and decision-making that machine learning may create.
YouTube: There are many video tutorials covering HTML and CSS for beginners.
They teach you how to make web pages and make them look nice.
You can also learn from courses on Coursera or edX.
4. Practice your skills.
Besides learning, make simple web pages to get better.
Try harder projects as you get more confident.
Make your own website to practice lots.
5. Responsive Web Design:
Make sure your websites work well on phones and computers.
Learn about media queries (they help your design fit different screens).
6. Master CSS Layouts:
Get really good at arranging web stuff using CSS (like making boxes and arranging them nicely).
7. Web Design Frameworks:
Think about using ready-made kits like Bootstrap.
They have pre-made pieces to help you design faster.
8. UI/UX Design:
Learn to make websites easy to use and nice to look at.
Think about how people will use your site.
9. Web Hosting and Domain:
To show your website to people, you need a place to put it (hosting) and a name for it (domain).
Lots of companies can help with this, like Bluehost or HostGator.
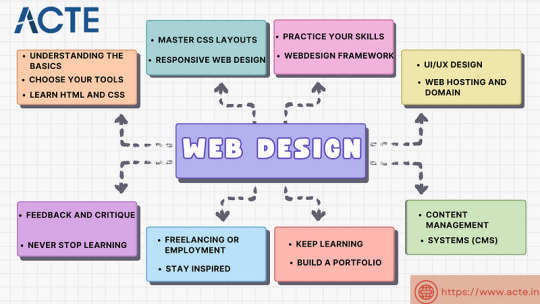
10. Content Management Systems (CMS):
Consider using tools like WordPress to manage your website easily.
11. Keep Learning:
Web design keeps changing, so keep learning new stuff.
Read blogs, watch webinars, and take more advanced classes.
12. Build a portfolio.
Make a collection of your best work to show others.
People who might hire you want to see what you can do.
13. Freelancing or employment:
Decide if you want to work alone or with a company.
Both ways have good things and not-so-good things, so pick what you like.
14. Networking:
Join groups of web designers to meet others like you.
Learning from others can help you become better.
15. Feedback and criticism:
Don’t be shy to ask for advice on your work.
When people give you tips, it helps you improve.
16. Launch your projects:
When you’re good enough, work on real websites.
Offer to make websites for friends or local businesses.
17. Stay Inspired:
Be creative and get ideas from different places.
Nature, art, and other designers can help you think of cool stuff.
18. Never Stop Learning:
Web design always changes, so keep learning new things.
Stay curious and open to learning more tricks and tools.
The secret to success in web design is to start with the fundamentals and gradually advance your abilities. Keep in mind that on this trip, patience and practice are the keys to success. As your skills advance, you’ll have the imagination needed to realise your ideas for websites. So put your hands in your pockets, launch your preferred coding editor, and start your web design experience!
4 notes
·
View notes
Text
Meine neue große Liebe: Da Vinci Resolve
Okay, das hier wird ein längerer Post also: BEWARE OF THE TEXTWALL :‘D
Wer mich schon länger verfolgt, der weiß vermutlich, dass ich schon einige Programme zur Videobearbeitung ausprobiert habe. Begonnen habe ich für meine ersten Tests mit (und ich schäme mich, das zuzugeben) Windows Movie Maker – Himmel, wie naiv ich vor über 10 Jahren doch war. Zum Glück sind diese damaligen Versuche nur Tests geblieben und ich habe nie irgendetwas davon hochgeladen.
Dann stieß ich auf das „Sony Movie Studio Platinum 12“ – eine Bezahlsoftware für damals rund 30 Euro aus dem Jahre 2013. Und nach anfänglichen Schwierigkeiten war ich doch sehr zufrieden mit dem Programm – es war zu Beginn zwar viel zu umfangreich für meine bescheidenen Verhältnisse und überforderte mich zunächst, aber dank der mitgelieferten Tutorials konnte ich mich doch nach einigen Versuchen mit dem Programm anfreunden und habe es lieben gelernt. Doch wie das mit Software nunmal so ist, wird auch diese irgendwann „outdated“, was mich letztlich dazu bewegte, nach einigen Jahren auf die nächst größere Version umzusteigen: Vegas Movie Studio 15 Platinum (2018).
Hätte ich das Programm damals zum Vollpreis erwerben müssen, wäre ich gute 200 Euro ärmer geworden – glücklicherweise bekam ich als Besitzer einer Vorversion allerdings einen ordentlichen Rabatt und musste nur noch knappe 60 Euro dafür bezahlen und würde erneut nicht enttäuscht. Bis dato habe ich tatsächlich mit dieser Version gearbeitet, da sich die nächst bessere Version (Magix Movie Studio 18 - 2021) als Fehlinvestition für mich erwies. Irgendwann wurde aus „Vegas Movie Studio“ nämlich „Magix Movie Studio“ und obwohl sich zwar auf den ersten Blick nur der Name änderte, veränderte sich auch das Layout im Vergleich zu den vorherigen Versionen und auch die Shortcuts waren plötzlich komplett anders – ohne Möglichkeit diese umzubelegen. Zudem schien die Version aus nicht näher definierten Gründen nicht mit meinem System kompatibel zu sein: Die Videodateien luden sich praktisch tot, die Audiospur wurde immer a-synchroner je weiter ein Video voranschritt und trotz zahlreicher neuer Funktionen war das Programm schlichtweg unbrauchbar für mich.
Also blieb ich bei meiner veralteten 15er-Version – immerhin hatte sie mir zuvor auch treue Dienste erwiesen. Aber wie bereits erwähnt ist sie nunmal nicht mehr die allerneueste Software und kann mit den damals veröffentlichten Funktionen nicht mehr mit den neuesten Programmen mithalten – auch die Hardwarebeschleunigung ist an diesem Punkt komplett ausgereizt und das Rendern von Videos dauert deutlich länger als notwendig.
Da ich demnächst auch einen neuen PC mit komplett aktueller Hardware mein Eigen nennen darf, hielt ich es für eine gute Idee, Audrey I noch einmal zu reanimieren und im Zuge der baldigen Ausmusterung die Festplatte sowie den in die Jahre gekommenen Core i7 noch einmal zu quälen und ein neues Programm zu testen: Da Vinci Resolve.
Gelesen hatte ich bereits einiges zu diesem Programm und spielte schon länger mit dem Gedanken, es einmal zu testen. Bevor ich allerdings den neuen Rechner mit Datenmüll zuschütte, hielt ich es für angemessen, das Programm auf dem alten Rechner erstmal zu testen und zu schauen, ob ich damit überhaupt zurecht komme.
Und ich muss sagen: Die ersten 30 Minuten war ich komplett überfordert. Optisch ist es dem Vegas Movie Studio zwar ähnlich, aber für ein komplett kostenloses Programm (!) verfügt es über derart viele Funktionen, dass ich erstmal völlig erschlagen war. So einen Umfang kannte ich zuvor nicht und musste mir erstmal Youtube-Tutorials ansehen, um überhaupt zu verstehen, wie ich das Programm benutzen musste.
Tatsächlich war ich dann doch recht schnell drin und bin begeistert von den Möglichkeiten, die sich einem bieten, wenn man sich die Zeit nimmt, sich mit allen wichtigen Funktionen auseinanderzusetzen.
Vor allem die Funktion zur Beschleunigung von Videos für Timelapses kommt mir sehr zugegen, da sie deutlich präziser ist als Vegas Movie Studio. Zuvor war es eigentlich eher ein „zurechtraten“, wie sehr man ein Video nun beschleunigt hatte – jetzt kann ich alles auf die gleiche Beschleunigung einstellen, was bei mehreren Videos, die man zusammenfügen will, äußerst praktisch ist. Auch lädt das Programm alle Videodateien deutlich schneller, wenngleich die Wiedergabe innerhalb des Programms etwas stottert. Das Endresultat überzeugt allerdings, weshalb ich vermutlich mit Audrey II gleich auf Da Vinci Resolve umsteigen werde.
Vegas Movie Studio bietet zwar mit jeder Version diverse Zusatzprogramme an, die ich bislang auch in OBS zur Audiokorrektur genutzt hatte, aber dafür finde ich sicher auch eine andere Lösung.
Wer also mit Video-Editing beginnen will, dem kann ich Da Vinci Resolve nur wärmstens empfehlen – auch wenn das Programm nicht besonders intuitiv für absolute Anfänger ist und Eingewöhnungszeit benötigt. Es lohnt sich jedoch und ist für ein kostenfreies Programm absolut unschlagbar.
Falls ihr auch Da Vinci Resolve benutzt: wofür verwendet ihr es? Oder benutzt ihr ein anderes Programm, das ihr ebenso schätzt?
Bis zum nächsten, unnötig langen, Blogpost! :‘D Eure Serenity
3 notes
·
View notes
Text
As someone who has been using Linux Mint Cinnamon (the most Windows-like of the Linux versions) since the disastrous release of Windows 10... yeah. Consider switching.
YES, most Windows programs are available on Linux (ie Firefox, Aseprite, LibreOffice, VLC player, just to name a few), or have a Linux-friendly alternative.
YES, you can dual-boot with Windows! My laptop has both in case of emergencies.
NO, you do not actually have to install to try! You can run Linux off a USB stick in a sort of "trial mode" to see if you like it!
YES, the installation is a bit tricky, and requires some computer know-how. Luckily there are lots of beginner-friendly tutorials on how to work Linux out there, as well as a very helpful forum right on the Linux website!
YES, you can move all your Windows files to Linux while using Linux, but not the other way around. Windows does not "see" the Linux partition. PRO TIP: delete things in Windows IN Windows. Windows likes to throw fits if you delete things from the Windows partition while in Linux.
NO, big updates will NOT lead to screen of death. The Linux team is much better at ironing out kinks before sending out updates.
Linux does take some getting used to. Things are pretty different but familiar at the same time. It took me about a week to learn how to get everything to my liking (this was after using a slightly older version of Linux for a while - new features are often introduced with new releases) Plus, the wallpapers it comes with are really pretty :)
I think every computer user needs to read this because holy fucking shit this is fucking horrible.
So Windows has a new feature incoming called Recall where your computer will first, monitor everything you do with screenshots every couple of seconds and "process that" with an AI.
Hey, errrr, fuck no? This isn't merely because AI is really energy intensive to the point that it causes environmental damage. This is because it's basically surveilling what you are doing on your fucking desktop.
This AI is not going to be on your desktop, like all AI, it's going to be done on another server, "in the cloud" to be precise, so all those data and screenshot? They're going to go off to Microsoft. Microsoft are going to be monitoring what you do on your own computer.
Now of course Microsoft are going to be all "oooh, it's okay, we'll keep your data safe". They won't. Let me just remind you that evidence given over from Facebook has been used to prosecute a mother and daughter for an "illegal abortion", Microsoft will likely do the same.
And before someone goes "durrr, nuthin' to fear, nuthin to hide", let me remind you that you can be doing completely legal and righteous acts and still have the police on your arse. Are you an activist? Don't even need to be a hackivist, you can just be very vocal about something concerning and have the fucking police on your arse. They did this with environmental protesters in the UK. The culture war against transgender people looks likely to be heading in a direction wherein people looking for information on transgender people or help transitioning will be tracked down too. You have plenty to hide from the government, including your opinions and ideas.
Again, look into backing up your shit and switching to Linux Mint or Ubuntu to get away from Microsoft doing this shit.
43K notes
·
View notes
Video
youtube
The Free Website Strategy Land $500:Month Clients Without Cold Calling!
Ready to transform your income WITHOUT pestering business owners? 👇 Click here to get started with your FREE 30-day trial: https://jmontgomery.net/GoHighLevel In this video, I reveal my exact strategy for landing $500/month clients by GIVING AWAY free websites to local businesses. Thousands of businesses in your city are losing customers right now because they don't have an online presence - and I'll show you how to find them in under 60 seconds. You'll discover: ✅ The "zero-selling" approach that turns free websites into monthly recurring revenue ✅ Two untapped gold mine niches that almost nobody is targeting (window cleaning & appliance repair) ✅ How to build professional websites in under 10 minutes with no tech skills required ✅ My 3-step follow-up system that converts hesitant business owners into paying clients ✅ Simple upsells that can triple your monthly income with zero extra work I went from $0 to six figures using this exact method, and thousands of others have followed these steps to land their first paying clients. No cold calling, no technical skills needed, and no upfront costs. Join our free 5-day AI challenge to get step-by-step guidance, plus a free 30-day trial of the exact software I use with all the AI tools preloaded. You'll get personalized coaching, 24/7 expert support, and proven templates to help you succeed. Click here to get started with your FREE 30-day trial: https://jmontgomery.net/GoHighLevel We discuss: how to make money online, passive income ideas 2025, free website business model, recurring revenue business, digital marketing for local businesses, website design business, high ticket sales, small business marketing, web design for beginners, monthly recurring revenue, how to get clients for web design, no cold calling strategies, local lead generation, service business marketing, high level software tutorial
0 notes
Text
Price: [price_with_discount] (as of [price_update_date] - Details) [ad_1] Have you been looking for a way to boost your skills and become a master in DevOps for your business or career in software development but lack an excellent, high-quality guide to assist you get there?And are you looking for a guide that is simple, assuring and easy to follow? If you've answered YES, keep reading... You Are About To Discover The Ins And Outs Of Dev-Ops, Including How To Leverage Its Power To Your Advantage In Your Business Or Career! It goes without saying that DevOps is one of the greatest inventions in software development. It came to satisfy a need to get away from the traditional software design for efficiency, collaboration and productivity in development processes, and by extension to boost business growth. Did you know that businesses that adopt DevOps enjoy up to 60% more revenue rates and profit than their reticent counterparts?Unfortunately, great as it is, DevOps remains one of the most misunderstood concepts- even by tutors across the world! Similarly, for someone who's just getting into the software development scene or someone wh0 has drowned in the "Waterfall" methodology a couple of times before, it may seem like something a little complex or one that requires some skill, or lots of effort and time to master. If you can relate, you must have wondered: What's DevOps all about, and is there a way to learn it quickly?What does DevOps entail?How exactly would I benefit from learning DevOps?How and where do I get started?Is DevOps agile? How does it work? So if such questions have been keeping you from making the next important step in your career or business with DevOps, then this simple, clear and straightforward guide is here for you. With it, you'll learn: What DevOps is and why you need itThe features of DevOps architecture The potential benefits and risks of using DevOpsWhat you need to know about the DevOps lifecycleThe ins and outs of the DevOps architectureThe workflow and principles of DevOpsThe DevOps tools you need to know and useHow DevOps automation worksWho DevOps engineers are, and the roles they playThe methodologies and pipelines of DevOps you need to familiarize yourself withThe DevOps Amazon Web ServicesThe tools and tutorials for DevOps, including their features and benefitsHow to install GIT on Mac, Linux and Windows ...And much more! Do you prefer practical guides that you can implement as you go (not ones that are heavy on theory- that require taking loads of caffeine to complete)?Do you want a beginners' book that is exciting to follow and well-structured for quick comprehension?Then don't let this one slip away.Even if this is your first time actually wanting to learn DevOps, this book will hold you by the hand until you feel confident about it! Publisher : 17 Books Publishing (20 July 2017) Language : English Paperback : 76 pages ISBN-10 : 1801490481 ISBN-13 : 978-1801490481 Item Weight : 113 g Dimensions : 15.24 x 0.41 x 22.86 cm
Country of Origin : United Kingdom [ad_2]
0 notes
Text
Here’s a **step-by-step beginner-friendly version of Untold’s grimey bass tutorial, fully adapted for Ableton Live using stock plugins** (like Analog, Operator, or Wavetable) so you don’t need Albino.
---
### **WHAT YOU’LL NEED:**
- Ableton Live (any version with stock synths)
- Headphones or monitors with good bass response
- Patience (you’re learning a grimey classic from 2006, give it some love)
We’ll use **Operator** (Ableton’s FM/Subtractive synth) because it’s simple, powerful, and built-in.
---
## **STEP 1: Create a Basic Triangle Wave**
**Goal:** A raw, simple tone to start with.
1. **Drag in Operator** from the Instruments section.
2. By default, Operator uses Sine waves. Click on the **‘Oscillator A’** tab.
3. Change the waveform from **Sine to Triangle**. (Click the waveform window and select Triangle)
4. Turn off **Oscillators B, C, D** (uncheck them or turn their volume down in the "Oscillator" tab).
5. In the **Filter section**, enable the filter (it’s ON by default).
6. Set **Filter Type to Low Pass (LP24)**.
7. Set **Cutoff to ~50%**, and **Resonance to ~50%**.
8. **Turn off any FX, reverb, chorus, or LFOs** (we’ll bring them in later).
**Result:** A simple muted triangle wave.
---
## **STEP 2: Adjust the Filter for Grit**
**Goal:** Remove the high-end sheen, make it darker.
1. Go to the **Filter section** of Operator.
2. **Lower the Cutoff** to around **30–40%**.
3. Turn **Resonance down** slightly to around **30–40%** too.
You now have a duller, less trancey tone.
---
## **STEP 3: Add Envelope Modulation to Filter**
**Goal:** Get that “wha” sound at the beginning of each note.
1. Still in Operator, go to the **Filter Envelope** tab (middle section).
2. Enable the **Envelope to control Filter** (This is done by increasing the **Envelope Amount**).
3. Set:
- **Attack** to around **30%**
- **Decay** to around **40%**
- **Sustain** to 0
- **Release** to around 10%
4. Now tweak the **Envelope Amount** (this controls how much the filter opens at the start). Try **around 30–40%**.
**Tip:** Play a short MIDI note to hear the "wha" effect.
---
## **STEP 4: Add LFO to Filter**
**Goal:** Get repeating filter movement while holding a note.
1. Go to the **LFO section** in Operator.
2. Set **LFO Destination** to **Filter Freq**.
3. Set the **Rate** to **1/8T (triplet 8th note)** — this makes the LFO bounce in a grimey rhythm.
4. Set **Amount** to something like **30–50%**, depending on how intense you want the wobble.
Now the filter modulates repeatedly — grime bass achieved!
---
## **STEP 5: Add Sub Bass Layer**
**Goal:** Add weight and chest-rattling low end.
**Option A – Duplicate Operator**
1. **Right-click the Operator track and select ‘Duplicate’.**
2. In the new track, go to Oscillator A and set it to a **Sine Wave** (deep and clean).
3. Turn **off filter envelope and LFO** — this will be clean and solid.
4. Drop the pitch **one octave down** (under ‘Pitch’, set Coarse to **-12 semitones**).
5. **Lower the volume slightly** so it blends with the main bass.
**Option B – Use Instrument Rack**
1. Group the original Operator with a new one: **Right-click → Group**.
2. In the Instrument Rack, click the **‘Show Chain List’**.
3. Add another Operator below and follow the steps for sub bass above.
**Optional:** Add a Saturator or Overdrive to the top layer only (not sub) for grit without muddying the lows.
---
## **EXTRA TWEAKS**
- Try modulating **pitch or pulse width** with envelopes or LFOs for crazy effects.
- Layer different waveforms (saw, square) with different envelopes.
- Use **EQ Eight** to roll off lows in the top layer and roll off highs in the sub layer — keeps it clean.
---
## **WRAP-UP**
You now have:
- A grimey triangle wave bass with filter movement
- A sub layer for weight
- Envelope + LFO action for texture
All done using **Ableton Live + Operator** — no extra plugins needed.
Want me to turn this into an Ableton preset or project file? I can walk you through that too.
0 notes