#Project Tutorial for Beginners
Explore tagged Tumblr posts
Visit Tumblr Blog
Explore Tumblr blogs with no restrictions, modern design and the best experience.
Last Seen Tumblr Blogs


Fun Fact
Tumblr’s website traffic is steadily declining.
Text
youtube
Simple beginners guide how to build create WebHID API Electron JS Desktop App for windows 10 & windows 11. Electron webhid api Desktop App html js Script: https://bit.ly/4egIyAw or https://drive.google.com/file/d/1euT1JxtpOgdZwVpA5C1nXOZRZ7bnbsoa/ Electron JS Desktop App Project Tutorial for Beginners: WebHID API Example w/ Source Code
#tutorials#how to#programming#arduino#esp32-s2#esp32#WebHID API#Desktop App#Electron#Electron JS#Source Code#Project Tutorial for Beginners#windows 10#windows 11#Youtube
0 notes
Text
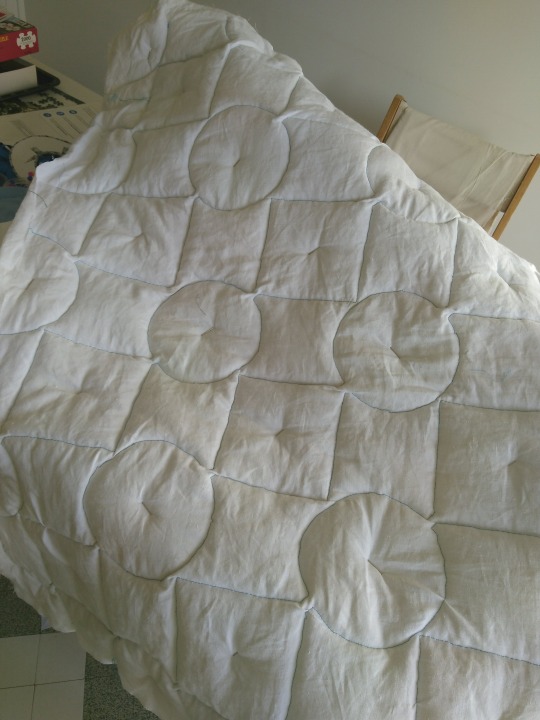
First Quilt!
It has been a lot of fun and a lot of trial and error but it's done!!!

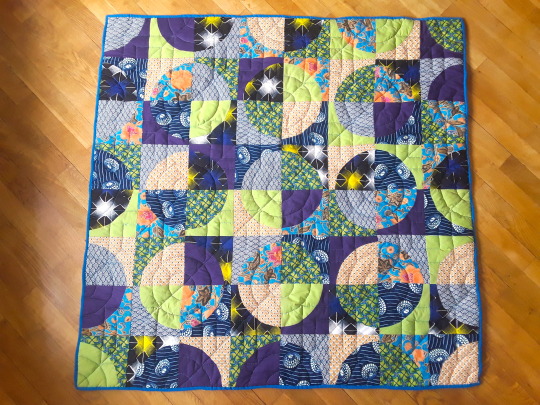

It's roughly 1.20 x 1.20m (which is a number of feet I can't be bothered to look up but let's say it's about child sized and it'll be great to chill on the couch).
I want to thank @langdon813 who I've never talked to (sorry if you hate being tagged) but whose gorgeous Drunkard path quilts made me wanna do it too :)
I had never done any quilting before (but I did sew), so here's what I've learned, if any beginner is interested in jumping off the deep end the way I did and wants advice from someone who has freshly acquired experience but will also not use any confusing technical terms (with pictures!) :
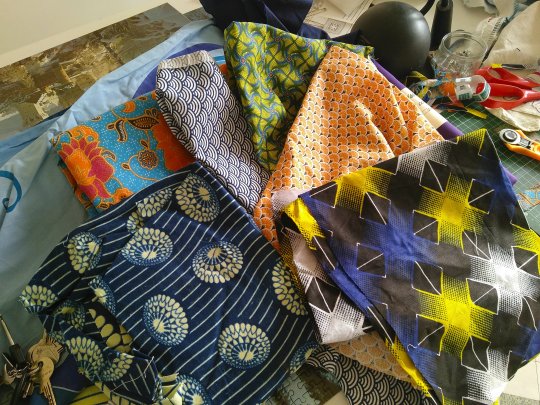
Fabric picking : so most advice I read was to go for pre-selected bundles of fabric that already go together, but I'm contrary and like to do my own thing so I used wax fabric (the blue ones on top the pile) I had laying around, which I strongly recommend: it's very easy to cut due to it being waxed, and I added a few fat squares from the shop, plus I also had the orange and blue floral and I based the coulour scheme on it. One thing that's true is it would have been easier to work with fabric of the same thickness, and the floral was givne to me by my ma who got in on trip to Thailand and it was alot thinner than the rest which didn't help.
Cutting: I got a rotary cutter for the occasion and it's great! Do not maybe push too hard on it and give yourself nerve damage the way I did (temporary but still), it's actually ery sharp and easy to use, so long as your template doesn't slip you're fine
Piecing :Yes you can do curved piecing even if you have zero experience, you just gotta make a template and
pin it a lot.
1/4 inch margins is the standard so I rolled with it because I don't like converting, but when you're strictly metric it is kind of annoying but doable because my machine does have a 1/4 inch mark and if you stick a length of tape along it it's pretty easy to follow, even for curved piecing.
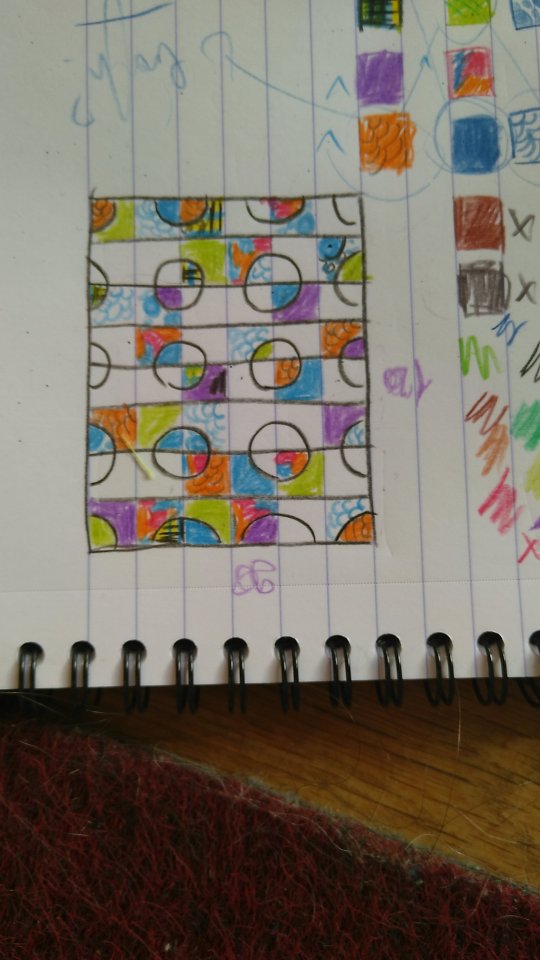
Layout: At some point you've got to decide the layout is done, because I've re-arranged the blocks at least 6 times and it's a very good way to go insane. (For rough reference, my plan was to have no repeat fabrics in any of the circle-in-a-square blocks, and I only made one mistake which I clocked too late to change)
Chain piecing!! Meaning you pile your blocks together in a specific order (that I personnaly wrote straight up on each piece with a very sophisticated letter/numbers down/across system) and then just sew them together in a line without having to cut the thread between each pair. Looks a little like a fanion banner and at some point it feels like you'll be forever tangled into it but then it's magic :) It's not that hard actually and will save you a lot of time + there's a lot of online tutorials you can use.
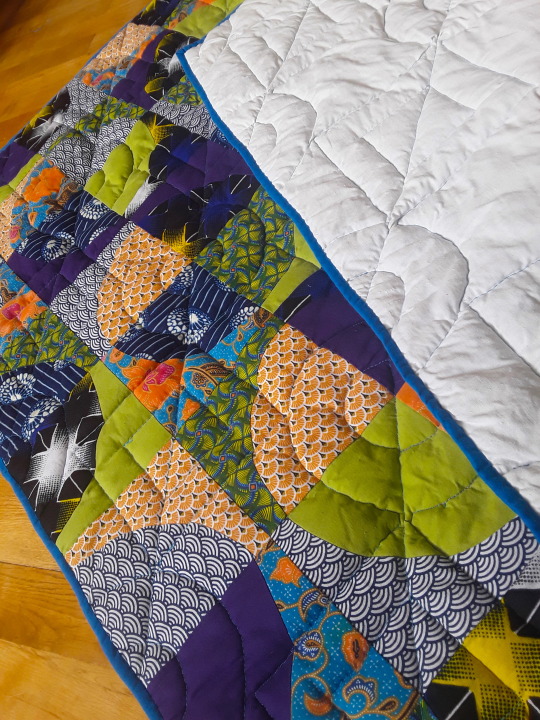
Basting! (which it took me while to understand is the part where you attach the backing, the fluff and the quilt top together) : you need more safety pins. Safety pins will save you from the wrinkles and the unfortunate oopsies of realising you've caught your backing double folded into your quilting stitch, which I did a good three times and was not fun to undo. Also, I forgot to tape the backing to the floor and it probably would have helped with the wrinkling...
Backing : I used an old linen table cloth I got for 10€ at a charity shop, and I've still got about 2/3 of it left, so I recommend that, it's sturdy but soft enough, doesn't thread easily and can be washed at very high temps, if that's a thing you do.
Quilting! Well, my machine came with a quilting foot for free motion quilting (which means you're the one moving the fabric along in whichever direction and you can sort of draw with your stitches) and it seemed fun so I did that, and here's what I learned : curves are hard but doable, also my machine doesn't like to go back (kept skipping sitiches for some reason) so it involves a lot of shifting the quilt around, which isn't easy considering the bulk. And also, drawing the quilting pattern you want so you can follow it while quilting actually does help, I used an iron/heat-erasable pen and it worked just fine. Check your stitch tension, mine was too loose and I realised too late so there's spots where I could pull on the thread and it looped, had to stitch back over that.
Quilitng pattern : I wasn't sure what to do, supposedly your batting (aka: the fluff) comes with instructions on how tight you should quilt to avoid it coming apart through use but I got mine cut at the fabric shop and forgot to ask so I just rolled with a rough 10cm maximum distance in between stitching lines but tried to do less in most places. According to many blogs : the tighter your lines the stiffer your quilt, so I kept it loose for comfort. (Picture is halfway done, I added a smaller square/circle inside each square/circle and if you look at it you'll see it's actually diagonal lines form one end of the fabric to the other.)
Binding is boring, and there's nothing to it. I got a length of pre-cut bias binding, machine-sewed it front to front to the quilt top side of the quilt and the folded it back and secured it by hand to the back with a ladder stitch. Took me roughly and entire rewatch of the Last Of Us. There's a trick to doing the corners that's fairly simple but I've lost the tutorial...
Overall : I got myself a quilting book with techinques and such and it helped, but there's a ton of stuff online, and once you get over the very Christian American mum vibe of most of the blogs, it's all very helpful (and gorgeous!) (no offense meant to Christian American mums, it's just a bit of a culture shock from where I'm standing).
#quilting#quilters of tumblr#quiltblr#quilt tutorial#quilt pattern#quilt#drunkard path#home sewing#sewing#sewing project#beginner's quilt#beginner quilting
184 notes
·
View notes
Text
Got today's video up a bit early compared to the last few! 😅
youtube
#onionart#🧅 art#beginner artist#small artist#small youtuber#small account#small creator#small channel#small youtube#youtubevideo#youtuber#youtube channel#youtumblr#youtube#diy projects#diy craft#diy#tutorial#recycling#recylcing#upcycling#upcylced#art storage#art supplies#organization
34 notes
·
View notes
Text


Chat which do we like more, with or without the extra little patches of colors (ignore that the bark edge on the top isn't finished- I'm gonna do it once I've figured put the rest of the bark)
#my art#my textures#<-uhhh new tag?? fun!#This is for a tree growing in the End and I'm calling it eucalyptus. this is because I watched a series YEARS ago with a blue + little-#-rainbow patches Eucalyptus tree in one of the mods (it was Stacyplays' Dogcraft)#and that has permanantly imprinted on my brain#also I needed a name for a powder-blue-y wood type lmao#I've got the plank texture too I made it first and i actually REALLY like it I'm excited#nowhere NEAR any kind of result for the project but I've got a lot of cool ideas and I'm suer hyped#Project Starsailor#<- thats its name (at least for now but I'm kinda attached)#also definitly not related. but does anybody know how to make a minecraft mod for fabric. namely adding new blocks to start with#or I guess does anyone have links to good tutorials for complete beginners#minecraft#mineblr#minecraft art#minecraft modding#minecraft textures#my wips
34 notes
·
View notes
Text

Crochet Roses Flower Bouquet Blanket
Follow this beginner-friendly, slow, detailed, step-by-step tutorial to make your own blanket!
HopefulTurns@YouTube
#crochetpattern #hopefulturns
#hopefulturns#hopeful turns#crochet for beginners#crochet#crochets#crochet pattern#crocheting#crochet tutorial#handmade#crochê#bolsa de crochê#bolsa de ganchillo#free pattern#crochet free pattern#youtube#creative#how to crochet#easy crochet#crafts#yarn crafts#crochet project#crochet bouquet#bouquet blanket#diy craft#diy#crochet diy
15 notes
·
View notes
Text
Making simple pouches from scraps
This started as a comment about simple projects for beginner sewists, but it got a bit out of hand, so I decided to drop it on this blog with illustrations for easier reference!
The result are pouches that I use to organize small things like the items in my daily carry bag (e.g. pens, medicine/toiletries) or regularly packed items that I would like to be able to grab quickly to bring to certain outings (e.g. dice bag for roleplay).
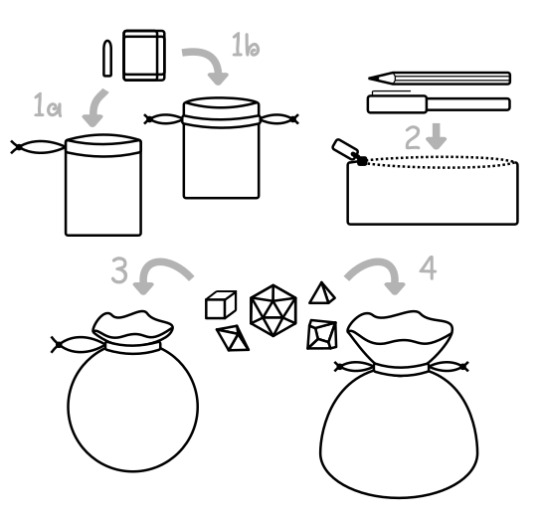
Generally, there are four kinds of pouches I have made from scraps:
A flat, rectangular drawstring bag, good for small items like e.g. tampons, band aids, pill blisters. We're going to discuss two variations, one of which is a little easier (a) and one that IMHO looks a little better (b).
A flat, equally rectangular zipper bag, good for pens or makeup.
A circle drawstring bag, good as a smaller dice bag or as a gift bag, imho.
A circle drawstring bag with a flat bottom. A bit more complicated, but better for bigger dice collections. Because we greedy gremlins need space for all our shiny click-clacks, don't we ;)
1. Flat Drawstring Pouch
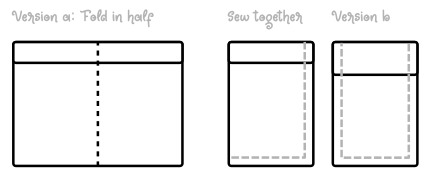
These are super easy in my opinion. You’ll need either a single piece that is significantly wider than it is high, which I usually make into version a or two scraps in about the same size, which I like to use for version b.
For version a, to make it a drawstring, we fold over the top edge (about 1,5cm/half an inch is usually enough) to the inside and sew that down close to that folded down fabric edge.
For version b, do the same for both pieces, but the fold over needs to be a bit bigger (about 3cm/an inch) as you need a little more space. Sew this down the same as version a, but add a second seam above, with a distance of about 1cm (~3/8th inch). If you have a twin needle, this might also be a use for it.

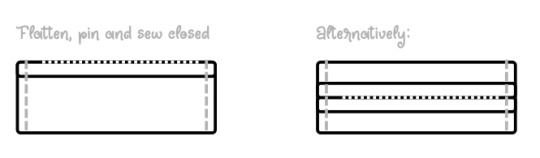
Then, for version a, you fold the wide piece in half and for version b you lay the two pieces on top of each other, outsides together in both cases. And then you sew shut all the sides you want to be closed.
Turn it inside out and – using a seam ripper or pair of snips – cut holes into the outer layer of fabric on each side of each side seam.
This means two holes for version a between the seam and top edge and four holes for version b, between the two seams.

(Only one side each depicted here, do the same on the back.)
Then you can thread a string or ribbon into one of the holes and through the channels you have sewn. I tie the string to a small safety pin as it is easier to push through the channel from the outside.
For version b you can either use two strings (one for each side) or one long one to go all the way around (by going out the hole on one side of the side seam and going into the one on the other side of the side seam).
Tie up the ends of your strings and you’ve got your drawstring bag!
2. Flat Zipper Bag
As a note: The zipper might prove challenging. However, it does present a great opportunity to try your hand on this dreaded piece of haberdashery. To make things easier on yourself I would recommend to avoid invisible or separating zippers and to make sure they’re not shorter than the longest item (e.g. the longest pen) you would like to fit through it.
Aside from the zipper you will need a roughly square piece of fabric. I usually just use the zipper as a ruler for one side, making sure that the whole scrap (so including seam allowance) is the same length as the tape. If you don’t quite have that, take e.g. the noted longest pen as reference and, as illustrated below, make sure that (in addition to seam allowance) one side of the square is the length of the pencil (L) and two of its heights (H).
The other side determines how much space we have in the pouch. So for our example we want it to be at least three pencil heights plus one extra for wiggle room (so 4*H). But we need this measure twice because a pouch generally has at least two sides, so all in all we’re at 8*H. Or you use whatever you have as long as it’s bigger than that. ;)

First of all we sew the zipper in. We determine the outside of both the zipper and the fabric and put them against each other, with one of the outer edges of the zipper tape aligned with the side that is supposed to be the opening. Pin it, then you sew it on with a straight stitch. If you’re using a normal foot (in contrast to a zipper foot, which should come with its own instructions), you can usually let it run along the teeth, as that will provide a great ruler to not get any wobbliness in your seam.

Tip: Make sure you’re not sewing too close to the zipper’s slider. I usually push it all the way to the opposing end of the zipper when I start sewing and when I’m halfway, I sink my needle into the fabric, lift the sewing foot and pull the slider all the way to the already sewn end before I lower the foot again and proceed to sew the other half.
You’ve attached one side of the zipper! Great! Now do the same thing on the other side, still making sure to lay outsides onto each other. You will end up with what looks like a zippable tube with the slider on the inside. Flatten the tube, pin it closed if necessary (the zipper tape might be a bit stubborn) and sew it close on both ends. (Careful to move the slider away from your needle!)
I like my zipper on one edge, but you can just as well flatten the tube so the zipper is centered on one of the sides.
Turn the whole thing inside out and TADA! Zipper pouch!
3. Circular Drawstring Pouch
This pouch is probably the easiest of the pouches as you only have to sew a channel around the edge and draw a string through. That channel, however, is basically a hem on a small circle. Which will prepare you for the pain of hemming circle skirts ;)
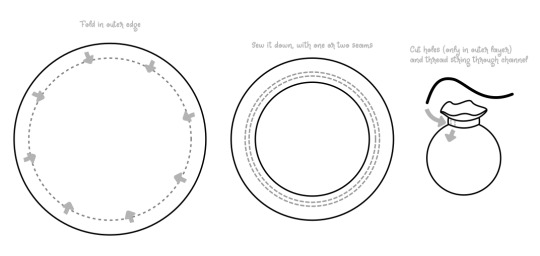
Once again you will have to cut holes for the drawstring to go in and it is fully a matter of taste if you do more than two holes, but they should be an even number.
4. Drawstring Pouch With Flat Bottom
This pouch has similarities with the other draw string pouch, but because of the flat bottom it is the only one that will stand on its own, which makes it a good shape for a bigger pouch. Nevertheless, it is still a good scrap project!
You will need a circular piece and a strip that is the length of the circle’s circumference and at least the height of the circle’s radius 6 cm / 2 inches.
(If you struggle to find the circle’s circumference and radius, I included the equations for both in the illustration below. The Diameter can be measured by folding the circle in half and measuring the fold.)
Fold over one of the long (top) edges and sew drawstring channels as described for the flat pouches. Then lay the bottom edge along the edge of the circle, pin and sew them together. You will hate it, as flats sewn to curves is the point of this, but it’s worth the effort.

Finally, sew the two short edges of the strip together and turn the bag inside out.
Once again, you will have to add a drawstring, but it is up to you how many holes you cut for it, 2 or more, buit an even number.
8 notes
·
View notes
Text
Understanding Seam Allowance in Sewing: A Comprehensive Guide for Beginners and Experts
In this post you learn how to add seam allowance to sewing patterns. Do you want to learn how to sew garments that look professional and fit well? If so, you need to master the concept of seam allowance. Seam allowance is one of the most important aspects of sewing, yet it is often overlooked or misunderstood by many sewists. In this guide, we’ll explain everything you need to know about seam…
View On WordPress
#seam allowance#sewing#sewing blog#sewing for beginners#sewing is fun#sewing love#sewing patterns#sewing project#sewing tips#sewing tutorial
143 notes
·
View notes
Text
Diy garden tutorials:
youtube
Fast privacy ideas
Small container garden
youtube
Small space food garden
Tiny yard container garden
youtube
Fixing common container garden problems
youtube
Growing new from scraps
youtube
Hydrophonics tutorial
youtube
Diy rainbarrel
youtube
Reduce mosquitos laying eggs in the rainbarrell
youtube
#community#urban gardening#diy#diy projects#zerowaste#garden#yard#solarpunk#beginner garden#tutorial#Youtube
2 notes
·
View notes
Text
i really love that the look of early computer games that used pixel art to emulate a 3D space is now being emulated using 3D graphics bc it's genuinely easier to do it that way. that being said i do still kind of want to make a first person game entirely in a 2D engine just because. <- same impulse that makes me want to bake baklava entirely from scratch (devil talking)
#i am currently working on a first person grid based dungeon crawler project but like. early early early first steps#brainstorming and doing beginner godot tutorials and such#i also want to play more games in the genre before i start doing anything too involved. especially more recent games#etrian odyssey when i get my hands on you....
2 notes
·
View notes
Text
How to Download My Free beginner Sewing Patterns: Step-by-Step Guide
#diy#youtube#sew#sewing#tutorial#free pattern#free sewing pattern#beginner sewing#beginners sewing#learn sewing#sewing pattern#sewing project#sewing patterns
3 notes
·
View notes
Text
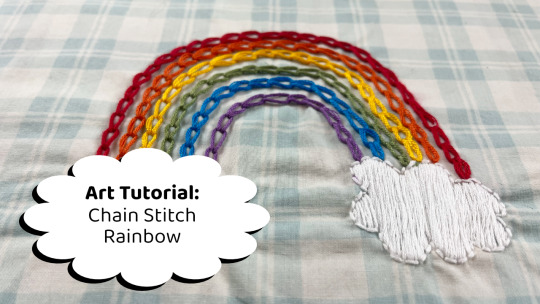
Looking for a gloomy day project? Try making a chain stitch rainbow!This project is beginner friendly and uses only 3 basic embroidery stitches.
Watch the tutorial
#design#sewing#fashion#handcrafted#handmade#slow fashion#textiles#textile art#one of a kind#embroidery#tutorial#yarn#youtube#my art#artwork#art#diy#crafts#video#hand stitching#rainbow#diy project#diy craft#diy tutorial#embroidery tutorial#beginner embroidery
5 notes
·
View notes
Text
I wish the fiber craft stores had classes on the things that are actually difficult and intimidating and hard to learn by yourself like different types of short rows, or how to do a button band with buttons, or colorwork, or the dreaded steek, or bobbles or icord instead of dozens of 101 classes where they teach you how to cast on, knit, purl, bind off, and mayyyyybe really basic increase and decrease, and then occasionally they have a "class" labeled 102 or skill building or something that is just open knitting while an instructor (who is also working the register) is available if you have a question, for $125-200.
#i would happily pay real money for someone to teach me#about short rows and stranded colorwork#like i THINK i can execute instructions for a basic short row#with limited issues. but i do not understand the short row#we are not friends#colorwork looks fun and I'm going to try to teach myself#but like. what if. i didn't have to.#i hate how everything goes from the most basic#garter or maybe stockinette babys first project#straight to like. advanced shit.#you are either a beginner or know how to do everything#why not actually teach the stuff in the middle??#also: PLEASE do not send me tutorials or youtube videos#showing how to do this stuff#that is not the point of the post and i can find that on my own
5 notes
·
View notes
Text
Advanced C Programming: Mastering the Language
Introduction
Advanced C programming is essential for developers looking to deepen their understanding of the language and tackle complex programming challenges. While the basics of C provide a solid foundation, mastering advanced concepts can significantly enhance your ability to write efficient, high-performance code.
1. Overview of Advanced C Programming
Advanced C programming builds on the fundamentals, introducing concepts that enhance efficiency, performance, and code organization. This stage of learning empowers programmers to write more sophisticated applications and prepares them for roles that demand a high level of proficiency in C.
2. Pointers and Memory Management
Mastering pointers and dynamic memory management is crucial for advanced C programming, as they allow for efficient use of resources. Pointers enable direct access to memory locations, which is essential for tasks such as dynamic array allocation and manipulating data structures. Understanding how to allocate, reallocate, and free memory using functions like malloc, calloc, realloc, and free can help avoid memory leaks and ensure optimal resource management.
3. Data Structures in C
Understanding advanced data structures, such as linked lists, trees, and hash tables, is key to optimizing algorithms and managing data effectively. These structures allow developers to store and manipulate data in ways that improve performance and scalability. For example, linked lists provide flexibility in data storage, while binary trees enable efficient searching and sorting operations.
4. File Handling Techniques
Advanced file handling techniques enable developers to manipulate data efficiently, allowing for the creation of robust applications that interact with the file system. Mastering functions like fopen, fread, fwrite, and fclose helps you read from and write to files, handle binary data, and manage different file modes. Understanding error handling during file operations is also critical for building resilient applications.
5. Multithreading and Concurrency
Implementing multithreading and managing concurrency are essential skills for developing high-performance applications in C. Utilizing libraries such as POSIX threads (pthreads) allows you to create and manage multiple threads within a single process. This capability can significantly enhance the performance of I/O-bound or CPU-bound applications by enabling parallel processing.
6. Advanced C Standard Library Functions
Leveraging advanced functions from the C Standard Library can simplify complex tasks and improve code efficiency. Functions for string manipulation, mathematical computations, and memory management are just a few examples. Familiarizing yourself with these functions not only saves time but also helps you write cleaner, more efficient code.
7. Debugging and Optimization Techniques
Effective debugging and optimization techniques are critical for refining code and enhancing performance in advanced C programming. Tools like GDB (GNU Debugger) help track down bugs and analyze program behavior. Additionally, understanding compiler optimizations and using profiling tools can identify bottlenecks in your code, leading to improved performance.
8. Best Practices in Advanced C Programming
Following best practices in coding and project organization helps maintain readability and manageability of complex C programs. This includes using consistent naming conventions, modularizing code through functions and header files, and documenting your code thoroughly. Such practices not only make your code easier to understand but also facilitate collaboration with other developers.
9. Conclusion
By exploring advanced C programming concepts, developers can elevate their skills and create more efficient, powerful, and scalable applications. Mastering these topics not only enhances your technical capabilities but also opens doors to advanced roles in software development, systems programming, and beyond. Embrace the challenge of advanced C programming, and take your coding skills to new heights!
#C programming#C programming course#Learn C programming#C programming for beginners#Online C programming course#C programming tutorial#Best C programming course#C programming certification#Advanced C programming#C programming exercises#C programming examples#C programming projects#Free C programming course#C programming for kids#C programming challenges#C programming course online free#C programming books#C programming guide#Best C programming tutorials#C programming online classes
2 notes
·
View notes
Text

✨ Ready to crochet something cute and practical? ✨
Hopeful Turns has put together a step-by-step video tutorial on crocheting a stylish pouch. Whether you’re a beginner or a seasoned crocheter, this guide is full of tips to make the process smooth and fun! 🧶💫
🎥 Watch here: HopefulTurns@YouTube
Tag your crochet buddies and let’s get crafting! 💛✨#crochetpattern #hopefulturns
#crochet#hopefulturns#youtube#hopeful turns#crochet for beginners#crochê#crochet tutorial#handmade#crochet pattern#crocheting#crochet pouch#diy craft#diy#diy projects#crafts#pouch
5 notes
·
View notes
Text
I will never learn to cut my losses with an animation because I would simply rather spend two hours re-learning blender just to get a 5 second shot
#I say ‘re-learning’ but I’m pretty sure it’s physically impossible to be ‘done learning’ blender#it’s by far the LEAST beginner-friendly software I’ve ever used#but like it can do pretty much anything lmao#high key feels like it’s made less for artists and more for programmers#like the thing I was doing wasn’t even that difficult it’s just that everything I needed was buried in like 20 layers of UI#I needed like 6 different tutorial videos#if you wanna learn blender really you just think of a project and then off to YouTube you go#i use it for video editing and the kind of videos I make has an upper limit on the shit you need to know how to do lol
8 notes
·
View notes
Text
Step into the World of Code with DICS

In today’s fast-paced digital world, learning programming is not just a skill—it's a career-defining move. Among the most powerful and versatile programming languages is C++, a language trusted by tech giants and used in everything from game development to high-performance applications. If you're looking to take your first step into the world of programming or enhance your existing coding skills, there’s no better place to start than the best C++ institute in Laxmi Nagar.
Why Choose C++?
C++ is known for its performance, efficiency, and control over system resources, making it a favorite among software engineers and system developers. It lays a strong foundation for understanding object-oriented programming and is an ideal starting point for those aiming to build a career in software development, data structures, game design, or competitive programming.
DICS – Your Gateway to Programming Excellence
When it comes to quality computer education, Delhi Institute of Computer Science (DICS) stands out as the best C++ institute in Laxmi Nagar. With a reputation built on years of excellence and student success stories, DICS has become a hub for aspiring programmers looking for expert guidance and practical learning.
Here’s what makes DICS a top choice:
Expert Faculty: Learn from industry-experienced professionals who simplify complex concepts and provide real-world insights.
Hands-on Learning: Our C++ course is designed with a practical approach—ensuring you write, test, and debug your own code from day one.
Small Batch Sizes: Get personalized attention in a focused learning environment.
Career Support: Resume building, interview preparation, and placement assistance are part of our comprehensive training program.
The Best C++ Course in Laxmi Nagar
At DICS, we offer the best C++ course in Laxmi Nagar, tailored to both beginners and intermediate learners. Whether you’re a student aiming for a technical career or a professional looking to upskill, this course covers:
Basics of C++ syntax and structure
Object-Oriented Programming (OOP) concepts
File handling, pointers, and memory management
Data structures using C++
Real-time mini projects to build coding confidence
By the end of the course, students are not just equipped with technical knowledge—they gain the confidence to crack job interviews, take on coding challenges, and even build their own software solutions.
Don’t Just Learn—Transform Your Career
Choosing the right institute is crucial when you're investing in your future. At DICS, you're not just joining a course—you're becoming part of a community of learners and tech enthusiasts who believe in growing together. With flexible batch timings, affordable fees, and a strong placement track record, DICS remains the best C++ institute in Laxmi Nagar for students who are serious about building a strong programming foundation.
#C++ programming#C++ course#Learn C++#C++ tutorials#C++ institute#C++ training#C++ classes#C++ for beginners#C++ projects#C++ coding
0 notes