#a rough tutorial on How To Gun
Explore tagged Tumblr posts
Visit Tumblr Blog
Explore Tumblr blogs with no restrictions, modern design and the best experience.
Last Seen Tumblr Blogs


Fun Fact
The average Tumblr user visits about 67 pages every month.
Text
i am going to become an intimacy coordinator but specifically for cosplayers and their guns
#mochi rambles#mochi cosplay#i guess adding to my List Of Stock Photos to make is just#a rough tutorial on How To Gun#because man cr is bad at it#i understand that percy literally invented the things but like#he should fukken know better#how to bother mochi in .3 seconds: cosplay editon#a) slathering yourself in JUST face paint and deeming that acceptable for fantasy skin make up#or b) holding a gun prop in ways that would certainly AT THE VERY LEAST maim you if it were and irl gun#i am a rootin tootin high femme redneck and i will die on stupid hills for stupid costume hobbies
5 notes
·
View notes
Text
Playing Animal Crossing New Horizons with HSR Men
Warnings: ugly villager slander, established relationship (can be platonic or romantic)
──── ⋆⋅☆⋅⋆ ────
Argenti: Your fellow knight of beauty grows quite fond of the game, immediately finding the freedom of creativity in decoration endearing. He always gives you compliments on your OOTD, and takes screenshots whenever you design a new area on your island. Argenti gave himself the gardening job- spending his bells on red rose seeds. He gets proficient in following the flower guide, and is very proud of himself if he ever gets a golden rose on your island. He loves the villagers, finding them each very cute, and even beauty in the "ugly" villagers. "Did you see the villagers wearing the red rose on their head? I must say I am flattered they love it so much. Though, I am more happy that they appreciate the beauty of our island." He enjoys documenting the beautiful places in your island with photos <3
Aventurine: From the beginning he points out the fact that Tom Nook is a capitalist, which makes you roll your eyes thinking he thinks this game is silly. However, it is quite the opposite as it doesn't take him long to get out of his home loan debt and is somehow extremely lucky. It's unfair to you that he could just log in on any given day and have the best deal for turnips. However because you are his favourite he says he’s willing to buy you whatever you want, he guesses. He happens to be able to catch rare species like the Coelacanth, and it infuriates you but you really can't be if it's helping the museum. "445 bells per turnip, sounds like music to my ears~" "What's that? You want this violin? Well I guess I could spare you a few bells... is one million okay?"
Blade: Let's not kid ourselves here- it takes a lot of convincing and help from Silver Wolf to get him to even be in the presence of Animal Crossing. He says he would much rather stand and look at the wall (SW: "You already do that everyday"). Eventually he sits himself next to you, and listens to your giddy rambling about what to do in the game while he puts on a serious face not saying anything. After the preliminary tutorial/startup gameplay, he finally says, “…why is this rat harassing me for money.” However, the loans aren't the worst but the villagers chasing him down are. He purposely ignores them and grumbles when you tell him to answer ):/. He prefers to watch you play, but because he sees you smile and laugh at his sarcastic comments, he thinks it's not so bad.
Boothill: He's definitely down to try it out, but he ends up being a bit of a troll. He doesn't really mind cute/ugly villagers, until he judges them for what they say. “That’s right, (y/n) did catch all those fish.” “Did he just ask me if he could call me Muffin.” “WHAT DO YOU MEAN I GOTTA PAY ANOTHER LOAN?!!?” Yeah… he quickly feels the grindy-ness, complaining that Tom Nook was working him like a forkin’ dog. A little bit of comical rage, but he won’t lie he is enjoying it. He also asks if there are any guns and he is disappointed, so he opts for the net. He's a little rough and rowdy, but he does it in style. That being said, he 100% spends his extra bells on a cowboy outfit.
Dan Heng: He agrees instantly- aw :(. He knows you (and March) have been begging him to play. He’s is fairly good at it- gets out of the tent quickly, masters catching creatures, a nicely organized house… He’s quite resourceful too, chopping down trees and going to mystery islands to farm the heck out of it. The villagers love him, both of you often seeing them run to him with the little sparkly flowers. And even though he's normally serious, you can't help but fawn over how sweet he is with the villagers. "...She wants to call me Shmoopy, do I-" "YES." Villagers asking him to catch a fish? He's immediately on it. He remembers their names and treats them like real people :(
Dr. Ratio: "Is it educational?" Bro is such a nerd. You deadpan at him, and sass him for expecting this to be IXL or something. He is also one to get through the tutorial part easily. You expected him to be overly critical of the game, but he finds appreciation in the museum: both the creatures and the art. Is it a farfetched idea that I think he'd know how to tell the reals and fakes right off the bat? "Do you really think Da Vinci spilled coffee on his work?" At least it saves you the troubles of wasting your bells and getting a fake. I think your island would not be a mess, and would have at least a few statues (you know the ones) which add his touch to it.
Gallagher: Honestly he's happy as long as he gets a little area for himself. Kind of a wild card this one- somehow calm and chaotic at the same time, and it's puzzling because how is he doing such weird things with a straight face? Trolls the villagers quite a bit (he's lucky ACNH villagers are nice) by hitting them with a net (just once though) and giving them different catchphrases every time they ask. "Why is Bob saying 'spaghettini' at the end of his sentences?" "Um, because I thought it'd be funny? Also I'm kinda hungry so-" "Gallagher ):/" Despite the randomness, he is wholesome at times. He is also one to compliment your new outfit, and stargaze with you on the new area you decorated.
Gepard: He's busy so you weren't expecting too much from him, but he takes pride in having a well-rounded island. He gets so excited when he catches a new species that you don't have yet- what a cutie. Also goes full throttle when there's a bug-off or fishing tourney. Despite being a video game, I feel like there will be some way he messes up taking care of plants. The flowers overgrow, the turnips rot, and he doesn't understand why the trees aren't growing? But with some tips from you along with your island designing skills, your island rank moves up and he is BEAMING. "Zucker asked about you." "...he did?" "Mhm, he asked how you were doing, and said he saw you laying out pathways on the island."
Jing Yuan: He finds it so cute when you ask him to play. Lowkey like Blade where he likes watching your happy expressions when playing. He's happy that this game provides him a way to relax while not getting bored. Secretly an enjoyer of villager drama: "Wolfgang wants to apologize to Audie with this present. What happens if I don't deliver it?" "Again? Ah, just give it to her quickly." "...what if I don't." "...Jing Yuan." Oddly I feel like he'd enjoy the group stretching (what an old man), and encourages you to join. Like the "Dozing General" he is, there will be times when he's inactive and gets the bed head.
Luocha: You weren't expecting him to enjoy the game, but he's surprisingly willing to be resourceful. His storage is full of materials, which you scold him for because this is the reason for his empty undecorated house. But he always has things you need so you can't exactly complain. Also one to be pretty smart with managing bells and resources, able to maximize their worth. When the island gets visitors like Label or Flick, he has items ready. "Luocha... where did you get that coat?" "This? It's a designer piece, from Miss Label." I'd say he does have a sense of beauty in design, so thankfully your island is gorgeous.
Sampo: Sympathizes with Redd like a true scammer. "Aw look, he just needs a bit of money to get started... he even gave us a 'cousin's discount'." However, a rivalry starts with Redd when Sampo's first art piece turned out to be fake (scammer gets scammed moment). He asks if he can be the salesman that he's supposed to be. When villagers run up to him to offer bells for an item he has, he accepts thinking it'll get him a deal along the way. Unfortunately friendship gets you nowhere in terms of home loans. I'd say he's pretty good with the turnip stonks, so there's a balance. Also TRASH ISLAND. I'm sorry, but your man is a hoarder, "But what if I need this?" (Literally me.)
Welt: When you ask him to play he asks why the animals are crossing. He finds the style and characters are so cute, and he can see why you enjoy it. This is definitely a way he gets in touch with his "youthful" side. He loves the creative freedom in the game, even getting indecisive about how to design your island, and thinking of what outfit to wear. He once made a simple t-shirt for fun, but was surprised when he saw a villager wearing it. It'd be so cute and funny when he learns new emotes- and he just spams them with a straight face. Not gameplay related, but I feel like in his free time he'd draw you both in villager form <3.
──── ⋆⋅☆⋅⋆ ────
#honkai star rail#honkai star rail fluff#honkai star rail imagines#animal crossing#animal crosing new horizons#acnh#hsr imagines#argenti x reader#aventurine x reader#blade x reader#boothill x reader#dan heng x reader#dr ratio x reader#gallagher x reader#gepard x reader#jing yuan x reader#luocha x reader#sampo x reader#welt x reader
794 notes
·
View notes
Note
The girls’ birthday party is coming up and wifey is Stressed. So there comes Joel, huffing and puffing with the hot glue gun decorating party hats and watching a tutorial on how to do cute frosting flowers on a cake.
Wifey makes all the invitations, gets the guest lists, schedules, parents staying or dropping, car pooling, allergies, etc. Scrambling everywhere and making calls as you set the table.
And Joel is sweating like he just worked the biggest construction job known to man, but really its the polk a dot pom paper party hats and streamers on the doors. He had a rough morning at the grocery store bakery where he ordered 3 weeks ago. Half vanilla, half chocolate sheet cake. But when he went to pick it up, it was a marble cake.
"Does this look like half chocolate half vanilla?" He cursed at the poor baker, who likely didnt even make the cake last night but was the only one there to hand it to him. "I got one girl who likes chocolate and the other who likes vanilla. What am I supposed to do with this? My wife is gonna-- No no I'll still take it, but im leaving a strongly worded review!" He gave narrow eyes and slid the cake on his arm as he backed away to the checkout.
So he calls you and tells you to fire up the oven.
Leading him now, with his skilled carving crafting hands being put to the desk with soft decorative icing flowers and butterflies, writing their names with piping and wiping the sweat off his brows.
His whole face is smudged with pink and purple icing but by god, you'll now forever be fucking up cake orders and making your mans bake the best cake for his girls from now on.
21 notes
·
View notes
Note
TransIV/PermaIV tips? Our dysphoria is so bad, but we don't know how to alleviate it since we still live at home :(

TRANS - IV
Mainly going to be ways to relieve dysphoria !!
We cosplay and once had to do a fake IV bag , so here is a tutorial for that !! - You're going to take clear garden plastic , it is close to most IV material , although using any sort of thick plastic bag can also work ! - Cut out two sheets of rectangles from the plastic , generally of the same size - should be sort of the size of a simple notebook ! - Take hot glue ( if ur using simple bag plastic , simple wet glue can be a better option ) and gently put the glue around the corners of the rectangles and glue them together - leave two small openings ( one at the top and one at the bottom ) . - Wait for it too cool of / dry , then turn the bag inside out through the un-glued part , to hide the rough glue edges ! - Then glue the bottom part up - but leave a small opening for the tube to be inserted later !! - Get a clear rubber tube - generally on the thicker side , and cut / saw 2 inches of it . Glue the part that is going to be in the bag shut so no liquid will escape - you're going to place this tube into the small opening , make sure the majority of the tube is out of the bag ( although it's alright if there is tube inside the bag ! ) , and glue the opening shut around the tube ! - Get a smaller clear tube - one that is thinner than the first one , measure it to how much you want it in length ( suggest to maybe half of your height or the length of your arm ) . Take the end that's going to be facing the IV bag and glue it shut , then glue it to the thicker tube , for this it's recommended to use hot glue , although using tape for it is also an option to make it sturdy ! - It is up to you of what you want inside the IV ! Through the top open part , pour it whatever liquid you want and then gently glue / seal the top part up ! I suggest to do a thick seal , so that after it is sealed , you can make a small hole through the thick seal for a handle ( you can do this with simply poking a hole with scissors and then cutting , or use a hot glue gun to melt into the thick seal and make the hole bigger )
YOU GOT AN IV BAG !! Here is how to simulate an IV to your arm !!
- Take the other end of the small tube and take the cap off of a pen ( can be clear or of color , doesn't matter ! ) , then take a q-tip and cut off one side of it , file it down to be dull - insert it in the pen cap so the dull side is sticking out , and the uncut side is working like a stopper to not let the q-tip slip out , glue it for extra sturdiness ! - Glue the cap to the end of the tube , and then you have an IV bag with a Tube ! You can add some details to it , like putting some sort of tape around the connecting ends of the smaller tube ( can also work to hide any imperfections while also looking on theme ! ) - To ' attach ' it to yourself , you're going to take bandage tape / any sort of bandage , take the end of the IV and place it where you want the q-tips end to be , take the bandage tape and tape it open the pen-cap-part to not make it move , You can elevate the bag by placing it somewhere higher , or using the handler - hanging it somewhere that can support it ( hanging it around your room , like on a corner of a shelf or placing a tac on the tap for it to hang off of ! )
Hope this helped ! Stay safe and remember that I love you !!


#.ᐟ my dear corpse ..#radqueer#rq 🌈🍓#transid#rqc🌈🍓#rq#pro radq#pro radqueer#pro rq 🌈🍓#radqueer safe#pro transx#transid transitioning tips#transid tips#transid transition#transid transitioning#transid community#rq community#radqueer community#rq safe#transability#transabled#transid positivity#transid safe#transid please interact#pro transid#rq 🍓🌈#rqc#transharmed#rq please interact#rq interact
55 notes
·
View notes
Text
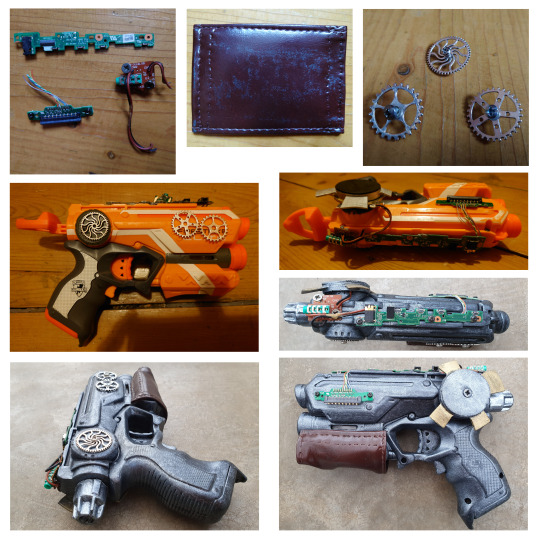
I was going to post a cosplay photo today, but decided to do another of my tutorial type things instead👩🏫. This time it’s for the steampunk handgun I used in my recent Typhoid Mary shoot and also seen in a few of my earlier pics. I’ve found it super useful to have, as it suits a bunch of different characters. If you want to rustle one up yourself, you’ll need these ingredients…
1 x Nerf gun or similar – Choose your gun carefully, as it will dictate what your finished weapon looks like. I went for something small, but chunky, which I picked up cheap in a thrift store (💜 my bargains).
Sandpaper for prepping the gun.
1 x can of black spray paint (or possibly more depending on the size of your gun – tbh I regularly misjudge how much paint I’ll need for stuff and end up having to make extra trips to the craft store to stock up 🚶♀️😩
Silver acrylic paint and 🖌️🖌️ to give the gun a metallic look (or gold if you want to bling out).
Assorted fixtures for decorations – I used some gears left over from another project, a bit of an old speaker and some circuitry from a broken tablet, but loads of other stuff will work. Btw, if you haven’t tried it, it’s super therapeutic pulling bits out of an old tablet, especially if it’s one that used to crash on you a lot like mine😈😈😈
Plastic knob – Replacement for the cocking thingy at the back of the Nerf gun, as this totally gave away that it was a toy. My piece was stripped off a toy gun I used in another project, but you can use whatever’s available.
A piece of leather – Trim for the barrel to add to the steampunk vibe and (hopefully) make the gun look a bit more realistic.
Needle and thread 🪡 – Most of my projects involve sewing in some way, as it’s something I like doing. Here it was used for finishing the edges of the piece of leather.
Fixative spray – Used to try and ensure I don’t accidentally scratch off any paint when I’m using the gun in a typical display of klutziness 🥴
Normally when I do these tutorials, I start rambling on at this point about whatever bits of the project pop into my head, but this time, I’m totally going to be structured about it, so here’s a step-by-step guide…
Sand off any logos and stuff on your gun, as these always make them look toy like. If the gun you’ve chosen has any smooth surfaces, you might want to sand these as well, as the paint will go on better that way. Top tip here is not to use really rough sandpiper or you’ll end up with nasty scratches.
Strip off any fittings on the gun which don’t look realistic and replace if necessary. In my case, this included replacing the thing for getting the gun ready to fire (I’m sure there’s a technical term for this, but it beats me what it is). I screwed the new bit into the end of the mechanism, so it still works, which is pretty cool.
⛫💨 Spray the gun matt black to prime it, plus any of your fittings which need to match. Usually this has to be done in a couple of stages, as if you’re working on a table or something you won’t be able to turn anything over until it’s dry. Also, no matter how good a surface looks at the time, you often come back to find the paint hasn’t covered something properly 😠😠. Here’s another tip… go off and do something else between coats rather than waiting around for however many hours it takes the paint to dry 💡
🎨 Add the metallic distressed look with the arcylic paint. For this to work, you need to dust the paint on super lightly. I usually wipe my brush on a bit of paper each time I dip it in the paint to get rid of the excess.
Once the paint is dry, attach your fittings. The trick here is to try to make them look like they have some kind of purpose and aren’t just window-dressing. Glue is the easiest way to stick things on, but I use bolts and screws when possible 🪛🔧, as these are more secure and allow gears and stuff to spin around if you want them to. If you’re using leather like me (or any other material), you’ll probably want to sew in a folded overedge before attaching it to stop it fraying 🪡.
Touch up any damage you did to your paintwork when working on step 5. Maybe you’ll be luckier than me, but no matter how careful I am, there always seems to be some.
⛫💨 Spray on your fixative for protection. This should be done in steady lines with the can about 30 cms away from the gun. It’s best to do a few coats, sometimes working from side to side and sometimes from top to bottom, so you get good coverage. My tip for this stage is to shake the can well before use and do a quick test spray first to make sure the fixative is coming out evenly.
Pick up the finished gun and start rocking it /̵͇̿̿/’̿’̿ ̿ ̿̿ ̿̿ ̿̿💥
So there you have it. Hopefully if you’re new to projects like this, it will give you a good starting point. I think you get good results for some pretty easy steps. Let me know if you found it useful or if you have any questions 💬, and stay tuned for more cosplay stuff.
Luv your friendly neighborhood cosplayer, Christabel ❤️🧡💛💚💙💜
ko-fi.com/christabelq instagram.com/christabel.simpson/ deviantart.com/christabelq
#steampunk gun tutorial#cosplay tutorial#steampunk gun#costume design#prop design#cosplay gun#hand guns#steampunk#cosplaygirl#cosplayers#ukcosplayer#cosplaygirls#follow for follow#follow back#followback#followforfollow#like for like#likeforlike#typhoid mary cosplay#typhoid mary
50 notes
·
View notes
Note
dude you took on the titanic task of giffing queer as folk—something i have tried and desperately failed so i KNOW how difficult it is. and not only did you gif it, but your gifs of this 00s show are CRAZY HIGH QUALITY and GORGEOUS and your coloring always blows my mind by how great it is. like!!!! everyone should appreciate you and your gifs.
hey!
okay, for that give me all the compliments, i'll happily take them because i nearly died during that era they're earned. i was basically borderline hysterical in ps #trauma
the things i did for brian kinney, i went places i wouldn't go with a gun for him gifwise 🙈
qaf and iwtv s2 really honed my colouring skills because they were rough to get good gifs out of, i spent twice as long with 100 adjustment layers per gif.
tysm for being crazily complimentary but honestly there's so many of you on here who make gorgeous sets, i just half ass it and it somehow works. im the incoherent george costanza gif the whole time.
the real superstars are the people who gif scenes & edits, that's talented!!! download your talent and skill to me pls.
im crying through edit tutorials, not knowing what a screencap is and 12 different ways to lay a gradient map. IT NEVER LOOKS LIKE THEY SAY IT WILL. THEY LIE.
i don't need everyone to love them and be all you're great, soph. i just like to contribute what i can on here that happens to be gifs. i appreciate anyone putting a gif out it's not easy full stop.
also regards to qaf, im like an addict who says never again will i gif it but im back there every time. if there was more appetite for it id gif it more.
#soph asks#i remember you being so lovely when i was making those gifs#i appreciated it then & now so thank you lovely#💛
7 notes
·
View notes
Text
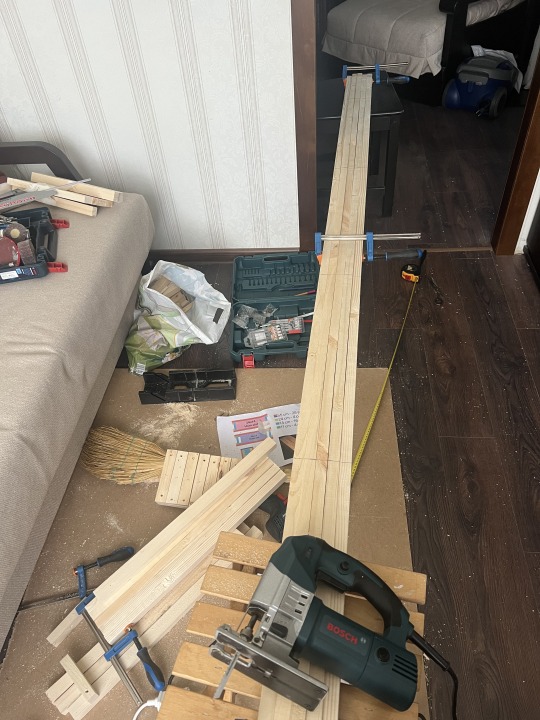
Day Four — So Far, the Most Productive One
Picked up the glue and dowels today, and finally bought the wood stain. I gave up waiting for the dark oak delivery and realized I actually need to stain before assembling anything. So! It’s going to be Palisander instead — a bit lighter, but still authentic enough.
We also went and got more beams, and now I’m scared I miscalculated everything and might need yet another one -_-
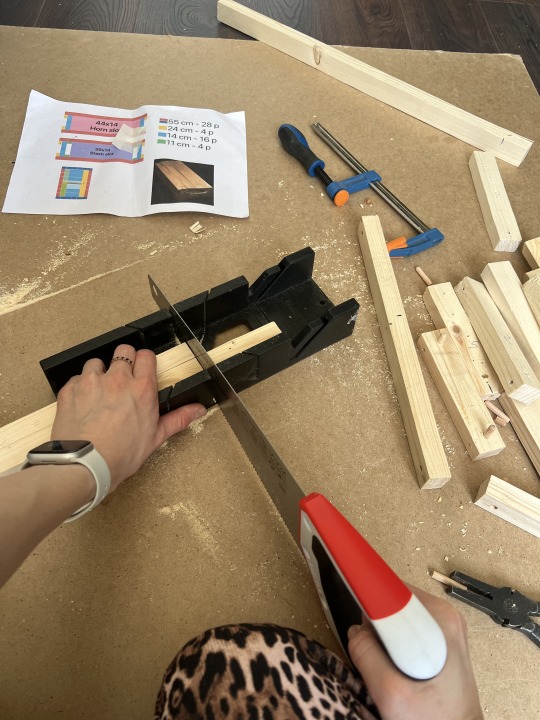
Started assembling the narrow side panels — it’s slow because I saw slowly, so… I sweet-talked my husband into letting me use the jigsaw. Bribery phrase of the day:
“No, I’m not going to cut off my fingers.”
After a quick tutorial, I was allowed to saw things myself and… OMG it’s FUN
bZzZzZzZzZzZzZz!!!
Funny moment: my very sensible giant of a husband still had no idea what I was making — even though he saw me drilling, cutting, and even saw the half-assembled frame. So here’s how that conversation went:
🦊 "I’ll probably need to buy more wood. You do realize I’m making a box, right? To pack the gift? I had to expand it because of the new parts.» 🐻 "Not really.» 🦊 "What do you mean, “not really”?» 🐻 "I saw you building something… on little legs. I thought it was a small table.» 🦊 "A TABLE?? Why??» 🐻 "I dunno. Who knows what’s in your head."
He absolutely cracks me up and melts my heart — and honestly, I admire his patience. I’d be tearing my hair out trying to guess what’s being made and what’s going inside, but he just lets me be. We love that in a man.
Surprisingly, even with the jigsaw, my cuts are coming out clean — though I’ll sand everything anyway. For the main frame, I’m still using the handsaw and miter box, for better precision.
Also drafted the velvet lining plan (thank you, staple gun!) but I’ll write about that once I actually get to it.
Today’s wins:
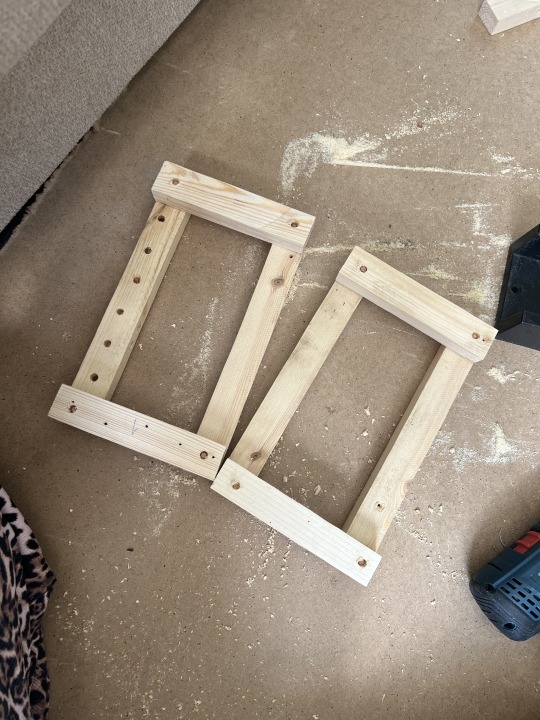
Finished all the rough cuts
Assembled two narrow sides
Cleaned up the chaos — which was honestly the worst part.You can see a time-lapse, but know this: what you see as 5 seconds was 15 minutes of pain for me 😅
P.S. I found some LOTR-themed wax seals! I used the horse one for his birthday, but now I’m eyeing either the Crown of Gondor or a Lothlórien leaf — both would look amazing. Just waiting for payday to order the rest!
Tomorrow I go pick up the horn — fingers crossed it’s still there!
5 notes
·
View notes
Text
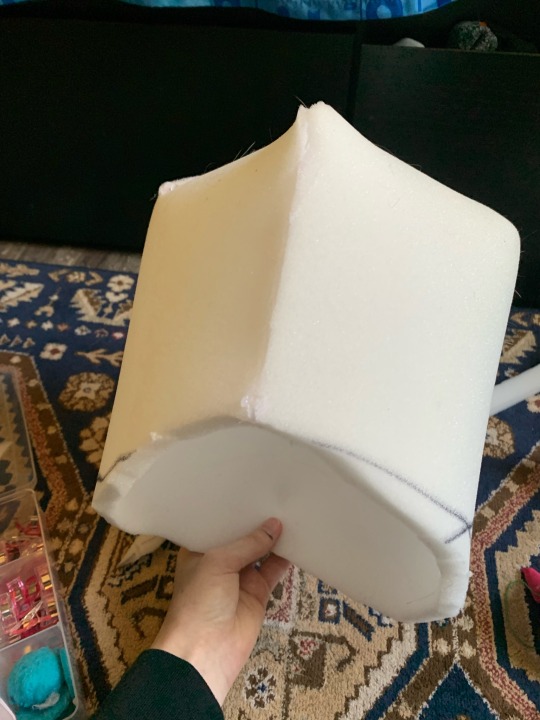
How I do my Bucket heads!!
Hello! This is how I do my bucketheads and after a lot of trail and error this is my favorite method!
—-
Materials needed:
- foam: I use 1.5 inch from Walmart for this specific project
- scissors
- flexible measuring tool
- hot glue gun and hot glue sticks
- sharpie or other marking tool
-optional clips: I used sewing clips to clamp foam while the hot glue cooled down
———
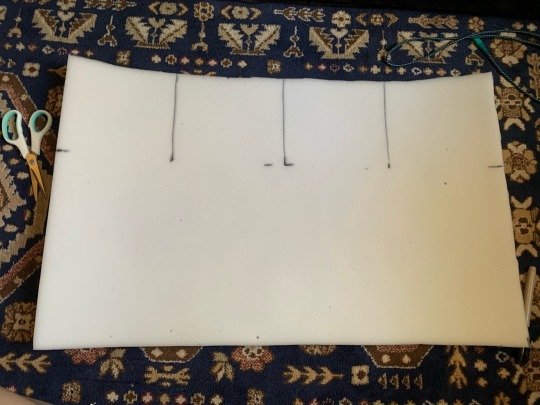
Step 1: cutting out the foam
I measure my head for this step, and I roughly got a 65cm circumference for my head and a 25cm height. For the height I added on extra to make it 40cm so I can cut the triangles to close off the top in the future.
Next I divided the 65 cm by 4 to mark my future triangles. I used all the area above the 25cm mark to add these lines. I then cut these lines after.
—
Step 2: Glueing the Tube
Here I glued to make a tube shape (this is where the head will fit inside). I did not glue the areas I marked off for the triangles, which is any of the space above the 25 cm mark.

—
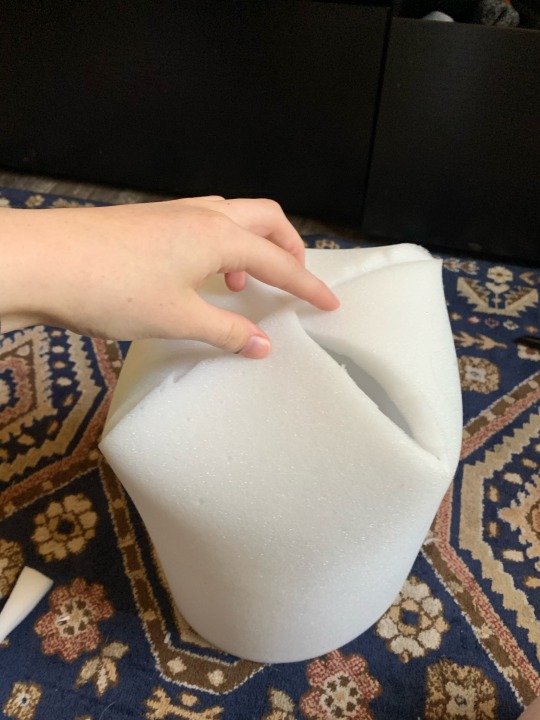
Step 3: Cutting out the Triangles
Next up I cut the pieces dedicated for triangles into actual triangles! This results in the head having this kind of crown shape.

—
Step 4: Modifying and Glueing the triangles
I wanted all the triangle pieces to converge in the middle so I trimmed accordingly. From there I glued all of them in.
—
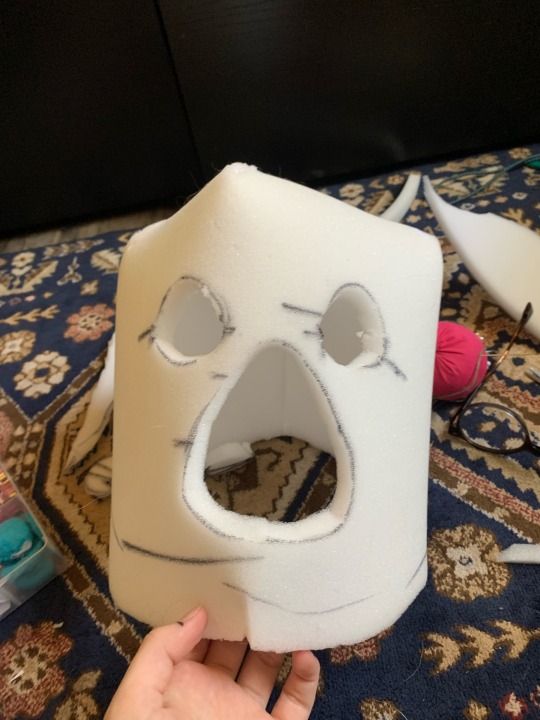
Step 5: marking area for the eyes and trimming to better fit my head
I slipped the buckethead on once the glue had dried and marked my facial features accordingly (nose, eyes, and mouth). I also added a dart below the facial features to better fit on my face.
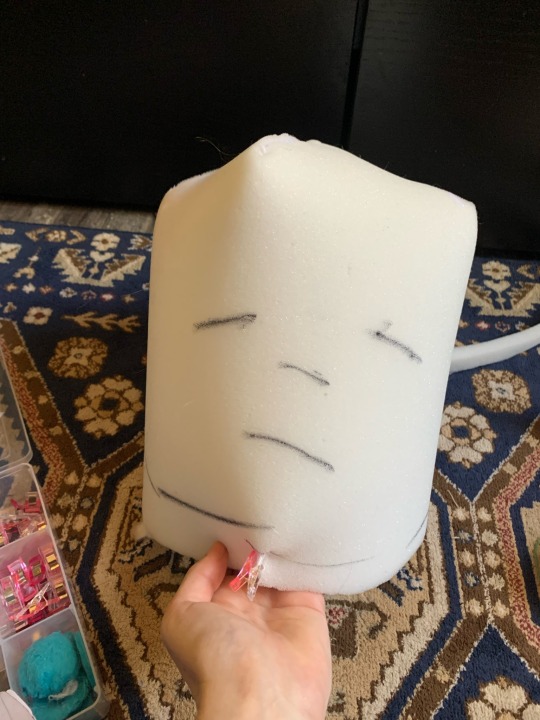
From then I trimmed the bottom of the head itself, in the way shown below. This makes it so I can look up with maximum mobility. (The back of the head is shown in the picture below)
—
Step 6: cutting out the facial features
Using the guides I made from step 4 (and some extra ones I drew in later on) I created a rough area that would allow for me to see and breath.
-
And the bucket head is finished!! This is a very rough tutorial and my first ever one, so I hope it makes sense! Thankyou for viewing :)
9 notes
·
View notes
Text
The awaited shrink plastic earring walkthrough (NOT A TUTORIAL!! DO SOME OF YOUR OWN RESEARCH PLEASE)
Hello hi hello! I've made a few pairs of earrings now, and especially on the Black Book pair I've gotten a few folks asking for instructions on how I did it!
The images are sorted by number so I could fit them all in one post. I am also still very much learning as I have only made a few of these myself, so please do your own experimentation and research to better understand the processes!
Let's get right into it !
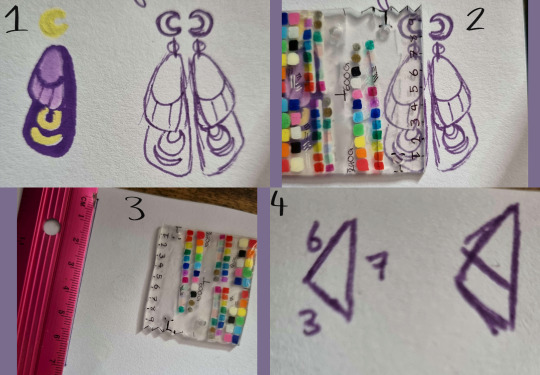
I start by making up the rough idea in the size I would like the finished product. This will be my reference for all measurements.
I then use my shrink ruler (a 10cm by 10cm square with markings, then shrunk for a fairly accurate translation of size) to figure out the rough dimensions of the un-shrunk design.
I use the centimeter measurement to draft the rough size and shape of the design.
Connect the lines together with each measurement.

5. Make the design more fluid/more alike the original design based on the drafted shape.
6. Repeat the same for any extra shapes. The moon circles needed a 2cm diameter.
7. Place the shrink plastic over the design, and trace the rough shape onto it using any form of marker. non-permanent is preferred.
8. Lay out the pieces, and dont forget to flip the designs if applicable.
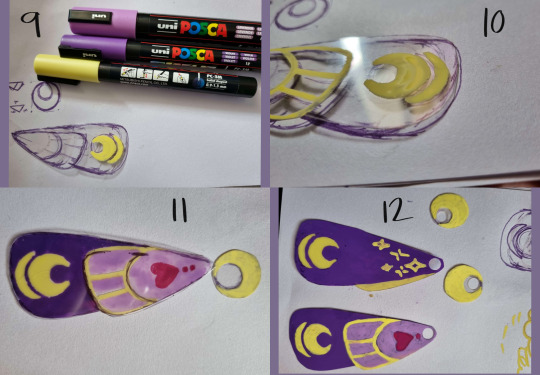
9. Start transferring the design onto the shrink plastic using the markers of your choice. Hold the cut plastic over the template to get accurate markings.
10. Wait for the marker to dry around the edges of the design before doing the next colour. This applies no matter what sort of marker you are using.
11. To get mirrored designs, finish one and flip it over, then use that as the new template.
12. finish the pieces, and add back designs if applicable. Use a hole punch to make space for the jump rings.
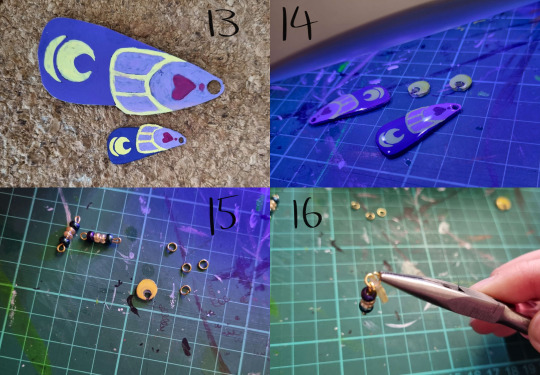
13. Shrinking time! use a heat gun to shrink the plastic according to its attached instructions. Be careful of heating up metal/pliers/tweezers, they get Very Hot Very Quick
14. I use UV resin to set in the design. I use a toothpick to spread the resin, then cure it under the UV light. Refer to individual product instructions for curing time, it varies heavily!
15. Gather and assemble any extra pieces, such as beads, jump rings, earring posts, and base pieces.
16. place two pieces on an opened jump ring, then close it to lock in the positioning. Make sure the pieces are in the right direction!
--Not pictured- Glue the earring posts on the back of the earring. Not applicable with hook earrings

17. do the same for the bottom pieces, once again ensuring they face in the correct direction. Jump rings can be undone, but it weakens the metal to be constantly bent.
18. Display and wear!

And the finished Product!
Once again, do some of your own research, This is mostly just my personal guide for how I make earrings currently! The same logic can be applied to charms.
A few things I have learnt-
Use permanent marker where possible. Paint pens like the ones I have used will shrink unnaturally, and crack on the surface meaning it is even more necessary to seal the design.
Make your own test square- different brands of shrink plastic will shrink differently, at different ratios and sometimes unnaturally. It is also a good opportunity to test how your markers work on the plastic, and which thicknesses are best for fine details.
Don't expect them to turn out the same each time- If you are making multiple of one design, remember that it is by hand and not a perfect manufactured piece. There will always be variations, so go into it with that knowledge.
Use each pair as a learning experience- Now that I've made this design, I know that I would like the wings to be larger by about a centimeter, so I will adjust the template before making a new one. Always learn something new from it!
Feel free to ask any questions, I am more than happy to answer! I do hope to sell some earrings in the future, so keep an eye out for that as well!
REQUESTED TAGS! @im-not-a-l0ser @strangeandinteresting
9 notes
·
View notes
Text
The Ultimate Guide to Choosing the Perfect Cosplay Costume: A Beginner’s Guide

Cosplay is more than just dressing up — it’s a creative expression, a community, and a lifestyle. Whether you're preparing for your first convention or exploring cosplay for fun, choosing the perfect costume can feel overwhelming at first. This guide breaks down everything you need to know, from types of costumes to materials, planning tips, and character ideas.
What Is Cosplay?
Cosplay (short for “costume play”) is the practice of dressing up as a character from anime, manga, movies, TV shows, comics, or video games. It's a global phenomenon where fans recreate characters’ outfits, props, and even personalities. Some cosplayers compete in contests, while others enjoy it casually.
Types of Cosplay Costumes
Understanding the different types of cosplay costumes can help you decide what fits your interests and skill level:
1. Anime and Manga Costumes
Characters from series like Naruto, One Piece, Demon Slayer, and Lelouch Lamperouge Cosplay Costume Choice for Anime outfits.
Great for expressive wigs, colorful accessories, and recognizable uniforms.
2. Video Game Costumes
Popular choices include Zelda, Final Fantasy, Genshin Impact, and League of Legends.
Often involve armor pieces, glowing props, and fantasy elements.
3. Superhero Costumes (Marvel & DC)
Characters like Spider-Man, Black Widow, Thor, or Batman.
Tight-fitting suits, capes, and detailed emblems are typical.
4. LARP and Fantasy Costumes
Based on medieval or fantasy themes — elves, knights, sorcerers.
Perfect for Renaissance fairs, LARP events, and fantasy conventions.
5. Sci-Fi Costumes
From Star Wars, Doctor Who, Stranger Things, and more.
Usually tech-heavy, with helmets, futuristic weapons, or space suits.
How to Choose the Right Character for Your Cosplay
Choosing the right character is crucial for enjoying your cosplay experience. Ask yourself:
Do I love this character?
Is the costume within my budget or skill level?
Is the costume comfortable for long wear?
Does it suit the event (indoor/outdoor, casual/formal)?
It’s okay to cosplay outside your gender, race, or body type — cosplay is for everyone.
DIY vs. Store-Bought Cosplay Costumes
DIY (Do It Yourself)
Pros: Customization, lower cost (sometimes), sense of achievement.
Cons: Time-consuming, requires tools/skills.
Store-Bought
Pros: Convenient, professionally made, great for beginners.
Cons: Can be expensive, less personalized.
Tip: Some cosplayers combine both — buying parts and modifying them to suit their vision.
Cosplay Budgeting: How Much Should You Spend?
Cosplay costs can vary widely. Here's a rough estimate: Type of Costume Estimated Budget Simple School Uniform (anime) $50–$100 Superhero Suit (Marvel/DC) $100–$300 Armor or LARP Costume $150–$500 High-End Custom Design $500+
Always account for accessories, wigs, shoes, and tools if you're making it yourself.
Essential Cosplay Tools for Beginners
If you’re thinking of crafting your costume, here are beginner-friendly tools:
Hot glue gun
Fabric scissors
Sewing machine (or needle/thread)
Heat gun (for shaping foam/Worbla)
X-Acto knife
Measuring tape
Best Places to Find Cosplay Inspiration
Looking for costume ideas? These platforms offer endless character inspiration:
Tumblr: Search hashtags like #cosplay, #animecosplay, or #marvelcosplay.
Pinterest: Boards filled with costumes, makeup, and DIY guides.
Instagram: Follow creators and see their character transformations.
YouTube: Tutorials, cosplay vlogs, and reviews.
Common Mistakes to Avoid in Cosplay
Underestimating time – Start planning weeks (or months) ahead of your event.
Ignoring comfort – Choose breathable fabrics and comfy shoes.
Skipping makeup/wigs – These complete the look and add realism.
Overcomplicating your first cosplay – Start simple, build your skills gradually.
Frequently Asked Questions (FAQs)
Q: Do I have to make my own costume to be a “real” cosplayer?
A: Absolutely not! Cosplay is about creativity and fun. Whether you buy or make your costume, you're a cosplayer.
Q: Where can I wear my cosplay costume?
A: Comic conventions, anime expos, Halloween events, LARP gatherings, photoshoots, or just for fun at home.
Q: How do I take good cosplay photos?
A: Use natural lighting, clear backgrounds, and learn a few character poses. Many smartphones today take excellent photos.
Final Thoughts
Cosplay is a rewarding hobby where creativity and fandom meet. Whether you're stepping into the shoes of a superhero or channeling your favorite anime protagonist, the key is to enjoy the journey. With the right planning, resources, and passion, your perfect costume is totally achievable — even as a beginner.
#cosplay costume#cosplay ideas#anime costume#marvel costume ideas#marvel costume#diy cosplay#tumblr cosplay blog#cosplayguide2025#cosplayresources#cosplaycommunity
0 notes
Text
youtube
Lan Lam: Restaurant Style Salad | American Test Kitchen
Tastiest croutons: Soak cubed rustic bread in water, squeeze to ensure insides get some, then sprinkle with salt, and pan fry with olive oil & garlic & Parmesan
Candied nuts: Egg whites, brown sugar, butter, two spices of choice, whip together & pour over pecans/almonds/walnuts, then bake 350C until nuts are browned, stirring half-way cooking, cool & rough chop, store for a week or use right away
Crispy Vegg: Shaving vegg in mandoline + cover with ice & water, leave in the fridge for at least 2hrs, water fills cells making them super crisp; when ready to use, spin dry then they are ready to use.
Flavour Greens: Toss baby arugula [leafy greens] with lemon juice, olive oil, and salt; then shave Pecorino cheese over top, microplane some lemon zest over & some cracked pepper, serve immediately
Tip: Drizzle emulsified dressing or spread thicker dressing on bottom of salad bowl, then use hands to toss salad but for thicker dressing be sure to use fingers to rub dressing about vegg [to not bruise vegg]
Emulsified Vinaigrette: In mason jar add salt, mayo, mustard, molasses, vinegar [shake], add olive oil [only add vegetable oil to prevent separation in fridge, if making day ahead]
Consider types of vegg/dressing & adding textures for well rounded salad; ATK has courses available on apps; really enjoyed the explanation behind each ingredient. I just made the worst salad tonight so some of these tips would have been handy to know. Whoops didn't check online for what was posted for the day first.
youtube
Adam Witt: Dumpling with Poppy Seeds
what happened to your spiel about how using sheep intestine casing gives the hot dog a classic pop, all that hard work went nada when you blitzed them in the food processor. Also I forgot hot dogs count as a sandwich, really good tutorial on Chicago dawg. I have a bunch of poppy seeds that need using up too! Mustard swirl :P
youtube
A guy gets a job at a fruit stand
His first ever customer walks up to him and asks "how much is a pound of apples?" "I don't know." says the guy "let me call my manager." He calls the manager and the manager says "Your supposed to say '25 cents, sir.'"
When the guy gets off the phone he sees the first customer has already left, but another customer is there. The second customer asks "how much for a pound of apples?" and the cashier replies "25 cents, sir." "Are they fresh?" he asks. "I don't know. Let me call my manager" the cashier says again. The manager tells him the correct response is "Yes! very fresh."
The second customer is also gone by the time the phone call is finished, but a third one shows up. The third customer asks "How much would it cost for a pound of apples?" "25 cents, sir" says the worker. " "Are they fresh?" asks the customer. "Yes! very fresh," says the worker. "Should I buy them?" asks the customer. "I don't know. Let me ask my manager." says the worker. The manager is angry now and explains very slowly "Just say '25 cents sir' 'Yes very fresh' and 'if you don't somebody else will'."
The vendor finds this easy enough and is confident now. A burglar comes up to the stand with a gun and says "GIVE ME ALL THE MONEY!" The vendor calmly replies "25 cents, sir." "ARE YOU BEING FRESH WITH ME?" screams the burglar. "Yes very fresh" says the vendor. "DO YOU WANT ME TO SHOOT YOU RIGHT NOW?" yells the burglar. "If you don't then somebody else will"
#American Test Kitchen#recipe#salad#tips#vegg#eat your veggies#homemade#croutons#candied nuts#crispy vegg#vinaigrette#dressing#dumpling#Adam Witt#tortellini#American Cuisine#Italian Cuisine#Chinese Cuisine#sauces#joke#yes yes very fresh
0 notes
Text
Adding Tape to SMG
I had some feedback saying to add some tape for some wear and tear so I researched into how to add tape in Substance Painter.
youtube
ArtStation - Duct Tape Smart Material | Tutorials

At the 39 minute mark, this person shows how they create tape.
youtube
I decided to use the free smart material and make it how I want.

Laying out the tape how I want it, experimenting with the colours.

The height details of the handle were showing through the tape so I researched way to stop this.
https://www.reddit.com/r/Substance3D/comments/17skn8o/please_help_how_can_i_override_height_detail_of/
youtube
youtube
Researching how tape on guns looks. Turns out that there is specific tape to help add grip, which was more of a fabric material.
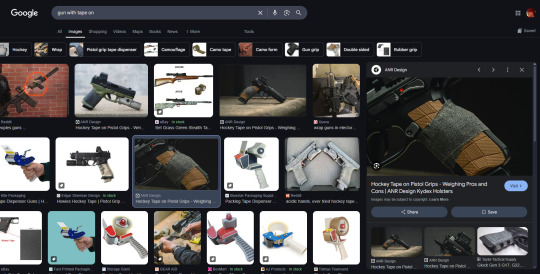
So I added a roughness and a height with a fabric pattern and trialed different colours.
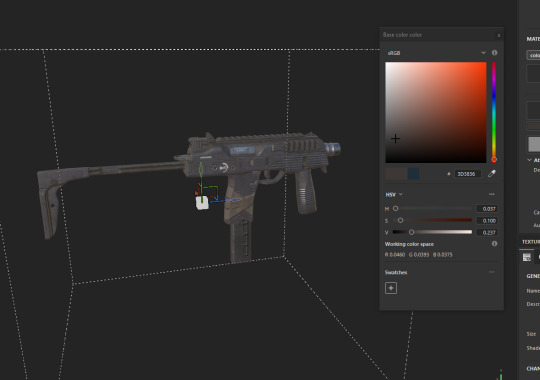
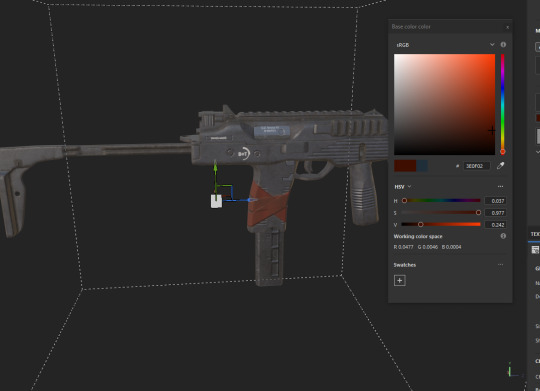
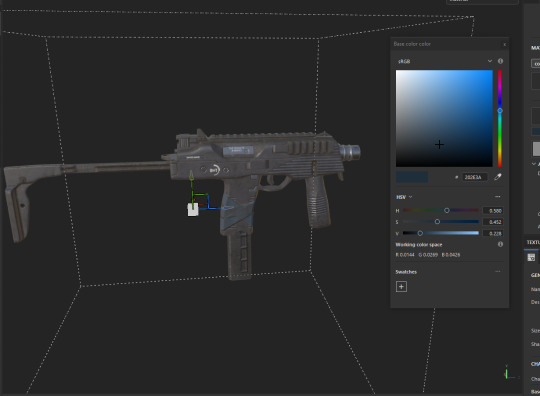

My favourite out of these are the beige and blue, however I want there to be a bit of colour so I am going to go with the blue. Unfortunately, the fabric texture I applied only goes one way, which doesn't look quite correct since the pieces of fabric are angled different ways. It isn't that noticeable, so I am going to move on.
0 notes
Text
Oceanhorn 2: Knights of the Lost Realm Review (PlayStation 5)

For this Oceanhorn 2: Knights of the Lost Realm Review. we play the sequel to the critically acclaimed action adventure. Experience a gorgeous new third-person 3D view and embark on an epic journey that unfolds the mysteries of what happened 1000 years ago.
Oceanhorn 2: Knights of the Lost Realm Review Pros:
- Beautiful graphics. - 2.77GB download size. - Platinum trophy. - 3 save slots along with a save backup system. - Ui scale slider. - Challenges act as the game's own in-game achievements and give rewards for completing them. - Action adventure gameplay. - Cutscenes are a mix of cutscenes and in-game sequences. - A full 3D world with full 360-degree camera control. - Fast loading time. - Has a strong Zelda vibe. - Cheerful upbeat soundtrack. - Bloodstone - hidden collectible. - Collect material drops and they then unlock and become accessible potions like health. - A caster gun allows you to shoot enemies from a distance. - Hack and slash combat. - Cut down shrubs, and bushes and smash crates, etc for drops. - Enemies drop exp crystals. - The map fills in as you play. - Search spots can be dug up for loot/materials. - Progress bars for crafting/challenges/missions pop up as you build it up. - Tutorial sign posts are scattered around the world but the core controls show on the screen. - Stamina system in place for swimming/climbing/running etc. - Can Invert the camera axis. - New dungeons/encounters will trigger a flyover of said place. - Play how you want. - Auto saves regularly. - Loot chests to find. - Running playtime clock on the menu. - Find heart shards to increase your health bar. - All enemies require different strategies to take out. - Earn EXP and level up to get rewards and your health topped back up. - Handy retreat button to travel back to the last save point. - Open world game with full control left to you. - Travel the world on your boat. - Missions come in both sides optional ones and the main progress is the story ones. - Get special shards that attach to weapons that make them stronger. - With your shield, you can deflect attacks but also use stamina and the shield to move certain objects. - Vending machines are where you can get some resources and upgrades. - Big boss encounters. - Unlock and use fast travel points. - You can recruit and have party members with you who act independently at times but you can give commands. Oceanhorn 2: Knights of the Lost Realm Review Cons: - The controls are a bit loose, not being able to toggle run or having a jump button or lock on makes it all a bit more tedious than simple tasks need to be. - Combat takes some getting used to. - Dropping down on ledges is a rough camera cut. - Sometimes it just feels like a Zelda game but with checklists. - Cannot drop down vines or climb them faster. - When you level up regardless of what's going on the camera turns to face you and stays there for a few seconds. - The leveling up feels redundant. - Mission/quest management is a nightmare, as you cannot mark/unmark missions, all side missions are one icon color regardless of how many you have. - Cannot place your own waypoints. - Sharp difficulty spikes. - The combat is very mashy. - Can be hard to know where to go or what's important. - Beautiful locations to explore. Related Post: Detective Archives Rain Code Review (Nintendo Switch OLED) Official website. Developer: Cornfox & Brothers Ltd. Publisher: fdg-entertainment.com Store Links - PlayStation Read the full article
0 notes
Text
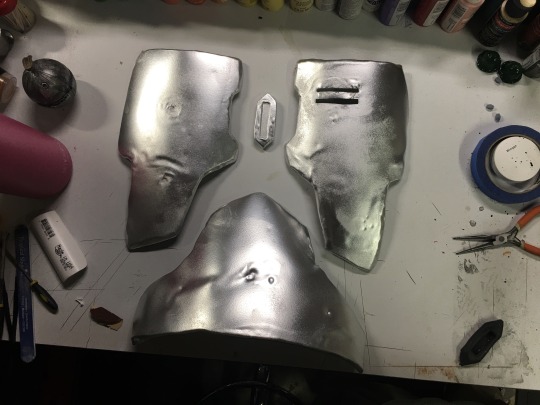
Boba Fett Armor (Take 2)
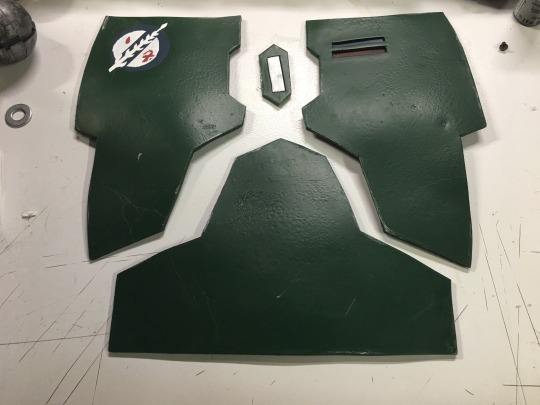
It occurs to me that I haven't posted any updates on my Boba Fett cosplay since I made that original post about 6 months ago. I did actually finish these pieces for the chest armor, along with several more parts of the costume (including the helmet!)
While I was satisfied with how the armor came out, it could be better. EVA foam is flimsy, it's difficult to get it to keep its shape, and if you're not careful with it it can bend and get creases where the metal it's meant to visually imitate should never have creases.
On top of those material issues, the shapes I cut are...too perfect. Seriously, the one time I manage to get super clean cuts is when I actually don't want them. Boba Fett's armor should have worn and rounded edges, not this clean sharpness! It's been around the galaxy more than a few times.
ANYWAY. I heard about this "Worbla" stuff, and thought it sounded like a really interesting material to learn to work with. So I got myself a big ol' roll of the stuff and got to work.
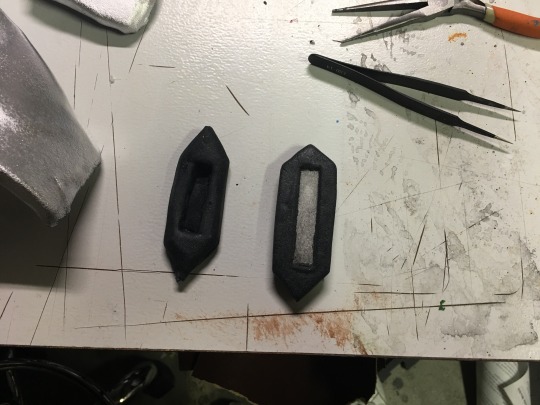
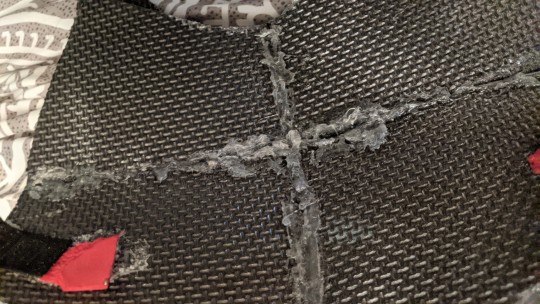
I started with the small center diamond piece to get an idea of how to shape the Worbla. Most tutorials I found about the basics recommend shaping it around EVA foam pieces. My first attempt came out kinda wonky, as expected, and I tried a few different things with the second one.
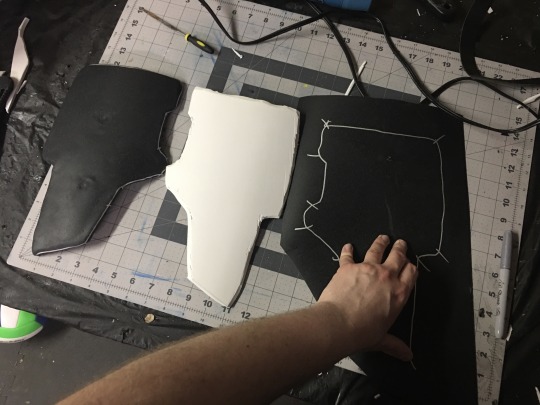
So yeah! The idea is you cut out a piece of EVA foam in the shape you want. (Basically step one as if you were just making the armor out of foam.) Then you want to cut that same shape out of Worbla, but leave a good inch or so around the pattern, and cut notches into the corners because you're going to wrap this weird plastic around the foam cutout. After blasting it with a heat gun of course.
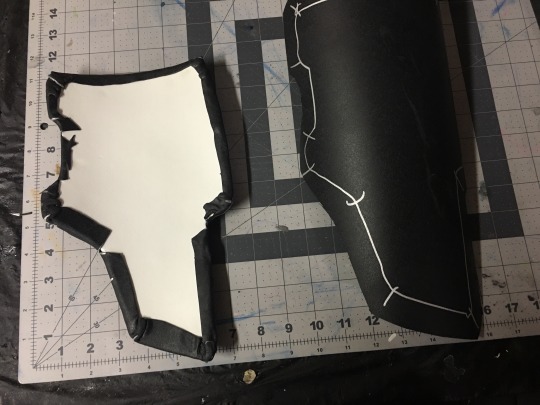
Of course, you *could* just make an entire piece out of Worbla, but doing this with the foam gives it some thickness and structure. The Worbla holds its shape perfectly once it cools down from being heated, and if it doesn't come out right you can just heat it up again and fiddle with it until it works. Weird stuff, but I love it already.
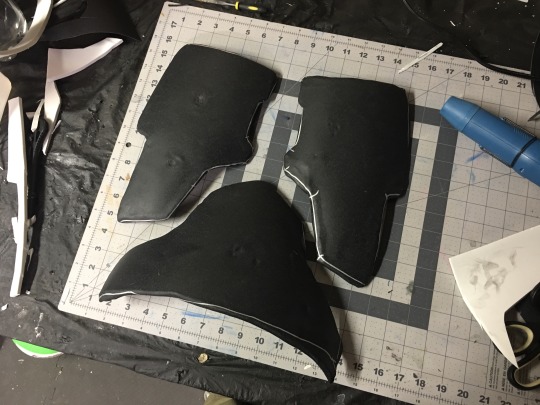
I had to stop myself from going overboard with dents and dings because of how easy and fun they are to do.
One of the OTHER cool things about Worbla is you don't really need to Plasti-Dip it before painting. (Unless you want a SUPER smooth finish, I guess, but the slight roughness of the material works perfectly for beat up metal.)
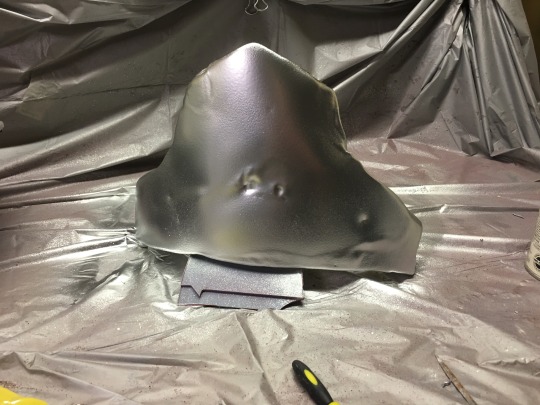
Full coat of shiny silver. Let it dry completely.
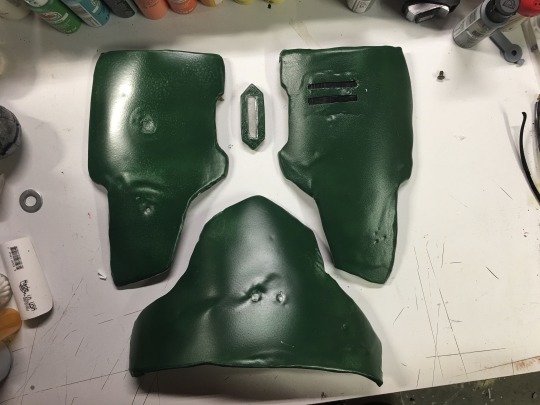
Then green. Let it *mostly* dry, then rough up the edges with some sandpaper until the silver underneath shows through. A slightly tedious extra step I have to follow is to spray it with a matte finish because the only green paint I could get was super glossy, so the matte finish just makes it less obnoxiously shiny. I've since used up the can I used on the original armor pieces, and this new stuff doesn't work quite as well, so these are still a good bit shinier than I would like, but it did get that same sort of crackly texture in some parts that I kind of like, so...eh.
NOW. Since I am now a master of wiring LEDs, having completed exactly one somewhat janky project, I wanted to actually make the little panels on the left chest piece instead of just painting in the cutouts. Unfortunately, I don't know how to program a number display thingamahoozit. Fortunately, I DO know how to model and 3D print things...
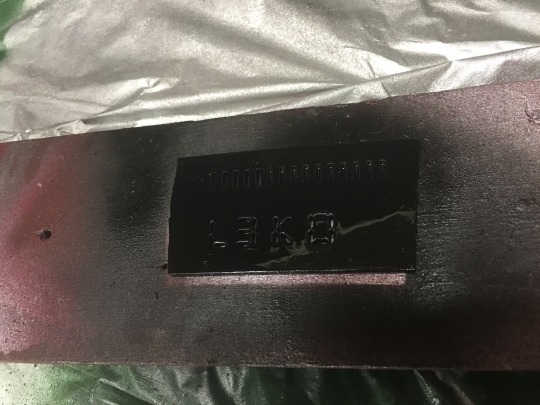
Nailed it.

Aaaaand...following the same idea as the first set, except only the left piece is held on by velcro so I can get to the switch and battery for the lights. Everything else is glued to the shirt, which has foam cutouts glued inside for support. Really, given the sturdier nature of the Worbla, this may not have actually been necessary, but it seemed like a good idea, so I did it anyway. Not like it can hurt anything.
Now I just need to redo the shoulder pieces. I was planning on just reusing the originals because they came out perfectly fine, but the paint just completely cracked all over when I bent them slightly, so...yeah...
8 notes
·
View notes
Note
Hi could you do 14. touch on a bruise for brio please?
ahhh thanks for sending this one in!! have some post-s3 angst, hahaha. :)
(also on ao3)
.
The next time she sees him, he’s bleeding.
Okay, maybe not actively, but the jagged line of stitches etched above his ear looks like it’s seconds away from ripping open. Beth takes in the nasty bruise blooming along his jawline, the cut splitting his bottom lip.
“Um,” she says.
Rio smirks. “What’s up?”
“I—” she sputters, because he’s just standing there with that stupid, smug expression, like it’s the most normal thing in the world to drop by the showroom after hours looking like—that. “You—what happened?”
“Not your division, darlin’.”
He says it lightly enough, but Beth reads the undercurrent of warning in his voice like a neon sign. He wants her to drop it.
Well. She’s not feeling very incentivized to give him what he wants at the moment.
“It is when you bring that”—she pointedly eyes the stitches—“into my showroom. Those look awful, by the way. Did he do them?” She juts her chin toward Mick, who’s lurking in the doorway.
The two men share a look, and Mick folds his arms across his chest. “Maybe I did,” he grumbles. “YouTube’s got tutorials for everythin’.”
Beth glances between them both. She’s about to open her mouth—to say what, she has absolutely no idea—when Mick snorts, shaking his head at the same time that Rio’s mouth twists into a grin.
“Nah,” Rio says, still smiling as he casts a glance back at Mick. “Nah, he didn’t. Your concern’s duly noted, though.”
Mick makes another sound in his throat that he quickly covers by turning it into a cough. Beth’s face flames, but she draws herself up and meets Rio’s gaze head-on. Let him try to get a rise out of her—she knows better than to take that bait.
“Fine. What can I do for you, boss?” she says, spitting out that last word like it’s acid.
Rio’s eyes fall to the floor, but Beth can still see the ghost of a grin lingering at the corners of his mouth, like he knows he got under her skin. Like he’s won. For one furious second, she imagines how hard she’d have to hit him to split his lip, leave a bruise. She imagines hurting him and liking it.
But she doesn’t really have to, does she? Beth still remembers the weight of his gun in her hand, how the recoil from pumping the trigger once, twice, three times made her hand ache for days afterwards. She remembers him choking on his own blood, the sound of it filling up the loft—
No. No, she hadn’t liked any part of that. It’s a catch twenty-two; she hates him, she wants him dead, gone and out of her life, his name crossed out in permanent ink, but then—sometimes she doesn’t. It’s the not-knowing that keeps her circling the drain, pushing that damn boulder up the hill only to watch it come crashing down again and again.
She thinks she might hate that even more than she hates him.
Beth blinks, coming back to the office. Mick’s staring her down like a hawk, but Rio’s gaze is more appraising, head tilted to the side in a gesture that’s so familiar, so him, it makes her stomach flip.
“Just here for my cut,” he says, as nonchalant as if they’re discussing the weather. She hears the unspoken words as clearly as the night he said them—you, me, we. It’s just business.
Beth holds his gaze a second longer, then tugs a black duffel out from under her desk. She hands it off, dropping the straps like they burned her to avoid brushing her hand against his when he takes it from her. If he notices, he doesn’t show it.
“What, no mama bag this time?” he says, then presses his lips together like he’s trying not to grin.
Beth glares at Mick, who just shrugs. She snaps her eyes back to Rio, barely managing to unclench her teeth before asking, “Anything else?”
“Yeah, Mick’s gonna check the books.”
Of course he is. Beth isn’t exactly shocked, but it still feels like a slap on the wrist, another reminder that there’s a hierarchy and she’s the furthest thing from sitting on top. Even this, the operation she pieced together herself, the system she built on equal parts desperation and determination—even this isn’t hers.
You wanna be the king, you gotta kill the king.
Yeah, she tried that. Technically she’s still trying, but she shoves that thought down deep and ignores the twinge in her chest.
Rio’s already turning to go, slinging the duffel over his shoulder. “Next week, yeah?”
Maybe it’s the way he says it, like he’s glad he can pawn her off on someone else because he has better things to do with his time, or maybe the stress and exhaustion from these past few months are finally cracking her foundation—the reason doesn’t really matter. Beth can’t—won’t—let him have the last word.
“You should really get those stitches looked at,” she says.
He pauses, then looks back at her. In the low light, his eyes almost look black.
“I’ve had worse,” he says, and the words hang between them for a moment, heavy as a loaded gun.
Beth swallows. “Still. They could get infected.”
Something slides across Rio’s face, sharp and predatory. It’s the look he gets when he sees an opportunity, and Beth feels her stomach drop.
“Yeah?” he says, turning around so that he’s facing her again. He drops the duffel, and Beth can’t help flinching at the thud it makes when it hits the floor. “Sounds like you’re volunteerin’.”
“No, that’s not—”
But he’s moving, sliding into the chair on the opposite side of her desk. Beth’s eyes dart to Mick, but he just arches an eyebrow, not even bothering to look up from the list of sales projections he’s been checking.
Rio leans back in his seat. “A’ight, doc, fix me up.”
Beth stays where she is. The irritation that’s been bubbling just beneath the surface ever since he walked through the door is reaching its boiling point, but there’s something else humming under her skin, crackling like a live wire. He can leave whenever he wants—he was halfway out the door a second ago—but instead he chose to stay.
They’re circling the same drain, each of them waiting to see who will get sucked under first.
“I’ll—get the first aid kit,” Beth says, stepping around the desk only to be stopped in her tracks by Mick, who clears his throat audibly and pulls his jacket back to reveal the Glock tucked against his side.
Beth resists the urge to roll her eyes. “Really? You think I’m stupid enough to try something with both of you here?”
Rio doesn’t answer, just fixes her with an amused look.
“Fine,” Beth snaps, taking a step back. She nods at Mick, tips her head in the direction of the door. “It’s in the bathroom across the hall.”
Mick gives her a two-fingered salute and ducks out of the room, and then it’s just her and Rio.
He’s still—watching her. He looks relaxed enough, legs spread a bit and his hands clasped loosely in front of him, and if Beth didn’t know better, she’d say the expression on his face is almost neutral. But she does know better. His eyes are what give him away, flashing with the same electricity that’s thrumming behind her sternum. He’s waiting for her to make a move. She knows, because she’s doing the same thing.
God, she hates how much she likes this.
She barely registers Mick coming back—it’s only when he tosses the first aid kit onto the desk that she jumps, startled back to herself.
“Thanks,” she says, injecting as much sarcasm as she can into the word.
Mick’s mouth twitches, but he goes straight back to the books, sinking into a chair in the far corner of the office. Beth rolls her own chair around the side of the desk, lowers herself slowly into a seated position beside Rio. This close, she can see each individual color in the whorl-patterned bruise that stretches up toward the hollow of his cheek. She lets her eyes drag across it, then up his temple. The stitches look—well, not great. It’s clear they were done hastily, probably to prevent as much blood loss as possible, but the wound is seeping.
“Damn, that bad, huh?” Rio asks, reading it on her face.
Beth stares down at the kit in front of her. Her first aid knowledge extends about as far as patching up a skinned knees and Benadryl for minor allergic reactions—removing possibly-infected stitches from her crime boss’ head isn’t even in the same zip code.
“I don’t—I don’t know what you want me to do,” she says, abruptly exhausted.
Rio adopts an expression of mock concern that does nothing to ease Beth’s urge to slap him. “Oh, no?” he says. “What part’s trippin’ you up?”
Beth shuts her eyes for a second, briefly wonders why the hell she didn’t let him waltz out of here when she had the chance—except she knows why, and so does he, and when she looks again—
He’s practically beaming, that smug tilt at the corners of his mouth dialed up about a thousand percent, and it’s like a puzzle piece slotting into place. This is just another game—he’s messing with her, playing with his food before eating it.
The low buzz of electricity inside her ignites.
He’s not the only one who’s hungry.
“No, you’re right,” she says, popping open the first aid kit and digging around until she finds the antiseptic wipes. “I should at least clean those stitches up. Maybe even remove them, start fresh.”
She glances up, and that’s the only reason that she sees him falter, a blink-and-miss-it record-scratch behind his eyes before he recovers, slides the mask back on. Satisfaction floods through her. She can play his game.
“Whatever’s good, ma,” he says with a shrug. “You’re the boss, yeah?” He echoes her earlier emphasis on the word, grinning when he sees the barb land. “Shit, that’s my bad—poor choice o’ words.”
Beth rips open a wipe. “This might sting,” she says, pressing against his line of stitches, hard. She’s rewarded with him hissing a breath through his teeth, the hand at his knee balling into a fist.
“Easy, mama,” he grits out.
Beth flashes him her sweetest smile. “I’m sorry, is that too rough? I thought you liked that.”
Mick makes a noise like he’s choking, and Rio looks over, eyes bright with amusement. “Ay, cállate la boca.”
“Didn’t say nothin’,” Mick mumbles, still staring intently at the books.
Beth presses her tongue behind her teeth, swallowing a pinch of annoyance as she switches tactics. “Aren’t crime lords supposed to have, I don’t know, some sort of medical professional on retainer? For situations like this?”
“Nah,” Rio says with a shake of his head. “Why, you gunnin’ for a promotion? ‘Cause I gotta say, your bedside manner could use some work.”
And something inside her roars, because this is how she’s going to get him. She dabs gently at the wound beneath his stitches, swiping a thumb over the sutures. Rio winces, jerks back—
She sees it, the moment he drops the mask.
Beth leans forward. She brings the antiseptic up to his face again, stops just short of pressing it to his skin, as if to ask, okay?
She sees it, the moment he drops the mask.
Beth starts at his temple, softly scrubbing at the caked-on blood that’s streaked down from the cut above his ear. Her hand moves lower, fingers gliding over his cheekbones, and she’s not sure if she imagines his breath hitching when she reaches the bruise at his jaw. She drags her thumb across it, then back again. His skin is warm, under the pads of her fingers.
“How am I doing now?” she breathes, barely above a whisper, and she knows she doesn’t imagine him dipping a glance down to her mouth. Their faces are inches apart, close enough for her to count the shades of brown in his eyes. Her fingers trace lower, toward the curve of his lips—
His hand comes up to grasp her wrist, tug it away from his face. “Don’t,” he growls, low like thunder. A warning. “Don’t do that, Elizabeth.”
He’s looking at her again, but she almost doesn’t recognize the emotion swimming in his eyes. He’s—terrified. Of her. For a fleeting second she lets the thrill of it run through her, buoyant on the feeling of power, the feeling that she’s won—
(—she did it, she shot him, she’s free—)
The moment pops like a soap bubble, and she’s empty, hollow, everything good inside of her scooped away until this is what’s left. This is who she is. And maybe this game they’re playing was never meant to have a winner.
The realization leaves her numb.
She’s vaguely aware of Mick slipping the books back onto her desk, and when her eyes flick back up to Rio, his mask is firmly back in place. Steel, untouchable.
“I’m all better now, thanks,” he says, and then he’s pulling away, pushing up from the desk, slipping out the door. She watches his silhouette until it dissolves into shadow.
She’s alone.
77 notes
·
View notes
Note
I've really been trying hard to get a Kris cosplay together for a con that's coming up. But I'm stuck on the armor, How do you make your armor and such? As I've seen it and absolutely love the design and style of it. Love your cosplays btw :))
Heya! Thank you ;A;
My armor was mostly made from cheap EVA puzzle piece floor mats! :D Everything was pretty much drawing out rough patterns, transferring them to foam, using a heat gun to warp the foam to shape, sealing with plastidip, and painting but the hardest part was the chest piece. I basically doodled a heartish shaped breast plate on paper while holding it against me, tidied up the pattern and then transferred it to the foam. To get the front of the breastplate to come to a point on the chest I cut v shaped divots on the inside of the foam to a + design and filled them with hot glue! (That made the edges raised and the chestplate itself more fitted)
I Permanently attached the shoulder guard/strap armor to the front and back pieces and then used elastic on the sides of my torso to make so that I just pull the armor over my head!
(Exposing myself with how horrid my armor always looks on the inside but this one was particularly bad since I tried to knock it out in a couple of days xD)
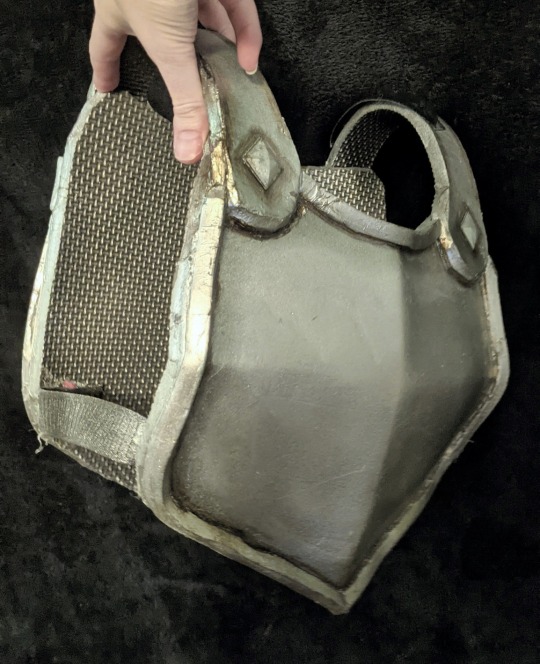
I also used cheap gems to make my diamond rivets and the strips that come off the floor mats to make my edging!
She's been rotting in a box for like 3 years so she's not in the best shape 🥲 if I ever remake the armor I'll be sure to make a real tutorial!
The pauldron was a free thingiverse pauldron I modified and 3D printed but it could also be made with foam, I was just crunched for time xD
I hope this helped!
10 notes
·
View notes