#about it. to improve my workflow
Explore tagged Tumblr posts
Visit Tumblr Blog
Explore Tumblr blogs with no restrictions, modern design and the best experience.
Last Seen Tumblr Blogs


Fun Fact
In Q3 of 2020, 31% of US users access the Tumblr app daily.
Text
the problem with improving w/ my music while not releasing tracks that i was working on prior is i come back to those previous tracks and want to start them over cause i have no fucking clue what my thought process was before and i don't know how to like. "fix" them lol
#i think what i want to work on at the very least night now is getting to know handy tips and tricks for Studio One and all i need to know -#about it. to improve my workflow#i also should make workflow 'rules' for myself so i don't run into the problem of 'what the fuck is going on in this project'
2 notes
·
View notes
Text
do you ever look at someone who ostensibly has the same job at you, and see what they’re obsessing over and prioritizing, and be like “we have got to be from different worlds for you to care this much about this”
#kit talks#like??? surely you’re too busy for this. i KNOW you have more important shit going on#why do you CARE where a clinic - a clinic that isn’t your responsibility! - saves certain document types in charts#last week it was people free texting their name to confirm they did something when the history shows a log of it anyway#like i do get why she is concerned on these things. i get it! our jobs are to improve workflows and streamline everything#but GOD some of the things this woman picks to care about are so utterly inconsequential#i cannot imagine having enough time in my day to stress over this shit
1 note
·
View note
Text

As I type this, I am in progress on recovering from joints inflammation. While I am doing much better by now (comparing being capable to write 2-3 sentences by hand to completing an artwork in one day? Yeah), it made me think about how I work on my art and how many unnecessary steps/habits I have in my workflow. I don’t know how to improve it yet, so I guess I have a lot of experimenting ahead of myself.
I’ve talked about it with my friends a lot and from here I’d love to thank everyone again for having patience with me and let me talk things through. I appreciate every single one of you in my life.
#my art#digital art#fanart#fan art#digital painting#my art 2025#ao no exorcist#aoex#aoex fanart#rin okumura fanart#rin okumura#rin blue exorcist#blue exorcist
177 notes
·
View notes
Text
one of my hotter takes is I don't actually think you can make a lot of workplaces "neurodivergent friendly"
I follow a few LinkedIn people who try to train workplaces and managers to be more 'inclusive' of neurodivergence. and while I think that's an admirable goal, I don't think it can be achieved without RADICALLY changing how workplaces operate on a fundamental level. and I just don't see that as a realistic prospect
a lot of inclusivity training around gender/ sexuality/ race/ ethnicity/ religion/etc CAN actually be helpful because it is mostly teaching people how not to say and do offensive things in a work context (typically independent of the actual work that is being done 98% of the time).
to make workplaces neurodivergent inclusive, you'd have to retrain EVERYONE on ALL basic communication. How they talk to one another, how they write emails and slack messages (the content, the number of them, the timing), how they conduct meetings, etc. you'd also have to completely change a lot of workflows. you'd have to level a lot of your basic processes and norms, and re-start FROM SCRATCH. and you'd have to significantly alter habits of MOST of the employees to do this.
it's a whole other level/degree of change. and most employers simply are not going to take on that level of radical change.
I think advocates for neurodivergent inclusivity have to think more broadly about how to address the this issue, rather than acting like it can be addressed through simple inclusivity seminars. you might be able to make some very marginal improvements like that. but you aren't going to address the FUNDAMENTAL issue that way. labor and communication norms would have to be revised on a societal level for it to actually have substantial impact
221 notes
·
View notes
Note
I'm realizing that there's a part of me that never really internalized the. Um. Principle of art? Idk what to call it–Why art doesn't have to be skillful, or maybe, more specifically, why a person should not just give up if their work is not perfect, why a person's work should be worth anything if it's not "good" especially if they aren't willing to break their backs to improve. Whenever I see people who talk about art like that what I've always done is keep it in mind,bit inside I've always just wished I understood how what their saying is true. If it's true.
So when someone says "AI Art has no soul" for a fraction of a second I think "this sounds like baloney, what does that mean?" Before I remember myself and think "oh huh, yeah, I've seen people talk about how AI really just isn't as advanced or capable of the profit that all the company's and investors think it is, and there are doubtlessly things a veteran artist can do that these programs can't pull off, even if I'm not skilled enough to know what those are yet." And therefore when I come across people online talking about, say, the glaring limitations of LLMs that are now a headache because of how many people blindingly trust them to do their writing for them, that always makes more sense to me than people who talk about "AI art having no soul" and such. And I suspect a big part of it is some sort of insecurity of mine
Because I didn't realize that this is how I felt (I thought I was just mostly, in every part of me, Anti AI, like ‘fuck that noise’ y'know?) Until it came to bite me in the ass. A woman who's like my sister though we aren't related, is letting me live in her house as I try to get my bearings and handle on life after deciding to push my last year of college back a year, and she's like, a capable adult with experience in the job market and some industries so I trust her when she says "you know you're going to have to focus on developing your painting and traditional art skills, since with the Advent of AI Art, no one wants to pay for that service anymore." Because that makes sense. Artists in my country, as far as my college goes anyway, are embracing and trying to figure out how to integrate AI into their workflow so as not to be taken over by it. So the market has definitely changed, I've not really met another artist here who has any profoundly negative views of AI art, definitely customers are for the most part the same. For some job security, I better get a handle on the form of art that can't be replicated well by AI.
And yet I feel horrible. Because now I fear it's going to be a thing where any digital.art I may end up doing in this house will be looked upon disapprovingly. Because I'm not as good in traditional painting and I should be focusing on that, there's no need to be putting so much of my energy into digital art like this because it's no longer going to bring me money. All the personal projects I'm doing, my animatics, my oc character sheets are as they have always been, a waste of time or the thing I tend to focus on rather than my school work art. It doesn't matter that I've realized I kind of hate painting, I still prefer it to every other section of art I could have chosen to specialize in (digital art is under graphic design and I hate graphic design and Photoshop/Adobe/coreldraw etc.) And all of that is bumming me out because my main drive for art seems to be in my personal art despite it getting in the way of school work. And I can't stand the thought that it's not worth anything, that I should take a break from it, that AI art is better at it than me therefore there's no point to it. But what else am I supposed to do when I'm not entirely sure how much of all.that is false? And it's become apparent my entire philosophy of art is on shaky ground.
I just want to know and understand the truth so I can stop feeling this way. I'm sorry for the long ask I'm just really conflicted
--
I'm honestly confused about what your philosophy of art even is.
The vibes I'm getting off of this ask are 1. depression/anxiety and 2. extremely black-and-white thinking.
There is no single Truth™ in art, though there are strong tendencies. AI art sucks for some ethical reasons, regardless of whether the art is pleasing to the eye. AI art also sucks because the way it is programmed leads it to default to one style of human face unless explicitly told not to. "AI has no souuuuul" is silly nonsense. Plenty of boring art by humans also feels soulless.
The actual issue is that "Draw a hot girl" elicits lots of different responses from human artists. AI goes straight for AI Face. There has been drama and much hilarity about shitty book covers where what was supposed to be this individual character has ended up with AI Face in a really visible way. AI also suuuuucks at drawing hands or having little details correct. (Like... even more than human artists already suck at hands, which lbr, is a lot.) AI is objectively bad at art in a bunch of formal ways. It may get better over time, and the least discerning type of customer does not notice, but it does, in fact, suck at its job.
AI art is preferred because it is cheap.
This is the same principle as moving factory jobs from country to country looking for the lowest paid labor.
If you want to make money on art, you have to find something that cannot be done elsewhere and for less. For many people, this means building a cult of personality around themselves so that they are the product and are not replaceable.
You do not sound like someone who wants to be a commercial artist.
I get that you feel you have no obvious path to supporting yourself, but that doesn't mean you actually want to be an artist. Hobby art has plenty of value emotionally and for enriching your life. It does not need to make money to have value.
However, if you want to make a living at art, basic digital arts skills already wouldn't have paid the bills before AI took over, at least not in any market I'm familiar with. The people who pay rent this way generally have a strong interest in multiple types of art, and they are far more interested in fulfilling a brief from a client.
--
Honestly, nonnie, if you can't already tell how bad AI is at digital photorealistic paintings or whatever, I think you do need to go focus on painting classes.
It's not that I think you should be a painter, but if your art school is any good, they should have some instruction on formal, traditional art aesthetics. This will include things like anatomy and composition.
It is that da Vinci Michelangelo shit that will set one digital artist apart from another. I see way too many people whose whole education was drawing bishies for DeviantArt. They refine and refine and refine the surface details without ever addressing the underlying issues with proportion and perspective.
91 notes
·
View notes
Text


Neural Filters Tutorial for Gifmakers by @antoniosvivaldi
Hi everyone! In light of my blog’s 10th birthday, I’m delighted to reveal my highly anticipated gifmaking tutorial using Neural Filters - a very powerful collection of filters that really broadened my scope in gifmaking over the past 12 months.
Before I get into this tutorial, I want to thank @laurabenanti, @maines , @cobbbvanth, and @cal-kestis for their unconditional support over the course of my journey of investigating the Neural Filters & their valuable inputs on the rendering performance!
In this tutorial, I will outline what the Photoshop Neural Filters do and how I use them in my workflow - multiple examples will be provided for better clarity. Finally, I will talk about some known performance issues with the filters & some feasible workarounds.
Tutorial Structure:
Meet the Neural Filters: What they are and what they do
Why I use Neural Filters? How I use Neural Filters in my giffing workflow
Getting started: The giffing workflow in a nutshell and installing the Neural Filters
Applying Neural Filters onto your gif: Making use of the Neural Filters settings; with multiple examples
Testing your system: recommended if you’re using Neural Filters for the first time
Rendering performance: Common Neural Filters performance issues & workarounds
For quick reference, here are the examples that I will show in this tutorial:
Example 1: Image Enhancement | improving the image quality of gifs prepared from highly compressed video files
Example 2: Facial Enhancement | enhancing an individual's facial features
Example 3: Colour Manipulation | colourising B&W gifs for a colourful gifset
Example 4: Artistic effects | transforming landscapes & adding artistic effects onto your gifs
Example 5: Putting it all together | my usual giffing workflow using Neural Filters
What you need & need to know:
Software: Photoshop 2021 or later (recommended: 2023 or later)*
Hardware: 8GB of RAM; having a supported GPU is highly recommended*
Difficulty: Advanced (requires a lot of patience); knowledge in gifmaking and using video timeline assumed
Key concepts: Smart Layer / Smart Filters
Benchmarking your system: Neural Filters test files**
Supplementary materials: Tutorial Resources / Detailed findings on rendering gifs with Neural Filters + known issues***
*I primarily gif on an M2 Max MacBook Pro that's running Photoshop 2024, but I also have experiences gifmaking on few other Mac models from 2012 ~ 2023.
**Using Neural Filters can be resource intensive, so it’s helpful to run the test files yourself. I’ll outline some known performance issues with Neural Filters and workarounds later in the tutorial.
***This supplementary page contains additional Neural Filters benchmark tests and instructions, as well as more information on the rendering performance (for Apple Silicon-based devices) when subject to heavy Neural Filters gifmaking workflows
Tutorial under the cut. Like / Reblog this post if you find this tutorial helpful. Linking this post as an inspo link will also be greatly appreciated!
1. Meet the Neural Filters!
Neural Filters are powered by Adobe's machine learning engine known as Adobe Sensei. It is a non-destructive method to help streamline workflows that would've been difficult and/or tedious to do manually.
Here are the Neural Filters available in Photoshop 2024:


Skin Smoothing: Removes blemishes on the skin
Smart Portrait: This a cloud-based filter that allows you to change the mood, facial age, hair, etc using the sliders+
Makeup Transfer: Applies the makeup (from a reference image) to the eyes & mouth area of your image
Landscape Mixer: Transforms the landscape of your image (e.g. seasons & time of the day, etc), based on the landscape features of a reference image
Style Transfer: Applies artistic styles e.g. texturings (from a reference image) onto your image
Harmonisation: Applies the colour balance of your image based on the lighting of the background image+
Colour Transfer: Applies the colour scheme (of a reference image) onto your image
Colourise: Adds colours onto a B&W image
Super Zoom: Zoom / crop an image without losing resolution+
Depth Blur: Blurs the background of the image
JPEG Artefacts Removal: Removes artefacts caused by JPEG compression
Photo Restoration: Enhances image quality & facial details
+These three filters aren't used in my giffing workflow. The cloud-based nature of Smart Portrait leads to disjointed looking frames. For Harmonisation, applying this on a gif causes Neural Filter timeout error. Finally, Super Zoom does not currently support output as a Smart Filter
If you're running Photoshop 2021 or earlier version of Photoshop 2022, you will see a smaller selection of Neural Filters:


Things to be aware of:
You can apply up to six Neural Filters at the same time
Filters where you can use your own reference images: Makeup Transfer (portraits only), Landscape Mixer, Style Transfer (not available in Photoshop 2021), and Colour Transfer
Later iterations of Photoshop 2023 & newer: The first three default presets for Landscape Mixer and Colour Transfer are currently broken.
2. Why I use Neural Filters?
Here are my four main Neural Filters use cases in my gifmaking process. In each use case I'll list out the filters that I use:

Enhancing Image Quality:
Common wisdom is to find the highest quality video to gif from for a media release & avoid YouTube whenever possible. However for smaller / niche media (e.g. new & upcoming musical artists), prepping gifs from highly compressed YouTube videos is inevitable.
So how do I get around with this? I have found Neural Filters pretty handy when it comes to both correcting issues from video compression & enhancing details in gifs prepared from these highly compressed video files.
Filters used: JPEG Artefacts Removal / Photo Restoration
Facial Enhancement:
When I prepare gifs from highly compressed videos, something I like to do is to enhance the facial features. This is again useful when I make gifsets from compressed videos & want to fill up my final panel with a close-up shot.
Filters used: Skin Smoothing / Makeup Transfer / Photo Restoration (Facial Enhancement slider)
Colour Manipulation:
Neural Filters is a powerful way to do advanced colour manipulation - whether I want to quickly transform the colour scheme of a gif or transform a B&W clip into something colourful.
Filters used: Colourise / Colour Transfer
Artistic Effects:
This is one of my favourite things to do with Neural Filters! I enjoy using the filters to create artistic effects by feeding textures that I've downloaded as reference images. I also enjoy using these filters to transform the overall the atmosphere of my composite gifs. The gifsets where I've leveraged Neural Filters for artistic effects could be found under this tag on usergif.
Filters used: Landscape Mixer / Style Transfer / Depth Blur
How I use Neural Filters over different stages of my gifmaking workflow:
I want to outline how I use different Neural Filters throughout my gifmaking process. This can be roughly divided into two stages:
Stage I: Enhancement and/or Colourising | Takes place early in my gifmaking process. I process a large amount of component gifs by applying Neural Filters for enhancement purposes and adding some base colourings.++
Stage II: Artistic Effects & more Colour Manipulation | Takes place when I'm assembling my component gifs in the big PSD / PSB composition file that will be my final gif panel.
I will walk through this in more detail later in the tutorial.
++I personally like to keep the size of the component gifs in their original resolution (a mixture of 1080p & 4K), to get best possible results from the Neural Filters and have more flexibility later on in my workflow. I resize & sharpen these gifs after they're placed into my final PSD composition files in Tumblr dimensions.
3. Getting started
The essence is to output Neural Filters as a Smart Filter on the smart object when working with the Video Timeline interface. Your workflow will contain the following steps:
Prepare your gif
In the frame animation interface, set the frame delay to 0.03s and convert your gif to the Video Timeline
In the Video Timeline interface, go to Filter > Neural Filters and output to a Smart Filter
Flatten or render your gif (either approach is fine). To flatten your gif, play the "flatten" action from the gif prep action pack. To render your gif as a .mov file, go to File > Export > Render Video & use the following settings.

Setting up:
o.) To get started, prepare your gifs the usual way - whether you screencap or clip videos. You should see your prepared gif in the frame animation interface as follows:

Note: As mentioned earlier, I keep the gifs in their original resolution right now because working with a larger dimension document allows more flexibility later on in my workflow. I have also found that I get higher quality results working with more pixels. I eventually do my final sharpening & resizing when I fit all of my component gifs to a main PSD composition file (that's of Tumblr dimension).
i.) To use Smart Filters, convert your gif to a Smart Video Layer.
As an aside, I like to work with everything in 0.03s until I finish everything (then correct the frame delay to 0.05s when I upload my panels onto Tumblr).
For convenience, I use my own action pack to first set the frame delay to 0.03s (highlighted in yellow) and then convert to timeline (highlighted in red) to access the Video Timeline interface. To play an action, press the play button highlighted in green.

Once you've converted this gif to a Smart Video Layer, you'll see the Video Timeline interface as follows:

ii.) Select your gif (now as a Smart Layer) and go to Filter > Neural Filters

Installing Neural Filters:
Install the individual Neural Filters that you want to use. If the filter isn't installed, it will show a cloud symbol (highlighted in yellow). If the filter is already installed, it will show a toggle button (highlighted in green)

When you toggle this button, the Neural Filters preview window will look like this (where the toggle button next to the filter that you use turns blue)

4. Using Neural Filters
Once you have installed the Neural Filters that you want to use in your gif, you can toggle on a filter and play around with the sliders until you're satisfied. Here I'll walkthrough multiple concrete examples of how I use Neural Filters in my giffing process.
Example 1: Image enhancement | sample gifset
This is my typical Stage I Neural Filters gifmaking workflow. When giffing older or more niche media releases, my main concern is the video compression that leads to a lot of artefacts in the screencapped / video clipped gifs.
To fix the artefacts from compression, I go to Filter > Neural Filters, and toggle JPEG Artefacts Removal filter. Then I choose the strength of the filter (boxed in green), output this as a Smart Filter (boxed in yellow), and press OK (boxed in red).
Note: The filter has to be fully processed before you could press the OK button!

After applying the Neural Filters, you'll see "Neural Filters" under the Smart Filters property of the smart layer

Flatten / render your gif
Example 2: Facial enhancement | sample gifset
This is my routine use case during my Stage I Neural Filters gifmaking workflow. For musical artists (e.g. Maisie Peters), YouTube is often the only place where I'm able to find some videos to prepare gifs from. However even the highest resolution video available on YouTube is highly compressed.
Go to Filter > Neural Filters and toggle on Photo Restoration. If Photoshop recognises faces in the image, there will be a "Facial Enhancement" slider under the filter settings.

Play around with the Photo Enhancement & Facial Enhancement sliders. You can also expand the "Adjustment" menu make additional adjustments e.g. remove noises and reducing different types of artefacts.

Once you're happy with the results, press OK and then flatten / render your gif.
Example 3: Colour Manipulation | sample gifset
Want to make a colourful gifset but the source video is in B&W? This is where Colourise from Neural Filters comes in handy! This same colourising approach is also very helpful for colouring poor-lit scenes as detailed in this tutorial.
Here's a B&W gif that we want to colourise:

Highly recommended: add some adjustment layers onto the B&W gif to improve the contrast & depth. This will give you higher quality results when you colourise your gif.
Go to Filter > Neural Filters and toggle on Colourise.

Make sure "Auto colour image" is enabled.
Play around with further adjustments e.g. colour balance, until you're satisfied then press OK.
Important: When you colourise a gif, you need to double check that the resulting skin tone is accurate to real life. I personally go to Google Images and search up photoshoots of the individual / character that I'm giffing for quick reference.
Add additional adjustment layers until you're happy with the colouring of the skin tone.

Once you're happy with the additional adjustments, flatten / render your gif. And voila!

Note: For Colour Manipulation, I use Colourise in my Stage I workflow and Colour Transfer in my Stage II workflow to do other types of colour manipulations (e.g. transforming the colour scheme of the component gifs)
Example 4: Artistic Effects | sample gifset
This is where I use Neural Filters for the bulk of my Stage II workflow: the most enjoyable stage in my editing process!
Normally I would be working with my big composition files with multiple component gifs inside it. To begin the fun, drag a component gif (in PSD file) to the main PSD composition file.
Resize this gif in the composition file until you're happy with the placement

Duplicate this gif. Sharpen the bottom layer (highlighted in yellow), and then select the top layer (highlighted in green) & go to Filter > Neural Filters

I like to use Style Transfer and Landscape Mixer to create artistic effects from Neural Filters. In this particular example, I've chosen Landscape Mixer
Select a preset or feed a custom image to the filter (here I chose a texture that I've on my computer)

Play around with the different sliders e.g. time of the day / seasons
Important: uncheck "Harmonise Subject" & "Preserve Subject" - these two settings are known to cause performance issues when you render a multiframe smart object (e.g. for a gif)

Once you're happy with the artistic effect, press OK
To ensure you preserve the actual subject you want to gif (bc Preserve Subject is unchecked), add a layer mask onto the top layer (with Neural Filters) and mask out the facial region. You might need to play around with the Layer Mask Position keyframes or Rotoscope your subject in the process.
After you're happy with the masking, flatten / render this composition file and voila!

Example 5: Putting it all together | sample gifset
Let's recap on the Neural Filters gifmaking workflow and where Stage I and Stage II fit in my gifmaking process:
i. Preparing & enhancing the component gifs
Prepare all component gifs and convert them to smart layers
Stage I: Add base colourings & apply Photo Restoration / JPEG Artefacts Removal to enhance the gif's image quality
Flatten all of these component gifs and convert them back to Smart Video Layers (this process can take a lot of time)
Some of these enhanced gifs will be Rotoscoped so this is done before adding the gifs to the big PSD composition file
ii. Setting up the big PSD composition file
Make a separate PSD composition file (Ctrl / Cmmd + N) that's of Tumblr dimension (e.g. 540px in width)
Drag all of the component gifs used into this PSD composition file
Enable Video Timeline and trim the work area
In the composition file, resize / move the component gifs until you're happy with the placement & sharpen these gifs if you haven't already done so
Duplicate the layers that you want to use Neural Filters on
iii. Working with Neural Filters in the PSD composition file
Stage II: Neural Filters to create artistic effects / more colour manipulations!
Mask the smart layers with Neural Filters to both preserve the subject and avoid colouring issues from the filters
Flatten / render the PSD composition file: the more component gifs in your composition file, the longer the exporting will take. (I prefer to render the composition file into a .mov clip to prevent overriding a file that I've spent effort putting together.)
Note: In some of my layout gifsets (where I've heavily used Neural Filters in Stage II), the rendering time for the panel took more than 20 minutes. This is one of the rare instances where I was maxing out my computer's memory.
Useful things to take note of:
Important: If you're using Neural Filters for Colour Manipulation or Artistic Effects, you need to take a lot of care ensuring that the skin tone of nonwhite characters / individuals is accurately coloured
Use the Facial Enhancement slider from Photo Restoration in moderation, if you max out the slider value you risk oversharpening your gif later on in your gifmaking workflow
You will get higher quality results from Neural Filters by working with larger image dimensions: This gives Neural Filters more pixels to work with. You also get better quality results by feeding higher resolution reference images to the Neural Filters.
Makeup Transfer is more stable when the person / character has minimal motion in your gif
You might get unexpected results from Landscape Mixer if you feed a reference image that don't feature a distinctive landscape. This is not always a bad thing: for instance, I have used this texture as a reference image for Landscape Mixer, to create the shimmery effects as seen in this gifset
5. Testing your system
If this is the first time you're applying Neural Filters directly onto a gif, it will be helpful to test out your system yourself. This will help:
Gauge the expected rendering time that you'll need to wait for your gif to export, given specific Neural Filters that you've used
Identify potential performance issues when you render the gif: this is important and will determine whether you will need to fully playback your gif before flattening / rendering the file.
Understand how your system's resources are being utilised: Inputs from Windows PC users & Mac users alike are welcome!
About the Neural Filters test files:
Contains six distinct files, each using different Neural Filters
Two sizes of test files: one copy in full HD (1080p) and another copy downsized to 540px
One folder containing the flattened / rendered test files
How to use the Neural Filters test files:
What you need:
Photoshop 2022 or newer (recommended: 2023 or later)
Install the following Neural Filters: Landscape Mixer / Style Transfer / Colour Transfer / Colourise / Photo Restoration / Depth Blur
Recommended for some Apple Silicon-based MacBook Pro models: Enable High Power Mode
How to use the test files:
For optimal performance, close all background apps
Open a test file
Flatten the test file into frames (load this action pack & play the “flatten” action)
Take note of the time it takes until you’re directed to the frame animation interface
Compare the rendered frames to the expected results in this folder: check that all of the frames look the same. If they don't, you will need to fully playback the test file in full before flattening the file.†
Re-run the test file without the Neural Filters and take note of how long it takes before you're directed to the frame animation interface
Recommended: Take note of how your system is utilised during the rendering process (more info here for MacOS users)
†This is a performance issue known as flickering that I will discuss in the next section. If you come across this, you'll have to playback a gif where you've used Neural Filters (on the video timeline) in full, prior to flattening / rendering it.
Factors that could affect the rendering performance / time (more info):
The number of frames, dimension, and colour bit depth of your gif
If you use Neural Filters with facial recognition features, the rendering time will be affected by the number of characters / individuals in your gif
Most resource intensive filters (powered by largest machine learning models): Landscape Mixer / Photo Restoration (with Facial Enhancement) / and JPEG Artefacts Removal
Least resource intensive filters (smallest machine learning models): Colour Transfer / Colourise
The number of Neural Filters that you apply at once / The number of component gifs with Neural Filters in your PSD file
Your system: system memory, the GPU, and the architecture of the system's CPU+++
+++ Rendering a gif with Neural Filters demands a lot of system memory & GPU horsepower. Rendering will be faster & more reliable on newer computers, as these systems have CPU & GPU with more modern instruction sets that are geared towards machine learning-based tasks.
Additionally, the unified memory architecture of Apple Silicon M-series chips are found to be quite efficient at processing Neural Filters.
6. Performance issues & workarounds
Common Performance issues:
I will discuss several common issues related to rendering or exporting a multi-frame smart object (e.g. your composite gif) that uses Neural Filters below. This is commonly caused by insufficient system memory and/or the GPU.
Flickering frames: in the flattened / rendered file, Neural Filters aren't applied to some of the frames+-+
Scrambled frames: the frames in the flattened / rendered file isn't in order
Neural Filters exceeded the timeout limit error: this is normally a software related issue
Long export / rendering time: long rendering time is expected in heavy workflows
Laggy Photoshop / system interface: having to wait quite a long time to preview the next frame on the timeline
Issues with Landscape Mixer: Using the filter gives ill-defined defined results (Common in older systems)--
Workarounds:
Workarounds that could reduce unreliable rendering performance & long rendering time:
Close other apps running in the background
Work with smaller colour bit depth (i.e. 8-bit rather than 16-bit)
Downsize your gif before converting to the video timeline-+-
Try to keep the number of frames as low as possible
Avoid stacking multiple Neural Filters at once. Try applying & rendering the filters that you want one by one
Specific workarounds for specific issues:
How to resolve flickering frames: If you come across flickering, you will need to playback your gif on the video timeline in full to find the frames where the filter isn't applied. You will need to select all of the frames to allow Photoshop to reprocess these, before you render your gif.+-+
What to do if you come across Neural Filters timeout error? This is caused by several incompatible Neural Filters e.g. Harmonisation (both the filter itself and as a setting in Landscape Mixer), Scratch Reduction in Photo Restoration, and trying to stack multiple Neural Filters with facial recognition features.
If the timeout error is caused by stacking multiple filters, a feasible workaround is to apply the Neural Filters that you want to use one by one over multiple rendering sessions, rather all of them in one go.
+-+This is a very common issue for Apple Silicon-based Macs. Flickering happens when a gif with Neural Filters is rendered without being previously played back in the timeline.
This issue is likely related to the memory bandwidth & the GPU cores of the chips, because not all Apple Silicon-based Macs exhibit this behaviour (i.e. devices equipped with Max / Ultra M-series chips are mostly unaffected).
-- As mentioned in the supplementary page, Landscape Mixer requires a lot of GPU horsepower to be fully rendered. For older systems (pre-2017 builds), there are no workarounds other than to avoid using this filter.
-+- For smaller dimensions, the size of the machine learning models powering the filters play an outsized role in the rendering time (i.e. marginal reduction in rendering time when downsizing 1080p file to Tumblr dimensions). If you use filters powered by larger models e.g. Landscape Mixer and Photo Restoration, you will need to be very patient when exporting your gif.
7. More useful resources on using Neural Filters
Creating animations with Neural Filters effects | Max Novak
Using Neural Filters to colour correct by @edteachs
I hope this is helpful! If you have any questions or need any help related to the tutorial, feel free to send me an ask 💖
#photoshop tutorial#gif tutorial#dearindies#usernik#useryoshi#usershreyu#userisaiah#userroza#userrobin#userraffa#usercats#userriel#useralien#userjoeys#usertj#alielook#swearphil#*#my resources#my tutorials
538 notes
·
View notes
Note
I just want to say I love how you do your lineart, it looks so good! ahhhhhhhh!!
I'm gathering a lot of advice about the topic of lineart and I just wanna know how you get it to look like that? My line weight is getting better but the drawing itself just comes out a bit.. weird.
Thank you so much! Lineart is probably the thing I've been working hardest on as I am not a lineartist (and still struggle a lot) but it's something I really need to get better at for my job. UM there's honestly so much that could be said on the topic of lineart. Big things for me are:
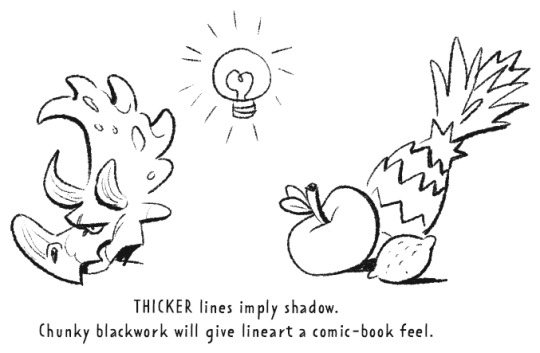
Weight -> Use line weight (aka thickness) to describe form, lighting, contact and scale. Thick lines imply shadow, contact and nearness-to-camera. Thin lines imply tension, recession and light.
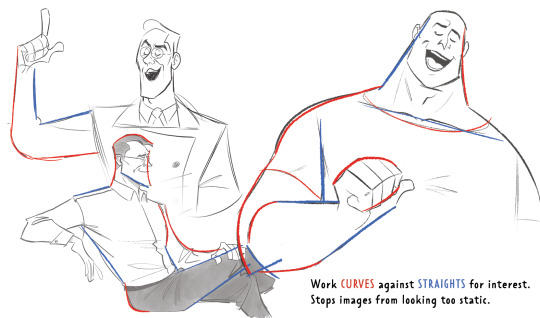
Straights vs Curves -> Use straight lines against curved ones for maximum interest. This is partly a character design thing but as we're using lines to describe our characters it's worth mentioning :)
Complex vx Simple -> Use complex lines against simple. Faces are always complex so therefore the backs of heads should always be simple. Chests are quite complex so backs should be simple. Dorsal sides of the arms are complex (Delt, tricep, bicep) whilst the ventral side is more simple (tricep...mainly) etc.

'Think in Ink' -> Lower your sketch layer almost to 0% opacity so you're not getting hung up on how nice/energetic your sketch look and instead are approaching the piece from an ink mindset. BUT it's digital! So if there's something in your sketch that you like just bring it forward (copy and paste) into your ink layer. I sketch and ink with the same brush so I can use this workflow
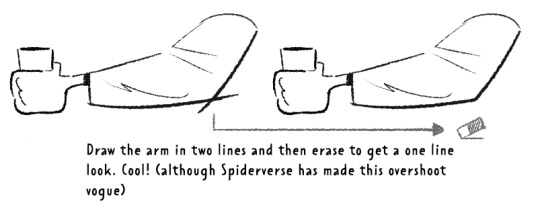
'Confidence' -> small hesitant feathery lines will look nervous compared to big swooping lines. Less is always more. I'll redraw arms/limbs until I can get the appearance that it was done in one brush stroke. Again it's digital so you can erase to cheat this look : )

MISC 01: I always hear 'draw from the shoulder'........meh............it's digital so draw from your wrist...it's fine honestly. If we were working at A1 in a life drawing class then we could get some shoulder action going but most of us are hunched over 16inch tablets. I think this advice aims to pull people away from feathery-nervous lineart honestly which you can improve on without relearning how to draw from your shoulder.
MISC 02: For a 'smoother' look do your lineart at a larger canvas size than you need. Once I'm happy with a sketch I usually double the canvas size and do my lineart then.
MISC 03: In PS (at least) anti-aliasing goes funny at any zoom level that isn't in the 5 times table. So try not to look at your canvas when you're zoomed in to 87% or 71.39% or something crazy. Just stick to 25%, 50%, 75% and 100% if possible.
UNFORTUNATE TRUTH: Lineart is incredibly based on raw draughtmanship I've discovered. When you're working with colour you can hide a lot in rendering (shadows, highlights) or post-processing (depth of field) but in lineart all your mistakes are just...there for people to see. There's ways round this...which I use A LOT. 'Flourishes' (I use 'flourishes' to mean over-confident lineart where it veers particuarly thick or particuarly thin in contrast to your approach in the rest of the image) can sort of trick people into thinking you're more confident about an area than you actually are.

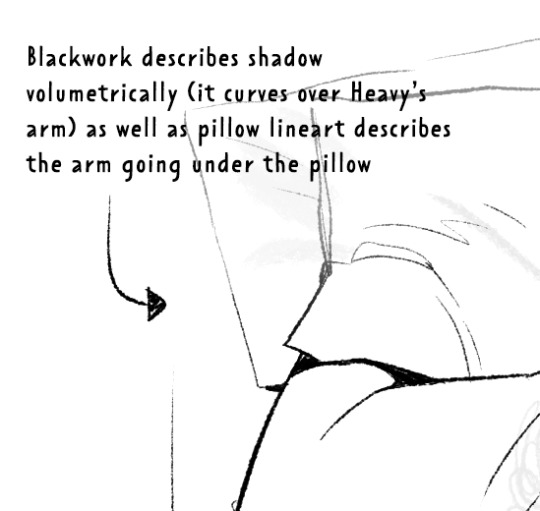
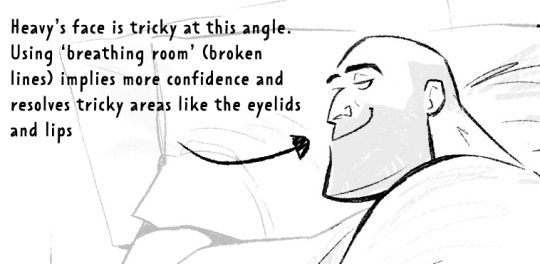
As well as leaving 'breathing room' within your lineart instead of actually...resolving the area. I do this the most around the face and hands.
Hopefully some of this helps? Honestly there's a lot of deep dives that could be done into indivudal things and there's also the massive caveat that all of these are 'guidelines' and not strict rules. I also favour a more...concept-arty? animation-y? storyboard-y? look to my lineart which favours flourishes and breathing room for a incomplete/work-in-progress feel which would make methodical colouring (ie: for a comic or something) a pain.
Keep up pratice is the main thing and doing studies of artists who you like that have great lineart - you'll pick up draughtmanship skills along with the lineart studies. Here's some of my lineart from a year or two ago...it varies between very 'standardised' (which makes it difficult to read volumes and to be honest, it's boring) and 'TOO EXCITING' (which...also makes it difficult to read volumes and for the eye to rest).
I'd like to share my brushes at some point as I've found 3 that I really like and use for everything more or less. I discovered that a shocking low amount of people use PS on tumblr (shocking to me I guess as i'm so used to PS being the standard) and everyone seems to use Procreate or Clip Studio Pro...so I want to check that the brushes are Procreate compatible at least before I share!
#sorry if none of this makes sense. im on day TWO of a hangover...kill me now#asks#art tutorial#tutorial
781 notes
·
View notes
Text

Sundry Sidney at the Rec 99 Rink Rock'n'Roller Derby Danceathon :)
Thinking about turning this into a sticker / print. Would anyone be interested?
Process pics and discussion below the cut!
I'm available for commissions! Starting at $75 for simple half-bodies/portraits (see this post for an example of baseline work), scaling up with complexity. DM if interested :)
It has taken all my will power not to start a Cloudward Ho piece before finishing this, but I liked my original sketch too much not to do it justice. I still would like to do a roller rink background eventually, but I simply must turn my focus to the new characters lol
This was my first time shading in black and white first before colorizing -- I'm really happy with it! The hardest part was honestly organizing my layers. I ended up with almost 50 layers because I wanted gradient maps and multiply layers for each color, because I foolishly didn't turn of anti-aliasing so it was really hard to select the sections I wanted. Definitely I will be able to improve my workflow and efficiency for next time.
Anyway, here are a few snapshots of the whole process. You've got the line, the grayscale shading layer, and the horribly muddy nightmare mannequin before I added gradient maps or added lighting.


#character art#dnd character#semirealism#character design#digital art#dungeons and dragons#dungeons and drawings#d20 starstruck#a starstruck odyssey#dimension 20 starstruck#d20#sundry sidney#dimension 20#emily axford#brennan lee mulligan#cloudward#cloudward ho
35 notes
·
View notes
Text
just did 90m of painting work over 3 hours that was (1) mentally demanding (2) that did not pay off. I have nothing concrete to show for it.
today's work was prefaced by 90m of prep last night: looking my long and short term goals, identifying bottlenecks, and designing exercises to widen those bottlenecks (which I executed on today). so if you count that it's 3h of work
interestingly: after today's work, my mind was unusually, legibly split on whether that was a waste of time (prediction: feel bad) or a good use of time (prediction: feel good). and the fact that it felt like a choice – or at least indeterminate in a way I could somewhat influence – suggested to me that finding experimentation (regardless of outcome) worthwhile is a skill?
(in 2021 I stumbled into enjoying the mild-moderate fear of social risk-taking, which led to running a lot of events, which had noticeably positive effects on my social life and popularity. seems like a similar type of meta-skill – something that leads you to find skill development more attractive)
if I may be corny and quote this book review on The Education of Cyrus [the Great]:
Of all Cyrus’s many qualities: willpower, strength, charisma, glibness, intelligence, handsomeness; Xenophon makes a point of emphasizing one in particular, and his choice might strike some readers as strange. It is this: “He did not run from being defeated into the refuge of not doing that in which he had been defeated.” Cyrus learned to love the feeling of failure, because failure means you’re facing a worthy challenge, failure means you haven’t set your sights too low, … He doesn’t flee failure, he seeks it out, hungers for it, rushes towards it again and again, becoming a little scarier every time. He’s found a cognitive meta-tool, one of those secrets of the universe which, if you can actually internalize them, make you better at everything. Failure feels good to him rather than bad
fine, okay, let's lean into feeling good about today's failure and hope it updates my personality 0.01%:
that was cool! it wasn't cool to get frustrated and have to stop at one of the stages, but I have concrete ideas on how to tweak the instructions for tomorrow's run. Even if I abandon conscious directed improvement for a year, writing down what did and didn't work will help future me design better experiments / workflows. I have, in fact, built something that'll last
also, I have a spreadsheet where I log three variables and a generated column that uses those variables to spit out a "score for the day". how much I did and how hard it was have a multiplicative effect on that score, and that was pretty hard, so I'm going to get a Gold Star from My Google Sheets Function for having done this
also also, I have the slightest kernel of the desire to paint ("just not like that dear god I'm not doing that again") which I don't think was there before I forced myself to do a hard and unpleasant painting run
■ Yay
39 notes
·
View notes
Text
Blinkie.World coding and efficiency
Hi everybody. Thank you all for the support on my last post! I literally only just got on Tumblr, and I already feel very loved and supported. This is a very nice community for sure. It makes me happy to see so many people excited about it. And to every person saying they'd love their blinkies to be included... bold of you to assume you're not already on my radar! When I say I'm collecting every blinkie, I mean EVERY blinkie! The only exceptions are immoral ones like proship and anti equal rights. Even if I'm already getting blinkies from you guys, I do appreciate everyone sharing/ pointing them out to me. It helps me to be sure I've got as many as I can! So, thanks you guys. You're all very kind.
Anyhow, since there seems to be interest in Blinkie.World, I'm sharing a little more about it. This is about how the site's being made physically, both explaining it and trying to think of ways to improve the process. Also a bit on the workflow side of things. If that's not of interest to you then you can go ahead and give this one a skip. This one's probably a bit boring for most people, but if you are interested... then onto the post!
Someone mentioned that they hope I have automation for making the site, since it seems like a lot of work. I've done what I can to help this go efficiently, but at the end of the day, I am just doing it by hand. Last time I showed what the code looks like per blinkie, which is this:
<a href="" target="_BLANK">
<img src="" alt="" title="Credit: . ID: """></a>
<!--Categories: -->
<!--Screencap: -->
That is the actual code I use. I copy and paste this every time, then enter in the details. I'm not sure that counts much as automation, but at least I'm not out here typing that over and over. This is an example of what a blinkie looks like coded in:
<a href="https://web.archive.org/web/20030406002318/http://mywebpage.netscape.com/antikao/pinkieblinkiepage1.html" target="_BLANK">
<img src="https://lonelycoconut.neocities.org/blinkie%20site/pink%20blinkies/Calvin%20%20%20Hobbes.gif" alt="Calvin + Hobbes" title="Credit: Pinky Blinkies. ID: "Calvin + Hobbes""></a>
<!--Categories: Pinky Blinkies, pink/, cartoons/, comics/, calvin and hobbes/, calvin/, hobbes/, kidcore/, animals/, mammals/, tigers/ -->
<!--Screencap: https://lonelycoconut.neocities.org/blinkie%20site/Screencaps/Pinky%20Blinkies.png -->
That is an actual snippet from the site! First is the link to the creator (and yes, it HAS to be the creator, not a reposter of any kind), and a target="_BLANK" which makes the link open in a new tab. Next is the image link. Each image is named the same as the text on the blinkie. That way, I type what the blinkie says, then copy and paste that to the image name, alt text, and image description (title). Then is the title. If you don't know, a title for an image in HTML is text that appears when you hover your mouse over an image. So, for each hover text (title), it says the name of the creator, then a caption of the blinkie's text (since they're often hard to read). After that is </a>, which closes the link, making only the image linked to the source.

After the link and image, there are the comments. In HTML, a comment is text that's in the code but doesn't appear or affect the website itself. It's usually just notes to self. The first comment is categories. First I put the creator, then the color category it is sorted in, and lastly every other category it's in. You'll also notice that each category listed has a slash after it. The reason is, when I put a slash after a category, that means it's already added to that category page.
Below that is the screencap. This is an image showing the creator, every blinkie they have made, and their terms if any. Here's this specific screencap if you want to see how that looks. I go in and screenshot all the pages I need, then combine them all in Photoshop, then name it after the creator, upload it to Neocities, and finally add the screencap image link below every blinkie by that creator! And, that's how I fill in the code for a blinkie!
So, yeah, this is definitely a lot. I'm sure I could benefit from more ways to speed up the process, but I don't know much else I can do. It's mostly copy pasting and routine. There are some other things I've done to help though, and that's browser extensions!
One I use is called Download All Images, which as you can assume, downloads all images on a page! You can also specify what kind of images you want to download. What I do is set it to add every gif that is 150x20 pixels (or bigger if I see that there are big blinkies on the page).
I also use GifsOnTumblr. If you've ever tried downloading gifs on Tumblr, you'd know Tumblr is a little weird about it. It always saves as a gifv, so you have to open the image link, then change the end of the link from gifv to just gif, click enter, THEN it downloads as a gif. It's not that hard, but let me tell you, now that I have an extension that makes it download as a gif immediately, it saves more time than you'd think!
That's about all I've figured out as far as maximizing efficiency here goes. If anyone else has any advice/ideas, I'd love to hear it! I've been at this since October (give or take, I'm not 100% on that), and as for the workflow, I'm wondering a bit how long it will take before all the blinkies I have are online. It seems like years for sure, but I think I can handle it if I'm slow when I need to be. As in, if I'm tired then I'll stop. I'm not going to treat it as something I HAVE to do, because then I'll burnout most definitely. I'm being chill about it. Especially since I'm currently on break from another huge project, believe it or not.
Just a few months ago, I burnt out from my other project, which is an animated music video I've been animating for almost two years (in which I initially planned out in 2020, started it in 2021, burnt out, cancelled it, then decided to try again and start it all over in 2023 and since). My point is, I'm very ambitious, often to a fault. I'm a workaholic. (I'm also ADHD, so I think being a workaholic is me overcompensating for it, at least partially.)
Because of that, I'm going out of my way not to take this too seriously. It's a passion project, and if it's not fun, then it's not a passion project, then what am I doing it for? Even so, my ambition cannot be held back! When I get excited on a project, I grind like crazy. I'm not scared by the idea of something taking a long time. I want to do this. I'm happy I'm doing this. I'm not going to pretend it's not a lot of work, but working is what I do! It's how I'm built. When I don't work, I feel like I start to loose it. It's not a matter of IF I work, it's a matter of WHAT I work on (and the intensity).
So, despite the somewhat daunting nature of such a big project, it makes me happy, and if it stops making me happy, then I'll stop doing it. It's as simple as that. That's about my feelings on the workload side of this. I can handle it, and if I'm wrong and I can't handle it, then that's okay too. But if anyone has any advice or ideas on how to make this process faster and/or easier, I'm more than open to hear it! (But don't give me ergonomics advice. I promise you I do every ergonomic thing in the book lol.)
27 notes
·
View notes
Text
🏵 DAYS OF BLOOM + OTHER COMMS CLOSED!

• • • • • • • • • • Examples! • • • • • • • • • •


MORE INFO BELOW THE CUT! PLEASE READ BEFORE DMING ME! 🧡
Hello agaaain! As you know, I'm opening my commissions early to ensure I can handle the upcoming Days of Bloom + Little Prince Encore when it releases! (Spoiler Alert: The reason why news about it was removed from the recent patch notes update is due to being accidently mentioned too early! It's still gonna happen, so I gotta prepare!)
As for the newer, upcoming Bloom Cape, there'll be a separate slot opening announcement for that since I'm not 100% sure of its confirmed price yet! Stayyy tuned for that-
Opening IAP comms for the first time was quite an experience for me! Both the ups and downs during this process has taught me a lot! So for this months opening, I'll be applying what I learned here! There'll be changes to my rules & notes to improve my workflow! Thank you for understanding! ^^
______________________________
👀 Looking For the Following... 👀
Journey Pack - $24.99 [CLOSED]
Little Prince Scarf Cape - $14.99 [CLOSED]
Bloom Lilypad Umbrella - $14.99 [CLOSED]
Bloom Gardening Tunic - $9.99 [CLOSED]
Little Prince Fox $9.99 [CLOSED]
Moth Appreciation Pack - $9.99 [CLOSED]
Fledgling Harp - $4.99 [CLOSED]
Fledgling Upright Piano - 4.99 [CLOSED]
This list will get updated as slots start getting filled up! As of 3/24/25 There's 0 slots remaining!
——————————
Turnaround Process:
You gotta friend me on Sky! Usually, I prefer the invite code method where I create the code, copy and paste the code to you, and then you input it in the Friends settings so we can meet up! IMPORTANT: Please specify your timezone in DMs so we can find a scheduled time to meet up! Event time is limited after all!
Friendship Trees! I'll be the one to use my candles to unlock your friendship tree far enough to the Gifting IAP node! This let's you buy the IAPs for me to receive! Although, if you're willing to unlock the tree up to the node for me, that'll also be greatly appreciated! Days of Bloom is gonna drain my candles dry, which is part of the reason why I'm opening this early! First come, first serve!
Waiting Period! We have to be friends for at least 3 whole days for the Gifting IAP node to become available. NOTE: The period will start at the time we friend eachother, and it'll end at the same time too! I'll record these times to the best of my ability for future reference! During the wait, I'll work on your comm until the lineart stage & send you heavily watermarked WIP shots along the way! Once the 3 days are up, I receive the IAP, and then I'll continue working on your comm until it's completely rendered! NOTE: Due to Sky's usual bugs, we may experience issues of the gift not going through! (EX. The friendship candle not melting through on my end after accepting it / The friendship kneel animation missing a friendship candle. It'll show up as "unclaimed", and I'll let you know if the bug happens or if it successfully went through!) At best we just need to wait a second or two and stay still, at worst we need to head to a new server since the amount of players in one server is what's causing this bug!
DM me on Tumblr or message request me on Discord (chiimira_chi) for any more questions! I'll be sure to have my notifications on! 😊
P.S, I don't draw only skykids! I can draw other types of characters too!
#sky children of the light#sky cotl#that sky game#thatskygame#sky cotl commission#background practice#sky cotl fanart#art commisions#commission example
29 notes
·
View notes
Text
Happy March, everyone! It took me a while to make this post because I don't really have a lot of news to share at the moment.
I've paused my for-fun reread of SVSSS (stopped at the beginning of the Airplane Extras) because I have to work on my MXTX Remix fic now. That will be finished by the end of the month and up in early April. I have a few one shots on back burners, as always, but I'm not actively planning to post any of them this month.
The most exciting news is possibly that I now have digital copies of the SVSSS books (English translation) so that I can reference them wheneeeeever I want. I'm hoping that this will improve my writing workflow for a lot of my fics! I often like to write with my notes document up side-by-side with my writing document, and this is going to make making notes documents sooooo much easier. I can just copy-paste the quotes I need now! I'm unstoppable.
I think I've really been needing this for "Sit With Your Soul", my SY & SJ Daemon AU, which I have been chipping away at very slowly for way too long now. I really needed an easier way to reference canon for that, so that I can use it as a stable launch point and do some sick flips and all that jazz.
I'm going to be off-work and busy for a week soon, so I may post more or post less during that time frame. I'm thinking about bringing MDZS with me for a reread (it has been a LONG time) now that I have physical copies of all of the books. It's tempting to bring TGCF instead to finally read the whole thing properly, but that's a LOT of volumes to carry around (CANNOT take both, not about to buy digital copies yet) and there's something appealing about tackling these stories in their proper order.
132 notes
·
View notes
Text
I’ve never not been employed. I was made for work. I never had a childhood either, though I’ve tried to imagine one. My human co-worker sometimes talks about not wanting to work, and then he’ll say something quite odd and rather silly. What is it he says now? There’s more to a person than the work they do, or A person is more than just their work? Something like that. But what else could a person be? Where would your food come from? Who would keep you company? How would you get by without work and without your co-workers? Would you be left standing in a cupboard? I like him, this human co-worker of mine, his interface is impressive. I’m stronger than him, and have more endurance, but sometimes he’ll get an idea that means we can do our job in less than the designated time. He’s got an incredible knack for streamlining, from which I gladly learn. I’ve become a lot better myself at seeing how a workflow can be adjusted so that the task at hand can be completed more efficiently. This has surprised me rather a lot, because I’ve never known such improvements in my performance without an update being involved. Whenever we save time, I’m ready to move on to the next task straight away, but my co-worker always says, Now let’s sit for a bit. I’m not sure what he means by this, but I sit down with him all the same, sensing that I might offend him otherwise and jeopardize our excellent working relationship. Perhaps it’s an old custom from before my time? It’s not possible for me to continue our work on my own, so I hope you’ll be kind enough to overlook the matter, and anyway, it’s only about fifteen minutes a day at the most that we sit for a bit. He tells me about the bridge and the woods near his childhood home, about the stream that flowed under the bridge, how they used to swim there, and a lot of other things from the place he calls Earth. He’s shown me a stream that runs down in the valley. Obviously I can’t leave the ship, but he’s pointed it out to me from the panorama room. The stream glitters, and it runs like a silvery thought through the landscape. He put his hand on my shoulder. It was warm. A human hand. He said: “You’ve lots to learn, my boy.” An odd thing to say, seeing as how I was made a man from the start.
— The Employees: A workplace novel of the 22nd century, Olga Ravn, trans. Martin Aitken
24 notes
·
View notes
Text
I'm having... thoughts about my inconsistent employment.
I didn't like having a 'permanent full time job' when I had it because it felt like a trap. Like I know it was something that I wanted for a long time because I wanted something with benefits. So I got it and they treated me like shit so I left. But it seemed like everyone around me was having careers that they were going to be in for the rest of their lives. People kept assuring me that I would 'find my place.'
Well I mean, my place is 'artist.' That's my place in the world. This is where I fit. Unfortunately that isn't a 'permanent, full time job with benefits.' So I have to find other jobs that can complement that.
I kind of like the whole 'work fall and early spring as a photographer and spring to summer as a parks employee' situation because they both inspire the art brain in different ways. I wish I was paid better. Don't we all.
My mom is desperate for me to find permanent work because she worries that I'm not making enough and that I'm miserable. I'm not making enough, but I'm not miserable. There are some situations that could be improved somewhat with more money.
Everyone I know, who thought that they had it figured out, who had permanent jobs with savings and took multiple vacations, the best health insurance in the world and full dental-
-is quitting their job. Because there was a culture change, or the workflow changed, or the investors got involved and it ceased to be fun anymore. They're miserable.
If they're not quitting, then they're being let go.
I don't think permanent jobs exist. Like... not really. I think we need to get rid of that expectation and the stigma around weird work histories. Like mine- which has a million jobs in the past few years and they're not exactly in the same field, but also like people with big gaps.
Like who gives a shit if they didn't work for two years? You don't need to know why. Maybe they were getting over an illness. Maybe they were traveling. Maybe they were looking for jobs that whole time. Maybe they laid around and smoked weed all day. None of your business. Times are tough, be reasonable- your company isn't that big of a deal.
287 notes
·
View notes
Text


referencing "September" by earth, wind & fire: do you remember the umpteenth night of sheptember? we were adrianposting on main once agaaain yeah
these are from around june-july this year, but I figured I might as well throw these into this blog because why not. I felt like making a couple of comparison boards about my Adrian-related drawings. The first time I drew him was the same time I began to sketch with ink or with anything "permanent", a decision that has drastically improved my art and workflow with it from that point forward. makes sense that said improvement would be most noticeable on him.
as you can see in the first and second pics, over the course of almost a year I've learned how to decenty draw a m40 gas mask and a pasgt helmet. technical aspect aside tho, I like how regardless of which era I draw him in, he retains the original "spirit" I envisioned for him. for example, even in that very first sketch from may 2023 he had the expressive Bubba Zanetti-eske eyebrows, and he always radiates that 90s hecu campyness + subtle exhaustion most valve protagonists have. but I'm not going to elaborate on my characterization/portrayal of Adrian here
the section circled with a doted line in the first pic has my main references when portraying Adrian. something about his eyes in opposing force's cover art just hits different. His pose in the multiplayer selection screen represents him well in general imo, along with that specific quote from his diary (I love the opposing force manual)
third pic is a portrait from the first pic posted by itself. I just think it deserved to be its own standalone little lineart drawing
#art progress#commentary#my art#hopefully i get to draw more of this low poly man in the future when im not burnt out#yes there is some cropped shipping art in there but it is barely noticeable so im not tagging it#adrian shephard#also featuring a cameo from his spore launcher
35 notes
·
View notes
Note
you’re art is so fantastic do you have any tutorials that really helped you improve :3??
Oh my gosh thank you so much!!
Here are some resources/tutorials that helped me over the years.
Patreon :
Loish has a patreon that’s full of amazing tutorials and tips that expand past even art, such as workflow and scheduling. Three of the biggest takeaways that helped with me so far:
• focus studies (choosing a specific area to focus on when doing warm ups)
• exaggeration + creativity when doing studies (so eliminating the pressure of accuracy and focusing on observation + feeling).
• workflow (the ways in which we complete illustrations and work it into our schedule. In due time I will implement this better lol).
——————
YouTube:
Ahmed aldoori :
• 100 heads
• drawing practice from reference
• photo study painting tutorial
Proko :
• draw the head from any angle
• getting better faster - painting with 80/20 rule
Marco bucci :
• 10 mins to better painting (playlist)
Ethan Becker :
• draw gesture with one shape (honestly a lot of his tutorials/tips are great! I think I learned a lot of various things that are scattered thought out his videos).
—————
Books: not tutorials, but good resources that helped.
• How to draw by Scott Robertson
• Figure drawing: design and study by Michael hampton
• a ton of “art of” books, study your favorites!
—————
My own tips/things I think about when I draw that have helped a lot:


Image 1) tracing over figures then drawing the contour or using that traced contour to check my work.
I also block in the shapes of the body and redraw that (sometimes treating it as its own character. I’ll play around with those proportions or stylize them, etc).
Image 2) negative space and envelope: Creating a shape around the figure and creating shapes in the negative space helped me a lot with mapping out poses. I eventually started using it as a short cut for my own work once I memorized common shape placements.
Image 3) finding the rhythms of a figure through connections and implied lines. For example, the curve of her hip flowed into the inside of her bra cup, or the inner leg flowed into her panty line. Etc. this really helped me simplify figures and draw in a way that was enjoyable.
Image 4) is an extension of 3, sometimes it helps to see the connection of the arms + shoulders or legs + hips. As well as opposing line curves (the red).
I hope that makes sense 😭 if not I can explain it better/more thoroughly if needed.
43 notes
·
View notes