#aesthetic tutorial
Explore tagged Tumblr posts
Visit Tumblr Blog
Explore Tumblr blogs with no restrictions, modern design and the best experience.
Last Seen Tumblr Blogs


Fun Fact
China blocked Tumblr because of pornography and censorship problems in 2013.
Text
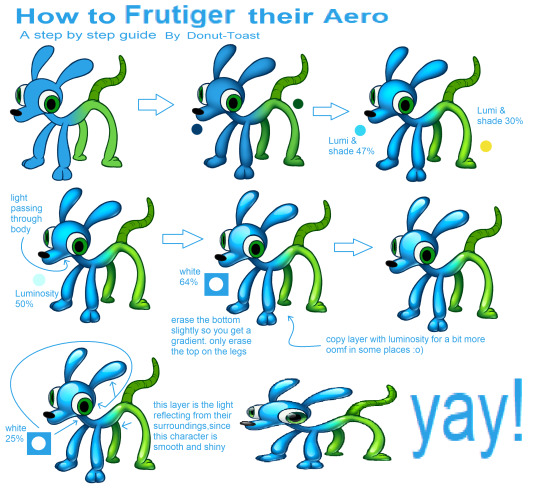
Made a quick tutorial for how to apply that Frutiger Aero Button texture to living creatures, since I made an entire design with it!
#art tutorial#frutiger aero#art tips#art help#art resources#art research#drawing tutorial#tutorial#resource#art resource#digital art#art#aesthetic tutorial#aesthetic#frutiger aesthetic#y2k#spore 2008#spore#old web#donutdrawsthings#character design
540 notes
·
View notes
Note
i has a question.
how do you manage to make pixel art fit with the drawn parts of the art pieces? i think you're amazing and i love your art style, but it's amazing how you manage to make it feel like they fit in the same universe even being different styles (being pixel and drawn parts)
you are amazing <3
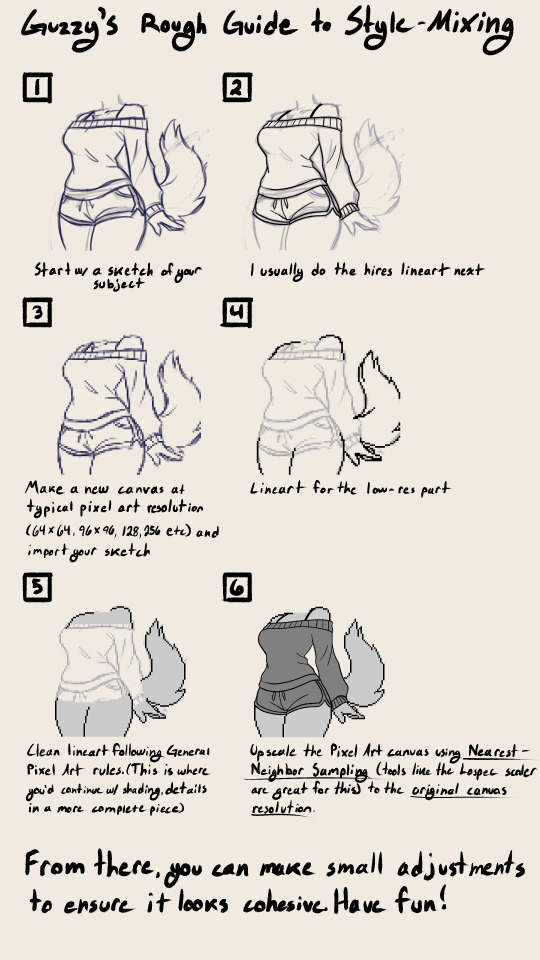
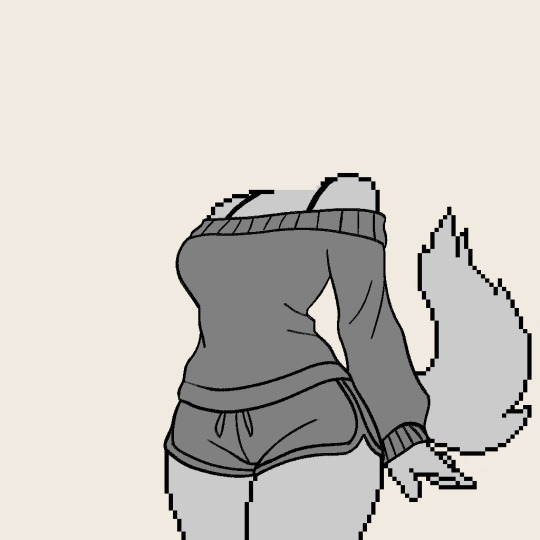
Thank you so much, I think you're super amazing :3 this is just a rough guide mostly on how to achieve the mixed resolutions, I hope it's at least interesting!!!
#pixel aesthetic#pixel artist#pixel art#furry#furry artist#sfw furry#furry art#furry oc#anthro#anthro art#mixed media#guide#style guide#tutorial#art tips
2K notes
·
View notes
Text


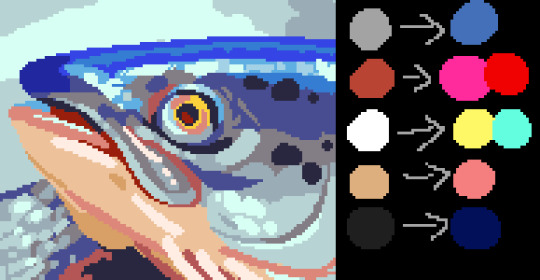
easy tutorial for how i made this simple stylized "nebula" from my 'head full of stars' piece. note that this is not the only way, or the best way to do it, it's just the way i did it (and i made it up). enjoy
btw this was made with my 8 colour palette 'supernova' which you can download free here. eyestrain warning maybe
30% off pixquare pixelart app with code 'tofu' 💕
pixelart guide | support me | commission me | buy a print | buy a sticker
#pixel art#pixelart#artists on tumblr#art#dark art#dark aesthetic#pixel#illustration#pixel illustration#pixel aesthetic#pixel graphics#pixel art tutorial#tutorial#stars#space#nebula#eyes#cw#eyestrain#scopophobia#art tutorial
4K notes
·
View notes
Text
Had a few folks interested in how I made the patches I posted for Solarpunk Aesthetic Week, so I thought I'd give y'all my step-by-step process for making hand-embroidered patches!

First, choose your fabric and draw on your design. You can use basically any fabric for this - for this project I'm using some felt I've had lying around in my stash for ages.

Next, choose your embroidery floss. For my patches I split my embroidery floss into two threads with 3 strands each, as pictured. You can use as many strands in your thread as you prefer, but for the main body of my patches I prefer 3 strands.
Next you're going to start filling your design using a back stitch.

First, put in a single stitch where you want your row to start.

Poke your needle up through the fabric 1 stitch-length away from your first stitch.

Poke your needle back down the same hole your last stitch went into so they line up end-to-end.
Repeat until you have a row of your desired length (usually the length of that colour section from one end to the other). Once you have your first row, you're going to do your next row slightly offset from your first row so that your stitches lay together in a brick pattern like this:

Make sure your rows of stitches are tight together, or you'll get gaps where the fabric shows through.
Rinse and repeat with rows of back stitch to fill in your patch design.

When you're almost to the end of your thread, poke your needle through to the back of the fabric and pull the thread under the back part of the stitching to tuck in the end. Don't worry if it looks messy - no one's gonna see the back anyway.
This next step is fully optional, but I think it makes the patch design really pop. Once your patch is filled in, you can use black embroidery floss to outline your design (or whatever colour you want to outline with - it's your patch, do what you want). I use the full thread (6 strands, not split) of embroidery floss to make a thicker outline.

I use the same back stitch I used to fill the piece to make an outline that adds some separation and detail. You could use most any 'outlining' stitch for this, but I just use back stitch because it's just easier for me to do.
Once you're finished embroidering your patch, it's time to cut it out!

Make sure to leave a little border around the edge to use for sewing your patch on your jacket/bag/blanket/whatever, and be careful not to accidentally cut through the stitches on the back of the patch.
If you have a sturdy enough fabric that isn't going to fray, you can just leave it like this. If not, I recommend using a whip stitch/satin stitch to seal in the exposed edges (I find that splitting your embroidery floss into 3-strand threads works best for this).

And then you're done! At this point you can put on iron-on backing if you want, or just sew it on whatever you wanna put it on. Making patches this way does take a long time, but I feel that the results are worth it.
Thanks for reading this tutorial! I hope it was helpful. If anyone makes patches using this method, I'd love to see them! 😁
#solarpunk aesthetic week#sewing#tutorial#sew on patch#punk diy#diy punk#punk aesthetic#handmade#solarpunk#handcrafted#embroidery#embroidered patch#how to#how to make a patch
18K notes
·
View notes
Text
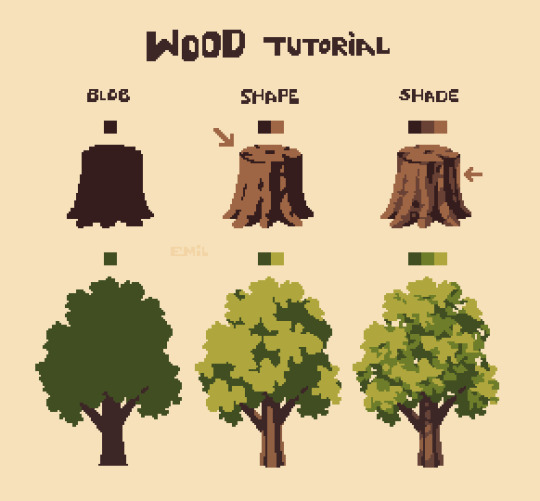
Simple tree tutorial
#pixel art#pixelart#art#art study#artists on tumblr#8bit#pixel#illustration#16bit#art practice#nature#aesthetic#trees#tree#tutorial#art tutorials
4K notes
·
View notes
Text
⠀⠀谷 : TUTORIAL : link personalizado para twitter


⠀⠀
en notas, escribiremos POR SEPARADO la frase o emoji que deseamos convertir. ��por qué por separado? si se hace junto nos saldrá como un link invalido y no podremos ponerlo en nuestro perfil, procuren hacerlo por separado (para las letras usen el espacio en blanco para la separación)

⠀⠀
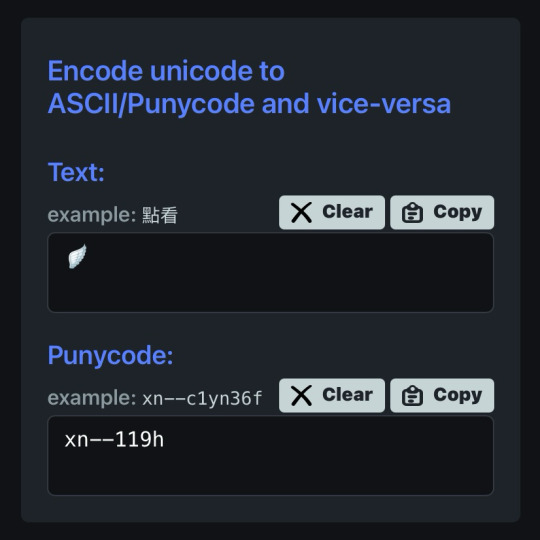
ya con esto realizado, nos dirigimos a la pagina puny coder (https://www.punycoder.com) en donde pondremos nuestros textos respectivos que se codificaran, es muy fácil ya que la misma pagina te entrega la opción de copiar el nuevo formato, copias ambos y vuelves a notas
⠀⠀

⠀⠀
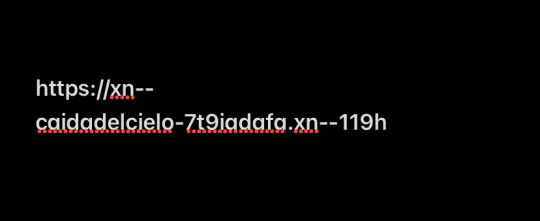
para lograr cualquiera de los formatos que elijamos, al inicio de nuestro link hay que usar el HTTPS:// y para separar la palabra del emoji hay que usar un PUNTO ejemplo:
⠀⠀

⠀⠀
con nuestro link listo, nos dirigimos a twitter, iremos a editar perfil y procedemos a ingresarlo en la categoría de sitio web, aceptar los cambios y quedará así:
⠀⠀
⠀⠀
esto servirá bastante para hacer tu perfil más atractivo o por el entretenimiento de decorarlo más, recuerden que pueden jugar con todo el formato pero solo está disponible para twitter, en otras apps puede que no se convierta el link pero al menos en twitter puedes cambiarlo infinitas veces. espero haberlas ayudado y haganme saber sus dudas o deseos sobre otros tutoriales ( ദ്ദി ˙ᗜ˙ )
⠀⠀
#᭪𒋲 ִ੭﹕evrthng⠀: post#tutorial#link#aesthetic#messy moodboard#random moodboard#cute moodboard#aesthetic layouts#messy layouts#random layouts#messy headers#random headers#dividers#kaomoji#cute symbols#random usernames#username ideas#twitter usernames#twitter#messy bios#messy locs#messy symbols#alternative users#cutecore#cute locs#goth moodboard#goth users#grunge moodboard#emo moodboard#edgy moodboard
1K notes
·
View notes
Text
⠀⠀⠀⠀̣݊🤍 ࣭ٜ࣪ ◌゚ ⠀⠀twt links


( 1 )
(http://xn--4hbaa82xababavdd4070feae402tfaf566fgaaaaagaaa14247glak.xn--6iiaaaa)
( 2 )
(xn--xnhaaaa364da55718fbabb.xn--6iiaa)
( 3 )
(xn--6iiaa4965waaaa.xn--6iiaa)
( 4 )
(xn--mcia5t8vaaaabaabaa.xn--6iiaa)
( 5 )
(xn--hddaarbb8ucc9kdd5427eeae147daaafafa.xn--6iiaa)
#⠀⠀⠀⠀⠀⠀⠀⠀⠀⠀⠀⠀⠀⠀⠀ . ˚ * ✦ . . ✦ ˚ ˚ .˚ . . ˚ . ✦⠀⠀⠀⠀⠀#⠀⠀⠀⠀⠀⠀⠀⠀⠀⠀⠀⠀⠀⠀⠀⠀⠀⠀⠀⠀⠀⠀⠀⠀⠀⠀⠀⠀⠀⠀⠀⠀⠀⠀⠀⠀⠀⠀⠀⠀⠀⠀⠀⠀⠀#nudjismo#foryopage#archive#my post#like#visual archive#new post#helping you#recursos#links in bio#cute links#links#twitter#twitter links#x links#x#link#messy layouts#messy packs#messy symbols#aesthetic symbols#cute symbols#simple moodboard#tutorial#tumblr#simple bios#cute bios#biografía
437 notes
·
View notes
Text
Popular cocktail in chinese club to increase new year vibe 'Howl's Heart' (name inspired by movie Howl's Moving Castle)
#china#video#fun#tutorial#cocktails#aesthetic#music#important tips if you use flint powder don't drink it
769 notes
·
View notes
Note
Heyy!! I love your carrds so so much they're so pretty!! Can you please make a f2u non pro discord nitro themed carrd please please please
HELLO HOPE THIS IS GOOD!
non pro freindly discord nitro themed carrd
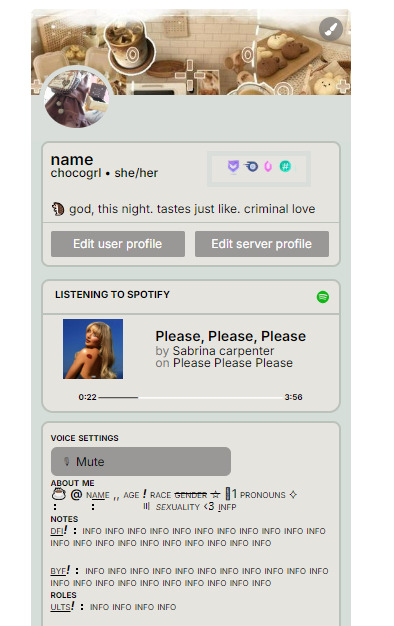
get the carrd here look at it here! here is also the image i used for the nitro badges!
REQS ARE OPEN FOR CARRDS!! only req i have is to be following me to ask for a carrd! and I DO CARRD COMMS!! so if you have a specific carrd you want made message abt my prices and what i take!! use my referral code also to help donate and get some money off on buying pro here / use the code manually HXYLIN !
#carrd commissions#carrd stuff#aesthetic#carrd templates#carrd icons#carrd inspo#carrd moodboard#carrd theme#carrd material#carrd packs#carrd req#discord chat#discord server#discord app#discord mobile#carrd template#request#carrd tutorial#free carrd template#carrd profile#strawberry#cutecore#commission#taking commisions#f2u
1K notes
·
View notes
Note
can u do a tut for sizing borders bc im rlly bad at coding in rentry


This is the code that I usually start out with, and it works most of the time without tweaking much. The thing I still tweak the most though is the CONTAINER_BORDER_IMAGE_OUTSET. I usually set it anywhere from 10px to 20px, and sometimes I will set two values to it if I want the outset to be diff for top+bottom and left+right
I prefer a more like bigger(?) Look to how my border are cut, so I do that by making the slice smaller (15% to 20%) or I make the width bigger (25px to 30px)
There are a lot of ways to playe around with the coding though like down below I set slice to 30% which I think I see a lot of people do idk. But to keep the bigger cut look I like I make the width 30px. I like to keep my widths at 20px to 25px though because of how much my outset is. My outset sometimes clips under the edit button when you save the code and view it normally, so I keep the width a bit smaller and use a smaller or equal slice. But there are a lot of ways to play around with this because it depends a lot on your rentry and what border you're using becuase there are out(?) Borders and in(?) Borders. Basically just play around with CONTAINER_BORDER_IMAGE_SLICE + CONTAINER_BORDER_IMAGE_WIDTH You can also have fun with the repeat options (round, repeat, space, and stretch iirc). I'll leave my code and examples below. I hope this helps Anon! I'm not sure if it's comprehensible or if I'm just yapping BS..


Above big slice big width, below big slice small width


Down below are what I call 'In borders' cause they're facing inwards. I usually have the outset on these a little bigger


CONTAINER_MAX_WIDTH = 300px
CONTAINER_BORDER_IMAGE = Your border image
CONTAINER_BORDER_IMAGE_SLICE = 20%
CONTAINER_BORDER_IMAGE_WIDTH = 25px
CONTAINER_BORDER_IMAGE_OUTSET = 10px
CONTAINER_BORDER_IMAGE_REPEAT = round
#rentry#rentry stuff#rentry decor#rentry inspo#rentry resources#rentry graphics#rentry pixels#sntry#stelluar#aesthetic#rentry tutorial#rentry metadata#metadata#tutorial#rentry border#borders#metadata border#rentry code#code#rentry help
596 notes
·
View notes
Text


More photos from my digital camera (7.2 megapixels)
#thought it had been a while#one of my favourite shirts#my girlfriend bought this crt tv#so she could watch sewing curtains tutorials#on a vhs#it’s super nostalgic I haven’t tapped on a screen and heard the ding in so long#y2k#y2k aesthetic#y2k style#y2k nostalgia#y2k icons#2000s web#old web#2000s#early 2000s#2000s internet#crt tv#vintage games
356 notes
·
View notes
Text
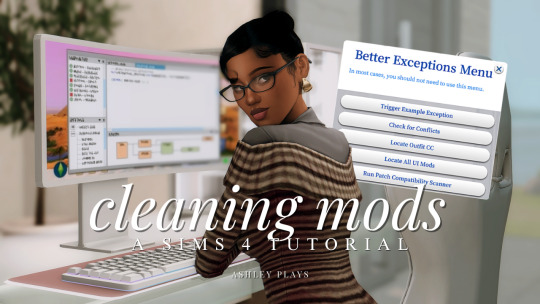
how to clean & organize your mods folder + update broken/outdated mods by ashley plays
this video goes over the following:
how to organize your mods folder
how to update your mods folder after a patch update
how to find broken/outdated mods
how to clean out custom content & find duplicate files
↓ mods, programs & helpful websites mentioned below
mods:
better exceptions
mc command center
programs:
sims 4 tray importer
sims 4 mod manager
helpful websites:
sims 4 news & updates
scarlet's realm: the mod list
bienchen's mods
littlemssam's mods
kiarasims4mods's spreadsheet
mizoreyukii's spreadsheet
2K notes
·
View notes
Text
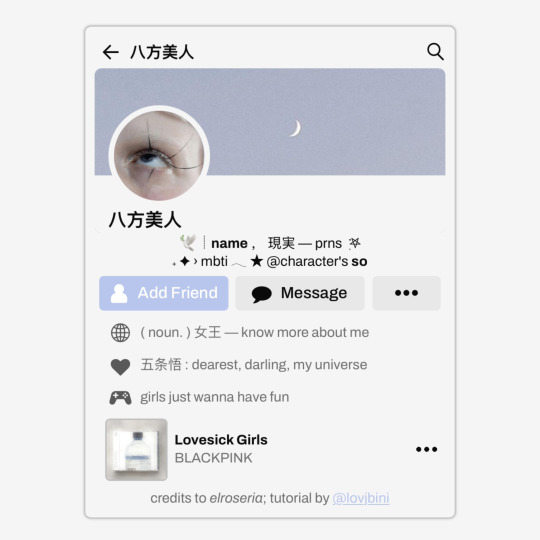
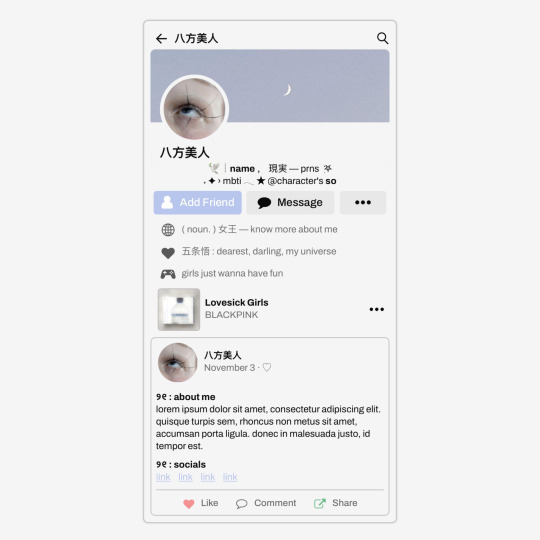
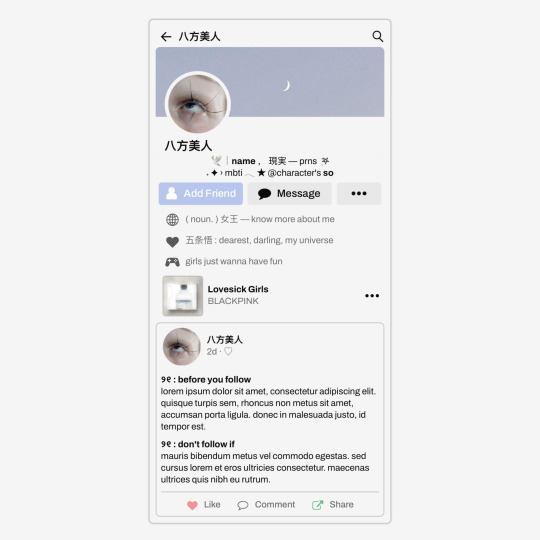
✩ CARRD INSPO by LOVJBINI // © elroseria
like or reblog if you useㅤෆㅤ2024.
✎﹏ please, put “ © elroseria – tutorial by @lovjbini ” in the description if you use our tutorial!
CLICK HERE FOR TUTORIAL
#lovjbini#carrd#carrd.co#carrd co#carrd inspo#carrd tutorial#carrd template#carrd layout#carrd tutorials#carrd templates#carrd layouts#carrd theme#carrd themes#carrd design#carrd designs#carrd stuff#aesthetic#simple#kpop#macbook#pastel colors#pastel aesthetic#kawaii#blue#pastel blue#light blue#facebook
537 notes
·
View notes
Text
how tofu colour
#colour theory#“theory”#no theory just vibes#pixel art#artists on tumblr#pixel artist#pixel illustration#pixel aesthetic#art study#pixel art study#pixel#illustration#pixel graphics#tutorial
3K notes
·
View notes
Text

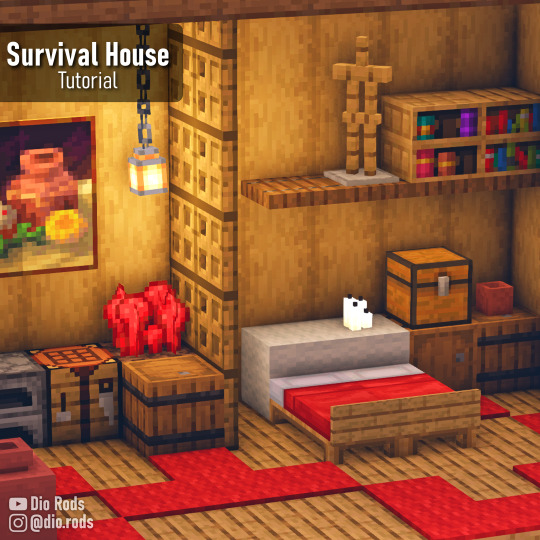
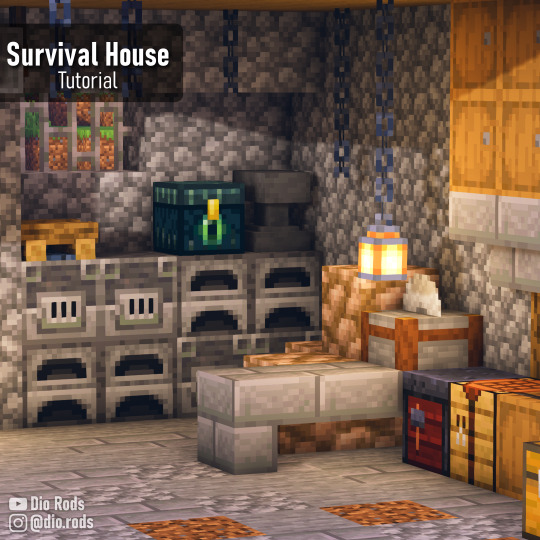


Minecraft Small Oak House! A complete survival house made out of easy-ish blocks to get!
I wanted to make a house with mainly oak blocks, cause I feel like that's a block that I always find (almost) everywhere, so why not, right? And cobblestone, cause I always have loads of that. The whole interior of the build is quite cozy, imo, and it has always the features u might need on your base, from your personal mineshaft to an enchantment setup. Anyway, this was the result!! I hope this serves as inspiration 🙌 If u want u can find the tutorial on my channel here!
✨ Shaders: BSL Shaders 🕹 Game version: 1.21 🌹 Resource Packs: Jerm's Better Leaves
#minecraft#mineblr#minecraft building#minecraft ideas#minecraft aesthetic#minecraft build#minecraft inspiration#minecrafters#minecraft house#minecraft interior#minecraft survival#minecraft server#minecraft smp#minecraft inspo#minecraft stone#minecrfat#minecraft builds#minecraft base#minecraft tutorial
432 notes
·
View notes
Text
Soda tab flower tutorial post! 🌻🌼🌸 lots of pictures included. ****This is part one, check the reblogs for the other half!! *****
****also this is not my idea. It's been done before and I got inspired by pinterest where I saw really similar diys****
What you'll need: scissors, yarn or string (any color) and soda tabs. 6 tabs for one flower (or 7, but I use 6 personally)
Step 1: take 2 tabs and lay them over each other so that the hole on the bottom of one lines up with the hole on the top of the other, like this-


And tie them together. Then cut the short end of the string sticking up to get rid of the excess. You'll want to tie it with the back of he tabs facing up so the knot will be on the back side. Make sure to tie it tightly so the knot doesn't slip around when you're wrapping the tabs with the yarn
Step 2: wrap the side edges of the 2 tabs 3 times. You'll want to do it relatively tightly, but not as tight as possible. The tension is a little tricky to figure out because you want the flower to keep its shape well but also be loose enough to bend into a flower shape with ease. This takes practice.


Step 3: On the 3rd wrap, add another tab under the 2nd tab, like this-


And pull the string through the back of the new tab you put under the 2nd tab. And wrap 3 times to attach it to your other tabs. Pulling the string over the edges to the back, through the lined up holes, and pulling it out towards you. On every 3rd wrap, add another tab the same way until you have 6 tabs wrapped together like this-

#solarpunk#punk#solarpunk diy#punk diy#solarpunk fashion#solarpunk aesthetic#punk fashion#diy#fashion#tabistry#soda tabs#upcycled jewelry#goth jewelry#jewelry making#jewelry#punk jewelry#goth diy#goth#goth fashion#hatchet makes stuff#tutorial#long post#crafting#art#recycling#recycled jewelry#hopepunk#ecopunk
384 notes
·
View notes